
You'll first need some parts so you can build your quadruped robot. There are several kits out there, including the ones found at www.trossenrobotics.com/p/PhantomX-AX-12-Quadruped.aspx. However, such kits can be expensive so, for this example, you'll create your own kit using a set of Lynxmotion parts. These are available from several online retailers, such as www.robotshop.com. To build this quadruped, you'll need two sets each of the two leg parts, and then one set each of the body. Here are the parts with their robotshop part number:
|
Quantity |
Description |
|---|---|
|
1 |
Lynxmotion Symmetric Quadrapod Body Kit - Mini QBK-02 |
|
2 |
Lynxmotion 3'' Aluminum Femur Pair |
|
2 |
Lynxmotion Robot Leg "A" Pair (No Servo) RL-01 |
|
4 |
Lynxmotion Aluminum Multi-Purpose Servo Bracket Two Pack ASB-04 |
|
2 |
Ball Bearing with Flange - 3mm ID (pair) Product Code : RB-Lyn-317 |
The last part is not a Lynxmotion part, but is a bearing you'll need to connect the leg to the body.
You'll also need 12 standard size servos. There are several possible choices, but I personally like the Hitec servos. They are a very inexpensive servo you can get at most hobby shops and online electronics retailers. Now let's talk briefly about the model of servo. Servos come in different model numbers, primarily based on the amount of torque they can generate.
Torque is the force that the servo can exert to move the part connected to it. In this case, your servos will need to lift and move the weight associated with your quadruped, so you'll need a servo with enough torque to do this. In this case, I suggest you use eight model HS-485HB servos, you'll use these for the servos attached to the end of the leg and for the body. Then you'll use four model HS-645MG servos for the middle of the leg; this is the servo that will require the highest amount of torque. You can also just use twelve HS-645MG servos, but they are more expensive than the HS-485, so using the two different servos will be less expensive.
Here are the steps for assembling the quadruped:
- Put the lower part of the right leg together; it should look like this:

- Now connect this assembly to an interconnecting piece, like this:

- Complete the leg by connecting two of the servo brackets together at right angles, mounting the HS-645MG onto one of the brackets and then connecting this servo to the interconnected piece, like this:

- Put another right leg together.
- Now put two left legs together following the same steps as mentioned previously, but in left leg configuration. They look like this:

- The next step is to build the body kit. There are some instructions at www.lynxmotion.com/images/html/sq3u-assembly.htm, but it should look like this:

- Then connect each leg to the body kit. First, connect the empty servo bracket to the body using the bearing, like this:

- Now connect the other servo to the empty servo bracket and the body, like this:

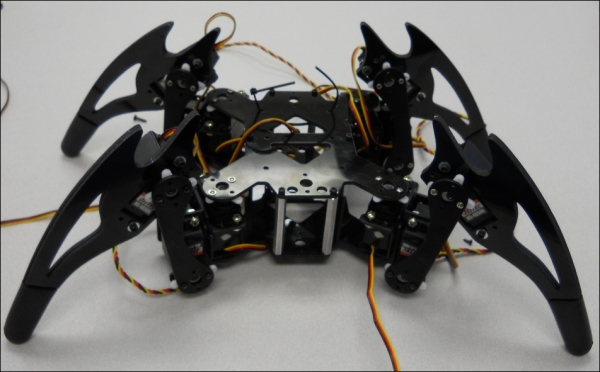
Your quadruped should now look like this:
Now that you have the basic hardware assembled, you can turn your attention to the electronics.