
Now that we have PostgreSQL installed, let's get started. The techniques you learn in this chapter are the bread and butter of using a database: inserting data, selecting it, updating it, and deleting it. Then to give you a glimpse of what makes the relational database relational, we'll go over a few basic joins.
For our example, let's build the backend for a basic blogging engine. All blogs have one master entity at the center of all the action: the blog post.
Let's start by thinking about what sorts of things a blog post has. In fact, we just want to worry about the information a blog post has exactly such as:
- A title
- An author
- A category
- The date it was posted
- The text of the blog post
To create the table, open the query window in pgAdmin III just like we did at the end of the previous section, and then enter and run this SQL:
CREATE TABLE posts (
  title     VARCHAR PRIMARY KEY,
  author    VARCHAR NOT NULL,
  category  VARCHAR,
  posted_on DATE DEFAULT current_date,
  body      TEXT
);
This is called a CREATE TABLE statement and is part of the Data Definition Language (DDL), a subset of SQL. Don't worry about the spacing and line endings, they aren't significant, but they do make it more readable to other humans, which is important. Fundamentally every CREATE TABLE statement has the same structure: the CREATE TABLE words, the table name, and then parentheses around a bunch of column definitions. Those column definitions consist of the name, the type of the column, and whatever modifiers you want. In this table we've defined a primary key of title, which means the title is acting as the identifier for the whole row. We've also marked the author value as NOT NULL, which means PostgreSQL will prevent rows from being created without an author. It will also prevent rows from being modified in a way that removes the author. And we're using the current_date magic value for the created on column, so that if we omit that column it will default to today, whenever a row is added.
Most of these modifiers are supplying constraints, which are rules the database will enforce, and are your main tool for ensuring data validity and integrity. Nearly every table needs a primary key, which is just the column or set of columns that uniquely identify a row. In practice it's common to use an auto-incrementing integer for this purpose. Any kind of extra data added to the table to identify rows is called an artificial key, as opposed to a natural key, which is something intrinsic about the data that uniquely identifies it. While I prefer to use natural keys as much as possible, in practice there are reasons not to use them: most ORM software expects surrogate keys, it can be hard to correctly identify candidate keys, and there are legal restrictions on what you can use for the primary key that prevent you from choosing things such as social security numbers. In principle, any column you mark UNIQUE NOT NULL is at least a candidate key.
After you run the query, PostgreSQL creates the table, but there's nothing in it yet, so let's write our first blog post.
The first thing you want to do with a fresh table is insert some data. This is done by the running one or more aptly-named INSERT statements. Delete the CREATE TABLE text from the query window, then type this and run it:
INSERT INTO posts (title, author, category, body)
VALUES ('Hello, world!',
        'Your name here',
        'first-posts',
        'This is probably the shortest blog post ever. You''ll be glad because INSERT isn''t a very convenient user interface.'),
Much like the CREATE TABLE statement, there is a pattern at work here, which is: INSERT INTO table name (column names) and VALUES (data for each column). You don't have to list the column names if you're going to insert into all the columns, but I recommend you get in the habit anyway, because it affords you more control, and if your table grows more columns someday, you don't want to have to rewrite all your insertion code. The other important detail here is that the strings are wrapped in single quotes, and you can insert a literal single quote by putting it in the string twice.
After you run this, you should get the message: One row affected. We're making progress!
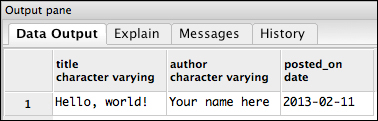
Let's do the simplest query possible:
SELECT * FROM posts;

Query output
Now the resemblance to spreadsheets should be more clear: this really is just one row in a table.
SELECT is the only statement type in the Data Query Language (DQL) subset of SQL. It's also the most complex statement type in SQL, by a huge margin, so we're just going to try and get the flavor of it in this book.
The first and simplest way to improve on our query is to be a little choosier about which columns we want. After all, if the body of the blog post gets large you don't want PostgreSQL transmitting it back to you in every query. Let's just get the title, author, and posted_on date value:
SELECT title, author, posted_on FROM posts;
Query output with just three columns
This feature will become more useful as you start using joins. The Joined-up tables can easily wind up dozens to hundreds of columns, so it's helpful to just ask for the ones you need.
The last two operations on data are updating and deleting. The UPDATE statement starts out very straightforward but can get quite complex, with about as much power as the SELECT statement. Let's do a simple change and fix the author on the posts table:
UPDATE posts
SET author = 'Jane Austen'
WHERE title = 'Hello, world!';
Every UPDATE will have a table name and a SET clause. A basic update like this one will also need a WHERE clause with the primary key, which in our case is the title. A unique feature of PostgreSQL is the RETURNING clause. We can use it from an insert, update, or delete statement to return the rows that were created, modified, or deleted. So for instance, we can use it here to see the row after the modification:
UPDATE posts
SET author = 'Jane Austen'
WHERE title = 'Hello, world!'
RETURNING *;
Let's run the query and see what happens:
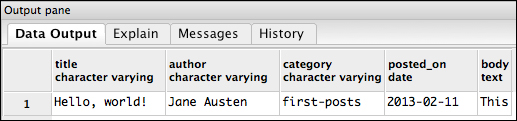
Update with RETURNING clause.
The update was successful and we see the change we made to the author column.