
Chapter 6. Hardening Web Applications
We’ve spent some time in previous chapters discussing the relevance of OAuth 2.0 and OpenID Connect, and analyzed the relevance of identity and biometry plus the impact of multifactor authentication. This chapter covers security considerations for Node applications, especially focusing on Express.
In security, it is fantastic to provide a secure solution to identify users and authorize access to certain resources, but because of a multitude of attack vectors, it is simply not enough to rely on a simple protocol to secure applications. This is why we tend to go for layered security. Let’s use a simple analogy: In medieval times, a castle was secured by a wooden gate, which was a good way to keep people out and defend property. When combined with stone walls, the gate got even better, because it took more time for even heavy machinery to breach the walls. If combined with a moat, the wall and gate became even more useful. If we take this analogy and apply it to today’s standards, we want to make sure not only that our application is capable of identifying users, but also that we can withstand a DDoS attack, secure our sessions, and prepare for potential XSS and CSRF attacks.
Securing Sessions
Sessions have a simple reason to exist: they persist user logins across various routes within our application without the need to re-authenticate the user by prompting for usernames and passwords over and over again. Just like passwords, sessions have to meet certain requirements in order to meet security expectations: session IDs should be unique, nonguessable, and nonsequential. Just like passwords, sessions benefit from long session IDs that decrease attack vectors.
Types of Sessions
Before we dive into the details of sessions and securing sessions on top of the mechanisms that Express provides by default, it is sensible to explore the differences between cookies and sessions (Figure 6-1) and what makes them interesting.

Figure 6-1. Session and cookie relationship
What’s a cookie?
Cookies are used as client-side storage for information—they’re mostly used in order to store certain user preferences, authentication details (such as the username and password), and session information. In fact, cookies can be seen as the client-side implementation of sessions and are usually combined with strong cryptographic mechanisms to provide safety, integrity, and authenticity of the data.
If you are looking for additional material on cookies, RFC 2965 “HTTP State Management Mechanisms” from 20001 states that cookies are not to be used for account information unless encryption is being used. Section 8 of the updated RFC 6265 from 20112 (this RFC supersedes RFC 2965) defines various considerations that must be taken into account to ensure security.
What’s a session?
While cookies are used as a client-side mechanism, sessions are stored server side and serve as a way to persist user interaction with web applications. Session identifiers are used to handle a minimum of details on the client side but also expose the application to the possibility of session fixation attacks (as outlined in RFC 62653).
How Express Handles Sessions
Since version 4 of Express, a lot of bundled middleware (for example, bodyParser, cookieParser, and session) has been moved into separate modules to allow for quicker updates and better maintainability. This section explores some of the functionality that the module express-session brings to the table in order to allow for secure handling of sessions.
When using the Express generator or looking at most tutorials, you will see a default initialization of the session middleware that looks something like this:
var session = require('express-session');

app.use(session({
  secret: 'mechagodzilla',
  resave: false,
  saveUninitialized: true,
  cookie: {
    secure: true
  }
}));
Let’s look at the default options that are being passed to the middleware:
-
secretis a required option and resembles the session secret that is utilized to sign the session ID cookie. The session module relies on the node modulecookie-signature, which utilizescrypto(a popular module for cryptography) in order to sign the provided value withSHA-256as keyed-hash message authentication code, also known as HMAC. Finally, the signed value is hashed asBase64before being returned to Express. -
The next option,
resave, determines whether sessions are saved in the session storage even when they did not get modified. This used to default totruebut its use is no longer recommended. Instead, decide based on your session storage: ifreq.session.touch()is used,resavecan be set tofalse; otherwise,trueis the recommended value.4 -
saveUninitializedis used to indicate whether a new (but unmodified) session should be saved. Whiletrueis the default value, it is recommend to set this value tofalsewhen being used to handle authentication. -
cookieallows for deeper configuration of your session ID cookie.secureis recommended to be set totrueand ensures that secure cookies for HTTPS-enabled websites work. The session middleware does not rely on thecookieParsermiddleware anymore and can even cause issues when used in conjunction with it. -
cookie.maxAgeis set tonullby default and results in cookies being handled as browser-session cookies, which means that they are removed as soon as the browser window is closed.
Note
Testing the session ID generation can be a difficult task when using the secure option for the cookie. The value true serves the cookie only via HTTPS. When testing on both HTTP and HTTPS connections, the value auto can be used, but please be aware that a cookie that is set via HTTPS is accessible only for HTTPS connections. Nonsecure cookies can be accessed using either HTTP or HTTPS.5
In our examples, we stick to true as the default value for our session cookie (this is the recommended setting).6 When developing in a non-HTTPS-enabled environment, consider setting secure to false.
A prime feature of this middleware is the possibility of setting up your own function for generating session IDs. genid can be used with any function that creates and returns unique IDs. Currently, the default implementation uses uid2.
Using genid
While uid2 seems to be a reasonable implementation for creating session IDs, genid provides a way to create harder-to-guess IDs, provide Access Tokens, or whichever other scenario you are looking for. Asynchronous functions are sadly not supported as of now but are a listed issue in the project’s repository.7
Let’s use genid to produce our own session IDs:
var session = require('express-session');
var uuid = require('node-uuid');

app.use(session({
  genid: function(req) {
    return uuid.v4()
  },
  secret: 'mechagodzilla',
  resave: false,
  saveUninitialized: false,
  cookie: {
    secure: true
  }
}));
In this example, we generate UUIDs with node-uuid. In the following section, we will have an in-depth look at applying this in practice.
Best practices when dealing with sessions
Sessions are designed to have a finite lifespan and are supposed to expire by either being invalidated through the web application or simple cookie mechanics. Within our application, we can tie the generated session to a timespan and therefore easily validate whether the session should remain valid, is invalid, or should be invalidated. To minimize expensive database operations, it is reasonable to provide the session’s creation date as an additional suffix in the session hash itself. This not only helps to reduce computing time, but also adds another factor to the generated hash and therefore acts as an additional security mechanism. A potential attacker deals not only with the session’s ID, but also with a timestamp. To make session-guessing even harder, we can add additional factors into generating session hashes.
When using your own function to generate session IDs, you need to be aware that the session secret provided to Express is not being used (even though it is a required parameter). The module cookie-signature is easy to use and allows for the signing and unsigning of cookies:
var cookie = require('cookie-signature');

var value = 'test';
var secret = 'myamazingsecret';

var signedValue = cookie.sign(value, secret);
// signedValue is 'test.6L58yh6xptQIl6IyKA5GxGr63TRJwwxTNUYy6ui51Bk'

var unsignedValue = cookie.unsign(signedValue, secret);
// unsignedValue is 'test'
Let’s apply these best practices to the session-generation function we’ve worked with before:
var session = require('express-session');
var uuid = require('node-uuid');

app.use(session({
  genid: function (req) {
    var timestamp = Date.now();
    var id = uuid.v4();
    var sessionId = id + '$' + timestamp;
    return sessionId;
  },
  secret: 'mechagodzilla',
  resave: false,
  saveUninitialized: false,
  cookie: {
    secure: true
  }
}));
In this example, the $ symbol is being used as a delimiter. By leveraging this syntax, we can easily identify the timestamp after we’ve retrieved the session’s ID. Using this mechanism, we not only benefit from making session-guessing harder, but also have the power to check whether sessions are expired already by simply validating the timestamp:
var sessionParts = req.sessionID.split('$');
if (sessionParts.length === 2) {
  var timestamp = sessionParts[1];
  // Validate session
  ...
}
In this section, you’ve learned how the express-session module works, which methods and modules it uses, and how to build your own secure implementation of session ID generation in order to achieve security-layering and make session-guessing harder than before.
Handling XSS
Cross-site scripting is a popular attack that was briefly introduced in Chapter 4. XSS attacks are based on the fact that the browser trusts sites it visits, and therefore can be led toward executing malicious code. By injecting this code into other sites, it’s distributed and either persisted or used for one-off attacks such as filling out forms within web applications.
The Three Types of XSS Attacks
When dealing with XSS prevention mechanisms, three attack methods become apparent:
-
Persistent XSS
-
Reflected XSS
-
DOM-based XSS
Persistent XSS relies on malicious code being stored in a website’s database. This results in the injected code being loaded over and over again and was a popular exploit in the early days of Internet forums.
Reflected XSS attacks originate from the original request and can be seen as one-time attacks that are returned in the server’s response to the victim.
The last type, DOM-based XSS, is based on modifying client-side code and often attacks the URL’s fragment identifier, which we know as the hash mark that normally serves for navigational purposes. Another example of DOM-based XSS is modifying entries in HTML5’s LocalStorage; OWASP released a cheat sheet when dealing with HTML5 in order to assist with securing your application.8
Testing XSS Protection Mechanisms
In this section, we will explore how a basic reflected injection attack works and which mechanisms Node, HTTP, and the browsers put into place to prevent exploitation.
First we will generate a new project (using the Express generator) configured to be vulnerable. To get started, execute the following command in your terminal:
express xss
cd express
npm install .
This generates the initial setup for our application. After all modules are installed, we can start working on a basic user-registration feature—residing in views/index.jade—which accepts a first and last name and eventually displays these details on a simple profile page:
extends layout

block content
  h1 Registration
  form(method='POST', action='/register')
    fieldset
      legend Your details
      label(for='firstname') Firstname
      input(id='firstname', name='firstname', type='text')
      label(for='lastname') Lastname
      input(id='lastname', name='lastname', type='text')
      input(type='submit', value='Submit')
The form submits a POST request with the populated body to the route /register. In this step, we will add this new route declaration to our application (which you can find in routes/index.js):
router.post('/register', function(req, res) {
  var user = {
    firstname: req.body.firstname,
    lastname: req.body.lastname
  };

  res.render('profile', { user: user });
});
For this example, we don’t bother with storing user data and simply render another template, profile, with the POST request’s details. The profile page is created by running the following command:
touch views/profile.jade
The following template displays the user’s first name and last name by using Jade’s buffered code mechanism:
extends layout

block content
  h1 Your Profile
  p= user.firstname
  p= user.lastname
Now that all the pieces are in place, we can run our first attempt at an XSS attack. Instead of submitting an innocent combination of first and last name, we want to abuse the last name in order to submit a script that loads another site:
<script>window.location="http://tme.coffee"</script>
Submitting the details populates the POST request’s body like this:
{
  firstname: 'Tim',
  lastname: '<script>window.location="http://tme.coffee"</script>'
}
Now the basic assumption is that our profile page would simply render the information provided and therefore load the URL http://tme.coffee instead of displaying the last name.
Gladly, Jade escapes buffered code and therefore simply renders the output shown in Figure 6-2.
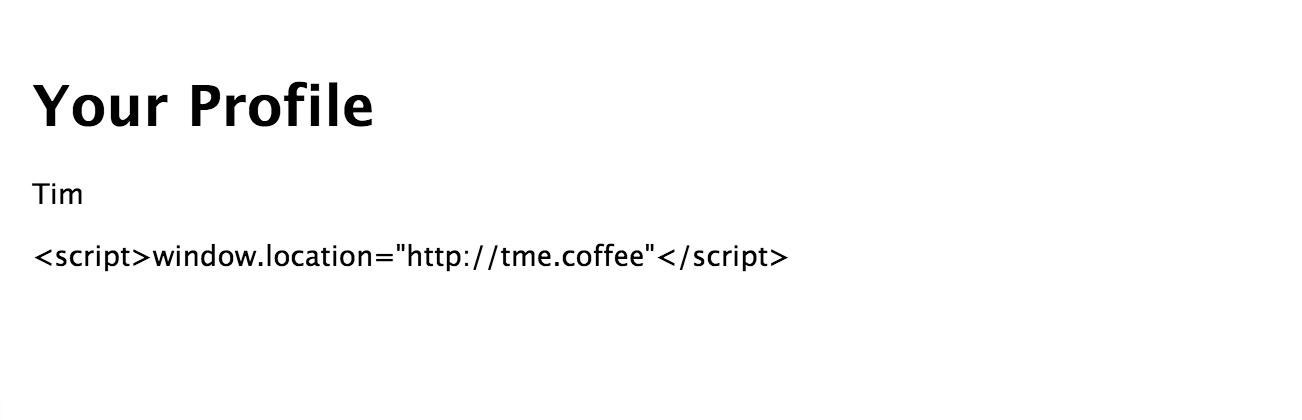
Figure 6-2. Escaped profile information
When inspecting the page’s source, you will notice that the escaped profile page renders like this:
<body>
<h1>Your Profile</h1>
<p>Tim</p>
<p><script>window.location=
"http://tme.coffee"</script></p>
</body>
For this upcoming step, let’s be foolish and disable this automatic escaping-mechanism. We can do this by changing the template:
extends layout

block content
  h1 Your Profile
  p= user.firstname
  p!= user.lastname
Instead of displaying buffered code with =, we use the functionality to render unbuffered code, != (which is definitely not safe for input) and resubmit our form.
This is where things get interesting, as differences in browsers become quite apparent. Chrome (tested with Version 48.0.2564.48 beta) doesn’t render the last name field and prints the following statement in the JavaScript console:
Warning
The XSS Auditor refused to execute a script in http://localhost:3000/register because its source code was found within the request. The auditor was enabled as the server sent neither an X-XSS-Protection nor Content-Security-Policy header.
Doing the same experiment with Mozilla’s Firefox V42 results in the script tag executing—the browser loads up the page http://tme.coffee.
XSS Auditor is a feature that was initially introduced with WebKit and made its way into the Chromium Project’s WebKit fork Blink. That implies that a wide array of browsers such as Chrome, Opera, and Safari come with this built-in mechanism against reflected XSS attacks. Microsoft’s Internet Explorer supports XSS Auditor functionality with version 8 and above.
Circumventing XSS Auditor
XSS Auditor should not be seen as a sole defense mechanism against XSS attacks. It is rather an additional client-side tool to decrease the risk implied by vulnerable software. By blacklisting certain payloads and query parameters, injection points are supposed to be detected and execution on the browser DOM is prevented by transforming the response into a nonexecutable state.
Let’s have a look at the script tag detection mechanism in WebKit’s XSSAuditor.cpp:9
static bool startsOpeningScriptTagAt(const String& string, size_t start)
{
    return start + 6 < string.length() && string[start] == '<'
        && WTF::toASCIILowerUnchecked(string[start + 1]) == 's'
        && WTF::toASCIILowerUnchecked(string[start + 2]) == 'c'
        && WTF::toASCIILowerUnchecked(string[start + 3]) == 'r'
        && WTF::toASCIILowerUnchecked(string[start + 4]) == 'i'
        && WTF::toASCIILowerUnchecked(string[start + 5]) == 'p'
        && WTF::toASCIILowerUnchecked(string[start + 6]) == 't';
}
Based on this detection mechanism, potential threads can be detected and examined more deeply.
The Auditor relies on the following HTTP header to be set: X-XSS-Protection. We can inspect our request’s header to understand how Express, Node, and Chrome handle this situation:
Accept:text/html,application/xhtml+xml,application/xml;q=0.9,image/webp,*/*;q=0.8
Accept-Encoding:gzip, deflate
Accept-Language:en-US,en;q=0.8,de;q=0.6
Cache-Control:max-age=0
Connection:keep-alive
Content-Length:73
Content-Type:application/x-www-form-urlencoded
Host:localhost:3000
If-None-Match:W/"be-JIAfZIOVAe1p85FawKqWIg"
Origin:http://localhost:3000
Referer:http://localhost:3000/
Upgrade-Insecure-Requests:1
User-Agent:Mozilla/5.0 (Macintosh; Intel Mac OS X 10_10_5) ...
The sample application does not provide the X-XSS-Protection itself; WebKit sets this option by default, and it needs to be explicitly disabled by setting the header manually:
router.post('/register', function(req, res) {
  var user = {
    firstname: req.body.firstname,
    lastname: req.body.lastname
  };

  res.set('X-XSS-Protection','0');
  res.render('profile', { user: user });
});
The header options value 0 disables this mechanism, 1 enables it, and 1;mode=block results in rendering a blank page. Obviously, it is always desirable to set the value to either 1 or 1;mode=block. Be aware that while other web frameworks—such as Sinatra for Ruby—provide the X-XSS-Protection header as default, Express relies on external modules such as Helmet.
Caution
Setting the X-XSS-Protection header causes vulnerabilities on old versions of Internet Explorer.10 It is recommended to set the header to 0 accordingly. Helmet handles this exception automatically.11
Security consultant Egor Homakov wrote an interesting post about the mechanism of XSS Auditor.12
Conclusion
Through a combination of sensible browser defaults like the X-XSS-Protection header and the features of modern templating engines like escaping input, a solid base-layer security is being provided. Previously, we’ve explored security-layering, and it definitely makes sense to hold on to this behavior when dealing with reflected XSS. As developers, we should use both client-side and server-side features that help escaping and sanitizing input in order to prevent exploitation of our application.
More information on XSS attacks and tools that help with reducing attack vectors can be found on http://excess-xss.com.
CSRF Attacks
Nearly as popular as XSS, cross-site request forgery is used to leverage the browser’s trust in a user to execute requests on the user’s behalf. This can cause sites to execute requests that seemingly come from a valid authorized user and pose a huge threat. In fact, CSRF ranks as the eighth-biggest harm in OWASP’s top 10 list of current security threats,13 down from the fifth place in 2010.14 While the threat might be decreasing in commonness, a place within the top 10 of ongoing vulnerabilities still justifies discussing the issue itself and the prevention mechanisms that help Node.js developers to deploy secure applications.
Handling CSRF with csurf
Express offers an optional middleware called csurf that can be installed via npm. The module provides a unique token that needs to be rendered in forms and will be validated after form submission—a mechanism that’s similar to what we have done with providing the state parameter when requesting the Authorization Code in the previous example:
var csurf = require('csurf');

var csrfMiddleware = csurf({
  cookie: true
});

app.get('/form', csrfMiddleware, function(req, res) {
  res.render('form', { csrfToken: req.csrfToken() });
});
In this example, we create a new middleware based on csurf that stores cookies instead of req.session to store the CSRF token secret. This middleware is mounted for the route /form and provides the generated token as an option to the form template:
extends layout

block content
  h1 CSRF protection using csurf
  form(action="/login" method="POST")
    input(type="text", name="username=", value="Username")
    input(type="password", name="password", value="Password")
    input(type="hidden", name="_csrf", value="#{csrfToken}")
    button(type="submit") Submit
By rendering the CSRF token as a hidden part of a hypothetical login form, we provide a way to send the token back to the server. This allows us to validate the authenticity of our request in the /login route:
app.post('/login', csrfMiddleware, function(req, res) {
  // This request is unique and can be handled accordingly
});
Some of the functionality in csurf relies on using a session middleware (like cookie-parser or express-session) before using the middleware itself. This is just a matter of handling the initialization process of your application’s middleware accordingly.
Protecting our application against CSRF attacks with popular modules such as csurf is incredibly easy and leaves little excuse for not doing so. By simply using a middleware and handling the provided token, a whole level of threat can be managed.
Valuable Resources for Node
In this section, we briefly introduce a handful of Node modules that help you with improving your application’s security.
Lusca
Back in 2012, PayPal started adopting Node to power its application stack. Part of this process was the development of krakenjs, an extension of Express. Part of the kraken suite is a module called Lusca, which focuses heavily on improving security by setting sensible defaults and providing protection mechanisms against prominent vulnerabilities.
Lusca can be used as application-level middleware by adding it to your application’s initialization process:15
var express = require('express'),
    app = express(),
    session = require('express-session'),
    lusca = require('lusca');

//this or other session management will be required
app.use(session({
    secret: 'abc',
    resave: true,
    saveUninitialized: true
}));

app.use(lusca({
    csrf: true,
    csp: { /* ... */},
    xframe: 'SAMEORIGIN',
    p3p: 'ABCDEF',
    hsts: {maxAge: 31536000, includeSubDomains: true, preload: true},
    xssProtection: true
}));
Please note that not only common threats such as XSS and CSRF are covered. Lusca also features HTTP Strict Transport Security (HSTS), Content Security Policy (CSP) options, and support for the X-Frame-Options response header.
Helmet
Helmet is a collection of 10 security middlewares that operate similarly to how PayPal’s Lusca functions. You can either use a default initialization with app.use(helmet() and cover 6 out of 10 middlewares or use the submodules individually.16
Currently, Helmet comes with the following modules:
-
contentSecurityPolicy, which contains CSP settings -
dnsPrefetchControl, which controls browser DNS prefetching. Currently beta and soon part of the default middleware. -
frameguard, for prevention of clickjacking -
hidePoweredBy, which controls theX-Powered-Byheader -
hpkp, HTTP Public Key Pinning -
hsts, HTTP Strict Transport Policy -
ieNoOpen, X-Download-Options (IE8 and newer) -
noCache, which enables or disables client-side caching -
noSniff, which prevents MIME-type sniffing -
xssFilter, theX-XSS-Protectionheader
We definitely recommend reading Helmet’s documentation. The contributors took the time to provide detailed explanations of attack types and how they can be mitigated.17
Node Security Project
The last valuable resource that is worth mentioning is the Node Security Project. Subscribing to its Node Security Newsletter is definitely worthwhile and trying out nsp. nsp allows for auditing your Node application’s package.json and npm-shrinkwrap.json files for known vulnerabilities.
Install nsp by running the following command:
npm install -g nsp
Then navigate to your project and run nsp like so:
cd testapp
nsp check
Potential output looks similar to Figure 6-3.
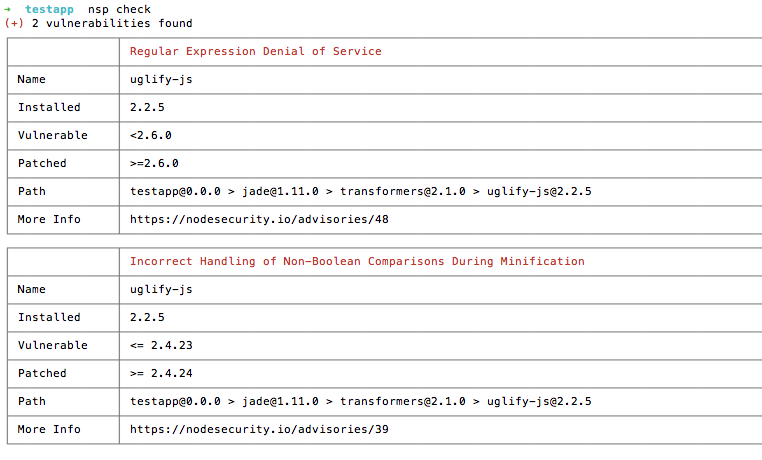
Figure 6-3. nsp security audit
The Node Security Project also curates a list of valuable resources (such as talks, papers, blog posts, and more).18 This collection serves as a great overview of current security best practices for Node.
Other Mitigation Techniques
A lot of mitigation techniques—such as HSTS and CSP—have been mentioned in the preceding sections. Before moving on to the next chapter, Table 6-1 briefly summarizes their core functionality.
The X-Powered-By header does not necessarily open up a vulnerability but tells potential attackers about our application stack. By default, Express sets the header to X-Powered-By: Express and therefore exposes which framework was used to build the application. We recommend unsetting the header either by using the options provided by Helmet and Lusca, or manually as shown here:
router.get('/myroute', function(req, res) {
  res.set('X-Powered-By', '');
});
We highly recommend that you do some further research on these mitigtation techniques in order to understand how to implement them most effectively.
| Mechanism | Description |
|---|---|
Content Security Policya |
Prevents execution of malicious content in trusted sites (reduces risk of XSS). |
HTTP Strict Transport Securityb |
A mechanism that allows applications to be accessed only via secure connections. |
HTTP Public Key Pinningc |
Ensures the authenticity of a server’s public key. |
Frameguardd |
Allows you to define if an application can be framed (in a |
Platform for Privacy Preferencese |
P3P defines which information a website collects about users. |
a http://content-security-policy.com b http://tools.ietf.org/html/rfc6797 c https://developer.mozilla.org/en/docs/Web/Security/Public_Key_Pinning | |
Our Findings
In this chapter, we have discussed and dissected session mechanisms, the potential threat behind cross-site scripting, and the severe impact of cross-site request forgery. So far you have learned about the following:
-
Express security features (such as
express-session) -
Client-side XSS prevention (XSS Auditor and the
X-XSS-Protectionheader) -
Server-side XSS prevention (escaping and buffering parameters using templating engines)
-
Securing requests against CSRF (providing unique tokens with
csurf) -
Using security modules (
helmetandLusca) -
Mitigation techniques (CSP, HSTS, HPKP, and more)
In the following chapter, we will look at efficient and secure data transmission using techniques such as SSL, asymmetric and symmetric encryption, and the implications of cryptography itself.
1 http://tools.ietf.org/html/rfc2965
2 http://tools.ietf.org/html/rfc6265#section-8
3 http://tools.ietf.org/html/rfc6265#section-8.4
4 http://github.com/expressjs/session#resave
5 http://www.w3.org/Protocols/rfc2109/rfc2109
6 http://github.com/expressjs/session#cookie-options
7 http://github.com/expressjs/session/issues/107
8 http://www.owasp.org/index.php/HTML5_Security_Cheat_Sheet#Local_Storage
9 https://github.com/WebKit/webkit/blob/fa65954cef5bc7a64f34e38d08f21833cad81506/Source/WebCore/html/parser/XSSAuditor.cpp#L102
10 http://hackademix.net/2009/11/21/ies-xss-filter-creates-xss-vulnerabilities
11 http://github.com/helmetjs/helmet#xss-filter-xssfilter
12 http://homakov.blogspot.de/2013/02/hacking-with-xss-auditor.html
13 http://www.owasp.org/index.php/Category:OWASP_Top_Ten_Project#tab=OWASP_Top_10_for_2013
14 http://www.owasp.org/index.php/Category:OWASP_Top_Ten_Project#tab=OWASP_Top_10_for_2010
15 Sample taken from the project’s documentation, https://github.com/krakenjs/lusca#usage
16 As documented in the project’s repository, http://github.com/helmetjs/helmet#how-it-works