

Backing up IBM i on IBM Power Systems Virtual Server
An effective backup process is a vital part of any data center operation. It insures business continuity and allows specific data recovery for historical and auditing purposes.
IBM Power Systems Virtual Server provides different tools to fit operational needs and includes some constrains that are related to its cloud nature.
This chapter describes different backup options that can be used for normal operations, makes suggestions for backup strategies, and discusses the differences between methods.
This chapter includes the following topics:
4.1 Backup and restore considerations on IBM Power Systems Virtual Server
This section describes a few considerations for backing up and restoring data on the IBM Power Systems Virtual Server environment.
4.1.1 Overview
IBM Power Systems Virtual Server includes differences to the regular on-premises environment.
Most on-premises IBM i operations use tape backups because of their capacity, transfer rate, and reliability. IBM provides two solutions: native commands and Backup, Recovery, and Media Services (IBM BRMS) as a complete recovery solution.
Also, only a few software products can back up by using network facilities. Traditionally, tape devices are faster.
When operating on IBM Power Systems Virtual Server environment, only the network can be used to transport backups. Fast connections increase transfer rate, but backup windows must be sized and considered on this environment.
When multiple backups must store a large amount of data, IBM Cloud Object Storage is used. This parallel storage system provides concurrent access from anywhere with an any-to-any-to-any architecture with no single point of failure, which reduces bottlenecks and provides almost endless scalability. IBM Cloud Object Storage can store data in primary or auxiliary storage layers, which allows different service levels for backups and archives, and reduces costs when needed.
When sizing buckets (that is, cloud object storage containers), the following issues must be considered:
•Size and frequency of ingress and egress requests
•Amount of data that is transferred
•Type of communications between the server instance and IBM Cloud Object Storage
•Needed redundancy
Server-side data compression can use IBM Power Systems Virtual Server hardware compression and uncapped capacity (when possible) to reduce the amount of data that is needed to transfer and store on IBM Cloud Object Storage. This reduction in data also reduces transfer times and storage costs.
IBM i also provides mechanisms to create incremental and differential backups to reduce the amount of data that must be saved and stored. This most used mechanism is effective data is backed up to the cloud, and IBM i is no exception.
By using differential backups, the backup window and size of backup media can be reduced dramatically. However, the time it takes to restore increases because the process starts with the full backup and continues in partial increments. It is recommended that differential backups are used with full backups one a week or one a month, and are combined with full disk clones or Disaster Recovery (DR) software.
Today, some Open Source tools can be used to complete backup scripts and compression and encryption capabilities can be used that are included with IBM i Cloud Storage Solutions software to secure and improve transfers.
These pre- and post-processing tasks and the limited capability to start the instance from physical or virtual media creates a challenge to base the disaster recovery strategy only with backup and restore processes.
IBM Power Systems Virtual Server provides snapshots and clones, which are used to take a complete or partial copy of disks to improve recovery. Disks also can be copied by using a gold image and stored on IBM Cloud Object Storage for DR activities, which simplifies and improves the full system backup procedure.
4.2 Backing up and restoring by using IBM Backup, Recovery, and Media Services
This section describes the backup and restore procedures that use IBM Backup, Recovery, and Media Services (IBM BRMS).
4.2.1 IBM BRMS overview
IBM BRMS helps you implement a disciplined approach to managing your backups and provides you with an orderly way to retrieve lost or damaged data.
IBM BRMS is the IBM strategic solution for planning and managing save and restore operations on your IBM i product. IBM BRMS base product provides all of the functions that most IBM i users need to implement a fully automated, single system, backup, recovery, and media management strategy.
By using IBM BRMS, you can manage your most critical and complex save operations, including online backups of Lotus servers. It also supports parallel save operations of a library or single object by using up to 32 tape devices, which shortens the save window.
You can also recover your system fully during a disaster or failure, or restore single objects or libraries from your save media. IBM BRMS can also perform some daily maintenance activities that are related to your backup routine.
In addition to these backup and recovery functions, IBM BRMS can support and manage an unlimited number of media, shared tape devices, automated tape libraries, virtual tape devices, optical devices, and IBM Tivoli Storage Manager servers. IBM BRMS enables you to track all of your media from creation to expiration. You no longer must track which items are on which volumes, nor be concerned that you might accidentally write over active data.
As your business needs change and grow, you can add functions to the IBM BRMS base product by purchasing and installing other options.
|
Note: For more information about IBM BRMS, see Systems management Backup, Recovery, and Media Services for i.
|
4.2.2 IBM Cloud Storage Solutions
IBM Cloud Storage Solutions can be used to store IBM i data securely in the cloud, which eliminates the need for tape drives, tape cartridges, and courier services for off-site storage. To store data, you must obtain server space from a cloud service provider. Then, you must create a Cloud Storage Solutions resource that defines the cloud server location and authorization information that is needed to access it. You then can copy files between the Integrated File System (IFS) on the IBM i computer and the cloud server.
You can work with resources and files directly by using Cloud Storage Solutions commands, or your applications can work with resources and files by using the Cloud Storage Solutions API.
Cloud Storage Solutions passes information about file transfers to and from the cloud to a registered IBM i exit point. To have your applications receive that information, you can register the applications as exit programs and associate them with the Cloud Storage Solutions exit point.
Requirements
The following licensed program products must be installed:
•5733ICC *BASE IBM Cloud Storage Solutions for i
•5733ICC 1 Cloud Storage
IBM BRMS can be used to transfer virtual save media, from tape or optical image catalogs, to and from the cloud by using product IBM Cloud Storage Solutions for i (5733ICC). IBM Cloud Storage Solutions for i allow cloud connector resources to be defined for cloud storage providers, such as IBM Cloud, and for private interfaces, such as file transfer protocol (FTP).
IBM BRMS creates storage locations for each cloud resource that is defined on a system. When virtual media is moved to a cloud storage location, the media is transferred to the cloud by using the cloud resource. When that media is moved from a cloud location, the media is transferred back to the i system. Media also is automatically transferred back to the system during a restore when no local save media is available to the restore.
IBM i components for backup in IBM PowerVS
The following components are required to take IBM i backups on IBM Power Systems Virtual Server on IBM Cloud:
•5733ICC *BASE IBM Cloud Storage Solutions for i.
Unless double of storage capacity on IBM i virtual machine (VM) to hold the backup images.
•Direct Link to the Classic Infrastructure (commonly, Direct Link Connect is a good option).
•An Ngix reverse proxy server. This server can be provisioned on IBM Power Systems Virtual Server instances for bandwidth up to 1 Gbps. If more bandwidth is required, Bare Metal must be used.
•IBM Cloud Object Storage, with which you can choose the type of speed and resiliency required.
•IBM BRMS software:
– 5770-SS1 Option 18: Media and Storage Extensions
– 5770-SS1 Option 44: Encrypted Backup Ennoblement
– 5770-BR1 *BASE
– 5770-BR1 Option 1: Network feature
– 5770-BR1 Option 2: Advanced Functions feature
•If DSI VTL is used, a VM instance that uses Red Hat Enterprise Linux 7 or 6 (can be provisioned on IBM Power System):
– The required storage resource is typically setup capacity plus 30% more capacity for buffer
– Network: 1 GbE or 10 GbE
– Memory: Minimum 16 GB (over 32 GB is suggested for systems that have over 50 TB backup capacity)
|
Note: Consider the following points:
•The operating system feature is a prerequisite feature to IBM BRMS. It also is required when HSM dynamic retrieval functions are developed.
•Media and Storage Extensions provides an API to enable application monitoring and control media usage, including volumes to be selected and volume expiration dates. This feature can be useful for software developers who want to customize their own storage management applications.
•An API is provided to manage the interruption that occurs when an application attempts to open a database file that was migrated to offline media. The API enables an on-demand recall of a database file from offline media to a direct access storage device (DASD) and resumes the application (although application changes are not required).
These APIs provide support to use or build applications to manage tape use and data recall from offline media to DASD.
|
For more information about IBM Cloud Storage Solutions for i, see IBM Cloud Storage Solutions for i User’s Guide.
Terminology
The following new terminology is important to understand:
•Cloud location is an IBM BRMS storage location that is associated with a Cloud Storage Solutions cloud resource.
•Cloud resource is a Cloud Storage Solutions cloud resource.
•Location: An IBM BRMS storage location.
•Media is used for Cloud Storage Solutions topics, or virtual media from an image catalog.
•Move and movement refers to media that changes from one IBM BRMS storage location to another. This logical movement is reflected in IBM BRMS databases only. It does not imply that the media is physically transferred to other storage.
•System refers to an IBM i system that uses Cloud Storage Solutions.
•Transfer refers to media that is physically changing from IBM i storage to storage that is associated with a cloud connector. IBM BRMS media movement to or from a cloud location causes media to be transferred to or from a cloud resource.
4.2.3 Cloud solutions for IBM i characteristic
Solutions in the cloud include the following IBM i characteristics:
•Creates and maintain IBM Cloud Object Storage and FTP targets.
•Provides copy to cloud, copy from cloud, and delete from cloud functions for IBM Cloud Object Storage and FTP servers.
•Supports IBM i and Lynx FTP servers.
•Manages TCP/IP networking communications to IBM Cloud Object Storage or FTP Servers on IBM i or Lynx.
•Authenticates resource users with IBM Cloud Object Storage or FTP servers, and seamless updates expired IBM Cloud Object Storage tokens.
•Calls registered exit programs after each copy operation.
•Maintains file codices.
•Creates local or remote directories when needed.
•Tracks transfer progress.
•Identifies server errors.
•Provides the WRKSTSICC tool to identify active, failed, and successful transfers, and show progress of active transfers:
– Operations are run in jobs
– View the status of those jobs
– Work with those jobs (for example, end)
•Uses the CRTS3RICC command to create a Cloud Storage Solutions AWS S3 or IBM Cloud Object Storage resource. A resource defines a cloud server location and the credentials that are needed to access that location. After a resource is created, the files can be copied between IFS directories and the cloud server location.
•Uses the CHGS3RICC command to change an AWS S3 or IBM Cloud Object Storage resource. A resource defines an AWS S3 or IBM Cloud Object Storage cloud server location and the credentials that are needed to access that location. It also changes a resource to use different credentials to access the same bucket, or to specify a different bucket.
•Uses the DSPS3RICC command to display an AWS S3 or IBM Cloud Object Storage resource. A resource defines an AWS S3 or IBM Cloud Object Storage cloud server location and the credentials that are needed to access that location.
•Overrides database files to the scope of the activation group so that the user does not need to be concerned about library lists.
•APIs implemented with Qlg_Path_Name_T path name formats so that native IBM i programs can work seamlessly with the APIs.
•Provides synchronous or asynchronous copy and delete operations.
•Seamless handles CCSID string conversions (IBM i interfaces works in EBCDIC, IBM Cloud Object Storage, and FTP Linux in UTF-8).
•Works with the native IBM i messaging system to return server errors as diagnostic or escape messages.
For more information about the IBM i Cloud storage solution, see the following resources:
•IBM BRMS Cloud Education videos:
4.2.4 IBM BRMS turn-key
IBM BRMS turn-key is an automated, pre-scripted solution within IBM BRMS that is simple to set up and run.
When you provide the cloud resource name (that is, the cloud storage resource name), IBM BRMS performs the following tasks:
•Creates the virtual tape
•Shows the image catalog
•Mounts the image catalog
•Saves the image catalog
•Backs up to the cloud
When the policy is set, IBM BRMS turn-key automatically runs Cloud Storage Solutions commands.
IBM BRMS turn-key setup
One of the following commands can create object for new cloud resources:
•Run STRMNTBRM RUNCLNUP(*YES)
•Run INZBRM (*DATA)
The required IBM BRMS objects are created.
IBM BRMS creates the following objects when it detects the IBM Cloud Object Storage or FTP Resource Name:
•Media Class: One class for Virtual Tape (if MSE is on the system) and one class for Virtual Optical.
•Storage Location: Based on the Resource Name.
•Move Policy: Based on Resource Name.
•Media Policy: Based on Resource Name.
•Four Backup Control Groups:
– QCLDBIPLnn: Backs up what is minimally needed for a system D-IPL (must be burned to a DVD).
– QCLDBSYSnn: Backs up all system data, except *SAVSYS.
Paired with QCLDBIPLnn.
– QCLDBUSRnn: Backs up all user data.
– QCLDBGRPnn: Backs up what is minimally needed to and from the cloud, except *SAVSYS.
– Paired with QCLDBUSRnn (must be burned to a DVD).
The backup requires the following separate recovery reports:
•Cloud Connection Recovery (DVD)
•Recovering user data from cloud
4.2.5 Backing up the IBM i system to the cloud
IBM BRMS stores system backup media in cloud locations the same way it stores media in physical media storage devices.
This backup solution is an example of how to use IBM BRMS with IBM Cloud Storage Solutions for i to save your entire system to virtual media in the cloud. Consider the following points:
•If IBM Cloud Storage Solutions are used for i V1.2.0 with compression or encryption, it is not possible to recover the system from the cloud if a disaster occurs.
•The nn in the control group names is a number that IBM BRMS assigns to the connector for which the control group was created.
•Backup strategies often require full system backups at specific intervals and daily, incremental backups to capture changes. It is assumed in this example that a full backup of the system was run with the QCLDBSYSnn and QCLDBIPLnn control groups to obtain a full backup of the user data.
When IBM BRMS is used to perform a system backup to media at a conventional location, control groups run in succession save specific objects and data. The control groups obtain the data that is required to restore the entire system.
The use of IBM BRMS to back up a system and store the data to media in the cloud requires a similar process. Special control groups that are created by IBM BRMS store the media in the cloud.
System backups to the cloud follow the same procedure as transferring data to the cloud. The only difference is that the entire system is backed up at a specific point by using the cloud resource control groups. As with backups to a conventional location, the cloud backup must specifically save the system and user group objects and can other production data can be saved on other media.
Beginning with the full backup control groups, QCLDBSYSnn and QCLDBIPLnn, complete the following steps:
1. Sign onto the console.
2. Verify that the cloud location is available by using the WRKLOCBRM command.
3. Begin with the QCLDBSYSnn control group by running the STRBKUBRM CTLGRP(QCLDBSYS01) SBMJOB(*NO) command to start the system backup.
4. Run the QCLDBIPLnn control group by using the STRBKUBRM CTLGRP(QCLDBIPL01)SBMJOB(*NO) command.
5. Begin the backup by running the STRBKUBRM CTLGRP(QCLDBUSR01) SBMJOB(*NO) command.
6. Run the STRBKUBRM CTLGRP(QCLDBGRP01) SBMJOB(*NO) command.
7. After these backups complete, review the job logs to ensure that the full backup was successful.
After obtaining a full backup of a system, move to a backup plan that is similar to the following example:
•On Sunday, run the following commands to obtain a full backup of the system:
– STRBKUBRM CTLGRP(QCLDBSYS01) SBMJOB(*NO)
– STRBKUBRM CTLGRP(QCLDBIPL01) SBMJOB(*NO)
•Run the following commands Monday - Saturday to obtain incremental backups of user data:
– STRBKUBRM CTLGRP(QCLDBUSR01) SBMJOB(*NO)
– STRBKUBRM CTLGRP(QCLDBGRP01) SBMJOB(*NO)
|
Important: It is critical to run these cloud control groups in the order that is indicated here; otherwise, all necessary media information is not available to perform a recovery.
|
As a part of your backup process, it can be advantageous to have the backup media quickly accessible on the system for a period after the transfer. If cloud resources are the only location where your system backup is stored, consider copying your QCLDBGRPnn and QCLDBIPLnn control group data to optical media and storing the discs with other physical media. Keeping this backup data accessible allows restores to be performed from the media without the time and expense of transferring the media that is in the cloud back to the system.
IBM BRMS permits media that is associated with a move policy to be retained on the system for a period after it was transferred to the cloud. This retention is done by changing the Retain media field of the move policy to keep the media for a specified number of days after the move. Use the Work with IBM BRMS policies WRKPCYBRM *MOV command.
Customizing the backup of am entire IBM i system to the cloud
The example that is presented in this section shows how to override default settings that are used by IBM BRMS with IBM Cloud Storage Solutions for i to save your entire system to virtual media in the cloud.
The same restrictions and precautions that must be observed when backing up your entire system to the cloud also apply when customized control groups are used to perform the system backup to the cloud.
Consider the following points:
•If IBM Cloud Storage Solutions for i V1.2.0 are used with compression or encryption, the system cannot be recovered from the cloud if a disaster occurs.
•The nn in the control group name is a number that IBM BRMS assigns to the connector for which the control group was created.
•Backup strategies often require full system backups at specific intervals and daily, incremental backups to capture changes. It is assumed in this example that a full backup of the system was run with the QCLDCSYSnn and QCLDCIPLnn control groups to obtain a full backup of the user data.
In addition, when creating custom control groups for a system backup to the cloud, some restrictions exist on the naming conventions. Consider the following points when control groups are copied and modified:
•The new control group name must begin with a QCLD prefix to enable automatic transfers to the cloud.
•The new control group names cannot begin with QCLDB, QCLDUIPL, or QCLDUGRP.
When IBM BRMS is used to perform a system backup to media in a cloud location, the control group or multiple control groups run in succession and save specific objects and data.
In system backup that uses the turnkey settings, IBM BRMS stores the data in the cloud in volumes of a default size that is enforced in the media class.
The IBM BRMS implementation enforces the use of the default media class QCLDVRTOPT with a value of IMGSIZ(*DVD4700) for virtual optical media volumes. Copying a control group for use as a modified user control group named, for example, QCLDUGRPnn, also results in the same implementation that enforces the default media class value.
If this default size is too small for the data users to store, a modified, custom control groups must be created with larger media sizes. To use a user-defined media size that is controlled by a user-defined media class, a control group must be created and used that does not follow the IBM BRMS turnkey automated control group naming conventions.
|
Note: Control groups cannot use the QCLDU prefix instead adopting a new name with the QCLDC prefix.
|
To customize the system backup and use modified control groups that can use nondefault media sizes, complete the following steps:
1. Sign onto the console.
2. Verify that the cloud location is available by using the WRKLOCBRM command.
3. Copy control group QCLDBSYSnn to a new custom control group and update any entries as needed. Also, rename the control group; for example, QCLDCSYS01.
4. Copy the default cloud-named media policy to a new custom name and set the wanted cloud virtual media class that is to be used.
5. Run the QCLDCSYS01 control group by using the STRBKUBRM CTLGRP(QCLDCSYS01) SBMJOB(*NO) command to start the system backup.
6. Copy the control group QCLDBIPL01 to a new custom control group and update any entries as needed. Also, rename the control group; for example, QCLDCIPL01.
7. Update the custom control group attributes to use the new, modified media policy.
8. Run the QCLDCIPL01 control group with STRBKUBRM CTLGRP(QCLDCIPL01) SBMJOB(*NO).
9. Copy the control group QCLDBUSR01 to a new custom control group and update any entries as needed. Also, rename the control group; for example, QCLDCUSR01.
10. Update the custom control group attributes to use the new, modified media policy. Begin a backup that uses this control group by running the STRBKUBRM CTLGRP(QCLDCUSR01) SBMJOB(*NO) command.
11. Copy the control group QCLDBGRP01 to a new custom control group and update any entries as needed. Also, rename control group; for example, QCLDCGRP01.
12. Update the custom control group attributes to use the new, modified media policy.
13. Run a backup that uses this control group by running the STRBKUBRM CTLGRP(QCLDCGRP01) SBMJOB(*NO) command.
14. After these backups complete, review the job logs to ensure that the backup was successful.
15. Run the cloud control groups regarding the previous sample.
As a part of your backup process, it can be advantageous to have the backup media quickly accessible on the system for a period after the transfer.
If cloud resources are the only location where your system backup is stored, consider copying your QCLDCGRP01 and QCLDCIPL01 control group data to physical media. Keeping this backup data accessible allows restores to be performed from the media without the time and expense of transferring the media that is in the cloud back to the system.
4.2.6 Full-system backups from the cloud
Complete the following steps to run the full-system backups from the console by using IBM BRMS:
1. Log in to the IBM Cloud by using your IBMid and Password.
2. Go to your Service and select your virtual server instance. Open the console, as shown in Figure 4-1.

Figure 4-1 Open 5250 console for IBM i
3. Sign on by using your Dedicated Service Tools (DST) username and password, or select PF18 to bypass the use of the DST tool. Select Next and then, press PF18.
|
Note: The console times out if it is inactive after 5 minutes. You must close your console browser and start a new console connection. For more information, see 5.1.3, “IBM i 5250 console through LAN adapter” on page 153.
If you see a break message during the backup process, press Enter to return to the window in which you entered the STRBKUBRM command so that you can see the progress of the backup.
|
4. Run the IBM BRMS control group QCLDBSYS01. Put the system in a restricted state and then, run the ENDSBS SBS(*ALL) DELAY(120) command.
5. Display QSYSOPR MSGQ on the command line. Run the DSPMSG QSECOFR command and look for the following messages:
– System ended to restricted condition.
– A request to end TCP/IP has completed.
6. Change the subsystems to process for control group QCLDBSYS0:
a. Use the WRKCTLGBRM command, and find QCLDBSYS01.
b. Select Option 9=Subsystems to process.

Figure 4-2 Change restart to *No on subsystem to process
7. Run the First backup from the console: STRBKUBRM CTLGRP(QCLDBSYS01) SBMJOB(*NO).
8. Check the backup for errors. It is normal to have some errors (see Figure 4-3), including the following examples:
– Objects not saved (Some objects are not required for the recovery).
– Media not transferred (You will complete this step manually after the Second backup).

Figure 4-3 Display possible errors
9. Check the subsystems after the backup completes. You see only subsystem QCTL in an RSTD status. If it is not in this status, end all subsystems again and run the ENDSBS SBS(*ALL) DELAY(120) command.
10. Change IBM BRMS control group QCLDBIPL01:
a. Run the WRKCTLGBRM command.
b. Select Option 8=Change attributes.
c. Page down, change the Automatically backup media information to *LIB and the Append to media to *NO.
d. Select Option 9=Subsystems to process.

Figure 4-4 Change restart to *Yes on subsystem to process
11. Issue the second backup from the console STRBKUBRM CTLGRP(QCLDBIPL01) SBMJOB(*NO).
12. Check the backup for errors. It is normal to have some errors, including the following examples:
– Objects not saved (Some objects are not required for the recovery).
– Media not transferred (You will complete this step manually after the Second backup).
13. Identify the volumes that used both backups QCLDBSYS01 and QCLDBIPL001 and transfer to IBM Cloud Object Storage.
14. Check the status of the transfer by running the WRKSTSICC STATUS(*ALL) command (a status of Failed is normal). The volumes are transferred in the next step.

Figure 4-5 Identifying the volumes that were used
16. Transfer the volumes to IBM Cloud Object Storage. Run the STRMNTBRM command and the WRKSTSICC STATUS(*ALL) command. You see the volume name, status, and complete percentage for each file transfer. Wait until all volumes are successfully completed before proceeding to the next step.
17. Verify that all of the volumes that were used for the full-system backup no longer feature a status of *TRF. Then, run the WRKMEDBRM TYPE(*TRF) command. No volumes are listed.
18. As with other recoveries that are performed by using IBM BRMS, a recovery report is used to assist with successful recoveries from save media that was transferred to the cloud. To generate a report for recovery from the cloud, run the following command:
STRRCYBRM OPTION(*CTLGRP) ACTION(*REPORT) CTLGRP((QCLDBSYS01 1) (QCLDBIPL01 2)
|
Important: It is important to review the recovery report to ensure that it is complete. If any of the media that was produced during the backup process was successfully transferred to the cloud, it is not included in the recovery report.
The CTLGRP and PERIOD parameters that were specified in the STRRCYBRM command help identify objects that were saved to volumes that were not transferred to the cloud. If objects are on volumes that were not included in the recovery report, they are listed in a missing objects Attention section that is near the top of the report.
After the recovery report is verified, the report is stored in a safe location so that it can be referred to during a recovery.
Daily incremental backups can be run Monday - Saturday by using the following control groups:
STRBKUBRM CTLGRP(QCLDBUSR01) SBMJOB(*NO)
STRBKUBRM CTLGRP(QCLDBGRP01) SBMJOB(*NO)
|
Figure 4-6 shows how to perform full system saves by using IBM BRMS, IBM Cloud Storage (the IBM Cloud Storage GUI), and IBM Cloud Object Storage.

Figure 4-6 IBM i source that uses IBM BRMS and IBM Cloud Storage
|
Note: Consider the following points about the use of IBM Cloud Object Storage over IBM Cloud Direct link:
•IBM Cloud customers that purchase IBM Cloud Object Storage and Direct Link can make remote connections to IBM Cloud Object Storage “private” endpoints.
•HTTPS IBM Cloud Object Storage requests are started from a remote site.
•The requests are transmitted through IBM Cloud Direct Link and target a Proxy server.
•The requests are passed to an IBM Cloud Object Storage private endpoint.
•The request is processed.
•The request results are returned to the user.
|
4.2.7 Recovering the IBM i system from the cloud
IBM BRMS restores backup media from cloud locations by using a unique process:
•As with other recoveries that are performed by using IBM BRMS, a recovery report is used to assist with successful recoveries from save media that was transferred to the cloud. To generate a report for recovery from the cloud, the following command is used:
STRRCYBRM OPTION(*CTLGRP) ACTION(*REPORT) CTLGRP((QCLDBSYSxx 1) (QCLDBIPLxx 2) (QCLDBUSRxx 3) (QCLDBGRPxx 4)) PERIOD((<time> <date>))
where xx identifies the cloud where the media is stored and <timestamp before to the last full backup.
•The following save data must be restored from physical media before IBM BRMS can begin restoring save data directly from the cloud:
– SAVSYS, which is used to install the operating system.
– Product IBM BRMS for i and IBM BRMS save information before automatic recovery can be performed.
– Product IBM TCP/IP Connectivity Utilities for i and configuration information to allow communications with cloud storage providers.
– Product IBM Cloud Storage Solutions for i and configuration information to establish connections with cloud storage providers.
System recoveries cannot be performed directly from IBM BRMS media that was transferred to the cloud. To perform a system recovery from cloud media, special procedures must be followed to create physical optical installation media.
The physical optical media contains SAVSYS data and objects from other libraries, such as QUSRSYS, QBRM, QUSRBRM. After the optical media is used to restore Licensed Internal Code (LIC), the operating system, and other required objects, subsequent restores can be performed directly from the cloud media by using IBM BRMS.
Some media that is listed in your recovery report must be recovered from physical media. Complete the following steps:
1. Locate the media that requires conversion to a physical copy. Use the volume identifiers to locate:
– LIC
– Operating system objects
– IBM BRMS product and associated libraries
– User profiles and configuration data
– Required system libraries
Normally, these media are stored in the QIBM BRMS_XXXXXXXX directory. The files in this directory use the same name as the media volume identifiers that are listed in your recovery report.
2. By using your connection to the cloud, transfer this media to your system to write the files to optical discs. A .iso extension must be added to the file name if it is required by the image burning software that is used.
|
Note: Before restoring from media in the cloud, the IBM BRMS media database must be updated. Cloud volumes must be registered with IBM BRMS.
|
3. Run the program call ADDLIBLE LIB(QICC) QICC/REGEXTPTS ACTION(R) to register the cloud exit programs.
4. Ensure that the media library name is correct for the Device prompt and enter *YES in the Create parent directories prompt.
After this step, the physical media is not required. The system is now in a restricted state. TCP/IP must be started to allow IBM BRMS to download the media that is required for cloud recovery.
5. To start TCP/IP, enter the following commands:
STRTCP STRSVR(*NO) STRIFC(*NO) STRPTPPRF(*NO) STRIP6(*YES)
STRTCPIFC INTNETADR('nnn.nnn.nnn.nnn')
where ‘nnn.nnn.nnn.nnn’ is the internet address of the recovery system.
6. Press Enter.
IBM BRMS downloads the media from the cloud and begins recovering all remaining system data. The restored system performs verification as a final stage of the recovery. To allow the system to verify the system information, end TCP/IP by using the ENDTCP command.
After system verification is complete, restart TCP/IP by using the STRTCP command and then, IPL the system.
4.2.8 Full-system recovery from the cloud using IBM i as an NFS server
In this section, we describe to perform a full-system recovery from the cloud.
Setting up IBM i Network Install Server with NFS Server and NFS Client
To set up IBM i Network Install Server with NFS server and NFS client, provision an IBM i VSI in target Power Systems Virtual Server location to be an NFS Server.
Consider the following points:
•IBM i NFS Server must be at a minimum at Version 7.2 with current PTFs.
•To use virtual optical images through an NFS server, the IBM i NFS client must meet the following requirements:
– The IBM i has a Version 4 Internet Protocol (IP) address.
– During set up, the shared NFS server directory is mounted over a directory on the IBM i client.
– An IBM i service tools server or a LAN console connection is configured by using a Version 4 IP address.
– A 632B-003 virtual optical device is created by using the IP address of the NFS server.
|
Note: The IBM i IP address and the IBM i service tools server (LAN console connection) IP address can be the same.
|
For more information, see this IBM Documentation web page.
Requirements to create a PowerVS instance for NFS Server
The following requirements must be met to create a Power Systems Virtual Server Instance NFS Server:
•An IBM i VSI NFS Server is created in the IBM Power Systems Virtual Server location.
Ensure that enough disk storage is available to support the size of the SAVSYS or Control Group QCLDBIPLxx.
•An IBM i VSI Client in Server is created in the same IBM Power Systems Virtual Server location.
Ensure that twice the disk storage is available to support the size of the IMAGE Catalog volumes (User Data), and the Full-System Restore.
•Verify that the IBM i VSI Client Server can ping itself and the IP address of IBM i VSI NFS Server.
•Verify that the IBM i VSI NFS Server can ping itself and the IP address of IBM i VSI Client Server.
Creating an IBM i VSI for NFS Server
Complete the following steps to create an IBM i IBM Power Systems Virtual Server Instance NFS Server:
1. Create IBM i VSI NFS Server in your Power Systems Virtual Server location.
2. Provision and add your storage.
3. Create a mount directory for the IBM i VSI NFS server:
a. Run the MKDIR DIR(‘/install’) command.
b. Run the MKDIR DIR(‘/install/sysipl’) command.
A directory is created in the IFS that is called /install/sysipl.
4. From the Cloud, copy the volumes that were created by using the QCLDBIPL01 backup. In this example, three volumes were available (Q06990, Q07898, and Q08807).
To copy the volumes from the Cloud, you need the following information:
– Resource name: The cloud resource that was created.
– Submit to batch: *YES (submit all three simultaneously).
– Cloud file name: The full name of the volume that is on the cloud.
– Local file name: The full directory path plus volume name.
5. Display the volumes on the IBM Cloud Object Storage by clicking Cloud Object Storage → Bucket → Object name → Details.
|
Note: IBM BRMS stores media in the cloud as files in the QIBM BRMS_XXXXXXXX directory, where XXXXXXXX is the name of the system that performed the backups (see to Figure 4-7).
|

Figure 4-7 IBM BRMS storing media on IBM Cloud Object Storage

Figure 4-8 Copying IBM Cloud Storage file from cloud
7. Check the status of the transfer jobs by using the WRKSTSICC STATUS(*ALL) command. Then, after all volumes complete the transfer and show a status of Success, see the next section, Creating virtual optical device on IBM i VSI NFS Server.
Creating virtual optical device on IBM i VSI NFS Server
Complete the following steps to create an optical device on IBM i VSI NFS Server:
1. Create a Virtual Optical Drive that is named “INSTALL” CRTDEVOPT DEVD(INSTALL) RSRCNAME(*VRT) LCLINTNETA(*N).
2. Vary on the Virtual Optical Device by using the WRKCFGSTS *DEV INSTALL command.
3. Create an image catalog: CRTIMGCLG IMGCLG(SYSIPL) DIR('/install/sysipl').

Figure 4-9 Add image catalog entry
5. Add the next two volumes by using the same name for the TOFILE; that is, the To image file.
6. Load the image catalog, as shown in Figure 4-10.

Figure 4-10 Load to image catalog
7. Check or verify the Image catalog:
a. On the command line, run the WRKIMGCLG command.
b. Select Option 10=Verify for image catalog “SYSIPL”.
c. From the command output, verify that the type = *LIC.
d. Verify from the command output that the sort image catalog = *YES.
e. Verify that the network file server share = *YES.
8. Work with Entries:
a. Select Option 12=Work with entries for image catalog “SYSIPL”.
b. Verify the directory.
c. Verify the Index order of the image file name; that is, the image file that contains the SAVSYS is the first image in the index order.
d. Verify the status (Mounted or Loaded).
9. Work with Object Links by using the following command:
WRKLNK OBJ('/install/sysipl/*')
– Verify that a BOOTP DIR was created.
– Verify that a VOLUME_LIST was created.
10. Run the STRNFSSVR SERVER(*ALL) command to start NFS Servers.
11. Run the CHGNFSEXP OPTIONS('-i -o ro') DIR('/install/sysipl') command to change NFS export options.
12. Run the CHGAUT OBJ('/install/sysipl') USER(*PUBLIC) DTAAUT(*RWX) SUBTREE(*ALL) command to change Object Authority.
13. Run the CHGTFTPA AUTOSTART(*YES) ALTSRCDIR('/install/sysipl') command to change the TFTP Attributes.
14. Specify the alternative source directory where the volumes are stored.
15. Run the CHGAUT OBJ('/install/sysipl') USER(QTFTP) DTAAUT(*RX) SUBTREE(*ALL) command to change Object Authority.
16. End the TCP Server TFTP by running the ENDTCPSVR SERVER(*TFTP) command.
17. Start the TCP Server TFTP by running the STRTCPSVR SERVER(*TFTP) command.
Creating and configuring an IBM i VSI client server
Complete the following steps to create an IBM i Power Systems Virtual Server Instance Client Server:
1. Create an IBM i VSI Client Server in your Power Systems Virtual Server location.
2. Provision and add your storage.
3. Log in to the Start System Service Tools (SST) by using the STRSST command.
4. Select Option 8=Work with service tools user IDs and Devices.
5. Select F13=Select STS LAN adapter. Click Next. Then, click F13 at the bottom of the console window.
6. Choose Option 1=Select, as shown in Figure 4-11. Use the same resource that was used to communicate with the IBM i VSI NFS Server.

Figure 4-11 Selecting a resource name for LAN Adapter
|
Note: The CMNxx Resource MUST be on the same VLAN (public, direct, or DL) as your IBM i VSI NSF Server. You also MUST End TCP/IP and Vary Off the Line Description by using that CMNxx.
|
7. Configure Service Tools LAN Adapter (see Figure 4-12):
– IP version allowed: IPV4.
– Internet address: The same IP address of the client (TARGET) IBM i VSI can be used.
– Gateway router address: Use the same gateway on the client (TARGET).
– Subnet mask: Use the same.
Complete the following steps:
a. Select F7=Store.
b. Select F13= Deactivate.
c. Select F14=Activate.
|
Note: After you select F14=Activate, the adapter restarts, which might not be ready immediately.
|

Figure 4-12 Set up TCP IP on LAN Adapter
8. Work with IP IPv4 Connection Status and verify the status of port 3000 status:
a. Run the NETSTAT command.
b. Select Option 3=Work with IPv4 connection status.
c. Select F14=Display port numbers.
d. Verify that port number 3000 (as-sts) is running, which is Service Tools Server.
9. On the client server, create the optical device by running the CRTDEVOPT command:
a. Select F4 to prompt.
b. Set the local internet address as *SRVLAN.
c. Set the remote internet address as the IP address of the IBM i VSI NFS Server.
d. Set the network image directory as ‘/install/sysipl’.
10. Run the WRKCFGSTS *DEV INSTALL command. Select Option 1= Vary On for device INSTALL.
11. Run the WRKIMGCLGE IMGCLG(*DEV) DEV(INSTALL) command to verify that you can access the remote image catalog.
12. Verify the Catalog, Type, and Directory by running the /install/sysipl command.
Verify the status of the volumes (Mounted or Loaded).
Installing LIC and operating system on IBM i PowerVS on client server by NFS server
Complete the following steps to install the LIC and operating system on IBM i PowerVS on client server by using NFS server:
|
Warning: Before you begin the scratch installation on the (TARGET) IBM i VSI, document all your network information. You must re-create the network information after the installation completes. For example, document the following information:
•CFGTCP:
– Work with TCP/IP interfaces
– Work with TCP/IP routes
•DSPLIND:
– CLOUDINIT0
– CLOUDINIT1
– CLOUDINIT2
•WRKHDWRSC *CMN:
Display all of the available CMNxx resource information and document the location and resource name:
– Resource name . . . . . . . : CMN03
– Location: U9009.22A.788D380-V5-C4-T1
|
1. Start the network installation:
a. Run the STRNETINS command and then, select F4 to prompt.
b. Use the following settings:
– Network optical device: INSTALL.
– Installation option: *LIC.
– Keylock mode: MANUAL.
c. Press Enter.
d. Select F16 to confirm power down.
COMM657 is displayed after 15 minutes (see Figure 4-13).

Figure 4-13 COMM657 after STRNETINS
2. Install the licensed internal code by completing steps 4 - 6 that are described at this IBM Documentation web page.
3. In the menu, a prompt to IPL or install the System is displayed. Select Option 2=Install the operating system.
4. Select Option 5=Network device.
5. Configure the network device (see Figure 4-14) by using the following settings:
– Server IP: IP address of the SOURCE NFS IBM i VSI Server.
– Path Name: Name of the Directory where the image volumes are located.
Complete the following steps:
a. Select F10 =Continue.
b. Press Enter to confirm.

Figure 4-14 Configure the network device
6. Check whether the language group is correct. Then, press Enter twice, and confirm.
7. Complete steps 19 - 28 at this IBM Documentation web page.
After the first login at the IBM i main menu, the System name is changed.
8. At the command line, enter GO LICPGM.
9. Select Option 10=Display Installed Licensed Programs.
The Base IBM i that is installed and the Library QGPL and QUSRSYS are *BACKLEVEL.
10. Recover the IBM BRMS product and associated libraries on the IBM i PowerVS instance Client server by using NFS Server. On the Client Server Create Optical Device, run the CRTDEVOPT command. Then, select F4 to prompt and use the following settings:
– Local internet address: *SRVLAN
– Remote internet address: IP address of the IBM i VSI NFS Server
– Network image directory: ‘/install/sysipl’
11. Run the WRKCFGSTS *DEV INSTALL command. Then, select Option 1= Vary On for device INSTALL.
12. Verify that you can access the remote image catalog by running the following command:
WRKIMGCLGE IMGCLG(*DEV) DEV(INSTALL)
13. Verify the Catalog, Type, and Directory by running the /install/sysipl command.
Verify the status of the volumes (Mounted or Loaded).
|
Tip: Your IBM BRMS Recovery Report is available in the QP1ARCY file.
|
14. Starting with STEP004: Recover the IBM BRMS Product and Associated Libraries in your IBM BRMS Recovery Report, complete the following steps:
a. Run the following command to change the QSYSOPR message queue to prevent messages that are not related to the recovery from interrupting the recovery process:
CHGMSGQ MSGQ(QSYSOPR) DLVRY(*NOTIFY) SEV(99)
b. Press Enter.
c. Recover the libraries by specifying the saved item, the name of the stand-alone device, or media library that is used, and the volume identifiers and sequence numbers that are listed. For type *FULL, run the following command:
RSTLIB SAVLIB(saved-item) DEV(device-name) VOL(volume-identifier) OPTFILE('')
Example 4-1 QBRM, QMSE, and QUSRBRM saved items
Saved Save ----- ASP ------ Save Save Not Sequence
Item Type Name Number Date Time Saved Saved Number
---------- ------- ---------- ----- -------- -------- -------- ------ ---------
QBRM *FULL *SYSBAS 00001 7/06/20 10:37:08 1184 0 48
OPTFILE('/IBM BRMSOPTSAV2248801200706103706I922BRMC/QBRM ')
QMSE *FULL *SYSBAS 00001 7/06/20 10:37:09 8 0 49
OPTFILE('/IBM BRMSOPTSAV2248801200706103706I922BRMC/QMSE ')
QUSRBRM *FULL *SYSBAS 00001 7/06/20 10:37:41 264 0 58
OPTFILE('/IBM BRMSOPTSAV2248801200706103708I922BRMC/QUSRBRM ')
In our example, run the commands that are shown in Example 4-2 to recover the IBM BRMS libraries.
Example 4-2 Restoring library to recover IBM BRMS libraries
RSTLIB SAVLIB(QBRM) DEV(INSTALL) VOL(Q06990) ENDOPT(*REWIND) OPTFILE('/IBM BRMSOPTSAV2248801200706103706I922BRMC/QBRM')
RSTLIB SAVLIB(QMSE) DEV(INSTALL) VOL(Q07898) ENDOPT(*REWIND) OPTFILE('/IBM BRMSOPTSAV2248801200706103706I922BRMC/QMSE')
RSTLIB SAVLIB(QUSRBRM) DEV(INSTALL) VOL(Q08807) ENDOPT(*REWIND) OPTFILE('/IBM BRMSOPTSAV2248801200706103708I922BRMC/QUSRBRM')
15. Complete Step 005 in your IBM BRMS Recovery Report.
You must recover this information for the IBM BRMS product to accurately guide you through the remaining recovery steps.
Run the following command to recover the libraries that specify the saved item, name of the stand-alone device or media library that is used, and the volume identifiers and sequence numbers that are listed as shown in Example 4-3:
RSTOBJ OBJ(*ALL) SAVLIB(saved-item) DEV(device-name) VOL(volume-identifier) OPTFILE('') MBROPT(*ALL) ALWOBJDIF(*COMPATIBLE)
Example 4-3 QUSRBRM saved item
Saved Save ----- ASP ------ Save Save Not Sequence
Item Type Name Number Date Time Saved Saved Number
---------- ------- ---------- ----- -------- -------- -------- ------ ---------
QUSRBRM *QBRM *SYSBAS 00001 7/06/20 10:37:48 16 0 59
16. Press Enter.
The information that is shown in Example 4-4 is used to restore the object.
Example 4-4 Sample to restore object
RSTOBJ OBJ(*ALL) SAVLIB(QUSRBRM) DEV(INSTALL) VOL(Q08807) MBROPT(*ALL) AL
OBJDIF(*COMPATIBLE) OPTFILE('/IBM BRMSOPTSAV2248801200706103708I922BRMC/QUSRBRM')
17. Complete Step 006 in your IBM BRMS Recovery Report by running:
INZBRM OPTION(*SETAUT) SETUSRBRM USER(QSECOFR) USAGE(*ADMIN)
18. Follow Step 009 in your IBM BRMS Recovery Report by running:
INZBRM OPTION(*DEVICE)
WRKDEVBRM
Verify that you INSTALL device is included in the list.
19. Complete Step 010 in your IBM BRMS Recovery Report (see Example 4-5).
Example 4-5 Sample of report that contains item from a cloud backup
----- Attention --------------------------------------------------
THIS REPORT CONTAINS ITEMS FROM A CLOUD BACKUP.
PLEASE RUN THE FOLLOWING PROGRAM CALL TO SET UP THE CLOUD VOLUMES:
CALL QBRM/Q1AOLD PARM('CLOUD ' 'FIXDRVOL ' 'Q06990' 'Q07898' 'Q08807' 'Q13692' 'Q32656')
|
Note: You find your VOLUMES in the IBM BRMS Report QP1A2RCY file.
|
20. Run the following command to restore a current version of your user profiles:
STRRCYBRM OPTION(*SYSTEM) ACTION(*RESTORE)
Then, press Enter.
|
Attention: Press F9 in the Select Recovery Items display to return to the Restore.
Ensure that the tape device name or media library name is correct for the Device prompt and that the following prompts are specified:
•*SAVLIB for Restore to library
•*SAVASP for Auxiliary storage pool
•*YES is specified for Create Parent Directories
If you are recovering to a different system or logical partition, specify the following prompts:
•*ALL for the Data base member option
•*COMPATIBLE for the Allow object differences
•*NONE for the System resource management
Press Enter to return to the Select Recovery Items display.
|
Figure 4-15 shows a sample of STRRCYBRM.

Figure 4-15 Sample of STRRCYBRM
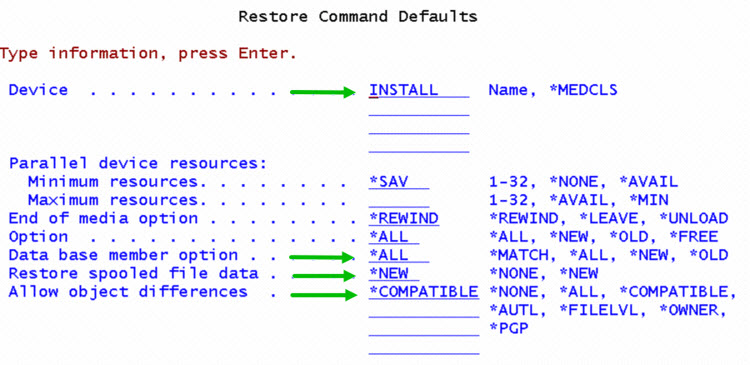
Figure 4-16 Sample to change parameters on restore commands
22. Page down and make the following changes:
– System resource management: *NONE (when you restore to a different system)
– Create parent directories: *Yes
Press Enter.
23. Select Option 1=Select “*SAVSECDTA” and then, press Enter.
|
Note: If you receive a message that reads: Waiting for reply to message on message queue QSYSOPR, select SysReq and then, type 6 to display QSYSOPR system messages.
If you are prompted to load volume Qxxxxx on INSTALL (C G), enter C to cancel and continue with the restore.
|
24. Follow Step 011 in your IBM BRMS Recovery Report and run the following command:
CHGUSRPRF USRPRF(QSECOFR) PASSWORD(new-password)
25. Follow Step 012 in your IBM BRMS Recovery Report. Select Option 1=Select “*SAVCFG” and then, press Enter (see Figure 4-17).

Figure 4-17 Sample of SAVCFG
26. Follow Step 013 in your IBM BRMS Recovery Report. Select Option 1=Select for all of the “Saved Item” and then, press Enter.
27. Display the remaining objects during the restore (see Figure 4-18).

Figure 4-18 Sample of display recovery items.
28. Work with TCP/IP interfaces and add internet addresses from target IBM i.
|
Important: Before you began the scratch installation on the (target) IBM i VSI, document all your network information.
|
Re-create the following network information to complete the restore:
– Work with TCP/IP Interfaces.
– Command CFGTCP.
Select Option 1= Work with TCP/IP interfaces.
Select Option 1=Add (enter the IP Address you used to connects to IBM Cloud Object Storage.
|
Note: Use the IP Address information that you documented from the target IBM i VM that was created in the previous step. The following information is needed:
•Internet address: IP address x.x.x.x
•Subnet mask: 255.255.255.x
•Line description: Use one of the three CLOUDINITx line descriptions that were restored or use the same description that was documented.
|
29. Work with TCP/IP Interfaces to start the Interface by running the CFGTCP command:
Select Option 1= Work with TCP/IP interfaces.
Select Option 9= Start.
30. Find the Resource URI that was used for IBM Cloud Object Storage (it is where the volumes are stored), as shown in Figure 4-19:
a. Work with IBM Cloud Storage Resources.
b. Run the WRKCFGICC command and then, press Enter.
c. Select Option 5=Display.

Figure 4-19 Sample of URI
31. Ping the Resource URI to verify the connection.
If the ping was successful, a working network to the Cloud Object Storage exists.
If the ping was unsuccessful, END the IP Interface and Vary off the Ethernet Line. Change the Ethernet line description to another CMNxx Resource that is not yet used and attempt to ping again.
32. Create a virtual tape device by running the CRTDEVTAP DEVD(TOR1CLDTAP) RSRCNAME(*VRT) command.
33. Vary on the virtual tape device by running the following command:
VRYCFG CFGOBJ(TOR1CLDTAP) CFGTYPE(*DEV) STATUS(*ON)
At this point in the recovery, physical media is no longer required because media is downloaded from the cloud.
Because the system is in restricted state, TCP/IP must be started so that IBM BRMS can transfer the media.
|
Attention: Consider the following points:
•If done in a previous step, this command is not required to be run again because TCP/IP must be started so that IBM BRMS can transfer media that is required by a recovery from the cloud. To continue the recovery in restricted state, run the following commands:
STRTCP STRSVR(*NO) STRIFC(*NO) STRPTPPRF(*NO) STRIP6(*YES)
STRTCPIFC INTNETADR('nnn.nnn.nnn.nnn')
where 'nnn.nnn.nnn.nnn' is the Internet address of the recovery system. Also, nnn is a decimal number 0 - 255.
•The use of restricted state TCP/IP requires that 5770SS1 option 3 was installed when the backups were run. Otherwise, start all subsystems by running the following commands:
STRSBS SBSD(QCTL)
STRTCP
|
34. Move volumes from IBM Cloud Object Storage to the TARGET IBM i VSI Client:
a. Run the WRKMEDBRM command and then, press Enter.
Find your volumes that is listed your IBM BRMS Recovery Report.
If you volume has a plus (+) to the right, it is part of a serial set.
Notice that the volumes are in the IBM Cloud Object Storage location.

Figure 4-20 Sample to work with serial set of volumes
35. Select Option 8=Move, as shown in Figure 4-21 (all the volumes at the same time) and then, press Enter.

Figure 4-21 Sample of volumes to move from cloud

Figure 4-22 Sample to change storage location to HOME
37. Check the IBM Cloud Storage Status transfer by running the WRKSTSICC STATUS(*ALL) command:
Check that the status is “Active”.
The operation being run; for example, FRMCLD is a copy from the cloud operation. Oper = FRMCLD (From Cloud).
After all of the jobs have a status of Success, you can continue with the IBM BRMS restore by running the WRKSTSICC STATUS(*ALL) command.
38. Follow Step 014 in your IBM BRMS Recovery Report and the following command:
INZBRM OPTION(*DEVICE)
WRKDEVBRM
You see the Virtual Tape Device “TOR1CLDTAP *VRTTAP”.
39. Recover IBM Product Libraries on the IBM i Power Systems Virtual Server Instance Client Server (target) by using IBM Cloud Object Storage:
Follow Step 017 in your IBM BRMS Recovery Report and run the following command:
STRRCYBRM OPTION(*IBM) ACTION(*RESTORE)
|
Note: The Restore Command default settings are used to specify the correct Device parameter and change the Create parent directories prompt back to *NO.
|
|
Attention: Press F9 on the Select Recovery Items display to go to the Restore. The following Command Defaults display:
•Ensure that *MEDCLS is specified for the Device prompt.
•Ensure that *NO is specified for the Create parent directories prompt.
Press Enter to return to the Select Recovery Items display.
|
40. Review the list of Recovery Items, as shown in Figure 4-23, and Remove any that were restored. Select Option 4=Remove and then, press Enter.
You can also see that the Volume Serial is from the optical media.
After you remove the items, they are removed from the list.

Figure 4-23 Sample to remove items already used
41. Change the Recovery Defaults by selecting F9=Recovery defaults:
– Device: TOR1CLDTAP.
– Option: *ALL.
– Data base member option: *ALL.
– Restore spooled file data: *NEW.
– Allow object differences: *COMPATIBLE.
Page down.
– System resource management: *NONE.
– Create parent directories: *NO.
Press Enter to return to Select Recovery Items.
42. Complete the following steps:
a. Select the saved items.
b. Review the list again.
c. Select Option 1=Select for each item or F16= Select (this will select all the items).
d. Press Enter to recover the saved items.
43. Recover User Libraries on the IBM i Power Systems Virtual Server Instance Client Server (target) by using IBM Cloud Object Storage:
Follow Step 018 in your IBM BRMS Recovery Report by running the STRRCYBRM OPTION(*ALLUSR) ACTION(*RESTORE) command.
44. Review the list of Recovery Items and remove any that were restored.
Select Option 4=Remove and then, press Enter.
You can also see that the Volume Serial is from the optical media.
Press F11=Object View (shows you which Control Group created the saved item).
Remove any items that were created by QCLDBIPL01 (see Figure 4-24).
After you remove the items, they are removed from the list.

Figure 4-24 Sample of item to be removed created by QCLDBIPL01
45. Select the saved items:
a. Review the list again.
b. Select Option 1=Select for each item or F16= Select (this will select all the items for you).
c. Press Enter to recover the saved items.
46. To recover Document Library Objects on the IBM i Power Systems Virtual Server Instance Client Server (TARGET) by using IBM Cloud Object Storage, follow Step 019 in your IBM BRMS Recovery Report:
STRRCYBRM OPTION(*ALLDLO) ACTION(*RESTORE)
47. Select the saved item, as shown in Figure 4-25.
Select Option 1=Select.
Press Enter to recover the saved items.

Figure 4-25 Sample of *ALLDLO saved item
48. Recover Directories and Files on the IBM i Power Systems Virtual Server Instance Client Server (TARGET) by using IBM Cloud Object Storage.
Follow Step 020 in your IBM BRMS Recovery Report:
STRRCYBRM OPTION(*LNKLIST) ACTION(*RESTORE)
49. Review the list of Recovery Items and remove any that were restored:
a. Select Option 4=Remove and press Enter.
You can also see that the Volume Serial is from the optical media.
b. Press F11=Object View (shows you which Control Group created the saved item).
c. Remove any items that were created by QCLDBIPL01.
After you remove the items, they are removed from the list.
50. Select *LINK, the saved items:
a. Select Option 1=Select.
b. Press Enter to recover the saved items.
51. Follow Step 025 in your IBM BRMS Recovery Report:
UPDPTFINF
52. Follow Step 026 in your IBM BRMS Recovery Report:
RSTAUT USRPRF(*ALL)
53. Follow Step 027 in your IBM BRMS Recovery Report (restores your System Values):
UPDSYSINF LIB(QUSRSYS) TYPE(*SYSVAL)
54. Follow Step 030 in your IBM BRMS Recovery Report:
DSPJOBLOG JOB(*) OUTPUT(*PRINT)
55. Change IPL Attributes:
CHGIPLA STRRSTD(*YES)
After the IPL, you can verify the system.
56. Change System Value for QIPLTYPE:
WRKSYSVAL QIPLTYPE
Select Option 2=Change.
Select 0=Unattended IPL.
57. Follow Step 031 in your IBM BRMS Recovery Report:
PWRDWNSYS OPTION(*IMMED) RESTART(*YES)
Press F16=Confirm.
58. Complete the following steps at the IPL or Install the System menu:
a. Select Option 3=Use Dedicated Service Tools (DST).
b. Sign on to Dedicated Service Tools (DST).
c. Select Option 7=Start a service tool.
d. Select Option 7=Operator panel functions.
In IPL mode:
a. Select Option 2=Normal.
b. Press F8 to set the IPL attributes and restart the system.
c. Press Enter to confirm.
|
Note: Check that IPL source is set to 2 and the IPL mode is set to 2.
|
After the IPL the 5250 is ready to sign on.
Figure 4-26 shows a summary of your IBM i NFS client through an IBM i NFS Server by using a backup that was created by using IBM BRMS that is on IBM Cloud Object Storage.

Figure 4-26 Full system recovery from the cloud by using IBM i
4.3 Creating object-level backups
This section describes how to create object-level backups.
4.3.1 Introduction
This method is the most popular backup and recovery method that is used by IBM i customers at the time of this writing.
Similar to our on-premises environment, day-to-day daily backups and full system backups can be done on IBM Power Systems Virtual Server by using native commands and CL scripts or GO SAVE, GO BACKUP, and GO RESTORE menus to run and schedule backups.
The following commands used:
•SAVLIB
•SAVOBJ
•SAVCHGOBJ
•SAVDLO
•SAV
•SAVSECDTA
•SAVCFG
As a target device, use the Image Catalog facility with virtual optical or virtual tape media, and save files or the new offering from IBM (see 4.4, “Dynamic Solutions International Virtual Tape Library” on page 132).
This virtual media that is produced must be stored and archived. IBM Cloud Object Storage is the native solution to save backups with almost endless capacity.
Communicating with IBM Cloud Object Storage can be done by using the IBM i Cloud Storage Solutions software offering, or the use of the Open Source capacity in the IBM i operating system.
In this section, we discuss how to back up data to a save file or an image catalog by using native commands. Also discussed is how to save and restore data from IBM Cloud Object Storage. Moreover, a library cab be saved and transferred to the cloud by the way of IBM BRMS, and the movement to the cloud can be automated.
4.3.2 Copying files to the cloud
Use the CPYTOCLD command to copy files from the IFS to a cloud resource. Consider the following points:
•A cloud resource must be created.
•An IBM i Read (*R) authority must be available on the file that you copy, and Execute (*X) authority on all directories in the path leading to the file. For example, if you copy the /home/user/jdoe/file.txt file, you must have Execute authority on the home, user, and jdoe directories, and then Readauthority on file.txt.
The copy command cannot use Cloud Storage Solutions to work with files in the /QSYS.LIB file system. The size of files that you can copy to a resource is determined by the cloud service provider.
When you copy files to or from the cloud, the operation is run asynchronously; that is, in its own batch job instead of in the same job as the command.
When you copy files asynchronously, you do not have to wait for much time for large files to finish copying before other commands can be run. Also, you can use the IBM i facilities to work with asynchronous jobs; for example, by scheduling when the jobs run.
In the Submit to batch field, you can specify instead that the copy operation be run in the same job as the command. This command is not thread safe.
Complete the following steps to copy a file to the cloud:
1. From the IBM i command line, enter CPYTOCLD and then, press F4.
Table 4-1 CPYTOCLD required fields
|
Field
|
Action
|
|
Resource Name
|
Enter the name of a resource.
|
|
Submit to Batch
|
enter *NO to run the copy operation in the same job as the command.
Leave the *YES value to run the copy operation in its own job. |
|
Local file name
|
Enter the IFS path and the name of the file to copy; for example:/home/user/jdoe/file.txt. The path must begin with a forward slash (/) and is not case-sensitive.
|
|
Cloud file name
|
Enter a path and name for the cloud copy of the file; for example, dir1/dir2/file.txt.
The path is created if it does not exist. When you specify this path, do not include the container, bucket, or root directory that is defined in the resource. Cloud Storage Solutions combines that directory with this path to create the full path in the cloud.
The container, bucket, or root directory that is defined in the resource must exist before you copy files to the cloud.
When overwriting a file, in most cases the directory and file name are case-sensitive. If you overwrite a file on an IBM i FTP computer, the directory and file name are not case-sensitive unless they are on the /QOpensys file system.
|
4.3.3 Copying files from the cloud
Run the CPYFRMCLD command to copy files from a cloud resource to the IFS.
You must have Execute (*X) authority on all directories in the path to which you copy the file, and Write (*W) authority on the last directory in the path. I
f the file was copied before and exists in the path, the user must have Write access to it. For example, to copy file.txt to /home/user/jdoe, you must have Execute authority on the home, user, and jdoe directories, and Write authority on jdoe. If file.txt is available, you must have Write authority on it.
You cannot use Cloud Storage Solutions to work with files in the /QSYS.LIB file system. If you copy a file from an FTP cloud server to the IBM i computer, and that file was not originally copied to the FTP server by using Cloud Storage Solutions, Cloud Storage Solutions assigns the file a coded character set identifier (CCSID) of 65535. A CCSID of 65535 means that the operating system treats the file as binary data and it is unreadable in an editor.
If you copy a file from an Amazon S3 or IBM Cloud Object Storage cloud server to the IBM i computer and that file was not originally copied to the cloud server by using Cloud Storage Solutions, Cloud Storage Solutions reads the data and from it assigns the file a coded character set identifier (CCSID) of 1208 (UTF-8) if it is text, or 65535 if it is binary.
When files are copied to or from the cloud, the operation is run asynchronously; that is, its own batch job instead of in the same job as the command. When files are copied asynchronously, you do not have to wait a long time for large files to finish copying before running other commands.
Also, the IBM i facilities can be used to work with asynchronous jobs; for example, by scheduling when the jobs run. In the Submit to batch field, specify instead that the copy operation be run in the same job as the command. This command is not thread safe.
Complete the following steps:
1. From the IBM i command line, enter CPYFRMCLD and then, press F4.
Table 4-2 CPYFRMCLD required fields
|
Field
|
Action
|
|
Resource Name
|
Enter the name of a resource.
|
|
Submit to Batch
|
Enter *NO to run the copy operation in the same job as the command.
Leave the *YES value to run the copy operation in its own job. |
|
Cloud file name
|
Enter the cloud path and the name of the file to be copied; for example: dir1/dir2/file.txt.
Do not include the container or bucket that is defined in the resource. The cloud file name path is appended to those directories to construct the full path for the cloud copy of the file.
In most cases, the directory and file name are case-sensitive. The directory and file name are not case-sensitive with IBM i FTP resources unless they are on the /QOpensys file system.
|
|
Local file name
|
Enter the IFS path and file name of the file being copied, for example:/home/user/jdoe/file.txt.
The path must begin with a forward slash (/). Path and file names are not case-sensitive. Path directories are created if they do not exist locally. You can enter a local file name that is different from the cloud file name.
|
4.3.4 Backup and restore by using save files
When small to medium amounts of data must be moved between IBM i systems, the most common file transfer method is the use of save files with FTP.
This method is simple and includes the following restrictions and features:
•Data from only one library can be saved on each save file.
•SAVSYS cannot be used on a save file.
•“D” IPL from a Save File cannot be used to restore License Machine Code (LIC or SLIC).
•The maximum size for a save file on IBM i V7R1 and later is 2 TB.
•The empty save file must be created by using the target version operating system.
•Save files cannot be created on IFS or a mounted file system; however, they can be copied to IFS or mounted file system after the data is saved.
•Data can be compressed during backup after the backup completes by using the JAR command or Open Source tools.
•Data in save files can be uploaded to physical tapes or virtual by using SAVSAVFDTA command.
•Parallel backups can be performed, which save to multiple save files simultaneously.
•Backups to multiple save files cannot be spanned by using one command. For example, if a large library must be saved to a single file, some PASE or QSHELL commands can be used to split and compress the data into several components.
Sample scenario
In this example, one library and security information are saved in two different Save Files, the data is compressed, and then uploaded to IBM Cloud Object Storage, assuming communications exist with Direct Link Connect and CentOS reverse proxy.
|
Note: For more information about how to connect from IBM Power Systems Virtual Server and IBM Cloud Object Storage, see IBM i Migration to Cloud with IBM Power Systems Virtual Server.
|
Complete the following steps:
1. Create an empty Save Files for backups, libraries, and security data, as shown in Example 4-6.
Example 4-6 Steps to backup on save file
CRTLIB BACKUPSAV
CRTSAVF BACKUPSAV/MYLIB01
CRTSAVF BACKUPSAV/SAVSECDTA
2. Backup a library to the Save File, as shown in Example 4-7.
Example 4-7 Save library routine
SAVLIB LIB(MYLIB01) DEV(*SAVF) SAVF(BACKUPSAV/MYLIB01)
3. Backup security data as shown in Example 4-8.
Example 4-8 Save security data routine
SAVSECDTA DEV(*SAVF) SAVF(BACKUPSAV/SAVSECDTA)
4. Update the YUM environment and install some tools, as shown in Example 4-9.
Example 4-9 Update the YUM environment
CALL QP2TERM
TERM=aixterm
export TERM
PATH=$PATH:/QOpenSys/pkgs/bin
export PATH
yum -y update
yum -y install pigz gzip gunzip python3 python3-pip readline curl
pip3 install awscli
5. Configure awscli to communicate with IBM Cloud Object Storage by using aws configure.
6. Use your credentials from your IBM Cloud Object Storage bucket to complete the configuration.
For more information about how to create your IBM Cloud Object Storage resource, bucket, and credentials and configure AWS CLI, see 2.2.2, “Full system backup and restore by using native commands” on page 19 or this IBM Cloud Docs web page.
7. Compress the files and upload to IBM Cloud Object Storage, as shown in Example 4-10.
Example 4-10 Saving and compressing data to Cloud Object Storage bucket
cd /QSYS.LIB/BACKUPSAV.LIB
cat MYLIB01.FILE | pigz -9 -p40 -c | aws --endpoint-url=https://s3.eu-gb.cloud-object-storage.appdomain.cloud s3 cp - s3://ibmi-backup/MYLIB01.gz
cat SAVSECDTA.FILE | pigz -9 -p40 -c | aws --endpoint-url=https://s3.eu-gb.cloud-object-storage.appdomain.cloud s3 cp - s3://ibmi-backup/SAVSECDTA.gz
8. List the backup on IBM Cloud Object Storage, as shown in Example 4-11.
Example 4-11 List the backup from IBM Cloud Object Storage
aws --endpoint-url=https://s3.eu-gb.cloud-object-storage.appdomain.cloud s3 ls s3://ibmi-backup/
Displaying sample script on a menu
|
Note: This sample code is hosted on an external site to IBM. IBM assumes no responsibility on this sample code. Code is provided as-is with no warranty and can vary over time.
|
This sample code from GitHub features a sample menu system that was written in BASH. IBM i images on IBM Power Systems Virtual Server include a preinstalled YUM package that enables this code to be run. For more information, see this GitHub web page.
Complete the following steps:
1. Sign in to your system by using an *ALLOBJ capable user profile.
2. Configure OpenSSH environment with BASH:
Example 4-12 Edit the configuration file sshd_config
EDTF ‘/QOpenSys/QIBM/UserData/SC1/OpenSSH/etc/sshd_config’
b. Add the lines that are shown in Example 4-13 to the end of the file.
Example 4-13 Add lines on sshd_config file
ibmpaseforienv PASE_USRGRP_LIMITED=N
ibmpaseforishell=/QOpenSys/pkgs/bin/bash
3. Uncomment and change the following line (optional):
from:
#UseDNS yes
to:
UseDNS no
Example 4-14 Update YUM and install tools
CALL QP2TERM
mkdir /home/$LOGNAME
TERM=aixterm
export TERM
PATH=$PATH:/QOpenSys/pkgs/bin
export PATH
yum -y update
yum -y install p7zip pigz gzip gunzip python3 python3-pip readline curl
pip3 install awscli
5. Configure awscli to communicate with IBM Cloud Object Storage by using aws configure.
6. Use your credentials from your IBM Cloud Object Storage bucket to complete the configuration.
For more information about how to create your IBM Cloud Object Storage resource, bucket, and credentials and configure AWS CLI, see 2.2.2, “Full system backup and restore by using native commands” on page 19 or this IBM Cloud Docs web page.
Example 4-15 Generate a SSH key
ssh-keygen
#Enter to all requests
cd
echo ‘export PS1="u@[e[32m]H[e[m]:w>"‘ > .bash_profile
echo ‘export TERM="aixterm"’>> .bash_profile
echo ‘export PATH=$PATH:/QOpenSys/pkgs/bin’>> .bash_profile
echo ‘export LC_CTYPE=ES_MX’>> .bash_profile
echo ‘export QIBM_MULTI_THREADED=”Y”’>> .bash_profile
echo ‘export LC_ALL=EN_US’>> .bash_profile
chmod +x .bash_profile
#Exit pression F3
8. Restart the *SSHD server, as shown in Example 4-16.
Example 4-16 Start and stop TCP/IP Server on IBM i
ENDTCPSVR *SSHD
STRTCPSVR *SSHD
9. Follow the guidelines that are included in the README.md file.
10. Download the source code to your system, as shown in Example 4-17.
Example 4-17 Git clone on QP2TERM
CALL QP2TERM
/QOpenSys/pkgs/bin/git clone https://github.com/dkesselman/IBMi_Cloud_Backup.git
11. Connect to your system by using SSH and the *ALLOBJ-capable user profile. You can use PuTTY or OpenSSH client on your system.
On PuTTY, click Window → Translation → Remote Character set → Add Use font encoding, as shown in Figure 4-27.

Figure 4-27 Character set translation on PuTTY
Example 4-18 Edit using vi
cd IBMi_Cloud_Backup
vi mnus3_const.sh
# Constants:
# IFSPATH=Temporary space for compressed files
# BUCKETDFT=The name of your bucket
# S3CMD=The command we run. The default endpoint is using US-SOUTH region. You can change this based on your Endpoint information
13. Change the execution permission to chmod +x mnus3.sh.
14. Open the Backup menu or the IBM Cloud Object Storage (COS) Backup Menu (see Figure 4-28): ./mnus3.sh.
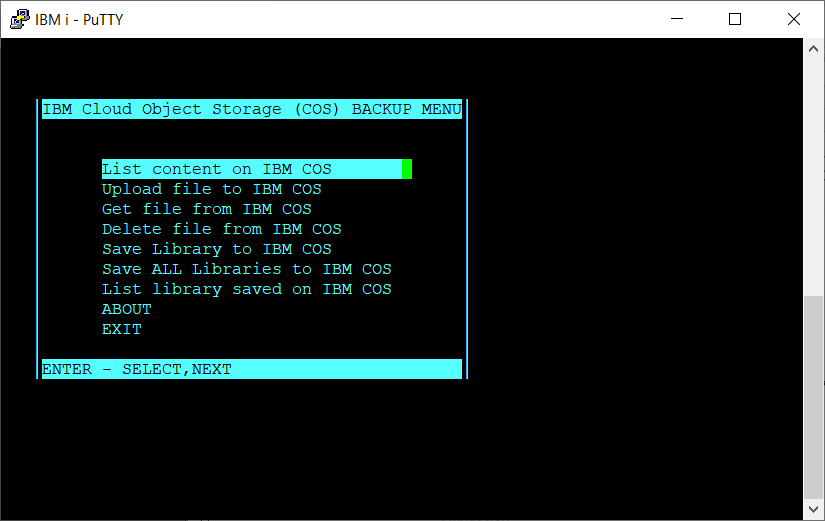
Figure 4-28 Sample tool main menu
The menu includes the following options:
– List content on IBM COS: List buckets and their is content.
– Upload file to IBM COS: Select a specific file to upload from IFS.
– Get file from IBM COS: Retrieve the file.
– Delete file from IBM COS: Delete the file from bucket.
– Save library to IBM COS: Create a Save File, and then, compress and upload the file.
– Save ALL Libraries to IBM COS: This option creates a list of user libraries and starts the backup, compression, and upload process.
– List library saved on IBM COS: An experimental option, it lists the Save File content from the output in CSV format.
|
Note: This solution is process of a backup solution. Instead, it is a sample script or menu to demonstrate IBM Power Systems Virtual Server capabilities to save on IBM Cloud. In this example, the public endpoint was used. No restore option is available. The file is available from IBM Cloud Object Storage only.
|
4.3.5 Backup by using image catalog and IBM Cloud Object Storage
The image catalog is a feature on IBM i as an image device from V5R1. From V5R3, you can save to your disk by using optical images; from V5R4, you can create Virtual Tape images.
This useful feature can be used to install PTFs, perform system upgrades, and save our data to disk, which avoids save file limitations to only one library.
Media can be saved to a Virtual Tape Image Catalog and duplicated to a physical tape, or from a Virtual Optical Image Catalog to a CD or DVD (images must be created with the correct size and format).
For more information about maximum capacities, see this IBM Support web page.
When backing up data on IBM Cloud Power Virtual Server instances, you can use both of these Image catalog types; however, consider the following environment characteristics when restoring:
•A full system restore or recover cannot be made from SAVSYS by using tape images.
•Because media is transferred to IBM Cloud Object Storage or a gateway appliance, consider the number of image files and their size when transferring and restoring data.
•Large Image files can slow the restore process when only one file must be restored.
•Small Image files can be a bad idea when many terabytes must be backed up because of image catalog limits and the number of files that is created.
•Managing multiple backup sets can be complicated. Consider the use of IBM BRMS to create backups and manage your image catalogs.
•Whenever possible, use the IBM Cloud internal network to avoid extra charges.
•The following commands can be used to manage the image catalog:
– WRKIMGCLG: Allows the user to work with a list of image catalogs.
– CRTIMGCLG: Creates an image catalog object (*IMGCLG) in library QUSRSYS and associates the image catalog with a target directory.
– CHGIMGCLG: Changes the attributes of an image catalog.
– DLTIMGCLG : Deletes an image catalog.
– ADDIMGCLGE: Creates a virtual image in the image catalog directory.
– CHGIMGCLGE : Changes the attributes of a virtual tape volume.
– RMVIMGCLGE: Removes a virtual volume from an image catalog and optionally deletes the virtual volume.
– RTVIMGCLG : Used in a CL procedure to retrieve the name of the image catalog that is loaded in a virtual device, or to retrieve the name of the virtual device where an image catalog is loaded.
– STRNETINS: Starts a network installation from the NFS server.
– LODIMGCLGE: Changes the status of a virtual tape or optical volume within an image catalog.
– LODIMGCLG: Loads an image catalog on a virtual tape or optical device to make the virtual volumes accessible by the device.
– WRKIMGCLGE: Works with the images in the specified image catalog.
– VFYIMGCLG: Used to work with the image catalogs that are on the system.
Using image catalogs
Complete the following steps:
1. Create an optical image catalog and virtual media, as shown in Example 4-19.
Example 4-19 Create image catalog and virtual media
CRTIMGCLG IMGCLG(OBACKUP) DIR('/IMGCLG/OBACKUP/') TEXT('Optical Image Catalog - OBACKUP')
ADDIMGCLGE IMGCLG(OBACKUP) FROMFILE(*new) TOFILE(OBKP01) IMGSIZ(10240) TEXT('Optical Backup Image 1 - 10GB') VOLNAM(OBKP01) NEWOWNID(IBMI01)
2. Create a virtual optical device, make it available, load it with the image catalog and initialize, as shown in Example 4-20.
Example 4-20 Create virtual optical device
CRTDEVOPT DEVD(VOPTBK) RSRCNAME(*VRT) LCLINTNETA(*N) TEXT('Virtual Optical Device for Backup')
VRYCFG CFGOBJ(VOPTBK) CFGTYPE(*DEV) STATUS(*ON)
LODIMGCLG IMGCLG(OBACKUP) DEV(VOPTBK)
INZOPT VOL(*MOUNTED) NEWVOL(OBKP01) DEV(VOPTBK) CHECK(*NO)
3. Start the use of the virtual device and backup to the new virtual media, as shown in Example 4-21.
Example 4-21 Save security data to the virtual optical device
SAVSECDTA DEV(VOPTBK)
When the virtual optical media must be transferred to IBM Cloud Object Storage, use IBM Cloud Storage Solutions for i or the same procedure, as shown in Example 4-22.
Example 4-22 Upload file with IBM Cloud Storage Solutions for i
CPYTOCLD RESOURCE(ICOS01) LOCALFILE('/IMGCLG/OBACKUP/OBKP01') CLOUDFILE(OBACKUP01)
The file is transferred to resource ICOS01.
Using Example 4-22 with the configured AWS CLI, upload the file with gzip compression and list content to verify the correct file transfer, as shown in Example 4-23.
Example 4-23 Transferring file to IBM Cloud Object Storage using PASE and AWSCLI
CALL QP2TERM
### Add environment variables ###
cd /IMGCLG/OBACKUP
TERM=aixterm
PATH=$PATH:/QOpenSys/pkgs/bin
export TERM
export PATH
### Compress and upload file ###
cat OBKP01 | pigz -9 -p40 -c | aws --endpoint-url=https://s3.eu-gb.cloud-object-storage.appdomain.cloud s3 cp - s3://ibmi-backup/OBKP01.gz
### List content on IBM COS bucket ###
aws --endpoint-url=https://s3.eu-gb.cloud-object-storage.appdomain.cloud s3 ls s3://ibmi-backup/
|
TIP: Use QSHELL and include awscli in the CLs to upload data to IBM Cloud Object Storage. Run the following command from QCMD:
SBMJOB CMD(QSH CMD('/QOpenSys/usr/bin/sh -c "cd /IMGCLG/OBACKUP ; PATH=$PATH:/QOpenSys/pkgs/bin;export PATH;cat OBKP01 | pigz -9 -p40 -c | aws --endpoint-url=https://s3.eu-gb.cloud-object-storage.appdomain.cloud s3 cp - s3://ibmi-backup/OBKP01.gz" ')) JOB(S3CP)
|
4.3.6 Sample save and restore IBM i objects to IBM Cloud Object Storage
In this section, we introduce IBM Cloud Object Storage. You also learn how to copy a save file directly from your IBM i partition to your own bucket in IBM Cloud Object Storage.
This process can be useful not just as a backup solution, but also as a simple migration strategy; especially to get started and move a few applications and many small databases to IBM PowerVS to get started with your own PoC or testing.
Therefore, it can be easy to move a save file directly from IBM i by using the IBM Cloud Storage Solutions LPP. Your bucket includes public and private endpoints that can be used whether your source partition is within the IBM Cloud, or is external.
|
Note: The use of the private endpoints requires Direct Link, which is why we use the public interface to the IBM Cloud Object Storage Bucket in this example.
|
On IBM i, and in this sample, we use the IBM Cloud (S3/COS) Connector (5733-ICC). This Copy From Cloud (CPYFRMCLD) command, and Copy to Cloud (CPYTOCLD) command are 5733-ICC CL commands that copy files between IBM Cloud Object Storage and the IFS. These IFS files can be used with image catalogs to automate the process (as does IBM BRMS).
Although Backup, Recovery, and Media Services (and IBM BRMS Network in an HA/DR scenario) is not used in this example, if you can use IBM Cloud Storage without IBM BRMS, IBM BRMS is fully integrated with IBM Cloud Storage and can be of great help in managing Terabytes of data and thousands of objects in an HA/DR plan.
The following overall process is used in our example:
1. Save data to a save file.
2. Copy that save file from IBM i to IBM Cloud Object Storage.
3. Verify the bucket contents.
4. Drop the file to the IBM Cloud Object Storage bucket.
Backing up IBM i object to IBM Cloud Object Storage
Complete the following steps:
1. Create a database to save:
RUNSQL
CALL QSYS.CREATE_SQL_SAMPLE('KMSAMPLE')
WRKLIB KMSAMPLE
2. Save that library to a save file:
CRTSAVF FILE(QGPL/KMSAMPLE)SAVLIB LIB(KMSAMPLE) DEV(*SAVF) SAVF(QGPL/KMSAMPLE)
3. Create your IBM Cloud Object Storage Resource by using the CRTS3RICC command.
Enter a Resource Name, the Access key ID, and the secret access key that was captured when you created your bucket. Press Enter and then, continue to complete other information (see Figure 4-29).

Figure 4-29 Create an IBM Cloud Object Storage resource by way of CRTS3RICC

Figure 4-30 Bucket name and resource URI
The resource is created successfully, and the following message received:
Resource COSRSC was created for resource type AWSS3.
5. From the console, run the ENDTCP command.
6. Begin over again and run:
STRTCP
STRTCPSVR *TELNET
STRTCPSVR *SSHD
|
Note: You must restart your SSH Tunnel connections.
|
7. Start the Cloud Object Storage Subsystem:
STRSBS SBSD(QICC/QICCSBS)
8. Copy the file to your IBM Cloud Object Storage:
CPYTOCLD RESOURCE(COSRSC) ASYNC(*NO) LOCALFILE('/QSYS.LIB/QGPL.LIB/KMSAMPLE.FILE') CLOUDFILE(KMSAMPLE)
The following message is displayed:
File copied.
9. Switch back to the bucket, and verify the file, as shown in Figure 4-31. Browse to Buckets and Objects.

Figure 4-31 IBM i object on IBM Cloud Object Storage
Restoring IBM i object from IBM Cloud Object Storage
In this section, we describe restoring from IBM Cloud Object Storage. Combined with 4.3.6, “Sample save and restore IBM i objects to IBM Cloud Object Storage” on page 124, you now have your first application migration strategy.
You save your applications and data into a save file, move to IBM Cloud Object Storage and then, restore from IBM Cloud Object Storage. As a prerequisite, complete the steps that are described in “Backing up IBM i object to IBM Cloud Object Storage” on page 125.
In this example, assume that a SAVLIB was performed of a business database and objects (ACMEAIR Library) to a save file ACMEAIR.FILE by using the CPYTOCLD command. Because this process is out of the scope of this example, assume that the file is in IBM Cloud Object Storage bucket.
The objective is to use an IBM Cloud Object Storage service with Reader access and credentials to restore this data to your IBM i VM that is running in IBM Power Systems Virtual Server.
|
Note: Although the graphics that are used in the figures in this section show how the service it works, you are encouraged to create your own IBM Cloud Object Storage service from the IBM Cloud Catalog, your first bucket and credentials, and get started with your first backup and restore.
|
Complete the following steps to transfer and restore a library from IBM Cloud Object Storage to the Integrated File System:
– Resource Name: The resource name that was created.
– Submit to Batch: *NO (for example, interactive; for large files, use *YES).
– Cloud File Name: The file name that is in the IBM Cloud Object Storage Bucket.
In our example, acmeair.file is the name of the save file that is in the IBM Cloud Object Storage service. It was sent to IBM Cloud Object Storage by using a CPYTOCLD command or another upload process (HTTP, S3 client, Aspera, and so on).
– Local file name: An IFS directory and file name as a destination; for example, your home directory /home/QSECOFR/acmeair.file. If the file exists, it is overwritten.

Figure 4-32 Copy IBM Cloud Storage file from cloud
Issue CPYFRMCLD RESOURCE(COSRSC) ASYNC(*NO) CLOUDFILE(acmeair.file) LOCALFILE('/QSYS.LIB/QGPL.LIB/ACMEAIR.FILE').
The following message is displayed:
File copied.
2. Restore the file by running the following command:
RSTLIB SAVLIB(ACMEAIR) DEV(*SAVF) SAVF(QGPL/ACMEAIR)
3. Display the restored content, as shown in Figure 4-33:
DSPSAVF FILE(QGPL/ACMEAIR)

Figure 4-33 Display the objects restored from IBM Cloud Object Storage
4.3.7 Transferring a save library to the cloud by using IBM BRMS
Complete the following steps to transfer a save library to the cloud by using IBM BRMS:
1. Create a cloud resource that is named IBM BRMSCLD by running one of the following commands:
– CRTFPRICC
– CRTSLRICC
|
Note: The following commands can be used to verify that the cloud resource is working correctly:
•CPYTOCLD
•CPYFRMCLD
|
2. Configure IBM BRMS objects that are required to use the cloud resource:
INZBRM OPTION(*DATA)
3. Create a virtual tape device:
CRTDEVTAP DEVD(IBM BRMSCLDTAP) RSRCNAME(*VRT)
4. Vary on the virtual tape device:
VRYCFG CFGOBJ(IBM BRMSCLDTAP) CFGTYPE(*DEV) STATUS(*ON)
5. Create an image catalog:
CRTIMGCLG IMGCLG(IBM BRMSCLDTAP) TYPE(*TAP) DIR('/tmp/IBM BRMSCLDTAP') CRTDIR(*YES)
6. Add a volume to the image catalog:
ADDIMGCLGE IMGCLG(IBM BRMSCLDTAP) FROMFILE(*NEW) TOFILE(*GEN) VOLNAM(BRMCLD)
7. Load the image catalog on the device:
LODIMGCLG IMGCLG(IBM BRMSCLDTAP) DEV(IBM BRMSCLDTAP)
8. Configure the virtual tape device in IBM BRMS:
WRKDEVBRM
Specify the following information:
– Opt field: 1= Create
– Device field: IBM BRMSCLDTAP
– Category field: *VRTTAP
9. Add a media class for the virtual tape media:
WRKCLSBRM TYPE(*MED)
Specify the following information:
– Opt field: 1=Create
– Class field: IBM BRMSCLDTAP
– Density field: *VRT256K
– Shared media field: *NO
10. Add volume BRMCLD to the IBM BRMS media inventory:
ADDMEDBRM VOL(BRMCLD) MEDCLS(IBM BRMSCLDTAP) IMGCLG(IBM BRMSCLDTAP)
11. Add a media policy for the virtual tape media:
WRKPCYBRM TYPE(*MED)
Specify the following information:
– Opt field: 1=Create
– Policy field: IBM BRMSCLDTAP
– Media class field: IBM BRMSCLDTAP
12. Create a library to save to the cloud:
CRTLIB LIB(CLDLIB)
13. Save the library to the virtual tape volume:
SAVLIBBRM LIB(CLDLIB) DEV(IBM BRMSCLDTAP) MEDPCY(IBM BRMSCLDTAP)
14. Move volume BRMCLD to the cloud location:
WRKMEDBRM VOL(BRMCLD)
Verify the following information:
– Volume is in *ACT status
– Location is *HOME
– Volume is in *ACT status
– Location is CLOUD
•Specify the following information:
– Opt field: 8=Move
– Storage location field: CLOUD
Manually restoring a library from cloud
To manually restore a library, use RSTLIBBRM command. IBM BRMS automatically “moves” the virtual media from the cloud and performs the restore. IBM BRMS then creates the image catalog and image stub to move the file or library into from the cloud.
4.3.8 Automatically transferring media to IBM Cloud Object Storage
IBM BRMS provides specific control groups that can be used to automatically save data to media in the cloud. Then, the cloud media can be used to create physical media.
The control groups create cloud media that is formatted so it can be downloaded and burned directly to physical optical media. All remaining data on the system can be backed up to media in the cloud and restored directly from the cloud without a need to create physical media.
Automatic transfers of media to IBM Cloud Object Storage are shown in Figure 4-34.

Figure 4-34 Automatic transfer of media to IBM Cloud Object Storage
Control groups that feature a QCLD prefix cause IBM BRMS to automatically create and transfer media to the cloud during a backup.
For example, a library that is named PAYROLL can be used to automatically transfer the media to the cloud and then, transfer the media back to the system by restoring the library.
Sample automatic save and transfer
The predefined cloud control groups that IBM BRMS created for the cloud resource is set up to work as defined. To simplify this example, copy one of the predefined control groups:
WRKCTLGBRM TYPE(*BKU)
Complete the following steps:
1. Specify 3=Copy next to QCLDBUSR01.
2. Specify CLOUDBKU for the New Name field.
3. Change the entries in the control group to save the library WRKCTLGBRM TYPE(*BKU).
4. Specify 2=Change entries next to CLOUDBKU.
5. Clear all entries from the control group by removing all of the numbers from the Seq column.
6. Add an entry for the CLDLIB library:
– Seq: 20
– Backup Items: CLDLIB
7. Use the default values in the remaining fields, as shown in Figure 4-35.

Figure 4-35 Using default values in remaining fields
8. Issue the control group, as shown in Figure 4-36.

Figure 4-36 Issuing the control group
As shown in Figure 4-37, the volume status is *ACT and the location point is cloud resource.

Figure 4-37 Volume status and location
4.4 Dynamic Solutions International Virtual Tape Library
This section describes the Dynamic Solutions International (DSI) Virtual Tape Library (VTL).
4.4.1 Introduction
IBM i customers require backups and many use tape or virtual tape, which requires a software-based VTL. VTL is a requirement for IBM Power Systems Virtual Server to be successful with IBM i.
Today, you can use a VTL to back up IBM i virtual machines in IBM Power Systems Virtual Server by going directly to DSI. For more information, see this Dynamic Solutions web page.
4.4.2 Overview
The DSI VTL solution is a backup and recovery hardware and software solution for IBM i systems. The solution implements a backup solution that uses DSI VTL iSCSI attached device to provide a NFS as a DR solution.
Virtualized data protection system
The Data Protection System includes the following characteristics:
•Virtualized VTL/Dedupe system
•Local or cloud VM
•All features of appliance VTLs:
– Tape emulation and deduplication
– Secure replication
– iSCSI support, which is ideal for IBM i and PowerVS backup and recovery
•Replicate to and from hardware VTL
•Archive and export direct to cloud storage
Virtualized environments
Restore can run in the following on-premises virtualized (VM) environments:
•IBM Power Systems LPAR/VM
•Red Hat Enterprise Linux 7 or 6
•VMware:
– ESXi 5.x, 6.x
– OEL 7 or 6
•Microsoft Hyper-V: OEL 7 or 6
Cloud environments
Restore can run in the following cloud virtual machines:
•IBM Power Systems Virtual Server: Red Hat Enterprise Linux 7 or 6
•Amazon Web Services (AWS): OEL 7 or 6
•Microsoft Azure: OEL 7 or 6
Figure 4-38 on page 133 shows the cloud environment for an IBM i iSCSI that uses DSI VTL.

Figure 4-38 Cloud environment by Dynamic Solutions
Building a restore VM
The following VM resources are available:
•Virtual processors
•Memory
•Storage (operating system, VTL database, VTL landing space, deduplicated storage, and deduplication index)
•Network (if iSCSI is used)
•DSI for sizing help
•DSI-provided sample OVF (expected to be modified)
|
Note: The following supported IBM i backup tools can be used with DSI VTL:
•IBM Backup, Recovery, and Media Services for i (see IBM BRMS).
•Native save/restore IBM i commands.
•Robot Save, for more information, see Robot/SAVE by HelpSystems.
•LXI/MMS, see LXI.
•DSI Tracker, further information, refer to DSI Tracker:Media Management System for IBM i.
IBM i does not support DSI VTL iSCSI attached devices as an installation device.
|
4.4.3 IBM BRMS requirements for DSI VTL iSCSI
IBM BRMS requires the licensed program products tat are listed in Table 4-3.
Table 4-3 IBM BRMS products required for DSI VTL iSCSI
|
Product
|
Option
|
Description
|
|
5770-BR1
|
BASE
|
IBM Backup, Recovery and Media Services for i.
|
|
5770-BR1
|
2
|
BRMS - Advanced Feature.
|
IBM BRMS also requires the following PTFs:
•IBM i 7.2, SI75082
•IBM i 7.3, SI75083
•IBM i 7.4, SI75084
Also, more PTFs are required to support IBM i with Dynamic Solution International Virtual Tape Library iSCSI devices. For more information, see IBM i Support for Attaching an iSCSI VTL.
|
Note: DSI VTL iSCSI configuration and support is not owned by IBM BRMS for i. IBM Lab Services implements the DSI VTL solution, but the support is provided by Dynamic Solutions.
|
Setting up IBM BRMS for DSI VTL iSCSI
Ensure that the IBM BRMS-Advanced Feature is installed before issuing INZBRM OPTION(*NFSCTLG). Also, enable the default control groups that define how objects are saved. IBM BRMS creates the following control groups:
•QNFSIPLFUL
•QNFSIPLINC
•QNFSSYSFUL
•QNFSSYSINC
|
Note: For more information about the control groups, such as QNFSIPLFUL, QNFSIPLINC, QNFSSYSFUL, and QNFSSYSINC, see this IBM IPP wiki page.
Control groups are the default for SYSBASE; however, this setting can be changed for an independent auxiliary storage pool (IASP).
|
4.4.4 Backing up IBM BRMS by using DSI VTL iSCSI
Complete the following steps to fully back up IBM BRMS by using DSI VTL iSCSI that uses the control groups:
1. Issue the IBM BRMS QNFSSYSFUL control group to save the IBM i system user data to the DSI VTL iSCSI device.
2. Run the QNFSIPLFUL control group to a virtual optical tape device on an image catalog on IBM i, and back up the IBM i system data.
3. After the backups are taken, the QNFSIPLFUL control group automatically saves virtual optical image catalog to DSI VTL iSCSI.
4. After the backup is transferred successfully from the image catalog to the DSI VTL iSCSI, remove the image catalog and its entries.
5. Run the STRRCYBRM command to generate a report in case of a DR.
Figure 4-39 shows the three first steps to back up on IBM BRMS by using DSI VTL.

Figure 4-39 Backing up by using IBM BRMS on DSI VTL iSCSI
4.4.5 Recovering IBM BRMS by using DSI VTL iSCSI
To restore data on an IBM i NFS client LPAR, an IBM i NFS server must exist at the same release or higher that the IBM i NFS client LPAR. It also must be configured with the DSI VTL iSCSI device.
Complete the following steps to recover an IBM i NFS client LPAR:
|
Note: The recovery report that is cited in the volume sequence is used for the correct image files from the DSI VTL, and is restored to the IFS on IBM i NFS Server. Refer to Figure 4-40.
|
1. Create the image catalog and configure it as an IBM i NFS installed.
2. Verify that the remote network is configured.
3. Restore the system data and QUSRBRM information by using a virtual optical network device.
4. Use the Recovery report as a guide to restore the remainder of the user data from DSI VTL iSCSI device.

Figure 4-40 Restore using IBM BRMS and NFS server to the NFS client
4.4.6 DSI VTL restore on IBM PowerVS
DSI Restore deduplicates backup and recovery virtual software. Based on DSI’s world class enterprise VTL, a restore runs on your virtual infrastructure and scales from TBs to PBs of backup data.
Licensed per TB, Restore is a fit for small businesses and global enterprises. Bandwidth efficient, encrypted data replication to a second site or cloud instance meets your compliance and DR requirements. For more information, see this website (log in required).
4.4.7 Sizing and ordering DSI VTL
For more information about sizing and ordering, see this IBM Support web page.
If you need to display a TCO Calculator -VTL, see this website (log in required).
4.5 Full-system snapshot, cloning, and restore
This section describes how to obtain a full system snapshot, clone, and restore.
4.5.1 Overview
IBM Power Systems Virtual Server introduced the capability to perform snapshots, restores, and clones of Power Virtual Server Instances (VSIs).
4.5.2 Snapshot
By using the snapshot interface, a relationship can be created between source disks and a target disks (target disks are created as part of the snapshot API) at time T1. The snapshot API tracks the delta changes that are made to the source disk beyond time T1. This feature enables the user to restore the source disks to their T1 state later.
Several use cases are available for the snapshot feature. For example, an administrator plans to upgrade the middleware on their system, but they want to revert the middleware to its original state before proceeding with an upgrade.
If the middleware fails, the source disk can be restored to its previous state by completing the following steps:
1. Start the snapshot API with the source disks where the middleware information is stored.
2. Upgrade the middleware.
3. If the upgrade fails, restore the source disks by using the snapshot that was created in the previous step.
4. If the upgrade succeeds, delete the snapshot that was created in the first step.
|
Note: Multiple snapshot operations can be conducts simultaneously. However, these concurrent snapshot operations occur on a different set of disks.
|
Best practices
Consider the following best practices:
•Before you take a snapshot, ensure that all of the data is flushed to the disk. If you take a snapshot on a running VM and did not flush the file system, you might lose some content that is in memory.
•It is recommended that all of the applications that are on the snapshot volume be quiesced.
Restrictions
Consider the following restrictions:
•Parallel VM snapshot operations from different VM nodes for the same shared volume are not allowed.
•A VM cannot be restored if a snapshot is taken and cloned (full-copy) IBM FlashCopy® operations are running in the background. The FlashCopy operations must complete first.
•Some of the attributes of source disks cannot be changed while the disks are in a snapshot relationship. For example, the source disks cannot be resized when snapshot relationships are in place for those disks.
•Volumes that are in a snapshot relationship cannot be detached from the VM.
4.5.3 Cloning a volume
The clone operation creates a full copy of the volume. You can select multiple volumes and start a group clone operation. When multiple volumes are selected, the clone operation ensures that a consistent data copy is created.
The clone operation continues to copy data from the source disks to target disks in the background. Depending on the size of the source disks and the amount of data to be copied, the clone operation can take a significant amount of time.
You cannot modify the source or target disk attributes, such as disk size, while the clone operation is in progress.
Best practice
Quiesce all of the applications on the volume that you want to clone.
Restriction and consideration
When the clone operation is performed on a volume that is in-use, the Power Systems Virtual Server service creates a consistent group snapshot and re-creates the copy of the cloned volume by using the group snapshot.
4.5.4 Restore a snapshot
The restore operation restores all of the volumes that are part of a VM snapshot back to the source disks. Although it restores the VM, the Power Systems Virtual Server service creates a backup snapshot, which can be used if the restore operation fails.
If the restore operation succeeds, the backup snapshots are deleted. If the restore operation fails, pass in the restore_fail_action query parameter with a value of retry to attempt the restore operation again.
To roll back a previous disk state, pass in the restore_fail_action query parameter with a value of rollback. When the restore operation fails, the VM enters an Error state.
Best practice
During the restore operation, it is critical that your source disks be quiesced. Your source disks cannot be in use.
Considerations
Consider the following points:
•If the restore operation fails, contact your storage support administrator. A failed restore operation can leave behind incomplete states, which might require a cleanup initiative from an IBM operations team.
•If you choose to restore a shared volume on one VM, you cannot perform the snapshot, restore, clone, or capture operations on the other VMs that use the shared volume (while the restore operation is running).
4.5.5 IBM PowerVS API use
|
Important: The following samples are as-is and no support is provided.
|
Example 4-24 shows how to use Cloud API. The example focuses on use of VM shutdown and such operations. This sample can be modified to perform any snapshot or restore such operations.
Example 4-24 Sample how to use an API from PowerVS
#!/bin/bash
### START OF VARIABLES
API_KEY="ENTER YOUR API KEY HERE"
CLOUD_CRN="ENTER YOUR CLOUD CRN"
INSTANCE_NAME="ENTER YOUR INSTANCE NAME"
## Acceptable values are stop, start ,hard-reboot, soft-reboot
OPERATION="stop"
################
IFS=":" read -ra ADDR <<< "${CLOUD_CRN}"
CLOUD_INSTANCE_ID=${ADDR[7]}
CLOUD_URL=(${ADDR[5]}.power-iaas.cloud.ibm.com)
## FIRST WE GET THE TOKEN FROM THE CLOUD IAM SERVICE USING THE API KEY
GET_TOKEN=$(curl -X POST -H "Content-Type: application/x-www-form-urlencoded" -H "Accept: application/json" -d "grant_type=urn%3Aibm%3Aparams%3Aoauth%3Agrant-type%3Aapikey&apikey=$API_KEY" https://iam.bluemix.net/oidc/token | jq -r '.access_token')
## THIS IS THE POST CALL TO INVOKE the OPERATION
curl -X POST https://$CLOUD_URL/pcloud/v1/cloud-instances/$CLOUD_INSTANCE_ID/pvm-instances/$INSTANCENAME/action -H "CRN: $CLOUD_CRN " -H "Authorization: Bearer $GET_TOKEN" -H 'Content-Type:application/json' -d '{ "action":"'$OPERATION'" }'
sleep 30
## THIS IS A GET CALL
curl -X GET https://$CLOUD_URL/pcloud/v1/cloud-instances/$CLOUD_INSTANCE_ID/pvm-instances/$INSTANCE_NAME -H "CRN: $CLOUD_CRN " -H "Authorization: Bearer $GET_TOKEN" -H 'Content-Type:application/json'
Sample of volume snapshot, restore, and clone operations
In this section, we provide samples of snapshot, restore, and cloning operations.
Preconditions
The body of the Snapshot, Restore and Clone (PVM and Volume) API can be modified by using user-defined values.
Before running the Restore API, the PVM instance must be shut off.
Creating a snapshot
An example of creating a snapshot is shown in Example 4-25.
Example 4-25 Creating a snapshot
curl -X POST https://< Cloud IP >/pcloud/v1/cloud-instances/<Cloud Instance ID>/pvm-instances/<PVM Instance ID>/snapshots
-H "authorization: <AuthToken>"
-H "content-type: application/json"
-H "crn: <CRN>"
-d "{"name": "VM1-SS","description": "Snapshotfor VM1","volumeIDs": ["VM1-7397dc00-0000035b-boot-0","vm1dv1"]}"
The expect response is shown in Example 4-26.
Example 4-26 Response after snapshot
{"snapshotID":"65ea39fd-cab6-46b3-b88c-3c28479ab019"}
Obtaining snapshot details
Figure 4-27 shows how to obtain th details of a snapshot.
Example 4-27 Obtaining snapshot details
curl -X GET https://< Cloud IP >/pcloud/v1/cloud-instances/<Cloud Instance ID>/snapshots/<Snapshot ID>
-H "authorization: <AuthToken>"
-H "content-type: application/json"
-H "crn: <CRN>"
The expected response is shown in Example 4-28.
Example 4-28 Response of snapshot details
{
"action": "snapshot",
"creationDate": "2020-04-13T08:51:21.000Z",
"description": "Snapshotfor VM1",
"lastUpdateDate": "2020-04-13T08:51:54.000Z",
"name": "VM1-SS",
"percentComplete": 100,
"pvmInstanceID": "7397dc00-f328-4bfb-bef2-27200ca42cb9",
"snapshotID": "65ea39fd-cab6-46b3-b88c-3c28479ab019",
"status": "available",
"volumeSnapshots": {
"398344bb-a64d-4fd5-b3cd-14ddfea6dd0e": "72f07383-ca5b-46a0-94a2-3d1e7a7faceb",
"7a7a5b6e-1177-400a-82a4-0784957bbe75": "33f91096-f204-4ed2-8110-c497a258c29c"
}
}
Restoring to snapshot
Example 4-29 shows a n example of restoring to snapshot.
Example 4-29 Restoring to snapshot
curl -X POST "https://< Cloud IP >/pcloud/v1/cloud-instances/<Cloud Instance ID>/pvm-instances/<PVM Instance ID>/snapshots/<Snapshot ID>/restore?restore_fail_action="
-H "authorization: <AuthToken>"
-H "content-type: application/json"
-H "crn: <CRN>"
-d "{"forceRestore":"false"}"
The expected response is shown in Example 4-30.
Example 4-30 Expected response to restoring the snapshot
{
"action": "restore",
"creationDate": "2020-04-13T08:51:21.000Z",
"description": "Snapshotfor VM1",
"lastUpdateDate": "2020-04-13T08:55:28.000Z",
"name": "VM1-SS",
"pvmInstanceID": "7397dc00-f328-4bfb-bef2-27200ca42cb9",
"snapshotID": "65ea39fd-cab6-46b3-b88c-3c28479ab019",
"status": "available",
"volumeSnapshots": {
"398344bb-a64d-4fd5-b3cd-14ddfea6dd0e": "72f07383-ca5b-46a0-94a2-3d1e7a7faceb",
"7a7a5b6e-1177-400a-82a4-0784957bbe75": "33f91096-f204-4ed2-8110-c497a258c29c"
}
}
Creating a volume clone
Example 4-31 shows how to create a volume clone.
Example 4-31 Creating a volume clone
curl -X POST
https://<Cloud IP>/pcloud/v1/cloud-instances/<Cloud Instance ID>/volumes/clone
-H 'authorization: <Auth Token>'
-H 'content-type: application/json'
-H 'crn: <CRN>'
-d '{
"displayName": "PerfClone",
"volumeIDs": ["VMT-1422dbc9-00000063-boot-0", "vmtdv1"]
}'
The expected response is shown in Example 4-32.
Example 4-32 Sample after creation of volume clone
{
"clonedVolumes": {
"6342e6a9-716d-4686-b644-7f089bceb332": "fd99a7ae-3e15-4f7e-af79-f5637e9a27f8",
"8461389f-e8fb-403f-8f48-81edcc9ef46f": "16ed7611-26cc-4b93-945d-760cd6a52c58"
}
}
4.5.6 Use cases
This section provides some use cases.
Snapshot and restore use case
This section describes the snapshot and restore use case, which is shown in Figure 4-41:
•Capture the LUN’s state before an upgrade; for example, upgrade of IBM i release:
– A successful upgrade results in the snapshot relation being deleted.
– A failed upgrade results in a rollback to the pre-upgrade state.

Figure 4-41 Use case - Snapshot and restore
Clone use case
A clone use case scenario is shown in Figure 4-42:
•A production environment or running environment are created and attached to a test environment to check production data and analyze data copy.
•Save the clone to IBM Cloud Object Storage. Use IBM Cloud Object Storage to regularly save as a DR strategy.

Figure 4-42 Use case - cloning
|
Important: For more information about taking snapshots, see Chapter 7, “Reference architectural decisions to migrate IBM i on-premises to IBM Power Systems Virtual Server” on page 243.
|
..................Content has been hidden....................
You can't read the all page of ebook, please click here login for view all page.