


Application onboarding
In this chapter, we show how CICS Interdependency Analyzer (IA) can assist in identifying application entry points and application dependencies to enable you to cloud-enable your CICS applications.
This chapter should be read and used with IBM Redbooks publication Cloud Enabling IBM CICS, SG24-8114. See section “Help from IBM” on page 240.
We show how CICS IA can assist in the following approaches:
In this publication, we will not create and deploy platforms and applications. That is covered in the “Cloud Enabling CICS” Redbooks publication.
|
Note: The new Application Entry points and Dependency wizards used in the creation of this book were still in BETA development. They might not exactly look the same as the ones in the final product.
|
Before that, we give a brief overview of the CICS cloud capabilities. The following extract is copied from the “Cloud Enabling IBM CICS” Redbooks publication mentioned above.
6.1 CICS cloud capabilities
Cloud computing, although a relatively new concept, offers many values that existing CICS Transaction Server (TS) users claim they already enjoy, so why introduce new cloud style concepts into CICS TS today?
Well, cloud is more than just a technology. Cloud offers a conceptual shift in how a business delivers services. It promises increased operational efficiency over the management and operation of these services, and increased agility when developing and deploying them. By introducing cloud capabilities, CICS TS allows both new and existing customers to gain the benefits offered by cloud computing, while maintaining the solid foundation CICS TS offers.
Specifically, CICS TS provides the following cloud capabilities and benefits.
Platforms as first-class entities
First-class platforms enable the creation of agile service delivery runtimes. CICS TS regions can be grouped as platforms for rapid application deployments, decoupling applications from the underlying topology, which increases flexibility. When regions within a platform are started, applications are deployed to them, without any further interaction from a system administrator. In turn, reliability is increased through automatic resource validation, provisioning, and de-provisioning. Platforms can be managed dynamically by applying policies during runtime.
Applications as first-class entities
First-class applications enable the creation of agile services from new or existing assets. Disparate application resources can be combined and managed as a single entity that can be versioned and rapidly moved through the development, test, and production lifecycle. Using applications improves dependency management, and entire applications can be measured for resource usage and internal billing. Applications can be managed dynamically by applying policies during runtime.
Policy-based operations
Automated control over critical system resources can now be managed by using policies. Task thresholds can now be set for data access requests, storage usage, program loops, and processor time used. Policy breaches can be managed by issuing messages, abending tasks, or emitting events that can trigger further actions. Policies can be applied dynamically during runtime operation.
These three capabilities, when combined with the existing features of CICS Transaction Server, provide the building blocks to enable you to transform your existing CICS TS topologies and applications into cloud-style platforms and services.
6.2 Identifying entry points and dependencies: One-phase approach
In this section, we use a technique to capture dummy operational data for a CICS transaction. We then use the CICS IA plug-in wizards to identify both the entry points and dependencies for this operation. The wizards will also be used to create a CICS Bundle that can then be included when you define your CICS Application. Creating a CICS Application is covered in chapter 4, “Create CICS Application” of the “Cloud Enabling IBM CICS” Redbooks publication.
In this section, we perform the following steps:
•Assign an operation value to the initial program for transaction SSC1
•Collect CICS IA Application data for transaction SSC1
•Identify and create an entry point CICS Bundle
•Identify and create a dependency Bundle
6.2.1 Assign an operation value to the initial program for transaction
SSC1
SSC1
In CICS TS V5 onwards, you can edit a program entry and assign an operation value to the Operation field associated with it. You can perform this task by using the CEMT transaction, the CICS Explorer resource editor, or from within the CICS IA plug-in perspective. We do it from the CICS IA plug-in.
|
Restriction: At the time of publication, the ability to use CICS IA to capture data that is based on an assigned operation value is only possible in CICS TS V5.1. Work is in progress to make this capability available in later releases.
|
First, we need to identify the initial program for transaction SSC1. Right-click the transaction and select Uses Resources → Specific Region as shown in Figure 6-1.

Figure 6-1 Uses resources for SSC1
We select region IYDZZ528. This action opens the Uses view as shown in Figure 6-2. For more information about the Uses view, refer to 3.1.2, “The Uses view” on page 67.

Figure 6-2 Uses view
By fully expanding the expanding “Program entry” in the “Resources used” window, you can see that the initial program for SSC1 is LGTESTC1.
We can now open the Explorer editor for this program and set an operational value. Right-click the program and select Open CICS SM Editor as shown in Figure 6-3.
|
Note: For the editor to open, you must have an active CMCI connection to your CPSM environment and the program must be active.
|

Figure 6-3 Open CICS SM Editor
Then, select which region to use as shown in Figure 6-4 on page 147.

Figure 6-4 Select region IYDZZ528
The editor window for the program is now open as shown in Figure 6-5.

Figure 6-5 Program editor for LGTESTC1
You can now enter a value for the operation field as shown Figure 6-6. Enter CTRL+S or select FILE → SAVE to save the change.

Figure 6-6 Enter an operation value
We now collect CICS IA Application data for transaction SSC1.
6.2.2 Collect CICS IA Application data for transaction SSC1
Before starting the CICS IA dependency collector, ensure that you are collecting application data. To set this option as the DEFAULT, you need to use the CINT transaction. Select option 2 for Configure Region Options then select option 4 for Options against the DEFAULT entry shown in Figure 6-7.
|
CIU200 CICS Interdependency Analyzer for z/OS - V5R3M0 2015/10/19
Region Configuration Menu 09:45:51AM
Type action code then press ENTER. More :
1=Add Region 2=Copy Region 3=Delete Region 4=Options
CICS CICS New New
Act Applid Sysid Applid Sysid Status Collecting
4 DEFAULTS DFTS
ALL ALL
IYDZZ518 Z518 STOPPED
IYDZZ528 Z528 STOPPED
IYDZZ538 Z538 STOPPED
CICS Sysid: Z528 CICS Applid: IYDZZ528 TermID: TC30
F1=Help F2= F3=Exit F4= F5= Refresh F6=
F7=Page Up F8=Page Down F9= F10= F11= F12=
|
Figure 6-7 Default options
Select 8 for Application Data as shown in Figure 6-8.
|
CIU290 CICS Interdependency Analyzer for z/OS - V5R3M0 2015/10/19
Resource Options for 09:47:30AM
CICS Sysid: DFTS CICS Applid: DEFAULTS
Type action code then press ENTER: 8
1 = General Options
2 = Time/Date Options
Interdependency Options Affinity Options
3 = CICS Options for APIs 7 = Affinity Options
4 = CICS Options for SPIs
5 = DB2/IMS/MQ/CPSM Options CICS TS Applications
6 = Natural Options 8 = Application Data
CICS Sysid: Z528 CICS Applid: IYDZZ528 TermID: TC30
F1=Help F2= F3=Exit F4= F5= F6=
F7= F8= F9= F10= F11= F12=Exit
|
Figure 6-8 Select Application Data
Enable the collection of Application Data by entering a Y as shown in Figure 6-9.
|
CIU210 CICS Interdependency Analyzer for z/OS - V5R3M0 2015/10/19
Application Data Collection Options 09:49:16AM
Type Collection Option then press ENTER :
Enable collection of Application Data: Y
Selected Application:
ALL.
CICS Sysid: Z528 CICS Applid: IYDZZ528 TermID: TC30
F1=Help F2= F3=Save&Exit F4= F5= Refresh F6=
F7= F8= F9= F10= F11= F12=Cancel
|
Figure 6-9 Enable collection of Application Data
You also need to collect DETAILED information for transactions. Use the CINT transaction to check this value. Select option 3 for CICS Options for APIs from the panel shown in Figure 6-8 on page 149 and check the API values as shown in Figure 6-10.
|
CIU240 CICS Interdependency Analyzer for z/OS - V5R3M0 2015/10/19
CICS Resources Options for 09:53:02AM
CICS Sysid : DFTS CICS Applid : DEFAULTS
Modify the options and press Enter to update, or PF12 to Cancel.
Detect command types: Y=Yes, N=No
D=Yes+Detail ( Only for API types marked with * )
APIs
*Programs . . . D *Files. . . . . D *Transactions . D Task Control . Y
Presentation . Y *TS Queues . . D *TD Queues . . D Journals . . . Y
DTP . . . . . Y Counters . . . Y FEPI . . . . . Y *WEB Services . D
*Exits . . . . D Others . . . . Y *EVENTS . . . . D ATOMServices . Y
XMLtransform . Y WSAddressing . Y
CICS Sysid: Z528 CICS Applid: IYDZZ528 TermID: TC30
F1= F2= F3=Exit F4= F5= F6=
F7= F8= F9= F10= F11= F12=Cancel
|
Figure 6-10 Collect Detail values
You can also use the IA plug-in to enable application data collection for individual regions by editing collector options against the required region in the IA Operations view as shown in Figure 6-11.

Figure 6-11 Edit collector options
We can now start the collector, run the SSC1 transaction, stop the collector, and then load the dependency data using sample job CIUUPDB with a collection ID of APPLTEST. For more information about setting the collection ID, see 2.3, “Using the collection ID to manage your data” on page 44.
We can now use the CICS IA plug-in to identify application entry points and dependencies.
6.2.3 Identify and create an entry point CICS Bundle
CICS Platform and Application data captured by CICS IA can be viewed by using the Cloud Explorer folder in the IA Navigation view. The data collected for a dummy application collection is saved under a reserved application name of TEST_OPERATIONS(0.0.0) as shown in Figure 6-12 on page 152.
You can see that we now have an entry for the dummy operation RunSSC1Test. The name of the operation is the value that we set in the operation field from the initial program LGTESTC1.

Figure 6-12 Cloud Explorer folder
There are a number of options available to you via right-click against the TEST_OPERATIONS application or against the operation RunSSC1Test as shown in Figure 6-13.

Figure 6-13 Options available for operations
We use the Application Entry points by Operation option to drive the Entry Point wizard as shown in Figure 6-14.

Figure 6-14 New Entry Point wizard
This wizard lists all the available entry points that you can define at CICS TS V5.3 level. We list the following entry points:
•Transactions
•Initial programs associated with a transaction
•URIMAPs associated with a CICS Webservice
The wizard allows you select at which level of CICS you are going to deploy your application as shown in Figure 6-15.

Figure 6-15 Select CICS level
The level of CICS that you select controls which entry point types you can select and create:
•V5.1: Program entry points
•V5.2: Program and URIMAP entry points
•V5.3: Transaction, program, and URIMAP entry points
We are running at CICS V5.3 so we select V5.3 and create a transaction entry point as shown in Figure 6-16.

Figure 6-16 Select a transaction entry point
The wizard creates a default name for the entry point operation based on the resource name and type. In Figure 6-16, you can see that for the transaction entry point this default is set to SSC1_OPER. The wizard allows you to edit this value. We change it to Genapp_EP1 as shown in Figure 6-17.

Figure 6-17 Edit the Operation name
We are ready to create or update a CICS Bundle project. To create a new CICS Bundle project, select the New project option as shown in Figure 6-18.

Figure 6-18 Create new project
This action drives the CICS Explorer wizard to create a CICS Bundle project. Enter a meaningful name as shown in Figure 6-19.

Figure 6-19 CICS Bundle project
Click Finish to create the project and open the editor as shown in Figure 6-20.

Figure 6-20 Bundle project editor
Click Finish in the New Entry Points window shown in Figure 6-14 on page 153 to add the transaction as an entry point to the project as shown in Figure 6-21.

Figure 6-21 Transaction SSC1 entry point
You have now created a CICS Bundle containing our entry point. This bundle can be included when creating your CICS Application Bundle as shown in Figure 6-22.

Figure 6-22 Creating an application project
6.2.4 Identify and create a dependency CICS Bundle
Right-click your test operation and select the Application dependencies by Operation option, as shown in Figure 6-23 on page 158.

Figure 6-23 Application dependencies by Operation selection
This action drives the New Dependency wizard as shown in Figure 6-24.

Figure 6-24 New Dependency wizard
This wizard lists all possible dependencies that we have collected data for and that can be defined as a dependency in a CICS Bundle project.
We report the following CICS dependencies:
•TRANSID
•PROGRAM
•FILE
•MAPSET
•ATOMSERVICE
•DOCTEMPLATE
•TDQUEUE
•JVMSERVER
•LIBRARY
•TSMODEL
•ENQMODEL
•JOURNALMODEL
•PARTITIONSET
•PIPELINE
•PROCESSTYPE
•TCPIPSERVICE
•URIMAP
•EVENTBINDING
•EPADAPTER
•EPADAPTERSET
•WEBSERVICE
•XMLTRANSFORM
|
Note: The CICS IA does not collect information about many of these resource types unless they are used in an SPI command such as INQUIRE TSMODEL.
|
We also report if there is a dependency on a DB2 connection and an IBM MQ connection. For the DB2 connection, we report the DB2 subsystem ID but not the DB2 connection definition name. For IBM MQ, we report that the application or operation has used IBM MQ resources.
In our example, we add the MAPSET and PROGRAM as a dependency as shown in Figure 6-24 on page 158. To create a new CICS Bundle project, select the New project option as shown in Figure 6-25.

Figure 6-25 New project options
This action drives the CICS Project wizard. Enter a meaningful name as shown in Figure 6-26.

Figure 6-26 CICS Bundle project
Click Finish to create the project.
Click Finish in the New Dependency window as shown in Figure 6-24 on page 158 to add the dependencies to the project as shown in Figure 6-27.

Figure 6-27 Dependency bundle
We have now created a CICS Bundle containing our dependencies. Again, this bundle can be included when creating your CICS Application Bundle as shown Figure 6-28.

Figure 6-28 CICS Application: CICS Bundle selection
6.3 Identifying entry points and dependencies: Two-phase approach
In this section, we use existing CICS IA data to first identify entry points and create a CICS Bundle project to contain these entry points. The CICS Bundles can then be used to create an application. The application can then be deployed in to a platform. We can then collect and load CICS IA Application data. We can then use this data to identify the application dependencies.
We perform the following steps:
•Identify entry points by resource used
•Identify entry points by using the same resource type
•Identify dependency for an application
6.3.1 Identify entry points by resource used
The CICS IA plug-in provides a wizard to identify entry points by a specific resource used. You select to group at the transaction level, the program level, or a Webservice level.
For the program and transaction grouping, we return the following data:
•The transactions using the resource
•The initial program for the transaction using the resource
•The actual programs using the resource (BACK_PROG)
For Webservices grouping, we return the following data:
•The Webservices using the resource
•The programs associated with the Webservices using the resource
•The URIMAPs associated with the Webservices using the resource
•The actual programs using the resource (BACK_PROG)
In our example, we identify entry points grouped by transaction that use the FILE resource KSDSPOLY.
Right-click the resource and select as shown in Figure 6-29. This option can be driven against any resource type in any view in the CICS IA plug-in.

Figure 6-29 Application entry points by resource used
We select region IYDZZ528. The New Entry Point wizard is driven as shown in Figure 6-30 on page 163.

Figure 6-30 New entry points
To choose your grouping, use the Call type option as shown in Figure 6-31.

Figure 6-31 Select Call type
We select the Transaction call type. The wizard is now populated with possible entry points as shown in Figure 6-32 on page 164.
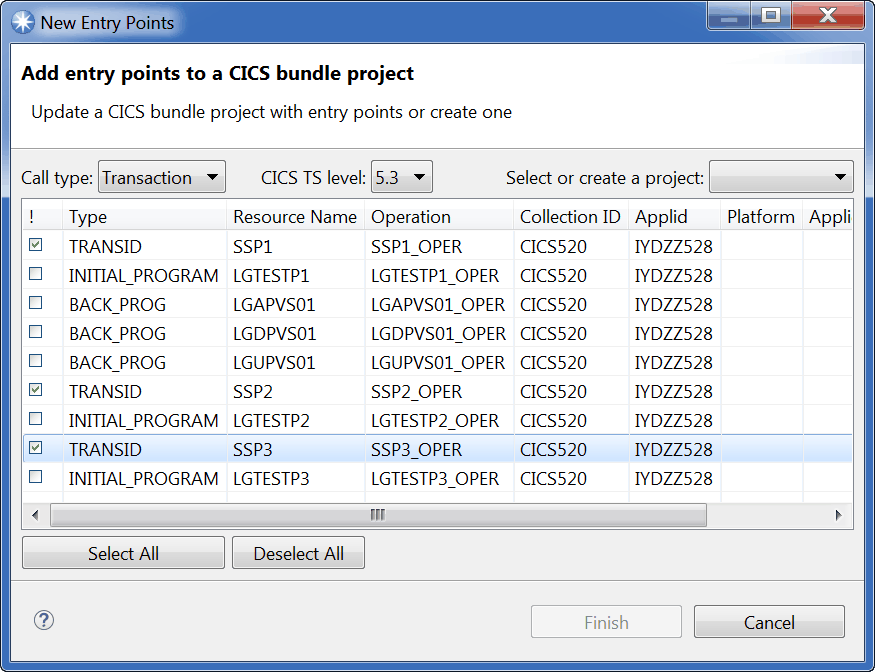
Figure 6-32 New entry points by transaction
The wizard allows you to select your CICS release as shown in Figure 6-15 on page 153.
The level of CICS that you select controls which entry point types you can select and create:
•V5.1: Program entry points
•V5.2: Program and URIMAP entry points
•V5.3: Transaction, program, and URIMAP entry points
We create transaction entry points at CICS V5.3 and we use the default operation names generated by CICS IA, as shown in Figure 6-32.
To create a new CICS Bundle project, select the New project option as shown in Figure 6-33.

Figure 6-33 Create a new project
This action drives the CICS Explorer CICS Bundle Project wizard as shown in Figure 6-34.

Figure 6-34 CICS Bundle Project wizard
Enter a meaningful name and click Finish to open the CICS Bundle editor as shown in Figure 6-35 on page 166.

Figure 6-35 CICS Bundle editor
Click Finish in the New Entry Point wizard as shown in Figure 6-32 on page 164 and the entry points are added to your project as shown in Figure 6-36.

Figure 6-36 CICS Bundle entry points
6.3.2 Identify entry points that use the same resource type
In this section, we identify entry points for a transaction, program, or Webservices that use the same resource type.
For the program and transaction, we return the following data:
•The transactions using the resource
•The initial program for the transaction using the resource
•The actual programs using the resource (BACK_PROG)
For Webservices, we return the following data:
•The Webservices using the resource
•The programs associated with the Webservices using the resource
•The URIMAPs associated with the Webservices using the resource
•The actual programs using the resource (BACK_PROG)
In our example, we start with transaction SSC1 and identify entry points for all other transactions that use a resource type of MAPSET.
Right-click transaction SSC1 and select Application Entry points by transaction resource usage as shown Figure 6-37.

Figure 6-37 Application entry points by resource usage
We select region IYDZZ528. The New Entry Point wizard is driven as shown in Figure 6-38 on page 168.

Figure 6-38 New Entry Point wizard
To select the MAPSET as the resource type, select the Resource types options as shown in Figure 6-39.

Figure 6-39 Select MAPSET
The wizard is now populated by the transactions and initial programs that use a resource type of MAPSET. In this example, we create PROGRAM entry points as we are on CICS TS V5.2 where TRANSACTON entry points are not available.
We selected all programs as shown in Figure 6-40.

Figure 6-40 Select PROGRAM entry points
We can now create a new project by following similar steps to what we did in 6.3.1, “Identify entry points by resource used” on page 161.
Figure 6-41 shows the CICS Bundle project that we created containing program entry points.

Figure 6-41 Program entry points
6.3.3 Identify dependencies by application
After we created and deployed applications using the CICS entry point Bundles created in the previous steps, we can collect and load CICS IA Application data as described in 6.2.2, “Collect CICS IA Application data for transaction SSC1” on page 148.
Then, we can proceed to the second phase and identify the resource dependencies for the application. In this example, we use the GENAPP_APPL shipped as IVP data with CICS IA.
Right-click the application and select Application dependencies by Application as shown in Figure 6-42.

Figure 6-42 Application dependencies by application
This action drives the New Dependency wizard as shown in Figure 6-43.
Details about how this wizard works are described in 6.2.4, “Identify and create a dependency CICS Bundle” on page 157.

Figure 6-43 Add dependencies to CICS Bundle
The DB2 entry returns the DB2 subsystem ID and not the actual DB2 resource definition name. To get the definition name, use the CICS Explorer and look for the active DB2 connections as shown in Figure 6-44.

Figure 6-44 DB2 Connections view in the CICS Explorer
In this example, we create a CICS Bundle for a DB2 connection dependency. In the wizard, clear all the resources, select only the DB2 entry, and select New project as shown in Figure 6-45.

Figure 6-45 New CICS Bundle project for DB2 dependency
This drives the CICS Bundle Project wizard. Enter a meaningful name and click Finish as shown in Figure 6-46.

Figure 6-46 CICS Bundle project for DB2 dependency
Click Finish in the New Dependency wizard shown in Figure 6-45 on page 172 and the CICS Bundle project editor contains your DB2 dependency as shown in Figure 6-47.

Figure 6-47 CICS Bundle project editor for GENAPP_DB2_Dependency
This CICS Bundle can now be included in a CICS Application Bundle. Alternatively, it could be added to the CICS Application Binding Bundle or the CICS Platform Bundle as a dependency.
6.4 View application data
In this section, we look at two ways of viewing resources used by an application. We use the data collected for the GENAPP_APPL application that is shipped as IVP data with the CICS IA product.
CICS IA platform and application data collected by CICS IA are displayed in the Cloud Explorer folder in the IA Navigation view as shown in Figure 6-48.
There are a number of options available to you, including:
•Show all resources
•Visualization
We look at these two in more detail.

Figure 6-48 Cloud Explorer folder in the IA Navigation view
6.4.1 Show all resources for an application
Right-click the GENAPP_APPL and select Show All Resources as shown in Figure 6-48. This opens the Show Resources view as shown in Figure 6-49 on page 175.

Figure 6-49 Resources used by application
6.4.2 Visualization for an application
Right-click the GENAPP_APPL and select Visualization → Selected Application as shown in Figure 6-50.

Figure 6-50 Application visualization
This opens the Resource Application view as shown in Figure 6-51.

Figure 6-51 GENAPP_APPLICATION
Use the “+” icon to expand the view as shown in Figure 6-52.

Figure 6-52 Expanded view
You can further expand the view for transaction SSC1 by using the “+” icon as shown in Figure 6-53.

Figure 6-53 Expand transaction SSC1 to show the programs
To show the resource and connections used by transaction SSC1, right-click the transactions and select Show Connections as shown in Figure 6-54.

Figure 6-54 Show connections
This action opens the Connections view as shown in Figure 6-55.

Figure 6-55 Connections view for transaction SSC1
If you hover the mouse over the connection, it shows you the command, in this case a program LINK.
You can add other resource types by switching on the filter option as shown in Figure 6-56.

Figure 6-56 Show Filters option
You can then select which resources to display. In the example shown in Figure 6-57, we selected to filter on DB2 resources.

Figure 6-57 Filter on DB2 resources
You can change the orientation of the Connections view from horizontal to vertical and vice versa by using the Orientation icon as shown in Figure 6-58.

Figure 6-58 Orientation icon
..................Content has been hidden....................
You can't read the all page of ebook, please click here login for view all page.