We don’t need no plug-in. After all, video is now a first-class member of the HTML family—just throw a <video> element in your page and you’ve got instant video, even across most devices. But video is far more than just an element, it’s also a JavaScript API that allows us to control playback, create our own custom video interfaces and integrate video with the rest of HTML in totally new ways. Speaking of integration... remember there’s that video and canvas connection we’ve been talking about—you’re going to see that putting video and canvas together gives us a powerful new way to process video in real time. In this chapter we’re going to start by getting video up and running in a page and then we’ll put the JavaScript API through its paces. Come on, you’re going to be amazed what you can do with a little markup, JavaScript and video & canvas.
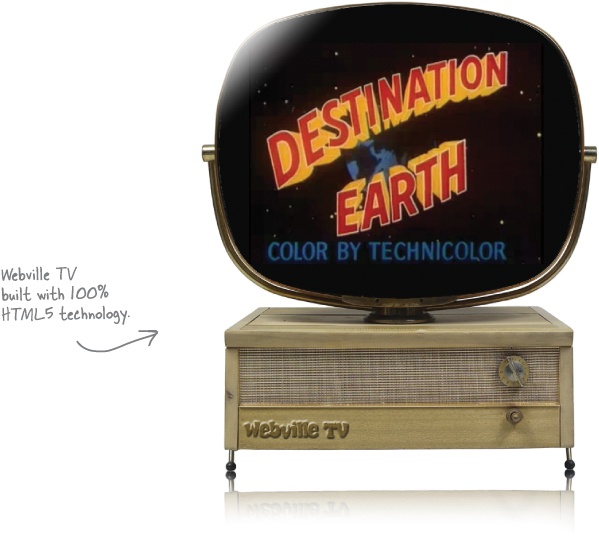
Webville TV—all the content you’ve been waiting for, like Destination Earth, The Attack of the 50’ Woman, The Thing, The Blob, and it wouldn’t be beyond us to throw in a few ‘50s educational films. What else would you expect in Webville? But that’s just the content, on the technology side would you expect anything less than HTML5 video?
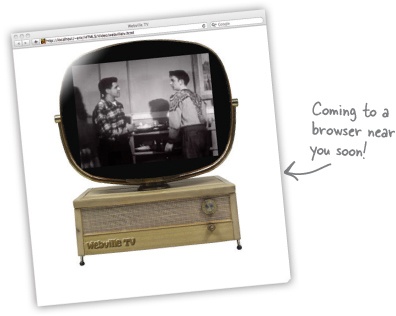
Of course, that’s just the vision, we have to build Webville TV if we want it to be a reality. Over the next few pages we’re going to build Webville TV from the ground up using HTML5 markup, the video element and a little JavaScript here and there.
Hey this is Chapter 8, no lollygagging around! Let’s jump right in and create some HTML:
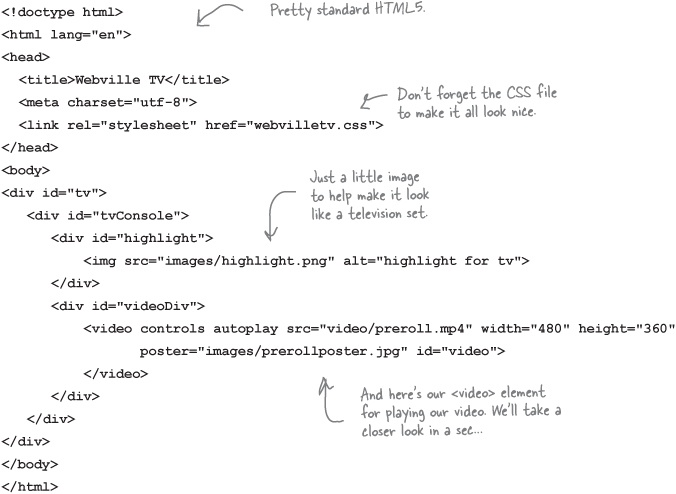
You need to make sure of a few things here: first, make sure you’ve got the code above typed into a file named webvilletv.html; second, make sure you’ve downloaded the CSS file, and finally, make sure you’ve also downloaded the video files and placed them in a directory named video. After all that, load the page and sit back and watch.
Note
Download everything from http://wickedlysmart.com/hfhtml5
Yes, it’s probably the video format.
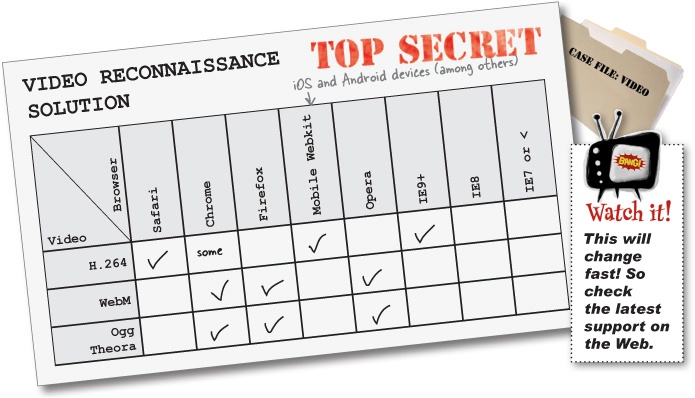
While the browser makers have agreed on what the <video> element and API look like in HTML5, not everyone can agree on the actual format of the video files themselves. For instance if you are on Safari, H.264 format is favored, if you’re on Chrome, WebM is favored, and so on.
In the code we just wrote, we’re assuming H.264 as a format, which works in Safari, Mobile Safari and IE9+. If you’re using another browser then look in your video directory and you’ll see three different types of video, with three different file extensions: “.mp4”, “.ogv”, and “.webm” (we’ll talk more about what these mean in a bit).
Note
By the time you read this, these formats could be more widely supported across all browsers. So if your video’s working, great. Always check the Web to see the latest on this unfolding topic. And we’ll come back for more on this topic shortly.
For Safari you should already be using .mp4 (which contains H.264).
For Google Chrome, use the .webm format by replacing your src attribute with:
src="video/preroll.webm"If you’re using Firefox or Opera, then replace your src attribute with:
src="video/preroll.ogv"And if you’re using IE8 or earlier, you’re out of luck—wait a sec, this is Chapter 8! How could you still be using IE8 or earlier? Upgrade! But if you need to know how to supply fallback content for your IE8 users, hang on, we’re getting to that.
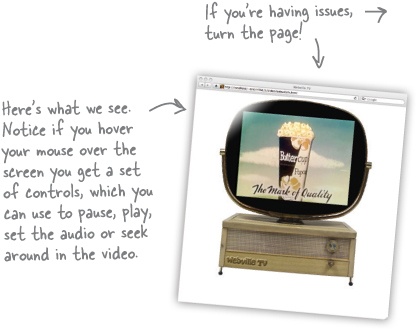
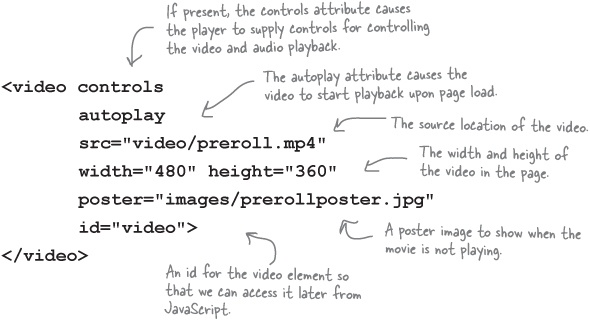
At this point you’ve got a video up and playing on your page, but before we move on, let’s step back and look at that video element we used in our markup:
Note
Good Video Etiquette: The autoplay property
While autoplay may be the best thing for sites like YouTube and Vimeo (or WebvilleTV for that matter), think twice before setting it in your <video> tag. Often, users want to participate in the decision of whether or not video is played when they load your page.
Let’s look more closely at some of the more important video attributes:


Yes, the controls in each browser are different with HTML video.
The look and feel of your controls is dictated by those who implement the browsers. They do tend to look different in different browsers and operating systems. In some cases, for instance, on a tablet, they have to look and behave differently because the device just works differently (and it’s a good thing that’s already taken care of for you). That said, we understand; across, say, desktop browsers, it would be nice to have consistent controls, but that isn’t a formal part of the HTML5 spec, and in some cases, a method that works on one OS might clash with another operating system’s UI guidelines. So, just know that the controls may differ, and if you really feel motivated, you can implement custom controls for your apps.
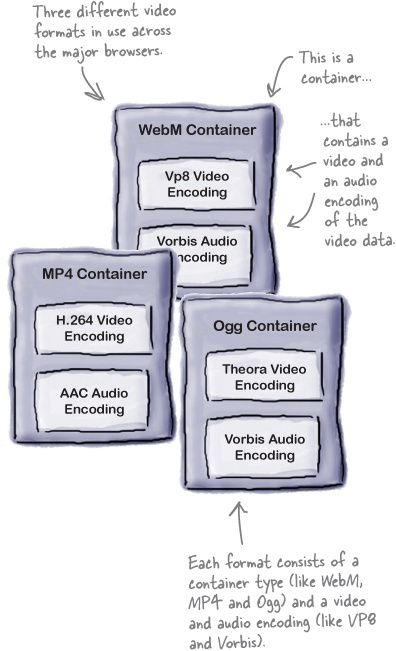
We wish everything was as neat and tidy as the video element and its attributes, but as it turns out, video formats are a bit of a mess on the Web. What’s a video format? Think about it this way: a video file contains two parts, a video part and an audio part, and each part is encoded (to reduce size and to allow it to be played back more efficiently) using a specific encoding type. That encoding, for the most part, is what no one can agree on—some browser makers are enamored with H.264 encodings, others really like VP8, and yet others like the open source alternative, Theora. And to make all this even more complicated, the file that holds the video and audio encoding (which is known as a container) has its own format with its own name. So we’re really talking buzzword soup here.
Anyway, while it might be a big, happy world if all browser makers agreed on a single format to use across the Web, well, that just doesn’t seem to be in the cards for a number of technical, political, and philosophical reasons. But rather than open that debate here, we’re just going to make sure you’re reasonably educated on the topic so you can make your own decisions about how to support your audience.
Note
Your mileage may vary by the time you read this book, as favored encodings tend to change over time.
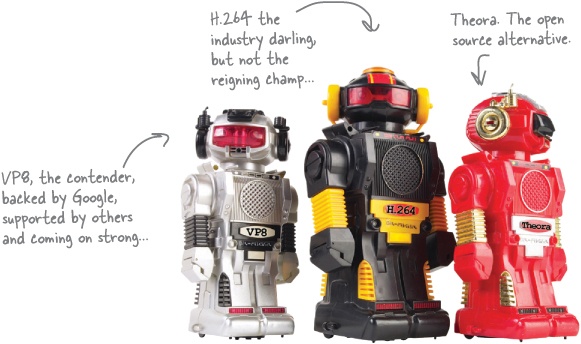
Let’s take a look at the popular encodings out there; right now there are three contenders trying to rule the (Web) world...
The HTML5 specification allows for any video format. It is the browser implementation that determines what formats are actually supported.
The reality is, if you’re going to be serving content to a wide spectrum of users you’re going to have to supply more than one format. On the other hand, if all you care about is, say, the Apple iPad, you may be able to get away with just one. Today we have three main contenders—let’s have a look at them:
Note
MP4 container with H.264 Video and AAC Audio
H.264 is licensed by the MPEG-LA group.
There is more than one kind of H.264; each is known as a “profile.”
MP4/H.264 is supported by Safari and IE9+. You may find support in some versions of Chrome.
Note
WebM container with VP8 Video and Vorbis Audio
WebM was designed by Google to work with VP8 encoded videos.
WebM/VP8 is supported by Firefox, Chrome and Opera.
You’ll find WebM formatted videos with the .webm extension.
So we know it’s a messy world with respect to video format, but what to do? Depending on your audience you may decide to provide just one format of your video, or several. In either case, you can use one <source> element (not to be confused with the src attribute) per format inside a <video> element, to provide a set of videos, each with its own format, and let the browser pick the first one it supports. Like this:


Telling the browser the location of your source files gives it a selection of different versions to choose from, however the browser has to do some detective work before it can truly determine if a file is playable. You can help your browser even more by giving it more information about the MIME type and (optionally) codecs of your video files:
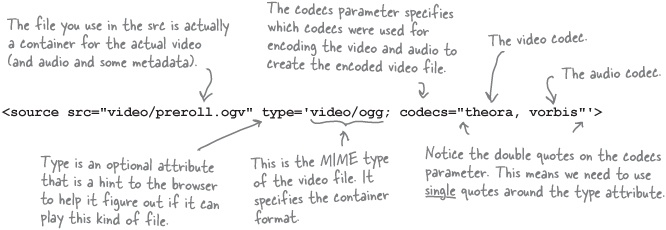
We can update our <source> elements to include the type information for all three types of video we have, like this:

If and when you do your own video encoding, you’ll need to know more about the various options for the type parameters to use in your source element. You can get a lot more information on type parameters at http://wiki.whatwg.org/wiki/Video_type_parameters.


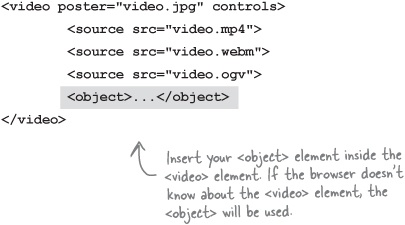
There are techniques for falling back to another video player if your preferred one (whether that be HTML5 or Flash or another) isn’t supported.
Below you’ll find an example of how to insert your Flash video as a fallback for HTML5 video, assuming the browser doesn’t know how to play HTML5 video. Obviously this is an area that is changing fast, so please take a look on the Web (which is updated a lot more often than a book) to make sure you’re using the latest and greatest techniques. You’ll also find ways to make HTML5 the fallback rather than Flash if you prefer to give Flash video priority.
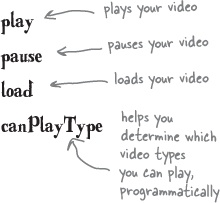
As you can see, you can do a lot using markup and the <video> element. But the <video> element also exposes a rich API that you can use to implement all kinds of interesting video behaviors and experiences. Here’s a quick summary of some of the methods, properties and events of the <video> element you might be interested in (and check the spec for a comprehensive list):

Use these Properties
videoWidth | loop |
videoHeight | muted |
currentTime | paused |
duration | readyState |
ended | seeking |
error | volume |
Note
These are all properties of the <video> element object. Some you can set (like loop and muted); some are read only (like currentTime and error).

Call these Methods

Catch these Events
play | abort |
pause | waiting |
progress | loadeddata |
error | loadedmetadata |
timeupdate | volumechange |
ended |
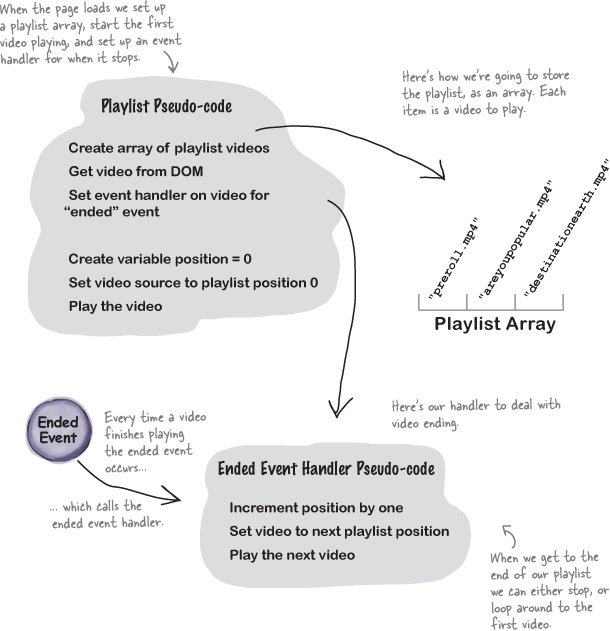
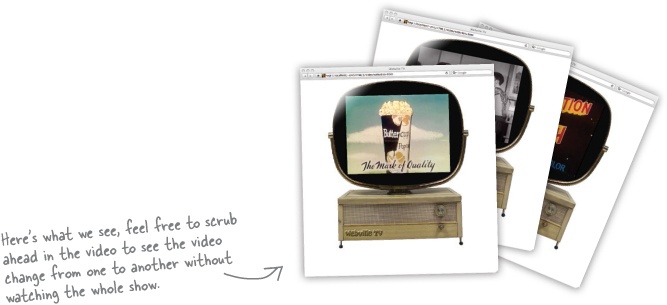
So far we’ve got one single video up and running on Webville TV. What we’d really like is a programming schedule that serves up a playlist of videos. Let’s say we want to do this on Webville TV:
Show a little preshow to the audience, you know, the Coke and popcorn ads, the audience etiquette, and so on...
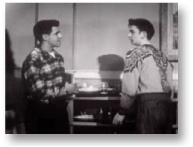
Show our first feature, titled Are you Popular? Trust us, you’ll enjoy it.
And then show our featured presentation, Destination Earth, presented in full technicolor. Created by the American Petroleum Institute, what on earth could be their message? Watch and find out.


Sharpen your pencil Solution
Now you might be tempted to look at the <video> markup specs to see how you specify a playlist, but for this you’re going to need code because the <video> element allows you to specify only one video. If you were on a desert island and had to implement a playlist with only the browser, the <video> element, the src property, the load and play methods, and the ended event, how would you do it (you can use any JavaScript data types you like)? Here’s our solution:
Now we’re going to use JavaScript and the video API to implement the Webville TV playlist. Let’s start by adding a link to a JavaScript file in webvilletv.html; just add this into the <head> element:
<script src="webvilletv.js"></script>And delete this from your existing <video> element:

Now, create a new file webvilletv.js, and let’s define a few global variables and a function that will be called when the page is fully loaded:

In the past we’ve always just assigned a handler function to be called when an event occurs to a property (like onload or onclick) like this:
video.onended = nextVideo;However, this time we’re going to do things a little differently. Why? Because at the time we’re writing this, support for all the event properties on the video object are a little spotty. That’s okay; that deficiency is also going to allow us to show you another way of registering for events: addEventListener, which is a general method supported by many objects for registering for various events. Here’s how it works:
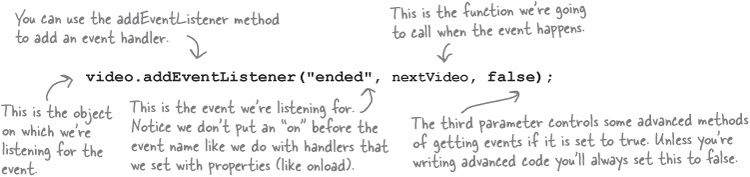
Other than the fact the addEventListener method is a little more complicated than just adding a handler by setting the property to a function, it works pretty much the same way. So let’s get back to our code!
Now we just need to write the handler for the video’s ended event. This handler is going to be called whenever the video player hits the end of the current video file. Here’s how we write the nextVideo function (add it to webvilletv.js):
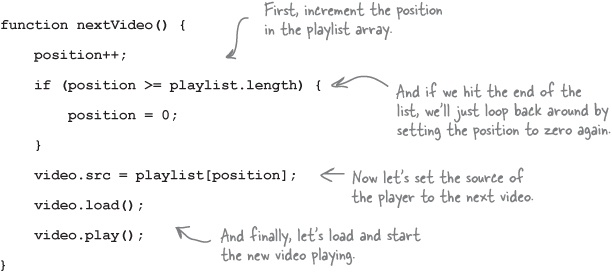
Can you believe we’re ready for a test drive? All we did was use the API to set up a video to play, then we made sure we had an event listener ready to handle the situation when the video ends, which it does by starting the next video in the playlist. Make sure you’ve got the changes made to your HTML file, type in your new JavaScript code and give it a test drive.

Good question.
When we were using multiple source tags we could count on the browser to sort through one or more video formats and decide if it could play any of them. Now that we’re using code we’re just giving the video element a single option. So how do we test to see what the browser supports to make sure we supply the best format?
We do that using the canPlayType method of the video object. canPlayType takes a video format and returns a string that represents how confident the browser is that it can play that type of video. There are three confidence levels: probably, maybe or no confidence. Let’s take a closer look and then rework the playlist code to use this.
The video object provides a method canPlayType that can determine how likely you are to be able to play a video format. The canPlayType method takes the same format description you used with the <source> tag and returns one of three values: the empty string, “maybe” or “probably”. Here’s how you call canPlayType:

Notice that the browser is only confident beyond “maybe” if you include the codec parameter in the type. Also notice that there’s no “I’m absolutely sure” return value. Even if the browser knows it can play a type of video, there’s still no guarantee it can play the actual video; for instance, if the bitrate of the video is too high, then the browser won’t be able to decode it.
Note
Bitrate is the number of bits the browser has to process per unit of time to decode the video and display it correctly.
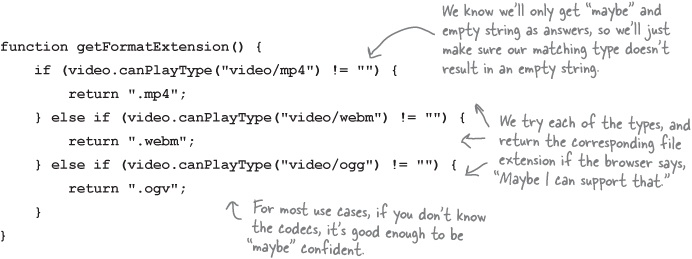
We’re going to use canPlayType to determine which video format to use for Webville TV videos—you already know that we have three versions of each file: MP4, WebM and Ogg, and depending on which browser you’re using, some will work and some won’t. Let’s create a new function that returns the file extension (“.mp4”, “.webm” or “.ogv”) that is appropriate for your browser. We’re going to use only the MIME types ("video/mp4", "video/webm" and "video/ogg") and not the codecs, so the only possible returns values are “maybe” and the empty string. Here’s the code:
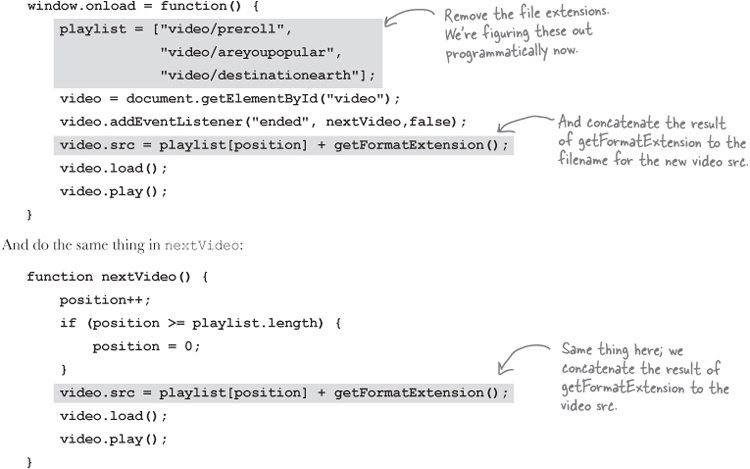
Now, we need to make some changes to the window.onload and nextVideo functions to use getFormatExtension. First, we’ll remove the file extensions from the filenames in the playlist (because we’re going to figure those out using getFormatExtension instead), and then we’ll call getFormatExtension where we set the video.src property:
Add the canPlayType function and make the changes above, then reload your webvilletv.html file. Work? Now your code is figuring out the best format. If you want to know which video the browser chose, try adding an alert to the window.onload and nextVideo functions; add it at the bottom of each function, after video.play():
alert("Playing " + video.currentSrc);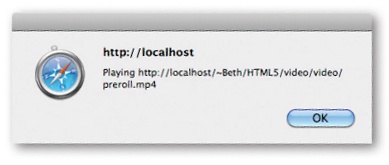
Which file did your browser play?

At some point we have to treat you like a real developer.
In this book we’ve (hopefully) helped you every step of the way—we’ve been there to catch you before you fall and to make sure that, in your code, your i’s were dotted and your t’s were crossed. But, part of being a real developer is jumping in, reading other peoples’ code, making out the forest despite all the trees, and working through the complexity of how it all fits together.
Over the rest of this chapter we’re going to start to let you do that. Up next we’ve got an example that is the closet thing to a real web app we’ve seen so far, and its got lots of pieces, lots of API use and code that handles lots of real details. Now, we can’t step you through every single piece, explaining every nuance like we usually do (or this book will be 1200 pages); nor do we want to, because you also need to acquire the skill of putting all the pieces together, without us.
Don’t worry, we’re still here and we’re going to tell you what everything does, but we want you to start to learn how to take code, read it, figure it out, and then augment it and alter it to do what you want it to do. So, over the next three chapters, we want you to dig into these examples, study them, and get the code in your head. Really... you’re ready!
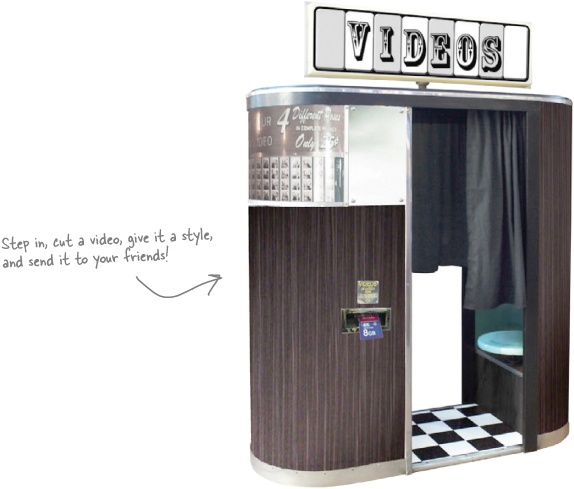
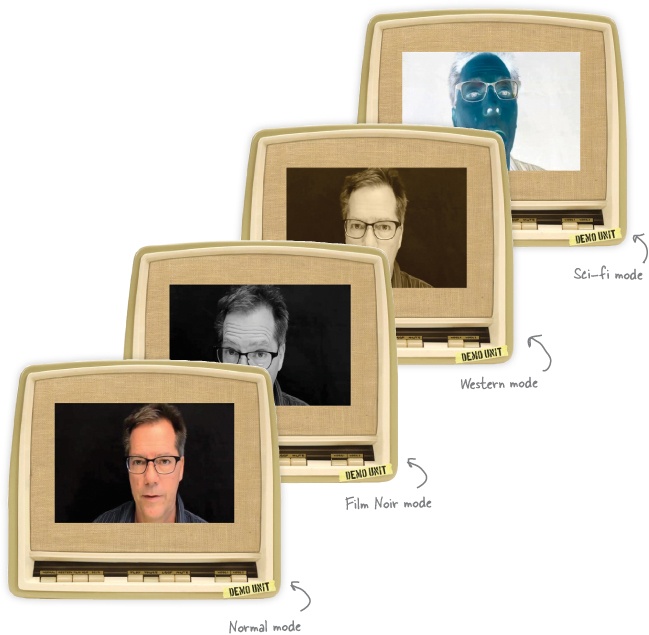
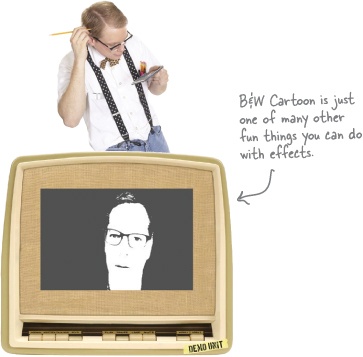
This just in... we just got the contract to build the Starring You Video software for their new video booth. What on earth is that? Oh, just the latest HTML5-enabled video messaging booth—a customer enters an enclosed video booth and shoots their own video message. They can then enhance their video using real movie effects; there’s an old-time western sepia filter, a black & white film noir filter, and even an otherwordly sci-fi alien filter. Then the customer can send their message to a friend. We went ahead and commited us all to building the video interface and effects processing system for it.
There’s a problem though. The video booths won’t be available for another six weeks, and when they arrive the code has to be done. So, in the meantime, we’re going to get a partly functional demo unit and a few test video files, and we’ll write all our code using those. Then when we’re done, the Starring You folks can just point the code to the just-captured real video. And of course, remember that all this has to be done using HTML5.
So, we hope you’re in, because we signed the contract!
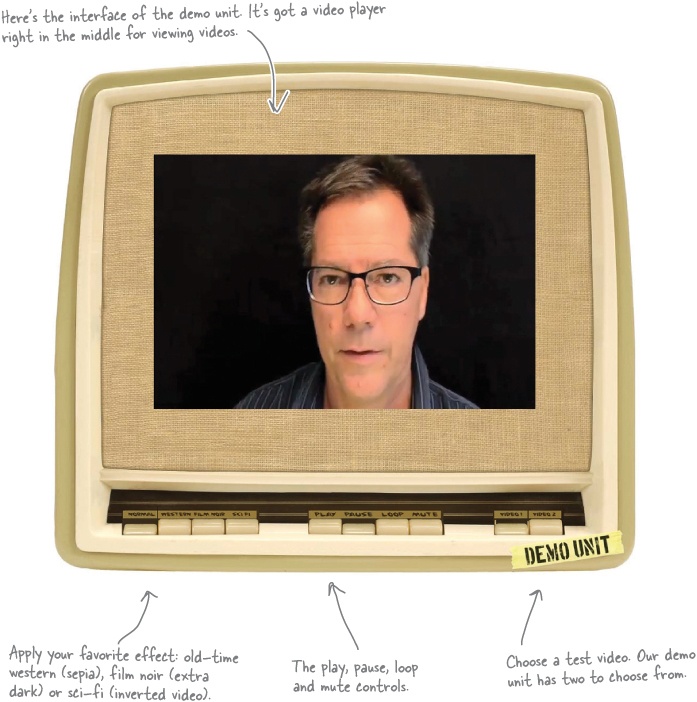
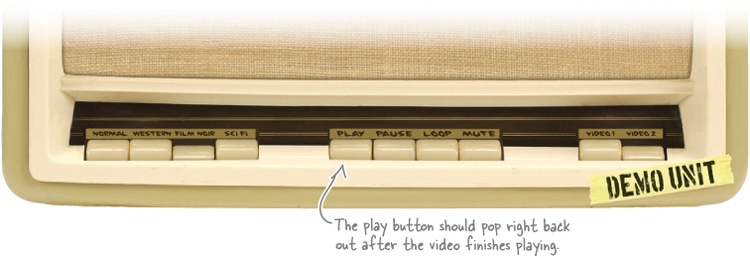
Below you’ll see our demo unit complete with a user interface. What we’ve got is a video screen where users will see their video played back. They’ll be able to apply a filter like “old-time western” or “sci-fi,” see how it looks, and when they’re happy, send it off to a friend. We don’t have record capability yet, so we’ve got the test videos to play with. Our first job is going to be to wire everything up so the buttons work, and then write the video filters. Before we get into all that, check out the interface:
The demo unit just arrived via next day air and it’s time to unpack it. It looks like we’ve got a functioning unit with some simple HTML markup & JavaScript written so far. Let’s have a look at the HTML first (videobooth.html). By the way, sit back; we’ve got a few pages of factory code to look through, and then we’ll get cracking on the real code.

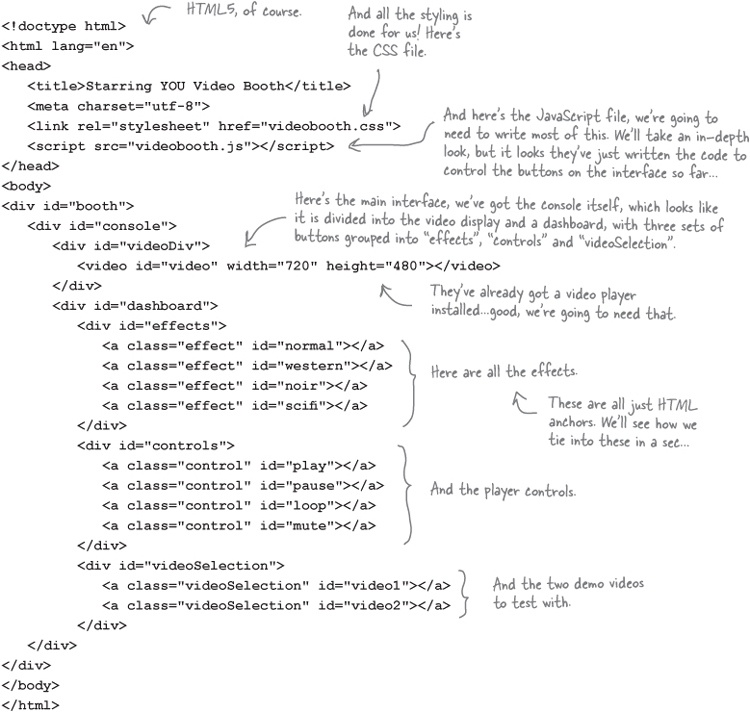
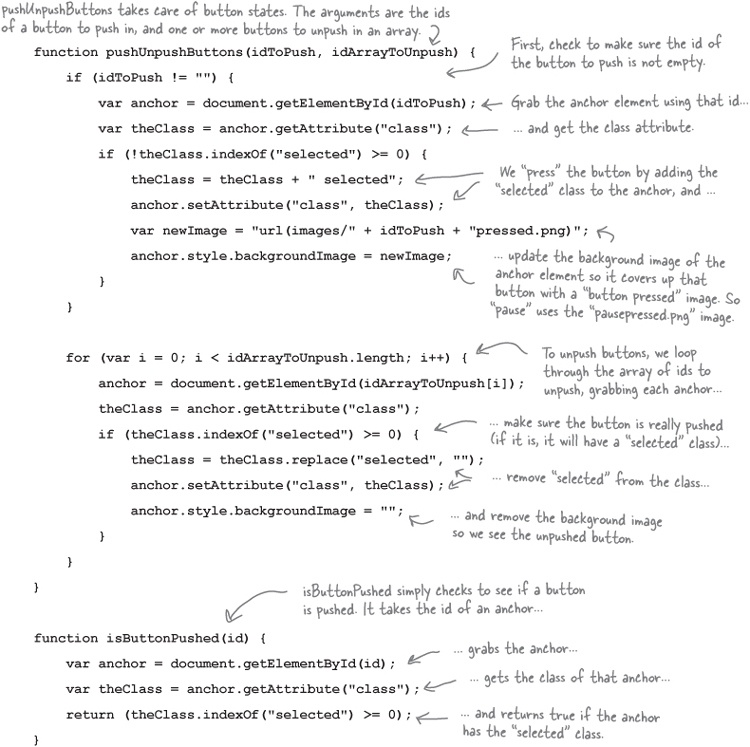
Now let’s take a look at all the JavaScript code that shipped from the factory, including the code that sets up the buttons (which we just looked at in the HTML) and the code for each button handler (which, right now, just makes sure the right buttons are depressed). We’ll review it all before we start adding our own code.
So let’s crack open the JavaScript (videobooth.js). It looks like all the interface buttons work, they just don’t do anything interesting, yet. But it’s important that we understand how these are set up because the buttons are going to invoke the code we have to write (like, to play a video or to view a video with an effect filter).
Below you’ll find the function that is invoked when the page is loaded. For each set of buttons (effects, controls, and the video selection), the code steps through the buttons and assigns click handlers to the anchor links. Let’s take a look:

Note
You haven’t seen document.querySelectorAll before; it’s
similar to document. getElementsByTagName except that
you’re selecting elements that match a CSS selector. The method returns a node list of
element objects that match the CSS selector argument.
var elementarray = document.querySelectorall("selector");OK, so far the JavaScript code takes care of setting up all the buttons so that if they are clicked on, the appropriate handler is called. Next, let’s take a look at the actual handlers, starting with the handler for the player buttons (play, pause, loop and mute), to see what they are doing:
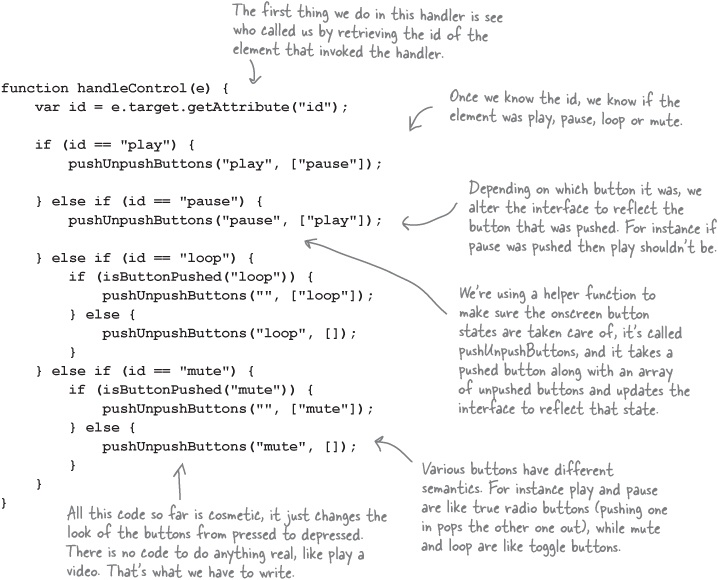
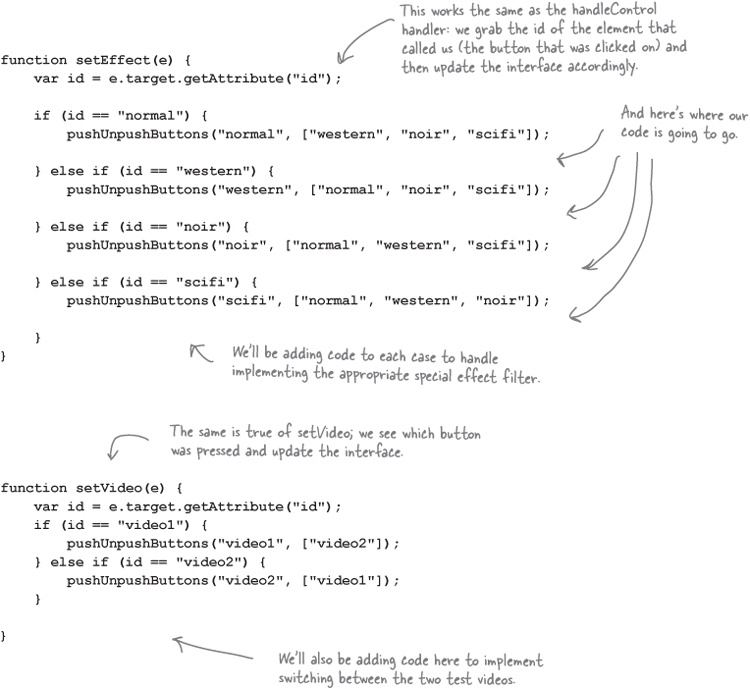
Now that’s great and all, but where does our code come in? Let’s think through this: when a button, like play, is pushed, not only are we going to update the interface (which the code already does), we’re also going to add some code that actually does something, like make the video start playing. Let’s go ahead and look at the other two handlers (for setting the video effects and for setting the test video), and it should be pretty obvious (if it isn’t already) where our code is going to go...
Let’s look at the other two handlers. The setEffect handler handles your choice of effect, like no effect (normal), western, film noir or sci-fi. Likewise the setVideo handler handles your choice of test video one or two. Here they are:

And remember, if you don’t want to type it in, you can get all the code from http://wickedlysmart.com/hfhtml5.
And for the sake of completeness (or if you’re on a 11-hour flight to Fiji without Internet access and you really want to type all this in):
We haven’t done much writing code, but we are reading and understanding code, and that can be just as good. So load the videobooth.html file into your browser and check out the buttons. Give them a good testing. For extra credit, add some alerts into the handler functions. Get a good feel for how this is working. When you come back, we’ll start writing some code to make the buttons work for real.

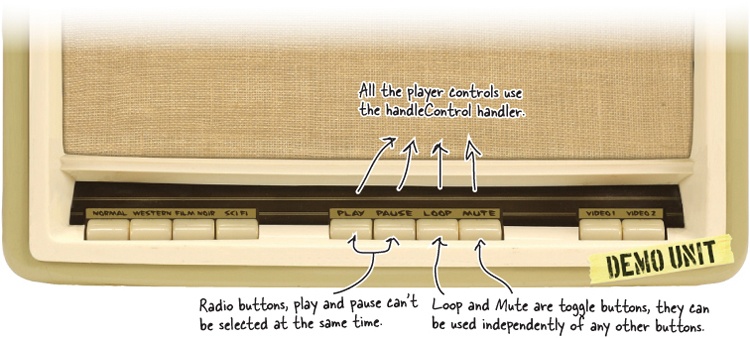
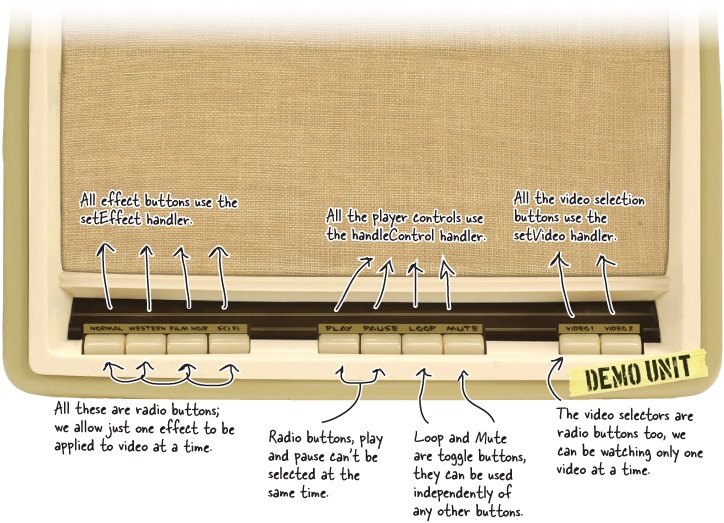
Sharpen your pencil
Mark the buttons below with whether they are like toggle buttons (independent) or like radio buttons (pushing one in pops the other ones out). Also annotate each button with its corresponding click handler. We’ve done a couple for you:

That would be the power of CSS.
It’s a shame this book isn’t Head First HTML5 Programming with JavaScript & CSS, but then it would be 1,400 pages, wouldn’t it? Of course, we could be talked into writing an advanced CSS book...
But seriously, this is the power of markup for structure and CSS for presentation (and if that is a new topic to you, check out Head First HTML with CSS & XHTML). What we’re doing isn’t that complex; here it is in a nutshell for the curious:
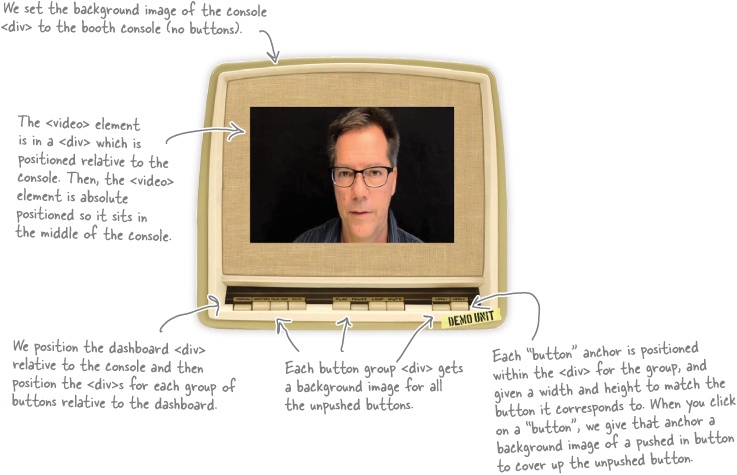
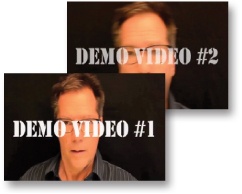
Before we implement the button controls, we need video to test them with, and as you can see from the buttons, Starring You Video has sent us two demo videos. Let’s go ahead and create an object to hold the two videos and then add some code for our onload handler to set up the source of the video object (just like we did for Webville TV).
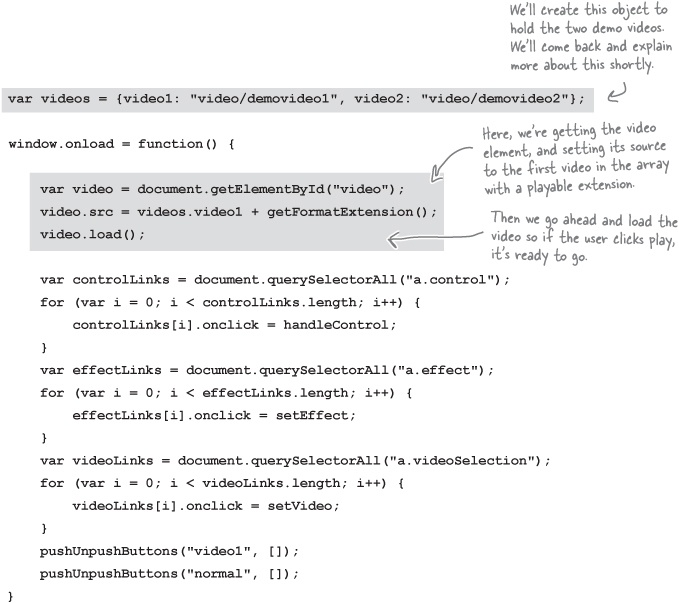
Now before we get sloppy, remember the getFormatExtension function is in Webville TV, not this code! So open up webvilletv.js and copy and paste the function into your video booth code. One other small thing: in the video booth code we aren’t keeping a global video object, so add this line to the top of your getFormatExtension function to make up for that:


Alright, time to get to those buttons! Now, it’s important to point out that for this project, we’re going to implement our own video controls. That is, rather than use the built-in video controls, we’re going to control the experience ourselves—so when the user needs to play, pause or mute the video, or even to loop the playback, they’re going to use our custom buttons, not the built-in controls. It also means we’re going to do all this programmatically through the API. Now, we’re not going to go all the way, which would mean implementing our own video scrubber, or perhaps next and previous buttons, because those don’t make sense in this application, but we could if we needed to. You’ll find that just by implementing our small control panel you’ll get the idea and be in perfect shape to take it further if you want to.
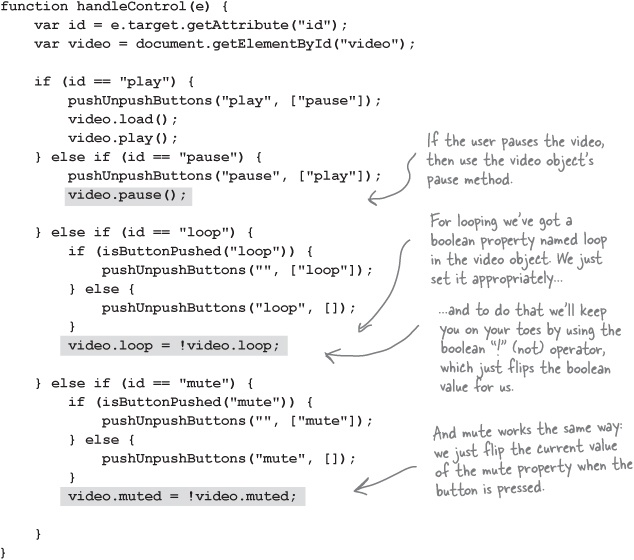
So, let’s get started. How about if we start with the play button and then move to the right (to pause and then to loop and then to mute) from there? So find the handleControl handler and add this code:

Let’s knock out the rest of the controls—they’re so straightforward they’re almost going to write themselves:
Make sure you’ve got all the code changes typed in. Load videobooth.html into your browser and give your control buttons a test. You should see video start playing, be able to pause it, mute it, or even put it in a loop. Of course, you can’t select the other demo video yet or add an effect, but we’re getting there!

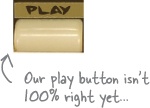
There’s a little loose end we need to take care of to really make these buttons work like they should. Here’s the use case: let’s say you’re playing a video and you don’t have loop selected, and the video plays to completion and stops. As we have things implemented now, the play button will remain in the pressed position. Wouldn’t it be better if it popped back up, ready to be pressed again?
Using events we can easily do this. Let’s start by adding a listener for the ended event. Add this code to the bottom of your onload handler:

Now let’s write the handler, which will be called any time the video playback stops by coming to the end of the video:

Okay, make the changes, save the code and reload. Now start a video and let it play to its conclusion without the loop button pressed, and at the end you should see the play button pop back out on its own.
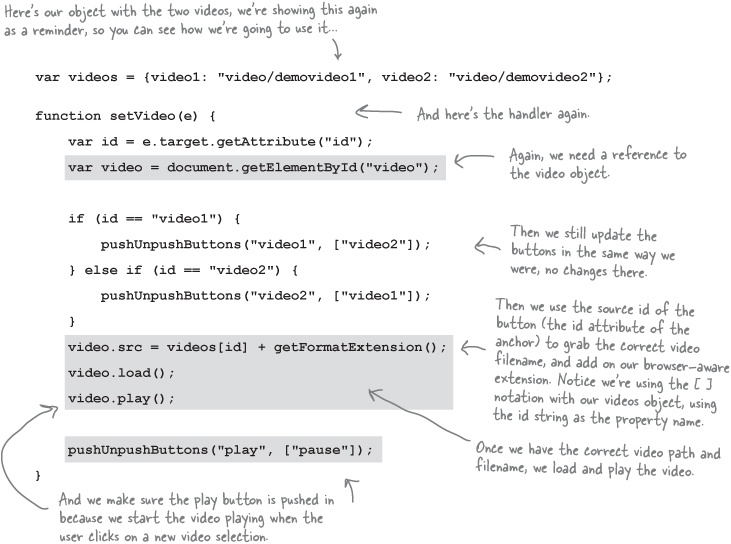
We already added an object to hold our two test videos, and we’ve even got two buttons for selecting between them. Each button is assigned the setVideo handler. Let’s work through writing that now so we can switch between our videos:

Isn’t it about time we add those movie effects? What we want to do is take our original video and be able to apply effects, like film noir, western, and even an otherworldly sci-fi effect. But if you look at the video API, you won’t find any effects methods there, or any way to add them directly. So how are we going to add those effects?
Take a little time to think through how we might add effects to our video. Don’t worry that you don’t know how to process video yet, just think through the high level design.
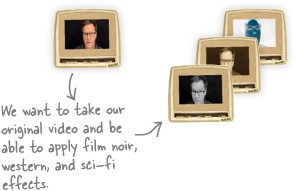

We don’t know exactly how to implement the effects yet, but here’s a high level plan of attack:
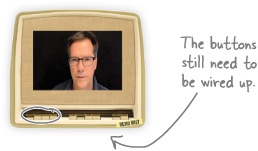
We know we’ve still got to hook up those buttons that control the effects. So we’re going to do that first.
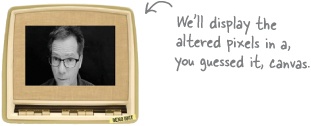
We’re going to learn a little about video processing and check out the “scratch buffer” technique for adding our effects.
We’re going to implement the scratch buffer, which is going to give us a chance to see video and canvas together in action.
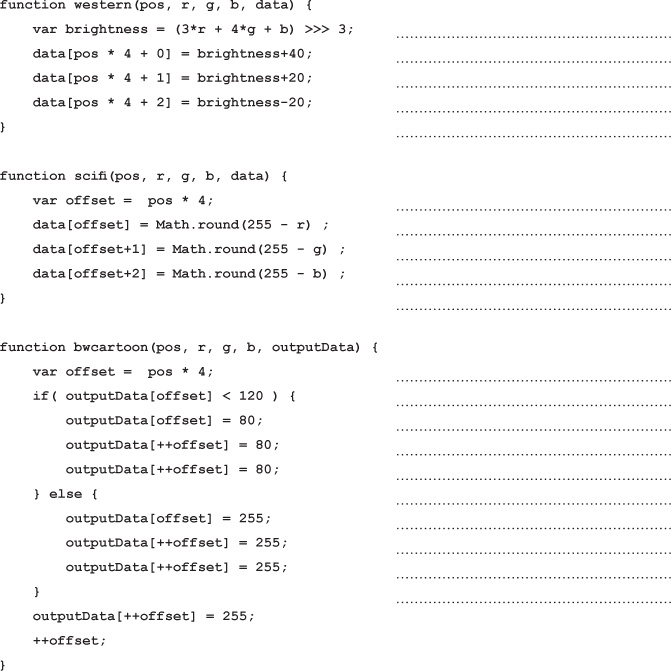
We’re going to implement one function for each effect: western, film noir, and sci-fi.
function noir(pos, r, g, b, data) {
  ...
}
Finally, we’re going to put it all together and test!


Brain Power
Now you know we’re going to implement a function that will handle each effect. Let’s take film noir, for example. How are you going to take a color pixel from the video and make it black and white? Hint: every pixel has three components: red, green, and blue. If we could get our hands on those pieces, what could we do?

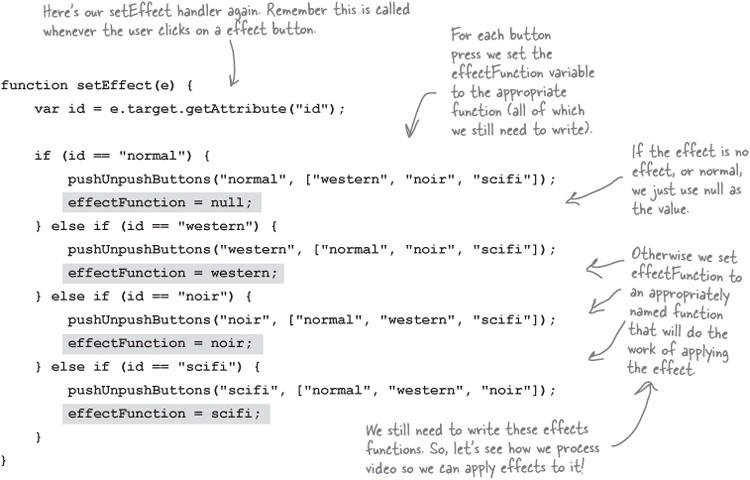
Alright, the easy part first: we’re going to get those effects buttons wired up and working. We’ll start by creating a global variable named effectFunction. This variable is going to hold a function that can take data from the video, and apply a filter to it. That is, depending on which effect we want, the effectFunction variable will hold a function that knows how to process the video data and make it black and white, or sepia, or inverted for sci-fi. So add this global variable to the top of your file:
var effectFunction = null;Now we’re going to set this variable anytime an effects button is clicked on. For now, we’ll use function names like western, noir and scifi, and we’ll write these functions in just a bit.
Okay, with that out of the way, we’re going to learn about that “scratch buffer” and then come back and see how these functions fit in, as well as how to write them!
What we’ve done so far is given ourselves a way to assign a function to the effectsFunction global variable as a result of clicking on the effects buttons in the interface. For now, just take that knowledge and tuck it in the back of your brain for a little while, because we’ve got to work through how we’re actually going to take video and process it in real time to add an effect. To do that we need to get our hands on the video’s pixels, alter those pixels to achieve our desired effect, and then somehow get them back on the screen.
Now, does the video API offer some special way to process video before it is displayed? Nope. But it does give us a way to get the pixels, so we just need a way to process and display them. Wait, pixels? Display? Remember Chapter 7? The canvas! Ah, that’s right, we did mention something about the “special relationship” that the video element and canvas have. So, let’s walk through one of the ways the video and canvas elements can work together:

Now, you might ask why we’re using two canvases to process and display the video. Why not just find a way to process the video as it is decoded?
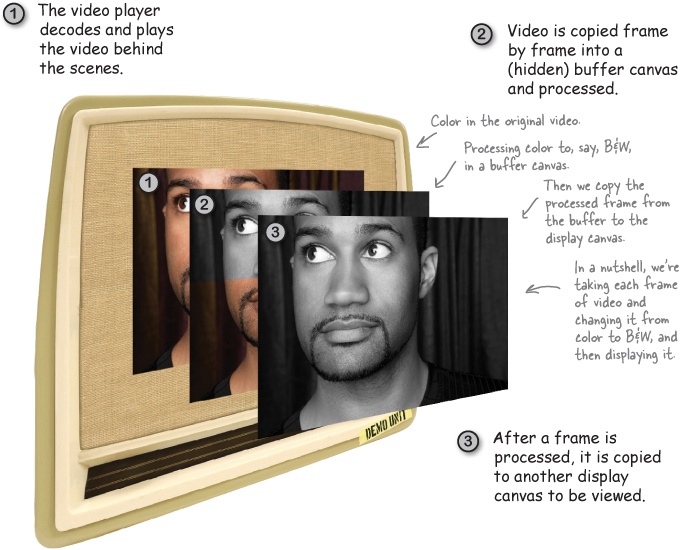
The method we’re using here is a proven technique for minimizing visual glitches during intensive video and image processing: it’s known as using a “scratch buffer.” By processing a frame of video in a buffer and then copying it all in one fell swoop to the display canvas, we minimize visual issues.
Let’s step through how our scratch buffer implementation is going to work.
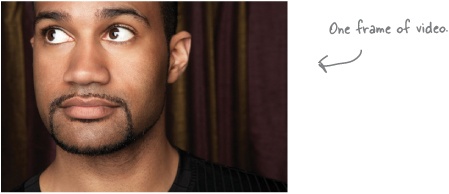
The browser decodes the video into a series of frames. Each frame is a rectangle of pixels with a snapshot of the video at a given point in time.
As each frame is decoded we copy it into the canvas that is acting as a scratch buffer.
We iterate over scratch buffer, pixel by pixel, passing each pixel to our effects function for processing.
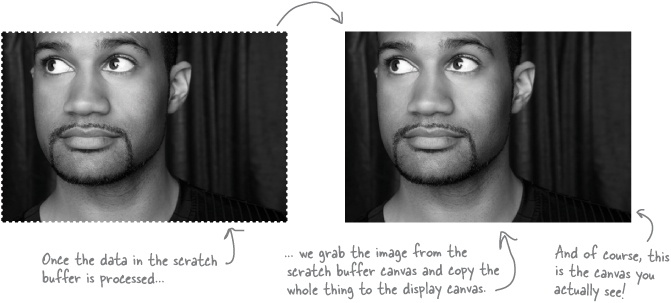
After all the pixels in the scratch buffer are processed, we copy them from the scratch buffer canvas to the display canvas.
And then we repeat the process on every frame as it is decoded by the video object.

As you already know, to implement a scratch buffer in canvas we need two canvases: one to do our computation in, and one to display our results. To create those canvases, we’ll start back in our HTML file videobooth.html. Open this file and find the <div> with the id “videoDiv” and add two canvas elements below the <video>:
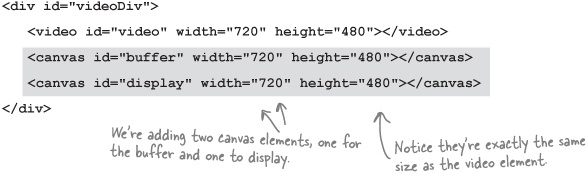
Now you might be wondering about positioning these elements; we’re going to position them right on top of each other. So at the bottom will be the video element, on top of that is the buffer, and on top of that, the display canvas element. We’re using CSS to do it, and although we don’t talk much about CSS in this book, if you open videobooth.css you’ll see the positioning for the three elements:

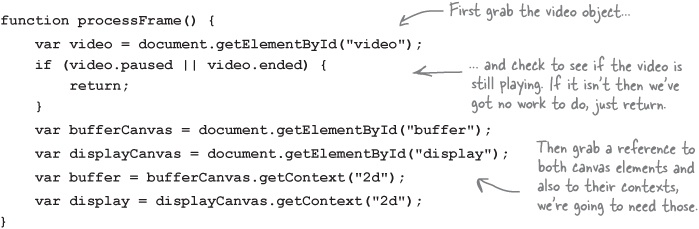
We’ve got a video element, a buffer that’s a canvas, and a canvas that is going to display the final video frames. And we’ve also got them stacked on one another so we see only the top display canvas, which will contain the video with the effect applied. To process the video we’re going to use the video element’s play event, which is called as soon as a video begins playing. Add this to the end of the onload handler:

The processFrame function is where we’ll process the video pixels and get them into the canvas for display. We’ll start by making sure we have access to all our DOM objects:
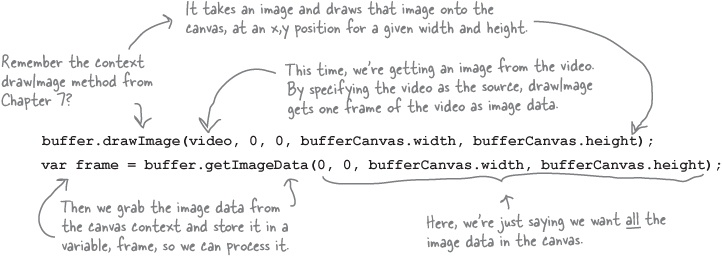
To create the buffer, we need to take the current video frame, and copy it to the buffer canvas. Once we have it on the canvas, we can process the data in the frame. So, to create that buffer we do this (add this to the bottom of processFrame):
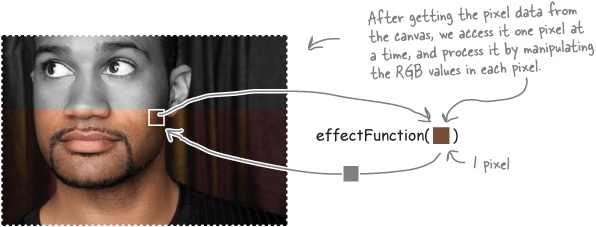
We’ve got our hands on a frame of video data, so let’s do some processing on it! To process the frame, we’re going to loop over every single pixel in the frame data and pull out the RGB color values that are stored in each pixel. Actually, each pixel has 4 values, RGB and Alpha (the opacity), but we’re not going to use the Alpha. Once we’ve got the RGB values, we’ll call the effectFunction (remember, that’s the function we set back in How video processing works and asked you to tuck in the back of your brain!) with the RGB information and the frame.
Add this code to the bottom of your processFrame function:

Yes, that’s one single frame we just processed, and we want to keep processing them all as the video continues to play. We can use setTimeout and pass it a value of zero milliseconds to ask JavaScript to run processFrame again as soon as it possibly can. JavaScript won’t actually run the function in zero milliseconds, but it will give us the next soonest time slot we can get. To do that, just add this to the bottom of your processFrame function:
Note
setTimeout is just like setInterval, except that it runs only once after a specified time in milliseconds.
You’re absolutely right: what we’d love to do is have our handler called once for every frame, but the video API doesn’t give us a way to do that. It does give us an event named timeupdate that can be used to update a running time display of your video, but it doesn’t tend to update at a granularity that you can use for processing frames (in other words, it runs at a slower rate than the video).
So instead we use setTimeout. When you pass zero to setTimeout, you’re asking JavaScript to run your timeout handler as soon as it possibly can—and this leads to your handler running as frequently as it possibly can.
But might that be faster than the frame rate? Wouldn’t it be better to calculate a timeout close to what is needed for the frame rate? Well, you could, but it’s unlikely that the handler is going to actually get to run in lockstep with the frames of your video, so zero is a good approximation. Of course, if you are looking to enhance the performance characteristics of your app, you can always do some profiling and figure out what the optimal values are. But until we have a more specific API, that’s our story.
Finally, we’ve got everything we need to write the video effects: we’re grabbing each frame as it comes in, accessing the frame data pixel by pixel and sending the pixels to our effect filter function. Let’s look at the Film Noir filter (which, in our version, is just a fancy name for black and white):
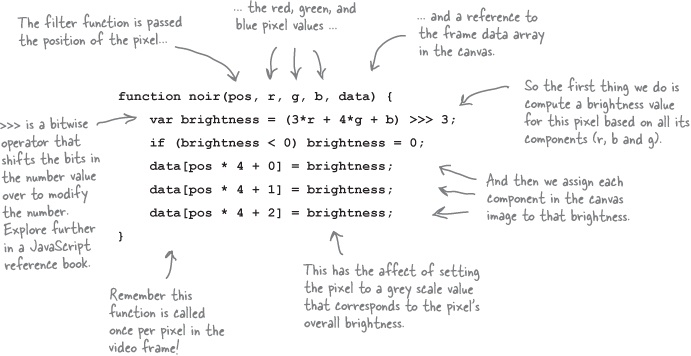
Add this function to videobooth.js and then reload your page. As soon as the video starts rolling press the Film Noir button and you’ll see a brooding black & white film look. Now choose Normal again. Not bad, eh? And all in JavaScript, in real time!

This is it! We have this code wrapped up and ready to ship off to Starring You Video. Go ahead and double check that you’ve got all the code typed in, save, and load videobooth.html. Then have fun playing around with your new app!
In The Laboratory
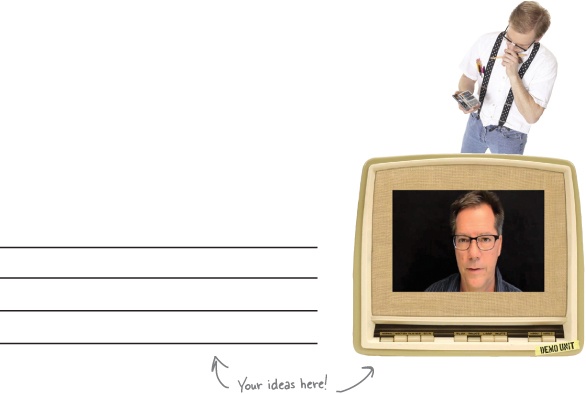
Obviously we’ve only scratched the surface in terms of video processing, and we’re sure you can think of more creative effects than those we came up with. Go ahead and think up a few, implement them, and document them here.
Have you invented something really cool and implemented it? Tell us about it at wickedlysmart.com and we’ll feature it for other readers!

You can substitute a web URL for any of the sources we been defining locally. For instance:
<video src="http://wickedlysmart.com/myvideo.mp4">Keep in mind there is more room for bad things to happen when you are delivering on the Web (and we’ll talk about how to handle those things in a moment). Also, the bitrate of your videos starts to matter a lot more when delivering to a browser or a mobile device over the network. Like with video formats, if you’re going down this road, seek out experts and educate yourself.

Yes, a big difference.
The term streaming often gets used like the term xerox or kleenex—as a generic term for getting video from the Web to your browser. But “progressive video” and “streaming video” are actually technical terms. In this book we’ve been using progressive video, which means when we retrieve the video (either locally or over the network) we’re retrieving a file using HTTP, just like an HTML file or an image, and we try to decode and play it back as we retrieve it. Streaming video is delivered using a protocol that is highly tuned to delivering video in an optimal way (perhaps even altering the bitrate of the video over time as bandwidth becomes more or less available).
Streaming video probably sounds like it would provide your user with a better experience (it does), and is perhaps more efficient in terms of your user’s connection and your bandwidth charges (it is). On top of all that, streaming video makes it easier to do things like protect the content of your video if you need that kind of security.
There is no standard for streaming video with HTML5. As a matter of fact the problem isn’t HTML5, there isn’t really a supported standard for streaming video anywhere—but there are plenty of proprietary ones. Why? There are a number of reasons ranging from the money to be made with streaming video to the fact that many people in open source don’t want to work on a protocol that could be used for DRM or other protection technologies. Like the situation with video formats, we’re in a complex world with streaming video.
There are solutions out there.
There are lots of legitimate uses for streaming video technologies, and if you have a large audience, or you have content you think needs to be protected, you should check them out: Apple’s HTTP Live Streaming, Microsoft’s Smooth Streaming and Adobe’s HTTP Dynamic Streaming are good places to start.
There’s good news on the horizon too: the standards bodies are starting to look closely at HTTP-based video streaming, so keep an eye out for developments in this area.
But it’s not: we have all those nasty network issues, incompatible devices and operating systems, and an increasing chance of asteroids hitting the earth. That last one we can’t help with, but for the first two actually knowing you have an error is half the battle, then you can at least do something about it.

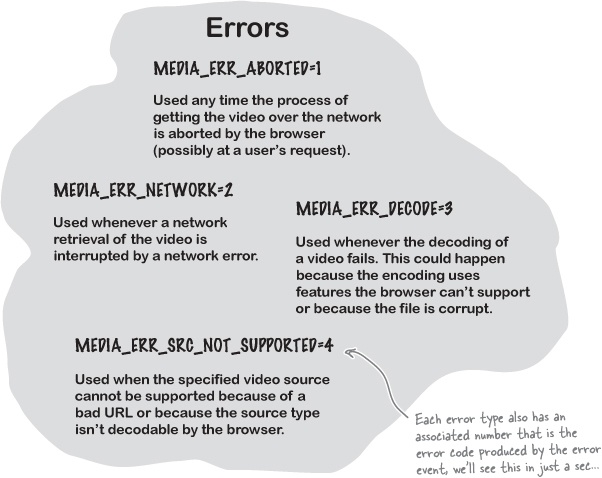
The video object has an error event, which can be thrown for a number of reasons that can be found in the video.error property, or more specifically in the video.error.code property. Let’s take a look at what kinds of errors we can detect:
Dealing with errors is complex business and how you deal with errors depends a lot on your application, and what would be appropriate for the app and your users. That said, we can at least get you started and point you in the right direction. Let’s take Webville TV and give it the ability to know it has encountered an error—and if it does encounter one, give the audience a PLEASE STAND BY message.
We want to be notified when there’s an error message, so we need to add a listener for the error event. Here’s how we do that (add this to the onload handler in webville.js):

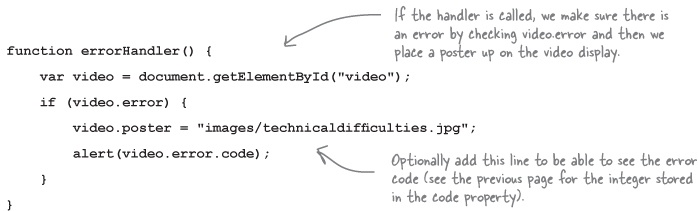
Now we need to write the function errorHandler, which will check if there is an error, and if so, place our “please stand by” image on the video display by making it the poster image:
There are many ways for the playback of the video to fail, and to test this code you’re going to make it fail. Here are a few suggestions:
Disconnect your network at different points in playback.
Give the player a bad URL.
Give the player a video you know it can’t decode.
Give the player a URL that isn’t even a video.
Use software to reduce your bandwidth (it’s out there, just look for it).

So get this code typed in and get testing. Remember you can map the integer in the alert dialog back to a real code by looking at the codes in Where can you go from here?.
This is where it gets exciting, because think of all you know how to do with HTML markup, with the video element and, of course, the canvas...not to mention web services, geolocation... wow. Sure, we did some cool video processing with canvas, but you can apply everything you know how to do with canvas to video. Here are just a few ideas we had, please add your own. And give yourself a pat on the back from us, you’ve earned it!

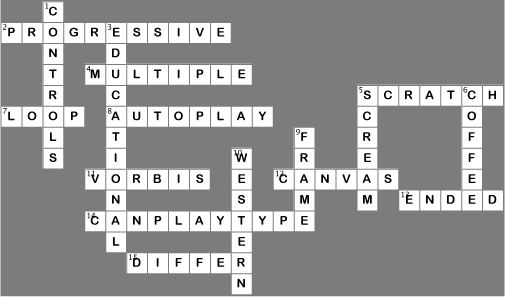
HTML5cross
Before you sit back and watch some more Webville TV, do a quick crossword to make it all stick. Here’s your Chapter 8 crossword puzzle.

Across | Down | ||
|---|---|---|---|
2. | Type of delivery the video element uses for video. | 1. | Use __________ if you want a built-in way to control video. |
4. | To provide several video options, use _____ source elements. | 3. | We saw ‘50s ______ films. |
5. | Kind of buffer we used canvas for. | 5. | What you should do if an asteroid is going to hit the earth. |
7. | Property to play your video over and over | 6. | The Starbuzz CEO spills his ___________. |
8. | Starts a video as soon as it can. | 9. | What we processed on every setTimeout call. |
11. | The open source audio codec. | 10. | Clint Eastwood would like this effects style. |
12. | Used to display processed video. | ||
13. | When the show is over, this event is thrown. | ||
14. | I can play this type, can you? | ||
15. | Look and feel of browser controls _____. | ||