
You’ve been sitting in your page for too long. It’s time to get out a little, to talk to web services, to gather data and to bring it all back so you can build better experiences mixing all that great data together. That’s a big part of writing modern HTML5 applications, but to do that you’ve got to know how to talk to web services. In this chapter we’re going to do just that, and incorporate some data from a real web service right in your page. And, after you’ve learned how to do that you’ll be able to reach out and touch any web service you want. We’ll even fill you in on the hippest new lingo you should use when talking to web services. So, come on, you’re going to use some more APIs, the communications APIs.
This just in: Mighty Gumball, Inc., an innovative company that builds and deploys real gumball machines, has contacted us for some help. If you’re not up on them, they’ve recently network-enabled their gumball machines to track sales in near real time.
Note
You might remember them from our book Head First Design Patterns, when we helped them design their server-side code.
Now it almost goes without saying that Mighty Gumball are gumball experts, not software developers, and so they’d like our help building an app to help them monitor gumball sales.
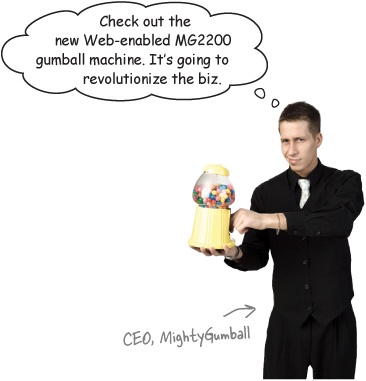
Here’s what they sent over:

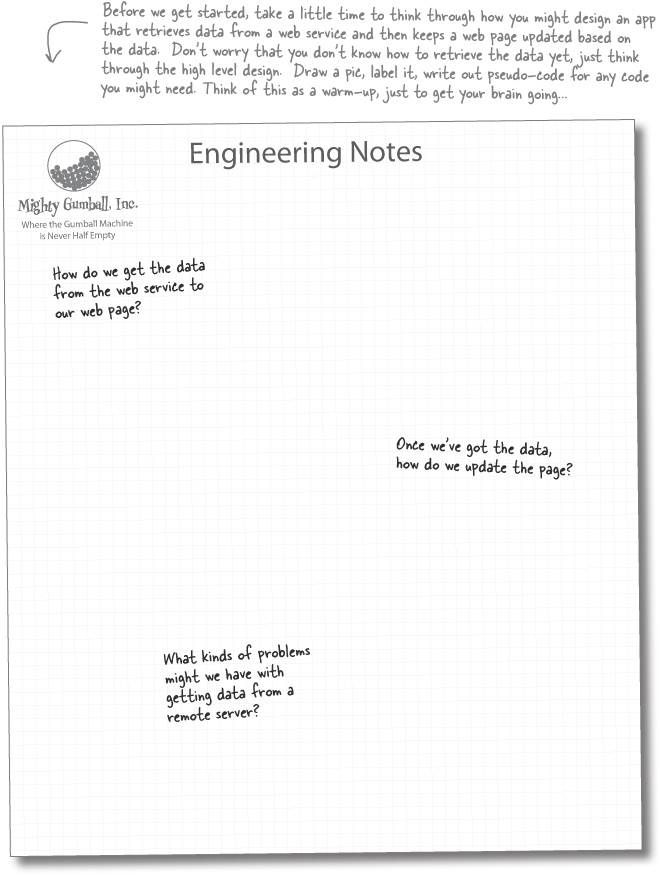

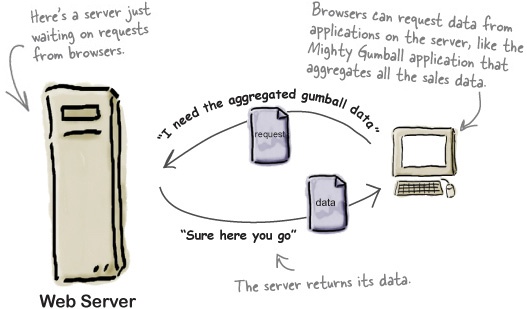
You probably need a little background beyond Mighty Gumball’s short note. Here’s what we’ve got: first, they’ve got gumball machines all over the country sending sales reports to a Mighty Gumball server, which combines all those reports and makes them available through a web service. And, second, they’re asking us to build a web app that displays the sales in a browser for the Gumball Sales team. And, most likely they want this report to be updated as the sales change over time. Here’s the view from 10,000 feet:

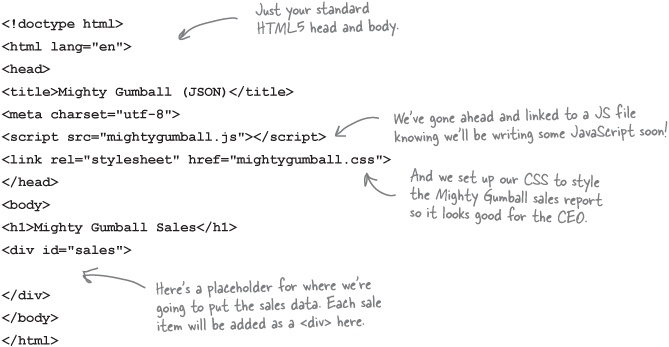
While we’re waiting on those specs from Mighty Gumball, let’s get some HTML going.
You’re probably getting the idea we don’t need a lot of HTML markup to get a web app off the ground, and you’re right. All we need is a place to put our sales reports as they come in, and we’ll let JavaScript do the rest. Go ahead and get this typed in, and then we’ll take a look at how to retrieve things via the Web.
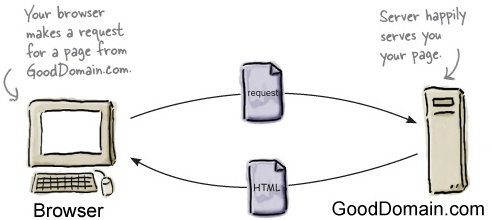
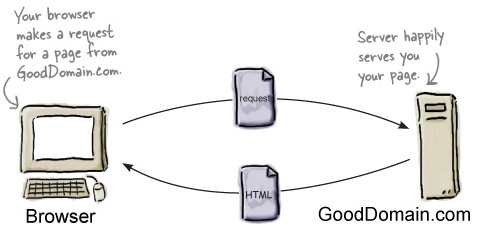
Let’s step back for a sec... you already know how a browser requests a page from a web server—it makes an HTTP request to the server, which returns the page along with other metadata that (typically) only the browser sees. What you might not know is that the browser can also retrieve data with HTTP from a web server in the same way. Here’s how that works:
It helps to look a little more closely at the request we make to the server and the response that comes back. The request takes care of telling the server what data we’re after (which we sometimes refer to as the “resource” we’re after), while the response contains metadata and, if all goes well, the data we requested:


Okay, so we know we can retrieve data with HTTP, but how? We’re going to write a little code to create an actual HTTP request and then ask the browser to make the request on our behalf. After it’s made the request, the browser will then hand us back the data it receives. Let’s step through making an HTTP request:
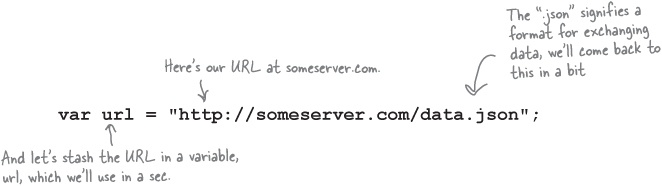
To kick things off, we’ll start with a URL. After all, we need to tell the browser where to get the data we’re after:
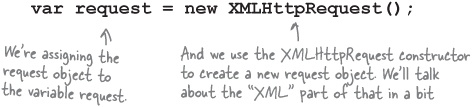
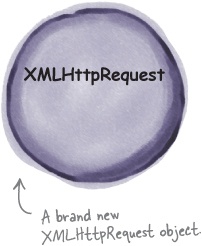
Next we’ll create a request object, like this:
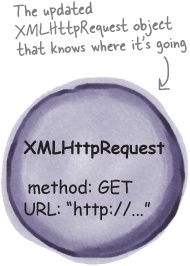
Next we need to tell the request object which URL we want it to retrieve along with the kind of request it should use (we’ll use the standard HTTP GET request like we saw on the previous page). To do this, we’ll use the request object’s
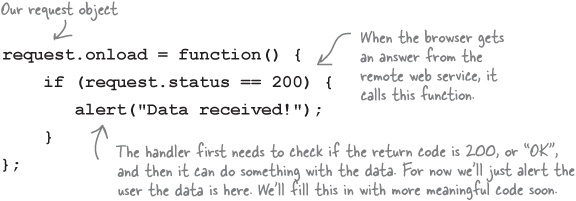
openmethod. Now “open” sounds like a method that not only sets these values in the request object, but also opens the connection and retrieves the data. It doesn’t. Despite the name,openjust sets up the request with a URL and tells the request object the kind of request to use so that XMLHttpRequest can verify the connection. Here’s how we call theopenmethod:Okay here’s the important part, and the trick of how XMLHttpRequest works: when we finally ask our XMLHttpRequest object to retrieve data, it’s going to go off on its own and get the data. It might take 90 milliseconds (quite a while in compute time), or, on a slow day, it might take ten seconds (an eternity in compute time). So rather than just waiting around for the data, we’re going to provide a handler that is called when the data arrives. Here’s how you set up the handler (this should look somewhat familiar):
Just one last step: we still need to tell the request to go out and get the data, and to do that we use the
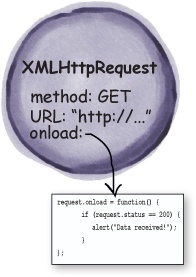
sendmethod:So, to review: we create an XMLHttpRequest object, load it with a URL and HTTP request type, along with a handler. Then we send the request and wait for the data to arrive. When it does, the handler is called.

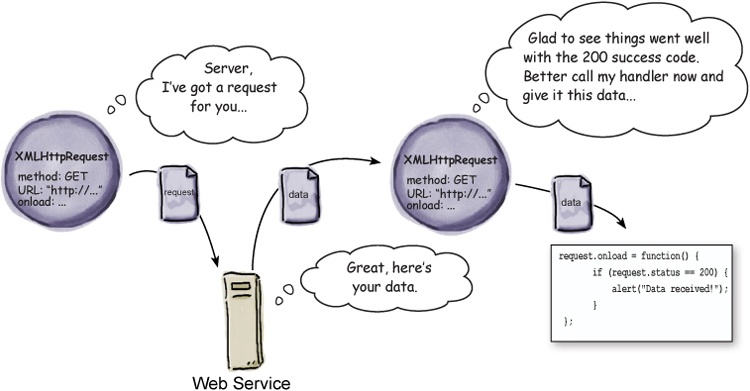
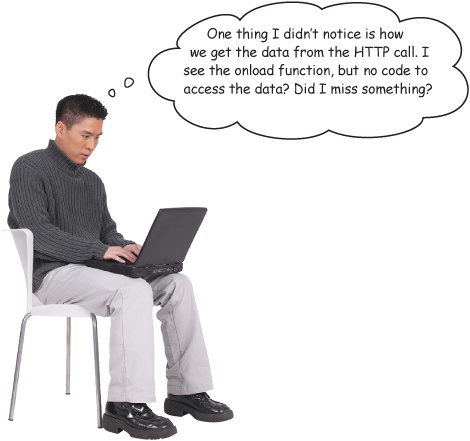
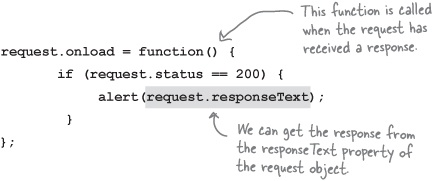
We just hadn’t quite got there yet. The data from the HTTP GET retrieval can be found in the responseText property of the request object. So we can write code like this:
But hang on, we’re just about to the point of writing some real code that uses request.responseText.
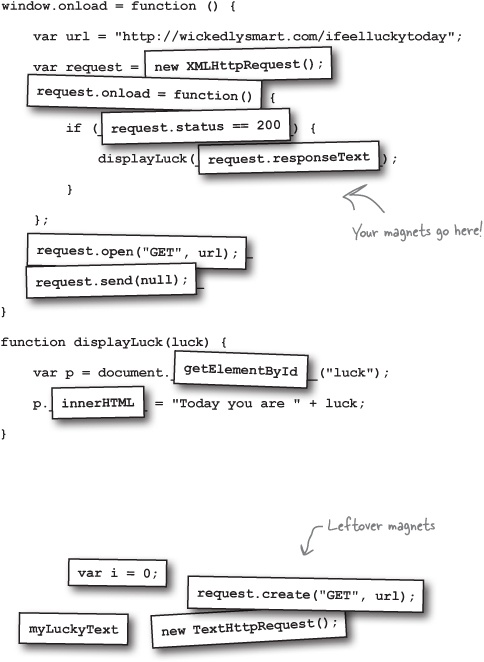
Code Magnets
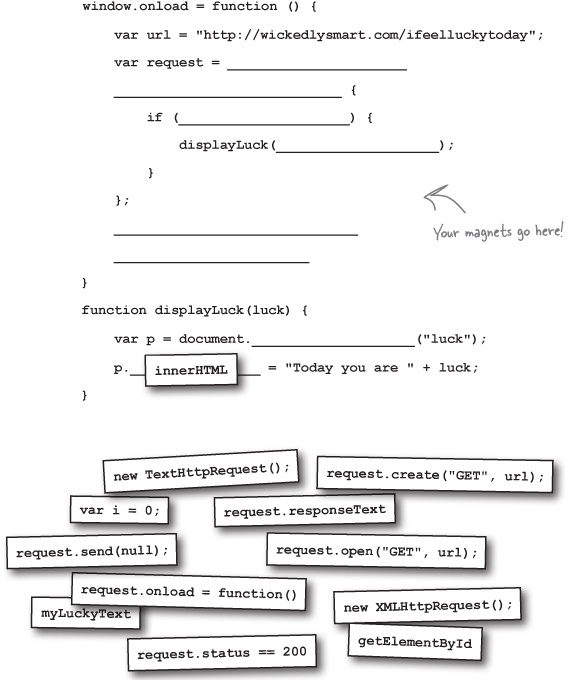
A new web service at http://wickedlysmart.com/ifeelluckytoday returns either “unlucky” or “lucky” each time you hit it. The logic is based on a secret and ancient algorithm we can’t reveal, but it’s a great service to let users know if they are lucky or not on a given day.
We need your help to create a reference implementation to show others how they might include it in their site. You’ll find the skeleton code below; help us fill in the details using the magnets. Be careful, you may not need all the magnets. We’ve already done one for you.

Code Magnets Solution
A new web service at http://wickedlysmart.com/ifeelluckytoday returns either “unlucky” or “lucky” each time you hit it. The logic is based on a secret and ancient algorithm we can’t reveal, but it’s a great service to let users know if they are lucky or not on a given day.
We need your help to create a reference implementation to show others how they might include it in their site. You’ll find the code skeleton below; help us fill in the details using the magnets. Be careful, you may not need all the magnets. Here’s our solution.

You might (or might not) remember that XML was going to save us all—a data format that was human readable and machine parseable, a data format that was going to support all the data needs of the world. And when XMLHttpRequest was first developed, XML was indeed the way we all exchanged data (thus, the name XMLHttpRequest).
Well, along the way XML apparently slipped on a banana peel thrown by JSON. Who’s JSON? Just the latest and greatest data format, born out of JavaScript, and being adopted across the Web in the browser and on the server side. And might we add, it’s quickly become the format of choice for HTML5 apps?
So, what’s so great about JSON? Well, it’s pretty darn human-readable, and it can be parsed quickly and easily straight into JavaScript values and objects. Unlike XML, it’s so cute and cuddly... anyway, can you tell we like it just a little? You’ll be seeing a lot of JSON in this book. We’re going to use it to exchange JavaScript data over the network, to store data in a local store with the Web Storage API, and as part of another way to access web data (more on that shortly).
But wait a sec, network data exchange formats... storage formats... that’s complex stuff, right? No worries, over the next ten pages we’re going to make you an expert you already know practically everything about JSON you need to. To use JSON you just need to understand JavaScript objects (which you do, big time) and two simple method calls. Here’s how it all works:
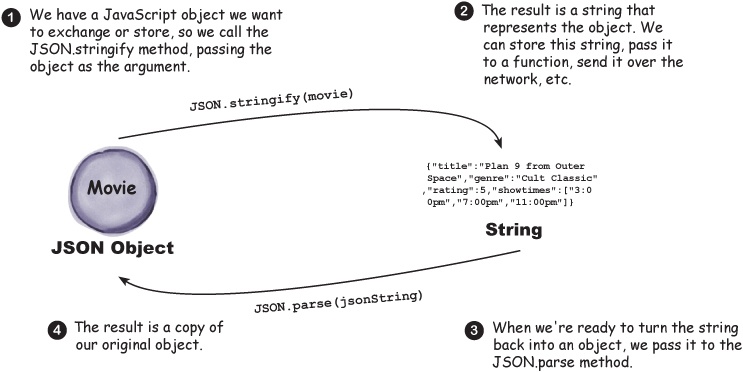
Let’s run through a quick example that converts an object into its JSON string format. We’ll start with an object you already understand, the Movie object from Chapter 4. Not everything can be converted into a JSON string—for instance, methods—but all the basic types, like numbers, strings, and arrays, are supported. Let’s create an object and then stringify it:
Once you’ve got an object, you can convert it into the JSON string format with the
JSON.stringifymethod. Let’s see how this works... (feel free to try this by opening your Chapter 4 movie code back up and adding the following code to the bottom of your script):Now we’ve got a JSON string that represents our movie object. At this point we could take this string and do any number of things with it, like send it over HTTP to a server. We can also receive a JSON string from another server. Let’s say a server gave us this string; how would we turn it back into an object we can do something with? Just use
JSON.stringify’s sister method:JSON.parse. Like this:


We’ve got our specs from Mighty Gumball and you’ve done your training on XMLHttpRequest and JSON. You should be all ready to get some code written and to get a first cut of the Gumball App running.
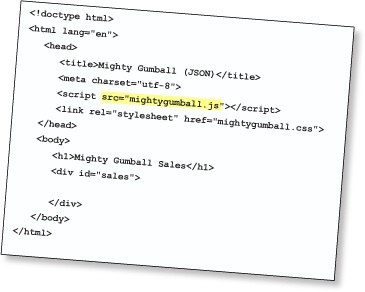
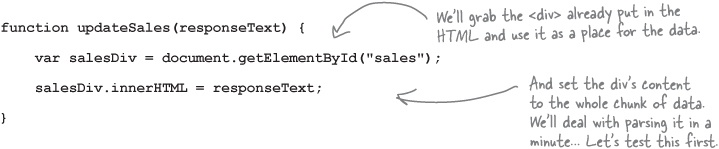
Now, remember we’ve already laid out some HTML to work from, which links to a file called mightygumball.js. That’s what we’re going to start writing our code now. Remember too that we’ve already left a spot in the HTML where we’re going to put the gumball sales data, right into the <div> we labeled with an id of “sales.” So let’s put everything together and write some code.
We’re sure this is old hat for you now, but we’re going to write an onload handler that gets invoked when the HTML is fully loaded; we’re also going to go ahead and fire off an HTTP request to get the sales data. When the data comes back we’ll ask the XMLHttpRequest to call the function updateSales (which we’ll write in just a sec):
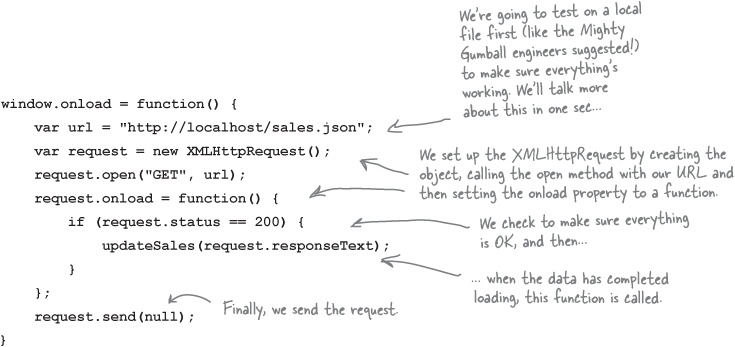
Now we need to write the handler, updateSales. Let’s make this easy and just go with the simplest implementation possible, we can always make it better later:
It’s time for another test drive, but we have a little detour to take care of first. The Mighty Gumball engineers asked us to test locally before hitting their production server, which is a good idea. But to do that we need the data to live on a server so that XMLHttpRequest can use the HTTP protocol to retrieve it.
In terms of servers you’ve got a few choices:
If your company has servers that are available for testing, use those.
Or, you can use a third-party hosting service like GoDaddy, Dreamhost or one of many other hosting companies.
Finally, you can set up a server right on your own machine. In that case your URLs are going to look something like:

Check out the next page for tips and pointers. Keep in mind, hosting environments differ a fair bit, so we can’t write a general guide to these. So, may the force be with you, and if you don’t have easy access to a server already, setting up a server on your local machine may be your best choice!
How you set up your local hosting really depends on what kind of operating system you’re using. Check out the tips below for OS X (otherwise known as the Mac), the PC and Linux. You’ll find other options on the next page.
I’m a Mac

Setting up a web server on the Mac is easy. Go to ![]() > System Preferences, and then choose Sharing. In the panel on the left, make sure Web Sharing is checked:
> System Preferences, and then choose Sharing. In the panel on the left, make sure Web Sharing is checked:
Once you’ve turned Web Sharing on (or if you already have it on), you’ll see some information about how to access your local server. You should be able to use localhost instead of the IP address (which tends to change if you’re using a DHCP router, so localhost will work better for you). By default, your files are served from http://localhost/~YOUR_USERNAME/, which serves files from your YOUR_USERNAME/Sites/ folder, so you’ll probably want to set up a subfolder there for Mighty Gumball.
I’m a PC

Installing your own web server on Windows is easier than it used to be thanks to the Microsoft Web Platform Installer (also known as Web PI). The current version is available for Windows 7, Windows Vista SP2, Windows XP SP3+, Windows Server 2003 SP2+, Windows Server 2008, and Windows Server 2008 R2, and you can download it from here: http://www.microsoft.com/web/downloads/platform.aspx.
Another option is to install the open source WampServer, which comes with Apache, PHP and MySQL for web application development. It’s easy to install and manage.
You can download WampServer from: http://www.wampserver.com/en/.
There are a few other open source solutions out there if you look, so you’ve got lots of options.
Ah, you want to really host your pages? Excellent, there’s no substitute for having your pages hosted on the real Web. Check out the tips below and have fun!
3rd Party Hosting...
If you don’t want to set up your own server, you can always use a remote server, but you’ll need to host your HTML, JavaScript and CSS, as well as the JSON file, all on the same server (we’ll talk later about why this is crucial) in order to follow along with this example.
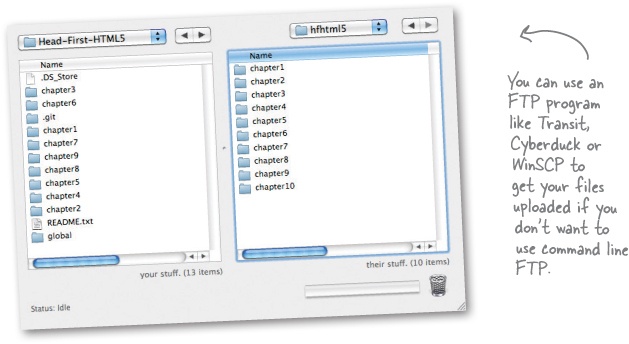
Most hosting services will give you FTP access to a folder where you can put all these files. If you have access to a server like this, upload all the files and substitute your server name wherever you see localhost in the following pages.
We’ve put together a list of hosting providers in case you need a recommendation, but they’re easy to find; just search for “web hosting” and you’ll find lots to choose from. Our list is at http://wickedlysmart.com/hfhtml5/hosting/hosting.html. And let us know if you get an HTML5 web site up online; we’d love to see it!
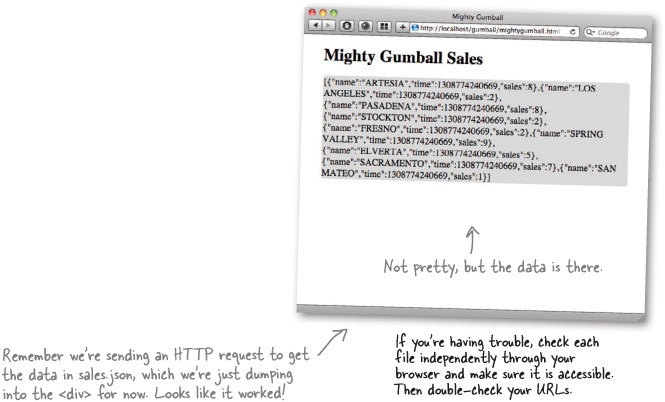
At this point we’re expecting you’ve got your own server up and running—that could be a server running on your local machine (what we’re doing) or a server somewhere else you have access to. In either case you’re going to place your HTML and JavaScript files on the server and then point your browser to the HTML file. You’re also going to need the Mighty Gumball sales data test file there too, so we’re going to give you a simple data file to place on your server. To your application it will look just like it’s being generated from Mighty Gumball’s near-real-time server, and it gives you a way to test your code without hitting the Mighty Gumball server. Here’s what the file looks like; it’s named sales.json and it’s included with the code for the book (or you can type it in if you enjoy that kind of thing):

Go ahead and put this file on your server and then make sure you update your JavaScript to the URL for this file. Ours is http://localhost/gumball/sales.json:

It’s been a long road but we’re finally ready to test this code!
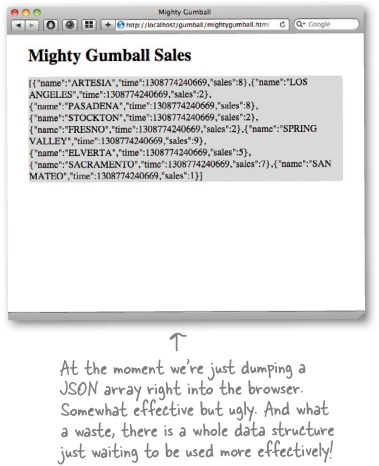
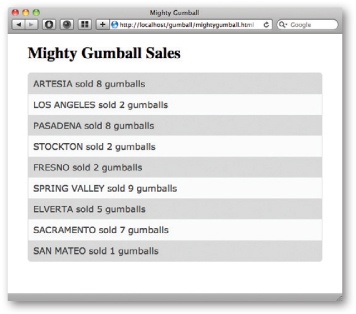
Just make sure you’ve got the HTML, JavaScript, JSON—and don’t forget your CSS—files on the server. Go ahead and enter the URL of your HTML file into your browser (ours is http://localhost/gumball/mightygumball.html), press return...
We’ve done a lot of heavy lifting to get this app working, and that’s great, but Mighty Gumball is going to be a lot more impressed if it looks good too. Here’s what we’re going for...
What we have
What we want

Here’s what we need to do to improve our display:
First we need to take the data we got back from our XMLHttpRequest object (which is just a JSON string) and convert it into a true JavaScript object.
Then we can walk through the resulting array and add new elements to the DOM, one per sales item in the array.
Let’s follow those two steps and get this code in shape:
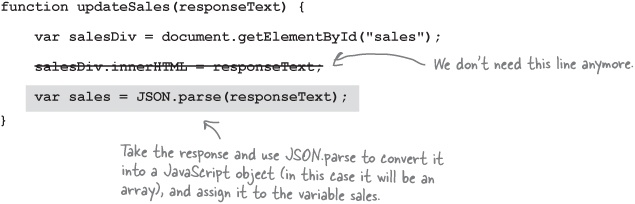
First we need to take the data we got from the
XMLttpRequestobject (which is just a JSON string) and convert it into a true JavaScript object.To do that, let’s update the
updateSalesfunction by first deleting the line that sets the <div> content to theresponseTextstring, and convert the responseText from a string to its equivalent JavaScript usingJSON.parse.Now let’s walk through the resulting array and add new elements to the DOM, one per sales item in the array. In this case we are going to create a new <div> for each item:
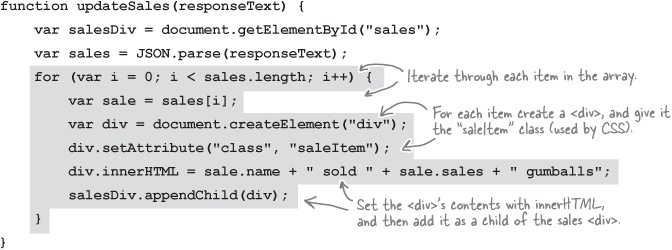
You already know what this one is going to look like, but go ahead and make these changes. Take one more careful look at the code on the previous page and make sure you’ve got it all down. Then go ahead, reload that page.


Mighty Gumball asked us to test locally, and we have. Now we’re ready to move on to testing against the real server. This time, rather than retrieving a static JSON data file, we’ll be retrieving JSON that is generated dynamically from the Mighty Gumball servers. We do need to update the URL that XMLHttpRequest is using and change it to point to Mighty Gumball. Let’s do that:
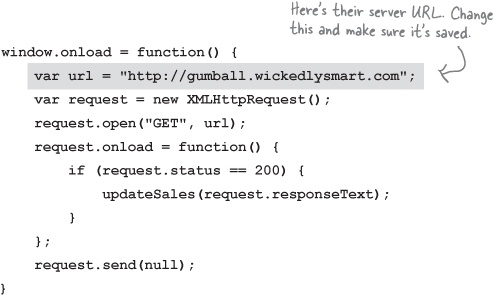
Make sure your URL change is saved in your mightygumball.js file on your server, if you want to keep retrieving your HTML from there, or to your local hard drive if you are using localhost. From there you know what to do: point your browser to your HTML file and watch the live, beautiful, real data from all those people around the world buying Mighty Gumballs!
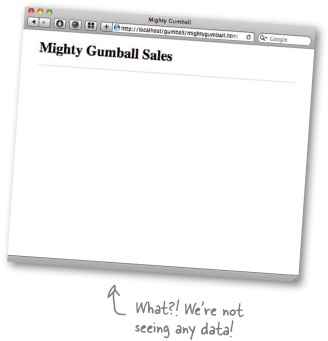

Yikes!
And everything was looking so good; we figured by this time we’d be sipping Perrier and celebrating another successful project with Mighty Gumball. Now the whole thing could go down in flames. Okay, we’re getting a little overly dramatic, but what the heck? This should have worked!
Note
Note to Editor: actually we thought we’d be cashing a fat advance check and shipping this book! Now we’ve got to write our way out of another fine mess!
Deep breath. Okay, there’s a logical explanation...
We’re not seeing any data in our page. It was all working fine until we moved to the live server...
Will we find the problem?
Will we fix it?

Stay tuned... we’ll answer these questions, and more...
And in the meantime, see if you can come up with ideas for what went wrong and how we can fix it.
Watch it!
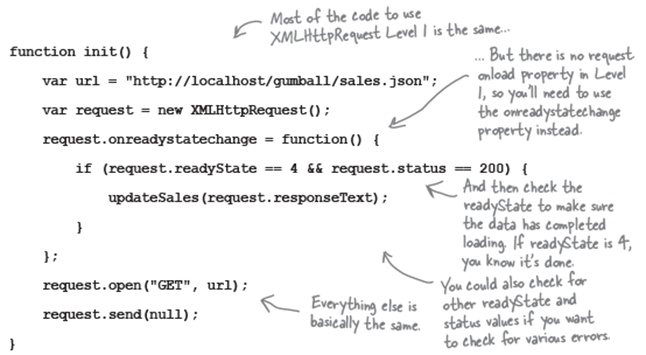
The XMLHttpRequest onload property isn’t supported by older versions of browsers, but there’s an easy workaround.
We’ve been using request.onload to define a function that is called when the request finishes getting the data from the server. This a feature of XMLHttpRequest Level 2 (think of it as “version 2”). XMLHttpRequest Level 2 is still pretty new, so many users may still be using browsers that don’t support it. In particular, IE 8 (and lower), and Opera 10 (and lower) support only XMLHttpRequest Level 1. The good news is that the new features of XMLHttpRequest Level 2 are enhancements, so you can continue to use only the features of version 1 in all browsers without any problems; it just means your code isn’t quite as elegant. Here’s the code to use XMLHttpRequest Level 1:
We had all the code working just fine using our local server, but as soon as we moved to the live server on the Web, it failed!
What we expected:
Here’s what our page looks like when we run the code using our local server to serve the sales data from http://localhost/gumball/sales.json.
What we Got:

Here’s what our page looks like when we run the code using the live Mighty Gumball server to serve the sales data from http://gumball.wickedlysmart.com.
Why, let’s do what we always do, pull the crew together for a quick cubicle conversation. We’re sure that together, all of us (including a few fictional characters) can figure this out! Frank? Jim? Joe? Where are you? Oh, there you are on the next page...


Jim: Do you have the correct URL?
Frank: Yep, and in fact, I typed it into the browser to make sure I see the sales data we’re expecting, and it worked fine. I don’t get it...
Joe: I peeked at the JavaScript console in Chrome and I see something about access control and origins or domains.
Frank: Errrrr?
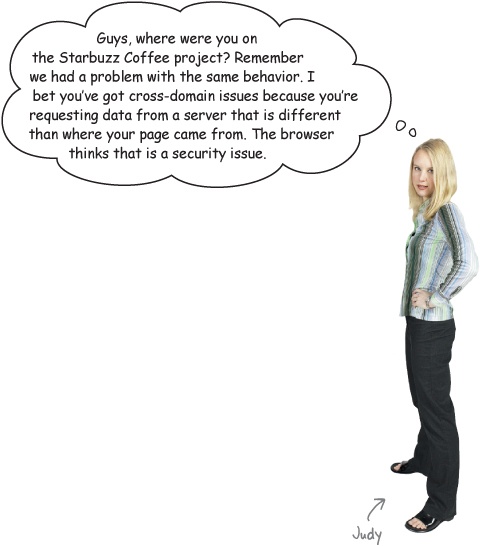

Okay, it’s embarassing to hit this kind of snag—just think of the position we’re putting you readers in—but Judy’s right, the browser does enforce some security around your XMLHttpRequest HTTP requests and that can cause some issues.
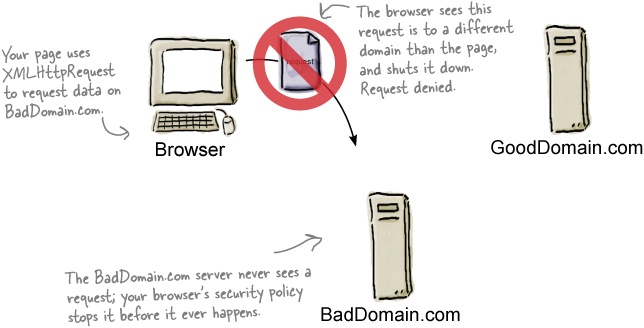
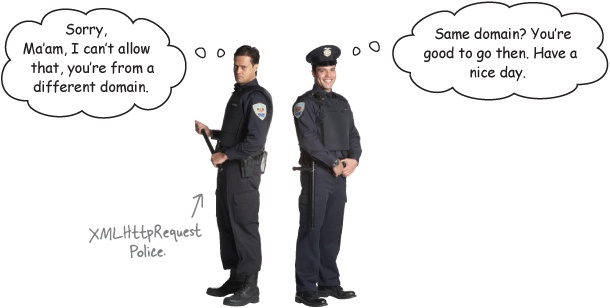
So what is this policy? Well, it’s a browser policy, and it says you can’t retrieve data from a domain that is different from the domain the page itself was served from. Say you’re running the site for DaddyWarBucksBank.com and someone has hacked into your systems and inserted a bit of JavaScript that takes the user’s personal information and does all kinds of interesting things with it by communicating with the server HackersNeedMoreMoney. com. Sounds bad right? Well, to stop that sort of thing, browsers prevent you from making XMLHttpRequests to domains other than the original domain the page was served from.
Let’s take a look at what is okay, and what isn’t:


Now let’s see what happens when your page hosted at GoodDomain.com tries to make a request for data using XMLHttpRequest to BadDomain.com instead.
Just like before, the browser makes a request for a page on GoodDomain.com. This may include JavaScript and CSS files that are also hosted at GoodDomain.com.
But now we have code that wants data from another source, that is, BadDomain.com. Let’ s see what happens when the page requests that data using XMLHttpRequest:
Say you were a developer working on code for Mighty Gumball, then you’d typically have access to their servers (or to people who could deploy files to the servers for you), and you could place all your files there and avoid any cross-domain issues. In this case, however (and we do hate to break your suspension of disbelief), you’re not actually working for Mighty Gumball, you’re readers of this book, and we can’t think of a way to have a couple hundred-thousand people copy their files to the Mighty Gumball servers.
So where does that leave us? Have we reached a dead end? No, we’ve still got a few options. Let’s step through them...
We gotta be honest with you, we knew all along that the XMLHttpRequest cross-origin request would fail. But, as we just said, when you’re building apps you’ve often got access to the server and so this isn’t an issue (and if you’re building apps largely dependent on your own data, using XMLHttpRequest is usually the best way to do it).
But at this point we can hear you saying “that’s great, but how can we get this code working already?” Well, we’ve got a couple ways to make that happen:
Plan 1: Use our hosted files.
We’ve already put files on our server for you and placed the files at:
http://gumball.wickedlysmart.com/gumball/gumball.html
Go ahead and give it a try by pointing your browser to this URL and you’ll be able to see the same code you typed in so far in action and working.
Plan 2: Use another way to get the data.
So,
XMLHttpRequestis a great way to get data into your apps when that data is hosted at the same domain as your app, but what if you need to really get data from a third party? Say you need data from Google or Twitter for instance? In those cases we really do have to break through this problem and find another approach.As it turns out there is another way, based on JSON, known as JSONP (if you’re curious it stands for “JSON with Padding”; we agree that sounds weird, but we’ll walk through it in just a sec). Get your jetpack on because the way it works is a little “from another planet” if you know what we mean.

Joe: Totally! But, what is it?
Jim: Sounds like it is another way to get data from web services into our apps.
Frank: I’m useless here, I’m just the creative guy.
Jim: Frank, I don’t think this is that bad. I quickly google’d JSONP and basically it is a way of getting the <script> tag to do the work of retrieving the data.
Joe: Huh, is that legit?
Jim: Totally legit—a lot of big services are supporting it, like Twitter.
Frank: Sounds like a hack.
Joe: Well yeah, that’s what I was getting at. I mean, how can using the <script> tag be a kosher way of getting data? I don’t even get how that would work.
Jim: I’m only a little way into understanding it myself. But think about it this way: when you use a <script> element, it is retrieving code for you right?
Joe: Right...
Jim: Well, what if you put data in that code?
Joe: Okay, wheels are turning...
Frank: Yeah, you mean hamster wheels...

HTML5 Guru: ...and this is one of those times. Grasshopper, look at this code:
What does it do?
Web Developer: When you evaluate it, assuming it is running in a browser, it will display an alert saying “woof”.
Guru: Ah, yes. Create your own simple HTML file and put a <script> element in it, in the body, like this:
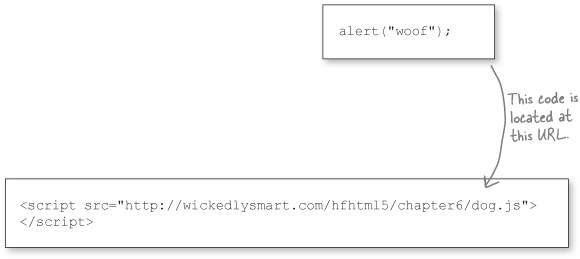
Guru: What does it do?
Web Developer: It loads the page, which loads the JavaScript from dog.js from wickedlysmart.com, which calls the alert function, and I see an alert with “woof” displayed by the browser.
Guru: So a JavaScript file, served from another domain, can call a function within your browser?
Web Developer: Well, now that you put it that way, yes Guru, I guess that is what is happening. The dog.js file at wickedlysmart.com, once retrieved, calls alert in my browser.
Guru: You’ll find another file at: http://wickedlysmart.com/hfhtml5/chapter6/dog2.js with the JavaScript:

Guru: What does it do?
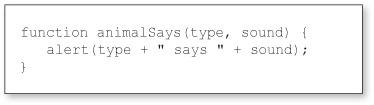
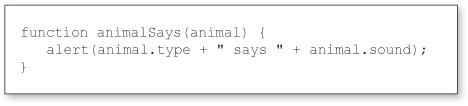
Web Developer: It’s similar to dog.js, but it calls a function animalSays. It also has two arguments not one: the animal type, and the animal sound.
Guru: Write the function animalSays and add it in a <script> element in the head of your HTML file, above the <script> element that points to wickedlysmart.
Web Developer: How’s this?
Guru: Very good, you’re progressing well. Now, change your other <script> reference, the one that points to dog.js, to point to dog2.js and reload the page in your browser.
Web Developer: I get an alert that says “dog says woof”.
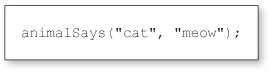
Guru: Take a look at http://wickedlysmart.com/hfhtml5/chapter6/cat2.js, change your <script> reference to point to cat2.js and try that.
Web Developer: I get an alert that says “cat says meow”.
Guru: So not only can a JavaScript file that was served from another domain call any function it wants in your code, but it can also pass us any data it wants?
Web Developer: I don’t see any data really, just two arguments.
Guru: And arguments aren’t data? What if we change the arguments to look like this:

Web Developer: Now the function animalSays is passing one argument that happens to be an object. Hmm, I can certainly see how that object starts to look like data.
Guru: Can you rewrite animalSays so it uses the new object?
Web Developer: I’ll give it a try...
Web Developer: How’s this?
Guru: Very good. Change your reference to http://wickedlysmart.com/hfhtml5/chapter6/dog3.js and try it. Try http://wickedlysmart.com/hfhtml5/chapter6/cat3.js too.
Web Developer: Yes, both work as you would expect with my new function.
Guru: What if you change the name of animalSays to updateSales?
Web Developer: Guru, I don’t see how animals are related to gumball sales?
Guru: Work with me here. What if we rename dog3.js to sales.js, and rewrite it like this:

Web Developer: I think I’m starting to get it. We are passing data through the JavaScript file we’re referencing, rather than using XMLHttpRequest to retrieve it ourselves.
Guru: Yes, Grasshopper. But don’t miss the forest for the trees. Are we not also getting it from another domain? Something that is forbidden by XMLHttpRequest.
Web Developer: Yes, it appears that way. This seems truly like magic.
Guru: There is no magic, the <script> element has always worked like this. The answer was within you all along. Now please go meditate on how this works to make it stick.
Web Developer: Yes master. “Make it stick”... you know that phrase sounds so familiar but I can’t quite place it.
Zen Moment
Using JavaScript to retrieve data is something you have to become one with. Grab a sheet of paper or use the inside cover of this book. Draw a server that hosts your HTML & JavaScript files. Also draw a server at another domain that has the files dog3.js and cat3.js. Now go through the steps the browser uses to get and use the object in each file. When you think you’ve got it, we’ll go through it all again together.
You’ve probably figured out that JSONP is a way to retrieve JSON objects by using the <script> tag. It’s also a way of retrieving data (again, in the form of JSON objects) that avoids the same-origin security issues we saw with XMLHttpRequest.
Let’s step through how JSONP works over the next few pages:

OK, the first thing you need to know about JSONP is it has a dumb and non-obvious name: “JSON with Padding.” If we had to name it, we’d call it something like “JSON with a Callback” or “get me some JSON and execute it when you get it back” or, well, really just about anything other than JSON with Padding.
But, all the padding amounts to is wrapping a function around the JSON before it comes back in the request. Here’s how that works:
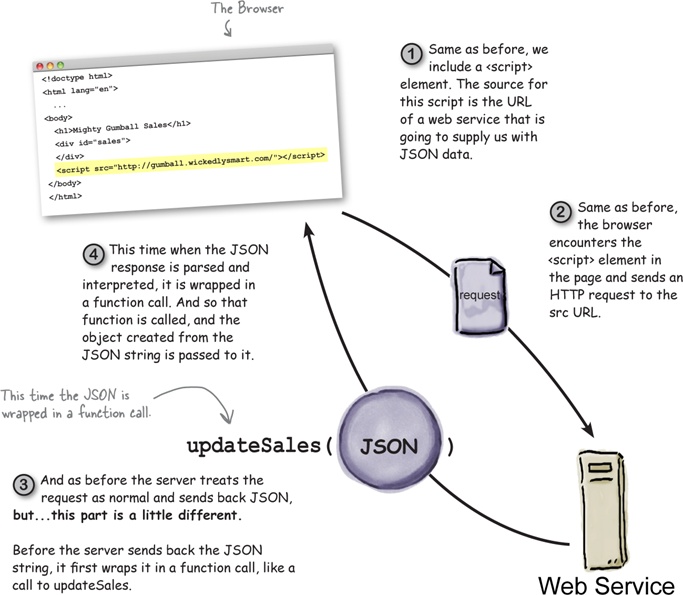

Web services let you specify a callback function.
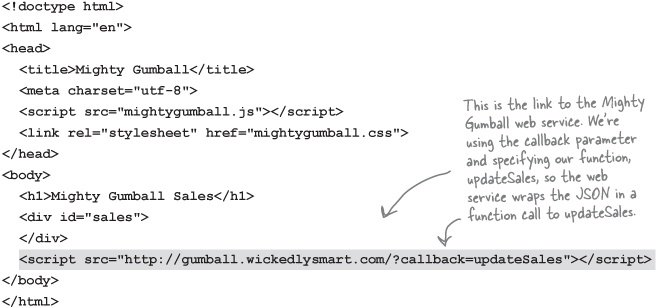
In general, web services allow you to specify what you want the function to be named. Although we didn’t tell you, Mighty Gumball is already supporting a way to do this. Here’s how it works: when you specify your URL, add a parameter on the end, like this:
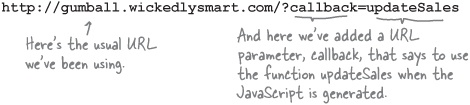
MightyGumball will then use updateSales to wrap the JSON formatted object before sending it back to you. Typically, web services name this parameter callback, but check with your web service documentation to make sure that’s what they’re using.
Brain Power
Try these URLs: what do you see in the response?
http://search.twitter.com/search.json?q=hfhtml5&callback=myCallback
http://search.twitter.com/search.json?q=hfhtml5&callback=justDoIt
http://search.twitter.com/search.json?q=hfhtml5&callback=updateTweets
Note: Firefox will ask you to open or save a file. You can open with TextEdit, Notepad, or any basic text editor.
Jim: Well, almost.
Joe: I think this actually allows us to delete some code.
Frank: And I’m ready to make it all look good when you’re done.
Jim: So Joe, code-wise, what do you have in mind?
Joe: With XMLHttpRequest we were retrieving a string. Using JSONP, the script tag is going to parse and evaluate the code coming back, so by the time we get our hands on the data it will be a JavaScript object.
Jim: Right, and with XMLHttpRequest we were using JSON.parse to convert the string into an object. We can just get rid of that?
Joe: Yup. That’s my story and I’m sticking to it.
Jim: What else?
Joe: Well obviously we need to insert the <script> element.
Jim: I was wondering about that. Where do we put it?
Joe: Well, the browser is going to control when it loads, and we want the page to be loaded first, so we can update the DOM when updateSales is called. The only way I can think of dealing with that is to put the <script> at the bottom of the page in the body of the HTML.
Jim: Yeah, sounds like a good guess. We should look into that a little more. But for starters let’s try it.
Joe: Okay, I want to get this code working! Let’s get this code in!
Frank: You guys better hurry, I bet Judy’s already got her own version in the works.
It’s time to update your Mighty Gumball code with JSONP. Other than removing the existing code that deals with the XMLHttpRequest call, all the changes are minor. Let’s make those changes now:
What we need to do:
Remove our XMLHttpRequest code.
Make sure the updateSales function is ready to receive an object, not a string (as it was with the XMLHttpRequest).
Add the <script> element to do the actual data retrieval.
All the code in our onload function was code involved in the XMLHttpRequest, so we can just delete it. We’ll keep the onload function around in case we need it a little later. For now it will do nothing. Open up your mightygumball.js file and make these changes:
Next, remember that when we use the <script> element, we’re telling the browser that it needs to retrieve JavaScript, and so the browser retrieves it, parses it and evaluates it. That means by the time it gets to your updateSales function, the JSON is no longer in string form, but is a first-class JavaScript object. When we used XMLHttpRequest, the data came back in the form of a string. Right now, updateSales assumes it is getting a string, so let’s change that so that it handles an object, not a string:
And finally, let’s add the <script> element to do the actual data retrieval.


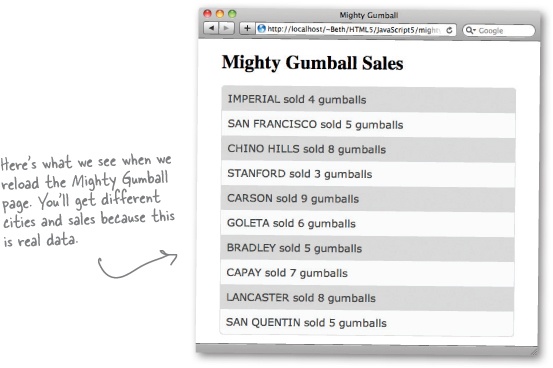
If you’ve made all your changes, it’s time for a test drive. Reload mightygumball.html into your browser. You’re now loading Mighty Gumball sales data using your web app and JSONP. The page should look the same as when you were getting the sales data from the local file, but you know that it’s using a whole different method of getting the data.


It’s not any more or less secure than using <script> to load JavaScript.
It’s true: if you make a JSONP request to a malicious web service, the response could include JavaScript code you’re not expecting and the browser will execute it.
But it’s no different than including JavaScript by linking to libraries hosted on other servers. Any time you link to JavaScript, whether it’s to a library in the <head> of your document, or using JSONP, you need to be sure you trust that service. And if you’re writing a web app that uses authentication to give the user access to sensitive data, it’s probably best not to use third party libraries or JSON data hosted on other servers at all.
So choose the web services you link to carefully. If you’re using an API like Google, Twitter, Facebook or one of the many other well-known web services out there, you’re safe. Otherwise, caution is advised.
In our case, we know the Mighty Gumball engineers personally and we know they’d never put anything malicious in their JSON data, so you’re safe to proceed.

Brain Power
He’s right, we need to change our app so that it is updating the display with new sales at some regular interval (say, every ten seconds). Right now we’re just putting a <script> element into the page that initiates the request to the server only one time. Can you think of any way to use JSONP to continually retrieve new sales reports?
Hint: using the DOM we can insert a new <script> element into the page. Could that work?

Jim: Yeah, he wants the data to be continually updated in the display.
Judy: That does make sense. I mean one big advantage of a web app is you don’t have to refresh it like a web page.
Joe: Fair enough, and obviously we know how to replace old sales data with new sales data in the page using the DOM. But we’re not sure yet how to handle the JSONP part.
Judy: Remember, you can use the DOM with the <script> element too. In other words, you can create a new <script> element in the DOM any time you want to retrieve more data.
Jim: Okay, right over my head. Can you say that again?
Joe: I think I sort of get it. Right now, we’re putting the <script> element statically in the HTML markup by just typing it in. We could instead create a new <script> element with JavaScript code, and add it to the DOM. The only part I’m not sure of is, will the browser do another retrieval when we create the new <script> element?
Judy: It sure will.
Jim: I see, so we’re creating a new <script> element any time we want the browser to do a JSONP-type operation for us.
Judy: Right! Sounds like you’re getting it. And you know how to do it over and over?
Jim: Well, uh, we’re not there yet, we were still thinking about the JSONP.
Judy: You know all about handler functions by now, you know like onload or onclick. You can set up a timer to call a function handler at a specified interval using the setInterval method in JavaScript.
Joe: So, let’s get that set up and get the dynamic JSONP working ASAP for the Gumball CEO.
Jim: Oh, is that all you want? We better get on it!
As you can see we have a little more work to do, but it’s not going to be too bad. Basically, we wrote our first version so that it grabs the latest sales reports from Mighty Gumball and displays them, once. Our bad, because almost any web app these days should continuously monitor data and update the app in (near) real time.
Here’s what we need to do:
We’re going to remove the JSONP <script> element from the Mighty Gumball HTML, because we won’t be using that any more.
We need to set up a handler to handle making the JSONP request every few seconds. We’ll take Judy’s advice and use JavaScript’s setInterval method.
Then we need to implement our JSONP code in the handler, so that each time it is called it makes a request to get the latest Mighty Gumball sales reports.
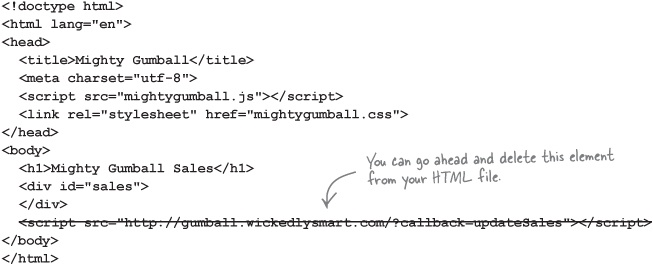
We’re going to be using a new way to invoke our JSONP requests, and so let’s go ahead and remove the <script> element from our HTML.
Okay, we’re progressing from retrieving the sales reports once, to retrieving them every so often, say every three seconds. That might be too fast or slow depending on the application, but for Mighty Gumball we’re going to start with three seconds.
Now, to do something every three seconds we need to have a function we can call every three seconds. And, as Judy mentioned, we can use the setInterval method in the window object to do this; here’s what it looks like:

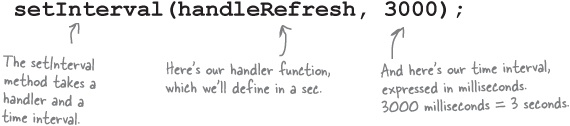
So every 3,000 milliseconds JavaScript will invoke your handler, in this case the handleRefresh function. Let’s write a simple handler and give it a try:

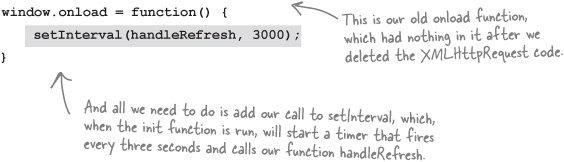
Now we just need some code to set up the setInterval call, which we’ll add to the onload function so it gets set up right after the entire page is loaded:
Let’s give this a try and then when we know it’s working—that is, when we see our our handler being invoked every three seconds—we’ll implement the JSONP code.
This should be fun. Make sure you’ve typed in the handleRefresh function and also made the changes to the onload handler. Save everything and load it into your browser. You’ll see a stream of alerts, and you’ll have to close your browser window to stop it!

Sharpen your pencil
Now that you know about setInterval (not to mention XMLHttpRequest and JSONP), think of ways you could use them in other web applications. List those here:
Check and update progress on a task and display it._______
See if any new comments have been posted on a topic.______
Update a map if any friends have shown up nearby._________
__________________________________________________________
__________________________________________________________
__________________________________________________________
__________________________________________________________
__________________________________________________________
__________________________________________________________

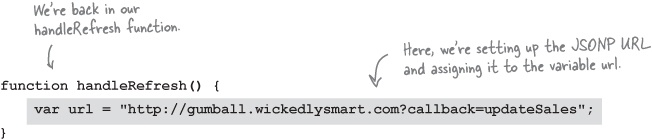
We still want to use JSONP to retrieve our data, but we need a way to do it whenever our refresh handler is called, not just at page load time. That’s where the DOM comes in—the great thing about the DOM is that we can insert new elements into the DOM at any time, even <script> elements. So, we should be able to insert a new <script> element any time we want to make a JSONP call. Let’s work up some code using everything we know about the DOM and JSONP to do this.
This is the same URL we used with our previous script element. Here we’ll assign it to a variable for later use. Delete the alert out of your handler and add this code:
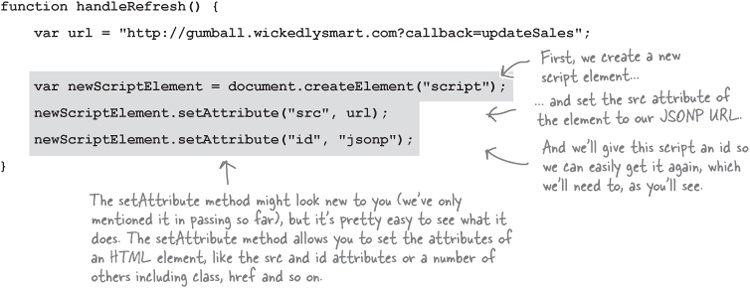
Now, instead of having the <script> element in our HTML, we’re going to build a <script> element using JavaScript. We need to create the element, and then set its src and id attributes:
We’re almost there, we just need to insert our newly created script element. Once we do that the browser will see it and do its thing, causing the JSONP request to be made. Now, to insert the script requires a little bit of planning and forethought; let’s see how this is going to work:
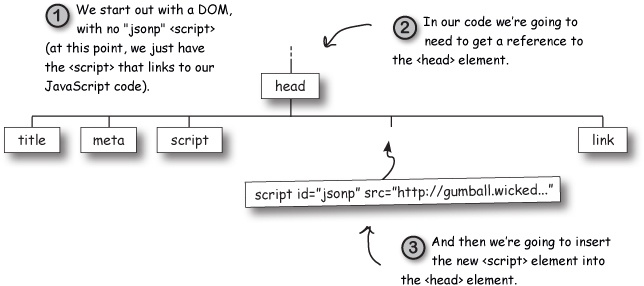
Once we’ve inserted the script, the browser will see the new script in the DOM and go retrieve what’s at the URL in the src attribute. Now, we’ve also got a second use case. Let’s look at it.

Now that we know the steps, let’s check out the code. We’ll do this in two steps too: first we’ll show the code to add a new script, then the code to replace a script:
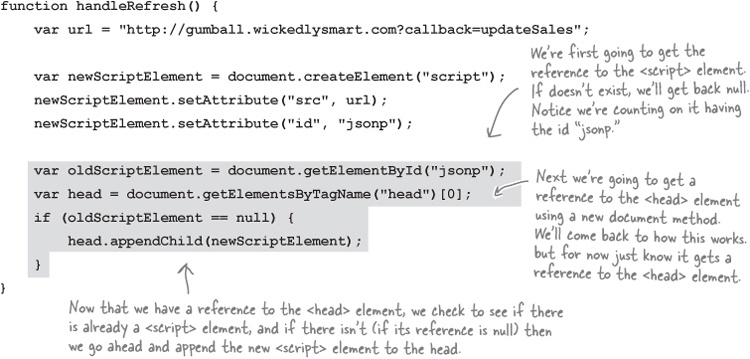
Okay, let’s check out the code that replaces the script element if it already exists. We’ll just show the conditional if statement, which is where all the new code is:

getElementsByTagName Up Close
This is the first time you’ve seen the getElementsByTagName method, so let’s take a quick up close look. It’s similar to getDocumentById, except that it returns an array of elements that match a given tag name.
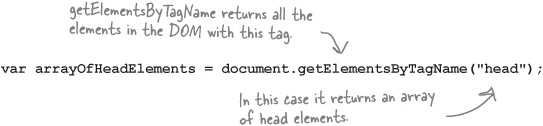
Once you have the array, you can get the first item in it using index 0:

Now we can combine these two lines, like this:

In our code example, we’re always using the first <head> element but you can use this method on any tag, like <p>, <div> and so on. And usually you’ll get more than one of those back on the array.
replaceChild Up Close
Let’s also look at the replaceChild method because you haven’t seen that before. Call the replaceChild method on the element in which you want to replace a child, passing in the references to both the new and old children. The method simply replaces the old child with the new one.

We’re almost ready to go here, but there’s a small detail we need to take care of, and it’s one of those “if you’ve never done it before, how would you know you need to address it” kind of issues.
Most browsers have an interesting property in that if you retrieve the same URL over and over (like our JSONP request will), the browser ends up caching it for efficiency, and so you just get the same cached file (or data) back over and over. Not what we want.

Luckily there is an easy and old-as-the-Web cure for this. All we do is add a random number onto the end of the URL, and then the browser is tricked into thinking it’s a new URL the browser’s never seen before. Let’s fix our code by changing the URL line above to:
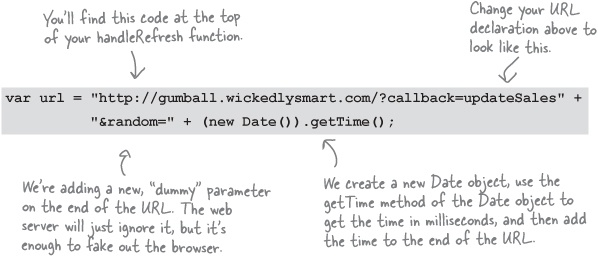
With this new code, the generated URL will look something like this:

Go ahead and replace the url variable declaration in your handleRefresh function with the code and then we’ll be ready for a test drive!
Alright, surely we’ve thought of everything this time. We should be all ready. Make sure you’ve got all the code in since the last test drive, and reload the page. Wow, we’re seeing continuous updates!

If you take a quick look back at the Gumball Specs in A quick example using JSON, you’ll see that you can specify a last report time parameter in the request URL, like this:
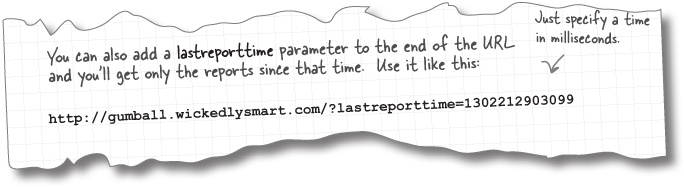
That’s a great, but how do we know the time of the last report we’ve retrieved? Let’s look at the format of the sales reports again:

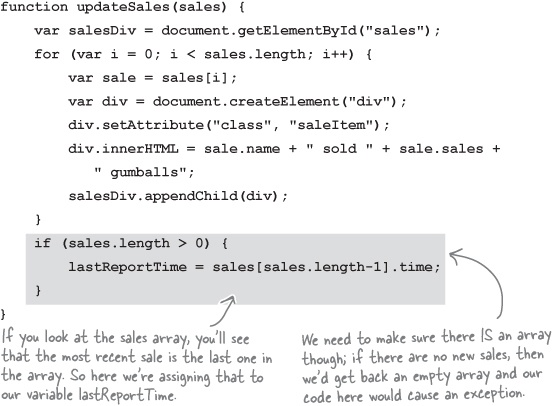
And to keep track of the last sales report received we’re going to need to make some additions to the updateSales function, where all the processing of the sales data happens. First, though, we should declare a variable to hold the time of the most recent report:

And let’s grab the time of the most recent sale in updateSales:
Now that we’re keeping track of the last reported sales time, we need to make sure we’re sending it to Mighty Gumball as part of the JSON request. To do that, we’ll edit the handleRefresh function, and add the lastreporttime query parameter like this:

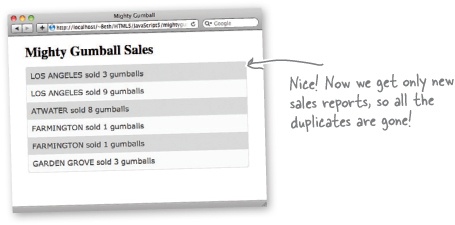
Let’s take the lastreporttime query parameter for a test run and see if it solves our duplicate sales reports problem. Make sure you type in the new code, reload the page, and click that refresh button.


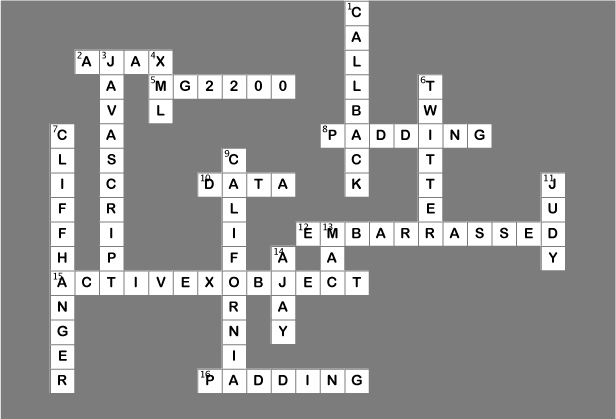
HTML5cross
Wow, you got your apps talking to the Web in this chapter! Time for some left-brain activity to help it all sink in.

Across | Down |
|---|---|
2. The pattern of using XMLHttpRequest to get data from servers is sometimes called ______. 5. ______ is the latest Mighty Gumball Web-enabled gumball machine. 8. XMLHttpRequest made fun of JSONP’s ___________. 10. The Guru teaches Grasshopper that function arguments are also _______. 12. We were ___________ to get twenty-five pages into the chapter before discovering the browser security policy. 15. One of XMLHttpRequest’s nicknames at Microsoft. 16. JSONP stands for “JSON with _______”. | 1. JSON P uses a ____________. 3. JSONP uses these types of objects. 4. Format we all thought would save the world. 6. _______ has a JSONP Web service. 7. This chapter had one of these in the middle. 9. Mighty Gumball is testing the MG2200 in ___________. 11. ______ reminded Frank, Jim, and Joe about the cross-domain security issues with XMLHttpRequest. 13. It’s easy to set up a local server on a ______. 14. ______, the QA guy, was upset when the request to the production Gumball server failed. |