
Remote control of a system allows a user to control a host from a remote location as if he or she were sitting in front of that system with local and physical access. This poses a significant security hole since it allows someone to use your resources from remote locations, perhaps over the Internet. Often once hackers gain access to a system, they install a remote control program to work on the system as if they were sitting at the console.
The remote control tools that provide this functionality can also serve a legitimate purpose, such as allowing employees to telecommute. Several corporations use remote control software to augment help desk or software maintenance functions. Allowing help desk employees to log in remotely to service the machine or upgrade software without having to travel to where the machine is located can save time and money.
That is the upside to remote control software. The downside is that the software listens for connections to which the software is prepared to give some and possibly full control over the host. This is quite dangerous. There are security measures that can be somewhat effective in countering the risk these tools present. However, if you can do without remote control software on your network, all the better. Remote control software is less popular than but akin to having rogue modems on user desktops. It potentially allows users to bypass security measures in place and access hosts on the network.
During testing, we take advantage of remote control devices installed on machines within our target networks. We even take the extra step of installing such programs on machines within the network to help us penetrate further. Often we install Virtual Network Computing (VNC) to give us remote access to a desktop on which we can then install a sniffer, such as Network Sniffer Pro or the old SessionWall tool . In addition, we can use VNC to remotely launch our tools from the exploited system. You should be careful using these tools during testing since you are installing software on the client's systems. You should make sure the use of such tools is covered in your testing agreement.
There are many tools that allow remote control, including pcAnywhere, VNC, NetBus, and Back Orifice 2000 (BO2K). PcAnywhere is currently the market leader; however, VNC is a freely available option. NetBus has always been considered a hacker tool, but its champions made an attempt to make it a legitimate remote management tool. BO2K is a modification of Back Orifice, which now also works on Windows NT/2000 as well as Windows 95. BO2K is a well-known hacker tool with the single intent of aiding in the compromise of infected hosts. While we do not actually use BO2K in our penetration testing, we cover it in this chapter since it is a popular remote control hacking tool available today.
Another software tool, Timbuktu, is popular among large organizations as a help desk tool. We do not cover it since it is not generally used to penetrate systems or perform ethical hacking. Timbuktu requires the remote user to consciously accept any incoming connections. The tools we mention here and use in the field can operate without the victim being aware of the intruder's presence.
URL: www.symantec.com
Client OS: Windows 9x/NT/2000
Target OS: Windows 9x/NT/2000
Description: This is one of the most popular remote control/management tools currently available. It features a client–server architecture, with the server running on the controlled host (called the host PC) and the client on the controlling host. However, the same source code can act as both a server and a client.
If you find pcAnywhere running on a host, you can (if you have the client running on your machine) attempt to connect to it. There are two passwords involved with this program, one protecting the administrator (user_admin) account and a second necessary to edit pcAnywhere's configuration. This password is used to decrypt the user_admin.cif file in which the properties are defined.
When connecting, you may be able to guess these passwords. Remote control software, including pcAnywhere, is frequently used as a convenience-seeking tool and in light of this, the passwords are often easy to guess. If that is not the case, there is a tool, pcax.exe, available that can crack both passwords. pcax.exe is run on the host running the pcAnywhere server.
Use: You can connect to a host running pcAnywhere in multiple ways. One method is to dial in through a modem. Often hosts with rogue modems also feature listening pcAnywhere servers. Additionally, connections can be made over networks running TCP/IP, SPX, NetBIOS, or Banyan VINES (newer versions may add additional protocols). Connections are made with either the host name or IP address. A direct cable connection is also possible.
Once you are connected, you should attempt to ascertain the level of control you have achieved. Within pcAnywhere, it is possible to specify permissions for individual users. While pcAnywhere is not an entirely secure tool, a few configuration options are available that can help thwart a hacker.
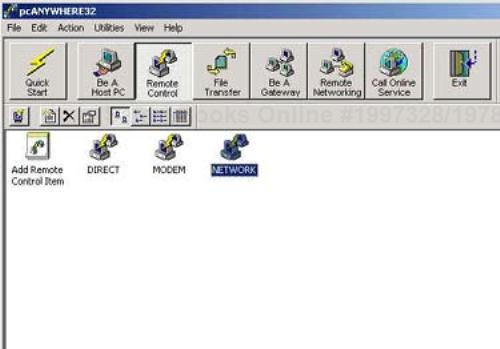
This tool has a GUI front end through which it can be configured and used as either the host PC or the controlling PC. Configuration settings are specified by selecting the appropriate button on the tool bar along the top of the GUI. By clicking on the Remote Control button, the icons illustrating the available connection options are displayed, as seen in Figure 18-1
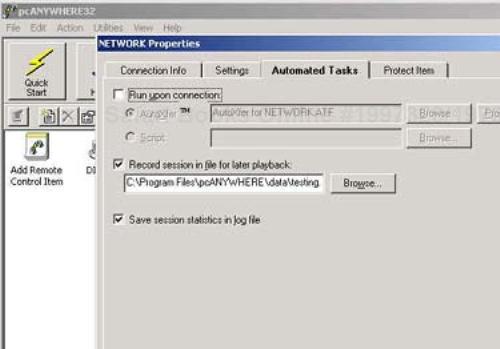
Double-clicking on one of these options starts the connection process. Before doing so, it is important to first configure the connection properties. For instance, you can select scripts to run immediately upon connection and record the session for future playback. You can configure the scripts to include a host of commands, including uploading or downloading files. These settings (see Figure 18-2) appear under the Automated Tasks tab in the NETWORK Properties menu; they can be accessed by right-clicking on the icons.
You can also select a new remote control item. This GUI-led process develops a new connection type featuring either a direct, modem, or network-based connection method.
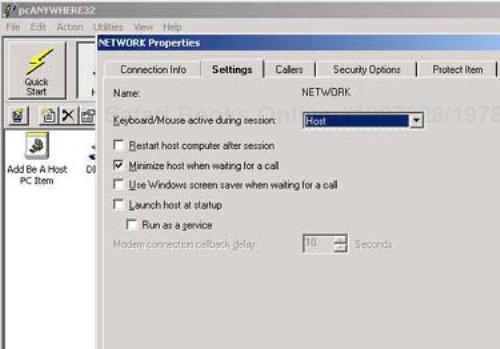
The settings under the Be A Host PC tab are also configured in a straightforward manner. However, since allowing remote users to control your PC is a significant security hole, we suggest that you lock down these settings as soon as you install pcAnywhere—especially if your main interest is to use the software to control remote hosts. We highlight a few settings that can be helpful. You can deny remote control of the keyboard and mouse to the remote controller under the Settings tab (see Figure 18-3) of the NETWORK Properties window. Thus the remote host will not be able to control either of these data input devices, greatly diminishing their ability to compromise your host.
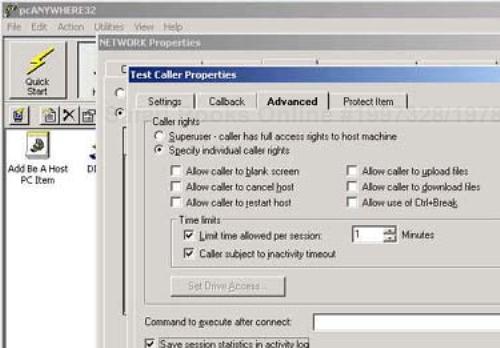
It is also possible to restrict who can connect remotely by configuring individual callers and their individual user rights on the Callers tab of the NETWORK Properties screen. You can configure new callers by double-clicking the Add Caller icon and then selecting the Advanced tab (see Figure 18-4). This screen's name will correspond to the name you give to your caller. You will definitely want to remove the Superuser designation of the remote caller. Additionally, we recommend you place a time limit on callers and make them subject to an inactivity timeout so that they cannot work indefinitely on ways to compromise your machine. Logging the session statistics is also a good idea to retain the ability to perform any forensics or incident response later.
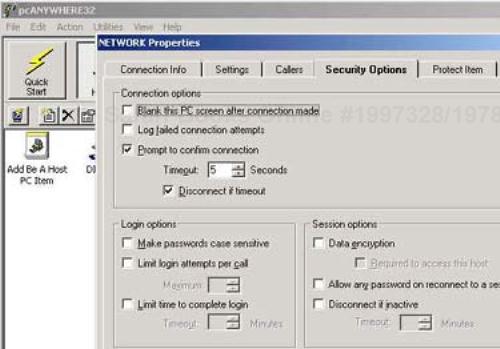
Additionally, it is a good idea to set pcAnywhere to request confirmation from the host user before accepting a remote connection. This is done by selecting a specific option, Prompt to confirm connection, under the Security Options tab of the NETWORK Properties screen (see Figure 18-5). You can also specify a timeout in seconds.
With nearly all configuration settings within pcAnywhere, a password should be used to protect them. This password will be required the next time any user attempts to make additional changes to these settings. Although there are tools to help potential hackers circumvent passwords, we still strongly encourage their use.
URL: www.uk.research.att.com/vnc
Client OS: Linux (x86 platforms), Solaris (SPARC), DEC Alpha OSFI, Mac OS, Windows 9x/NT/2000, Windows CE
Target OS: Linux (x86 platforms), Solaris (SPARC), DEC Alpha OSFI, Mac OS, Windows 9x/NT/2000
Description: VNC allows for the remote control of hosts (UNIX or Windows OS) from anywhere, even over the Internet via TCP ports 5800 and 5900. It is not uncommon for VNC to be used to control servers located in server rooms from a desktop PC. There are three ways an attacker can access the target: through a Java-enabled Web browser, the VNC viewer, and even a Palm Pilot. In our penetration testing, if loading a remote control device will help us, we usually use VNC.
VNC was originally developed and distributed by Olivetti Research Labs (ORL). ORL has been purchased by AT&T and the software is now freely available at www.uk.research.att.com/vnc.
Use: Although there is a list of operating systems for which this tool has been developed, we have run the program successfully on Red Hat Linux 6.2, Windows NT 4.0 (Service Packs 3–6), and Windows 2000.
Configuration and use of the program in either environment is fairly straightforward, and the Web site contains a great deal of documentation and useful information. On Windows machines, we load the tool on our own machine in order to make a copy of the two registry keys the tool creates. We copy these two keys and, with regedit, paste them into the target registry. This program does require you to have administrator privileges on the target machine, and using it changes the registry. However, it does not require a reboot, as does pcAnywhere.
Once you have patched the target's registry and loaded the VNC files on the target, you can install the program with the following command on the target machine:
C:> winvnc –install
You can then start the WinVNC listener by using the following command:
C:> net start winvnc
You may have to wait a few seconds between issuing these two commands. In newer versions, the WinVNC listener can be started through the Start menu. An icon is placed on the system tray while the tool is running (one for the WinVNC listener and one for the VNC viewer). However, we use an older version (version 2), which does not do this, thus drawing less attention from system administrators or users of the target host. VNC also loads as a service, making its detection more difficult.
On Linux, loading VNC may be a bit more challenging because the locations of files, including Perl and various class files, have to be determined and either the code modified or the files moved to where VNC expects to find them. Also, the VNC software files themselves should be in a directory within the root's path.
Once that is done, start the listener by simply executing the following command:
#>./vncserver
This Perl script starts the Xvnc server that listens for incoming connections. Also, it is important to set the connection password with the command:
#>./vncpasswd
You will be prompted to enter a password and verify it. The password is encrypted and written to the file /root/.vnc/passwd.
Once the service is started, you can connect to it through any of the three methods mentioned above. Our usual choice is to do so through a Web browser. You will need the password selected during installation to make the connection.
Under Windows, the default port for Web connections is TCP port 5800 and TCP port 5900 for connections through the VNC viewer. In Linux, the connection port for the VNC viewer is still in the 5900s, but the exact port is specified each time the VNC server is started. When the VNC server is started, a log of the script and the process ID are written to separate files called linuxap:#.log and linuxap:#.pid within the /root/.vnc directory. This number is sequentially incremented. The first time the script is run, the number is 1. The second time, it's 2, and so on. These numbers correspond to ports 5901 and 5902, respectively. Therefore, when connecting through a VNC listener on the fourth instance of a VNC server, the port is 5904. (If all the files generated when the VNC server is launched are deleted, the numbering starts over). The VNC viewer supports a faster connection with the remote host than does the Web browser option. The Palm Pilot option is the slowest of the three.
Through any of these means, older versions of VNC start in view-only mode. You have to change it to interactive mode once you are remotely viewing the target desktop. At this time, we generally begin another round of footprinting and information gathering to see what other systems we may be able to compromise. Loading a sniffer and listening to traffic on the network is also an option. In either case, when we have completed our ethical hacking exercise, we uninstall VNC from the target. The WinVNC listener can be stopped, without uninstalling it, under Windows with the following command:
#> net stop winvnc
Again, in the more recent versions, you can stop the listener through the Start menu. On Linux, you can obtain the process ID for the Xvnc listener from the /root/.vnc/linuxap:#.pid file (or by checking the process list with the ps command) and delete that process with the kill command.
Client OS: Windows 9x/NT/2000
Target OS: Windows 9x/NT/2000
Description: UltraAccess Networks, the maker of NetBus, attempted to transform this tool from what was essentially a hacker's tool designed to annoy and irritate its victims into a legitimate remote control, networking tool for the Windows 9x/NT/2000 OS. At this writing, the latest versions are being marketed as such. In that sense, to be fair, we shouldn't say that NetBus operates on a victim but on a controlled host.
Make no mistake, however—this tool started out as a hacking tool that allowed one user to annoy another. Classic examples of the exploits for which NetBus became famous are its ability to switch the left and right mouse button, open and close the CD-ROM drive, play WAV files located on the victim host, and send a message to appear on the victim's screen.
NetBus was a shareware product that asked for a $15 registration fee, though evaluation versions could be downloaded free of charge. (The company is now defunct, and you may be able to find a copy of the program for free on the Internet.) NetBus works in a client–server pair in which the server resides on the controlled host (or target) and the client resides on the hacker's (the controller's) box.
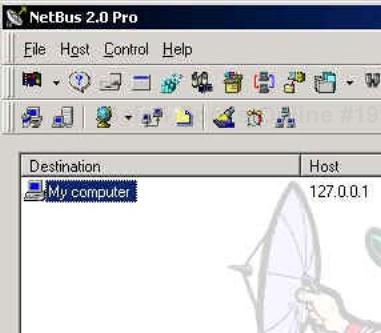
Use: The installation process follows the traditional Windows installation process. Both the server and client have GUIs (as shown in Figures 18-6 and 18-7, respectively). The server and client can be installed on the same host and controlled through a single interface (shown in Figure 18-7). The server simply needs to be configured to listen for incoming connections.
NetBus can make connections over standard TCP/IP on a listening port. The specific port on which to listen can be selected in the Server setup window (Figure 18-8) accessed from the File pull-down menu.
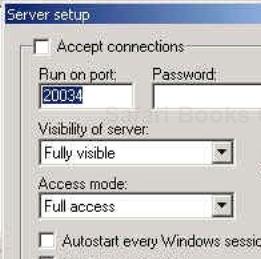
If you click the Accept connections box, the NetBus server will start actively listening for connections. One thing to consider is which port all communication will be over. The default port over which a client communicates with the server is TCP port 20034. (Previous versions used a default TCP port of 12345.) If this port is unavailable, blocked at the firewall for example, you must make the server listen on another port. You should configure the server to run on a port you know is open. Further, you should specify a password so there is at least some level of protection over this potential vulnerability. Various levels of visibility and access can be granted. Depending on your purpose for using NetBus, you can configure the tool in a way that suits your needs. If you select the option near the bottom of the screen, Autostart every Windows session, the server will run even if the machine is rebooted. Again, check this option only if you feel you require the server to keep listening after it is rebooted—no need to leave your clients a potentially dangerous back door on their system. If you are loading NetBus on a compromised host in order to attempt to compromise additional hosts, leave the settings on full visibility and access.
By default, the tool is set up to connect to the local host. Use of the tool is fairly straightforward. We recommend that you first attempt to connect to your own machine to become familiar with the tool. The client can be configured by selecting Settings under the File pull-down menu or by clicking the left-most icon on the bottom row of icons in the client interface.
Under the Firewall tab (see Figure 18-9), you can set your IP address, the port on which to communicate with clients, your user name, and whether or not you are behind a firewall or SOCKS4-compatible proxy.

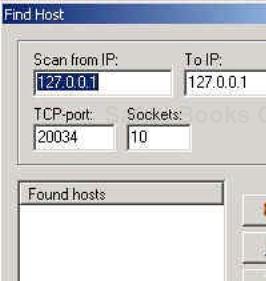
NetBus contains a rudimentary scanner that is helpful for determining open ports on potential targets. Select Find under the Host tab to access the scanner (Figure 18-10).
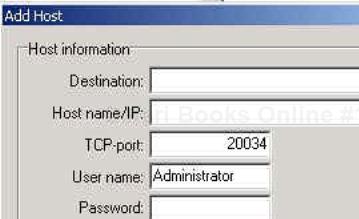
Once you find an open port on a target host, the next step is to configure the target as a destination host with which to connect. This is done by selecting New from the Host pull-down menu (or by clicking on the document icon in the bottom row). You can specify the target IP address and TCP port to which to connect along with a user name and password if applicable (see Figure 18-11). The Destination field can be anything you use to identify the target.
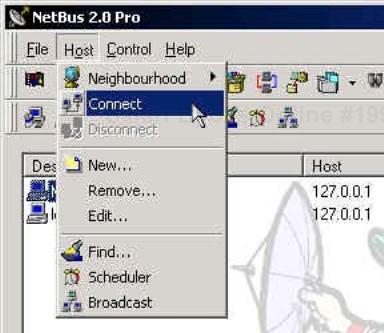
Finally, to create a connection, highlight the target on the main screen and select the Connect option under the Host pull-down menu (see Figure 18-12).
Once a connection is made, the remote control features become available. You can chat with your target host by selecting the Chat Manager option under the Control menu. Most of the remote control options are under this tab, including the ability to perform a screen capture of the target host (under the Spy Functions option), open files (under the File Actions option), adjust the target's sound settings (Sound System option), obtain host information (Host Info option), and even power down the target system (under the Exit Windows option). We do not recommend this last option when you are connecting to your own system. Most of the remote control options have icons on the main screen as well.
Also, under the Control menu, you can view and edit the target's Registry by selecting the Registry Manager option. You can delete files through the File Manager option. So, along with some interesting and playful capabilities, NetBus can inflict a bit of damage to target hosts. Be careful while using it.
The efforts of its maker notwithstanding, NetBus is not quite a fully functional remote control or management tool, but it does have a few good points. It is fun to play with and can indeed annoy an unlucky target.
One final word: Since NetBus used to be strictly a hacking tool, many virus protection programs still treat it as such and block the installation of both the server and client files. Therefore, you may need to disable the virus protection software before using NetBus.
URL: www.bo2k.com
Client OS: Windows 98/NT/2000
Target OS: Windows 98/NT/2000
Description: BO2K is also called a remote administration tool by its developer, DilDog of the Cult of the Dead Cow; however, it is a powerful tool that has developed a reputation as a hacker tool. This modification of the original Back Orifice program works on Windows 98/NT/2000 as well as Windows 95. We do not install BO2K during penetration testing, mainly because of its reputation. However, we make use of any BO2K servers we come across to gain unauthorized access to target hosts.
BO2K also features a client–server type architecture in which the server resides on the controlled machine and the client on the controlling machine. Both the server and client are packaged together and available for download from the Web site, www.bo2k.com. Documentation and installation instructions are also available from this site.
Use: BO2K can be installed remotely once it is loaded onto the target host. One of the popular ways to get the BO2K server onto the target machine is to hide it within an e-mail attachment. Once the user opens the attachment, the BO2K source code can quietly load itself onto the hard drive. For example, we could use a wrapping program such as eLiTeWrap (available at packetstormsecurity.org) to wrap BO2K into an executable greeting card, hmk.exe. When run, eLiTeWrap will look like the following on the screen.
eLiTeWrap 1.03 - (C) Tom "eLiTe" McIntyre
[email protected]
http://www.dundeecake.demon.co.uk/elitewrap
Stub size: 7712 bytes
Enter name of output file: trojan.exe
Operations:
   1 - Pack only
   2 - Pack and execute, visible, asynchronously
   3 - Pack and execute, hidden, asynchronously
   4 - Pack and execute, visible, synchronously
   5 - Pack and execute, hidden, synchronously
   6 - Execute only,  visible, asynchronously
   7 - Execute only,  hidden, asynchronously
   8 - Execute only,  visible, synchronously
   9 - Execute only,  hidden, synchronously
Enter package file #1: hmk.exe
Enter operation: 2
Enter command line:
Enter package file #2: bo2k.exe
Enter operation: 3
Enter command line:
Enter package file #3:
All done :)
In this example, eLiTeWrap creates an executable called Trojan.exe. When the user executes Trojan.exe, hmk.exe opens visibly while bo2k.exe installs hidden. The victim will see only the greeting card, while BO2K installs in the background and is ready to accept connections.
Among BO2K's capabilities are rebooting the controlled machine, editing its registry, locking the keyboard and mouse, performing keystroke capture, file browsing, editing, and transferring, as well as the ability to stop and start services from the process list. All this can be done while the server is running in the background.
In addition, BO2K is highly extensible and features a collection of plug-ins that can enhance its capabilities. These are available from the BO2K site and several others throughout the Internet, including www.netninja.com/bo/.
There are several plug-ins that encrypt BO2K traffic with algorithms such as Blowfish, CAST, IDEA, and others. The Silk Rope 2K plug-in is used to create executables infected with BO2K. Often, these executables are then sent to target users as e-mail attachments in the hopes that the unsuspecting receiver will execute them and install BO2K. Christmas and holiday greetings are commonly used to hide BO2K from unsuspecting users.
The BO Peep plug-in is distributed with BO2K. BO Peep provides keyboard and mouse control capabilities along with streaming video of the infected machine's screen. The most popular plug-in is Butt Trumpet 2000, which will send e-mail to a predetermined SMTP server and e-mail address(es) containing the IP address of the infected host.
Back Orifice 2000 is a powerful tool that can be used to cause significant damage to the infected machine. Use this tool with the appropriate caution and care. To combat BO2K, several virus vendors have developed signatures to identify and remove the tool. If a box is suspected of being infected with BO2K, it is very wise to scan the box with a virus scanner that is configured to identify and remove B02K.