
![]()
Building a Rock-Solid Content Pipeline with the COLLADA Conformance Test Suite
Paula Berinstein and Rémi Arnaud
If there’s one message emanating from the 3D content creation community these days, it’s “Ouch!” We all know why. There’s too much pain in the 3D content creation pipeline: incompatible formats, obsolescence of older material, platform limitations, and so on. Fortunately, there’s something we can do to ease the pain: create tools that adhere to open standards, such as COLLADA, a royalty-free, open standard schema for exchanging 3D assets.
It’s no wonder that the digital world is embracing openness. Digital citizens are realizing that the more proprietary their tools and formats, the more constrained they are, and the more money and time they have to spend in order to do their work. Often they find themselves recreating assets that already exist, just so they can exchange them with other team members or clients, or make them work with the latest version of their software. Tools and formats that use open standards enable them to be more productive and creative because components move effortlessly along the pipeline, freeing up creators to do what they do best: make cool stuff.
COLLADA, which is maintained by The Khronos Group, a nonprofit industry consortium, is defined by an XML namespace and schema that specify a list of features every COLLADA partner has agreed to support. The Khronos Group has devised a rigorous set of conformance tests for 3D tools that use COLLADA to help insure frictionless import and export operations. The tests have recently been open sourced and are now available at https://github.com/KhronosGroup/COLLADA-CTS.
Khronos wants to make it easy to achieve conformance, so they’ve devised two ways to license the tests. The Adopters Packageis designed for vendors who want to be able to use Khronos technology logos and trademarks in their product marketing. The Implementers Package is aimed at developers and open source communities with more limited resources. Adopters pay a modest fee and get significant value: when your product passes the tests, you may submit the results to Khronos and earn the right to use the COLLADA trademarks and claim conformance. Your customers can buy your products with confidence, knowing that their output will be clean and easy to use with other tools. Implementers also get a great deal, but with limitations: you may download and use the tests for FREE, and, if you pass, use the “COLLADA™” text trademark, but you can’t use the official COLLADA logo trademark or claim conformance. The Implementers Package is a great deal because you get a verified set of test cases and a testing framework that you can run as many times as you like in order to perform unit and regression testing—for nothing! If you had to write those tests yourself, you could spend thousands!
Membership in Khronos is not required in either case, but if you join, you get even more benefits, including access to all Khronos specifications and documentation, early access to the draft specifications, the ability to participate in work groups and the development of the specs and tests, discounted Adopter fees, and more.
Benefits of conformance include highly interoperable tools, credibility and good will, protection against product regression, easy-to-create use cases, streamlined procurement, clear customer expectations, and consistency of implementation with other vendors, not to mention happy and productive users.
In this chapter, which is based upon The Khronos Group’s current COLLADA CTS Tutorial, we explain how to use the suite to build a rock-solid 3D content pipeline, saving a huge amount of time in the development of tools and games.
The tests may be used on one target application alone for both conformance and regression testing, or to verify interoperability between one application and another, such as Trimble SketchUp (formerly a Google product), Autodesk 3ds Max, and Autodesk Maya. There are 613 tests and three possible levels of conformance (badges)—Baseline, Superior, and Exemplary—but regardless of the application’s capabilities, all the tests must be run. Based on the results, the framework determines which, if any, badge to award.
The conformance tests can be used on two types of applications: import only and import/export. Import-only applications include 3D document viewers, game engines, ray tracers, and rendering packages. Import/export applications include most traditional content creation tools that do modeling and animation. Both classes of applications must be able to render COLLADA data as an image because that is the primary method the CTS uses to determine whether a COLLADA document has been correctly understood. For a complete test, the software must also be able to import and export COLLADA documents. You can test applications that support only some of these functions, but they can only earn conformance within the context of a conformant implementation environment (i.e., one that has already passed the test suite) that provides the missing functionality.
The suite tests whether the target application does the following:
- Handles COLLADA input and output properly
- Renders files created under different conditions consistently
- Outputs COLLADA documents that conform to the COLLADA schema
- Completeness of support for each feature
- Robustness when bad data is encountered
- Appearance of images and movie clips
- Preservation of features during a load/save cycle
Types of tests include
- Minimal unit tests for specific features, like document referencing and skinning
- System tests that exercise desirable common scenarios, such as skinned rag doll export/import with COLLADA FX materials on different body parts
- Stress tests for very large scenes
- Handling of local or temporary test data
- Handling of invalid or corrupt data
All importers must be able to read any valid COLLADA document without failure, even if that document contains features not supported by the importer. Features beyond the importer’s level of support are not required to be understood, but simply encountering them should not cause the importer to fail. Unusual or unexpected ordering or quantity of elements should not cause an importer to fail as long as the document validates to the schema. For example, library elements may occur in any order and libraries of the same type can appear multiple times. Importers must not require their own COLLADA extensions in order to understand valid documents.
All exporters must create documents that validate to the COLLADA schema. Documents exported by the implementation should support the same feature set as that implementation's importer in order to provide a lossless (roundtrip) content pipeline.
The CTS works through a GUI on computers running the Microsoft Windows operating system. You can also use a command-line interface, and certain functions can be performed through Windows Explorer.
Using the tests is a matter of installing, configuring, and running them. The broad steps are
- Prerequisites: Download and install the suite and some helper applications.
- Integration: Write and test a Python script.
- Set up the tests: Create a test procedure, add tests.
- Run the tests.
- Interpret the results.
- If you want to be able to use Khronos technology logos and trademarks on your products, submit results to Khronos. If you want to use the tests internally only, you don’t need to submit results.
Things You Need to Know About the Tests
Before you start, there are a few concepts and ground rules you should know: the idea of “blessing,” the types of tests the CTS presents, the fact that there are two cycles for each test, and where the input and output data reside.
Blessed Images
The CTS incorporates the idea of “blessing,” which means that results have been officially “blessed” by Khronos, so they are considered correct and conformant by the COLLADA working group. A set of blessed images and animations—a control group to use as a baseline—comes with the test suite; you can compare these with your results to see how close you are and how you differ. Exact matches to the blessed images and animations are not required in order to pass. However, your application must generate images in a way that’s internally consistent.
Types of Tests
There are three types of tests: simple, medium, and complex.
- Simple: Tests that pass/fail based on successful importing, or importing and then exporting a COLLADA document. Examples include tests that check for proper handling of URIs on import/export, checking for unwanted adding/removing of elements from the document, testing sensitivity to element ordering, and checking for the ability to process any valid COLLADA document without crashing.
- Medium: Tests that require a successful import, export, and rendering of the exported document in the target application. These tests are generally used to confirm that programs are correctly processing and re-exporting a document without corrupting the geometry and other elements in it.
- Complex: Like the medium tests, complex tests require a successful import, export, and rendering of the exported document in the target application. However, this type of test also insures that the application is correctly interpreting the contents of the document. It is used to check how well the application handles materials, textures, cameras, lights, etc.
Two Cycles
Each test runs through two cycles.
- The Export step: The test case’s COLLADA document is imported, rendered, and exported. This cycle tests whether the target application can import and work with a valid COLLADA document (that was possibly) created in another tool.
- The Validate step:The COLLADA document that was exported in the first cycle is reimported into the target application, rerendered, and validated against the COLLADA schema. This cycle tests whether the document exported in the first cycle imports and compares properly and outputs valid COLLADA that can be imported by other conformant tools. The Validate step is needed to verify that the exported document meets criteria not tested in the Export step.
As you can see, a complete test includes two import and render operations. The first time, you import the test document furnished by Khronos; the second time, you import the document you just exported. The workflow is
Import ![]() Render
Render ![]() Export
Export ![]() Import
Import ![]() Render
Render ![]() Validate.
Validate.
Dataset for Input and Output
A collection of input datasets comes with the test suite (the StandardDataSets directory). Some input files are generated by the tests. The paths to the input are specified in the integration script. The output files are written to subdirectories in the TestProcedures directory.
Getting Started
In order to run the COLLADA conformance tests, your application must be able to
- Read and write COLLADA files
- Render a .PNG image at 512 x 512
- Include scriptable viewpoints and lights
The tests run on Windows machines only and take up a lot of memory.
Downloading and Installing the CTS
The CTS is available free of charge to anyone through the Khronos Implementer program available at www.khronos.org/conformance/implementers/collada/. Just create an account and download the package. The suite uses long file names that can cause problems on Windows systems by exceeding the 255-character (260 if you count D: and an invisible null at the end) path name limit. To avoid trouble, unzip the package in the root directory of your disk volume or some other directory with a short path name.
Prerequisites
The CTS requires only two prerequisites: the installation of some Python-related tools, and the Microsoft .NET Framework.
Python-related Tools
Before you can run the suite, you will need to install some Python-related tools, which you can find in the CTSPrerequisites directory. These include Python itself, the Win32 extensions, wxPython and pyOpenGL. Even though the suite comes with the correct version of Python, you may have to install more than one version, but only if your application needs them; some do, some don’t. Check the "add software" panel on your computer before installing anything to see if more recent versions of these tools are already installed. You must use the version numbers shown in this directory or higher. If your copy of Python isn’t installed in the standard location, you may need to set its path in the config file. On Windows 7 and Vista, you have to install the Python tools as an administrator.
Integration involves sending information back and forth between the test suite and the target application via a Python script, which you write, and a config file that you modify. The Python script generates and executes other scripts. To integrate your target application with the test suite, do the following:
- Create the Python script in the Scripts directory to map your application. You will usually copy and modify an existing script.
- Update config.txt in the top-level directory to set up your application path.
- Debug by running a small sample of the suite.
The Config File
The config file is held in the root of the CTS directory. Each line in the config file is a setting, with the description on the left and the value on the right. Update the config file with the path for your application. Be sure to use a tab delimiter between the key and value. (Watch for editors that convert tabs to spaces.) Do not leave a blank line at the end of the file.
The Python Script
The Scripts folder of the CTS directory holds a variety of integration scripts:
- FApplication is the basic script.
- FMax is the script for Autodesk 3ds Max.
- FMaya is the script for Autodesk Maya.
- FMimic is a bare bones script that includes a placeholder for a target application. It doesn’t actually run an application, but it does let you run the tests.
- FXsi is the script for Autodesk Softimage.
To write or adapt a script, you should know the following:
- What the inputs are, where to find them, and what to do with them
- What outputs you produce and where they go
- The status codes you get and return
If your application doesn’t support cameras and lighting and/or doesn’t read camera and lighting parameters from the COLLADA document, you may have to set the camera and light positions in your Python script; you need cameras and lights in order to render and you must use the settings the tests require. You may need to delete your default lights and cameras so that the application properly renders the values in the COLLADA document.
Listing 6-1 shows some pseudo code, contributed by Simone Nicolò, a software engineer at Google, which shows how to write the log file for an import operation for SketchUp.
Listing 6-1. Pseudocode for Writing a Log File for a SketchUp Import Operation
Get the return value from Import
return_value = Sketchup.active_model.import "<model_path>"
then based on the return value write the log
if return_value
  # write 'Import Succeeded' to the log
else
  # write 'Import Failed' to the log
end
Your script will need to call the following methods in the following order:
- Init
- BeginScript
- WriteImport
- WriteRender
- WriteExport
- EndScript
- RunScript
- BeginScript
- WriteImport
- WriteRender
- EndScript
- RunScript
See the list of methods in HowToIntegrateSoftware.doc in the CTSDocumentationHowtoAddSoftware directory, which also includes tips on dealing with cameras.
You will need to implement methods such as GetPrettyName(): return string, which passes information to the script that runs the target application. The script is run in the RunScript method. You can find all the methods in the complete COLLADA conformance test tutorial hosted by Khronos (see the “Useful Links” section).
The FApplication Script as a Model
The FApplication script in the Scripts directory provides useful information about methods, input, and output. Note the imported libraries:
- os (a Python module)
- os.path (a Python module)
- subprocess (a Python module)
- Core.Common.FUtils (resides in the C:CTSCoreCommon directory). Gets and replaces filename extensions; determines whether a filename extension is that of an image file; determines whether a filename is a proper filename; gets directory names and paths; parses dates; and so on.
- Core.Common.FConstants (defines the constants the scripts use)
Class FApplication is the abstract class for the target application. The class defs can be found in the COLLADA CTS Tutorial.
Creating and Running the Tests
To start the test suite GUI, click the Python script COLLADATestSuite.py in the CTS root directory. Before you can run the tests for the first time, you must populate the test grid as follows:
- Create a new test procedure (File menu)
- Open the procedure you just created (File menu)
- Add tests (Test menu)
To run the tests with an existing procedure, just select File ![]() Open Test procedure, and the full test grid will appear.
Open Test procedure, and the full test grid will appear.
Creating a Test Procedure
A test procedure comprises a series of tasks, some of which are repeated: import, export, render, and validate. Each task can generate one or more COLLADA documents and/or images. You must create and configure a test procedure before you can run any tests. Test procedures can be reused.
The input to a procedure is one or more data sets, which are found in the StandardDataSets subdirectory of the CTS hierarchy.
To create a new test procedure, select File ![]() New Test Procedure, and fill in the title: <Product Name> CTS Submission. For Trimble SketchUp, for example, your procedure name might be SketchUp_CTS_Submission. (Some test procedure names will not work with spaces.)
New Test Procedure, and fill in the title: <Product Name> CTS Submission. For Trimble SketchUp, for example, your procedure name might be SketchUp_CTS_Submission. (Some test procedure names will not work with spaces.)
In the Add Operation box, select each of the tasks in the order specified here (which is not necessarily the order in which the operations appear in the box):
- Import
 <ProductName> Add. Import is the only task that requires a product name. The product name will appear in the right-hand window. (When you run the integration script, the name of your application will be added to the Import drop-down box.) See Figure 6-1.

Figure 6-1. The Add Operation box. First select Import, then the product name
- Add Operation: Render Add. Note the Chosen Operations box. The operations must be selected and display in the proper order. Watch out: Export, which should be selected after Render, appears before Render in the Add Operation box.
- Add Operation: Export Add
- Add Operation: Import <ProductName> Add
- Add Operation: Render Add
- Add Operation: Validate MSXML 6.0 Add
You cannot add comments to a test procedure after it’s been created, so do it now. You may add comments to test results at any time, however.
Select OK. You now have a test procedure and can add tests. You should also have a TestProcedures directory, which holds not only procedures, but also the output from the tests.
You can delete or rename a test procedure through Windows Explorer or the command-line window, or you can rename a procedure using the “Save Test Procedure As” icon in the toolbar above the column headings. You cannot delete a procedure through the test GUI, but you can delete a single test using the context menu in the GUI.
Adding Tests
Go to the Test menu and select Add Tests. The Test Settings dialog will come up. Configure any test settings your product needs. In most cases, Default will be sufficient. Press Next.
The tests expect an image size of 512 x 512, so be sure your images comply. Larger images could cause you to run out of memory. Smaller ones may not compare well enough to pass the test case. You can change the size in the Edit Settings dialog, which is reached by pressing Add/Edit on any of the operations shown in the Test Settings dialog. The Select Data Set dialog will come up. Select the following and press Finish:
- StandardDataSets/Collada
- StandardDataSets/xml
Confirm that there are 613 tests in the Total box on the toolbar. (The tests are numbered 0 through 612.) If not, you might not have selected all six operations or the two datasets you need. Try creating a new test procedure.
Once the grid displays, you can use the menus, the toolbar, and the context commands on the right-click menu. Some context commands are available from every cell; some are cell-specific. See the list of the context menus in section 9.7 of the CTS manual, Context Menus. The CTS displays standard format images. If a format can’t be displayed, you’ll get a message to that effect.
Running the Tests
The input to the tests comes from the Standard Data Sets dialog box, which you can get to from the Tests ![]() Add Tests dialog.
Add Tests dialog.
Each test is composed of a COLLADA document (.dae file) and a judging script. Some of the scripts have different requirements for different badges, so it is possible to pass the Baseline level and not the Superior or Exemplary, or Baseline and Superior, but not Exemplary, for a given test. The description of the test is displayed in the Description column; it comes from the subject element in the .dae file.
For more information on what is being tested, see COLLADA_CTS_test_cases.xls in the CTSTestCaseDocumentation directory. You can also check the judging scripts to see what each test is looking for. The judging scripts are contained in the StandardDataSets folder structure along with the COLLADA input document for each test.
Selecting Tests
You can launch all the tests or a portion of them from the Test menu. You can also run a single test from the context menu when the cursor is positioned in its row. Some tests depend on the successful completion of other tests, so don’t (initially) run tests out of order.
You can select a range of tests by using the CTRL and/or SHIFT keys just as you do with any Windows application. Hold down the CTRL key while selecting more than one test. To select a block, highlight the topmost test, then hold SHIFT down while you select the last test in the sequence. All the tests in between the two will highlight and you can Run Selected from the Test menu.
There is no easy way to select only Baseline tests, but don’t worry about that: there’s no reason to do so. You have to run all the tests in order to earn a badge.
While the Tests Are Running
The CTS divides each test into three sections comprising one or more steps and runs them one after the other to minimize loading time for the target application. The steps, which correspond to the operations Import, Render, Export, and Validate in the order you set them up, are numbered 0 through 5; the test grid shows which number goes with which operation. In Figure 6-2, the scripts for steps 0, 1, and 2 have been created and executed; steps 3, 4, and 5 will run when the first batch has completed.

Figure 6-2. The suite displays simple progress messages while the tests are running
When a test crashes, the CTS attempts to locate the last test that completed and reruns the suite from there until it finds the test that crashed. Once you have fixed the issue that caused the test to crash, CTS will eventually manage to continue past the failing test. You can set crash detection to yes or no and specify the timeout value in the config file.
Canceling Tests
When you cancel the tests, the CTS waits until it reaches the next section before performing the cancel operation. Use the Task Manager to quit the CTS. Note that if you cancel, the suite ignores the entire run, and you have to start over. As a safeguard, you might want to run small groups of tests to begin with.
Reading the Results
When evaluating the results of a test, the most important columns to check are Results and the three badge columns. The Results column tells you whether the test worked as expected. Green means yes; red means that the test failed in some way. The three badge columns tell you whether the COLLADA files meet expectations. If they do, the column(s) will be green; if not, they will be red. It is possible for a Results column to be green and one or more badge columns to be red. This means that the test worked but a badge was not achieved because the target application failed to meet expectations, because it didn’t handle the COLLADA documents properly, didn’t render correctly, and so on.
When a test passes, you get messages that look like Figures 6-3 to 6-7.

Figure 6-3. A green (passed) indication in the Result column has nothing to do with badges. It simply means that the test executed properly (didn’t crash)

Figure 6-4. Green in Result, red in badge: when the Result column is green, the test/application has run okay, but a badge wasn’t awarded

Figure 6-5. Baseline only passed (only Result and Baseline columns are green)

Figure 6-6. Baseline and Superior passed, but some of the tests failed the Exemplary level
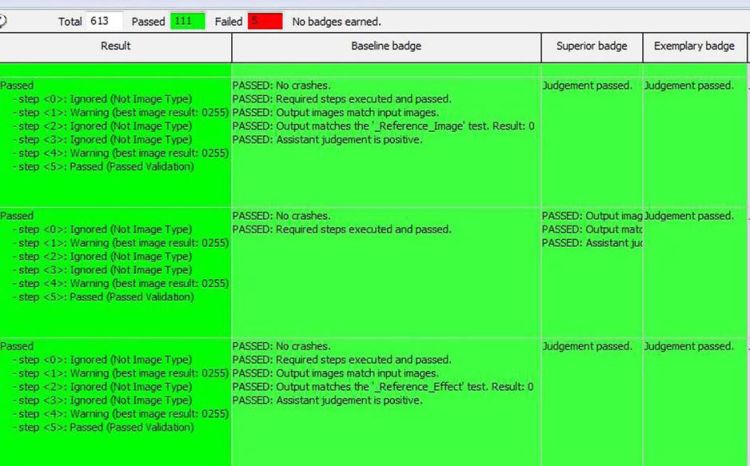
Figure 6-7. Test run successfully and all levels passed
You can add comments to a test’s row by double-clicking in the Comments cell, as shown in Figure 6-8.

Figure 6-8. The Comments cell
The Test Scene column in the grid contains a link to the COLLADA document used as input to the test. You can open the COLLADA document by using the View Image option in the context menu. The Test Filename column shows the name of the document prefaced by its path in the StandardDataSets directory.
The Test Scene column in the grid contains a link to the COLLADA document used as input to the test. You can open the COLLADA document by using the View Image option in the context menu. The Test Filename column shows the name of the document prefaced by its path in the StandardDataSets directory.
The Import, Render, Export, Import, Render, and Validate columns contain links to the output from each of those tasks for a given test. The first Import column links to the application’s native file generated from the Test Scene COLLADA document. The second Import column links to the application’s native file generated from the first cycle’s exported COLLADA document. The Blessed column shows what the rendered COLLADA document should look like. Depending on what’s being tested, if your Render columns don’t resemble the blessed image, you know immediately that something is wrong. (If rendering the image isn’t the objective of the test, a non-match doesn’t matter.) Don’t worry about anything the manual or the context menu says about blessing an execution. This is a legacy item that isn’t used.
The Result column tells you how each step in the test fared. Possible messages include Ignored, Warning, and Passed. Green in the Result column and a badge column means the test executed correctly and a badge was awarded.
Green in the Result column and red in a badge column means that the application can execute the test correctly (i.e., all the Import/Render/Export steps were successful) but the output files are not COLLADA conformant. When a test crashes, the Result column turns red.
When a Validate task fails, the CTS tells you how many warnings and errors you got. View the errors by clicking on View Report in the context menu for the Validate cell in question.
A test can fail if a prerequisite test has not been run and/or passed. When that happens, you get a message telling you which test(s) you need to run, by name, not test number (e.g., “_Reference _Oneimage test case”). However, if you run the suite in the order presented, you shouldn’t encounter this situation.
Comparing Test Runs
Comparing test runs helps pinpoint bugs and areas of nonconformance. By comparing images, you can see if you are getting warmer or colder.
To see the results of a previous test, right-click anywhere in the test row and select Show Previous. You can tell which tests have been run more than once by checking the Different from Previous column. You can delete an execution from the GUI by right-clicking the test and selecting Delete Execution. The histories are stored in the TestProcedures directory. When you compare executions, the results of the selected tests display in a pop-up window. Beware, though: executions are described only by date and sequence number, so keep track!
Comparing Images
Comparing images helps you diagnose problems in your application. You can compare your results with Khronos’s blessed images or with images you’ve produced during different test runs or steps (see Figure 6-9). Comparing images involves three dialog boxes: “Compare Image With,” where you select the images you want to use; “Image Comparison,” where you actually look at the images side by side; and “Image Diff,” which shows you the pixel-by-pixel differences.

Figure 6-9. Use the context menu on the image you want to compare
The “Compare Image With” Dialog
To compare images generated by a particular test with blessed images or with other images your application has produced during conformance testing, select the thumbnail for the image in question and bring up the context menu. Select Compare Image. You can include the blessed image in your comparison, but you cannot choose only the blessed image; you must also select another image generated during testing, either as output from a different step, or from a different execution, or from a different test, or from a different test procedure. Fortunately, you don’t have to remember every place you’ve generated a like image; the drop-down menu in the dialog shows you the options, and you select from those. Steps are numbered 0-5; different executions are identified by date and sequence number. If there are no valid different tests or test procedures, those choices will be disabled.
The “Image Comparison” Dialog
In this box, the images you’ve selected are displayed side by side. If you’ve included the blessed image, you’ll see it on the far left. The reference image—the one from the test you highlighted in the GUI—displays in the middle, and the image you’ve chosen to compare with is on the right. Metadata about the test and the execution date and sequence appears above. If your image is part of an animation, you can page through the frames with the arrows.
In Figure 6-10, you can see that there’s a shader problem in the tested image: the link on the left has no shading at all.

Figure 6-10. The “Image Comparison” dialog
The “Image Diff” Dialog
The “Image Diff” box shows you the absolute and relative differences between your image and either the blessed or the comparison image (see Figure 6-11). The absolute pixel-by-pixel difference displays on the left side of the Image Diff box. On the right is the grayscale relative difference where the most different pixels are shown in white. To compare your image with the blessed image, press Different Blessed. To compare your image with the comparison image, press Diff Image2. You can only make one comparison at a time.

Figure 6-11. Another image comparison
Because the absolute difference is calculated by subtracting one set of pixels from the other, the result shows you where there are rendering deviations. (If the images are exactly the same, the absolute difference will come out black, so the blacker the absolute difference, the more the images match.) The relative difference is the grayscale representation of those absolute differences normalized. The magnitude of the greatest difference is shown as white, which means that anywhere you see white, the relative difference image differs most from the comparison image.
You will find troubleshooting help for specific tests and conditions within the GUI test reports. However, here are some general tips.
Setup
If the test suite will not launch, run the Python script from the command line to see error reports. If wx or OpenGL is mentioned, make sure you installed both packages into the correct Python version. If your script code doesn’t compile, the suite will not launch. Rendering .PNG images at a resolution greater than 512 x 512 could cause memory problems. If your output document is significantly larger than your input document, you will get a warning. You won’t fail the test, but do follow these recommendations to avoid excessive growth of documents:
- Strip non-significant leading/trailing zeros from numbers in the output.
- Keep XML output indentations to a reasonable minimum. Two spaces or one hard tab per level is sufficient.
- Avoid indentations when writing large arrays or lists of numbers. Write them as a single long line of text with separating spaces or break them into multiple non-indented lines.
Judging Scripts
To achieve a badge beyond Baseline, your application must pass the Baseline tests and the Superior and/or Exemplary tests. Even though some tests are labeled Superior or Exemplary, they are not the only ones that test advanced capabilities.
Each test comes with a judging script that looks at the outputs and status returns from the test. The judging scripts are stored with the test cases in the StandardDataSets directory. You have to drill down to the lowest level of a directory to find them; they’re stored at the same level as the .dae file input to the test. These files contain useful information about what the test is looking for in order to satisfy each badge level.
For example, if you look at the multi_contributor judging script (Test ID 0711, #2 on the grid) in the folder C:CTSStandardDataSetscolladalibrary_geometriesgeometryassetcontributor, you will see that this test involves all three badge levels and deals with them like this:
# JudgeBaseline: just verifies that the standard steps did not crash.
# JudgeSuperior: also verifies that the validation steps are not in error.
# JudgeExemplary: same as intermediate badge.
These comments will quickly tell you whether the test does anything special for the advanced badges. (You may also want to check the code to make sure they’re correct. There are cases in which the comments contradict the code.) In this case, the Superior level and Exemplary levels require that the target application meet additional criteria.
You see also that at the Baseline level, not only must the test not crash, but import/export/validate must exist and pass, while render must only exist.
You can verify which operations the test is performing in the code. Only import, export, and validate are used. Render is absent.
self.__assistant.CheckSteps(context, ["Import", "Export", "Validate"], [])
However, in a script like C:CTSStandardDataSetscolladalibrary_camerascamera\_reference\_reference_optics_orthographic_zfar_z_near (Test ID 0106, #90 on the grid), all the operations are necessary.
self.__assistant.CheckSteps(context, ["Import", "Export", "Validate"], ["Render"])
The Render operation must exist because at the Superior level, the rendered images are compared, in this line:
self.__assistant.CompareRenderedImages(context)
The multi_contributor script tests all the levels separately, returning unique results for each, but the camera script tests only the Baseline and Superior levels, returning the same result for both the Superior and Exemplary levels.
The Judging Script Driver
The judging script for each test passes parameters to the judging driver script, FResult, which is stored in the C:CTSCoreLogic directory. The judging script status codes govern what goes in the badge and results columns in the GUI; see Listing 6-2.
Listing 6-2. Judging Script Status Codes and Their Meanings
PASSED_IMAGE = 0
    PASSED_ANIMATION = 1
    PASSED_VALIDATION = 2
    FAILED_IMAGE = 3
    FAILED_ANIMATION = 4
    FAILED_VALIDATION = 5
    FAILED_MISSING = 6
    IGNORED_TYPE = 7
    IGNORED_NO_BLESS_IMAGE = 8
    IGNORED_NO_BLESS_ANIMATION = 9
    IGNORED_NONE = 10
    CRASH = 11
The COLLADA Input Documents
You can look at the COLLADA input documents to see what you're trying to process. For example, using the tests from the judging script section, look at the accompanying .dae input files, C:CTSStandardDataSetscolladalibrary_geometriesgeometryassetcontributormulti_contributor.DAE and C:CTSStandardDataSetscolladalibrary_camerascamera\_reference\_reference_optics_orthographic_zfar_z_near\_reference_optics_orthographic_zfar_z_near.DAE.
The multi-contributor document contains two contributors (one of whom is Bugs Bunny). The camera document contains a main camera with the attributes shown in Listing 6-3.
Listing 6-3. Main Camera Attributes in the CTS Input
<library_cameras>
        <camera id="mainCamera" name="mainCamera">
            <optics>
                <technique_common>
                    <orthographic>
                      <ymag>100</ymag>
                      <aspect_ratio>1</aspect_ratio>
                      <znear>0.1</znear>
                      <zfar>5000</zfar>
                    </orthographic>
                </technique_common>
            </optics>
        </camera>
    </library_cameras>
All the COLLADA input files are available in the StandardDataSets directory. You can open them directly from the GUI by selecting the Test Scene cell, then View Image from the context menu.
The COLLADA Output Documents
You can see what you’re generating by examining your COLLADA output documents. There are two ways to view them:
- Right-click the export column and select View Image, then Text Only. Even though the menu item says View Image, you get a text file.
- Look in the Test Procedures directory. Drill down from the test number through the specific execution to the desired step.
Documentation
In the CTS Documentation directory, you will find
- The CTS Manual (CTSManual.doc)
- A COLLADA CTF How To (CTF_How_To.doc) that covers setup, fixing Autodesk Maya® errors, creating and running a simple test procedure, how to create your own test, and how to add a test to a local copy of the framework.
- A brief overview (README.doc) that explains how to create a test procedure and submit results.
- In the subdirectory HowToAddSoftware, see the HowToIntegrateSoftware.doc, which describes the methods you’ll need in your integration script.
There are two Python scripts in the Scripts subdirectory of HowToAddSoftware: FDebug and FMimic. FDebug helps you debug your integration script by printing a message and parameters for all steps. FMimic is a simple renderer that attempts to pass by copying the input and providing a single test image. It is used to validate that this type of renderer cannot pass the conformance suite. It also serves as a good example for command-line tools that want to integrate with the suite.
References
The Khronos Group hosts the complete COLLADA CTS Tutorial at www.khronos.org/files/collada/COLLADA-CTS-Tutorial.pdf.
The test suite code is available at https://github.com/KhronosGroup/COLLADA-CTS.
The Khronos Group hosts the official COLLADA web page at http://khronos.org/collada.
A public COLLADA mailing list at www.khronos.org/collada/public-mailing-list/ has been created specifically for asking questions and reporting bugs about the conformance tests.
There is a Twitter group at http://twitter.com/collada and a Facebook page at www.facebook.com/people/Collada-Duck/100000363377190.
The authors can be contacted at [email protected] and [email protected].