
![]()
Christian Ronchi
Working in a software house is primarily about collaborating with other people, so the first thing to do when you start a new project is set up a pipeline that facilitates the flow of assets and information. Ignoring this important preparation can create confusion and waste time during production, so you want to make sure you do it right.
One of the most important considerations in setting up such a pipeline is keeping track of your assets. You don’t want programmers and artists making changes to the wrong version, or losing the best version, or not being able to find that great character variation to show the director who needs to see it right now. Fortunately, it’s not difficult to create a system that will keep these kinds of disasters from happening. What you need is
- One place for everything. Assets and project information should be stored centrally to keep them consistent. You might want to use a wiki or set up a common space (sometimes we use Microsoft SharePoint in our studio) where information can be constantly updated and available.
- Easy-to-understand file names and organization. Asset naming conventions, folder structures, and file organization must be simple, efficient, and intuitive.
This chapter focuses on the second element of that system: file organization and naming conventions.
Folder Structure
Folder structures, file names, and their internal organization must be designed to be clearly interpretable by any person who needs to work with the project’s assets. Figure 2-1 shows an example of bad organization of the directory structure/files applied to a common type of Autodesk 3ds Max project. Next to it, in Figure 2-2, you can see the same project with a simple, well-organized structure. In this example, we’re using a train station with a palm tree.
|
|
Figure 2-1. (left). A badly organized structure |
Figure 2-2. (right). A clearly organized structure |

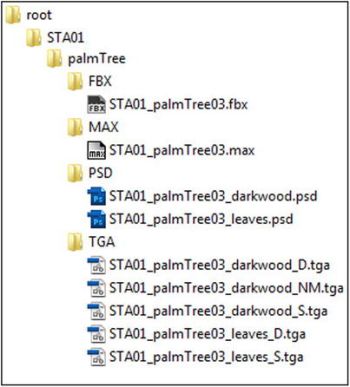
At first glance, the structure on the left (Figure 2-1) might seem the best solution, since it is definitely faster (everything resides in a single directory), but in practice, it is surely the most discouraging and inconvenient setup for a person who has no previous experience with the project. Grouping all the palm tree files into one folder and listing them alphabetically doesn’t impose any logical structure on the information. Because files used for different purposes are thrown together, the user must go through a process of trial and error, scanning every name and guessing at each file’s purpose. Imagine doing that all day.
The structure on the right (Figure 2-2) makes it easy to understand where to find all the files needed for the project, and their purpose. Files are grouped together by how they will be used and arranged hierarchically. Just like your object-oriented code, this kind of file structure is logical and depends on the relationships among assets. It takes a bit of extra thought to set up your structure this way, but the investment is worth it in time saved and frustration avoided. Even someone unfamiliar with the project could pinpoint a specific file in no time with this kind of organization.
Figure 2-3 shows the basic structure I usually use. The elements are
- Root: The root of your project
- Map name: The name of the layer where you’ll put the models and textures for your objects
- Obj name: The name of the 3D object
- FBX: 3D model export in FBX format
- MAX: Source file of the 3D model
- PSD: Source files used for this model
- TGA: Exported texture files in TGA format used for the 3D model

Figure 2-3. A basic folder structure for a common 3D project
You can expand on this scheme, of course. For example, if you have video files, Adobe After Effects projects, and sequences rendered from 3ds Max, you can add folders, as shown in Figure 2-4.

Figure 2-4. The basic folder structure expanded to a more “render-oriented” setup
Sometimes you will have items such as textures or render sequences of images that are shared by multiple projects. In this case, you should use a common folder (see Figure 2-5) to store your shared content. Or, opt for the most expensive choice (in terms of space) but more convenient because it creates fewer dependencies: duplicate your content in the folders of the projects where they are used. For example, if the object STA01_palmTree03 shares one or more textures with the object STA01_oakTree01, the textures would be found in the folders of both objects.
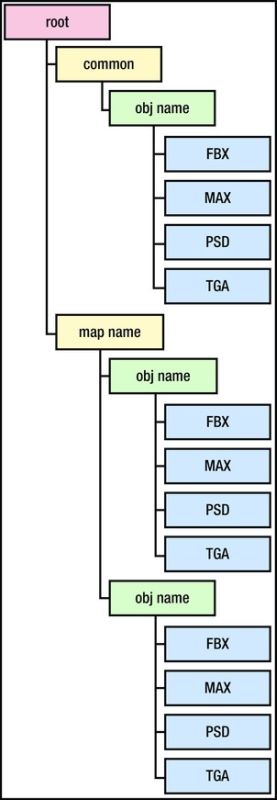
Figure 2-5. The complete folder structure of the project, also with the common tree
Avoid using linked references to other projects, as this practice usually creates confusion, even though it might save on disk space (which really isn’t a big problem anymore).
Naming Conventions
When naming files, I usually use a system that includes the name of the asset and a prefix indicating the name of the map to which it belongs. You can choose the number of characters to use; my advice is do not overdo it and be as brief as possible without having too many restrictions. Since most projects contain a vast amount of assets, in order to avoid a “wall of text” effect, it’s very important to maintain a very short, easy-to-read naming convention. A prefix with a length of 3-5 characters is ideal.
3D Models
When you are working with 3D models, always save both source files and exports; never keep only the export because it may contain only a reduced version of your model. For example, some scripts, rigs, or animation content might not be saved in the export file.
However, in either case, the naming conventions are the same. Suppose that you’re working on a map that has a setting for a train station. The suffix might look something like this:
STA01_palmTree03
This sample suffix is organized as
- <map name>_<object name><incremental number>, where
- <map name> is the name of the map that shows the location of the object (STA01).
- <object name> is the name chosen for the object (palmTree).
- <incremental number> is the number of the object version (for example day/night state or split into two chapters) (03).
You may also need to add a category for the object. My suggestion is to keep it short (three characters are enough in most cases), as in
STA01_VEG_palmTree03
As you can see, most of the suffix is the same as before, but I have inserted the category after the map name.
This suffix breaks down as follows:
- <map name>_<category>_<object name><incremental number>, where
- <map name> is the name of the map where the object is (STA01).
- <category> is the category of the object, in this case the abbreviation of vegetation (VEG).
- <object name> is the name chosen for the object (palmTree).
- <incremental number> is the number of the object variation (03).
In addition to constructing solid file naming conventions, you should create a clean and well-organized internal structure of your .max file.
In Figure 2-6, in addition to the 3D model, there is a mini-rig to procedurally control certain properties, like the three measurements of the table (height, width, and depth) and the color of the glass material. Layers are used to define which visual objects are part of the mesh, and which are control objects to help the mini-rig.

Figure 2-6. An example of a naming convention for a model with rig, inside 3ds Max
The naming convention here is slightly different from what I’ve described above, but the goal is the same: to immediately understand the purpose of the objects in the scene.
Textures
For textures as with 3D models, you must always maintain the source files together with the exports. Image file names and folders need to be as clear, simple, and well organized as those for 3D models.
Texture naming conventions are based on the characteristics of the textures. Names include the kind of object, the type of material, and a suffix that indicates the channel type in which they will be applied.
I use the following abbreviations (see Figure 2-7):
- _D: diffuse map
- _S: specular map
- _NM: normal map
- _HM: height map or displacement map

Figure 2-7. From a single .psd file, you will create the textures for all the channels (diffuse, specular, normal map, and height map)
In Figure 2-8, you can see that some folders are used to divide the layers according to their channel usage when exported, in order to group the parts that require a combination of multiple layers and layer colors in order to help the division within the folders.

Figure 2-8. An example of organization within a Photoshop file. The folder and the different colors help the reading of the file
You might also want to categorize by Smart Object, which introduces the concept of instances inside Adobe Photoshop. Modifying one Smart Object updates all the linked instances, which means that you can use that feature to easily change all the buttons of your ingame menu, or apply nondestructive transformations to some layers without losing your original image data. For more information about the Smart Object feature, see http://help.adobe.com/en_US/photoshop/cs/using/WSB3154840-1191-47b7-BA5B-2BD8371C31D8a.html#WSCCBCA4AB-7821-4986-BC03-4D1045EF2A57a.
Trying to maintain multiple versions of the file you’re working on, or incremental variations of the file name, is often a cause of chaos. At best you can lose time searching for a particular version; at worst you can make intricate changes to the wrong file, hold everyone up, and miss deadlines.
To solve this problem, you need a versioning system, such as Perforce, which will give you a revision history. With such a system in place, you can always roll back to a previous version, and you will solve three problems:
- You always have the latest version of the file available.
- You can return to any version you want at any time.
- You will have a consistent backup of your data.
Of course, an infrastructure with Perforce is not for everyone. A good alternative I use every day is a cloud system like Dropbox or SugarSync, which provides enough functionality for most situations. GitHub is another popular version control system.
Conclusion
In this chapter, I wanted to show the organization system that I most frequently use for my projects. However, this is not the only way; it’s just one possibility. The most important thing is clarity; without it, the quality of the work will undoubtedly suffer.
Some small rules that should be never forgotten:
- Always write in English, so anyone can understand.
- Spend the required amount of time to organize your work and your data.
- Making your work easy and clear will help not only you, but also anyone who takes over the project.