
2
Authentication and Authorization using JWTs
In this chapter, we’ll dive deeper into Django and its architecture. We’ll be working with models, serializers, and viewsets to create an API that can receive HTTP requests as well as return a response. This will be done by building an authentication and authorization system using JSON Web Tokens (JWTs) to allow users to create an account, log in, and log out.
By the end of this chapter, you’ll be able to create Django models, write Django serializers and validation, write viewsets to handle your API requests, expose your viewsets via the Django REST routers, create an authentication and authorization system based on JWTs, and understand what a JWT is and how it helps with authentication and permissions.
We will be covering the following topics in this chapter:
- Understanding JWTs
- Organizing a project
- Creating a user model
- Writing the user registration feature
- Adding the login feature
- Refresh logic
Technical requirements
For this chapter, you’ll need to have Insomnia installed on your machine to make requests to the API we’ll be building.
You can also find the code of this chapter at https://github.com/PacktPublishing/Full-stack-Django-and-React/tree/chap2.
Understanding JWTs
Before writing the authentication feature, let’s explain what a JWT is. As mentioned earlier, JWT stands for JSON Web Token. It’s one of the most used means of authentication in web applications but also helps with authorization and information exchanges.
According to RFC 7519, a JWT is a JSON object defined as a safe way of transmitting information between two parties. Information transmitted by JWT is digitally signed so it can be verified and trusted.
A JWT contains three parts—a header (x), a payload (y), and a signature (z)—that are separated by a dot:
xxxxx.yyyyy.zzzzz
- Header
The header of the JWT consists of two parts: the type of token and the signing algorithm being used. The signing algorithm is used to ensure that the message is authentic and not altered.
Here’s an example of a header:
{
    "alg": "RSA",
    "typ": "JWT"
}
Signing algorithms are algorithms used to sign tokens issued for your application or API.
- Payload
The payload is the second part that contains the claims. According to the official JWT documentation (https://jwt.io/introduction), claims are statements about an entity (typically, the user) and additional data.
Here’s an example of a payload:
{
  "id": "d1397699-f37b-4de0-8e00-948fa8e9bf2c",
  "name": "John Doe",
  "admin": true
}
In the preceding example, we have three claims: the ID of the user, the name of the user, and also a Boolean for the type of user.
- Signature
The signature of a JWT is the encoded header, the encoded payload plus a secret, and an algorithm specified in the header, all of them combined and signed.
For example, it’s possible to create a signature the following way using the RSA algorithm:
RSA(
  base64UrlEncode(header) + "." +
  base64UrlEncode(payload),
  secret)
The role of the signature is to track whether information has been changed.
But how are JWTs actually used in authentication?
Understanding how JWTs are used in authentication
Each time a user successfully logs in, a JWT is created and returned. The JWT will be represented as credentials used to access protected resources. The fact that it’s possible to store data in a JWT makes it vulnerable. That’s why you should specify an expiration time when creating a JWT.
In this book, we’ll be using JWTs in two ways. To make it simple, we’ll have two types of tokens:
- An access token: Used to access resources and handle authorization
- A refresh token: Used to retrieve a new access token
But why use two tokens? As we stated earlier, a JWT is generated when users log in. Moreover, JWTs used to access resources should have a short lifespan. This means that after the JWT has expired, the user has to log in again and again – and no user wants the login page to appear every 5 minutes.
That’s where a refresh token is useful. It’ll contain the essential information needed to verify the user and generate a new access token.
Now that we understand the purpose of JWTs, let’s learn more about models in Django while creating the user model.
Organizing a project
When working with Django, you’ll have to create many apps to handle different parts of a project. For example, you can have a different application for authentication, and another for payments or articles. To have a clean and well-organized project, we can create a Django application that will contain all the apps we will create for this book.
At the root of the project, run the following command:
django-admin startapp core
A new application will be created. Remove all the files in this app except for the apps.py file and the __init__.py file. Inside apps.py, add the following line:
core/apps.py
from django.apps import AppConfig
class CoreConfig(AppConfig):
   default_auto_field = 'django.db.models.BigAutoField'
   name = 'core'
   label = 'core'
Register the apps in the setting.py file of the project:
CoreRoot/settings.py
# Application definition
INSTALLED_APPS = [
   'django.contrib.admin',
   'django.contrib.auth',
   'django.contrib.contenttypes',
   'django.contrib.sessions',
   'django.contrib.messages',
   'django.contrib.staticfiles',
   'core'
]
INSTALLED_APPS is a Django settings configuration, which is a list of Django apps within a project.
We can now create the user application with confidence and write our first model.
Creating a user model
Unless you are creating a simple web application, there is little chance of avoiding the necessity to interact with a database, particularly having an account feature that requires users to register or log in to use your web application.
Before talking about the account feature, let’s learn more about Django models and what problems they resolve.
What are Django models?
If you need to connect your application to a database, particularly SQL, the first assumption that comes to mind is that you’ll have to work directly with the database via SQL queries – and if that’s true, it can be fun, but it’s not the same for everyone; some developers may find SQL complex. You are no longer focusing on writing the application logic in your own language. Some tasks can become repetitive, such as writing SQL scripts to create tables, getting entries from the database, or inserting or updating data.
As you’ll see, the more the code base evolves, the more difficult it becomes to maintain both simple and complex SQL queries in your code base. This is more of an issue if you are working with multiple databases, which will require you to learn many SQL languages. For example, there are a lot of SQL databases and each one implements SQL in its own way.
Fortunately, in Django, this messy issue is solved by using a Django model to access the database. This doesn’t mean that you don’t have to write SQL queries: it’s just that you don’t have to use SQL at all unless you want to.
Django models provide object-relational mapping (ORM) to the underlying database. ORM is a tool that simplifies database programming by providing a simple mapping between the object and the database. Then, you don’t necessarily need to know the database structure or write complex SQL queries to manipulate or retrieve data from the database.
For example, creating a table in SQL will require writing a long SQL query. Doing this in Python will just require writing a class inheriting from the django.db package (Figure 2.1):

Figure 2.1 – Comparison between the Django ORM and SQL queries
In the preceding figure, you can see the SQL statement, which requires some knowledge of the syntax, as well as the fields and the options. The second code from the Django ORM does exactly the same thing but in a more Pythonic and less verbose manner.
Writing models with Django comes with several advantages:
- Simplicity: Writing queries in Python may not be as clear as writing in SQL, but it’s less error-prone and more efficient, as you don’t have to control which type of database you are working with before trying to understand the code.
- Consistency: SQL is inconsistent across different databases. Working with Django models creates an abstraction and helps you focus on the most important tasks.
- Tracking: It’s even easier to track database design changes working with Django models. It’s done by reading migration files written in Python. We’ll discuss this more in the next chapter.
Notice that you also have access to model managers. Django Manager is a class that behaves as an interface through which Django models interact with databases. Every Django model, by default, inherits the models.Manager class that comes with the necessary methods to make Create, Read, Update and Delete (CRUD) operations on the table in the database.
Now that we have a better understanding of Django models, let’s create the first model in this project, the User model. Working with our first model, we’ll also learn how to use the basic methods of the Django ORM to perform CRUD operations.
Writing the User model
In the previous section, we saw how a model is represented as a class and how this can basically be created as a table in the database.
Talking about the User model, Django comes with a pre-built-in User model class that you can use for basic authentication or a session. It actually provides an authentication feature you can use to quickly add authentication and authorization to your projects.
While it’s great for most use cases, it has its limitations. For example, in this book, we are building a social media web application. The user in this application will have some bio or even an avatar. Why not also have a phone number for two-factor authentication (2FA)?
Actually, the User model of Django doesn’t come with these fields. This means we’ll need to extend it and have our own user model. This also means that we will have to add custom methods to the manager for creating a user and a superuser. This will speed up the coding process. In Django, a superuser is a user with administrator permission.
Before creating the model, we actually need an application, and to register it. A Django application is a submodule of a Django project. It’s a Python package structured to work in a Django project and share Django conventions such as containing files or submodules such as models, tests, urls, and views.
Creating the user application
To start a new application in this project, run the following command:
cd core && django-admin startapp user
This will create a new package (directory) containing new files. Here’s the structure of the directory:
├── admin.py
├── apps.py
├── __init__.py
├── migrations
│   └── __init__.py
├── models.py
├── tests.py
└── views.py
We can now confidently start writing the User model. Here is the structure of the User table we want to have in the database:

Figure 2.2 – User table structure
And here’s the code concerning the User table structure:
core/user/models.py
import uuid
from django.contrib.auth.models import AbstractBaseUser,
    BaseUserManager, PermissionsMixin
from django.core.exceptions import ObjectDoesNotExist
from django.db import models
from django.http import Http404
class User(AbstractBaseUser, PermissionsMixin):
   public_id = models.UUIDField(db_index=True, unique=True,
       default=uuid.uuid4, editable=False)
   username = models.CharField(db_index=True,
       max_length=255, unique=True)
   first_name = models.CharField(max_length=255)
   last_name = models.CharField(max_length=255)
   email = models.EmailField(db_index=True, unique=True)
   is_active = models.BooleanField(default=True)
   is_superuser = models.BooleanField(default=False)
   created = models.DateTimeField(auto_now=True)
   updated = models.DateTimeField(auto_now_add=True)
   USERNAME_FIELD = 'email'
   REQUIRED_FIELDS = ['username']
   objects = UserManager()
   def __str__(self):
       return f"{self.email}"
   @property
   def name(self):
       return f"{self.first_name} {self.last_name}"
The models module from Django provides some field utilities that can be used to write fields and add some rules. For example, CharField represents the type of field to create in the User table, similar to BooleanField. EmailField is also CharField but rewritten to validate the email that is passed as a value to this field.
We also set the EMAIL_FIELD as the email, and USERNAME_FIELD as the username. This will help us have two fields for login. The username can be the actual username of a user or just the email address used for registration.
We also have methods such as name, which is basically a model property. Then, it can be accessed anywhere on a User object, such as user.name. We are also rewriting the __str__ method to return a string that can help us quickly identify a User object.
Creating the user and superuser
Next, let’s write UserManager so we can have methods to create a user and a superuser:
core/user/models.py
class UserManager(BaseUserManager):
   def get_object_by_public_id(self, public_id):
       try:
           instance = self.get(public_id=public_id)
           return instance
       except (ObjectDoesNotExist, ValueError, TypeError):
           return Http404
   def create_user(self, username, email, password=None,
        **kwargs):
       """Create and return a `User` with an email, phone
           number, username and password."""
       if username is None:
           raise TypeError('Users must have a username.')
       if email is None:
           raise TypeError('Users must have an email.')
       if password is None:
           raise TypeError('User must have an email.')
       user = self.model(username=username,
           email=self.normalize_email(email), **kwargs)
       user.set_password(password)
       user.save(using=self._db)
       return user
   def create_superuser(self, username, email, password,
       **kwargs):
       """
       Create and return a `User` with superuser (admin)
           permissions.
       """
       if password is None:
           raise TypeError('Superusers must have a
           password.')
       if email is None:
           raise TypeError('Superusers must have an
               email.')
       if username is None:
           raise TypeError('Superusers must have an
           username.')
       user = self.create_user(username, email, password,
           **kwargs)
       user.is_superuser = True
       user.is_staff = True
       user.save(using=self._db)
       return user
For the create_user method, we are basically making sure that fields such as password, email, username, first_name, and last_name are not None. If everything is good, we can confidently call the model, set a password, and save the user in the table.
This is done using the save() method.
create_superuser also behaves in accordance with the create_user method – and it’s quite normal because, after all, a superuser is just a user with admin privileges, and also fields such as is_superuser and is_staff set to True. Once it’s done, we save the new User object in the database and return the user.
See the save method as a way to commit changes made to the User object to the database.
The model is written and now we need to run migrations to create the table in the database.
Running migrations and testing the model
Before running the migrations, we need to register the user application in INSTALLED_APPS in CoreRoot/settings.py.
First, let’s rewrite the apps.py file of the user. It contains the app configs that Django will use to locate the application. Let’s also add a label for the application:
core/user/apps.py
from django.apps import AppConfig
class UserConfig(AppConfig):
   default_auto_field = 'django.db.models.BigAutoField'
   name = 'core.user'
   label = 'core_user'
Let's register the application now:
   'core',
   'core.user'
]
Let’s register the application now in the INSTALLED_APPS setting:
CoreRoot/settings.py
...
   'core',
   'core.user'
]
We also need to tell Django to use this User model for the authentication user model. In the settings.py file, add the following line:
CoreRoot/settings.py
AUTH_USER_MODEL = 'core_user.User'
Great – we can now create the first migration for the user app:
python manage.py makemigrations
You’ll have a similar output:
Migrations for 'core_user':
  core/user/migrations/0001_initial.py
    - Create model User
Let’s migrate this modification to the database:
python manage.py migrate
The table is created in the database. Let’s use the Django shell to play with the newly created model a little bit:
python manage.py shell
Let’s import the model and add a dict containing the data needed to create a user:
Python 3.10.1 (main, Dec 21 2021, 17:46:38) [GCC 9.3.0] on linux
Type "help", "copyright", "credits" or "license" for more information.
(InteractiveConsole)
>>> from core.user.models import User
>>> data_user = {
... "email": "[email protected]",
... "username": "john-doe",
... "password": "12345",
... "first_name": "John",
... "last_name": "Doe"
... }
>>> user =  User.objects.create_user(**data_user)
The user is created in the database. Let's access some properties of the user object.
>>> user.name
'John Doe'
>>> user.email
'[email protected]'
>>> user.password
'pbkdf2_sha256$320000$NxM7JZ0cQ0OtDzCVusgvV7$fM1WZp7QhHC3QEajnb Bjo5rBPKO+Q8ONhDFkCV/gwcI='
Great – we’ve just written the model and created the first user. However, a web browser won’t directly read the user data from our database – and worse, we are working with a Python native object, and a browser or a client reaching our server to make requests mostly supports JSON or XML. One idea would be to use the json library, but we are dealing with a complex data structure; complex data structures can be easily handled with serializers.
Let’s write serializers in the next section.
Writing UserSerializer
A serializer allows us to convert complex Django complex data structures such as QuerySet or model instances into Python native objects that can be easily converted to JSON or XML format. However, a serializer also serializes JSON or XML to native Python. Django Rest Framework (DRF) provides a serializers package you can use to write serializers and also validations when API calls are made to an endpoint using this serializer. Let’s install the DRF package and make some configurations first:
pip install djangorestframework django-filter
Don’t forget to add the following to the requirements.txt file:
requirements.txt
Django==4.0.1
psycopg2-binary==2.9.3
djangorestframework==3.13.1
django-filter==21.1
We are also adding django-filter for data filtering support. Let’s add rest_framework to the INSTALLED_APPS setting:
CoreRoot/settings.py
INSTALLED_APPS = [
    ...
    'rest_framework',
]
In the core/user directory, create a file called serializers.py. This file will contain the UserSerializer class:
core/user/serializers.py
from rest_framework import serializers
from core.user.models import User
class UserSerializer(serializers.ModelSerializer):
   id = serializers.UUIDField(source='public_id',
       read_only=True, format='hex')
   created = serializers.DateTimeField(read_only=True)
   updated = serializers.DateTimeField(read_only=True)
   class Meta:
       model = User
       fields = ['id', 'username', 'first_name',
           'last_name', 'bio', 'avatar', 'email',
           'is_active', 'created', 'updated']
       read_only_field = ['is_active']
The UserSerializer class inherits from the serializers.ModelSerialzer class. It’s a class inheriting from the serializers.Serializer class but has deep integrations for supporting a model. It’ll automatically match the field of the model to have the correct validations for each one.
For example, we’ve stated that the email is unique. Then, every time someone registers and enters an email address that already exists in the database, they will receive an error message concerning this.
The fields attribute contains all the fields that can be read or written. Then, we also have the read_only fields. These fields are only readable. This means that they can’t be modified and it’s definitely better like that. Why give the external user the possibility to modify the created, updated, or id fields?
Now that UserSerializer is available, we can now write viewset.
Writing UserViewset
As we know, Django at its core is based on the Model-View-Template (MVT) architecture. The model communicates with the views (or controllers) and the template displays responses or redirects requests to the views.
However, when Django is coupled with DRF, the model can be directly connected to the view. However, as good practice, use a serializer between a model and a viewset. This really helps with validation and also some important checks.
So, what is a viewset then? DRF provides a class named APIView from which a lot of classes from DRF inherit to perform CRUD operations. Therefore, a viewset is simply a class-based view that can handle all the basic HTTP requests—GET, POST, PUT, DELETE, and PATCH—without hardcoding any CRUD logic here.
For the viewset user, we are only allowing the PATCH and GET methods. Here’s what the endpoints will look like:
|
Method |
URL |
Result |
|
GET |
/api/user/ |
Lists all the users |
|
GET |
/api/user/user_pk/ |
Retrieves a specific user |
|
PATCH |
/api/user/user_pk/ |
Modifies a user |
Table 1.1 – Endpoints
Let’s write the viewset. Inside the user directory, rename the view file viewsets.py and add the following content:
core/user/viewsets.py
from rest_framework.permissions import AllowAny
from rest_framework import viewsets
from core.user.serializers import UserSerializer
from core.user.models import User
class UserViewSet(viewsets.ModelViewSet):
   http_method_names = ('patch', 'get')
   permission_classes = (AllowAny,)
   serializer_class = UserSerializer
   def get_queryset(self):
       if self.request.user.is_superuser:
           return User.objects.all()
       return User.objects.exclude(is_superuser=True)
   def get_object(self):
    obj =
    User.objects.get_object_by_public_id(self.kwargs['pk'])
       self.check_object_permissions(self.request, obj)
       return obj
The only methods allowed here are GET and PUT. We also set serializer_class and permission_classes to AllowAny, which means that anybody can access these viewsets. We also rewrite two methods:
- get_queryset: This method is used by the viewset to get a list of all the users. This method will be called when /user/ is hit with a GET request.
- get_object: This method is used by the viewset to get one user. This method is called when a GET or PUT request is made on the /user/id/ endpoint, with id representing the ID of the user.
There we have the User viewset – but there is no endpoint yet to make it work. Well, let’s add a router now.
Adding a router
Routers allow you to quickly declare all of the common routes for a given controller; the next code snippet shows a viewset to which we will be adding a router.
At the root of the apps project (core), create a file named routers.py.
And let’s add the code:
core/routers.py
from rest_framework import routers
from core.user.viewsets import UserViewSet
router = routers.SimpleRouter()
# ##################################################################### #
# ################### USER                       ###################### #
# ##################################################################### #
router.register(r'user', UserViewSet, basename='user')
urlpatterns = [
   *router.urls,
]
To register a route for a viewset, the register() method needs two arguments:
- The prefix: Representing the name of the endpoint, basically
- The viewset: Only representing a valid viewset class
The basename argument is optional but it’s a good practice to use one, as it helps for readability and also helps Django for URL registry purposes.
The router is now added; we can make some requests to the API using Insomnia.
Important note
Insomnia is a REST client tool used to make requests to RESTful API. With Insomnia, you can manage and create your requests elegantly. It offers support for cookie management, environment variables, code generation, and authentication.
Before doing that, make sure to have the server running:
python manage.py runserver
Let’s make a request to http://127.0.0.1:8000/api/user/, a GET request. Look at the following screenshot and make sure to have the same URL – or you can replace 127.0.0.1 with localhost --, next to the Send button.

Figure 2.3 – Listing all users
As you can see, we have a list of users created. Let’s also make a GET request to retrieve the first user using this URL: /api/user/<id>/.

Figure 2.4 – Retrieving a user
We have now a User object. This endpoint also allows PATCH requests. Let’s set the last_name value for this user to Hey. Change the type of request to PATCH and add a JSON body.

Figure 2.5 – Modifying a user without permissions
Although it’s working, it’s actually a very bad scenario. We can’t have users modify other user names or data. A solution is to change the permission on the permission_classes attribute in the UserViewSet class:
core/user/viewsets.py
from rest_framework.permissions import IsAuthenticated
...
class UserViewSet(viewsets.ModelViewSet):
   http_method_names = ('patch', 'get')
   permission_classes = (IsAuthenticated,)
   serializer_class = UserSerializer
...
Let’s try the PATCH request again.

Figure 2.6 – Modifying a user without permissions
We normally have a 401 status, an indication of an authentication issue. Basically, it means that an authentication header should be provided. They are more permissions to add concerning interactions with users, but let’s discuss this in later chapters.
Great. Now that we are done with the user application, we can confidently move on to adding a login and registration feature to the project.
Writing the user registration feature
Before accessing protected data, the user needs to be authenticated. This comes with the assumption that there is a registration system to create an account and credentials.
To make things simpler, if the registration of a user is successful, we will provide credentials, here JWTs, so the user won’t have to log in again to start a session – a win for user experience.
First, let’s install a package that will handle JWT authentication for us. The djangorestframework-simplejwt package is a JWT authentication plugin for DRF:
pip install djangorestframework-simplejwt
The package covers the most common use case of JWT, and in this case here, it facilitates the creation and management of access tokens, as well as refreshing tokens. Before working with this package, there are some configurations needed in the settings.py file. We need to register the app in INSTALLED_APPS and specify DEFAULT_AUTHENTICATION_CLASSES in the REST_FRAMEWORK dict:
CoreRoot/settings.py
   …
   # external packages apps
   'rest_framework',
   'rest_framework_simplejwt',
   'core',
   'core.user'
]
...
REST_FRAMEWORK = {
   'DEFAULT_AUTHENTICATION_CLASSES': (
       'rest_framework_simplejwt.authentication
           .JWTAuthentication',
   ),
   'DEFAULT_FILTER_BACKENDS':
     ['django_filters.rest_framework.DjangoFilterBackend'],
}
First, we need to write a registration serializer, but before that, let’s create a new application called auth in the core app:
cd core && django-admin startapp auth
It’ll contain all the logic concerning logging in, registration, logging out, and a lot more.
As we did earlier for the user application, let’s rewrite the apps.py file and register the application in the INSTALLED_APPS settings:
core/auth/apps.py
from django.apps import AppConfig
class AuthConfig(AppConfig):
   default_auto_field = 'django.db.models.BigAutoField'
   name = 'core.auth'
   label = 'core_auth'
And adding the new application to INSTALLED_APPS:
...
'core',
   'core.user',
   'core.auth'
]
...
Remove the admin.py and models.py files from the auth directory, as we won’t be working with them. For registration and login, we’ll have many serializers and viewsets, so let’s organize the code accordingly. Create a Python package called serializers and another one called viewsets. Make sure that these new directories have an __init__.py file. Here’s how your auth app tree should look:
├── apps.py
├── __init__.py
├── migrations
│   ├── __init__.py
├── serializers
│   └── __init__.py
├── tests.py
├── viewsets
│   └── __init__.py
└── views.py
Inside the serializers directory, create a file called register.py. It’ll contain the code for RegisterSerializer, which is the name of the registration serializer class:
core/auth/serializers/register.py
from rest_framework import serializers
from core.user.serializers import UserSerializer
from core.user.models import User
class RegisterSerializer(UserSerializer):
   """
   Registration serializer for requests and user creation
   """
   # Making sure the password is at least 8 characters
       long, and no longer than 128 and can't be read
   # by the user
   password = serializers.CharField(max_length=128,
       min_length=8, write_only=True, required=True)
   class Meta:
       model = User
       # List of all the fields that can be included in a
           request or a response
       fields = ['id', 'bio', 'avatar', 'email',
           'username', 'first_name', 'last_name',
           'password']
   def create(self, validated_data):
       # Use the `create_user` method we wrote earlier for
           the UserManager to create a new user.
       return User.objects.create_user(**validated_data)
As you can see, RegisterSerializer is a subclass of UserSerializer. This is really helpful, as we don’t need to rewrite fields again.
Here, we don’t need to revalidate fields such as email or password. As we declared these fields with some conditions, Django will automatically handle their validation.
Next, we can add the viewset and register it in the register.py file:
core/auth/viewsets/register.py
from rest_framework.response import Response
from rest_framework.viewsets import ViewSet
from rest_framework.permissions import AllowAny
from rest_framework import status
from rest_framework_simplejwt.tokens import RefreshToken
from core.auth.serializers import RegisterSerializer
class RegisterViewSet(ViewSet):
   serializer_class = RegisterSerializer
   permission_classes = (AllowAny,)
   http_method_names = ['post']
   def create(self, request, *args, **kwargs):
       serializer =
           self.serializer_class(data=request.data)
       serializer.is_valid(raise_exception=True)
       user = serializer.save()
       refresh = RefreshToken.for_user(user)
       res = {
           "refresh": str(refresh),
           "access": str(refresh.access_token),
       }
       return Response({
           "user": serializer.data,
           "refresh": res["refresh"],
           "token": res["access"]
       }, status=status.HTTP_201_CREATED)
Nothing really new here – we are using attributes from the ViewSet class. We are also rewriting the create method to add access and refresh tokens in the body of the response. The djangorestframework-simplejwt package provides utilities we can use to directly generate tokens. That’s what RefreshToken.for_user(user) does.
And the final step – let’s register the viewset in the routers.py file:
core/routers.py
 ...
# ##################################################################### #
# ################### AUTH                       ###################### #
# ##################################################################### #
router.register(r'auth/register', RegisterViewSet,
    basename='auth-register')
...
Great! Let’s test the new endpoint with Insomnia. In the collection of requests for this project, create a new POST request. The URL will be as follows: localhost:8000/api/auth/register/.
As a body for the request, you can pass the following:
{
    "username": "mouse21",
    "first_name": "Mickey",
    "last_name": "Mouse",
    "password": "12345678",
    "email": "[email protected]"
}
With that, send the request. You should have a response similar to that shown in Figure 2.6 with a 201 HTTP status:

Figure 2.7 – Registering a user
Let’s see what happens if we try to create a user with the same email and username. Hit the Send button to send the same request again. You should receive a 400 error.

Figure 2.8 – Registering a user with the same email and username
Great. We are now sure that the endpoint behaves as we wish. The next step will be to add the login endpoint following the same process: writing the serializer and the viewset, and then registering the route.
Adding the login feature
The login feature will require the email or the username with the password. Using the djangorestframework-simplejwt package, which provides a serializer called TokenObtainPairSerializer, we’ll write a serializer to check for user authentication but also return a response containing access and refresh tokens. For this, we will rewrite the validate method from the TokenObtainPairSerializer class. Inside the core/auth/serializers directory, create a new file called login.py (this file will contain LoginSerializer, a subclass of TokenObtainPairSerializer):
core/auth/serializers/login.py
from rest_framework_simplejwt.serializers import
  TokenObtainPairSerializer
from rest_framework_simplejwt.settings import api_settings
from django.contrib.auth.models import update_last_login
from core.user.serializers import UserSerializer
class LoginSerializer(TokenObtainPairSerializer):
   def validate(self, attrs):
       data = super().validate(attrs)
       refresh = self.get_token(self.user)
       data['user'] = UserSerializer(self.user).data
       data['refresh'] = str(refresh)
       data['access'] = str(refresh.access_token)
       if api_settings.UPDATE_LAST_LOGIN:
           update_last_login(None, self.user)
       return data
We are surcharging the validate method from the TokenObtainPairSerializer class to adapt it to our needs. That’s why super is helpful here. It’s a built-in method in Python that returns a temporary object that can be used to access the class methods of the base class.
Then, we use user to retrieve access and refresh tokens. Once the serializer is written, don’t forget to import it to the __init__.py file:
core/auth/serializers/__init__.py
from .register import RegisterSerializer
from .login import LoginSerializer
The next step is to add the viewset. We’ll call this viewset LoginViewset. As we are not directly interacting with a model here, we’ll just be using the viewsets.ViewSet class:
core/auth/viewsets/login.py
from rest_framework.response import Response
from rest_framework.viewsets import ViewSet
from rest_framework.permissions import AllowAny
from rest_framework import status
from rest_framework_simplejwt.exceptions import TokenError,
    InvalidToken
from core.auth.serializers import LoginSerializer
class LoginViewSet(ViewSet):
   serializer_class = LoginSerializer
   permission_classes = (AllowAny,)
   http_method_names = ['post']
   def create(self, request, *args, **kwargs):
       serializer =
           self.serializer_class(data=request.data)
       try:
           serializer.is_valid(raise_exception=True)
       except TokenError as e:
           raise InvalidToken(e.args[0])
       return Response(serializer.validated_data,
           status=status.HTTP_200_OK)
Add the viewset to the __init__.py file of the viewsets directory:
from .register import RegisterViewSet
from .login import LoginViewSet
We can now import it and register it in the routers.py file:
core/routers.py
...
from core.auth.viewsets import RegisterViewSet,
    LoginViewSet
router = routers.SimpleRouter()
# ##################################################################### #
# ################### AUTH                       ###################### #
# ##################################################################### #
router.register(r'auth/register', RegisterViewSet,
    basename='auth-register')
router.register(r'auth/login', LoginViewSet,
    basename='auth-login')
...
The endpoint for login will be available at /auth/login/. Let’s try a request with Insomnia.
Here’s the body of the request I’ll use:
{
    "password": "12345678",
    "email": "[email protected]"
}
Figure 2.9 – Login with user credentials
The login feature is ready and working like a charm – but we have a little bit of an issue. The access token expires in 5 minutes. Basically, to get a new access token, the user will have to log in again. Let’s see how we can use the refresh token to request a new access token without logging in again.
Refresh logic
djangorestframework-simplejwt provides a refresh logic feature. As you’ve noticed, we’ve been generating refresh tokens and returning them as responses every time registration or login is completed. We’ll just inherit the class from TokenRefreshView and transform it into a viewset.
In auth/viewsets, add a new file called refresh.py:
core/auth/viewsets/refresh.py
from rest_framework.response import Response
from rest_framework_simplejwt.views import TokenRefreshView
from rest_framework.permissions import AllowAny
from rest_framework import status
from rest_framework import viewsets
from rest_framework_simplejwt.exceptions import TokenError,
    InvalidToken
class RefreshViewSet(viewsets.ViewSet, TokenRefreshView):
   permission_classes = (AllowAny,)
   http_method_names = ['post']
   def create(self, request, *args, **kwargs):
       serializer = self.get_serializer(data=request.data)
       try:
           serializer.is_valid(raise_exception=True)
       except TokenError as e:
           raise InvalidToken(e.args[0])
       return Response(serializer.validated_data,
           status=status.HTTP_200_OK)
Now add the class in the __init__.py file.
from .register import RegisterViewSet
from .login import LoginViewSet
from .refresh import RefreshViewSet
Now add the class in the __init__.py file.
core/auth/viewsets/__init__.py
from .register import RegisterViewSet
from .login import LoginViewSet
from .refresh import RefreshViewSet
And now register it in the routers.py file:
core/routers.py
from core.auth.viewsets import RegisterViewSet,
    LoginViewSet, RefreshViewSet
...
router.register(r'auth/refresh', RefreshViewSet,
    basename='auth-refresh')
...
Great – let’s test the new endpoint at /auth/refresh/ to get a new token. It’ll be a POST request with the refresh token in the body of the request, and you will receive a new access token in the response:
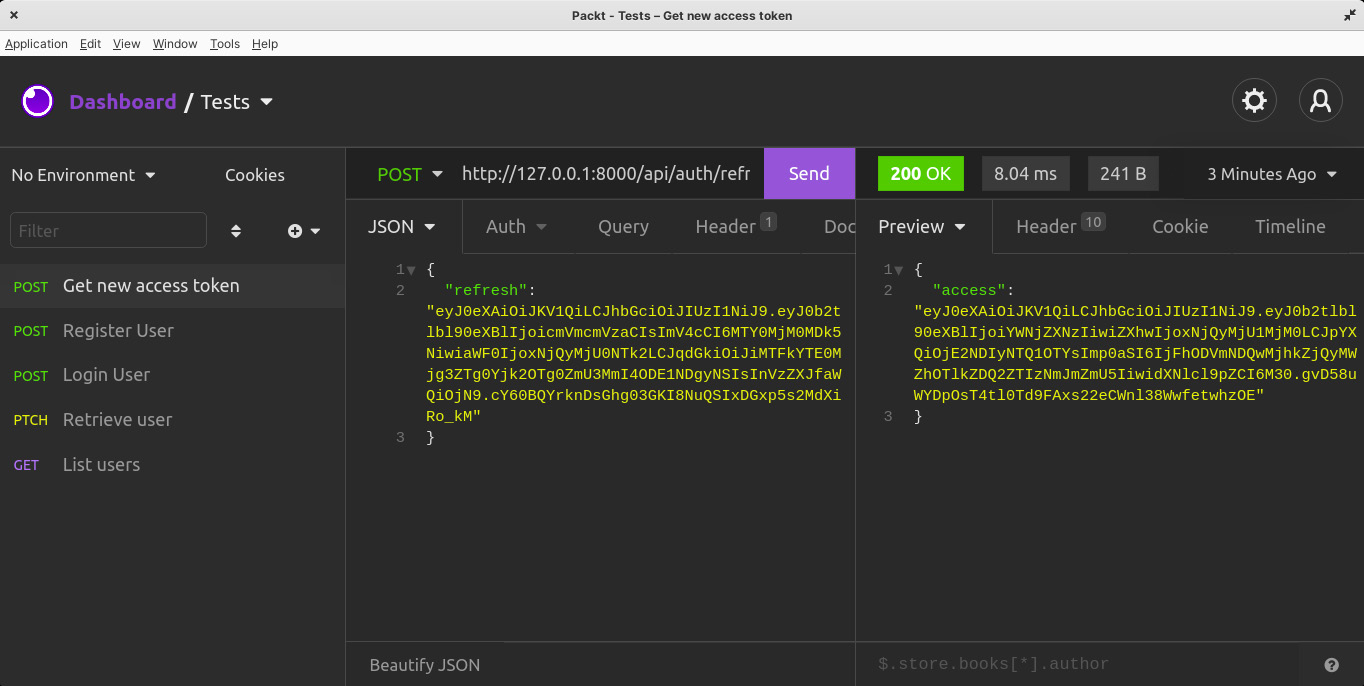
Figure 2.10 – Requesting for a new access token
Great – we’ve just learned how to implement refresh token logic in the application.
Summary
In this chapter, we learned how to write an authentication system based on JWT for a Django application using DRF and djangorestframework-simplejwt. We also learned how to extend classes and rewrite the functions.
In the next chapter, we’ll add the posts feature. Our users will be able to create a post that can be viewed and liked by other users.
Questions
- What is a JWT?
- What is Django Rest Framework?
- What is a model?
- What is a serializer?
- What is a viewset?
- What is a router?
- What is the usage of a refresh token?