
Chapter 7
Someone Moved My Stuff!
Ingredients
- 1 Arduino
- 1 Arduino USB cable
- 1 breadboard
- 5 jumper wires
- 1 pressure sensor
- 1 little buzzer
- 1 10k-ohm (10kΩ) resistor, which has a brown-black-orange stripe pattern
- a small object you cherish :-)
- Your computer
Optional part
- 1 Arduino power supply
Imagine an adventure movie where our hero is in search of the Object That Will Save Earth. After outwitting evil-doers, finding a hidden cave, and sneaking past laser-beam alarms, she puts her hands on the valuable object and picks it up. Moments later, red lights flash and alarms sound.
It is that moment we’re going to re-create!
Concepts: Sensing Force
Just as there are materials that change their conductivity with different light levels or temperature, there are also materials that change conductivity when something is pushing against them—like a finger, a toy or the weight of an Earth-saving object.
We call these “force sensors,” and they look like this:

Figure 7-1: A simple sensor to measure pressure, or force
This will be our sensor for this project.
All of the parts you need come in almost every Arduino starter kit. If you don’t have either the force sensor or the buzzer, there are links to places you can buy them at http://keefe.cc/stuff-alarm.
Steps
Wire Up the Parts
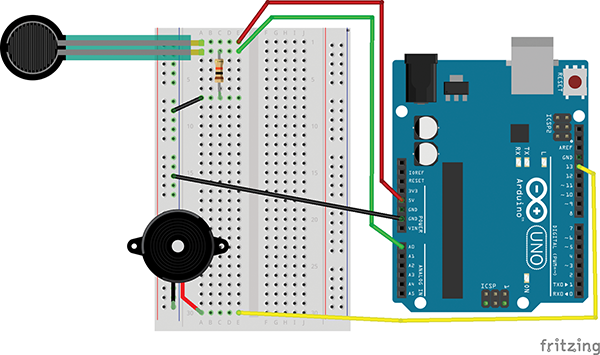
Figure 7-2: Wiring chart for the force sensor project
As you make more projects using electronic parts, you’ll begin to notice that many of the parts need to connect to “ground,” which is GND on the Arduino. To make it easier to wire up all of these parts, the breadboard has long blue and red rows—which I call “rails”—running the length of the board. It’s pretty common to connect a jumper wire from one of the blue rails, marked with a “–” minus sign, to the GND on the Arduino. That way, all of the parts needing ground can connect with a short hop to the rail.
Let’s first connect our ground rail, and we’ll go from there.
- Hold the breadboard so all of the numbers and letters are upright, and spot the blue row of holes on the left side of the board.
- Connect a jumper wire, preferably black for ground, from any
GNDpin on the Arduino to one of the holes along the blue row. (Why breadboard ground rails are marked blue instead of black is a mystery to me!)
For each of the following steps, use the holes on the same side of the breadboard’s center canal as our ground rail. Remember that holes in a row connect to each other, except across that canal.
- Insert the “feet” of the force sensor into the top two rows of the breadboard—so one foot is in the top row and the other foot is in the second row. Be sure the feet are pushed as far in as they will go.
- With your finger right where the force sensor and the breadboard meet, gently bend the sensor contacts so they form a right angle. This way your sensor is closer to horizontal than standing straight up.

Figure 7-3: Gently bend the pins of the pressure sensor so the whole sensor is more horizontal than vertical.
- Connect a jumper wire (preferably red, for power), from the top row of the breadboard to Pin
5Von the Arduino. - Connect another jumper wire (any color) from the second row of the breadboard to Pin
A0on the Arduino. - Insert one leg of the resistor into the second row on the breadboard
- Insert the other leg of the resistor into a new row—let’s use Row 7.
- Connect a jumper wire (preferably black, for ground) from Row 7 to the blue ground rail we wired up in the first step.
Grab the little buzzer from your kit. It’s usually a black, round plastic part with a hole in it (where the sound comes out). Buzzers have polarity, like LEDs or batteries, so look for signs of that. The positive side may have a ‘+’ plus sign, a red wire, or a longer leg. The negative side may have a black wire, a “–” minus sign, no sign, or a shorter leg.
- Insert the negative “–” side of the buzzer into a hole along the blue ground.
- Insert the positive ‘+’ side of the buzzer into the bottom row of the breadboard (very likely, it’s Row 30).
- Connect one more jumper wire (any color) from the same bottom row of the breadboard to Arduino Pin
13.
Load Up the Code
You’ve probably picked your favorite way to get code for these projects, but here are the three methods for this chapter’s code:
From the Web
- Use a web browser to visit http://keefe.cc/stuff-alarm.
- Click the “Copy Code to Clipboard” button.
- Switch back to your Arduino software.
- Start a new Arduino sketch using File → New.
- You’ll get a mostly blank sketch window. Delete the little code that’s there.
- Click anywhere inside the blank window.
- Paste the code you copied from the website using Edit → Paste from the menu.
- Save your work using File → Save.
From the Bundle
If you don’t already have the bundle, the instructions are at the beginning of Appendix B.
- Find your
family-projects-sketches-masterfolder, and double-click it to open it. - Click on the
stuff_alarmfolder. - Inside, you’ll see
stuff_alarm.ino. It’ll have a blue Arduino icon. - To use it, just double-click the file name and it should open in your Arduino software.
From the Back of This Book
The code for this project isn’t too long, and it’s printed in the back of the book. If you’re reading an electronic version of the book on your computer, you may be able to simply copy and paste it into your Arduino software:
- On your computer, start up your Arduino software and start a new sketch from the menu bar: File → New.
- Delete what’s in the window that pops up.
- Either type the code exactly as it appears in Appendix B or, if you have an electronic version of this book on your computer, copy-and-paste the entire code block for this chapter.
No matter how you got the project code into your Arduino software, save your work, using File → Save.
Make It Go
Before you upload your code to your Arduino, put the toy or your finger on the sensor—because if there’s nothing there, the buzzer will start to scream!
Upload the code to your Arduino by clicking the arrow button at the top of the blue window or using Sketch → Upload.
Carefully place your object onto the pressure sensor until it sits there without the buzzer going off. Now, if someone comes by and takes it (or if the cat knocks it over), the buzzer will sound!

Figure 7-4: Here’s a toy jaguar, holding down the pressure sensor. For the photo, I’ve replaced the buzzer with an LED, because it’s hard to see a buzzer work!
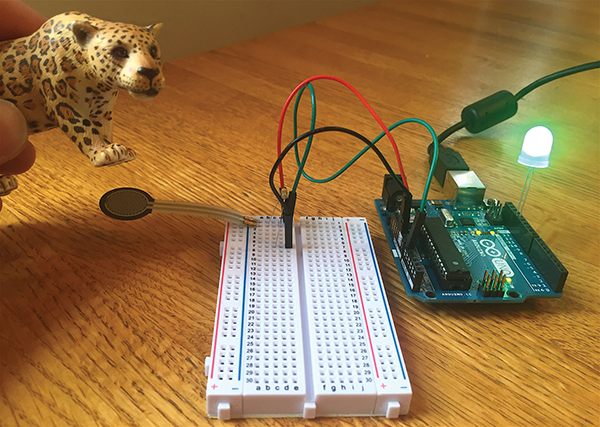
Figure 7-5: Pick up the jaguar, and the alarm gets powered—again, here using an LED instead of a buzzer for the visual effect.
Fixes
If the buzzer doesn’t stop when you place the toy on the sensor, you may need to reduce the amount of force needed to silence the alarm. That’s set as the movedValue number in the code.
int movedValue = 100; // threshold value to trigger the buzzerChange 100 to a smaller number, like 50, and give it a try. You can also open the Serial Monitor window using Tools → Serial Monitor to watch the values change with different pressure and help you pick the right threshold.
What’s Going On?
The force sensor conducts electricity better when something is pushing against it, so the sensor numbers rise when there’s weight or pressure applied to the disk, and they drop to zero (no current) when nothing is pushing on the sensor.
We watch for that drop toward zero with an “if-then” instruction: If the sensor value is less than 100, then sound the alarm.
Untethering Your Arduino
If you’re actually going to use this to monitor an object, chances are you don’t want your computer sitting next to your Arduino the whole time. This is where the optional Arduino power supply comes in. Your Arduino will run the current program in its memory (the last one uploaded) as long as it has power—even if you disconnect your computer.
But since your computer also provides power to the Arduino, you need power from another source. Hence the optional power supply. If you don’t have one, there are links to places you can purchase them at http://keefe.cc/stuff-alarm.
Taking It Further
Pressure-sensitive Plastic
I’m fascinated by fabrics and materials you can use for sensing. There’s material called Velostat that responds to changes in pressure the same way as our pressure sensor. It’s flexible and feels like a thick trash bag.
You can cut out much bigger sections of Velostat and place it under your Earth-saving object for a better effect.
Resources for how to do that, and links to places you can buy Velostat, are at http://keefe.cc/stuff-alarm.
Code Corner
Pretty much everything in this project’s code is something we’ve already talked about in “Code Corner,” so here’s something fun to learn about:
Equal Doesn’t Equal Equal-Equal
Heh. Say that ten times quickly!
Here’s the story. We’ve been using the equals sign = to assign a value to a variable. Like, “Set buzzerPin equal to 13”:
int buzzerPin = 13; But what if you want to use an “if-then” statement like this: “If the sensor value is equal to 100, turn on the buzzer.” In this case, we’re using “equal” as a comparison, not an assignment. See? And that’s very different for a computer. So for comparisons, we use equal-equal == instead.
if (sensorValue == 100){
  digitalWrite(buzzerPin, HIGH);
}
This is a key point, and it’s super common to mess up. It’s especially tricky because in many computer languages, such as Arduino’s, accidentally putting an assignment (one equals sign) instead of a comparison (two equals signs) into an “if-then” statement doesn’t cause errors. Worse, it’s considered a “True” statement! So the code inside your “if-then” statement always runs. And that’s probably not what you want.