
Chapter 1
You Only Have to Do This Once
Ingredients
- 1 Arduino Uno (Revision 3)
- 1 Arduino USB cable
- Your computer: a desktop or laptop running Mac OS, Windows, or Linux
You’re about to embark on the world of smart objects using Arduinos. There’s so much you can do and it’s all a lot of fun. You’ll say “Wow!” and “Yay!” and maybe even “Eureka!”
But first, we need to get you set up. This will take several steps, but I’ll walk you through each one. Think of me as a computer professional (or a talented child) walking you through each step; a kind, patient computer professional/talented child.
Most importantly, you only have to do this once. I really want you to remember that, which is why I put it right up there as the title of this chapter. Once you’re set up, the projects in this book will be a breeze.
So here we go!
Arduinos come in many, many flavors. That’s largely because it’s “open source” hardware, meaning anyone can build an Arduino from scratch. Each flavor has different features, sizes, and quirks.
I recommend you start out with the Arduino Uno, Revision 3. It’s the classic beginner’s board, and it’s the board I’ll assume you have throughout this book.
Almost any Arduino starter kit you find online will contain both the Arduino Uno and the Arduino USB cable. Many kits also have a bunch of the parts you’ll need for the projects in this book. For a list of kits and ways to buy parts individually, and some key parts you won’t find in a kit, check out Appendix A, “Everything You Need” at the end of the book, or visit http://keefe.cc/family-projects.
You also will need a computer onto which you have permission to install new software. If you’ve successfully installed new software before, you almost certainly have permission. If someone else such as a parent, a company manager, or the computer’s owner has the Administrator password, you’re going to need that person’s help to continue.
Steps
To make the Arduino do things, we’ll need to give it instructions. Normally, you give a computer instructions using a keyboard and a screen. But your Arduino doesn’t have a keyboard or screen. So instead, we write the instructions on a desktop or laptop computer and send them to the Arduino over the USB cable.
So let’s make that connection, physically linking your Arduino to your computer.
Get Connected
- Plug the flatter end of the USB cable into a USB outlet on your computer.
- Plug the squarish end of the USB cable into the matching outlet on the Arduino.

Figure 1-1: The squarish end of the USB cable goes into the squarish outlet on the Arduino.
- If your computer alerts you about detecting a new device, just cancel out of the alert for now.
Great. You’re connected, but you can’t communicate with the Arduino until you install some free software onto your desktop or laptop computer. The installation is slightly different depending on your type of computer: Mac OS, Windows, or a type of Linux. So pick the next section that fits you, and remember: You only have to do this once.
For Macintosh Users (Mac OS X)
These are the steps for the Apple brand of laptops and desktop computers:
- Get the free software. Go to http://arduino.cc and click on the “Download” tab near the top of the page. There’s a lot here, but just click the “Mac OS X” link near the top of the page to download the Arduino software for Mac.
- Optional contribution. You’ll be asked if you’d like to contribute money for the further development of Arduino software. That’s up to you! (You can always come back to contribute later once you love Arduino.) Here, click either the “Contribute & Download” or “Just Download” link.
- Find the downloaded file. Your browser will download a file called
arduino-#.#.#-macosx.zip(though instead of #’s you’ll see numbers corresponding to the latest version of the software). This is a compressed, or “zipped,” file containing the software. Your browser will probably put this file in your computer’s “Downloads” folder. If you can’t find the zipped file, use the “Spotlight” magnifying-glass icon in your computer’s upper-right corner to search for “Arduino.” Some browsers, like Safari, may unzip the file for you. If you find a blue Arduino icon instead, you can skip the next step!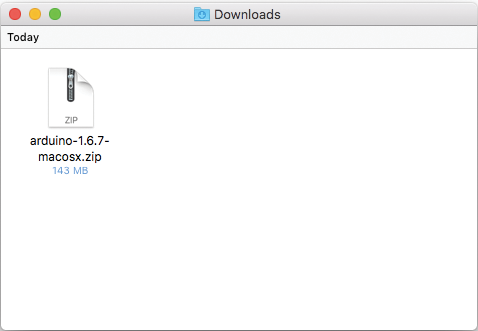
Figure 1-2: The Arduino .zip file sitting in the Mac OS X “Downloads” folder.
- Unzip the downloaded file. Once you find the
arduino-X.X.X-macosx.zipfile, double-click it. It will unpack the file and you’ll get a blue Arduino application in the same folder. You no longer need thearduino-X.X.X-macosx.zipfile and can throw it away if you want.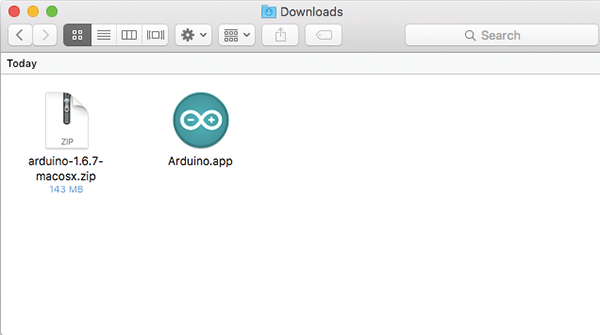
Figure 1-3: Welcome to the blue Arduino application icon!
- Open the Arduino software. Drag that blue icon to your computer’s “Applications” folder. Then open your “Applications” folder and double-click the blue Arduino icon.
- Pass through security. You don’t need to remove your shoes, but your Mac’s security system may question you a bit. If you get an alert that you can’t open Arduino “because it was not downloaded from the Mac App Store,” click “OK” to clear the alert. To continue, you need to make a small change in your system settings. It’s easy:

Figure 1-4: Adjusting the Mac’s security settings to allow downloads from “Mac App Store and identified developers”
- Click the Apple in the upper-left corner of your computer’s screen.
- Choose “System Preferences . . .”
- Pick the “Security & Privacy” icon (it looks like a little house).
- If the lock at the bottom is closed, click it to allow changes here (you’ll need to enter your computer’s password).
- Under “Allow apps downloaded from:” choose “Mac App Store and identified developers.”
- If you get an “Open Anyway” button, click it. Otherwise close this window and click on the blue Arduino icon again to launch the program.
- Confirm that you’re OK using your download. You may get another alert warning that you’re trying to launch something downloaded from the Internet. This one is easy to fix: just click “Open.”
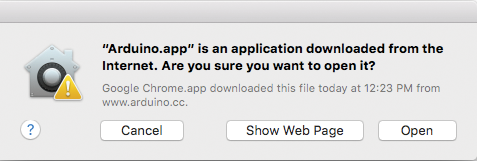
Figure 1-5: Sure you want to open it? Yes, please. (Just click Open.)
- Answer one last question. You might also get an alert asking whether you want to let Arduino accept incoming network connections. Here, click “Allow.” Now skip ahead to the section “All Together Now.”
For Windows Users
If your computer is running Microsoft Windows, this section is for you. The instructions might vary slightly based on the version of Windows you have.
- Get the free software. Go to http://arduino.cc and click on the “Download” tab near the top of the page. There’s a lot here, but just click the “Windows Installer” link near the top of the page to download the Arduino software for your PC.
- Optional contribution. You’ll be asked if you’d like to contribute money for the further development of Arduino software. That’s up to you! (You can always come back to contribute later once you love Arduino.)
- Download the software. From the contribution page, click either “Contribute & Download” or “Just Download.”
- Find the downloaded file. Your browser may start the installation once the file has been downloaded. If not, find the file in the “Downloads” folder. One way to get there is to click on Start and enter “downloads” in the search box. If the Arduino software isn’t there, use the same search box to look for “Arduino.”
- Launch the downloaded file. Once you find the Arduino file, double- click the blue Arduino icon to launch it.

Figure 1-6: The Arduino software ready to install from the Downloads folder
- Security check. You may be asked if you’re sure you want to install something downloaded from the Internet. Say yes!
- License please. Review the software license and click “Accept.”
- Options. In the “Arduino Setup: Installation Options” window, leave everything checked and click “Next.”

Figure 1-7: It’s easiest to leave these checked as-is and click “Next.”
- Destination? It’s probably best to use the recommended destination folder and click “Install.” The installation will begin, with a progress bar.
- In Arduino we trust. When you see “Would you like to install this device software?” first check the box “Always trust software from ‘Arduino LLC.’” If you don’t, you’ll just be asked about this repeatedly. Careful now, because you need to click the “Install” button, not the “Don’t Install” button, which is actually the one highlighted.

Figure 1-8: Check the box in this window and click “Install” (not the button that’s highlighted.)
- Almost there! When you’re done, “Arduino Setup Completed” will appear at the top of the install window, and you can click the “Close” button.
- Start the Arduino software. You’ll now see the friendly blue Arduino icon both on your desktop and in the Windows Start menu. Click it!
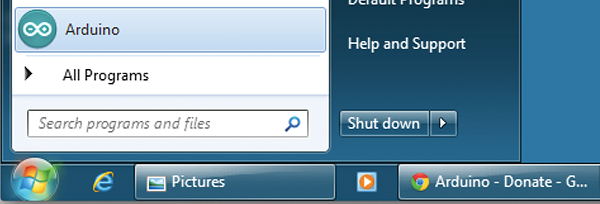
Figure 1-9: The Arduino software, loaded up and ready to go
- Still sure? The Windows security system may display one more alert as you get started. Click “Allow Access.” You are ready to skip ahead to the section “All Together Now.”
For Linux Users
Linux is an open source (and free) operating system. We have a computer at home running Ubuntu, one of the Linux flavors, and our kids use it all the time. That said, if you’ve ventured into Linux, I’m guessing you’re pretty computer savvy. It takes some extra fiddling to run and manage Linux systems.
- Get the free software. Go to http://arduino.cc and click on the “Download” tab near the top of the page. There’s a lot here, but just click the download link for the Linux type you use, either 32- or 64-bit. Definitely get the software from the Arduino website. We generally get our Ubuntu software from the built-in “Software Center”—but the version of Arduino I found there was very old. As I completed this book, Arduino was up to version 1.6.9. You’ll want at least that.
- Optional contribution. You’ll be asked if you’d like to contribute money for the further development of Arduino software. That’s up to you! (You can always contribute later.)
- Download the software. From the contribution page, click either “Contribute & Download” or “Just Download.”
- Extract the software. Find the downloaded file on your computer, probably in your “Downloads” folder, and extract that compressed file. In some systems, like our Ubuntu setup, you can view the contents of a compressed file without actually extracting it. Be sure to extract it.
- Get to the command line. This is where I’m going to assume that as a Linux user, you know a little more about your computer than most. At this point you need to get a command prompt. Usually, in Ubuntu and many other flavors, you do this by launching the “Terminal” program.
- Navigate to the Arduino directory. Using the command line navigate to the directory into which you extracted the downloaded file. If you extracted it directly in your “Downloads” folder, you’ll type something like
cd ~/Downloads/arduino-#.#.# - Run the installer. Once you’re in the Arduino directory, run the installer shell script like this:
bash ./install.sh
That should do all the work of installing your software and putting a launching icon on your desktop.
All Together Now
The software installation was quite possibly the hardest part of this book. You’re almost done.
Arduino boards come in all sorts of shapes, sizes, and internal workings. We need to make sure the software knows which kind yours is and how it’s connected to your computer. The software will make a good guess, but let’s be sure it was right. Again, you only need to do this once.
- Still connected? Be sure your Arduino is still physically connected to your computer with the USB cable.
- Set your “Board” type. Since I’m assuming you’re using an Arduino Uno, look to the Arduino software’s menu bar and navigate to Tools → Board:. You’ll get a list of Arduino types. If it’s not already checked, pick Arduino Uno or Arduino/Genuino Uno (Genuino is another name for Arduino; long story: https://en.wikipedia.org/wiki/Arduino#Legal_dispute).

Figure 1-10: Here’s where we tell the software which kind of Arduino you have. (The Windows and Linux versions are in the same place.)
- Set your “Port.” We need to tell your computer where to find your Arduino. Navigate to Tools → Port: and look at the drop-down menu. It’ll look slightly different than mine, but you want the port that has “Arduino/Genuino Uno” in the name. On Macs, it probably starts with something like “/dev/cu.usbmodem . . . .” On Windows it’ll start with “COM,” and with Linux packages try the one that’s “/dev/ttyACM0.”
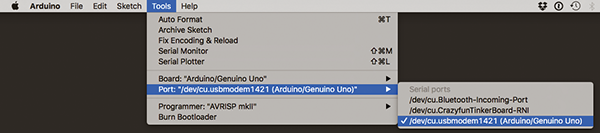
Figure 1-11: Telling my Mac where to find my Arduino. Yours may be slightly different. The Windows option probably starts with “COM,” Linux with “/dev/ttyACM0.”
If your Arduino Uno doesn’t show up as an option, be sure your Arduino is connected to the computer with the USB cable. You may need to quit and relaunch the Arduino software. The software looks for Arduinos when it starts, and this should fix things.
If you ever have a moment when your Arduino just doesn’t seem to be responding, check these settings. If they’re not correct, the software will get cranky.
Finally, you may notice a “Programmer:” option in the Tools menu. With an Arduino Uno connected by a USB cable, as you have set up, the software ignores this setting—so you can, too.
Congratulations! You are ready to play with your Arduino. Give yourself a high-five and skip to the next chapter for your first project, “Hello Blinky World.”
Fixes
If you have any trouble with the setup, rest assured you are not alone. Someone has almost certainly been in your exact same situation.
To get you on the way, search for your situation in Google or directly in the search box at http://arduino.cc—where you can also post your problem to the huge community of Arduino fans. I’ve also put helpful links to more installation instructions at http://keefe.cc/only-once.