
Chapter 5
Using Your Personal Profile to Support Your Business
In This Chapter
![]() Finding out whether you should turn on your Follow button
Finding out whether you should turn on your Follow button
![]() Understanding how to post publicly
Understanding how to post publicly
![]() Posting business milestones on your personal Profile
Posting business milestones on your personal Profile
![]() Changing your Public Timeline to support your business
Changing your Public Timeline to support your business
![]() Using personal Cover photos that support your business
Using personal Cover photos that support your business
We deliberately crafted the title of this chapter. Notice the word support in the title. We’re not suggesting that you turn your personal Profile into a straight-up business Page. Please make sure that you understand the difference between a Profile and a business Page by reading all of this book!
What we’re saying is that you can use your Profile to support your business in some very specific ways, such as finding out whether the Follow button is right for you, understanding the difference between a Public post and a Friends post, and how you can use photos on your Profile that support your business without breaking any Facebook rules.
Facebook realized that some people in this world are best served by a modified personal Profile instead of a business Page. These people are considered to be public figures. Are you a public figure? Maybe you are but don’t realize it!
Determining Whether the Follow Button Is Right for You
The Follow button is something you can turn on inside your Profile so that people can follow your public updates. We describe each of these terms in this list:
- Turn on: You can switch on this system, and you can switch it off. You need to make a few adjustments when you turn it on.
- Follow: This is a one-way connection inside Facebook. You can follow someone without being his Friend. You and your Friends are following one another. If you are following someone but he isn’t following you, you see his Public posts, but he doesn’t see yours. After you turn on your Follow button, anyone, anywhere in the world can follow your Public posts.
- Public updates: You can post an update designated as Public, which means that anyone can see it, including your Friends and those who have followed you. And as an added bonus, if someone has requested to be your Friend and you haven’t responded, he is automatically a follower and will see your Public posts.
 The biggest pro for turning on the Follow button is that there’s no limit on the number of followers you can have. (In comparison, the Friend limit on Facebook is currently 5,000.) You can go through your Friend list and unfriend people you don’t really know, and they will automatically become a Follower. This cleans up your Friends list. The biggest con for turning on the Follow button is having to create Public posts. Public posts are generally different from what you might be used to posting on Facebook. The public is not so interested in your cat, but it might be very interested in your work with the Humane Society. There is a difference in those two kinds of posts, and you’ll need to remember to make both.
So now you need to determine whether you are a public figure and whether you should go through the process of turning on your Follow button. Through this process, you also see whether you need to have both a Profile with the Follow button turned on and a business Page. Table 5-1 shows the different available features for a personal Timeline with the Follow button and a business Page.
Note: Turning on your Follow button is available only to those over the age of 18.
Table 5-1 Which Facebook Features Do You Need?
|
Available Features |
Personal Timeline + Follow Button |
Business Page |
|
Use for both Friends and a bigger audience |
X |
|
|
Quick mobile updating |
X |
|
|
Timeline applications (personal) |
X |
|
|
Interest lists/groups/chat |
X |
|
|
Privacy settings |
X |
|
|
Timeline layout |
X |
X |
|
Facebook Insights |
X | |
|
Multiple people can admin |
X | |
|
Custom tabs and apps |
X | |
|
Target updates by location/language |
X | |
|
Promote with ads and sponsored stories |
X |
Use these questions to help determine whether the using Follow button is right for you. Keep count of how many questions you answer, “Yes.” By the end of the quiz, it will be obvious whether you need to continue reading this chapter.
- Do you consider yourself to be a public figure?
“Public figure” is a slippery term. According to Facebook, authors, magazine and newspaper writers, politicians, actors, and radio and TV personalities are public figures, but there are other definitions, too.
- Do others consider you to be a public figure?
When others think of you, do they think “public figure”? You may be a spokesperson for some type of event (local, regional, or national), or you may represent a topic (such as a conversation in your business niche or a nonprofit organization).
- Are you considered to be an expert in your field?
Do people seek you out when they have a question about your business niche? Do you speak about your business niche at events?
- When people look at you, do they think of your business?
Most small-business people carry both sides of their lives — business and personal — with them wherever they go. If you’re walking down the street, and someone says “Hi,” does she also ask you about your family or your business or both?
- Do you like to share things that are business-related?
Look back at your personal posts on Facebook for the past year. How many of them are related to your business niche? Would you share more of those types of posts if you felt that people wanted to see them?
- Do you have people who want to be your Facebook Friends but are really business contacts?
Have people who you don’t know personally asked to be your Friends? Have you ignored a bunch of people who’ve asked to be your Friends?
- Are you branding yourself?
Are you setting yourself up to be a public figure in the future? Do you want to be a public figure?
- Are you and your products the same thing?
Do you sell information products that feature you as the expert?
- Are you branding your company to include you?
Apple = Steve Jobs. Is that the kind of relationship you have with your company?
Don’t turn on your Follow button if you answered most of the questions, “No.”
Do turn on your Follow button if
- You answered most of the questions, “Yes.”
- You’re branding yourself.
- You’re branding your products, and people think of you and your products together.
If you’re branding your company, you don’t have to turn on your Follow button. If you enjoy your business and have a great passion for it, though, consider turning on the Follow button so you can expand your territory of influence.
We show you how to turn on your Follow button in the next section. Anyone can turn on his Follow button (even people who answered “No” to all the previous questions). Give it a whirl: You can turn it on to test it out and then turn it off if it doesn’t work for you.
Turning On Your Follow Button
So you decide to turn on your Follow button. Take a minute to understand some important points about the Follow system, which can be very confusing at first.
“Follow” is how Facebook explains a connection. You and your Friends are following one another. You’re still called Friends, but the function is “following.”
After you turn on your Follow button, you won’t be able to see the Follow button on your Timeline. This aspect is the most frustrating part of teaching people how to turn on the button! Just trust us on this one. The button is there; you just can’t see it if you’re logged in as yourself.
To turn on your Follow button, follow these steps:
- Click the down arrow at the top-right of any Facebook page and click Account Settings.
- In the left sidebar, click Followers.
Now you are on a page with several sections. The top section is labeled Who Can Follow Me.
- Select Everybody from the drop-down menu, as shown in Figure 5-1.

Figure 5-1: Select Everybody to turn on your Follow button.
You also need to continue the process and edit your settings for comments and notifications. We will get to that in the next section. Here are a few interesting points about the Follow button:
- The number of Followers for someone incorporates the number of people who clicked the Follow button and the total number of Followers to Interest lists they’re featured on. Read more about the Followers through Interest lists later in this chapter.
- Only people who allow Followers have a Follow button on their Profiles. If you don’t see the button on a person’s Timeline, you can’t follow his updates without being his Friend. In that case. you see the Add Friend button instead. Sometimes, you see two buttons: Add Friend and Following, as shown in Figure 5-2. When both buttons appear, you know that you’ve followed this person’s Public updates, and you can make a Friend request.

Figure 5-2: Sometimes, you see Add Friend and Following buttons.
How do people follow your updates? After you allow followers, a Follow button shows up on your Profile. Someone would need to visit your Timeline to click the Follow button, or click the Follow button if your Profile shows up in the Ticker. Or, if someone hovers over your name somewhere on Facebook (such as a comment in a thread) they have the option of following you right from the hover card that pops up. Facebook might change these ways, or add to them in the future. Facebook has also created a nice interface (https://www.facebook.com/follow/suggestions) where you can see all the people who have turned on their Follow button.
Followers can see only the things on your personal Profile that you share publicly. We show you how to see which things are public on your Timeline in the “Adjusting Your Timeline for Public Viewing” section later in this chapter.
 Avoid heavy sales-type marketing techniques in your Public posts. Even though the follow system is like having an opt-in newsletter, you still need to remember that Facebook is a social platform.
Editing the Follow Settings
After you turn on your Follow button, you need to adjust the settings for Comments and Notifications. Both settings are important, and we explain them both in this section. You can go back and change these settings at any time, so don’t stress about them too much at this point. See how everything goes; you’ll know what you need to change over time.
When you select Everybody next to Who Can Follow Me (refer to Figure 5-1) to turn on your Follow button, you see a new dialog box with the following settings to adjust. After you adjust any of these settings, they’re automatically saved:
- Follower Comments: Who can comment on your public updates? The drop-down menu lists Everybody, Friends of Friends, and Friends. Think about your choice. If you create Public posts, you want your Followers to be able to comment on them, so choose Everybody.
- Follower Notifications: Notifications tell you when new people Follow you, like one of your posts, and so on. You can decide whether you want notifications from Friends of Friends, Everybody, or Nobody. You can choose Everybody and see how things go. You can always come back and adjust these settings. We show you how to do that in a moment.
- Username: If you haven’t set your personal Profile username (a.k.a. vanity URL) yet, you can click the link and go through the process of creating a nice URL.
You can set your personal username and your custom URL for your Pages by going to this address: https://www.facebook.com/username.
- Twitter: You can connect or disconnect your Profile to your Twitter account here. You can also set it at http://facebook.com/twitter.
- Follow Plugin: You can add a Follow button to your website to encourage more followers. This button allows people to Follow you on Facebook without leaving your website and is similar to the Like button or Like Box for Facebook Pages. All you need to do is copy the code provided and add it to your website.
To adjust these settings at a later date, just come back to this Page in your profile’s Settings page. Also notice that you can see how your Timeline appears to your Followers by clicking the link at the bottom of this page: Want to Know What Followers Can See? View Your Public Timeline.
Visit this link from time to time to make sure you haven’t shared anything publicly that you didn’t want to. You can adjust the settings on any post or picture after you’ve posted them.
Another interesting fact: After you turn on your Follow button, if someone asks to be your Friend, and you ignore her, that person automatically becomes a follower and can see your public posts.
Seeing How to Post Publicly
After you turn on your Follow button, and people are starting to follow you, you need to remember to post publicly the kinds of things that will support your business.
Because this is a post from your Profile, add your personal take, feelings, and experience to the post. The following list offers some examples of types of Public posts:
- Posts of public photos: If you have a new product coming out, post a picture of yourself holding it. In the description of the photo, talk about your personal experience with that product. Did it take a long time to develop? Did development involve some twist of fate? Did you have a personal “A-ha!” moment about it? What was the personal connection?
- Links to articles: If you’re being featured in an article, post the link to the article. Then in the post, talk about what it was like to be interviewed. What did the interviewer leave out? Did you like how the interviewer worked?
- Release of new product: You developed a new information product. Don’t be blatant about it, but don’t just post a discount code! Talk about your personal reasons for developing the product. Talk about the process of creating something new. People will click through if your post resonates with them.
Figure 5-3 shows where the posting icon is located. You need to make sure that you select Public (the option with the globe icon).

Figure 5-3: Set the posting icon to Public (globe icon).
You can change the icon when you’re posting on your Timeline and in the News Feed view. Just remember to check the icon before you post. You can change the icon on your mobile phone with the same process of using the drop-down menu and selecting the globe.
If you need to change the setting from Friends to Public, or vice versa, just click the drop-down arrow on the post, and choose the setting you intend to use.
Sometimes, the way you posted the last time is the default for the next time you post. This situation happens a lot when you post from a mobile device. You can make sure that the default is always Public or always Friends by going to your Privacy Settings (see Figure 5-4) on your computer and setting your preferred default. If you tend to post things from your phone that need to be public, choose Public as the default.
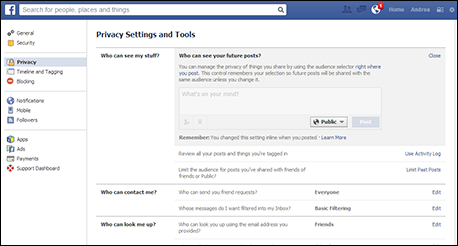
Figure 5-4: Choose the default setting for your posts from your computer and mobile phone.
Marketing Basics with a Personal Profile
This section title might bring up all sorts of comments, such as, “You can’t market on a personal account.” That’s completely true. But you can support your marketing by allowing people into your business world through your personal experience of your business. There’s an art to sharing and marketing appropriately through a personal account. As we state at the beginning of this chapter, if you wrap your posts in deeply personal impressions, being human and being transparent, you can open this personal-account door to more potential customers.
As with all social accounts, learning how to be an attraction-based marketer will serve you well. Some of the tenets of attraction-based marketing are
- Giving content freely: Figure out how much of your business content can be used freely, without links to your blog or as a tease. Give help to those who need it. This technique show two things: You have expert understanding of your niche, and you’re a nice person. Both aspects are highly attractive in a business sense.
- Being human: Some of the most successful people in almost any business are the ones who let you into their thinking, emotions, and experiences. They tell you when they were wrong and when they nailed something. They’re accessible and friendly.
- Being hooked up: Make all the important links back to your products and services easy to find. Make it extremely easy for someone to read your posts and then find your website or product pages. The About section on your personal account needs a really good review to make sure that people can click over to your site from there. If you also have a business Page, you need to make sure that the Work section of your personal account actually links to your Page, not to a phantom Interest Page. Review Book II, Chapter 2 for that discussion.
If you’ve turned on your Follow button, you can do all the things we suggest in Book II, Chapter 2, including these:
- Add your personal Facebook URL to your letterhead and e-mail signatures.
- Make an announcement via your other social accounts.
- Mention the Follow button in all interviews and promotional materials.
- Put your personal account URL on your business card.
- Embed the Follow button on your blog or website.
If you get some traction with people following you, you may find yourself on this page:
https://www.facebook.com/follow/suggestions
Make sure that you visit that page and follow other people in your industry or in a niche that provides you customers. After you follow those updates, comment and enliven conversation like this:
- Follow excellent connections in your business niche (especially bloggers and media writers).
- Post only excellent comments — not flippant, throwaway comments.
- Always reply to comments, both on your Timeline and on the other person’s Timeline.
Many people you follow may be “A-list people,” in that every time they post, hundreds of people comment. You may notice that some Internet rock stars (including Mari Smith and Robert Scoble) really interact with their followers. Robert responds only to what he would call intelligent questions. The lesson is this: Don’t just post “I agree” or “Good post.”
Understanding Friend Followers and Public Followers
After you turn on your Follow button, you have three types of followers:
- Public Followers: These are people who have followed your Public posts. If you ignore a Friend Request, they automatically become a follower and will see your Public posts.
- Friend Followers: These are your Facebook Friends. You are following each other. When you create a Public post, your Friends will see it, too. When you create a post and change the viewing icon to Friends, only people in this category will see the post.
- Followers via Lists: Anyone on Facebook can create an Interest list, which is a list of people and Pages you collect together. You can put all the TV Show Pages on one list, all the Natural food chefs in another, and so on. Then you can click the name of the List in the left sidebar (on the News Feed view) and see only the posts from the people and Pages on that List.
If someone puts your personal Profile on a list and shares the list, people will be able to follow the list. When that happens, you gain another number in this category. Even though they’re following the list, Facebook gives you the added number. You can find Interest lists to follow at www.facebook.com/addlist.
Create your own Interest list in your business niche and add yourself to the list. Then share the list and watch your numbers go higher.
To see who is in each category, click the Friends link on your Timeline. Then click Followers to see the people who are following you, like you see in Figure 5-5. Notice that some of your followers have turned on the Follow button themselves, and you can follow them back right from here. (Keep in mind that you will see only their Public updates, also.) Or if you mouse over their name, a hover card pops up, and you can request friendship or see whether they have requested friendship from you and you haven’t responded yet (which is why they appear in your Followers list).
If you’ve been put on an Interest list, you see the name of the list and numbers that are hyperlinked to those people by clicking the Followers via Lists link. See Figure 5-6 for a list of several numbers and information to explore.
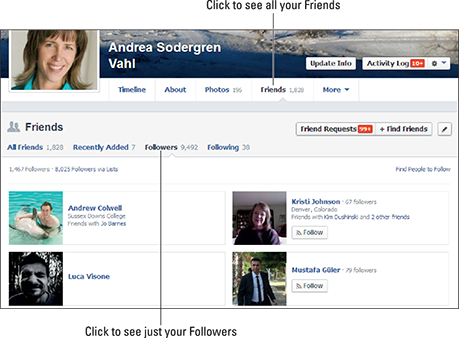
Figure 5-5: See who has followed to your public updates.

Figure 5-6: Explore the hyperlinked numbers for more information about the Interest List.
Adding Public Life Events to Your Personal Profile
This step is very important. Some people call the personal Timeline the ultimate résumé because of the wonderful Life Events feature. This is basically the same thing as adding milestones on a business Page except that this interface is really detailed. (We discuss milestones in great detail in Book III.) Life Events can go all the way back to when you were born! Now you can add as many Life Events as you want, in many areas, but in this section, we focus on using Life Events to support your business.
You can add Life Events when things like these happen:
- You get a book deal.
- You publish an article.
- You win an award.
- You gain special recognition from your industry.
- You launch a new product.
- Your business reaches a financial milestone.
- You’re featured in a local paper or magazine.
You can add all sorts of things to this list. Focus on adding these life events, and make sure to make them Public. Add your personal experience to each post, in your authentic human voice.
A few don’ts: You can’t add things with future dates. Don’t make Life Events one big infomercial. And don’t post all your Life Events at one time; spread them out over a few weeks.
Here’s how to create a Life Event on your personal Timeline:
- Go to your personal Timeline.
- In the posting box, click the Life Event tab.
You see a set of options: Work & Education, Family & Relationships, Home & Living, Health & Wellness, and Travel & Experiences.
- Click the category of Life Event you want to post.
Subcategories appear in a submenu, as shown in Figure 5-7.

Figure 5-7: The Life Event interface is very detailed.
- Choose the subcategory that matches what you want to post, or choose Create Your Own.
All the subcategories have Create Your Own as an option. If you opt for that, you get to create a custom title for the Life Event. Unless your Life Event matches one of the categories perfectly, choose Create Your Own.
- Fill in the fields.
Each subcategory has slightly different fields to fill in. Fill in as much information as you can. Make sure you adjust the date fields to be the date of the Life Event.
- Upload or choose a photo.
Always upload or choose a photo. A photo really makes a Life Event pop on the Timeline.
- Make sure that the viewing icon is set to Public.
The whole point of this task is to create items that the Public and your Public followers can see on your Timeline. (The Public icon is the globe.)
- Click Save.
Your Life Event is placed on your personal Timeline on the date you set for it. Go look. Life Events are wonderful to view on a Timeline.
Adjusting Your Timeline for Public Viewing
When you place Life Events that support your business on your personal Timeline, you’ll want to see how your Timeline looks to the public. You can view your personal Timeline as though different types of people are viewing it: the Public or a particular Friend. To do that, click the gear icon on your Cover photo and then choose View As from the drop-down menu as shown in Figure 5-8.
At the top of your Profile, you can see a black strip indicating that you’re looking at your Timeline as someone from the Public would see it. You can look through your entire Timeline to see what Joe Public sees. If you see anything that you don’t want the public to see, go back to your Timeline and change who can see a particular post. For example, if you find a post that you meant just your Friends to see, follow these steps:
- Click the X button (at the top of the page in the black strip).
- Find the post whose settings you want to change.
- Click the drop-down arrow next to the globe icon.
- Choose the setting you want (for example, Friends instead of Public).

Figure 5-8: The View As option lets you see how your personal Profile looks to the public.
You can view your Timeline as a particular person sees it, so you know if you’ve shared other posts correctly. Just click the View as a Specific Person link in the black strip and put that person’s name in the box. Now you can make sure any posts that you shared just with local friends or just with business lists appear correctly.
Think about your business and how your followers will see your account. Use this system of checking what’s public and what’s for Friends to clean up your Profile. If you’re using your personal Profile to support your business, make sure the Public view does just that. Change the view settings to fit the types of posts you make on Facebook.
Uploading a Cover Photo that Supports Your Business
Facebook doesn’t want you to think of your Page’s Cover photo as a billboard; it wants you to think of the Cover photo as a view of the spirit or soul of your business. The same idea applies to the Cover photo for your Profile.
Figure 5-9 shows a Profile Cover photo that supports a business, but other sides of Amy Porterfield’s life, too.

Figure 5-9: Use a Cover photo that conveys who you are without breaking Facebook’s rules.