Chapter 1. Install and configure Active Directory Domain Services
Active Directory Domain Services (AD DS) provide the cornerstone of identity and access solutions in Windows Server 2016. It is therefore important that you understand how to implement an AD DS infrastructure to support the identity needs of your organization.
In this chapter, we cover how to install and configure domain controllers, and how to create and configure users, groups, computers, and organizational units (OUs). These skills are fundamental to implementing AD DS.
Important: Have you read page xv?
It contains valuable information regarding the skills you need to pass the exam.
Skills covered in this chapter:
![]() Install and configure domain controllers
Install and configure domain controllers
![]() Create and manage Active Directory users and computers
Create and manage Active Directory users and computers
![]() Create and manage Active Directory groups and OUs
Create and manage Active Directory groups and OUs
Skill 1.1: Install and configure domain controllers
Domain controllers host the Windows Server 2016 AD DS server role and provide authentication and related services to your organization’s computers and other networked devices. Before you can properly understand deployment scenarios for AD DS domain controllers, you must first understand the fundamentals of AD DS, including forests, trees, domains, sites, and OUs.
This section covers how to:
![]() Add or remove a domain controller
Add or remove a domain controller
![]() Install AD DS on a Server Core installation
Install AD DS on a Server Core installation
![]() Install a domain controller using Install from Media
Install a domain controller using Install from Media
![]() Install and configure a read-only domain controller
Install and configure a read-only domain controller
![]() Configure a global catalog server
Configure a global catalog server
![]() Configure domain controller cloning
Configure domain controller cloning
![]() Transfer and seize operations master roles
Transfer and seize operations master roles
![]() Resolve DNS SRV record registration issues
Resolve DNS SRV record registration issues
AD DS fundamentals
AD DS consists of both logical and physical components. A physical component is something tangible, like a domain controller, while an AD DS forest is an intangible, logical component. AD DS consists of the following logical components:
![]() Forest A forest is a collection of AD DS domains that share a common schema and are bound by automatically created two-way trust relationships. Most organizations choose to implement AD DS with a single forest. Reasons to use multiple forests include the requirement to:
Forest A forest is a collection of AD DS domains that share a common schema and are bound by automatically created two-way trust relationships. Most organizations choose to implement AD DS with a single forest. Reasons to use multiple forests include the requirement to:
![]() Provide for complete administrative separation between disparate parts of your organization.
Provide for complete administrative separation between disparate parts of your organization.
![]() Support different object types and attributes in the AD DS schema in different parts of your organization.
Support different object types and attributes in the AD DS schema in different parts of your organization.
![]() Domain A domain is a logical administrative unit that contains users, groups, computers, and other objects. Multiple domains can be part of one or several forests, depending on your organizational needs. Parent-child and trust relationships define your domain structure.
Domain A domain is a logical administrative unit that contains users, groups, computers, and other objects. Multiple domains can be part of one or several forests, depending on your organizational needs. Parent-child and trust relationships define your domain structure.
 Exam Tip
A domain does not provide for administrative separation because all domains in a forest have the same forest administrator—the Enterprise Admins universal security group. For complete administrative separation, you must implement multiple AD DS forests.
![]() Tree A tree is a collection of AD DS domains that share a common root domain and have a contiguous namespace. For example, sales.adatum.com and marketing.adatum.com share the common root adatum.com; they also share a contiguous namespace, adatum.com. You can build your AD DS forest using a single tree, or you can use multiple trees. Reasons for using multiple trees include the requirement to support multiple logical namespaces within your organization, perhaps because of mergers or acquisitions.
Tree A tree is a collection of AD DS domains that share a common root domain and have a contiguous namespace. For example, sales.adatum.com and marketing.adatum.com share the common root adatum.com; they also share a contiguous namespace, adatum.com. You can build your AD DS forest using a single tree, or you can use multiple trees. Reasons for using multiple trees include the requirement to support multiple logical namespaces within your organization, perhaps because of mergers or acquisitions.
![]() Schema The AD DS schema is the collection of objects types and their properties, also known as attributes, that defines what sorts of objects you can create, store, and manage within your AD DS forest. For example, a user is a logical object type, and it has several properties, including a full name, a department, and a password. The relationship between objects and their attributes is held in the schema, and all domain controllers in a forest hold a copy of the schema.
Schema The AD DS schema is the collection of objects types and their properties, also known as attributes, that defines what sorts of objects you can create, store, and manage within your AD DS forest. For example, a user is a logical object type, and it has several properties, including a full name, a department, and a password. The relationship between objects and their attributes is held in the schema, and all domain controllers in a forest hold a copy of the schema.
![]() OU An OU is a container within a domain that contains users, groups, computers, and other OUs. They are used to provide for administrative simplification. With OUs you can easily delegate administrative rights to a collection of objects by grouping them in an OU and assigning the right on that OU. You can also use Group Policy Objects (GPOs) to configure user and computer settings and link those GPO settings to an OU, streamlining the configuration process. One OU is created by default when you install AD DS and create a domain: Domain Controllers.
OU An OU is a container within a domain that contains users, groups, computers, and other OUs. They are used to provide for administrative simplification. With OUs you can easily delegate administrative rights to a collection of objects by grouping them in an OU and assigning the right on that OU. You can also use Group Policy Objects (GPOs) to configure user and computer settings and link those GPO settings to an OU, streamlining the configuration process. One OU is created by default when you install AD DS and create a domain: Domain Controllers.
![]() Container In addition to OUs, you can also use containers to group collections of objects together. There are a number of built-in containers, including: Computers, Builtin, and Managed Service Accounts. You cannot link GPOs to containers.
Container In addition to OUs, you can also use containers to group collections of objects together. There are a number of built-in containers, including: Computers, Builtin, and Managed Service Accounts. You cannot link GPOs to containers.
![]() Site A site is a logical representation of a physical location within your organization. It can represent a large physical area, such as a city, or it can represent a smaller physical area, such as a collection of subnets defined by your datacenter boundaries. AD DS sites help to enable networked devices to determine where they are in relation to services with which they want to connect. For example, when a Windows 10 computer starts up, it uses its determined site location to try to find an adjacent domain controller to support the user’s sign in. Sites also enable you to control AD DS replication by configuring an intersite replication schedule and interval.
Site A site is a logical representation of a physical location within your organization. It can represent a large physical area, such as a city, or it can represent a smaller physical area, such as a collection of subnets defined by your datacenter boundaries. AD DS sites help to enable networked devices to determine where they are in relation to services with which they want to connect. For example, when a Windows 10 computer starts up, it uses its determined site location to try to find an adjacent domain controller to support the user’s sign in. Sites also enable you to control AD DS replication by configuring an intersite replication schedule and interval.
Exam Tip
A default site, Default-First-Site-Name, is created when you install AD DS and create your forest. All domain controllers belong to this site until you create additional sites and assign domain controllers to them. If you intend to create additional site objects, you should rename the default site.
![]() Subnet A subnet is a logical representation of a physical subnet on your network. By defining subnets, you make it possible for a computer in your AD DS forest to determine its physical location in relation to services offered in the forest. No subnets exist by default. After you create subnets, you associate them with sites. A site can contain more than one subnet.
Subnet A subnet is a logical representation of a physical subnet on your network. By defining subnets, you make it possible for a computer in your AD DS forest to determine its physical location in relation to services offered in the forest. No subnets exist by default. After you create subnets, you associate them with sites. A site can contain more than one subnet.
![]() Partition Your AD DS is physically stored in a database on all of your domain controllers. Because some parts of your AD DS change infrequently, while others change often, a number of separate partitions are stored in the AD DS database.
Partition Your AD DS is physically stored in a database on all of your domain controllers. Because some parts of your AD DS change infrequently, while others change often, a number of separate partitions are stored in the AD DS database.
Note AD DS replication
When changes are made to AD DS, other instances of the changed partition must be updated. This process is referred to as AD DS replication. By splitting the database into several elements, the burden of the replication process is reduced.
These separate partitions are:
![]() Schema A forest-level partition, which changes rarely. Contains the AD DS forest schema.
Schema A forest-level partition, which changes rarely. Contains the AD DS forest schema.
![]() Configuration A forest-level partition that changes rarely, this partition contains the configuration data for the forest.
Configuration A forest-level partition that changes rarely, this partition contains the configuration data for the forest.
![]() Domain Domain-level partition. This partition changes frequently, and a writeable copy of the partition is stored on all domain controllers. It contains the actual objects, such as users and computers, which exist within your forest.
Domain Domain-level partition. This partition changes frequently, and a writeable copy of the partition is stored on all domain controllers. It contains the actual objects, such as users and computers, which exist within your forest.
Note Read Only Domain Controllers
Read Only Domain Controllers (RODCs) contain a read-only copy of the domain partition.
Note Application directory partitions
You can also create specific partitions to support directory-enabled applications that you deploy within your forest. For example, you can configure DNS to use a specific application directory partition for AD-integrated zone replication purposes.
![]() Trust relationships A trust relationship, also sometimes referred to as a trust, is a security agreement between two domains in an AD DS forest, between two forests, or between a forest and an external security realm. This security agreement enables a user on one side of the trust to be assigned access to resources on the other side of the trust. In a trust relationship, one party is deemed to be trusting, while the other is said to be trusted. The resource-holding entity is trusting, while the user-holding entity is trusted. To help understand this, consider who is trusted and trusting when you lend someone your car keys.
Trust relationships A trust relationship, also sometimes referred to as a trust, is a security agreement between two domains in an AD DS forest, between two forests, or between a forest and an external security realm. This security agreement enables a user on one side of the trust to be assigned access to resources on the other side of the trust. In a trust relationship, one party is deemed to be trusting, while the other is said to be trusted. The resource-holding entity is trusting, while the user-holding entity is trusted. To help understand this, consider who is trusted and trusting when you lend someone your car keys.
Install a new forest
To install a new AD DS forest, you must deploy the first domain controller in that forest. This means deploying the AD DS server role on a Windows Server 2016 server computer and then promoting the server to a domain controller, and choosing the option to Add A New Forest.
To create a new forest, start by installing the AD DS role by using the following procedure:
1. Sign in to the Windows Server 2016 computer as a local administrator.
2. Launch Server Manager and then, on the Dashboard, click Add Roles And Features.
3. Click through the Add Roles And Features Wizard, and then, as shown in Figure 1-1, on the Server Roles page, select the Active Directory Domain Services check box, click Add Features, and then click Next.

4. Click through the rest of the wizard, and when prompted, click Install.
5. When installation is complete, click Close.
Exam Tip
You can also use Windows PowerShell to install the necessary files. Run the following command at an elevated Windows PowerShell command prompt: Install-WindowsFeature AD-Domain-Services.
After you have installed the binaries for AD DS, you must create a new forest by promoting the first domain controller in the forest. To do this, use the following procedure:
1. In Server Manager, click the yellow warning triangle in Notifications, and then click Promote This Server To A Domain Controller.
You can also use Windows PowerShell to perform the promotion. Run the Install-ADDSDomainController cmdlet. For example, run the Install-ADDSDomainController -InstallDns -DomainName adatum.com command to add the local server as an additional domain controller in the Adatum.com domain, and install the DNS server role.
2. In the Active Directory Domain Services Configuration Wizard, on the Deployment Configuration page, under Select The Deployment Operation, click Add A New Forest, and then type the name of the forest root domain, as shown in Figure 1-2. Click Next.

3. On the Domain Controller Options page, as shown in Figure 1-3, configure the following options, and then click Next:
![]() Forest Functional Level The forest functional level determines which forest-level features are available in your forest. The forest functional level also defines the minimum domain functional level for domains in your forest. Thus, choosing Windows Server 2012 at this level means that the minimum domain functional level is also Windows Server 2012. Choose between:
Forest Functional Level The forest functional level determines which forest-level features are available in your forest. The forest functional level also defines the minimum domain functional level for domains in your forest. Thus, choosing Windows Server 2012 at this level means that the minimum domain functional level is also Windows Server 2012. Choose between:
![]() Windows Server 2008 R2
Windows Server 2008 R2
![]() Windows Server 2012
Windows Server 2012
![]() Windows Server 2012 R2
Windows Server 2012 R2
![]() Windows Server 2016
Windows Server 2016
![]() Domain Functional Level Determines the domain-level features that are available in this domain. Choose between:
Domain Functional Level Determines the domain-level features that are available in this domain. Choose between:
![]() Windows Server 2008
Windows Server 2008
![]() Windows Server 2008 R2
Windows Server 2008 R2
![]() Windows Server 2012
Windows Server 2012
![]() Windows Server 2012 R2
Windows Server 2012 R2
![]() Windows Server 2016
Windows Server 2016
Need More Review? Windows Server 2016 Functional Levels
To review further details about domain and forest functional levels in Windows Server 2016, refer to the Microsoft TechNet website at https://technet.microsoft.com/windows-server-docs/identity/ad-ds/windows-server-2016-functional-levels.
![]() Domain Name System (DNS) Server DNS provides name resolution and is a critical service for AD DS. This option is selected by default, and unless you already have a configured DNS infrastructure, do not deselect this option.
Domain Name System (DNS) Server DNS provides name resolution and is a critical service for AD DS. This option is selected by default, and unless you already have a configured DNS infrastructure, do not deselect this option.
![]() Global Catalog (GC) Global catalog servers provide forest-wide services. They are selected by default, and cannot be unselected. The first (and only) domain controller must be a global catalog server. When you have added additional domain controllers, you can revisit this setting.
Global Catalog (GC) Global catalog servers provide forest-wide services. They are selected by default, and cannot be unselected. The first (and only) domain controller must be a global catalog server. When you have added additional domain controllers, you can revisit this setting.
![]() Read Only Domain Controller (RODC) Determines whether this domain controller is a read only domain controller. This option is not selected by default, and unavailable for the first (and currently only) domain controller in your forest.
Read Only Domain Controller (RODC) Determines whether this domain controller is a read only domain controller. This option is not selected by default, and unavailable for the first (and currently only) domain controller in your forest.
![]() Directory Services Restore Mode (DSRM) Password Used when you start the domain controller in a recovery mode.
Directory Services Restore Mode (DSRM) Password Used when you start the domain controller in a recovery mode.

4. On the Additional Options page, define the NetBIOS domain name. The NetBIOS protocol is not widely used anymore, and is based on a non-hierarchical naming structure. The default NetBIOS name is the first part of the AD DS forest name. For example, if your forest is called Contoso.com, the NetBIOS name defaults to CONTOSO; generally, you do not need to change this. Click Next.
5. As shown in Figure 1-4, define the location to store the AD DS database, log files, and SYSVOL content, and click Next. The defaults are:
![]() Database folder: C:WindowsNTDS
Database folder: C:WindowsNTDS
![]() Log files folder: C:WindowsNTDS
Log files folder: C:WindowsNTDS
![]() SYSVOL folder: C:WindowsSYSVOL
SYSVOL folder: C:WindowsSYSVOL
Exam Tip
There is usually little point in using different paths. However, you might achieve a small performance benefit by separating the SYSVOL, database, and log files if your server is installed with multiple physical hard disks, thereby distributing the load.

6. Review the configuration options, and then click Next to perform prerequisite checks.
7. When prompted, click Install. Your server computer restarts during the installation process.
8. Sign in to your server computer using the domain administrator account.
Need More Review? Install Active Directory Domain Services
To review further details about deploying AD DS, refer to the Microsoft TechNet website at https://technet.microsoft.com/en-us/windows-server-docs/identity/ad-ds/deploy/install-active-directory-domain-services--level-100-.
Add or remove a domain controller
After you have deployed the first domain controller in your AD DS forest, you can add additional domain controllers to provide for resilience and improved performance. The process for deploying additional domain controllers is broadly the same as that for the first domain controller: install the AD DS server role (either using Server Manager or Windows PowerShell), and then promote the domain controller (again, using either Server Manager or Windows PowerShell).
However, the specific options you select during the promotion process vary depending upon the details of the deployment. For example, adding a new domain controller in an existing domain is slightly different than adding a new domain controller in a new domain.
There are two basic scenarios for adding a new domain controller:
![]() Add A New Domain Controller In An Existing Domain To complete this process, you must sign in as a member of the target domain’s Domain Admins global security group.
Add A New Domain Controller In An Existing Domain To complete this process, you must sign in as a member of the target domain’s Domain Admins global security group.
![]() Add A New Domain Controller In A New Domain To complete this process, you must sign in as a member of the forest root Enterprise Admins universal security group. This gives you sufficient privilege to modify the configuration partition of AD DS and create the new domain, either as part of the existing domain tree, or as part of a new domain tree.
Add A New Domain Controller In A New Domain To complete this process, you must sign in as a member of the forest root Enterprise Admins universal security group. This gives you sufficient privilege to modify the configuration partition of AD DS and create the new domain, either as part of the existing domain tree, or as part of a new domain tree.
A common reason to add a new domain is to create a replication boundary. Because most changes to the AD DS database occur in the domain partition, it is this partition that generates most AD DS replication traffic. By splitting your AD DS forest into multiple domains, you can split the volume of changes, and thereby reduce the replication between locations. For example, if A. Datum had a large deployment of computers in both Europe and in Canada, they could create two separate domains in the Adatum.com forest root domain: Europe.Adatum.com and Canada.Adatum.com. Changes in the Europe.Adatum.com domain are not replicated to domain controllers in Canada.Adatum.com, and vice versa.
Add a new domain controller in an existing domain
To add a new domain controller in an existing domain, sign in as a domain administrator and then complete the following procedure.
Signing in as a member of the Domain Admins global security group presupposes that the server computer you are intending to promote is a member of the target domain. If it is not, it is easier to add the server computer to the target domain first, and then complete the procedure. If you decide not to add the computer to the target domain, you must sign in as a local administrator and provide Domain Admin credentials during the promotion process. It is also a requirement that the server computer you are promoting can resolve names using the DNS service in your AD DS forest.
1. Add the Active Directory Domain Services server role.
2. In Server Manager, click Notifications, and then click Promote This Server To A Domain Controller.
3. In the Active Directory Domain Services Configuration Wizard, on the Deployment Configuration page, as shown in Figure 1-5, click Add A Domain Controller To An Existing Domain.

4. Specify the domain name. The default name is the same as the domain to which the server computer belongs. However, you can select from other available domains in the forest.
5. Specify the credentials of a user account with appropriate privilege to perform the promotion process. The default is the current user account. Click Next.
6. On the Domain Controller Options page, configure the Domain Name System (DNS) server (enabled by default), Global Catalog (GC) (enabled by default), and Read Only Domain Controller (RODC) (not enabled by default) options. Unlike when promoting the first domain controller in a forest, you can enable the Read Only Domain Controller (RODC) to make this domain controller a read only domain controller.
7. In the Site name drop-down list, shown in Figure 1-6, select the site in which this domain controller is physically placed. The default is Default-First-Site-Name. Until you create additional AD DS sites, this is the only available site. You can move the domain controller after deployment.

8. Enter the Directory Services Restore Mode (DSRM) password, and click Next.
9. On the Additional Options page, you must configure how this domain controller populates the AD DS database. You can configure the initial population from an online domain controller, selecting either Any Domain Controller, as shown in Figure 1-7, or specifying a particular domain controller. Alternatively, you can use the Install From Media (IFM) option. Click Next.

10. Configure the Paths, as before, and then click through the configuration wizard.
11. Click Install when prompted. Your server computer restarts during the promotion process.
After you have completed the promotion process, sign in using a domain admin account.
Add a new domain controller in a new domain
To add a new domain controller to a new domain in an existing forest, sign in as a member of the forest Enterprise Admin universal security group, and then complete the following procedure.
Exam Tip
To sign in as a member of the Enterprise Admins universal security group presupposes that the server computer you are intending to promote is a member of one of the domains in your AD DS forest. If it is not, it is easier to add the server computer to the forest root domain first, and then complete the procedure. If you decide not to add the computer to the forest root domain, you must sign in as a local administrator and provide Enterprise Admin credentials during the promotion process. It is also a requirement that the server computer you are promoting can resolve names using the DNS service in your AD DS forest.
1. Add the Active Directory Domain Services server role.
2. In Server Manager, click Notifications, and then click Promote This Server To A Domain Controller.
3. In the Active Directory Domain Services Configuration Wizard, on the Deployment Configuration page, as shown in Figure 1-8, click Add A New Domain To An Existing Forest.

4. You can then choose how the new domain is added. You can select:
![]() Child Domain Selecting this option creates a subdomain of the specified parent domain. In other words, the new domain is created in the existing domain tree.
Child Domain Selecting this option creates a subdomain of the specified parent domain. In other words, the new domain is created in the existing domain tree.
![]() Tree Domain Select this option if you want to create a new tree in the same forest. The new tree shares the same forest schema, and has the same forest root domain, but you can define a non-contiguous namespace. This is useful when you want to create multiple DNS domain names in your AD DS forest infrastructure to support your organizational needs, but do not need, or want, to separate administrative function as is possible with a separate forest. If you choose Tree Domain, you must define the forest domain to which the tree is added. The default is the forest you are signed in to.
Tree Domain Select this option if you want to create a new tree in the same forest. The new tree shares the same forest schema, and has the same forest root domain, but you can define a non-contiguous namespace. This is useful when you want to create multiple DNS domain names in your AD DS forest infrastructure to support your organizational needs, but do not need, or want, to separate administrative function as is possible with a separate forest. If you choose Tree Domain, you must define the forest domain to which the tree is added. The default is the forest you are signed in to.
5. Enter the new domain name. In the case of a child domain, the name includes the parent domain as a suffix. For example, adding the Europe domain as a child of the Adatum.com domain creates the Europe.Adatum.com domain. If you create a new tree, you can enter any valid DNS domain name and it does not contain the forest root domain. Click Next.
6. On the Domain Controller Options page, select the domain functional level, and configure the DNS, GC, and RODC settings. Select the appropriate site name, and then finally, enter the DSRM password, and click Next.
7. On the DNS Options page, as shown in Figure 1-9, select the Create DNS Delegation check box. This creates a DNS delegation for the subdomain in your DNS namespace. Click Next.
Need More Review? Understanding Zone Delegation
To review further details about DNS delegation in Windows Server, refer to the Microsoft TechNet website at https://technet.microsoft.com/library/cc771640(v=ws.11).aspx.

8. Specify the NetBIOS domain name, and then click through the wizard. When prompted, click Install.
9. Your domain controller restarts during the promotion process. Sign in as a domain admin after the process is complete.
Removing domain controllers
From time to time, it might be necessary to decommission and remove a domain controller. This is a fairly straightforward process, and you can use Server Manager to complete the task.
1. Sign in using an account that has sufficient privilege. To remove a domain controller from a domain, sign in as a domain administrator. To remove an entire domain, sign in as a member of the Enterprise Admins universal security group.
2. Open Server Manager, and from the Manage menu, click Remove Roles And Features.
3. In the Remove Roles And Features Wizard, on the Before You Begin page, click Next.
4. Select the appropriate server on the Select Destination Server page, and then click Next.
5. On the Remove Server Roles page, clear the Active Directory Domain Services check box, click Remove Features, and then click Next.
6. In the Validation Results pop-up dialog box, shown in Figure 1-10, click Demote This Domain Controller.

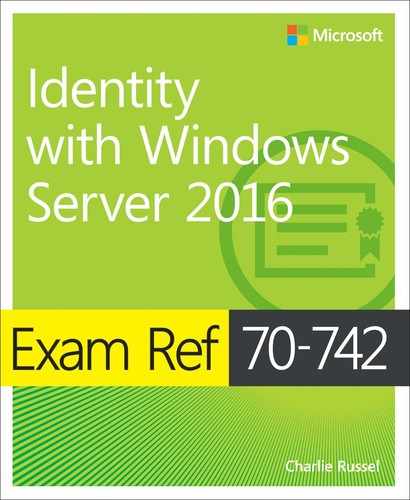
7. The Active Directory Domain Services Configuration Wizard loads, as shown in Figure 1-11. On the Credentials page, if necessary, specify user credentials that have sufficient privilege to perform the removal. Do not select the Force The Removal Of This Domain Controller check box unless the domain controller has failed and is not contactable. Click Next.

8. On the Warnings page, shown in Figure 1-12, you are prompted to confirm removal of the DNS and GC roles. Select the Proceed With Removal check box, and click Next.
9. On the New Administrator Password, enter and confirm the password that is set as the local administrator password, and click Next.
10. Review your choices, and then click Demote.
11. Your server is demoted and then restarts. Sign in using the local administrator account.
You can now verify the proper demotion and role removal. On a domain controller:
1. On a domain controller, open Active Directory Users And Computers. Verify that the demoted domain controller no longer is listed in the Domain Controllers OU.
2. Click the Computers container. You should see your demoted server computer.
3. Open Active Directory Sites And Services. Expand Sites, expand the Default-First-Site-Name site, and in Servers, delete the object that represents the server you demoted.
Exam Tip
If the server to be decommissioned is the last domain controller in a domain, you must first remove all other computers from the domain, perhaps moving them to other domains within your forest. The procedure is then as described above.
You can also complete the demotion process by using Windows PowerShell. Use the following two cmdlets to complete the process from the Windows PowerShell command prompt:
Uninstall-addsdomaincontroller
Uninstall-windowsfeature AD-Domain_Services
Need More Review? Demoting Domain Controllers and Domains
To review further details about demoting domain controllers, refer to the Microsoft TechNet website at https://technet.microsoft.com/en-us/windows-server-docs/identity/ad-ds/deploy/demoting-domain-controllers-and-domains--level-200-.
Install AD DS on a Server Core installation
You can deploy the AD DS server role on a Server Core installation. You can use Server Manager to remotely install the role, or you can use the Windows PowerShell Install-WindowsFeature AD-Domain-Services cmdlet.
After you have installed the required files, you can launch the Active Directory Domain Services Configuration Wizard from Server Manager to remotely configure the Server Core installation, or you can use the Windows PowerShell Install-ADDSDomainController cmdlet to complete the promotion process. In other words, the process for installing AD DS on a Server Core installation of Windows Server 2016 is the same as for a server with Desktop Experience.
Exam Tip
You cannot deploy the AD DS server role on Nano Server. Consequently, you cannot use a Nano Server as a domain controller.
Install a domain controller using Install from Media
During the domain controller deployment process, the content of the AD DS database is replicated to the new domain controller. This replication includes the schema, configuration forest-wide partitions, as well as the appropriate domain partition. After this initial synchronization, replication occurs normally between the domain controllers.
This initial synchronization can present a challenge in some circumstances. For example, this can be challenging when you are deploying a domain controller in a location that is connected to your organization’s network infrastructure using a low bandwidth connection. In this situation, the initial synchronization might take a long time, or use an excessive proportion of the available bandwidth.
To mitigate this, you can choose to deploy a domain controller and perform the initial AD DS synchronization using a local copy, or snapshot, of the AD DS database; this is known as performing an Install from Media (IFM) deployment. There are many steps involved in this process.
1. On an existing domain controller, using File Explorer, make a folder, for example C:IFM, to store the AD DS snapshot.
2. Open an elevated command prompt and run the ntdsutil.exe command.
3. At the ntdsutil: prompt, type Activate instance ntds, and then press Enter.
4. At the ntdsutil: prompt, type ifm, and then press Enter.
5. At the ifm: prompt, as shown in Figure 1-13, type create SYSVOL full C:IFM, and then press Enter.

6. At the ifm: prompt, type quit and then press Enter.
7. At the ntdsutil: prompt, type quit and then press Enter.
8. Close the command prompt.
9. Using File Explorer, copy the contents of the C:IFM folder, shown in Figure 1-14, to removable storage, such as a USB memory stick.

10. At the server computer that you want to promote to a domain controller, install the Active Directory Domain Services server role in the usual way, either by using Server Manager, or by using Windows PowerShell.
11. Insert the memory stick containing the AD DS snapshot, or copy the snapshot files so that they are accessible on the target server computer, and then launch the Active Directory Domain Services Configuration Wizard from Server Manager, and click through the wizard.
12. On the Additional Options page, shown in Figure 1-15, select the Install From Media check box. In the Path box, enter the path to the local copy of the AD DS snapshot, click Verify, and then click Next.

13. Click through the wizard, review your selections, and when prompted, click Install. Your server restarts during the promotion process.
14. Sign in as a domain administrator.
The domain controller now replicates in the normal way with other domain controllers in the forest. You might want to define the AD DS site to which the domain controller belongs, and then to configure a replication schedule to that site. These procedures are discussed in Chapter 2: Manage and maintain AD DS, Skill 2.3: Configure Active Directory in a complex enterprise environment.
Exam Tip
You can also complete the deployment by using the Windows PowerShell Install-ADDSDomaincontroller -InstallationMediaPath x:ifm command to promote the server computer.
Install and configure a read-only domain controller
An RODC is a domain controller that contains a read-only copy of AD DS. You can use RODCs to enable you to deploy domain controllers in offices where physical security cannot be guaranteed. For example, in a branch office, you might require a local domain controller, but do not have a physically secure computer room in which to install it.
Although RODCs offer several administrative benefits, before deploying them, you should consider the following factors:
![]() You should deploy only one RODC per site, per domain. If you deploy multiple RODCs per site, caching is inconsistent resulting in potential user and computer sign in problems.
You should deploy only one RODC per site, per domain. If you deploy multiple RODCs per site, caching is inconsistent resulting in potential user and computer sign in problems.
![]() You can install the DNS server role along with the RODC role. Local clients can use the installed DNS role as with any other instance of DNS within your organization with one exception: dynamic updates. Because the DNS zone information is read only, clients cannot perform dynamic updates on the RODC instance of a DNS zone. In this situation, the RODC provides the clients with the name of a writable domain controller that the client can use to update its records.
You can install the DNS server role along with the RODC role. Local clients can use the installed DNS role as with any other instance of DNS within your organization with one exception: dynamic updates. Because the DNS zone information is read only, clients cannot perform dynamic updates on the RODC instance of a DNS zone. In this situation, the RODC provides the clients with the name of a writable domain controller that the client can use to update its records.
![]() RODCs cannot perform the following AD DS functions:
RODCs cannot perform the following AD DS functions:
![]() Operations master roles Operations master roles need to be able to write to the AD DS database. Consequently, RODCs cannot hold any of the five operations master roles. Operations master roles are discussed later in this skill.
Operations master roles Operations master roles need to be able to write to the AD DS database. Consequently, RODCs cannot hold any of the five operations master roles. Operations master roles are discussed later in this skill.
![]() AD DS replication bridgeheads Because bridgeheads are responsible for AD DS replication, they must support both inbound and outbound AD DS replication. RODCs support only inbound replication, and therefore, cannot function as AD DS replication bridgeheads.
AD DS replication bridgeheads Because bridgeheads are responsible for AD DS replication, they must support both inbound and outbound AD DS replication. RODCs support only inbound replication, and therefore, cannot function as AD DS replication bridgeheads.
![]() RODCs cannot:
RODCs cannot:
![]() Authenticate across trusts when a WAN connection is unavailable If a branch office hosts users from several domains in your AD DS forest, users and computers from the domain of which the RODC is not a member cannot authenticate when a WAN link is unavailable. This is because the RODC caches credentials only for the domain accounts of which it is a member.
Authenticate across trusts when a WAN connection is unavailable If a branch office hosts users from several domains in your AD DS forest, users and computers from the domain of which the RODC is not a member cannot authenticate when a WAN link is unavailable. This is because the RODC caches credentials only for the domain accounts of which it is a member.
![]() Support applications that require constant AD DS interaction Some applications, such as Microsoft Exchange Server, require AD DS interaction. RODC cannot support the required interactivity, and therefore, you must deploy writeable domain controllers in those locations that also host Exchange Servers.
Support applications that require constant AD DS interaction Some applications, such as Microsoft Exchange Server, require AD DS interaction. RODC cannot support the required interactivity, and therefore, you must deploy writeable domain controllers in those locations that also host Exchange Servers.
Deploying an RODC
Before you deploy an RODC, you must ensure that there is at least one writable domain controller in your organization. You deploy RODCs in much the same way as you do all other domain controllers:
1. Install the Active Directory Domain Services server role on the server computer that you want to deploy as an RODC.
2. Launch the Active Directory Domain Services Configuration Wizard, and click through the wizard.
3. On the Domain Controller Options page, shown in Figure 1-16, select the Read Only Domain Controller (RODC) check box, and any other required options, and then click Next.

4. On the RODC Options page, shown in Figure 1-17, configure the following options, and then click Next.

![]() Delegated Administrator Account The delegated administrator(s) can perform local administration of the RODC without having equivalent domain administrator rights and privileges. Typically, an RODC delegated administrator can perform the following tasks:
Delegated Administrator Account The delegated administrator(s) can perform local administration of the RODC without having equivalent domain administrator rights and privileges. Typically, an RODC delegated administrator can perform the following tasks:
![]() Install and manage devices and drivers, hard disks, and updates
Install and manage devices and drivers, hard disks, and updates
![]() Manage the AD DS service
Manage the AD DS service
![]() Manage server roles and features
Manage server roles and features
![]() View the event logs
View the event logs
![]() Manage shared folders, apps, and services
Manage shared folders, apps, and services
![]() Accounts That Are Allowed To Replicate Passwords To The RODC By default, RODCs do not store sensitive password-related information. When a user signs in, the RODC forwards the sign in request to an online writeable domain controller elsewhere in the organization.
Accounts That Are Allowed To Replicate Passwords To The RODC By default, RODCs do not store sensitive password-related information. When a user signs in, the RODC forwards the sign in request to an online writeable domain controller elsewhere in the organization.
However, to improve usability, you can define that certain user and computer accounts can be cached on the RODC, enabling local authentication to occur. You do this by defining an RODC password replication policy. Generally, you would only add the users and computers that are in the same local site as the RODC to the replication policy.
Exam Tip
RODCs only store a subset of user and computer credentials. Consequently, if an RODC is stolen, security exposure is limited only to those cached accounts. This reduces the overall exposure, and helps reduce the administrative burden because only the cached accounts’ passwords must be reset.
By default, as shown in Figure 1-17, the Allowed RODC Password Replication Group is enabled. After deploying the RODC, you can add users and computers to this group.
Exam Tip
Also, there is a Denied RODC Password Replication Group. Members of this group can never have their credentials cached on the RODC. By default, this group contains Domain Admins, Enterprise Admins, and Group Policy Creator Owners.
![]() Accounts That Are Denied From Replicating Passwords To The RODC By default, the Denied RODC Password Replication Group is selected. After deploying the RODC, you can add users and computers to this group. Also, the following local groups are also denied from replicating passwords: Administrators, Server Operators, Backup Operators, and Account Operators.
Accounts That Are Denied From Replicating Passwords To The RODC By default, the Denied RODC Password Replication Group is selected. After deploying the RODC, you can add users and computers to this group. Also, the following local groups are also denied from replicating passwords: Administrators, Server Operators, Backup Operators, and Account Operators.
The Allowed RODC Password Replication Group and Denied RODC Password Replication Group groups enable you to configure the password replication policy on all RODCs. However, if you have multiple branch offices—and therefore multiple RODCs—it is more secure to configure a separate group for each RODC for allowed password replication. In this instance, remove the Allowed RODC Password Replication Group, and add a group that you manually created, and then add the required members for that branch.
5. Click through the wizard, review your selections, and when prompted, click Install. Your server restarts during the promotion process.
Exam Tip
You can use the Install-ADDSDomainController –ReadOnlyReplica Windows PowerShell command to install an RODC.
After you have deployed the RODC, you can configure the Allowed RODC Password Replication Group and Denied RODC Password Replication Group memberships to manage your RODC password replication policy.
Configure a global catalog server
In a single domain AD DS forest, any domain controller holds a copy of all objects within the forest. However, in multiple domain forests, this is no longer true. Although all domain controllers hold a copy of the schema and configuration partitions, they store only the local domain partition. Thus, if an application queries a domain controller in its local domain about the attributes of an object in another domain, there is no way for the local domain controller to satisfy that query.
This is where the global catalog is useful. The global catalog is a partial, read only copy of all objects in the forest and hosts a subset of all AD DS account schema attributes All domain controllers that are enabled as global catalog servers store a copy of this information locally. This enables them to satisfy queries for the attributes of objects that reside in other domains in the forest—without the requirement to petition a domain controller in that other domain.
Exam Tip
In a single domain forest, configure all domain controllers as global catalog servers. In a multi-domain forest, unless all the domain controllers are global catalog servers, you must not configure the infrastructure master as a global catalog server.
You can configure a domain controller as a global catalog server during deployment of the domain controller. You select the Global Catalog (GC) check box on the Domain Controller Options page, shown in Figure 1-16, when you run the Active Directory Domain Services Configuration Wizard.
Alternatively, after installation, you can use the Active Directory Sites And Services tool:
1. On a domain controller, open Server Manager, click Tools, and then click Active Directory Sites And Services.
2. Expand the Sites node, expand the relevant site, expand the Server folder, and then expand the node for the domain controller that you want to modify.
3. Click the NTDS Settings object, as shown in Figure 1-18.

4. Right-click the NTDS Settings node, and on the General tab, select the Global Catalog check box, as shown in Figure 1-19, and then click OK.

You can also use Windows PowerShell to make a domain controller a global catalog server.
1. Open Windows PowerShell (Admin).
2. Run the get-ADDomainController | select-object -property Name,IsGlobalCatalog command to query for a list of domain controllers and to verify their current global catalog status, as shown in Figure 1-20.

3. For the appropriate domain controller, run the following command, replacing LON-SVR3 with the name of your domain controller:
Set-ADObject -Identity (Get-ADDomainController -Identity LON-SVR3).
NTDSSettingsObjectDN -Replace @{options='1'}
4. Run the get-ADDomainController | select-object -property Name,IsGlobalCatalog command again to verify the change as shown in Figure 1-21.

Exam Tip
Many organizations now opt to make all domain controllers global catalog servers.
Adding attributes to the global catalog
It is important to note that the global catalog does not contain all attributes for all objects; rather, it contains a subset of the most useful attributes, known in Windows Server 2016 as the Partial Attribute Set. However, it is possible for you to modify which object attributes are stored in the global catalog; this is sometimes referred to as extending the partial attribute set. You can do this by using the following procedure:
Note Caution when editing the AD DS schema
Exercise great caution when editing the AD DS schema directly in this manner.
1. On the domain controller that has online access to the schema operations master role, run the regsvr32 schmmgmt.dll command at an elevated command prompt. This command enables the Active Directory Schema to be accessible through the management console.
2. Open the management console by running mmc.exe at an elevated command prompt.
3. In the Console1 – [Console Root] window, click File, and then click Add/Remove Snap-in.
4. In the Add Or Remove Snap-ins dialog box, in the Snap-in list, click Active Directory Schema, click Add, and then click OK.
5. Under Console Root in the navigation pane, expand Active Directory Schema, and then click Attributes. A long list of attributes is displayed.
6. You must know the specific attribute name to be able to modify its properties. Locate the attribute, right-click it, and then click Properties.
7. In the attribute Properties dialog box, the accountExpires Properties dialog box is shown in Figure 1-22, select the Replicate This Attribute To The Global Catalog check box, and then click OK.

8. Close the management console.
Configure domain controller cloning
It is relatively quick and straightforward to deploy domain controllers using the procedures outlined earlier in this chapter. But if you have many, broadly identical servers that you want to configure as domain controllers, a faster approach is to clone those domain controllers. This is especially relevant when your domain controllers are virtualized.
In versions of Windows Server prior to Windows Server 2012, cloning virtual domain controllers is prohibited. However, both Windows Server 2012 and Windows Server 2016 support virtual domain controller cloning. If you decide to deploy domain controllers by using cloning, there are the following potential advantages:
![]() Fast deployment of domain controllers Not only does this make the initial deployment less time-consuming, it also offers the opportunity of responding quickly to domain controller outages by deploying a new clone.
Fast deployment of domain controllers Not only does this make the initial deployment less time-consuming, it also offers the opportunity of responding quickly to domain controller outages by deploying a new clone.
![]() Respond to increased demand Whether that’s an increase in demand at a branch office, or elsewhere, you can deploy clones quickly when demand dictates.
Respond to increased demand Whether that’s an increase in demand at a branch office, or elsewhere, you can deploy clones quickly when demand dictates.
Creating a clone
Before you can clone a virtual domain controller, you must ensure that your infrastructure meets the following requirements:
![]() Windows Server 2012 or later Your domain controller guest virtual machines must run Windows Server 2012 or later.
Windows Server 2012 or later Your domain controller guest virtual machines must run Windows Server 2012 or later.
![]() PDC emulator operations master Your primary domain controller (PDC) emulator operations master must be running on a domain controller installed with Windows Server 2012 or later. Also, the PDC emulator role must be online when you start your cloned domain controllers for the first time.
PDC emulator operations master Your primary domain controller (PDC) emulator operations master must be running on a domain controller installed with Windows Server 2012 or later. Also, the PDC emulator role must be online when you start your cloned domain controllers for the first time.
![]() Virtual machine generation identifiers You must use a hypervisor, such as Hyper-V on Windows Server 2012 or later, that supports virtual machine generation identifiers.
Virtual machine generation identifiers You must use a hypervisor, such as Hyper-V on Windows Server 2012 or later, that supports virtual machine generation identifiers.
After you have verified these prerequisites, you can use the following procedure to clone a virtual domain controller. This consists of two stages: preparing the source domain controller, and preparing one or more target domain controller clones.
Prepare the source computer
1. Sign in to your domain controller as a member of the Domain Admins global security group.
2. Open the Active Directory Users And Computers console, navigate to the Users folder, and add the source computer to the Cloneable Domain Controllers global security group, as shown in Figure 1-23.

3. Run the Windows PowerShell Get-ADDCCloneingExcludedApplicationList cmdlet to check that all the apps and services on your source domain controller support cloning. Remove any unsupported apps.
Exam Tip
If, after you clone a domain controller, you discover that the apps work, you can add the apps to the CustomDCCloneAllowList.xml file.
4. Run the Windows PowerShell Get-ADDCCloneingExcludedApplicationList -GenerateXML cmdlet.
5. Run the Windows PowerShell New-ADDCCloneConfigFile cmdlet, as shown in Figure 1-24, to generate a DCCloneConfig.xml file. This file is used to configure the clones. You specify a computer name, IP configuration, and site name for your intended clone. This information is written to DCCloneConfig.xml. If you intend to create multiple clones, typically, each must have a different DCCloneConfig.xml file.

6. Shut down the source virtual domain controller.
7. Export the source virtual domain controller:
![]() Right-click the source domain controller virtual machine in the navigation pane, and then click Export.
Right-click the source domain controller virtual machine in the navigation pane, and then click Export.
![]() In the Export Virtual Machine dialog box, in the Location text box, specify the folder where you want to store the virtual machine export, and then click Export.
In the Export Virtual Machine dialog box, in the Location text box, specify the folder where you want to store the virtual machine export, and then click Export.
Exam Tip
Ensure that there are no checkpoints for your domain controller virtual machine before exporting.
8. If you are deploying multiple clones, you must now modify the DCCloneConfig.xml file for each one. Do this by mounting the VHD for the target domain controller clone and running the New-ADDCCloneConfigFile cmdlet and defining the unique information required for that clone. If you are deploying only a single clone, skip this step.
Create the clone(s)
1. Ensure that the PDC emulator and a global catalog server are online and visible to your target clones.
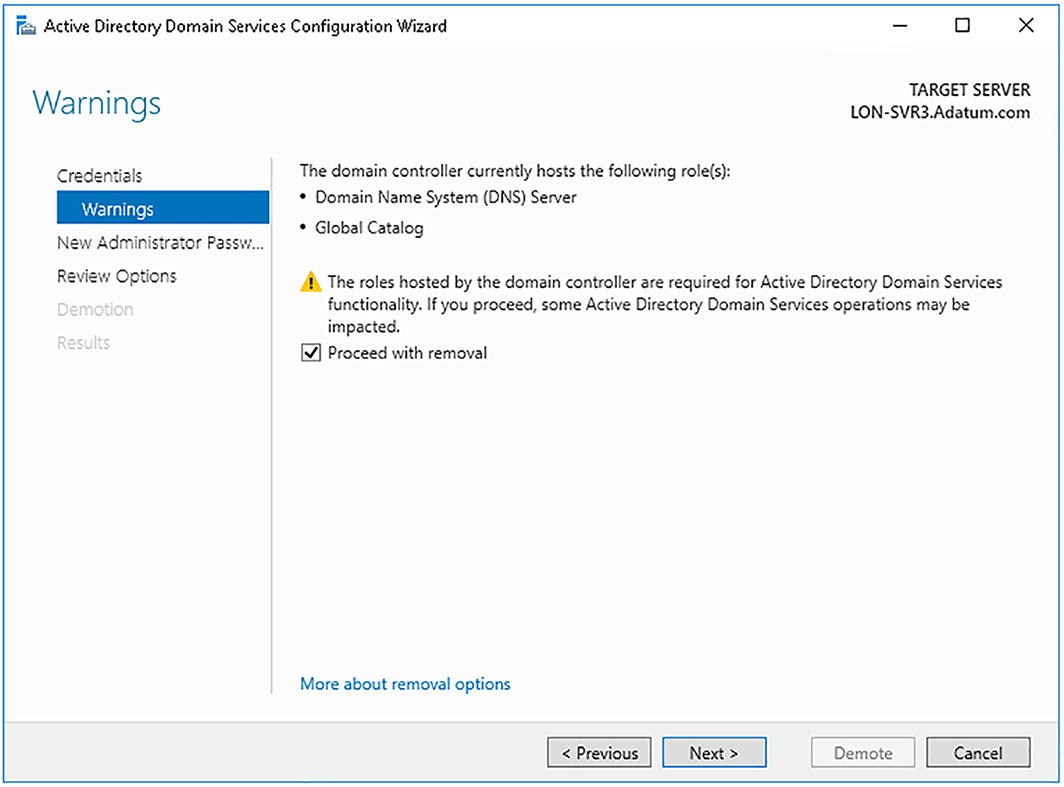
2. In Hyper-V Manager, import the virtual machine:
A. In the Actions pane, click Import Virtual Machine.
B. In the Import Virtual Machine Wizard, on the Locate Folder page, in the Folder text box, type the path to the exported files for your virtual machine, and then click Next.
C. On the Select Virtual Machine page, as shown in Figure 1-25, if necessary, select the virtual machine in the list, and then click Next.
3. On the Choose Import Type page, shown in Figure 1-26, click Copy The Virtual Machine (Create A New Unique ID), and then click Next.

4. On the Choose Folders For Virtual Machine Files page, shown in Figure 1-27, select the Store The Virtual Machine In A Different Location check box, and for each folder location, specify a suitable folder path, and then click Next.

5. On the Choose Folders To Store Virtual Hard Disks page, shown in Figure 1-28, specify a suitable folder path, and then click Next.

6. On the Completing Import Wizard page, click Finish. The virtual machine is imported, which can take up to 20 minutes or so.
7. After importing, in Hyper-V Manager, in the navigation pane, rename the imported virtual machine.
8. In Hyper-V Manager, in the Actions pane, click the newly imported virtual machine, click Start, and then click Connect to see the virtual machine starting. A “Domain Controller cloning is at x% completion” message is displayed during the completion of the cloning process.
Note Reminder
Ensure that the PDC emulator and a global catalog server are online and accessible to your clone.
When your cloned domain controller starts, the following process occurs:
1. The clone verifies the presence of a virtual machine generation identifier. This is required, and if it does not exist, the computer starts normally (as if no DCCloneConfig.xml file exists) or renames DCCloneConfig.xml and restarts in DSRM. The administrator must then attempt to determine why no virtual machine generation identifier exists.
2. Assuming the presence of the virtual machine generation identifier, the clone determines if this identifier changed:
![]() If it did not change, it is the original source domain controller. Any DCCloneConfig.xml file is renamed, and a normal startup occurs.
If it did not change, it is the original source domain controller. Any DCCloneConfig.xml file is renamed, and a normal startup occurs.
![]() If it did change, the cloning process continues. If the DCCloneConfig.xml file exists, the computer gets the new computer name and IP address settings from the file, and the initialization continues, creating a new domain controller.
If it did change, the cloning process continues. If the DCCloneConfig.xml file exists, the computer gets the new computer name and IP address settings from the file, and the initialization continues, creating a new domain controller.
Upgrade domain controllers
If you are using an earlier version of Windows Server and want to upgrade your domain controllers to Windows Server 2016, you can perform an in-place upgrade. However, this process does pose some risks. It is generally safer to add a new Windows Server 2016 domain controller(s) to your existing infrastructure and then migrate roles to the newly deployed domain controller(s).
Note In-place upgrades
An in-place upgrade is one where the Windows Server 2016 is installed on the same server computer as is currently running an earlier version, for example, Windows Server 2008 R2.
Before you can deploy the first Windows Server 2016 domain controller into your existing infrastructure, you must determine that the current forest functional level and domain functional level are at least Windows Server 2008. You can do this by using the following procedure:
1. In the Active Directory Domains And Trusts console, in the navigation pane, right-click the Active Directory Domains And Trusts node, and then click Raise Forest Functional Level.
2. In the Raise Forest Functional Level dialog box, the current forest functional level is displayed, as shown in Figure 1-29.

3. If necessary, in the Select An Available Forest Functional Level list, click a level greater than Windows Server 2008, and then click Raise.
4. In the navigation pane, locate and right-click the appropriate AD DS domain, and then click Raise Domain Functional Level.
5. In the Raise Domain Functional Level dialog box, the Current Domain Functional Level is displayed, as shown in Figure 1-30.

6. If necessary, in the Select An Available Domain Functional Level list, click a level greater than Windows Server 2008, and then click Raise.
After you have verified and, if necessary, raised the forest and domain functional levels, if your existing infrastructure is based on Windows Server 2008 or Windows Server 2008 R2, you must perform the following tasks:
![]() Prepare your AD DS forest On a domain controller in your existing forest, run adprep /forestprep.
Prepare your AD DS forest On a domain controller in your existing forest, run adprep /forestprep.
![]() Prepare your AD DS domain On a domain controller in your existing forest, run adprep /domainprep.
Prepare your AD DS domain On a domain controller in your existing forest, run adprep /domainprep.
If your current infrastructure is based on Windows Server 2012 or later, the Active Directory Domain Services Configuration Wizard performs these steps automatically. However, you can still choose to perform them as independent steps.
Exam Tip
Adprep.exe is in the SupportAdprep folder on your Windows Server 2016 DVD.
After you have raised the forest and domain functional levels (if necessary) and prepared your AD DS forest and domain, you can deploy the first Windows Server 2016 domain controller. Use the procedures discussed earlier in this chapter to complete this task. Then, you can transfer the operations master roles to your new Windows Server 2016 domain controller(s), as described in the next section. Finally, you can demote and remove your older domain controllers.
Transfer and seize operations master roles
The AD DS database supports multimaster updates. Broadly speaking, this means that a change to the database can be made on any instance, or replica, of the database. That change is then replicated to all other instances of the database on all other domain controllers throughout your forest.
However, there are certain operations that are not ideally suited to a multimaster approach. For example, handling user password changes is safer and more secure when handled by a single domain controller only, and then replicated to all other domain controllers.
What are operations master roles?
To handle the sort of operations best suited to single-master updates, Windows Server AD DS supports the notion of operations masters. Specifically, there are five operations master role holders (also sometimes called flexible single master operations (FSMO) roles). Two of these are forest-wide operations masters:
![]() Schema master The schema master maintains the schema and is responsible for propagating any changes to the schema to the other copies of this AD DS partition on all other domain controllers in the forest. Because the schema rarely changes, the temporary absence of this operations master might easily go unnoticed. However, it must be online when you make changes to the schema, for example, when you install an application, such as Exchange Server, that requires additional object types and attributes for existing object types.
Schema master The schema master maintains the schema and is responsible for propagating any changes to the schema to the other copies of this AD DS partition on all other domain controllers in the forest. Because the schema rarely changes, the temporary absence of this operations master might easily go unnoticed. However, it must be online when you make changes to the schema, for example, when you install an application, such as Exchange Server, that requires additional object types and attributes for existing object types.
![]() Domain naming master The domain naming master handles the addition or removal of domains in your AD DS forest. Because these sort of changes are infrequent, if the domain naming master is temporarily unavailable, you might not realize it straight away.
Domain naming master The domain naming master handles the addition or removal of domains in your AD DS forest. Because these sort of changes are infrequent, if the domain naming master is temporarily unavailable, you might not realize it straight away.
Exam Tip
By default, both these roles are assigned to the first domain controller in your AD DS forest.
You can use the Windows PowerShell get-ADForest cmdlet to retrieve information about the current Schema and Domain naming master role holders, as shown in Figure 1-31.

The remainder of the operations masters are domain-wide. This means each domain holds these three operations master roles, and they are specific to that domain. They are:
![]() PDC emulator Performs several critical domain-wide operations:
PDC emulator Performs several critical domain-wide operations:
![]() Acts as a time source in the domain
Acts as a time source in the domain
![]() Propagates password changes
Propagates password changes
![]() Provides a primary source for GPOs for editing purposes
Provides a primary source for GPOs for editing purposes
![]() Infrastructure master Maintains inter-domain references, and consequently, this role is only relevant in multidomain forests. For example, the infrastructure master maintains the integrity of an object’s security access control list when that list contains security principals from another domain.
Infrastructure master Maintains inter-domain references, and consequently, this role is only relevant in multidomain forests. For example, the infrastructure master maintains the integrity of an object’s security access control list when that list contains security principals from another domain.
Exam Tip
You should not assign the infrastructure master role to a global catalog server unless your forest consists of only a single domain. The only exception to this is if all domain controllers are also global catalog servers, in which case, the infrastructure master role is redundant.
![]() RID master Provides blocks of IDs to each of the domain controllers in its domain. Each object in a domain requires a unique ID.
RID master Provides blocks of IDs to each of the domain controllers in its domain. Each object in a domain requires a unique ID.
Exam Tip
By default, all these roles are assigned to the first domain controller you promote in a given domain.
You can use the Windows PowerShell Get-AdDomain cmdlet to retrieve information about the current Schema and Domain naming master role holders, as shown in Figure 1-32.

Generally, if one of these forest-wide or domain-wide operations masters is unavailable for a short period, it probably does not affect day-to-day operations in your AD DS infrastructure. However, extended periods of unavailability can pose significant challenges and might result in problems.
Exam Tip
Absence of the PDC Emulator will often have an immediate and noticeable effect. Users might experience problems signing in if it is unavailable.
Transferring roles
If you anticipate the need to shut down the domain controller that hosts an operations master role for an extended period, consider transferring that role. To transfer a role, use the appropriate following procedure.
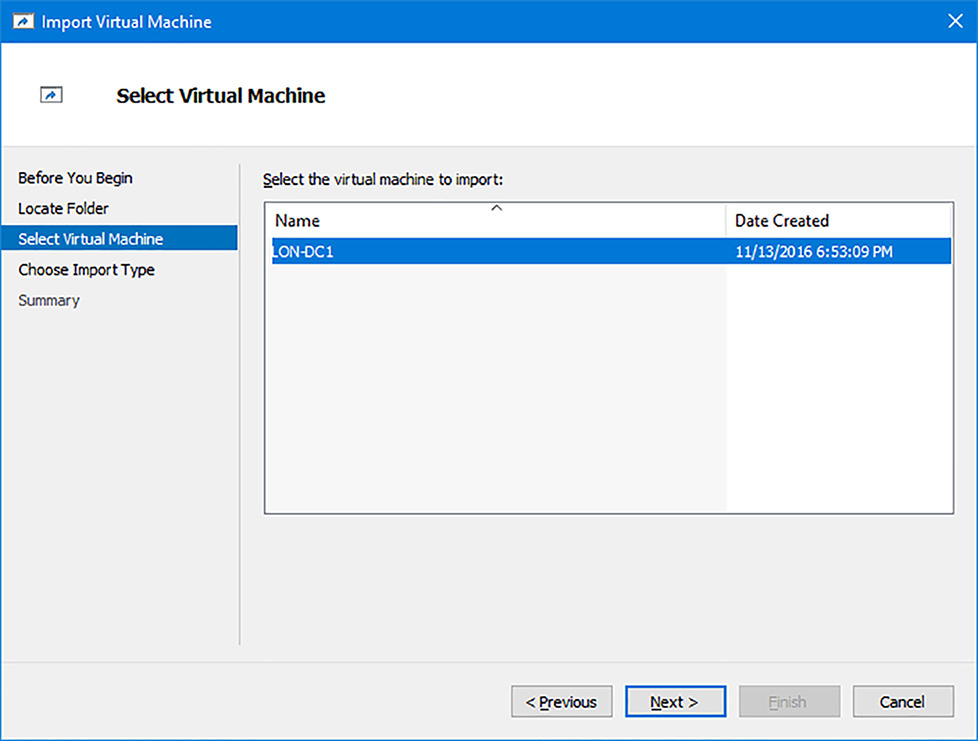
For the schema master:
1. On the domain controller to which you want to transfer the role, open the Active Directory Schema console.
2. Right-click the Active Directory Schema node in the navigation pane, and then click Change Active Directory Domain Controller. Select the domain controller that you want to transfer the role to, and click OK.
3. Right-click the Active Directory Schema node in the navigation pane, and then click Operations Master.
4. In the Change Schema Master dialog box, shown in Figure 1-33, verify that the target domain controller appears in the Change text box, and then click Change, click Yes, click OK, and then click Close.
For the domain naming master:
1. On the target domain controller, open the Active Directory Domains And Trusts console.
2. Right-click the Active Directory Domains And Trusts node in the navigation pane, and then click Change Active Directory Domain Controller. Select the domain controller that you want to transfer the role to, and click OK.
3. Right-click the Active Directory Domains And Trusts node in the navigation pane, and then click Operations Master.
4. In the Operations Master dialog box, verify that the target domain controller appears in the Change text box, and then click Change, click Yes, click OK, and then click Close.
For any of the three domain-wide operations masters:
1. On the target domain controller, open the Active Directory Users And Computers console.
2. Right-click the appropriate domain in the navigation pane, and then click Operations Masters.
3. In the Operations Masters dialog box, shown in Figure 1-34, on either the RID, PDC, or Infrastructure tab, verify that the target domain controller appears in the Change text box, and then click Change, click Yes, click OK, and then click Close.

You can also move these roles with the Windows PowerShell Move-ADDirectoryServerOperationMasterRole cmdlet. For example, to transfer the PDC emulator master to LON-SVR3, use the following command:
Move-ADDirectoryServerOperationMasterRole -Identity "LON-SVR3"
-OperationMasterRole PDCEmulator
Seizing roles
It is not always possible to anticipate the removal of an operations master role holder. Consequently, if a domain controller hosting one of the operations master roles becomes unavailable, and you cannot quickly and easily get it operational again, you might consider seizing the operations master roles held by the failed domain controller.
If you must seize a role, you cannot use the management console to perform the task. Instead, you must use the Move-ADDirectoryServerOperationMasterRole -force cmdlet. Each role is assigned a number identifier, as described in Table 1-1.

For example, to seize the PDC Emulator, RID master, and Infrastructure master roles, assigning them to LON-SVR3, use the following command:
Move-ADDirectoryServerOperationMasterRole -Identity "LON-SVR3" -OperationMasterRole
0,1,2 -Force
Need More Review? Move (Transferring or Seizing) FSMO Roles
To review further details about seizing FSMO roles, refer to the Microsoft TechNet website at http://social.technet.microsoft.com/wiki/contents/articles/6736.move-transfering-or-seizing-fsmo-roles-with-ad-powershell-command-to-another-domain-controller.aspx.
You can also use the Ntdsutil.exe command line tool to transfer or seize operations master roles.
Need More Review? Using Ntdsutil.exe to transfer or seize FSMO roles
To review further details about using Ntdsutil.exe to seize roles, refer to the Microsoft TechNet website at https://support.microsoft.com/en-us/kb/255504.
Resolve DNS SRV record registration issues
To locate services provided by AD DS, domain controllers register service location (SRV) records in DNS. These SRV records, shown in Figure 1-35, enable DNS clients to locate the appropriate services. For example, when a user signs in from a Windows 10 computer, Windows 10 uses DNS to obtain a list of adjacent domain controllers that can provide authentication services.

A SVR record consists of several elements that identify the AD DS service. These are the service, the protocol, the priority and weight, the protocol port number, and the host FQDN offering the service, as shown in Figure 1-36.

For example, if a Microsoft Exchange Server computer is attempting to locate a domain controller running the Global Catalog service in the Adatum.com domain, it queries DNS for _gc._tcp.Adatum.com.
To help clients obtain access to geographically adjacent instances of AD DS services, information about sites is provided in the SRV records on DNS. For example, when a Windows 10 computer starts up, it looks for site-specific SRV records in DNS. A typical DNS response to the client’s query includes:
![]() A list of the domain controllers in the same site as the client
A list of the domain controllers in the same site as the client
![]() A list of the domain controllers in the next closest site
A list of the domain controllers in the next closest site
Exam Tip
This assumes that no domain controllers were available in the same site and that the Try Next Closest Site GPO setting is enabled.
![]() A random list of available domain controllers in the domain, if there is no domain controller in the next closest site
A random list of available domain controllers in the domain, if there is no domain controller in the next closest site
Troubleshooting registration
Each domain controller runs the NETLOGON service. This service is responsible for, among other things, registering the domain controller’s SRV records in DNS. If you determine that a domain controller’s SRV records are not appearing in DNS correctly, restart the NETLOGON service. This should force the records to register correctly.
You can also use the nslookup.exe DNS testing command line tool to verify the correct registration of SRV records. For example, to ensure that the correct records are registered for the Adatum.com domain, from a command prompt, perform the following procedure:
1. Type nslookup and then press Enter.
2. Type set type=all and then press Enter.
3. Type _ldap._tcp.dc._msdcs.Adatum.com and then press Enter.
The output returned should look something like Figure 1-37.

Skill 1.2: Create and manage Active Directory users and computers
After you have installed and deployed your domain controllers, you can start to populate AD DS with objects, including users and computers. You can use several graphical tools accessible from Server Manager to perform these administrative tasks, or you can use Windows PowerShell to help automate these tasks.
This section covers how to:
![]() Create, copy, configure, and delete users and computers
Create, copy, configure, and delete users and computers
![]() Perform bulk Active Directory operations
Perform bulk Active Directory operations
Create, copy, configure, and delete users and computers
For every user in your organization, you must create a user account in AD DS. This identifies them as an individual when they attempt to perform tasks (rights) or access resources (permissions).
You can populate this user account with properties (attributes) that describe the user. These could include their full name, contact details, their role in your organization, their department, and many settings that define the scope of their abilities within your network.
It’s important that before you start this process, you spend a little time thinking about a naming standard for your user accounts. The user account name must identify the user clearly, and must be unique within your organization. Typically, organizations use a combination of a user’s last name and initials to yield a unique name. If your organization is large, this might require careful consideration because many users might share a last name, and some might share both first name and last name.
In AD DS, it’s not only users that must have an account. Computers that connect to your organization’s networked resources must also be identified. In some respects, this is simpler because you make the decision about the computer account name when you deploy the computer and name it during the installation process. Therefore, it’s critical that when you deploy your users’ computers, you consider the device name carefully.
Adding user accounts
There are several tools that you can use to create and manage user accounts, including Windows PowerShell, the dsadd.exe command-line tool, Active Directory Users and Computers, shown in Figure 1-38, and the Active Directory Administrative Center, shown in Figure 1-39. For the purposes of procedures in this chapter, we will use Active Directory Users and Computers and Windows PowerShell.


After defining your user account naming standard, use the following procedure to add a user account:
1. Sign in as a member of the Domain Admins global security group.
In fact, you can sign in as a member of the Account Operators group. Members of this group have sufficient privilege to perform account management tasks.
2. Open the Active Directory Users And Computers console, and then select the OU in which you want to create your user account.
Exam Tip
You can create user accounts in the Builtin, Computers, and Users containers, too, but it is best practice to consolidate your users in OUs for management purposes.
3. Right-click the OU, point to New, and then click User.
4. In the New Object – User dialog box, shown in Figure 1-40, enter the following information, and then click Next:
![]() First name, initials, and last name These should uniquely identify the user. These elements combined to create the user’s full name, which must be unique within the AD DS container where you create it. However, it is advisable to try to ensure that the name is unique within the forest.
First name, initials, and last name These should uniquely identify the user. These elements combined to create the user’s full name, which must be unique within the AD DS container where you create it. However, it is advisable to try to ensure that the name is unique within the forest.
![]() User logon name This name is combined with the adjacently displayed suffix (@Adatum.com in Figure 1-40) to create a user principal name (UPN); for example, [email protected]. This UPN must be unique within the AD DS forest. The UPN suffix is generally the domain name where you are adding the account. However, you can define additional UPN suffixes by using the Active Directory Domains and Trusts console.
User logon name This name is combined with the adjacently displayed suffix (@Adatum.com in Figure 1-40) to create a user principal name (UPN); for example, [email protected]. This UPN must be unique within the AD DS forest. The UPN suffix is generally the domain name where you are adding the account. However, you can define additional UPN suffixes by using the Active Directory Domains and Trusts console.

![]() User logon name (pre-Windows 2000) This name is also sometimes referred to as the SAM account name. It must be unique within the current domain.
User logon name (pre-Windows 2000) This name is also sometimes referred to as the SAM account name. It must be unique within the current domain.
5. Next, enter a password and confirm the password, as shown in Figure 1-41. Whatever you enter must meet the current password complexity rules in your domain. Configure the remaining settings, and click Next:
![]() User Must Change Password At Next Logon It is good practice to force a user to choose a new password when they first sign in.
User Must Change Password At Next Logon It is good practice to force a user to choose a new password when they first sign in.
![]() User Cannot Change Password Select this option if the user account is a specialist account, such as one used by an app or service rather than a person. This option is mutually exclusive with User Must Change Password At Next Logon.
User Cannot Change Password Select this option if the user account is a specialist account, such as one used by an app or service rather than a person. This option is mutually exclusive with User Must Change Password At Next Logon.
![]() Password Never Expires Likewise, choose this option if the user account is a specialist account, such as one used by an app or service. This option is also mutually exclusive with User Must Change Password At Next Logon.
Password Never Expires Likewise, choose this option if the user account is a specialist account, such as one used by an app or service. This option is also mutually exclusive with User Must Change Password At Next Logon.
![]() Account Is Disabled It is good practice to disable all user accounts until the user is ready to sign in for the first time. Many organizations add user accounts and create email accounts for new start employees before the new employee’s first day. However, leaving a user account enabled and unused, with its initial password, is not secure.
Account Is Disabled It is good practice to disable all user accounts until the user is ready to sign in for the first time. Many organizations add user accounts and create email accounts for new start employees before the new employee’s first day. However, leaving a user account enabled and unused, with its initial password, is not secure.

6. When prompted, click Finish.
After you have created the account, you must modify its properties so that you can configure group memberships, organizational details, and more advanced account properties. To do this, use the following procedure:
1. In Active Directory Users And Computers, locate the OU that contains your new user account.
2. Right-click the account, and then click Properties. There are a huge number of configurable user account properties, but the following are the most critical.
3. In the User Properties dialog box, click the Account tab, shown in Figure 1-42, and then configure the following settings:

![]() Logon Hours Specify the days and times of the week when the account can be used. The default is Always.
Logon Hours Specify the days and times of the week when the account can be used. The default is Always.
![]() Log On To Define which computers the user account can be signed in at. The default is All Computers.
Log On To Define which computers the user account can be signed in at. The default is All Computers.
![]() Unlock Account This option can only be selected when the account has been locked. This occurs when a user attempts to sign in using an incorrect password and exceeds the threshold of incorrect passwords.
Unlock Account This option can only be selected when the account has been locked. This occurs when a user attempts to sign in using an incorrect password and exceeds the threshold of incorrect passwords.
![]() Account Options Aside from the options you defined when you created the account (user must change password at next logon, and so on), you can enable some more advanced options for accounts that are used in sensitive situations requiring more security. Settings include: Smart Card Is Required For Interactive Logon, Account Is Sensitive And Cannot Be Delegated, and This Account Supports Kerberos AES 256 Bit Encryption.
Account Options Aside from the options you defined when you created the account (user must change password at next logon, and so on), you can enable some more advanced options for accounts that are used in sensitive situations requiring more security. Settings include: Smart Card Is Required For Interactive Logon, Account Is Sensitive And Cannot Be Delegated, and This Account Supports Kerberos AES 256 Bit Encryption.
![]() Account Expires You can configure an expiration date for an account. This is often useful for accounts used by interns or temporary staff. After the account is expired, you can reassign the account to the next intern and reconfigure the expiration setting.
Account Expires You can configure an expiration date for an account. This is often useful for accounts used by interns or temporary staff. After the account is expired, you can reassign the account to the next intern and reconfigure the expiration setting.
4. On the Profile tab, shown in Figure 1-43, the following settings.

![]() Profile Path If you define a profile path on a shared folder, the user’s desktop and app settings roam with the user account. When a user signs out, her desktop and app settings are saved to this location. Define a UNC name and use the variable %username% to define a subfolder off the shared folder. For example, as shown in Figure 1-43, the UNC name points to the shared folder Users on the server LON-DC1. A subfolder for this user, named after the user account, will be created automatically when you click Apply, as shown in Figure 1-44. Beneath that, a subfolder for the user’s profile is automatically created.
Profile Path If you define a profile path on a shared folder, the user’s desktop and app settings roam with the user account. When a user signs out, her desktop and app settings are saved to this location. Define a UNC name and use the variable %username% to define a subfolder off the shared folder. For example, as shown in Figure 1-43, the UNC name points to the shared folder Users on the server LON-DC1. A subfolder for this user, named after the user account, will be created automatically when you click Apply, as shown in Figure 1-44. Beneath that, a subfolder for the user’s profile is automatically created.

![]() Logon Script Specify the name of a batch file to use as a logon script for this user. You must not specify the path to this file; all scripts must be stored in the NETLOGON shared folder (part of SYSVOL) so that they can be replicated to all domain controllers. Generally, this field is seldom used. Most administrators prefer to apply logon scripts by using GPOs.
Logon Script Specify the name of a batch file to use as a logon script for this user. You must not specify the path to this file; all scripts must be stored in the NETLOGON shared folder (part of SYSVOL) so that they can be replicated to all domain controllers. Generally, this field is seldom used. Most administrators prefer to apply logon scripts by using GPOs.
![]() Home Folder It’s good practice to create a personal storage area on your network for each user. This is referred to as a home folder. If you use the variable %username% to define a subfolder off a valid shared folder, the username is applied when the user’s home folder is automatically created. Specify a drive letter to use to map to the user’s home folder.
Home Folder It’s good practice to create a personal storage area on your network for each user. This is referred to as a home folder. If you use the variable %username% to define a subfolder off a valid shared folder, the username is applied when the user’s home folder is automatically created. Specify a drive letter to use to map to the user’s home folder.
Ensure that you create the required shared folders before you create your first user accounts. That way, Windows Server can automatically create the required user subfolders and correctly assign permissions automatically. Also, use of the variable %username% means that if you copy this account, the variable is substituted with the details for the account you are creating as a copy.
5. On the Member Of tab, shown in Figure 1-45, add the user to the required groups, and then click OK. Groups are discussed in the next skill.

Configure templates
If you have many, broadly similar user accounts to add, you can consider using templates to help speed up the process. A template user account is an ordinary user account populated with common properties and settings. You copy the account in Active Directory Users And Computers, and then configure only the unique individual settings:
![]() First Name and Last Name
First Name and Last Name
![]() Full Name
Full Name
![]() User Logon Name
User Logon Name
![]() Password
Password
Exam Tip
It’s a very good idea to disable a template account and to configure the User Cannot Change Password setting; this helps prevent use of the account.
The following user account properties are copied when you create and copy a template account:
![]() Group Memberships
Group Memberships
![]() Home Directories
Home Directories
![]() Profile Settings
Profile Settings
![]() Logon Scripts
Logon Scripts
![]() Logon Hours
Logon Hours
![]() Password Settings
Password Settings
![]() Department Name
Department Name
![]() Manager
Manager
Exam Tip
Although the notion of a template account might seem attractive, there are easier and quicker ways to manage user accounts in bulk. Most administrators use Windows PowerShell scripts to create multiple accounts.
Managing user accounts
When your user accounts have been created, you must be prepared to manage these accounts. You can use Active Directory Users and Computers or Windows PowerShell to perform the following typical management tasks:
![]() Resetting passwords Right-click the relevant user account, and then click Reset Password. In Windows PowerShell, use the Set-ADAccountPassword cmdlet. For example, to reset Beth Burke’s password, use the following command:
Resetting passwords Right-click the relevant user account, and then click Reset Password. In Windows PowerShell, use the Set-ADAccountPassword cmdlet. For example, to reset Beth Burke’s password, use the following command:
Set-ADAccountPassword 'CN=Beth Burke,OU=IT,DC=Adatum,DC=com' -Reset -NewPassword
(ConvertTo-SecureString -AsPlainText "Pa55w.rd" -Force)
![]() Unlocking accounts Right-click the relevant user account, and then click Unlock. In Windows PowerShell, use the Unlock-ADAccount cmdlet.
Unlocking accounts Right-click the relevant user account, and then click Unlock. In Windows PowerShell, use the Unlock-ADAccount cmdlet.
![]() Renaming accounts Right-click the relevant user account, and then click Rename. Type the new full name and press Enter. In the Rename User dialog box, shown in Figure 1-46, type the relevant information and click OK. In Windows PowerShell, use the Rename-ADObject cmdlet.
Renaming accounts Right-click the relevant user account, and then click Rename. Type the new full name and press Enter. In the Rename User dialog box, shown in Figure 1-46, type the relevant information and click OK. In Windows PowerShell, use the Rename-ADObject cmdlet.

![]() Moving users Right-click the relevant user account, and then click Move. In the Move dialog box, click the new location, and then click OK. In Windows PowerShell, use the Move-ADObject cmdlet. For example, to move Beth Burke from IT to Marketing in the Adatum.com domain, use the following command:
Moving users Right-click the relevant user account, and then click Move. In the Move dialog box, click the new location, and then click OK. In Windows PowerShell, use the Move-ADObject cmdlet. For example, to move Beth Burke from IT to Marketing in the Adatum.com domain, use the following command:
Move-ADObject -Identity 'CN=Beth Burke,OU=IT,DC=Adatum,DC=com' -TargetPath
'OU=Marketing,DC=Adatum,DC=com'
Exam Tip
You can also use the Dsmod.exe command-line tool to accomplish many of these tasks.
You can use Windows PowerShell cmdlets to perform all common user management tasks. Table 1-2 lists the important cmdlets and explains their use.

Manage inactive and disabled accounts
There are many reasons why accounts might become inactive, including:
![]() An employee leaves your organization
An employee leaves your organization
![]() An intern or temporary member of staff leaves
An intern or temporary member of staff leaves
![]() A member of staff is away on a sabbatical, or is ill for an extended period
A member of staff is away on a sabbatical, or is ill for an extended period
![]() An employee is on parental leave
An employee is on parental leave
Whatever the reason, it is good practice to disable accounts that are inactive to help ensure the security of your network. To Disable an unused account, in Active Directory Users And Computers, right-click the user account, and then click Disable Account. To enable a disabled account, locate the user account, right-click it, and then click Enable Account.
Add and manage computer accounts
For computer devices that your organization owns, you should create an AD DS account for the computer. This helps to secure your organization’s network infrastructure because the computer can identify itself to the AD DS domain of which it is a member.
By default, computer accounts are created and stored in the default Computers container. This is not an OU and, therefore, you cannot delegate administration on it, nor apply GPOs to it. In larger organizations, consider placing your computers in OUs rather than the Computers container.
To add a computer to the domain, you must sign in with an account that has sufficient privilege. In fact, you require permissions to add a computer object within the domain. Also, you require local administrator privilege on the computer itself. By default, the following groups have the permissions to create computer objects in any OU:
![]() Enterprise Admins
Enterprise Admins
![]() Domain Admins
Domain Admins
![]() Administrators
Administrators
![]() Account Operators
Account Operators
Standard users can add a maximum of 10 computers to a domain. Use the Active Directory Services Interfaces Editor (ADSI Edit) console to increase the machine account quota if 10 is insufficient.
You can then add the computer account using one of two strategies:
![]() Add the computer account in one step When you join a computer to a domain, you can supply credentials to create the required computer account at the same time as you change the client computer’s settings. This is a simple, one-step process.
Add the computer account in one step When you join a computer to a domain, you can supply credentials to create the required computer account at the same time as you change the client computer’s settings. This is a simple, one-step process.
![]() Pre-create the computer account You can create the computer account in AD DS first, and then, from the client computer, add the computer to your domain. This two-step approach enables you to separate the administrative tasks of adding computers to the domain, and managing computer accounts. Also, any GPOs configured on the computer’s AD DS container apply more quickly.
Pre-create the computer account You can create the computer account in AD DS first, and then, from the client computer, add the computer to your domain. This two-step approach enables you to separate the administrative tasks of adding computers to the domain, and managing computer accounts. Also, any GPOs configured on the computer’s AD DS container apply more quickly.
To add a Windows 10 computer to a domain in a single step, use the following procedure:
1. Sign in to the Windows 10 computer as a local administrator.
2. Right-click Start, and then click System.
3. In System, click Advanced System Settings.
4. In the System Properties dialog box, on the Computer name tab, click Change.
5. In the Computer Name/Domain Changes dialog box, shown in Figure 1-47, select Domain, and then type the domain name.

6. Click OK, and in the Windows Security dialog box, enter the User Name and Password of a user account in the domain that has sufficient privilege to add a computer account, then click OK.
7. In the Computer Name/Domain Changes pop-up dialog box, shown in Figure 1-48, click OK.

8. Click OK to the warning that you must restart your computer.
9. In the System Properties dialog box, click Close, and then when prompted, click Restart Now.
10. Sign in using a domain account to your computer.
11. On your domain controller, open Active Directory Users And Computers.
12. Navigate to the Computers container, and locate the new computer account.
13. If necessary, right-click the new account, and then click Move, as shown in Figure 1-49.

14. Select the new OU location for the computer, and then click OK.
Generally, computer accounts do not require much management. You might need to add a computer to a security group, which is an almost identical process to adding a user to a group. You can use Active Directory Users and Computers or the Active Directory Administrative Center to perform computer management.
You can also use Windows PowerShell. Table 1-3 lists the common Windows PowerShell computer management cmdlets.

Reset the secure channel
Occasionally, you might need to reset the computer’s secure channel. When a computer signs in to the AD DS domain, it establishes a secure channel with the domain controller; the secure channel is sometimes referred to as a trust. Under some circumstances, this trust becomes unavailable, and the computer cannot establish the secure channel. This can result in users being unable to sign in at the computer, and in the failure of the application of GPOs on the computer.
Often, when a secure channel failure has occurred, users receive the following message when they attempt to sign in:
“The trust relationship between the workstation and the primary domain failed.”
Some administrators remove the computer from the domain, adding it temporarily to a workgroup, and then after restarting the computer, they add it to the domain again. This is usually successful. However, this removes the computer object in AD DS and creates a new one, albeit with the same name. Because the object is new, and has a new security identity (SID), any group memberships for the computer are lost; this might not be a concern.
However, if you use group memberships extensively, it is better to reset the secure channel rather than remove the computer from the domain. You can reset the channel by using Active Directory Users and Computers, Windows PowerShell, or the Dsmod.exe command-line tool. Resetting the channel ensures that the computer’s SID remains the same, and this means that group memberships are retained.
Exam Tip
You can also use the Netdom.exe or Nltest.exe command-line tools.
In Active Directory Users and Computers, to reset the secure channel.
1. Right-click the computer, click Reset Account, and then click Yes, as shown in Figure 1-50.

2. Rejoin the computer to the domain, and then restart the computer.
To use Windows PowerShell, on the computer, run the following command in an elevated Windows PowerShell command prompt:
Test-ComputerSecureChannel -Repair
To use the Dsmod.exe command-line tool, use the following command on the computer, and then rejoin the computer to the domain:
dsmod computer "ComputerDN" -reset
Implement offline domain join
Usually, when you add a computer to an AD DS domain, the domain controllers of the domain are online and accessible from the computer that you want to add. However, sometimes, it is not possible to perform an online domain join, for example, when the computer to be added is connected to a domain controller by an intermittent remote connection.
In Windows Server 2016, for client computers running Windows 7 or newer, you can use a feature known as offline domain join to bypass this problem. To perform an offline domain join, you use the Djoin.exe command-line tool. Djoin.exe generates a metadata blob, similar to a configuration file, which is used on the client computer to complete the join process. When you run Djoin.exe, you must specify the domain name you want to join, the name of the computer to be added to the domain, and the name and location of the file that will store this information.
To perform an offline domain join, use the following procedure:
1. On a domain controller, open an elevated command prompt and run djoin.exe /provision. The format for this command is:
djoin.exe /Provision /Domain <DomainName> /Machine <MachineName> /SaveFile
<filepath>
For example, to add LON-CL4 to the Adatum.com domain, use the following command:
djoin.exe /provision /domain adatum.com /machine LON-CL4 /savefile c:cl4.txt
2. Next, copy the join file to the target computer and then use the djoin.exe /requestODJ command. The command format is:
djoin.exe /requestODJ /LoadFile <filepath> /WindowsPath %systemroot% /Localos
For example, to add LON-CL4, run the following command:
djoin.exe /requestODJ /loadfile c:LON-CL4.txt /windowspath C:Windows /Localos
3. Restart the target computer.
Configure user rights
User rights are different from permissions. Permissions give the ability to access something, such as a folder or printer, while rights are the ability to do something, such as manage a printer.
Rights are sometimes described as being the assignment of management abilities; this is often true, because many rights enable users to perform management tasks. However, not all rights are administrative. Some are for simple, user-oriented tasks, such as the right to allow logon locally, or change the system time.
It is typical to assign rights by adding users to groups that already are assigned that right. For example, members of the local Administrators group can perform many management tasks through the assignment of rights to that group. By adding a user to the Administrators group, that user enjoys those rights.
However, if you want to grant a user a right directly, or, indeed, to assign a right to a group, it is important that you know how to do it. The tool most frequently used to assign rights in a non-domain environment is the Local Security Policy. In an AD DS forest, administrators use GPOs to assign these rights.
To modify user rights, use the following procedure:
1. Open the Group Policy Management console.
2. Navigate to the Group Policy Objects container.
3. In the details pane, right-click the Default Domain Policy, and then click Edit.
4. In the Group Policy Management Editor, in the navigation pane, expand Computer Configuration, expand Policies, expand Windows Settings, expand Security Settings, expand Local Policies, and then, as shown in Figure 1-51, click User Rights Assignment.

5. In the details pane, select the right that you want to assign by double-clicking it.
6. In the Right Properties dialog box, shown in Figure 1-52, select the Define These Policy Settings, click Add User Or Group, select the appropriate user or group, and click OK.

7. In the Right Properties dialog box, click OK.
Need More Review? User Rights Assignment
For a list of common user rights, refer to the Microsoft TechNet website at https://technet.microsoft.com/library/dn221963(v=ws.11).aspx.
Perform bulk Active Directory operations
Bulk operations are when an administrator performs a single task to complete multiple activities, and can include the following common administrative tasks:
![]() Automate the creation of Active Directory accounts
Automate the creation of Active Directory accounts
![]() Automate unlocking of disabled accounts using Windows PowerShell
Automate unlocking of disabled accounts using Windows PowerShell
![]() Automate password resets using Windows PowerShell
Automate password resets using Windows PowerShell
![]() Change the properties of many users in a single step, such as department name or street address
Change the properties of many users in a single step, such as department name or street address
In a small organization, the requirement to perform bulk operations is less likely. However, in large organizations, the need likely exists to add and configure blocks of users on a regular basis. This might take the form of bulk account creation, or of bulk account management, such as changing the accounts’ properties.
There are several methods you can employ to perform bulk account management, including using comma separated value (CSV) files, and Windows PowerShell scripts. Using CSV files can make working with multiple AD DS objects quicker and easier.
An example CSV file might look like this:
FullName, Department
Abbie Parsons, Sales
Allan Yoo, Sales
Erin Bull, Sales
After you have created a properly formatted CSV file, you can use it with a Windows PowerShell script to perform your bulk operation.
Exam Tip
You use the Windows PowerShell Import-csv cmdlet to read a CSV file’s contents into a variable in memory for use by a script.
For example, to create new accounts with Windows PowerShell and a CSV file, you could use the following basic script.
$users=Import-CSV –LiteralPath "C:
ew-users.csv"
foreach ($user in $users)
{
New-ADUser $user.FullName -AccountPassword (Read-Host -AsSecureString "Enter
password") -Department $user.Department
}
Need More Review? Creating Bulk Users in Active Directory Using PowerShell
To review further details about using Windows PowerShell to create AD DS user objects in Windows Server 2016, refer to the Microsoft MSDN website at https://blogs.msdn.microsoft.com/amitgupta/2012/02/06/creating-bulk-users-in-active-directory-using-powershell/.
Using Windows PowerShell to modify AD DS objects
To perform bulk operations on user or computer objects, or indeed, group objects, you must pass a list of the desired objects to a Windows PowerShell cmdlet that then performs the required modification. Often, the cmdlet that performs this modification is one of the following:
![]() Set-ADUser
Set-ADUser
![]() Set-ADComputer
Set-ADComputer
![]() Set-ADGroup
Set-ADGroup
![]() Set-ADOrganizationalUnit
Set-ADOrganizationalUnit
For example, if you wanted to modify the company name of all users following a merger, you could use the following command:
Get-ADUser -Filter {company -like "A Datum"} | Set-ADUser -Company "Contoso"
To disable all user accounts in the Sales department, you could use the following command:
Get-ADUser -Filter {Department -like "Sales"} | Disable-ADAccount
To reset the password for all users in the Marketing department, you could use the following command:
Get-ADUser -Filter {Department -like "Marketing"} | Set-ADAccountPassword -Reset
-NewPassword (ConvertTo-SecureString -AsPlainText "Pa55w.rd" -Force)
Need More Review? Active Directory Bulk User Modification
To review further details about using Windows PowerShell to manage AD DS objects in bulk, refer to the Microsoft TechNet website at https://blogs.technet.microsoft.com/poshchap/2014/05/14/active-directory-bulk-user-modification/.
Skill 1.3: Create and manage Active Directory groups and organizational units
In addition to users and computers, all AD DS forests contain groups and OUs. You can use graphical tools to create and manage groups and OUs, or alternatively, you can use Windows PowerShell cmdlets.
In some senses, groups and OUs are similar; they both contain objects, such as users, computers, or even other groups or OUs. Strictly speaking, however, groups have members and OUs contain objects.
OUs and groups are also used in different ways. Typically, you implement groups in AD DS to assign rights or permissions, whereas you use OUs to streamline management through the application of GPOs or through management delegation.
By default, a Windows Server 2016 domain controller contains several built-in group accounts, including those listed in Table 1-4.
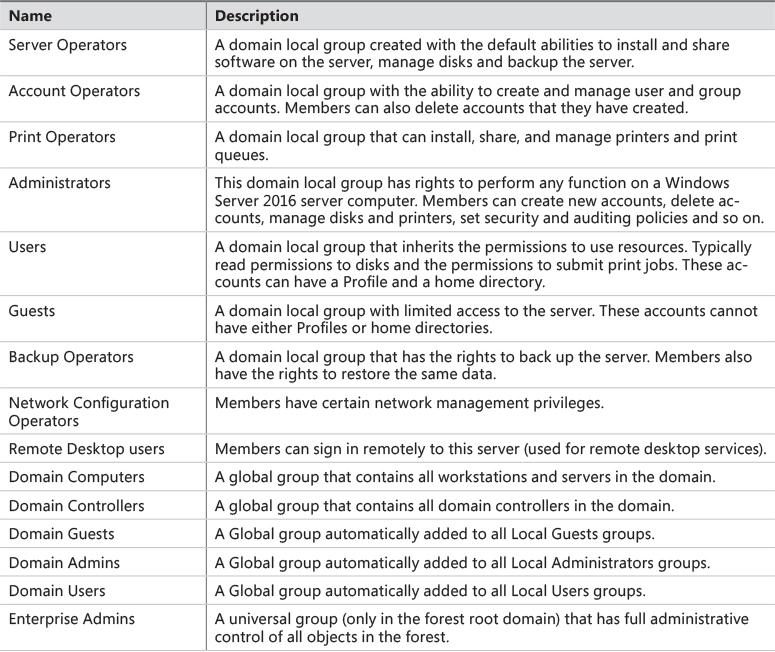
In addition to these groups, Windows Server also supports the notion of special identities. These are treated as groups within the operating system in as much as you can grant them permissions and rights, like any other group. However, the membership list is not editable; that is, you cannot assign a user (or another group) to a special identity. Rather, the membership is implied based on the characteristics of a user in a given situation. These special identities are:
![]() Everyone This identity represents everybody and includes both users with an account, and guests without an account—assuming the guest account is enabled.
Everyone This identity represents everybody and includes both users with an account, and guests without an account—assuming the guest account is enabled.
![]() Authenticated Users This identity is more specific and includes everybody except guests.
Authenticated Users This identity is more specific and includes everybody except guests.
![]() Anonymous Logon This identity is used by resources that do not require a username or password to permit access. It does not include guests.
Anonymous Logon This identity is used by resources that do not require a username or password to permit access. It does not include guests.
![]() Interactive A user that is attempting to access a resource on the local computer belongs to the Interactive identity.
Interactive A user that is attempting to access a resource on the local computer belongs to the Interactive identity.
![]() Network A user that is attempting to access a resource on a remote computer belongs to the Network identity.
Network A user that is attempting to access a resource on a remote computer belongs to the Network identity.
![]() Creator Owner Any individual that creates an object, such as a file, belongs to the Creator Owner identity for that object. A user that belongs to this identity has full control of the object.
Creator Owner Any individual that creates an object, such as a file, belongs to the Creator Owner identity for that object. A user that belongs to this identity has full control of the object.
Create and manage groups
When considering groups, it is important to determine when it is appropriate to use the built-in default groups or the special identities, and when it is necessary to create and configure additional groups to suit your specific organizational needs.
Configure group nesting
In Windows Server 2016, it is possible to configure group nesting. This is the process of adding a group as a member of another group. The purpose behind group nesting is one of scaling. If it is sometimes logical to group users together and assign the group permissions (or rights) rather than the individuals that make up the group, on occasion, it is logical to group groups. This is particularly relevant in large, multidomain AD DS forests.
To facilitate group nesting, AD DS in Windows Server 2016 supports three group scopes and two group types. These are:
![]() Scopes Define the scope (or range) of abilities:
Scopes Define the scope (or range) of abilities:
![]() Domain Local Can only be granted rights and permissions within the local security authority. That is, a domain local account can only be granted rights and permissions on resources in the local domain. A domain local group can contain:
Domain Local Can only be granted rights and permissions within the local security authority. That is, a domain local account can only be granted rights and permissions on resources in the local domain. A domain local group can contain:
![]() Users from any domain in the forest
Users from any domain in the forest
![]() Global groups from any domain in the forest
Global groups from any domain in the forest
![]() Universal groups from any domain in the forest
Universal groups from any domain in the forest
![]() Global Can be granted rights and permissions to any resource in any domain in the forest. A global group can contain:
Global Can be granted rights and permissions to any resource in any domain in the forest. A global group can contain:
![]() Users from anywhere in the forest
Users from anywhere in the forest
![]() Global groups from the same domain
Global groups from the same domain
![]() Universal Used for forest-wide operations, and allow for the assignment of permissions and rights in any domain in the forest. Universal groups can contain:
Universal Used for forest-wide operations, and allow for the assignment of permissions and rights in any domain in the forest. Universal groups can contain:
![]() User accounts, global groups, and other universal groups from any domain in the entire forest
User accounts, global groups, and other universal groups from any domain in the entire forest
![]() Types Define the purpose of the group:
Types Define the purpose of the group:
![]() Security Used to assign permissions or rights. Can also be used for the purposes of email distribution lists.
Security Used to assign permissions or rights. Can also be used for the purposes of email distribution lists.
![]() Distribution Used only for the purposes of email distribution lists.
Distribution Used only for the purposes of email distribution lists.
Exam Tip
Universal group membership lists are maintained in the Global Catalog, whereas other groups memberships are not.
In Windows Server 2016, there is a recommended strategy for nesting groups referred to as IGDLA, which is an abbreviation for the following:
![]() Identities User and computer accounts that represent business functions within your organization.
Identities User and computer accounts that represent business functions within your organization.
![]() Global groups Contain identities and belong to domain local groups. Generally, these are named after the objects that are members. For example, Sales, Marketing, European users.
Global groups Contain identities and belong to domain local groups. Generally, these are named after the objects that are members. For example, Sales, Marketing, European users.
![]() Domain local groups Granted permissions and rights on objects. Generally named after the functions members perform. For example, Administrators, Print Operators.
Domain local groups Granted permissions and rights on objects. Generally named after the functions members perform. For example, Administrators, Print Operators.
![]() Access The access that you grant on a resource to the domain local group.
Access The access that you grant on a resource to the domain local group.
In a large multidomain forest, you can also use Universal groups to help manage nesting. This is referred to as IGUDLA:
![]() Identities User and computer accounts.
Identities User and computer accounts.
![]() Global groups Contain identities and belong to Universal groups.
Global groups Contain identities and belong to Universal groups.
![]() Universal Consolidates multiple global groups from other domains into a single entity.
Universal Consolidates multiple global groups from other domains into a single entity.
![]() Domain local groups Contains Universal groups and granted permissions and rights on objects.
Domain local groups Contains Universal groups and granted permissions and rights on objects.
![]() Access The access that you grant on a resource.
Access The access that you grant on a resource.
You do not have to implement either of these strategies. In fact, in a single domain forest, there is little difference between the groups as the scope for all groups is then the same, as is the potential membership of any group. However, it is recommended that you at least consider using IGDLA in a single domain forest in case later, you add additional domains.
Convert groups, including security, distribution, universal, domain local, and domain global
If you create a group and define its scope and type, and later, you want to change the scope and/or type, this is permissible in certain circumstances, as summarized in the following list:
![]() Global to universal Permitted only if the group that you want to rescope is not a member of another global group. This is because a universal group cannot belong to a global group.
Global to universal Permitted only if the group that you want to rescope is not a member of another global group. This is because a universal group cannot belong to a global group.
![]() Domain local to universal Permitted only if the group that you want to rescope does not contain another domain local group. This is because a universal group cannot contain a domain local group.
Domain local to universal Permitted only if the group that you want to rescope does not contain another domain local group. This is because a universal group cannot contain a domain local group.
![]() Universal to global Permitted only if the group that you want to rescope does not have another universal group as a member. This is because a universal group cannot belong to a global group.
Universal to global Permitted only if the group that you want to rescope does not have another universal group as a member. This is because a universal group cannot belong to a global group.
![]() Universal to domain local Always permitted.
Universal to domain local Always permitted.
If you want to change the type of the group, this is always permissible but with the following caveats:
![]() Distribution to security Always permitted.
Distribution to security Always permitted.
![]() Security to distribution Always permitted, but any rights and permissions assigned to the group are lost because distribution groups cannot be assigned permissions or rights.
Security to distribution Always permitted, but any rights and permissions assigned to the group are lost because distribution groups cannot be assigned permissions or rights.
Need More Review? Group scope
To review further details about group scope, refer to the Microsoft TechNet website at https://technet.microsoft.com/en-us/library/cc755692(v=ws.10).aspx.
Create, configure, and delete groups
The process of creating and managing groups is straightforward. As with users and computers, you can use Active Directory Users and Computers, the Active Directory Administrative Center, or Windows PowerShell to perform all group management tasks.
To create a group in Active Directory Users and Computers, use the following procedure:
1. Locate the appropriate OU. Right-click the OU, point to New, and then click Group.
2. In the New Object – Group dialog box, shown in Figure 1-53, type the Group name. The Group name (pre-Windows 2000) autocompletes.

3. Specify the group scope and type. The default is global security. Click OK.
After you add the group, in the details pane in Active Directory Users and Computers, double-click the group to configure its properties, including members. To add a member, click the Members tab, as shown in Figure 1-54, click Add, browse and select your user or group, and then click OK.

You can configure group managers. This enables you to delegate responsibility for management of the group, as shown in Figure 1-55.

You can easily delete a group from Active Directory Users and Computers. Right-click the group and then click Delete. At the confirmation prompt, click Yes.
You can perform all group management tasks by using Windows PowerShell. Table 1-5 shows the group management cmdlets.

For example, to create a new group called IT Managers in the IT OU in the Adatum.com domain, you can use the following command:
New-ADGroup -Name "IT Managers" -SamAccountName ITManagers -GroupCategory Security
-GroupScope Global -DisplayName " IT Managers" -Path "OU=IT,DC=Adatum,DC=Com"
-Description "Members of this group are RODC Administrators"
To add members, you can use the following command:
Add-ADGroupMember "IT Managers" "Beth", "Ida"
To enumerate the current group members, use the following command:
Get-ADGroupMember "IT Managers"
Manage group membership using Group Policy
Although you can manually maintain group memberships by using either Windows PowerShell or the graphical tools, such as Active Directory Users and Computers, it can be time-consuming, especially in a large organization.
In Windows Server 2016 AD DS, you can use GPOs to maintain group membership. This means you can manage group membership automatically from a single point. This is called Restricted Groups.
Using Restricted Groups, you can configure the membership of a specific group, and you can also configure that a specific group must be a member of another group. Or you can configure both to create group nesting. To implement Restricted Groups, on your domain controller, open the Group Policy Management console.
1. Navigate to the Group Policy Objects container.
2. In the details pane, right-click the Default Domain Policy, and then click Edit. You can, of course, create your own GPO and link it to the appropriate OU
3. In the Group Policy Management Editor, in the navigation pane, expand Computer Configuration, expand Policies, expand Windows Settings, expand Security Settings, and then click the Restricted Groups node.
4. Right-click Restricted Groups, and then click Add Group.
5. In the Add Group dialog box, browse and locate the group you want to restrict, and click OK.
6. Then, in the Group Properties dialog box, shown in Figure 1-56, to restrict membership of the group, under the Configure Membership For Group heading, click Add, and then add any users or groups that must belong to the group.

7. Optionally, under the This Group Is A Member Of heading, browse and locate any groups of which this group must be a member. Click OK.
You can only implement the Restricted Groups feature in domain-level GPOs. You cannot use local group policies on Windows client or Windows Server operating systems.
Create and manage OUs
OUs enable you to manage your AD DS domain more easily by grouping users, groups, and computers together in a container, and then apply configuration settings to that container by using GPOs. In addition, you can configure security settings on your OUs so that a subset of management permissions are assigned to a user or group on that OU, and therefore objects within that OU; this is known as delegation.
Before you start creating OUs and populating them with users, groups, and computers, it’s worth spending some time thinking about what you want to achieve with them. Most organizations consolidate their AD DS objects into OUs based on one of the following strategies:
![]() Business units This might represent the department, such as Sales or Research. It might represent a product line, such as Aviation or Paints.
Business units This might represent the department, such as Sales or Research. It might represent a product line, such as Aviation or Paints.
![]() Geographical location Depending on the size of your organization, this might be office location, city location, or even country or continent. Remember that you can use AD DS site objects to control physical network behavior, so using geographical OUs must mean something in terms of delegation or configuration.
Geographical location Depending on the size of your organization, this might be office location, city location, or even country or continent. Remember that you can use AD DS site objects to control physical network behavior, so using geographical OUs must mean something in terms of delegation or configuration.
![]() Hybrid A combination of both these strategies. It is likely this will suit only the largest organizations. It is also probable that your OUs will be nested, perhaps first by region and then by department, or the other way around, depending on the management structure of your organization.
Hybrid A combination of both these strategies. It is likely this will suit only the largest organizations. It is also probable that your OUs will be nested, perhaps first by region and then by department, or the other way around, depending on the management structure of your organization.
After you have considered how best to implement OUs, you can start to create them, and then move objects, such as users and computers, into them. Generally, most OU management is performed using graphical tools, such as Active Directory Users and Computers. However, you can use Windows PowerShell. Table 1-6 lists the common Windows PowerShell OU management cmdlets.

To create an OU in AD DS, open the Active Directory Users and Computers console. Navigate to the domain object, and then use the following procedure:
1. Right-click the domain (or OU, if you are creating nested OUs), point to New, and then click Organizational Unit.
2. In the New Object – Organizational Unit dialog box, shown in Figure 1-57, in the Name box, type the name for your OU, and then click OK.

After you have created your OU, you can begin to create, or move, objects into the OU. Once this task is completed, you can create and link GPOs to the OUs to configure user and computer settings for objects within the OU. GPOs are discussed in more detail later in Chapter 3: Create and manage Group Policy.
Delegate management of Active Directory with groups and OUs
Having created your OUs and populated them with the required objects, you can optionally delegate administration of them to groups within AD DS.
Note Delegation not separation
Remember that although you can delegate administrative responsibility for certain tasks to specific users or groups on a designated OU, you cannot separate administration. Members of the Domain Admins group can perform all management tasks on even delegated OUs in the current domain. Members of the Enterprise Admins group can manage all OUs in all domains in the forest. The only way to achieve administrative separation is by implementing multiple AD DS forests, each with a separate Enterprise Admins group.
You can delegate tasks by using the Delegation Of Control Wizard in Active Directory Users and Computers. Alternatively, you can manually assign specific object-level AD DS permissions using the Security tab on AD DS objects; this, however, can be a time-consuming and fiddly process.
To delegate control using the Delegation Of Control Wizard, use the following procedure:
1. In Active Directory Users and Computers, locate and right-click your OU, and then click Delegate Control.
2. In the Delegation Of Control Wizard, on the Welcome page, click Next.
3. On the Users or Groups page, click Add, and locate the user or group to which you want to delegate the specific task you are configuring. Click OK, and then click Next.
Exam Tip
Even if you intend to delegate to a single user, it is still best practice to delegate to a group of which the single user is the only member. This makes things easier if later, you must delegate to a different user. Instead of having to start over, you can simply remove the old user and add the new user to the group.
4. On the Tasks To Delegate page, shown in Figure 1-58, in the Delegate The Following Common Tasks list, select the check box for the task(s) you want to delegate, and click Next.

Exam Tip
Common tasks are: User management, group management, limited GPO management, and inetOrgPerson management.
5. AD DS permissions are configured. Click Finish.
You can run the Delegation Of Control Wizard as many times as you require to assign the necessary permissions. However, for more advanced tasks, or specialist permissions, you must use custom tasks. For example, to delegate the ability to create and delete computer objects, you must use the custom task option.
1. Launch the Delegation Of Control Wizard, specify the user or group to which you want to delegate your custom task, and then, on the Tasks To Delegate page, click Create A Custom Task To Delegate, and click Next.
2. On the Active Directory Object Type page, shown in Figure 1-59, select This Folder, Existing Objects In This Folder, And Creation Of New Objects In This Folder. This option enables the delegated administrator to manage all aspects of the selected object types. Click Next.

3. On the Permissions page, select the Creation/Deletion Of Specific Child Objects, as shown in Figure 1-60, and then select the Create Computer objects and Delete Computer objects check boxes. Click Next.

4. Click Finish. AD DS permissions are configured.
There comes a point when using the Delegation Of Control Wizard is itself too time-consuming. Although relatively simple, to have to repeatedly step through the wizard to assign another custom task, and then another, would take longer than just configuring the AD DS permissions directly. To view and edit the AD DS permissions on an object, use the following procedure.
1. In Active Directory Users and Computers, click the View menu, and then click Advanced Features. This enables the Security tab on all objects.
2. Right-click your OU, and then click Properties.
3. In the OU Properties dialog box, on the Security tab, shown in Figure 1-61, you can see the permissions for the OU. These will include any that you have recently delegated.

4. If you want to view the specific delegated permissions, click Advanced, as shown in Figure 1-62. You can see the permissions that are delegated.

5. You can now use the Add button to configure specific permissions without needing to use the Delegation Of Control Wizard, as shown in Figure 1-63.

6. Click OK three times to complete the process.
Chapter summary
![]() AD DS consists of both logical and physical components.
AD DS consists of both logical and physical components.
![]() You create your AD DS forest by deploying the first domain controller in it.
You create your AD DS forest by deploying the first domain controller in it.
![]() You create your AD DS forest structure based on trees of domains.
You create your AD DS forest structure based on trees of domains.
![]() RODCs can be deployed in locations that are physically less secure than offices with dedicated computer rooms.
RODCs can be deployed in locations that are physically less secure than offices with dedicated computer rooms.
![]() You can use Windows PowerShell to easily manage users, groups, computers, and OUs.
You can use Windows PowerShell to easily manage users, groups, computers, and OUs.
![]() OUs are used to help delegate administration within an AD DS forest, and also to enable easier configuration of AD DS objects through the use of linked GPOs.
OUs are used to help delegate administration within an AD DS forest, and also to enable easier configuration of AD DS objects through the use of linked GPOs.
![]() Groups in AD DS can be nested to support larger organizations.
Groups in AD DS can be nested to support larger organizations.
Thought experiment
In this thought experiment, demonstrate your skills and knowledge of the topics covered in this chapter. You can find answers to this thought experiment in the next section.
You work in support at A. Datum. As a consultant for A. Datum, answer the following questions about implementing AD DS within the A. Datum organization:
1. A. Datum is acquiring a pharmaceuticals company, Contoso. It is important that users can access resources in the Contoso organization from their computers in A. Datum. However, Contoso wants to maintain complete administrative separation. What type of AD DS structure can you recommend based on this scenario?
2. A. Datum has several departments in their London, UK, offices. These are IT, Research, Sales, and Marketing. Computers within each of these departments have very different configuration requirements. How can you easily accommodate these differences, while streamlining administration as much as possible?
3. One of your sales offices supports a hundred or so users. Currently, users experience problems when they try to sign in during the morning. You discover that their link to the head office is unreliable and sometimes unavailable. You decide to deploy a domain controller at this office. What considerations are there with your decision?
Thought experiment answer
This section contains the solution to the thought experiment. Each answer explains why the answer choice is correct.
1. Complete AD DS administrative separation can only be achieved by implementing two AD DS forests.
2. Create OUs based on department and move the appropriate computer accounts into the relevant OUs. Create and link GPOs to the OUs and configure the GPOs to configure the required computer settings.
3. It is possible that the branch office is less secure than the head office. Using an RODC would help to protect the security of user accounts. Enabling caching of the user accounts used only at the branch would enable sign in even if the head office link is down.