Chapter 7. Configure system and data options
In this chapter, you’ll learn about system and data recovery options as they relate to the exam. Most of these tasks are performed by using wizards, and thus won’t require too much instruction. They are covered on the exam, though, so you’ll need to work through all of the wizards when instructed to do so here. You might already be familiar with many of the objectives, including but not limited to performing a device driver rollback, configuring System Restore, and recovering files from SkyDrive (which is being renamed OneDrive).
Objectives in this chapter:
Objective 7.1: Configure system recovery
System recovery involves, as you might guess, recovering from system failures. System failures can be caused by unstable device drivers and failed hard drives or by buggy or compromised third-party software, among other things. Sometimes resolving these problems is as simple as rolling back a device driver or using System Restore to return to a more stable date. When that doesn’t work, you can let Windows apply automatic repairs. As you’ll learn here, there are other recovery features available, including safe mode and boot logging, along with other familiar recovery options. You can also use a recovery drive you’ve created to resolve startup problems.
Perform a driver rollback
The option to perform a device driver rollback is available in Device Manager only after you install a newer device driver for a piece of hardware. The option is not available if the device has only had one driver and it was never updated. You will need to use this feature when a newly installed or upgraded device driver causes problems. Device driver rollback can only roll back to the driver installed before it and cannot be used to roll back to a driver that was installed previous to the last one or any before it.
To find the option to roll back a driver, open Device Manager, double-click the problematic device, click the Driver tab, and click Roll Back Driver, as shown in Figure 7-1, to perform the task.

Configure a recovery drive
A recovery drive can help you troubleshoot problems with your computer and recover from them even if it can’t start. You create a recovery drive using a wizard available for that purpose. If your computer also has a recovery partition, you can copy that as well so that you can use it to refresh or restore your computer should the need arise. To get started, type Recovery Drive on the Start screen and click Create A Recovery Drive in the results.
Exam Tip
If your computer does not have a recovery partition, the option to copy the recovery partition will be unavailable when creating a recovery drive. When this happens, the recovery drive will only include the recovery tools and a bootable image, not a recovery image you can use to refresh or reset the computer.
As you work through the Recovery Drive Wizard, you’ll be prompted to include any available recovery partitions created by the manufacturer, if desired. You’ll also be prompted to choose a drive to save the information to. On a physical machine (in contrast to a virtual one), you must choose a USB drive that can hold at least 512 MB of data, but you can also use a CD or DVD. Whatever you choose, it must be available to format (because anything on the drive will be erased when you configure it for the recovery drive). The wizard will get the drive ready, format the drive, and copy utilities.
Exam Tip
If your computer came with Windows 8 and you upgraded to Windows 8.1, any recovery drive you created while it was Windows 8 will have Windows 8 on it. Make sure to create a new recovery drive when you upgrade.
Use Windows RE
Windows Recovery Environment (RE) can help you repair an operating system that won’t boot. Windows RE is based on the Windows Preinstallation Environment (Windows PE) and offers troubleshooting and diagnostic tools. These include automatic repair options, push-button reset (detailed later), and system image recovery. By default, Windows RE is preloaded onto machines running Windows 8.1 and Windows Server 2012 R2.
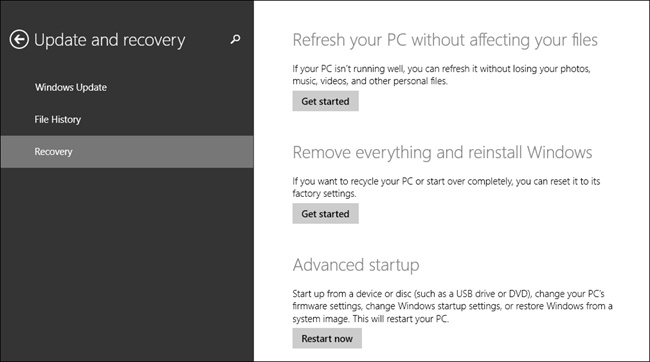
You can access the Windows RE tools from the Boot Options menu, which you can launch in various ways including booting the computer using recovery media. You can also use the Update And Recovery tab of PC Settings, specifically the Recovery tab, where you’ll find options to restart the computer (under Advanced Startup, click Restart Now). See Figure 7-2. Additionally, Windows RE will open automatically if the computer encounters any of the following:
A BitLocker error on touch-only devices
Two sequential failed attempts to start Windows
Two unexpected shutdowns that occur within two minutes of boot completion and are consecutive
A Secure Boot error (except for issues related to Bootmgr.efi)
Use additional recovery tools
You can use Msconfig.exe and its Boot tab to opt to boot into safe mode when the computer restarts. Other options exist, including but not limited to No GUI Boot and Boot Log. Make sure you know how to use the System Configuration tool to disable services, change the startup type, configure boot options, and so on. System Configuration is shown in Figure 7-3. (Remember, if you click the Startup tab you don’t see options that enable you to choose what applications boot with Windows; you only see the option to go to Task Manager to perform that task.)
More Info: Learn more about the Windows RE environment
Make sure you understand the options available in Windows RE and how to access them. Learn more here: http://technet.microsoft.com/en-us/library/hh825173.aspx. To learn how to perform tasks, including how to add a custom tool to the Windows RE Boot Options menu and how to deploy Windows RE, refer to this article: http://technet.microsoft.com/en-us/library/hh824896.aspx.

Configure System Restore and create a restore point
You can use System Restore to restore a computer to a previous time when it was stable. System Restore keeps restore points, and they are created automatically if the feature is enabled. You should try System Restore before you try solutions that are more destructive, such as restoring a computer to its factory settings. You can access System Restore by typing Create a Restore Point on the Start screen and clicking it in the results. In the System Properties dialog box, click Create to create a new restore point. Click Configure to see the configuration options. System Restore will be unavailable on drives that are not NTFS.
Exam Tip
There are some Windows PowerShell cmdlets you can use to manage System Restore, and they often include “ComputerRestore” in the cmdlet itself. Review cmdlets such as Enable-ComputerRestore, Disable-ComputerRestore, Get-ComputerRestorePoint, and so on before you take the exam. You can find these and others here: http://technet.microsoft.com/en-us/library/hh849785.aspx. Additionally, you might see questions that ask about command-line utilities for controlling System Restore. Make sure to review Vssadmin, where VSS stands for Volume Shadow Copy, which is used to manage restore points.
As you can see in Figure 7-4, you can opt to turn on or off system protection (System Restore) and change how much disk space you want to use to keep restore points. You can also create your own restore points manually when you are considering doing something you feel might compromise the machine, such as installing an untested device driver. When you use System Restore, available from the boot options, you choose the desired restore point.

Exam Tip
Make sure you know how to create a system image backup. This is an option in the File History window under Control Panel, All Control Panel Items. A system image is a copy of the drives required for Windows to run and can include additional drives if you desire. You can use this system image to restore your computer if your hard drive fails. With an image, though, you can’t pick and choose files to restore. It’s all or nothing.
Perform a refresh or recycle
When the computer is so damaged that System Restore doesn’t resolve the problem, rolling back disruptive device drivers isn’t effective or warranted, and you’ve tried other options available in Windows RE including attempting automatic repairs, booting into safe mode, and so on, you will likely need to refresh (push-button refresh) or recycle your computer. (Recycle is the new word for a reset, although the interface options still refer to the process as resetting your PC.) Of course, in an Active Directory directory service domain you will likely just push out a system image using domain-related tools, but in the case of stand-alone workstations and small organizations, refresh and recycle generally get the job done.
Exam Tip
If you want to keep your settings and traditional applications during a refresh, you need to use a utility called Recimg.exe to capture an image of your computer after you’ve installed applications and made customizations. Then if you ever need to perform a refresh later, that image is used and your settings and applications are retained.
You’ll find these two tools in PC Settings, under Update And Recovery. Both tools and the option to boot into Advanced Startup mode are available, as well as the option to use Advanced Startup. These options were shown earlier in Figure 7-2. The three options are defined here:
Refresh Your PC Without Affecting Your Files. Choose this option to remove third-party programs, Internet Explorer add-ons, printer and scanner software, and so on. You won’t lose any personal files. This resolves most problems.
Remove Everything And Reinstall Windows. Choose this option when you want to recycle your PC or to start over completely. This resets the computer to factory settings and removes all personal data.
Advanced Startup. This option is neither a refresh nor a recycle; instead, it restarts the computer into the Windows RE environment where you can start your computer from a device or disk, change firmware settings, change Windows startup settings, or restore Windows from a system image.
Exam Tip
Make sure you know what happens when you reboot the PC using Advanced Startup under PC Settings, Update And Recovery, on the Recovery tab. There are many options, some of which are outlined here from Microsoft: http://windows.microsoft.com/en-us/windows-8/windows-startup-settings-including-safe-mode. A more thorough description of Windows RE troubleshooting features is available here: http://technet.microsoft.com/en-us/library/hh824837.aspx. You’ll be expected to know these features.
Objective summary
If you suspect a newly installed or updated device driver is causing problems, you can roll back to the previous device driver in Device Manager.
You can create and then use a recovery drive to recover from startup problems. Windows RE offers many options for recovery, including but not limited to automatic repair, System Restore, and restore and recycle, among others.
When you restore a computer, no personal files are affected, but third-party applications and Internet Explorer add-ons are removed. When you recycle a computer, you restore it to factory settings.
Objective review
Answer the following questions to test your knowledge of the information in this objective. You can find the answers to these questions and explanations of why each answer choice is correct or incorrect in the “Answers” section at the end of this chapter.
Objective 7.2: Configure file recovery
Users must be able to recover files and folders when they become unavailable due to corruption, data loss, computer loss, and so on. There are many ways to achieve this. Home users might opt to run a simple backup program that stores data on an external drive; large corporations likely have users store their data on data servers and have an employee who is responsible for backing up and securing that data. Somewhere in the middle are a couple of other options: using SkyDrive and File History. These are the two backup options covered on the exam.
Note
The name SkyDrive is changing to OneDrive and at some point the exam will also make the terminology change.
Recover files from SkyDrive
SkyDrive is an online repository for saving files. You can retrieve files stored there from just about any computer or device that has an Internet connection. There are a couple of ways you can recover files from SkyDrive that have gone missing. You can recover files from the Recycle Bin, and you can recover previous versions of existing files if they exist.
For now, you can only access the Recycle Bin from SkyDrive in a web browser, not from the SkyDrive Start screen app. As shown in Figure 7-5, the Restore All Items and Empty Recycle Bin options are available at the top. If you don’t want to restore everything, which is what will happen by default if nothing is selected when you click Restore All Items or Empty Recycle Bin, you can select the check box next to each item you’d like to manage. We’ve sorted the data in the Recycle Bin by the date each was deleted, but there are other options.

You can also access previous versions of files in the SkyDrive window. Just right-click the file to recover and click Version History; this is shown in Figure 7-6. In the resulting window, you’ll see a list of versions. To select one, just click it in the list.

More Info: Learn more about SkyDrive
You can learn more about SkyDrive on TechNet: http://blogs.msdn.com/b/b8/archive/2012/04/23/the-next-chapter-for-skydrive-personal-cloud-storage-for-windows-available-anywhere.aspx. Make sure to search for SkyDrive Recycle Bin and SkyDrive Previous Versions to stay on top of new features as they become available.
Configure File History
File History is the primary feature available in Windows 8.1 for backing up data. The alternative, Windows 7 File Recovery, is no longer an option (it was in Windows 8). Windows Backup And Restore isn’t available either. Therefore, it’s important to know about File History, including how to set it up and use it to restore files. It should not be your only backup method, though; make sure you have a complete backup system in place, which might include a system image, the use of SkyDrive, manual backups to external drives, or third-party backup software that runs on a schedule. In fact, it’s best to use a combination of these.
You open File History by searching for it on the Start screen or in Control Panel. If you opt to show All Control Panel Items, File History is an icon there. In the File History window, you’ll see several configuration options and perhaps a few warnings. Figure 7-7 shows this. The first warning states that this particular PC is protected by BitLocker Drive Encryption, but File History is not; the second states that File History has found files that are encrypted with Encrypting File System (EFS), on a network location, or on a drive that doesn’t use NTFS, and these files won’t be backed up. You might see additional warnings on your computer. File History won’t back up what’s stored in SkyDrive, just as an FYI.

The left pane offers the following options:
Restore Personal Files. Use this option to recover files when necessary. You can select which files to restore, and you can choose the versions of them you want.
Select Drive. Use this option to select a drive or enter a network location for saving your File History data. File History can only be enabled if it detects an external drive to which to save data.
Exclude Folders. Use this option to view or add folders you do not want to include in File History.
Advanced Settings
Some of the advanced settings options allow you to configure how long to save copies of files, the size of the offline cache, and how long to keep saved files. Know that if you opt to save files once a day instead of every hour, which is the default, you might find yourself in a position in which you can’t restore the file you want to restore because it was not yet backed up. Make sure you review other defaults for the size of the offline cache (5 percent of disk space) and how long to keep saved versions (Forever).
You can opt to clean up versions saved in File History. You can choose the default, which is to delete files older than one year, or another option, such as older than one month, three months, and so on.
You can recommend the drive you’ve selected to use with File History data to homegroup users.
Using advanced settings, you can open File History event logs in Event Viewer to troubleshoot File History. If you see a question on the exam about these logs, note they are named FileHistory-Engine and FileHistory-Core. You might never need to do this; you’ll be prompted by the Action Center when problems occur with File History, including disconnected or full drives and the inability of File History to run.
Recovery. Use this option to access advanced recovery tools, including creating a recovery drive, using System Restore, configuring System Restore, and to access restore options in PC Settings.
System Image Backup. Use this option to create a system image backup. This is an image of your computer, a copy of the drives that Windows uses to run. You should create a system image so that you can restore your computer if your hard drive or computer fails. This is an image, and it cannot be used to select specific files or folders.
Exam Tip
There is one Group Policy you can configure for File History, which is to turn it off. You can find it under Computer Configuration, Administrative Templates, Windows Components, File History.
Exam Tip
You can use the command-line utility FhManagew.exe to manage and clean up File History backups.
Although we could walk you through each of these options, the process is fairly self-explanatory. You will be prompted when you turn on File History (see Turn On as an option in the lower-right corner of the File History window shown in Figure 7-8) to select a drive and request the selected drive to other homegroup users before the process starts. You can then opt to add folders you don’t want to back up. You can use Advanced Settings to change default settings for File History, including the Keep Saved Versions option. The default is Forever. This will cause a drive to fill up—perhaps rather quickly—if you have a lot of data and a small drive, so it might be best to change that setting to something else, perhaps six months or one year.
More Info: Back up from a command prompt
You can use the command-line tool Wbadmin to back up and restore your operating system, volumes, files, folders, and applications from an elevated command prompt. You’ll need to be an Administrator or Backup Operator to use this tool. Make sure you are at least familiar with this command and its available parameters, as detailed here: http://technet.microsoft.com/en-us/library/cc754015.aspx.
Restore previous versions of files and folders
After File History has completed its first backup, you can click Restore Personal Files in the File History window to restore files. Figure 7-8 shows a sample restore window. Look closely here and you’ll see that the selected window is 397 of 399 and was created on January 17, 2014. However, File History has been running on this computer for a long time, and files can be restored here as far back as 1 of 399, which in this case is about three months.

Once you’ve found what you want to restore (use the back and forward arrows to move around in the window), select them and then right-click and select Restore (to the original location) or Restore To (a specific place).
Objective summary
You can use SkyDrive’s Recycle Bin to recover files you’ve deleted from SkyDrive folders.
SkyDrive offers Previous Versions, a tool you can use to access previous versions of working files.
File History is a backup option in Windows 8.1 that can be used to perform automatic backups of files, and you have complete control over what’s backed up and what you restore, when necessary.
Objective review
Answer the following questions to test your knowledge of the information in this objective. You can find the answers to these questions and explanations of why each answer choice is correct or incorrect in the “Answers” section at the end of this chapter.
Chapter summary
The Windows Recovery Environment offers many options for recovery, including restore, recycle, safe mode, command prompt, Automatic Startup Repair, System Restore, and more.
You can create a recovery drive to help you recover from any future startup issue.
Device Driver Rollback, MSConfig, WBAdmin, VSSAdmin, FhManageW, Enable-ComputerRestore, Recimg, and others are tools administrators can use to troubleshoot computers and manage restore options.
Refresh and recycle are two ways end users can quickly restore their PCs to stability. Refresh keeps personal files but removes third-party applications and add-ons, and recycle (or reset) returns the computer to factory standards.
SkyDrive and File History can both be used as backup options, as can creating a system image backup. The best way to protect yourself is to use a combination of options.
Answers
This section contains the solutions to the thought experiments and answers to the objective review questions in this chapter.
Objective 7.1: Thought experiment
It would be better to try other options first. The user has a lot of applications installed, and if you do a push-button reset you’ll have to reinstall all of them. Additionally, the problem might be with the boot configuration data and have nothing to do with the installed applications.
You would. You can use the Recovery Disk to boot the computer and access the options to recover startup. One option is to choose Startup Repair to let Windows fix problems that are likely keeping the computer from starting.
Recycling restores the computer to its factory settings, so this would be a bad idea given the circumstances.
Objective 7.1: Review
Correct answer: C
Incorrect: You can install or roll back drivers for internal hardware.
Incorrect: It is not possible to configure a device driver so that it cannot be rolled back.
Correct: If the driver were updated, the option to roll it back would be available. Thus, the driver was not updated and the problem is due to something else.
Incorrect: If rolling back the driver is not an option, then uninstalling it won’t resolve the problem. The driver will likely be reinstalled by Windows, and the problem will still exist.
Correct answer: D
Incorrect: A USB drive must be at least 512 MB in size, not 1 GB.
Incorrect: A USB drive can have data on it prior to starting the wizard, but that data will be erased because the drive will be formatted.
Incorrect: A USB drive does not have to be formatted before you start the Recovery Drive Wizard; the wizard can format the drive for you.
Correct: None of the answers above are correct, thus None of the above is the correct answer.
Correct answer: A
Correct: The Windows RE environment will open.
Incorrect: Windows will not begin automatic repairs.
Incorrect: The computer will not shut down; it will reboot into the Windows RE environment.
Incorrect: The computer will not boot to LKGC. LKGC no longer exists in Windows 8.
Incorrect: The computer will not boot into System Restore mode; however, you can choose that from Windows RE.
Correct answers: A and E
Correct: Personal files are not disturbed.
Incorrect: C:Program Files will be overwritten.
Incorrect: C:Windows will be overwritten.
Incorrect: C:PerfLogs will be overwritten.
Correct: Any personal files you create, no matter where they are on the local drive, are not disturbed.
Objective 7.2: Thought experiment
File History would meet all of the needs of all users and is available in Windows 8 and Windows 8.1. Windows 7 File Recovery is not available for the Windows 8.1 users. File History keeps older versions of files and can be configured to run daily. This is better than saving data to an external drive, too, because you can store the data on corporate servers to protect and make the data available when needed.
You should store the backups on a network drive that is backed up regularly.
Because it’s better to be safe than sorry, when you can, you should create a system image backup.
Objective 7.2: Review
Correct answers: A and D
Correct: It is possible to recover files using the Recycle Bin from SkyDrive in Internet Explorer.
Incorrect: You cannot use the Recycle Bin from the SkyDrive app in Windows 8 to recover recently deleted files.
Incorrect: You cannot recover deleted SkyDrive files using File History. File History does not back up files saved to SkyDrive.
Correct: You can recover previous versions of files in SkyDrive in Internet Explorer.
Correct answers: A and C
Correct: You can use a USB flash drive or a network drive to save File History data.
Incorrect: The default setting for when to save copies of files is once per hour.
Correct: The default setting for the size of the offline cache is 5 percent.
Incorrect: The default length of time to keep saved versions is Forever.
Correct answer: B
Incorrect: Vssadmin is used to manage System Restore points.
Correct: FhManagew is used to manage File History at a command prompt.
Incorrect: Enable-ComputerRestore is a Windows PowerShell cmdlet you use to enable System Restore.
Incorrect: Wbadmin is used to back up and restore your operating system, volumes, files, folders, and applications from an elevated command prompt.
Correct answer: C
Incorrect: Because files are backed up every hour, it’s unlikely you’ll lose too much data in a single day that you can’t recover quickly.
Incorrect: The size of the offline cache is 5 percent, which is big enough for most users and won’t cause cache problems.
Correct: The drive you use to save File History data to will eventually become full because the default setting for Keep Saved Versions is Forever.
Incorrect: Event logs created by File History should never be large enough to cause any problems. Although you might see warnings and errors, you’ll be notified through the Action Center and should resolve those quickly.