Encrypting Files and Volumes
A common theme that you may be noticing in this book revolves around the concept of confidentiality. In a computer security context, confidentiality is the notion that sensitive data is accessible by only those users who have been approved or authorized for access to that data. For many organizations, and indeed for many malfeasants, data confidentiality is the most significant aspect of security. Certainly sabotage is a significant threat to many organizations, and often a source of incentive for many hackers, but more often than not the end-goal is to gain access to information. Whether it’s personal information that facilitates identity theft, or highly valuable corporate secrets, information is highly valuable, both to you and those that would do you harm. In many corporate environments, the policy to encrypt data may be simply due to legal necessity, as there is liability involved with leaking certain data, such as personally identifiable information and payment records. Recent research indicates that loss of corporate secrets can result in an even more dangerous financial windfall for a company. Thus, protecting that data should always serve as job number one for end user’s and system administrators alike.
Thankfully, OS X ships with a number of different technologies to facilitate the protection of data, as we have discussed throughout this book. In this chapter though, we will be focusing on one specific aspect of data confidentiality: encryption. Hopefully, if you’re reading this book, you already have some prerequisite knowledge as to what exactly encryption is: in short, the obfuscation of data. More precisely, encryption serves as a means to obfuscate and protect data that is stored on a computer system such that it cannot be accessed without the possession of a “secret.” In the broad context of data encryption, this secret can exist in many, many different forms from a simple password to a pre-shared cryptographic key, or even biometric data, such as a fingerprint or retinal scan. Certainly this isn’t an exhaustive list, and technologies exist in many shapes and sizes to perform this task. Put simply, the primary role of a secret in the terms of encryption is to limit the visibility of the obfuscated data stored on a computer system. Without possession of the secret, the encrypted data is simply a mash of bits and bytes that at first glance may contain no sensible data. However, at the root of all that junk actually lies a very sophisticated mathematical algorithm that serves as a pathway to understanding that which is incomprehensible. The take away is that, without the secret, encrypted data is useless, or at least should be useless, assuming you are using a strong cryptographic system. The good news is that, by modern day standards, the best metric that we can hope to achieve, OS X utilizes some pretty rock-solid encryption technologies, ranging from the Keychain, to FileVault, OS X’s encryption facilities that are both easy to use and transparent, but are also based upon well regarded mathematical algorithms.
In this chapter we will discuss the ins-and-outs of these technologies, endowing upon you, dear reader, the knowledge and power needed to harness them to their fullest. Without doubt each of these technologies has its own respective strengths and weakness, and it is also without question necessary to fully understand both of these aspects to ensure a truly protected environment. This chapter takes on that heavy burden so that you can confidently employ them for your own means.
Using the Keychain to Secure Sensitive Data
The keychain is an oft-misunderstood feature in OS X. This is rather unfortunate, because it is a very powerful tool for managing passwords and sensitive information, and the keychain entries in the iCloud keychain synchronize between computers using the same Apple ID. There is always a trade-off between security and accessibility, and the keychain provides a very good balance of both, providing an interface that both securely stores data and does so in an interface that is mostly seamless to the end user. We say “mostly seamless” here because there are certainly occasions where the system breaks down, and the result is end user confusion.
The keychain gets off to a bad start simply due to the fact that “password” is a four-letter word for many users; many can’t even reliably remember a single password. If at any time any kind of confusion or uncertainty is thrown into the mix, for some reason these users tend to panic, and thus a help-desk ticket is launched, perhaps even followed up by a frantic call. Your job, as an administrator, is to possess a fundamental understanding of how the keychain operates so you can readily and easily dispatch keychain problems, while at the same time educating your users on its proper operation. We seek to facilitate both of these goals in this section.
Keychains
Every user in OS X has a default keychain, called the login keychain. This keychain is provisioned to a user when they first log in to a workstation, and it is assigned a password identical to the password that the user provided at login. From then on, whenever a user logs into a workstation, the login password will be passed to the keychain, and the login keychain will be unlocked. As long as the keychain is unlocked, any applications that have been provisioned access to the keychain will be able to access their respective keychain password entries without user interaction. As you can see in Figure 9-1, there is an unlock icon next to the login keychain entry.
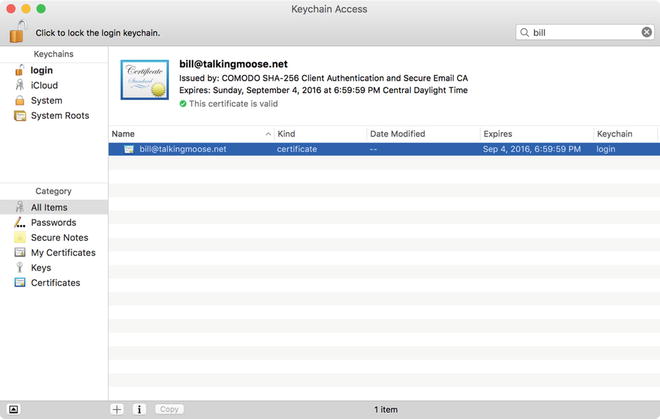
Figure 9-1. Keychain Access
One very key thing to know about the whole system is that each keychain utilizes a self-contained password. This keychain is stored in the user’s home directory and its secret, or password, does not directly integrate with Directory Services such as Open Directory or Active Directory. The primary ramification here is that, if a system administrator resets a user’s password through the directory system, typically due to the user forgetting their original password, the respective user’s keychain is not updated to reflect the new password. Thus, the next time a user logs into an OS X workstation, the new login password that they used will be passed to the login keychain. According to the login keychain, which still contains the old password, the new password will be rejected. Now, whenever the user opens an application that utilizes the keychain, they will be presented with a dialog to unlock the keychain. They’ll likely enter their new password again, and it will again get rejected. To the user this is very frustrating: what’s the deal, did the password get reset or didn’t it? Historically, OS X hasn’t really had a facility to help user’s recover from this: once the keychain password is out of sync, the only way around it is for the user to go to the Keychain Access utility found in the /Applications/Utilities folder. Once this application is open, the user can reset their login keychain password by selecting the “Change Password for Keychain ‘login’” option found under the Edit menu. Once they manually update the keychain password to the same as their account password, the login keychain will be automatically unlocked when they login. This whole reset process is non-intuitive and the keychain password reset utility is buried inside the Keychain Access app, which most end users would never discover on their own.
You will be prompted at login if the keychain password doesn’t match the user’s login password (see Figure 9-2). The key benefit now being of course that the facility is built in, and therefore there is no need to mass-deploy an application (and its associated fire-at-login settings) to all of your clients. Any feature that reduces management overhead is a plus in our book, so this one in particular is a very welcome.
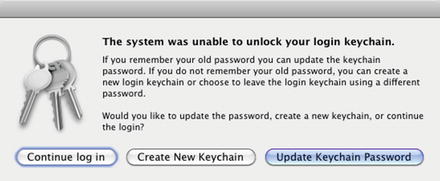
Figure 9-2. Keychain password reset dialog
Of course, it’s probably best to avoid this whole situation if you can. Although there’s no way to avoid this scenario if a user forgets his or her password, you definitely can avoid the issue if they can remember what it was. That is, if a user resets their password through client-local facilities, such as System Preferences or Login Window, then the login keychain password will be subsequently updated. The problem is that these password-reset methods require the user to know their old password, so it’s not always applicable.
By default, once unlocked (typically occurring at login), the login keychain remains unlocked for the life of the user’s session. This means that they will never be prompted to provide keychain access to pre-approved applications. This potentially includes Mail (Mail.app and Entourage), remote servers, Safari and Camino websites (Firefox does not utilize the Keychain), and other application passwords. For instance, if a user has his online banking credentials saved in his keychain, he will be able to go directly to his bank website and get in without ever needing to enter in a password; his banking login information will be auto filled by Safari. This can potentially lend to a security issue, because if he walks away from his computer without locking it, a malicious person could potentially sneak over to his computer and access his bank account. Likewise, if your computer is set to automatically login, then a malicious user can gain access to your accounts simply by rebooting your machine. This obviously presents a problem. Luckily, the Keychain utility has some facilities to address this very issue, which we’ll discuss over the next two sections.
Note By default OS X also has a global keychain, the System keychain. This keychain operates behind the scenes, and is used to store low-level secure data, such as globally trusted certificates, system private keys, auto-login credentials, and trusted wireless network credentials.
Creating Secure Notes and Passwords
The keychain is used by the system to store a variety of confidential information. This includes certificates, certificate trusts, private and public keys, passwords, and secure notes. From an end user perspective, the two most prevalent objects are passwords and secure notes. Conceptually, a stored password is pretty self-explanatory: it’s simply a secure object that holds authentication information consisting of the following fields:
- Name: This is an arbitrary name given to the password.
- Kind: This specifies the type of password item, which helps to identify the type of password item. For example, “Web form password,” “Application Password.”
- Account: This is typically the username.
- Where: This will typically contain a URI (Universal Resource Indicator) such as ‘www.mycoolbank.com/login,’ although the field does not always conform to URI standard.
- Comments: Miscellaneous information.
- Show Password: The encrypted password data.
Whenever an application needs to access to an encrypted password, it will search your keychain list for items based on its own defined criteria. This criteria will typically match using the fields: Kind, Account, Where, and Password. See Figure 9-3.

Figure 9-3. Keychain Access password
Note Of the above fields, only the password field is encrypted; everything else can be viewed without entering a password. Because of this, an attacker can potentially use this data for a “traffic analysis” attack; by analyzing the clear text data available in the keychain item, they may glean information that assists with gaining access to the account. For instance, an attacker can view a keychain item to gain access to your username for a website. Having access to the username may potentially open the door for them to manipulate a remote password-reset procedure. For highly sensitive sites, consider encrypting all data, including username and password, in the form a secure note, which we’ll discuss more in a bit.
Figure 9-3 illustrates a secure password item for the Exhange account we installed in Chapter 7, and when accessed, will log in with the account jdoe. The password, as seen, is masked. By clicking on the check box “Show password,” you will be prompted for the keychain password before it will present the password, even if the keychain is unlocked! This means that even if you walk away from your computer with the keychain unlocked, your nosey coworker won’t be able to pop open Keychain Access and peruse your password; they’ll need your keychain password for that. However, as stated earlier, they can just go to Outlook, and the application will auto fill the information. So, they’ll be able to login, but they won’t know what your password is. So why is Outlook granted full access to the password, but Keychain Access isn’t? Well, this facility is made possible through the Access Control tab, shown in Figure 9-4.

Figure 9-4. Keychain password object access controls
The Access Control tab allows you to specify applications that can freely access the password when the keychain is unlocked. In this case, only Safari is provisioned access, as Safari automatically provisions its own access when it creates the password item. If Keychain Access were added to this list, then you would be able to view the objects password without authentication whenever the keychain is in an unlocked state (so that naturally is a bad idea).
Note Regardless of Access Control settings, no application or facility will be able to freely access a password from a keychain when it is in a locked state.
The second user visible feature of the keychain system that we mentioned earlier is secure notes. Secure notes are similar to password items, but they are meant to store larger sets of data, as seen in Figure 9-5.

Figure 9-5. Keychain Access secure note
As Figure 9-5 shows, the interface for secure notes is much more apt to storing larger blocks of information than a standard password item. In this example, the user is using a secure note to save building access codes. Placing this information inside of an encrypted secure note is a great idea, especially if this is on a laptop or mobile machine: the chance of such a machine getting stolen is significantly higher, but the impact is greatly reduced if data is encrypted. In such an event, you might be able to sleep a little better knowing that your front door access code isn’t sitting in a text file just waiting to be found. As long as your keychain password is relatively secure, your data is also secure.
Unfortunately, there are limits to what you can do with secure notes. While it’s a great place to store odds and ends — building access codes, credit card information, personal information such as social security number, and so on — the text box provided supports only basic text, rich formatting is not supported. Because of this, if you have a large amount of data to encrypt, the lack of good formatting might sour your taste a bit, as it could be difficult to visually parse the information that it contains. On top of this, there isn’t really a great system for organizing secure notes: there is no hierarchical system for organization; the primary method for organization is search. Unsurprisingly, there’s no Spotlight support for secure notes, as allowing the system to index-encrypted note content would be counter-productive.
If these limitations become a problem for the data sets that you need to encrypt, consider using an encrypted disk image to encrypt the information, discussed later on in this chapter.
Managing Multiple Keychains
As mentioned, by default each user in OS X is provisioned a single keychain, the login keychain. That does not necessarily mean that the user can utilize only this keychain, though. In fact, the Keychain Access utility allows you to create as many keychains as you want, each with their own password, auto lock settings, and of course each can contain its own password items and secure notes. Any application in OS X that utilizes the Keychain for secure storage will automatically recognize additional keychains for use.
There are a number of key benefits that can be gained through the implementation of multiple keychains, mainly due to some security implications that are present by default in the login keychain. For instance, we learned a bit earlier that the login keychain is unlocked by default at user login, and that it has no lock timeout; that is, it will remain unlocked until the user logs out, or manually locks it. This means that if a user leaves their node while logged in and unlocked, a sneaky malevolent person could fire up Safari and gain access to any website that has its password stored in that unlocked keychain. New keychains, when created, have a default auto lock setting of five minutes. That means that a user unlocks this keychain for use, it will automatically lock itself five minutes later. If a malevolent user attempts to access a resource utilizing a password item in a locked keychain, they won’t have access: the keychain must first be unlocked. Thus, utilizing a second keychain provides a bit more security in that regard.
While it is certainly possible to configure the login keychain to auto lock, or even change its password to a value different then the login password, doing so can sometimes result in an annoyance to end users, as they may complain about having to constantly enter their password. Thus, maintaining multiple passwords can help to achieve security without negatively affecting usability. In such a configuration, the login keychain can be utilized for oft-used and less sensitive information, such as casual websites or commonly used applications that utilize the keychain framework. The second keychain then could be used for data of higher sensitivity such as passwords to financial websites, secure notes containing personal information, or passwords to confidential servers.
For example, this author utilizes three different keychains on his own machine. The login keychain is fairly sparse, and contains only minimal credentials such as passwords to commonly used wireless networks, S/MIME Certificates (utilized by Mail.app to validate e-mail messages we receive from colleagues), and access to various innocuous social websites and web forums. This keychain also contains a few application passwords. For instance, we utilize MobileMe for syncing our data, so we have our MobileMe passwords stored in this keychain to avoid being prompted for a password every time it wants to synchronize. The next keychain is used solely for financial and personal data and credentials. This keychain has extremely aggressive auto-lock settings, and utilizes a password that is over 12 characters long to ensure that it is not a password that can easily be broken through a brute-force attack. The last keychain we maintain contains all credentials that we utilize professionally. This keychain also has extremely aggressive auto-lock settings, and is protected by an extremely secure and unique password. To provide additional security to all of our keychains, we have configured every keychain in our systems, including the login keychain, to lock whenever the machine sleeps. To configure this and keychain auto locking settings, select the menu option “Change Settings for Keychain <keychain name>...” found under the Edit menu in the Keychain Access application (select the appropriate keychain first). This dialog is seen in Figure 9-6.

Figure 9-6. Keychain Access keychain settings
Maintaining multiple keychains like this allows us to organize data and assign different credentials and security policies to each keychain. This provides a very secure environment. However, there are still a few considerations that will be missed by most users. First and foremost, it’s important to ensure that each keychain (outside of your login keychain) has a globally unique password: if the keychain password itself is the same as a password utilized elsewhere, it is possible that it will be compromised, especially if that password is saved in a keychain somewhere; if a password item in Keychain A has the same credentials as those used by Keychain B itself, Keychain B will be compromised if Keychain A is first compromised. If Keychain A in this example is the login keychain, then this is exceptionally bad. Because the login keychain utilizes the same password as the user’s password by default, its credentials are more exposed.
Consider this: a user’s login password is stored in the form of a hash on the local hard drive. On an OS X client machine by default a user’s password is stored solely in the form of a SHA-1 hash inside the folder /var/db/shadow/hash. Thankfully, this file is protected with root-only access, so to access this file, a malicious user will need to either compromise your machine remotely, or gain physical access. Additionally, SHA-1 has proven to be a tough nut to crack, and is generally considered in the security industry to be a very secure algorithm. So the presence of this hash isn’t a huge problem in and of itself. The problem is that SHA-1 is not necessarily the only hash format that is stored in this file. For instance, if you enable Windows file sharing for a user, an NTLM hash is then added to the user’s hash file. Not all hashes are created equal, and NTLM has proven to be very susceptible to attack. In fact, a six-digit password stored in the NTLM hash can typically be cracked in a matter of minutes. Like a series of dominoes, once the login password is obtained, the login keychain is felled. If the login keychain has a single saved password containing the same password as one of your other keychains, then those keychains are also compromised, along with all of the items that they might contain. Suddenly this one small weakness has resulted in all encryption being negated.
To avoid such a chain reaction, common security practices can save the day. First and foremost, make sure that your login password is secure: at least eight characters, containing at least one alphabetic character, one capital character, one number, and one special character. The longer the password, the more secure it is from cracking. Additionally, avoid enabling Windows file services on an OS X client machine, particularly a mobile one. Lastly, as we cannot re-iterate enough, each keychain should be protected by secure, unique passwords. This is where you want to utilize those strong, harder-to remember passwords.
Note Many Unix variants have a maximum of 8 characters. OS X is very different, allowing you to make very long passwords, and each system can authenticate based on all of those characters.
There is one other limitation to know about when utilizing multiple keychains to secure your data. We mentioned earlier that any application that supports the keychain framework would be able to utilize any of your keychains. While this is true, it’s important to understand the default behavior when an application actually creates a new keychain item. For instance, say you browse to www.nytimes.com and log in to the website. Say it’s the first time you’ve done so, and so the system prompts you if you would like to save your password, and you click yes. When this happens, the application saves the new password item into your default keychain: there is no way to say specifically which keychain to create the item in. So, after first creating that password item, if you wish to place it into a different keychain, you can do so by using drag-and-drop in the Keychain Access application. The good news is that the login keychain doesn’t necessarily have to be the default keychain, though it is by default. To change the default keychain, highlight the desired keychain in Keychain Access, and select the menu option “Make Keychain <keychain name> Default,” found under the File menu. From then on, this keychain will be utilized whenever an application creates a new entry.
The keychain, if utilized properly, can provide a way to organize and secure passwords and secure notes on multiple levels. With such a baseline system in place, it allows a user to further leverage security best practices. Users can now create many differing passwords, each unique to their own entity: they can use a different password for Facebook, Google, Twitter, a different password for U.S. Bank or Wells Fargo, for Mint.com. By utilizing a different password for each service, the user ensures that they are reducing the impact of security vulnerabilities to any of these services. If Facebook gets hacked and the user’s credentials exposed, the user can maintain piece of mind knowing that that password, unique to Facebook, cannot be utilized to gain access to his other services. This is not something that most users can boast. In fact, we think it likely that most users have one password, and they use it everywhere. Someday, that user might be scratching their head to find there bank accounts emptied and their credit cards maxed, all because they trusted their credentials to a foreign entity, which could not competently protect it.
OS X’s keychain empowers the end user to avoid this scenario; a user can create hundreds of different passwords, one for each site, and those passwords can now all be stored safely and securely behind the scenes. The only password they’ll need to remember is that used for the keychain itself: whenever a password to a particular site is needed, the user only need ensure that the keychain is unlocked and it will be utilized by the system. This is a very powerful system: learn it and love it; it will be your friend.
Using Disk Images as Encrypted Data Stores
Although the keychain serves as a great tool for securely storing passwords and small blocks of information, it is not great for storing any type of data that requires formatting, and it has absolutely no facilities for storing files. For this type of data encryption need, we instead turn to disk images. A disk image is essentially a virtual volume that can be mounted on a computer and then used to store files. When a disk image is mounted, it appears just like any hard drive or CD would, and is accessed in the same manner as a hard drive: you simply create folders and save files to it. Disk images have been around the Mac OS for a long time, and are most commonly used today for the digital delivery of software and their subsequent updates. For instance, you navigate to http://support.apple.com and download a software package; it will be downloaded in the form of a diskimage file, as denoted by its .dmg extension. This file, when opened, will result in the mounting of a volume on the computer, typically named in a similar fashion of the disk image file itself, though that is not always the case; a disk image’s volume name is independent of its file name. Figure 9-6 shows an example disk image file, in this case the Office 2016 Installer, named Microsoft_Office_2016_installer.zip. When the .dmg file is opened, a volume named ‘Microsoft_Office_2016_installer’ is mounted, and a window is opened displaying the root of its filesystem.
In Figure 9-7, as in all scenarios where disk images are used to distribute software, the disk image presents a read-only volume. Disk images capable of modification are certainly possible, and in keeping with the tradition of this chapter, are fully capable of being fully encrypted. That is, a disk image when created can utilizes AES (Advanced Encryption Standard) encryption such that whenever a folder or file is written to its mounted volume, that data is first encrypted before being written back to the disk image’s file on the disk. This allows a disk image to function as a virtual bin of folders and files that can be transported securely. In order to mount the disk image’s volume (and thereby access its data), you must first enter in a password, which is then used to decrypt the data. If that password is unknown, the data will be inaccessible (though as we’ll find out later in this section, there are some back-door options that can be utilized).

Figure 9-7. Mounting a disk image
Throughout this section we will discuss the use of disk images to aid users in maintaining the confidentiality of their data by keeping it from unwanted interlopers. From creation to maintenance and also potential caveats, we will demonstrate effective methods to utilize encrypted disk images to achieve this end.
Creating Encrypted Disk Images
Creation of a disk image is accomplished through the Disk Utility application found in the folder /Applications/Utilities. Once open, a new image can be created by clicking on the New Image icon in the tool bar, or by selecting the menu option “New ![]() Blank Disk Image...” found under the file menu.
Blank Disk Image...” found under the file menu.
Note If you have a disk selected when you click the New Image button in the tool bar, Disk Utility will create a disk image based upon the contents of the selected disk, rather than a blank image.
As can be seen in Figure 9-8, there are a number of options presented when creating a new disk image. The first and most important option for creating an encrypted disk image is of course the encryption option, where we can choose between 128 and 256 bit AES encryption. AES is generally well respected, and has been officially endorsed by the U.S. government for use with classified data. The difference between the two options presented here lies solely in the length of the key used to encrypt the data. In this case, even though the key is only twice the size of 128 bit AES, the increased level of security that it provides is an order of magnitude larger. Even though 128 bit AES is generally thought to be extremely secure, attacks on data encrypted with 128-bit AES are becoming more and more plausible. Still, even today the NSA has approved 128-bit AES for the transmission of classified data, though TOP SECRET classified data requires at least 192-bit AES. Considering this, for the vast majority of environments, 128-bit AES will provide adequate data confidentiality. Functionally, the type of encryption used operates behind the scenes, with the only user perceptible difference being in the form of computer speed. Due to the increased complexity of performing mathematics with the larger key, computer performance will be degraded when writing the data. For most day-to-day operations, the difference in speed will be imperceptible to the end user; however, when performing I/O heavy duties, the performance impact will become more prevalent in the form of high CPU utilization.

Figure 9-8. Creating a disk image using Disk Utility
The next option to consider when creating a new disk image is the image format. This option is actually one of the more pertinent options when it comes to the long-term use and maintenance of the disk image itself. Here, we have a number of options. First, we have the option “Read/Write disk image,” which is the most traditional type of disk image used by the Mac OS through the years. A read/write image is a fixed size image: the size of the image is specified at creation time, and the disk image file is allocated to disk. The disk image file, regardless of how much data its volume contains, will always occupy the specified size. Thus, a 500MB read/write disk image will immediately occupy 500MB of space on disk, and it will continue to occupy 500MB of space throughout its life. Because of the fixed-size nature of this format, it is not particularly well suited for most use-cases involving data encryption requirements. If you are only looking to encrypt data for transport, then a fixed size encrypted read/write disk image will certainly fit the bill. However, for a day-to-day encryption store that may grow indeterminably, you’ll likely find this format to be limiting.
Note An interesting side-effect of using a read/write encrypted disk image is that someone observing the image can’t tell how much encrypted data it contains.
The next option, DVD/CD Master, is very similar in function to the “Read/Write disk image” option. The primary difference is in the lower level format of the disk image file. A DVD/CD Master formatted disk image is actually written to disk as an ISO compatible format. That is, you can change the .dmg file extension that is used on these disk images can be changed to .iso, and the image file can be processed by cross-platform disk utilities, such as those used in Linux or Windows. This does not necessarily mean that the data from such a disk image can be mounted and read on other platforms, the underlying volume format might still be the Mac-specific HFS+ format, and thereby undecipherable to a foreign OS, but the image itself can be written to CD or DVD and then read on a Mac.
The third option, “Sparse disk image,” is a more approachable format. A sparse disk image is a growable image that occupies only as much data on disk as is present on its underlying volume. The image size specified at image creation time (see Figure 9-8) therefore represents only the maximum size of the image volume, not the size of the image file itself. Therefore the creation of a sparse image file that is given a size of 500MB will first result in an image file that contains only minimal formatting and partitioning data written to disk with a .sparseimage file extension (rather than .dmg). The initial file size will differ based upon the maximum size of the disk image. In the case of a 500MB volume, the initial file will be roughly 10MB. The image file will grow as data is added to it, up to a ceiling of 500MB. For a larger volume, say 2TB, the initial image size will be roughly 1GB. Because of the dynamic nature of sparse images, they are very well suited for a general-purpose file store. The disk image can be created, a defined folder hierarchy can be established on its volume, and files can be added to it on an as-needed basis. Because the image file will only consume as much space on disk as the data that it contains, a high ceiling can be set on the disk image at creation time, such as 8GB, and the disk image will grow as needed without unnecessarily consuming disk space. There are a few side effects to this aspect, but we’ll dig into those details a bit later on (see section “Limitations of Sparse Images and Reclaiming Space,” later on in this chapter). Because of their dynamic nature for most purposes, a sparse image file will be the go-to option.
Note Volumes residing on a sparse disk image cannot be resized; therefore, it is a good idea to be somewhat liberal when setting the size of the volume. It also is not a great idea to specify a size that is overly large, as it will result in lost space due to partitioning and formatting overhead on the image file.
The last option, “Sparse bundle disk image,” is a different take on a sparse disk image. Like a sparse image, a sparse bundle will grow as needed based upon the content of its volume (up to the size specified at image creation). The difference between the two lies in the way that a sparse bundle is written to disk. Instead of creating a single monolithic file to represent all contents of its virtual volume as a sparse image does, a sparse bundle actually writes its data to disk in the form of directory that contains multiple files. Each of these files, referred to as a band, only contains a small subset of data within the disk image volume. As new data is written to the sparse image, new bands will be created as needed. When existing data is altered on the volume, only the bands that hold the contents of that file will change on disk. This has a couple of benefits: first, it is more resistant to data corruption: in the event of disk corruption, the chance of a catastrophic failure of the disk image’s volume is reduced. With individual bands, only the files whose data is written to that corrupted band will be lost. Contrast this with the single monolithic model of a .sparseimage file, which can be susceptible to complete data loss should that single file become corrupted. Sparse bundle disk images have another very valuable property. One significant issue found with monolithic image files is that whenever there is a change, no matter how minute, the underlying disk image file is changed.
Keep in mind that a volume isn’t changed solely by your actions; there are many underlying facilities that can result in small changes in data. For instance, the Finder will commonly modify .DS_Store files in any directory that it navigates. Spotlight, if enabled, can cause changes to the volume. Quicklook can cause the generation of proxies, which can also modify the volume. Realistically this means that any time the image is mounted, the file will change.
This has an important ramification for system administrators who are backing up your system, or perhaps on you, the user, if you utilize home directory syncing or back up your own machine. Such utilities, when run, detect file changes, and in such an event will copy/backup the file, typically over a network connection. All of these utilities operate at the file level, not the block level. This means that to back up or synchronize a file, the entire file has to be backed up, not just the changes. Basically what this means is that your backup system has to work overtime to ensure these backups are performed. If you have a sparse image with only a few documents on it, this isn’t likely a big deal. However, if your image contains a lot of data, then that can cause significant problems.
Consider an image with 50GB of data on it. If the image file is mounted, the effectively the underlying file will be changed. If you make a habit in opening that file, that’s 50GB that needs to be backed up each time, which is a lot of data. If your backup or synchronize window isn’t long enough, this could effectively act as a denial of service of your backup or synchronization process: other files might not be addressed by the system due to constant delays introduced by your huge file. This denial of service effectively acts as a breach of security in the area of redundancy. Encryption should not come at the expense of your backups, and as such, a sparse image can be detrimental at this scale. Whenever you have both encrypted files and backups, you have to make the decision of whether to back the files up in their encrypted or plain form. Backing up the plain form makes recovery easier (especially if the only person who knows the password leaves the company), but means it’s easier for confidential data to leak from your backups than from the original location.
If your backups are in a secure site and your main system is a laptop or iPad, then having plain backups actually isn’t so bad. Unfortunately, with a sparse image structure, backing up data in its encrypted form isn’t a very plausible reality.
This is where sparse bundles really shine, and is no doubt the primary rational behind the creation of the image format. With a sparse bundle, only the bands that are actually modified will be backed up or synchronized. Thus, with the same 50GB image, if a Word document is updated on the disk, only the bands that contain that file will be affected, and only those bands will need to be copied by the backup or sync. By default, sparse bundle bands are 8MB each, so such a small change will result in a backup of only that band, as well as band containing the file system table. It’s possible for a file to span multiple bands, but either way the end result is a backup of a couple dozen megabytes, which is significantly more manageable then a backup of 50GB. This isn’t quite as efficient as a backup of the data in its unencrypted form (in which case, the backup delta would be the size of the Word document itself), but the use of bands helps to utilize an approachable file size to facilitate incremental backups.
In order to ensure that all bands of sparse bundle saved to disk maintain coherence and cohesiveness, they are all saved into the sparse bundle directory. This directory is given an extension of “.sparsebundle,” which is interpreted by OS X so that is actually presented through the interface as a single file; similar in behavior to the way that the OS handles on .app or .pkg bundles, which are also commonly directories (.pkg packages can now actually be saved to disk as a single flat file, but historically they have actually been directories). Thus, when viewed from the Finder, a sparse bundle image looks at acts like a single file; the user will be completely oblivious to its actual make-up. Figure 9-9 shows both a sparse image and a sparse bundle as presented in the Finder. As can be seen from the rear image, they are both presented as files. However, if you were to view the contents of the sparse bundle by right-clicking on it and selecting “Show package contents,” you will clearly see the underlying contents, including some configuration files and the separate bands.

Figure 9-9. Finder presentation of a sparsebundle and sparseimage file (Untitled), and the contents of a sparsebundle image (the directories)
Just as a sparseimage adds flexibility over standard static disk images due to their reduced spaced consumption, sparse bundles introduce additional flexibility over sparse image files in regards to disk efficiency with larger data sets. Because of this, they are a good choice over sparse image files as image capacity grows. The downside to sparse bundles comes at the expense of their structure. Because they are in fact directories at a low level, there is possibility that files can be misplaced or removed. This is particularly problematic when the file will be presented on alternate platforms, as these platforms will not present the bundle as a single file, users viewing the file from such a platform will see a directory, which contains a large number of files, as seen in the front-most image of Figure 9-9. In such a case, if a user modifies or moves one of these files, then the integrity of the sparse bundle image will be compromised. Thus, in cross-platform environments, there can occasionally be problems caused due to this. Regardless, sparse bundles do offer tangible benefits over sparse images, so if you feel that your disk image will contain a large amount of data, then sparse bundles are worth a look.
Once you have chosen the appropriate image format, there remain a couple of options before creating this image. Specifically, we’ll want to define the partition type used for the image. By default, this will be the Apple Partition Map, which is an older partitioning format dating back to OS 9. This will work fine, though it may be desirable to utilize the GUID partition map, which is a newer partition map with broader cross-platform support. Effectively on a single Mac-only volume, Apple Partition Map will fit the bill without much fuss. If this disk image is to contain data that will be utilized on multiple platforms, it might be desirable to utilize a Master Boot Record (MBR) partition map, which is utilized by Windows (Later versions of Windows add limited support for GUID partition tables). Alternatively, the option “CD/DVD with ISO data” will utilize a partition map that can be read by Macs, Windows, and Linux machines.
With the appropriate partition format specified, the last step is to specify the file system. For the majority of environments the desirable format is “Mac OS Extended (Journaled),” which is the standard Mac OS filesystem. For cross platform support, the best option is “MS-DOS (FAT).”
With volume name, size and format, encryption settings, partition format, and image format selected, you are now ready to create your disk image. Once created, the disk image can be mounted as needed, and sensitive data can be saved directly to the volume. If the disk image was created with encryption enabled, all data on that volume will be encrypted on the disk. If the disk image file (or sparse bundle directory) is exposed, they will be reasonably secure as long as the password used to encrypt the data is also secure.
Tip When mounting disk images in the Finder, permissions on the disk image are ignored; all files on the image volume are assigned ownership to the mounting user. This means that any POSIX permissions assigned to the disk image will be bypassed. However, ACL’s applied to “Everyone” will be honored, as they are global across all users and will not be subjected to ownership masking.
There is one small caveat to the disk image system utilized by OS X. In order to access the encrypted data on a disk image, its volume must be mounted. Once that volume is mounted, it is presented on the local file system as another disk. The problem with this is that if the systems runtime is compromised, then referencing the filesystem path at which the image is mounted can access the unencrypted data. This means that if the user is subjected to malware such that a foreign program is executed in his environment, then that malicious program will be able to be accessed by that program. Thus, if an encrypted disk image is opened on a compromised system, it can be assumed that the data on the mounted volume will be detected and read; confidentiality of the encrypted data will be breached. Considering this aspect of utilizing disk images for encryption, it is a good practice to get in the habit of only having secure volumes mounted explicitly when needed: mounting an encrypted disk image opens a window to the data, keeping that window closed as much as possible is key to keeping the data safe; keeping an encrypted disk image mounted at all times may expose data unnecessarily.
Interfacing with Disk Images from the Command Line
Thus far, we have demonstrated the process for creating encrypted disk images using the Disk Utility GUI application. In some cases, it may be desirable to automate the process. For instance, as an administrator, you may wish to create an encrypted disk image for the purposes of backup. Or, you may be looking to mass-deploy encrypted disk images to a multitude of users. In cases such as this, using Disk Utility to interactively create a disk image might not be the most efficient use of time. Interactive creation of disk images will severely hamper your ability to automate backups that would utilize them. Economies of scale apply to large user environments inhibiting the practicality of manually creating an encrypted disk image for each of your users. Luckily, Mac OS X offers a very capable command line suite for creating and manipulating disk images.
The primary utility for dealing with disk images from the command line is the hdiutil command. This command can be used to create, mount (attach), and unmount (detach) image files, among other things. Mounting and un-mounting disk images is rather trivial to accomplish with this tool. To do so, we just call hdiutil with the attach verb, and then pass in the path to our disk image file. The command and subsequent output are shown here:
$ hdiutil attach ~/Desktop/mySecureData.sparseimage
Enter password to access "mySecureData.sparseimage":
/dev/disk3              Apple_partition_scheme
/dev/disk3s1            Apple_partition_map
/dev/disk3s2            Apple_HFS               /Volumes/mySecureData
As can be seen by the output, the user is prompted for a password, the image file “mySecureData.sparseimage” is assigned device of /dev/disk3, and is mounted at path /Volumes/mySecureData.
Note If you want to automate the mounting of an encrypted disk image for backups, you will need to automate the supply of the password, too, which means that the password is going to be sitting somewhere in cleartext for your script to grab. In the case of an ObjectiveC application, it is possible to utilize the keychain framework to store this value, but even then, the keychain must be unlocked at the time of use.
Once mounted, the encrypted disk image behaves just like another physical drive in the system. There are a few things to note about this. First and foremost, as stated, when an image file is attached, any POSIX permissions laid down on the volume will be effectively bypassed, due to the fact that ownership of all items on the disk image’s volume is masked to the running user. On top of this, the volume is mounted to the typical OS X directory in /Volumes. This can create a security issue on nodes that have more than a single logged in user: if you mount your disk image on a computer with another active user session, they will not only be able to see that the disk was attached, but they will also be able to navigate to the volume and likely read data off of that volume. Remember from Chapter 4 that a user’s default umask setting in OS X is set such that any newly created files have global read access. As such, concurrent user sessions will likely have access to the unencrypted data, which isn’t good. To avoid this issue, there are a couple of options. The first is to simply ensure that the top level of the disk image volume has adequate protections. While ownership is not respected by default with disk images, the mode is. This means that, if a directory only has read and execute permissions granted at the ownership level, other users will not be able to view any data on the volume. To accomplish this, a user can simply remove all access from other users by using the Permissions tab of a Finder Get Info window. Or, you can use the chmod command as shown here:
$ chmod 700 /Volumes/mySecureData
After running this command, only the mounting user will have access to the data. While for the most part this will work out, it is possible to further secure the data on a mounted volume by passing custom mount parameters to hdiutil when mounting an image. Through the use of –owners option, it is possible to force a disk image to mount in a manner that enforces permissions as laid down on the image volume. On top of this, you can specify a custom mountpoint, other than /Volumes, for the mounting of your volume. Lastly, we can use the –nobrowse option to prevent the volume from being recognized as such by the Finder: instead it will treated just like any other folder on the system, and will prevent the volume from showing up in other user’s devices list. To mount an image with such options, utilize the following syntax:
$mkdir ~/SecureData
$ hdiutil attach -owners on -nobrowse -mountpoint ~/SecureData
 ~/Desktop/mySecureData.sparseimage
After executing this command, the volume found in the mySecureData sparse image will be mounted to a folder named “SecureData” at the root of the user’s home directory. You’ll notice here that we are using the mkdir command to first create the directory prior to running the hdiutil command: if the designated mountpoint does not exist, then the mount operation will fail. Because we are passing the –owners flag with a value of “on,| we are ensuring that any ownership on the volume is preserved, which allows you to utilize normal file system permissions to secure data on mounted volumes. For more information on utilizing file system permissions, refer to Chapter 4.
To unmount or detach the image, we simply use the detach verb and pass it the volume path:
$ hdiutil detach /Volumes/mySecureData
"disk3" unmounted.
"disk3" ejected.
Alternatively we can provide the disk path:
$ hdiutil detach /dev/disk3
"disk3" unmounted.
"disk3" ejected.
As can be seen, with either syntax the device disk3 is ejected from the system.
Creation of disk images requires a bit more lengthy syntax, and is achieved by using the create verb. The process allows for the specification of all parameters that we were presented from the GUI and more:
$ hdiutil create -size 100M -fs "Journaled HFS+" -volname "myImage"
 ~/Desktop/myImage.dmg
created: /Users/cedge/myImage.dmg
In this case, a 100MB image file named myImage.dmg is created on the desktop. The volume name of the image is specified by the -volname parameter, in this case “testImage.” By default, the format of the image file is “Read/Write,” a GUID partition scheme is used, and no encryption is used on the disk image.
To create a sparse image with encryption we can use the following syntax:
$ hdiutil create -size 8G -fs "Journaled HFS+" -volname "myImage" -type SPARSE
 -encryption AES-128 ~/Desktop/mySecureImage.sparseimage
Enter a new password to secure "mySecureImage.sparseimage":
Re-enter new password:
created: /Users/cedge/mySecureImage.sparseimage
Here, we were prompted for a password to use for encryption. We can also use the –stdinpass if we want to specify the password programmatically:
$ echo -n ’myPassword1$’ | hdiutil create -size 8G -fs "Journaled HFS+" -volname
 "myImage" -type SPARSE -encryption AES-128 -stdinpass
 ~/Desktop/mySecureImage.sparseimage
created: /Users/cedge/mySecureImage.sparseimage
In both of these cases, we’re encrypting the image with AES-128 bit encryption. In the first example we had to interactively enter our password; in the second example, we’re passing a password of ‘myPassword1$’ via the echo command (the -n prevents echo from sending a trailing newline after the password), which is then read in as the password to use to encrypt the image. This is very handy in cases where you have to programmatically generate images for end users, and have a default password template or routine that should be used on new images. This password can then be changed on the image by using the Disk Utility GUI application or from the command line. To change an encrypted image’s password from the GUI, you can drag the image file into the source list for disk utility, highlight it, and then from the Images menu, select “Change Password...”. Or, with no image selected in the Disk Utility source pane, select “Change Password...” and you will be prompted to navigate to a disk image in the file system. To change a password from a command line using the chpass verb:
$ hdiutil chpass ~/Desktop/mySecureImage.sparsimage
Enter password to access "mySecureImage.sparseimage":
Enter a new password to secure "mySecureImage.sparseimage":
Re-enter new password:
Whether changing the password from the command line or graphical interface, the original password must be known in order to successfully complete the operation. So that begs the question: if an end user can change a password on a disk image, and that password must be known to access data on the image, what’s to prevent the user from locking out you, the administrator, from accessing the data’s contents? Well, nothing, and that is likely a problem in an environment that seeks to use encrypted disk images to secure company data. A loss in accessibility to company data represents a security failure, and therefore is likely unacceptable, depending on the company’s attitude to risk and the impact of such unavailability. Well, luckily there are some steps that you can take to protect your organization against this scenario. Apple’s disk image implementation has full support for certificate authentication based upon PKE (Public Key Encryption), which we’ve discussed elsewhere in this book (see Chapter 6). When creating a new disk image, it is possible to specify a certificate that can be used to authenticate an image, rather than (or in addition to) a password. When an image is created in such a fashion, as long as a user has access to the certificate’s secret, its private key, then the user will have access to the data on the encrypted image. This means that as an administrator, you can generate a disk image for each of your users, and these users can access the disk image via a standard text-based password. By passing a certificate for secondary authentication, you can ensure that you retain access to the data even after the user has changed the default password. As an administrator, you are no longer a subject to the loss of data: as long as your retain the private key that corresponds to the certificate that set upon the image at creation time, then you will be able to decrypt the data and mount the disk image.
To accomplish such a task, it is first necessary to create our identity, that is, our certificate and private key. This is a standard private key + certificate combination that is used in the majority of SSL-related tasks. In the case of creating an identity for securing disk images, it is recommend to use a key/cert pair that is dedicated to this task. That is, don’t re-use the same certificate that you use to secure your website or your mail system for instance. That being said, you can use these same identities if you absolutely must. The identity that you utilize for disk image authentication does not necessarily need to be signed by a trusted root Certificate Authority (CA), though if you maintain your own CA, you can sign to provide validation, we can specify that an image respect both a password as well as a certificate; if a certificate is not present in a user’s keychain, then a password fallback can be used. This is perfect for our needs; we can use the certificate when creating all of our images, which will grant us global access to them all, regardless of each image’s individual password. End users will continue to utilize their own password for the disk image, even changing them, and will never need access to our private key. If the end user leaves or forgets the password, we can simply recover it using our own closely guarded private key.
Caution By granting a single identity access to all disk images, it becomes absolutely imperative that the certificate’s private key be closely guarded at all times. If this key is compromised, so too are all images created with its certificate.
To create a disk image that utilizes both a password and a certificate for authentication, we simply add an additional option, -agentpass, to our previous command. When the –agentpass flag is specified, hdiutil will prompt for an interactive password:
$ hdiutil create -size 8G -fs "Journaled HFS+" -volname "myImage" -type SPARSE
 -encryption AES-256 -certificate ~/Desktop/MyCo Disk Encryption Identity.cer
 -agentpass ~/Desktop/mySecureImage.sparseimage
Enter a new password to secure "mySecureImage.sparseimage":
Re-enter new password:
created: /Users/cedge/Desktop/mySecureImage.sparseimage
If the image is being made programmatically, then the –stdinpass flag can be used to read data in from standard input:
$ echo -n ’myPassword1$’ | hdiutil create -size 8G -fs "Journaled HFS+" -volname
 "myImage" -type SPARSE -encryption AES-256 -certificate ~/Desktop/MyCo Disk
 Encryption Identity.cer -stdinpass ~/Desktop/mySecureImage.sparseimage
created: /Users/cedge/Desktop/mySecureImage.sparseimage
From here on, whenever the image is mounted, disk utility will first search through all of a user’s keychains for the corresponding private key; if it is not found, the user will be prompted to enter a password. If you need to mount the image from a machine that doesn’t have an active console, you can specify the path to the keychain using hdiutil:
$ hdiutil attach -recover /Library/Keychains/MyCo Disk Encryption.keychain
 ~/Desktop/mySecureImage.sparseimage

/dev/disk1              GUID_partition_scheme
/dev/disk1s1            EFI
/dev/disk1s2            Apple_HFS               /Volumes/myImage
In this example, we utilize the -recover option and specify the path to a keychain file that contains the appropriate identity. In this case, we are referencing a keychain that was made specifically for this purpose, “MyCo Disk Encryption.keychain” stored in the global library. This keychain contains solely the certificate/key pair that makes up the MyCo Disk Encryption Identity that we previously made. By creating a unique keychain for this, we can specify a very strong passphrase for this keychain and store it in a secure place. In the event that data recover is needed due to a lost password, the keychain can be imported on the administrators machine and facilitate access to the data.
Tip Or, the identity can be stored in a standard password-protected PKCS#12 container, which can be directly exported from Keychain Access, and then re-imported when needed.
Thus far, we’ve demonstrated how to create sparse images using hdiutil create and passing the –format option a value of SPARSE. However, there are a number of other formats that are worth knowing about, and each requires a specific identifier to be passed to the –format flag. Table 9-1 illustrates the available formats.
Table 9-1. New Image Formats Used with ‘diskutil create’
Format | Comment |
|---|---|
UDIF | This is a standard read/write fixed-size disk image. |
UDTO | This is format is the equivalent of “DVD/CD Master” in the Disk Utility GUI. |
SPARSE (UDSP) | A sparse disk image. |
SPARSEBUNDLE | A sparse bundle disk image. |
These options may be very familiar, and for good reason: the list is identical to the options presented in the Disk Utility GUI. However, there are a few additional properties that can be specified from the command line when dealing with sparse bundle images that are worth noting. As mentioned, a sparsebundle image is actually comprised of numerous separate files, or bands, which comprise the entire volume. By default, each band in a sparse bundle image is 8MB. Apple likely chose this default size because it is a good compromise between small and large file access. The truth of the matter is that one size doesn’t necessarily fit all, and for some data sets, a small band size can adversely affect performance. This is especially true in large data sets. Consider a 500GB sparse bundle image; in such a scenario, the sparse bundle would actually contain over 60,000 bands! For instance, a backup system could process and protect 15,000 32MB bands much faster than it could process 60,000 8MB bands. Another situation where a smaller band size can adversely performance is if you plan to store larger files on your image volume. If you plan to routinely store files that are in excess of 8MB, then can be adversely affected due to the extra overhead needed for the additional I/O operations. Even though you are only accessing a single file on the image volume, the underlying file system will have to open up the individual bands that store that segment of the file. For instance, a 128MB video, just a few minutes of HD, will actually require 16 file requests. That’s a fair amount of overhead, so the user may benefit from a larger band size. To create a sparse bundle with a custom band size, you use the -imagekey flag, which accepts key value pairs. For instance, to create a sparsebundle image that utilizes 32MB bands, we can use the following syntax:
$ hdiutil create -size 8g -type SPARSEBUNDLE -imagekey sparse-band-size=65536 -fs
 "JHFS+" -volname "myImage" ~/Desktop/myImage.sparsebundle
With this command, we are creating a sparse bundle image with a maximum size of 8GB, a “Journaled HFS” + file system (for which JHFS+ is a shortcut), and we have specified a band size via the sparse-band-size key. With this key, we specify the number of 512 byte blocks that exist on a given band. In this case, we have specified 65,536 blocks. At 512 bytes per block, we have a total band size of 32MB (512 x 65,536 = 33,554,432). You might be thinking that 33,554,432 bytes is more that 32MB, keep in mind we’re operating at a low level here, and thus are operating at base2. So if we were to be completely accurate, we would say that we’re specifying a band size of 32 mebibytes (MiB). With such an image, we are helping to improve the efficiency of data as laid out on the sparse bundle. The negative side to this is that we have now effectively raised our minimum backup size as well. With an 8MiB band, a small file change will only result in a backup of 8MiB. On a disk image with 32MiB bands, even a small change will require the entire band to be backed up, so that the same backup procedure would be at least 32MiB. Because of this, choosing a band size that is overly large can result in inefficiencies as well. Really, the exact value will depend on the environment, and values can range from 2048 (1MiB bands) to 262144 (128MiB bands). If in doubt, just use the default values, they work out pretty well, and they are the officially supported size. If you are an administrator and feel like an 8MiB band is not optimal for your environment, then you have the power to fine-tune the size to best fit your use-case.
And that, in a (rather large) nutshell, is the landscape for utilizing disk images for data encryption. Hopefully we have laid out a good blueprint for you to follow, and have established a good fundamental understanding of their strengths and weaknesses. Likewise, we hope we have imparted upon you the knowledge required to utilize disk-image encryption to ensure confidentiality of your data, and as well as providing fail-safes in the form of certificates so that encrypted data can be retrieved in a worse-case scenario.
Encrypting User Data Using FileVault
FileVault is a technology in OS X that allows users to seamlessly safeguard their personal data vis-à-vis encryption. FileVault is configured on a boot volume, and once enabled, accounts are allowed to unlock that volume; all encryption and decryption of the volume is handled behind the scenes. In the event that a computer is physically compromised, any accounts on the system that have FileVault enabled will maintain a rather high probability of avoiding compromise of confidentiality, subject to the strength of the password used to encrypt the data, and whether the machine was logged in and running at the time of theft. In the case of FileVault, this password is equivalent to the user’s login password. Without access to the password, provided that it is of relatively secure strength (8+ characters with a number, capital letter and at least one special character), the data stands a good chance of remaining secure.
Although you may be unfamiliar with FileVault itself, you actually already possess a good deal of knowledge as to the inner workings of the technology, provided of course that you have been paying attention. In case you haven’t guessed, FileVault technology is at its heart based upon the use of disk image encryption. If you skipped the previous section. Using Disk Images as Encrypted Data Stores, this would probably be a good time to stop and flip a few (dozen) pages back.
When FileVault is enabled for a user, the entire contents of the user’s home directory are relocated from the standard location of /Users, and is instead transferred onto a disk image in the form of an encrypted sparse bundle and stored in at /Users/username/username.sparsebundle. When a FileVaulted user logs into an OS X workstation, the system will attempt to mount the encrypted sparse bundle image stored at this location with the password provided by the user at login, and the respective image is then mounted at the traditional home directory path: /Users/username. This technique provides for a completely user-transparent system; from their perspective, their home directory is found at the usual location of /Users/username. However, unbeknownst to them (or beknownst), any changes to files or subdirectories in there home are instead written to the sparse bundle image in an encrypted form. When the user logs out, the home directory is unmounted, at which point the data only resides on the disk in a secure encrypted form.
Caution When a user is logged in, whether FileVault is enabled or not, the user’s data is accessible in an unencrypted form at their home directory path, and as such is susceptible to malware or other runtime exploitation: access to the data is controlled solely by POSIX or ACL filesystem access controls.
The assumption to all of this working, of course, is that the user’s login password is identical to that used to encrypt the contents of the FileVault image. By default this is the case, but it is certainly not an unconditional certainty. In this respect, the situation is not unlike that which we previously discussed for the login keychain. In both situations, the ability for the OS to seamlessly access the protected data, whether contents of the login keychain, or contents of the FileVault image, is correlated to the condition that the login password be identical to that used for encryption. The scenarios for these two passwords (login + login.keychain or login + FileVault) to become out of sync are identical. Like the login keychain, if a user changes his password locally on the machine, whether through a forced password change at the login window, or through a voluntary action of utilizing the Accounts System Preference pane to manually change a password, the corresponding login keychain and FileVault disk image will be subsequently updated behind the scenes.
To enable FileVault, first open the Security & Privacy System Preference pane and then click on the FileVault tab. Here, click on Turn On FileVault... as seen in Figure 9-10.

Figure 9-10. Enable FileVault
Next, you’ll be prompted whether you want the active iCloud account to be allowed to unlock the disk and reset the disk password if it’s forgotten. If you like iCloud, then you’ll likely want to use this. If you consider iCloud a security risk then you’ll likely want to create a recovery key that does not leverage the iCloud account. Once you’ve decided whether you’d like a copy of your recovery key saved in iCloud, click Continue.

Figure 9-11. The password reset dialog presented in the Accounts system preference pane
When prompted, click Restart to reboot the computer and begin the encryption process.
Once FileVault Is Enabled
Enabling FileVault for a user is a pretty easy endeavor, and is accomplished on a small scale through the Security System Preference pane. As seen in Figure 9-12, the interface presented is fairly minimalistic, and provides for only one button, used to disable FileVault for the current logged-in user.

Figure 9-12. Post Encryption FileVault
We’ll discuss the master password in just a bit; that indicator function is fairly obvious though there are a few specifics that are good to know. When you click the button to Turn On FileVault, the system will convert the volume into an encrypted volume. Upon doing so, the system will inform the user that the system needs to reboot to convert the volume.
In a larger scale managed environment, it may be desirable to enable FileVault across a large spread of users, or computers. To facilitate this, FileVault fully supports MCX and profile management. If you are unfamiliar with MCX, or Managed Client OS X, it can best be summed up as a technology supported by Mac OS X Clients and managed by OS X servers through the implementation of Open Directory. As its name implies, MCX is a system that allows for the management of various preferences and permissions applied to a user base, and can be applied to individual users, groups of users, individual computers, or groups of computers. Profiles are a means of implementing managed preferences. MCX and profiles are discussed in more detail in Chapter 16.
Due to the nature of FileVault, it will most likely be desirable to deploy FileVault settings at the computer group level, in which case as an administrator you might want to make a computer group named “Mobile Computers”. FileVault as a technology is typically targeted towards laptop computers after all, your companies desktop computers that perhaps utilize network home directories, or are otherwise physically secured are less apt to needing the protection of encryption (though certainly this is not the case in all environments). Thus, by enabling FileVault for all MacBooks, whenever a user enrolls a computer that is a member of this group, their boot volume will be protected using encryption. Figure 9-13 below shows the Security & Privacy settings utilized in Profile Manager to apply FileVault settings to a multitude of users/computers.

Figure 9-13. Deploying FileVault MCX settings Using Profile Manager
The FileVault Master Password
As we discussed in the previous section, there is a potential liability factor that a company assumes when deploying encryption of user data, as it means that there is a higher potential for the loss of sensitive company data, simply due to the potential loss of encryption keys. However, as we learned previously, companies can mitigate this liability by using a secondary access provision through the use of certificates. Fortunately, by default, FileVault uses such a certificate to provide a backdoor to this data. In the FileVault context, the terminology that Apple applies to this is a master password, and in fact, a master password must be set before a user can enable FileVault. This master password is in fact a FileVault-specific keychain whose contents consist solely of a certificate and private key identity that is used specifically for FileVault certificate-based authentication. The master password is simply the password that is used to secure the FileVault keychain itself. With this setup, the master password can be rotated without concern that existing encrypted volumes need to have the new password applied to it. As we all know (hopefully?), it’s a good idea in security sensitive environments to routinely rotate sensitive passwords, and certainly the backdoor password to decrypt company data qualifies as sensitive.
Deploying the centralized identity isn’t a terribly difficult task. As you saw in Figure 9-13, you can set a FileVault Master Password using a profile and via MDM. To accomplish this, all an administrator needs to do is to set a master password on the system used for deployment and then select it.
FileVault command Line
In some cases, the technologies we’ve mentioned will not meet the burden of criteria of a corporation’s security policies. While FileVault on a technology level provides very strong encryption, it is not without its own limitations. Thus there is a plethora of third party solutions that provide more options than FileVault alone. Most of these are based on FileVault, the APIs Apple provides for FileVault, and the command line options around fdesetup.
FileVault 2 has a command line configuration utility called fdesetup. To use fdesetup to encrypt a boot volume, first check FileVault’s status to make sure that the disk isn’t currently encrypted. Do so by entering the fdesetup command along with the –status option (wait, no — required any more!):
sudo fdesetup status
Read the help page before starting to use fdesetup, as options change now and then. To do so, use the help verb:
fdesetup help
Once you have confirmed that FileVault is not currently in use, enable FileVault with the enable option, as follows:
sudo fdesetup enable
Unless additional parameters are specified, you will be greeted with an interactive prompt. Here, provide the primary user’s short name and password. Once you have enabled FileVault, a Recovery key is returned. The Recovery key should stored somewhere safe, a task you can use a script to perform to a write-only share used for key escrowing. If you need more complicated logic, check out one of the 3rd party solutions provided later in this chapter or the open source Cauliflower Vest, at code.google.com. If you run fdesetup and you’ve deployed a master keychain, you will need to point the -keychain command at the actual keychain. For example:
sudo fdesetup enable -keychain /Library//Keychains/FileVaultMaster.keychain
To define a certificate, you will use the enable verb and then indicate the certificate path:
sudo fdesetup enable -certificate ~/filename.cer
Adding additional users other than the one who enabled fdesetup is a bit different than the first:
sudo fdesetup add -usertoadd julia
To remove users, just remove them with a remove verb followed by the -user option and the username:
sudo fdesetup remove -user julia
The remove and add options also offer using the -uuid rather than the username. Let’s look at Juia’s uid :
dscl . read /Users/julia GeneratedUID | cut -c 15-50
From the above command, take that GUID and plug it in as the uuid using the -uuid option. For example, to do so with the remove verb:
sudo fdesetup remove -uuid 31E609D5-39CF-4A42-9F24-CFA2B36F5532
All of these commands can be run interactively or using the various fdesetup options to define variables you would otherwise provide during the interactive prompt. One other option we’ll look at here though is -defer. The –defer option allows you to run the fdesetup tool at the next login, rather than attempting to do so at runtime. Here, we will write the key to a plist and use it with a script at a later time:
sudo fdesetup enable -defer /temp/fdesetupescrow.plist
Or define users concurrently (continuing to use the julia test user):
sudo fdesetup enable -user julia -defer /temp/fdesetupescrow.plist
FileVault can also use accounts from a Directory Services. These will synchronize with the Directory Service routinely, as their data is cached. To manually run a synchronization, use the sync verb:
sudo fdesetup sync
This is really just scratching the surface of what you can do with fdesetup. There are a number of third party solutions that provide far more extensibility, such as WinMagic SecureDoc.
Check Point
Check Point Endpoint Full Disk Encryption is a full disk encryption (FDE) technology for OS X that meets Common Criteria EAL4 FIPS 140-2 standards. Check Point allows you to use a key that is escrowed, as you could script with FileVault.
On its back-end Check Point FDE utilizes AES-256bit encryption, the same government-approved standard available for use with encrypted disk images. Authentication provided by the pre-boot environment supports a number of different facilities. Most commonly, a standard username and password can be utilized to provide access to the data. Alternatively, dynamic tokens, such as RSA or crypto card, are supported, allowing for very secure one-time token authentication. Regardless of the method used, backdoor access can be obtained by administrators or privileged users in order to gain access to the data: therefore the recovery of the data is not solely dependent on the user remembering their password. Likewise, if a user forgets their password in the field, the product has full support for remote recovery even if the laptop does not have an active connection to the Internet. This gives administrators the ability to restore access to a remote user via a standard voice-confirmation phone call. By granting temporary access, the user can regain access to the data and then reset their password. This is a pretty cool feature, and does improve accessibility, another critical component of information security. However, remote recovery systems are not without flaws, and can open up a can of worms, allowing an attacker to socially engineer the help desk or gain permanent backdoor credentials without having to compromise the user’s password or token.
In the end, Check Point is a very secure and robust product, and has very manageable features, particularly when working in large environments. For more on Check Point Endpoint Full Disk Encryption, see http://www.checkpoint.com/products/full-disk-encryption/.
Symantec Endpoint Encryption
Symantec is a well-known and trusted encryption technology. Like Check Point, Symantec Endpoint Encryption provides full support for OS X, and can be used to ensure that the volumes attached to your system are fully protected. Full disk protection is provided through a very similar approach to Check Point, where the user is prompted to authenticate prior to the system being able to read the OS X system on an encrypted disk, and therefore boot off of it.
Symantec Endpoint Encryption was once called PGP whole disk encryption (WDE) and has a very robust feature set, and supports numerous encryption algorithms, including the familiar AES-256 algorithm that we have seen throughout this chapter. PGP also supports a very strong hashing algorithm in the form of SHA-2-256, which provides very strong encryption on the stored keys themselves. Upon first configuring whole disk encryption, Symantec Endpoint Encryption creates a public and private key which operate in a similar manner to other PKI systems that we have discussed in this chapter: the public key is, as its name implies, a public file that can be distributed to anyone that might intend to send you encrypted data. The private key is essential to the decryption of any data generated with the public key; and therefore should be guarded with utmost care. The private key itself is protected with your passphrase, and this passphrase is required in order to utilize the private key to decrypt data. Once these keys are created, it is then possible to utilize them to begin to encrypt data stored on your local disks.
While Symantec Endpoint Encryption provides for strong security in and of itself, the strength of the solution is greatly improved through the use of a management suite that includes a Universal Server component. The Universal Server allows administrators to define and enforce various security policies, such as requiring any removable media to utilize encryption.
For more information on Symantec Encryption Desktop, see https://support.symantec.com/en_US/article.TECH174563.html.
WinMagic SecureDoc
SecureDoc is a promising player in the Mac encryption game, and has a compelling product. The system operates in much the same way as previously mentioned FDE products, making use of FileVault 2 and for iOS, profiles.
SecureDoc can be deployed to a single node, or to a fleet of nodes. If you’re looking to engage in the latter, you’ll likely want to deploy a SecureDoc Enterprise Server (SES), which provides a number of management and deployment capabilities that will make your life easier when trying to deploy the FDE system en masse. SES has full support for both Mac and Windows clients, and provides for platform-agnostic centralized management capabilities, which can be used for deployment and configuration of encryption identities/keys, security policies, and for provisioning user access. SES provides for centralized log collection, allowing for global auditing of security events. Lastly, the SES provides for remote password assistance capabilities.
SecureDoc has had Mac support for a few years now, and has gained a decent reputation in this time frame, as the system is generally well regarded. Its support for numerous authentication schemes, such as Active Directory and CAC/PIV, along with its support for booting off of encrypted volumes, rank it among the more capable of Mac-friendly FDE products.
For more information on SecureDoc, check out http://www.winmagic.com/products/full-disk-encryption-for-mac.
Summary
In this chapter we discussed in detail methods to provide security to your data in the form of encryption. As we have learned, OS X ships with a number of encryption technologies that can be used to increase the security of a running client: the Keychain for encrypting passwords and secure notes, disk images for encrypting user data, and FileVault can be used to encrypt the entirety of volume. While these technologies do provide a decently strong method for securing data, the protections they offer are not always enough at scale, and additional functionality or protection may be needed. In these cases, multiple third party solutions abound that cover a wide variety of data security needs. Determining the appropriate technology to use in your environment will depend on your needs and policies, but the diversity of the options available will typically ensure that OS X can exist in your environment and adhere to your defined security policy.
For the next chapter, Securing Network Traffic, we will shift focus from protecting data physically residing on a disk to instead ensuring data confidentiality when transmitted over a less secure and more public medium: the network.