
Chapter 11
Building Human Interfaces for Data
WHAT’S IN THIS CHAPTER?
- UI conventions for data-oriented apps
- Scaling the display
- Combining Tab and Fragment
- Using the ActionBar
- Touch and direct manipulation
WROX.COM CODE DOWNLOADS FOR THIS CHAPTER
Please note that all the code examples in this chapter are available at https://github.com/wileyenterpriseandroid/Examples.git and as a part of the book’s code download at www.wrox.com on the Download Code tab.
Chapter 1 introduced the basics of an application framework. The example code in Chapter 1 showed how to handle an application lifecycle correctly and illustrated good practices in scaling applications to fit many screen sizes.
That basic framework introduced the use of the Fragment class, which enabled the application to spread out across the screen of a tablet and “fold up” to fit on a handset. The framework integrated the use of fragments with tabs in the Action Bar.
Now that you have an application that meets those basic requirements and actually does something, it’s time to upgrade the ease and facility of interaction with that application and to implement a more complete range of Android conventions in the UI.
The users should find the UI obvious, and where it isn’t obvious at first glance, it should be explorable. Users should be able to guess at outcomes with reasonable success. That is, the application should encourage experimentation. It should avoid disappointing the users by having them find that a touch or a gesture that could do something useful does nothing.
MODULARITY AND FLEXIBILITY COMPARED WITH A “COOKBOOK” APPROACH
The “recipe” you find in this chapter shows you how to combine the scaling and Fragment-based modularity described earlier in this book with the direct manipulation and animation needed to create a UI that has a more satisfying touch experience than simply selecting list items and tabs.
You may wonder why in Google’s Android reference material there isn’t a model Android app that illustrates all the conventions covered in this chapter. In part this is due to the generality of each part of the Android user interface APIs. Each can be used separately, and in a near-infinite number of combinations. It’s also easier to make examples that focus on one feature or capability at a time. The example in this chapter shows some of the places where the API design hasn’t perfectly dovetailed, even when features should work well together.
Overview of Modules
Before you start looking at code, take a look at the modules, which have been added to achieve this boost in user interface sophistication:
So compared to what was discussed in Chapter 1, the number of modules in this program has increased.
The TabbedPagedFragment class is a class that ItemFragment and ItemDetailFragment both inherit from in order to acquire some common capabilities and behaviors.
We have also added a subclass of FragmentPagerAdapter called TabbedFragmentPagerAdapter, which works with the ViewPager to enable direct manipulation of the fragments. This is implemented in a private class within TabbedActivity in order to share information with that class.
Sideways swiping to “page” among items has become a popular Android UI convention, and the ViewPager class was created to make implementation of this convention convenient.
Layout Changes
Some of the layouts have changed, too. The following code shows the layout file called data_only.xml, where we have replaced the Fragment subclasses specified in XML with a ViewPager. The Fragment subclasses are instantiated by the TabbedFragmentPagerAdapter constructor, an implementation strategy that’s explained in depth later in this chapter.
Listing 11-1 is the layout for an activity containing just one ViewPager nested inside a LinearLayout.
LISTING 11-1: data_only.xml
<?xml version="1.0" encoding="utf-8"?>
<LinearLayout xmlns:android="http://schemas.android.com/apk/res/android"
    android:layout_width="match_parent"
    android:layout_height="match_parent"
    android:orientation="vertical" >

        <android.support.v4.view.ViewPager
            android:id="@+id/pager"
            android:layout_width="match_parent"
            android:layout_height="match_parent">
        </android.support.v4.view.ViewPager>

</LinearLayout>
Similarly, the layout-large version of main.xml (Listing 11-2) has a pager in place of the Fragment subclasses:
LISTING 11-2: main.xml
<LinearLayout xmlns:android="http://schemas.android.com/apk/res/android"
    android:layout_width="fill_parent"
    android:layout_height="fill_parent"
    android:id="@+id/content_layout"
    android:orientation="horizontal" >

        <fragment
            android:id="@+id/list_frag"
            android:name=
            "com.enterpriseandroidbook.contactscontractexample.PickFragment"
    android:layout_width="250dp"
    android:layout_height="match_parent"
    class="com.enterpriseandroidbook.contactscontractexample.PickFragment"/>

        <LinearLayout
            android:layout_width="match_parent"
            android:layout_height="match_parent"
            android:orientation="vertical" >

        <android.support.v4.view.ViewPager
            android:id="@+id/pager"
            android:layout_width="match_parent"
            android:layout_height="match_parent">
        </android.support.v4.view.ViewPager>

        </LinearLayout>
These layouts are the way this app differentiates between running on a small screen and a large screen. This approach has the benefit of leaving the decision of whether to put multiple fragments on a screen to the Android system, and we want to maintain this benefit as we integrate paging with tabs.
DIRECT MANIPULATION
In Figure 11-1 we demonstrate the ability to page, using one’s finger, between fragments that otherwise require selecting a tab to navigate to. Drag a fragment left or right, and watch the other fragment come into view. Drag far enough and let go, and you switch between fragments.

Both dragging and flinging gestures are supported. You can drag a page almost fully into view and then drag it back to the side of the screen from which you dragged it. Or you can fling a page into view, something like the way you might leaf through a book or magazine.
The TabbedActivity Class
The TabbedActivity class incorporates both the code for initializing tabbing and all of the code for page-swiping functionality because it must be aware of changes in the display commanded by switching among fragments using tabs. This is where most of the interesting modifications to support swiping were made. The next sections look at the details of how and why.
The Support Library
To implement this family of gestures and related UI behaviors, you use a ViewPager, which also requires use of the Support Library. In Listing 11-3, you see some imports related to the ViewPager class. Please note that you can find the code for Listings 11-3 through 11-12 in TabbedActivity.java in the code download for the chapter.
LISTING 11-3: Declaring use of the Support Library
package com.enterpriseandroidbook.contactscontractexample;

import android.app.ActionBar;
import android.app.ActionBar.Tab;
import android.app.ActionBar.TabListener;
import android.app.Activity;
import android.app.Fragment;
import android.app.FragmentTransaction;
import android.content.Intent;
import android.os.Bundle;
import android.support.v4.view.ViewPager;
import android.support.v4.view.ViewPager.OnPageChangeListener;
The first thing to notice is that we use the Support Library. The Support Library is installed by the SDK Manager. Once the Support Library is installed, you copy the jar file from the SDK file hierarchy to your project’s libs folder and add the jar to the libraries listed in your project properties. In this case we are using the v13 library.
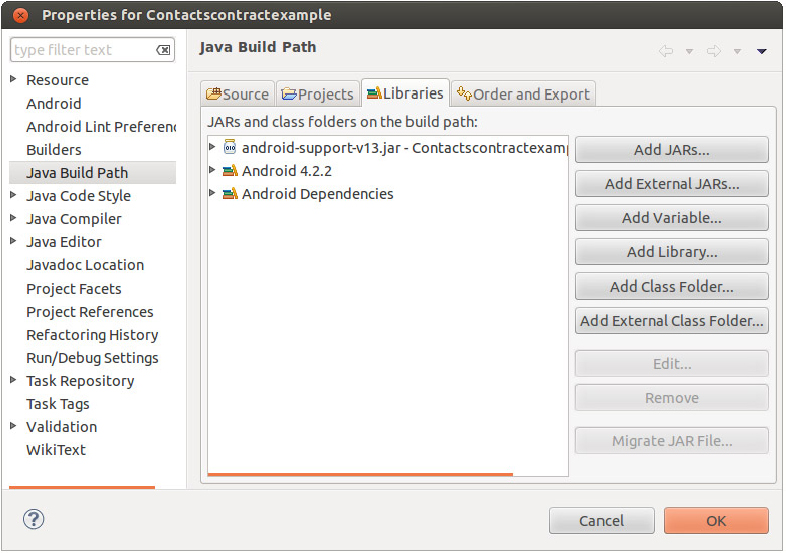
Once you have the jar file copied into your libs folder, add it to the build path of your project. Figure 11-2 shows a properly configured build path.
Why do we have the import statements for support.v4 in the list of imports in Listing 11-3? Because, even though we are using the v13 version of the Support Library, the package names for the imports use “v4” in the current version of the online documentation, and we chose to be consistent with the documentation. The v13 library supports import statements using v4 or v13. There are a few places, which will be pointed out, where you do need to specify a v13 package, however. The following shows the heading of the class definition for TabbedActivity. It implements OnPageChangeListener. A discussion about why the OnPageChangeListener is implemented here occurs later in this chapter:
public abstract class TabbedActivity extends Activity implements
       ViewPager.OnPageChangeListener {
As before, TabbedActivity inherits from Activity. That’s because you’re not using the Support Library to implement compatibility with earlier versions of Android that don’t directly support Fragment. Essentially, there are two main use cases for the Support Library:
This application is an example of the latter case. Using the Support Library for back-compatibility with early versions of Android introduces more complexity than we want to present here.
Initializing Tabs and the ViewPager
The initializeTabs method (Listing 11-4) has the same signature as before, but most of the initialization has been moved from this method into the constructor for the private nested class TabbedFragmentPagerAdapter. As you’ll see, the reason for moving that code and the reason its new class is private and nested are intertwined.
LISTING 11-4: Initializing tabs
private NerfTabListener nerfTabListener = new NerfTabListener();

/**
 * Initialize tabs in an activity that uses tabs to switch among fragments
 *
 * @param defaultIndex
 *            The index of the Fragment shown first
* @param nameIDs
*            an array of ID for tab names
* @param fragmentClasses
 *            an array of Class objects enabling instantiation of Fragments
 *            to be tabbed/paged
 */
public void initializeTabs(int defaultIndex, int[] nameIDs,
            Class<?>[] fragmentClasses) {

      // Find the pager
      ViewPager pager = (ViewPager) findViewById(R.id.pager);

      // If there is no pager, there are no tabs
      if (null == pager) {
                  return;
      }

      // Set the action bar to use tabs
      getActionBar().setNavigationMode(ActionBar.NAVIGATION_MODE_TABS);

      /*
      * Create an adapter that knows our Fragment classes and Activity. This
      * constructor does most of the heavy lifting because it knows about
      * both the tabs and the pager.
      */
      TabbedFragmentPagerAdapter adapter = new TabbedFragmentPagerAdapter(
                    pager, nameIDs, fragmentClasses);

      // Tell the adapter it has new items to display
      adapter.notifyDataSetChanged();

      // Select the tab designated as default
      getActionBar().getTabAt(0).select();
      }
Moving Data between Fragments
The code for loading data into the fragments to display it is much the same as it was in previous versions of this code. That’s on purpose. We didn’t want to disrupt the strategy for scaling this app over small and large screen sizes, and we didn’t want to give up the modularity of pushing the tab listener code out into the Fragment classes. After all, Fragment prevents you from having to place all your interaction code into Activity subclasses.
The method shown in Listing 11-5 is key to implementing that scaling. Notice that this is where a decision is made about layout. Not screen size. Not density. If the layout includes certain Fragment objects and their corresponding tabs, you can show the data for the item you selected.
LISTING 11-5: Bundle for moving data between components
/**
  * If we have tabs and fragments in this activity, pass the bundle data to
  * the fragments. Otherwise start an activity that should contain the
  * fragments.
  *
  * @param data
  */
  public void loadTabFragments(Bundle data) {
        int n = getActionBar().getTabCount();
        if (0 != n) {
           doLoad(n, data);
           } else {
           startActivity(new Intent(this, TabActivity.class).putExtras(data));
           }
}
You can show the item list and data in one of two ways. Either the screen is big enough for both the item list and the data for each item, or you must start a new activity to show the data. Since this is an abstract parent class of the Activity classes that can be in either role, the same code works in either case.
The code lets the system decide and follows the layout decision made by the system. That way you don’t have to take into account whether the users have changed font size and other often-overlooked factors in how much information can be displayed.
Abstract Methods and Nested Interfaces
To build the interface, you need a list of Fragment classes that should be represented by tabs in the Action Bar and the ViewPager needs to know about these classes. The abstract method here ensures that the child classes provide that information:
/**
 *
 * @return The array of Classes to be instantiated and tabbed/paged
 */
// public abstract Class<?>[] getTabFragmentClasses();
You could have put the following interface definition into a separate file, but it is so intimately tied to what this class does that it might as well remain here. And it serves as a useful contrast to the abstract method you just added. Why use an abstract method in one case and an interface in another? The SetData interface consists of more than one method, and its implementer isn’t going to be a child class of this class. In contrast, the getTabFragmentClasses abstract method doesn’t need to be grouped with other methods and is implemented only by its child classes.
/**
 * An interface to pass data to a Fragment
 */
     public interface SetData {
     public void setData(Bundle data);

     public String getDataLabel();

     void setDataLabel(String label);
     }
Connecting Tabs and Fragments
A key element in the architecture of this UI framework example is the use of the Tab object’s tag fields as references to the Fragment objects the tabs are related to. In Listing 11-6, you can see that the doLoad method uses this aspect of the implementation to find and call the setData method of the SetData interface implemented by each fragment. This is what happens when the user selects an item from the list: Related data is serialized into a bundle object, which is used to convey the data to the fragment objects that display it.
LISTING 11-6: Delivering the data
/**
 * Iterate over the tabs, get their tags, and use these as Fragment
 * references to pass the bundle data to the fragments
 *
 * @param n
 * @param data
 */
private void doLoad(int n, Bundle data) {

       // Null check - harmless if no data
       if (null == data)
           return;

       int i;
       ActionBar actionBar = getActionBar();

       for (i = 0; i < n; i++) {
           SetData f = (SetData) actionBar.getTabAt(i).getTag();
           f.setData(data);
       }
}
Mixing in the ViewPager
Although the previous code did not change from the example used in Chapter 8, the following code is new. Mixing tabs, the Fragment class, and ViewPager requires mixing two different APIs that, in some places, don’t mix that well. As you have seen in the XML for the layouts, the Fragment instances you can page among are not created by inflating the XML any longer. That is because the ViewPager uses an Adapter class that behaves something like a ListView’s adapter.
Unlike tabs, where each tab can have its own listener and where an instance of a fragment can implement that listener interface, a pager wants one adapter and one listener and has no provision in the API design to call each fragment being paged. In part this is a consequence of working like the adapter of a ListView, which may be used to create and destroy items in the ViewPager container dynamically. So, though here we don’t use the adapter in the way that adapters are used to put arrays of data into ListViews, some of the same architectural constraints apply.
The question is, “Can you deal with these constraints while meeting the key architecture and implementation goals?” Consider these questions:
- Can you avoid having the TabListener pulled out of the Fragment class and having one place where all these interfaces converge?
- Can you avoid holding references to Android components, especially instances of this activity, in multiple other objects?
- Can you coordinate swiping a page with tapping a tab and be able to use both interaction gestures?
A Nested Subclass of FragmentPagerAdapter
A ViewPager is generic: It will page anything you give it. In this case, you are giving it Fragment objects and their view hierarchies. What makes this ViewPager page Fragment objects is its adapter class. The adapter class is a subclass of FragmentPagerAdapater, whose name is a dead giveaway to what it does.
As we mentioned earlier, the trick here is getting Fragment objects, Tab objects, the ActionBar object in its enclosing activity, and a ViewPager and its FragmentPagerAdapater object to all coordinate. That way, when the users use a tab or a swipe gesture, they get the expected result. The Tab objects should be highlighted correctly and the correct fragment should be displayed. This should happen no matter how the users choose to interact.
As it turns out, by embedding the FragmentPagerAdapter subclass (see Listing 11-7), and at the cost of a fairly complex constructor, you can retain the way your scaling decision is made, and you can retain the implementation of TabListener in the Fragment classes controlled by the tabs. You can also coordinate between the tabs in the Action Bar and the Fragment objects being paged by the ViewPager.
LISTING 11-7: The pager’s adapter
/**
 * This class is private because we only access it from here and it is
 * intimately tied to instances of this class. That is, unless it was nested
 * it would be holding a reference to instances of this component
 */
private class TabbedFragmentPagerAdapter extends
        android.support.v13.app.FragmentPagerAdapter {

private Class<?> fragmentClasses[];
private int[] nameIDs;
The TabbedFragmentPagerAdapter Constructor
The code in Listing 11-8 illustrates why nested classes are sometimes useful and sometimes confusing. For example, the keyword this refers to two different instances of two different classes in this method. When used this way, it is qualified with the class name.
FragmentPagerAdapter is nested to give it access to the members of the TabbedActivity class, especially to the instances of its subclasses, which are accessed through the keyword this. The TabbedActivity class name qualifies the use of the this keyword. TabbedActivity.this refers to the instance of TabbedActivity that called the constructor, whereas the this keyword without any qualifier refers to the instance of TabbedFragmentPagerAdapter being initialized by this constructor.
Only the abstract Activity subclass needs to refer to instances of TabbedFragmentPagerAdapter, which means you can make the class private and prevent the concrete subclasses from having to be aware of what happens at this layer. Among the benefits of this approach is that references to instances of this component don’t leak out of this component, while the code of this constructor has access to the Activity instance and its members. Also, you know that the only user of this class is the enclosing abstract Activity class.
Most of the following code (Listing 11-8) appeared in the initializeTabs method in the example code for Chapter 8. The reason it is now here is that tab initialization and pager initialization need to happen alongside each other. They both use information common to the pager subclass and the fragments to be paged.
LISTING 11-8: Creating tabs
/**
 * Create an instance of TabbedFragmentPagerAdapter. This constructor
 * sets up later instantiation of fragments, and tab creation
 *
 * @param tabbedActivity
 *            - the activity with tabs and a pager
 * @param pager
 *            - the pages that pages the fragments
 * @param nameIDs
 *            - the names identifying the fragments
 * @param fragmentClasses
 *            - the Fragment subclasses to instantiate
 */
TabbedFragmentPagerAdapter(ViewPager pager, int[] nameIDs,
              Class<?>[] fragmentClasses) {
              super(TabbedActivity.this.getFragmentManager());

              /*
               * The activity implements PageChangeListener, we
               * set it here, though
               */

pager.setOnPageChangeListener((OnPageChangeListener) TabbedActivity.this);
A Placebo Tab Listener
Here (Listing 11-9) is where you set up the tabs. But wait! You don’t have the real Fragment objects yet, and the Fragment classes implement TabListener. The Fragment objects are created in a FragmentPagerAdapater callback and passed to the ViewPager. You need to use a placebo called nerfTabListener in case the TabListener is called before it is set. Because of the way the Tab API works, it is more convenient to use a placeholder tab listener than it is to check the validity of the TabListener every time you do something that might invoke it.
LISTING 11-9: Adding tabs to the Action Bar
// Check if there are any Fragments to instantiate
if (null != fragmentClasses && fragmentClasses.length != 0) {

    /*
     * Stash a reference to the fragment classes and names for
     * later use in the callbacks
     */
    this.fragmentClasses = fragmentClasses;
    this.nameIDs = nameIDs;

    // Get the action bar and remove existing tabs
    ActionBar bar = TabbedActivity.this.getActionBar();
    bar.removeAllTabs();

    // Make new tabs
    int i = 0;
    for (; i < fragmentClasses.length; i++) {

    // Create the tab
    Tab t = bar.newTab().setText(nameIDs[i]);

    // Give it a placebo to chew on
    t.setTabListener(nerfTabListener);

    // Add the tab to the bar
    bar.addTab(t);
    }
   }

    // Set the pager's adapter to this
    pager.setAdapter(this);

    notifyDataSetChanged();
}
FragmentPagerAdapter Callbacks
Here you override some methods of the FragmentPagerAdapter class. The way that tabs and the pager are woven together is such that when a fragment is instantiated, the instance is stored with the tab that is used to select it. When the pager asks its adapter for a fragment at a position, you use the fact that fragment and tab positions are always the same. The position in the Action Bar’s tabs returns a tab with a fragment instance stored in the tag. This results in using the Action Bar tabs as the “data model” for the pager and its adapter.
The following methods (Listing 11-10) override the getItem and getCount methods. You can see how the tabs of the Action Bar are accessed to retrieve Fragment instances. The index or position parameter identifies which tab holds the requested fragment instance.
Note that the fragments are instantiated in the getItem method. This is due to the way that a ViewPager uses the FragmentPagerAdapter. The ViewPager is enabled to think that it never needs to instantiate the fragments.
LISTING 11-10: Accessing the fragments being paged
@Override
public Fragment getItem(int index) {

    ActionBar bar = TabbedActivity.this.getActionBar();
    TabbedPagedFragment f = (TabbedPagedFragment) bar.getTabAt(index)
      .getTag();

    if (null == f) {

      /*
       * Instantiate the Fragment here. Otherwise it is never
       * added to the pager.
       */
      f = (TabbedPagedFragment) Fragment.instantiate(
           TabbedActivity.this, fragmentClasses[index].getName());

      // Set the data label to the name of the corresponding tab
      f.setDataLabel(TabbedActivity.this.getString(nameIDs[index]));

      // Set the tab's tag and the TabListener
      bar.getTabAt(index).setTag(f).setTabListener((TabListener) f);
      }

    return f;
    }

@Override
public int getCount() {
    return TabbedActivity.this.getActionBar().getTabCount();
}

/**
 * Find a fragment by position
 *
 * @param position
 *            The position of the fragment in both the ViewPager and as the
 *            tag of tab
 * @return
 */
public Fragment getFragmentByPosition(int position) {
    return (Fragment) getActionBar().getTabAt(position).getTag();
}
OnPageChangeListener and Tabs
The following code (Listing 11-11) implements the OnPageChangeListener interface. The onPageSelected callback connects the ViewPager to the tabs. When a page is selected, the Action Bar is told to set the selected navigation item using the same position. When you are notified of a new selection via tabs, the obverse is implemented in the tab listener.
Recall from earlier that, when initializing the Fragment, Tab, ViewPager, and other objects, you used a temporary tab listener. That’s because the TabListener and OnPageChangeListener don’t simply call each other. The link between them runs through the Action Bar in one direction and the ViewPager in the other direction.
LISTING 11-11: OnPageChangeListener implementation
/////////////////////////////////////////////////////////////////////////////
// Implementation of OnPageChangeListener
/////////////////////////////////////////////////////////////////////////////

@Override
public void onPageScrollStateChanged(int arg0) {
     // Do nothing

}

@Override
public void onPageScrolled(int arg0, float arg1, int arg2) {
     // Do nothing

}

@Override
public void onPageSelected(int position) {
     getActionBar().setSelectedNavigationItem(position);

}
The Placebo
This class (Listing 11-12) enables you to decouple the way Fragment objects get instantiated from the Tab objects that are created, without subclassing Tab or implementing null checks in all the code that uses the Tab API.
LISTING 11-12: A convenient placeholder
private class NerfTabListener implements TabListener {

     @Override
     public void onTabReselected(Tab tab, FragmentTransaction ft) {
       // Do nothing

     }

     @Override
     public void onTabSelected(Tab tab, FragmentTransaction ft) {
       // Do nothing

     }

     @Override
     public void onTabUnselected(Tab tab, FragmentTransaction ft) {
       // Do nothing

     }

     }

}
The TabbedPagedFragment Class
We need to make some additional changes from the previous version of this example from Chapter 8. One is that the implementation of the TabListener interface has been pulled into a new abstract class called TabbedPagedFragment, so it can be easily shared among tabbed fragments as you can see in Listing 11-13.
LISTING 11-13: TabbedPagedFragment.java
package com.enterpriseandroidbook.contactscontractexample;

import android.app.ActionBar.Tab;
import android.app.ActionBar.TabListener;
import android.app.Fragment;
import android.app.FragmentTransaction;
import android.support.v4.view.ViewPager;


public abstract class TabbedPagedFragment extends Fragment implements TabListener {

@Override
public void onTabReselected(Tab tab, FragmentTransaction ft) {
     // Do nothing

}
Completing the Circuit
This (Listing 11-14) is where you tell the ViewPager, if necessary, to change which Fragment object is in view. You must check to see that a change is necessary; otherwise, you might ping pong back and forth between the TabListener here and the OnPageChangeListener.
LISTING 11-14: Coupling tabs to the pager
@Override
public void onTabSelected(Tab tab, FragmentTransaction ft) {

    if (true == attached) {

        // The ViewPager is used to show the specified Fragment
        ViewPager pager = (ViewPager) getActivity()
                .findViewById(R.id.pager);

        // Check that we need to change current fragments
        if (pager.getCurrentItem() != tab.getPosition()) {
            pager.setCurrentItem(tab.getPosition());
        }
    }
}

@Override
public void onTabUnselected(Tab tab, FragmentTransaction ft) {
    // Do nothing

}

}
At this point, you have taken three separate parts that can be used in any combination with other ways of building Android user interfaces and combined them into a UI that fits many common use cases. You have multiple fragments that can be brought into view as needed. These fragments are controlled by tabs and through direct manipulation using a pager.
NAVIGATION
Navigation and flow from one activity to another is a fundamental aspect of the architecture of Android applications, and it goes hand in hand with lifecycle. In a mobile device with a small screen, having an intuitive flow among multiple screens is the key to maximizing the visual information the user can access and use.
When applications are correctly implemented and seamlessly cooperative, users can navigate among several activities, each implemented in a separate application, and think they have used only one application.
Multitasking in a Small-Screen Environment
Keeping track of multiple tasks on a PC — multiple programs, documents, and so forth — is so commonplace that you might not think much about how it is accomplished. Multiple documents, overlapping windows, and a mouse pointer are all ingredients of a user interface paradigm called the “desktop metaphor.” Your personal computer screen is a metaphor for a real desk, with overlapping documents on it. Move a document to the top by selecting it with the pointer, and it becomes the active document.
On a small screen, the entire screen is devoted to a single task, and the concept of a task, and task switching, is inherently less visual, since other tasks are not visible in other windows. In mobile interfaces, a back-stack — the stack of activities you can go back to — is often a central concept. In Android, the back-stack is called the “activity stack.”
The Android Task Model
If an activity is the basic unit of Android user interaction, a “task” is the next grouping. In Android, the word task does not denote an executable object such as a process or application; instead, it refers to a single activity stack with, potentially, multiple activities from multiple applications in it.
As the user interacts with the system, sometimes one activity will — by way of an Intent object — ask the system to find an activity that matches the intent’s specifications. If that activity is in another application, it usually becomes part of the task the users began when they launched an application from the launcher or home screen shortcut. When users launch what they think of as an application, they also start the “root activity” of a task.
Concepts like a “root activity” become concrete to the users through Android’s methods of task switching. If users touch an application icon in the Home activity or use the Recent Tasks switcher after an application has been launched, in most cases the system goes back to an already started task.
Tasks and the Conventional Process Model
Tasks are not always processes. Even when the process containing the current activity of a task has been killed, it will be restarted when users switch to the task where that activity is in the foreground. A new instance of the Activity object is created in a new process. Every other component in that process is re-created and their states are restored as needed.
Android provides developers with rich control over the behavior of interactive components in tasks. Used correctly, your control over task behavior will reinforce the Android concept of tasks and make the users feel as though the Back button always does what they expect. If it’s used incorrectly or inconsistently, the users might be wondering, “How did I get here?”
Modifying Task Behavior
Some task behavior is determined by the argument to the launchMode attribute in the activity tag of the manifest.
If you think of activities as cards in a stack, think of these launchMode variants as ways of stacking new cards or re-ordering the stack.
- The standard launch mode is the default. Default back-stack behavior when launching a new activity is to create a new instance of the Activity object and put it on top of the stack. This is the correct behavior in most cases.
- The singleTop launch mode diverges from the default behavior by checking if an instance of the specified Activity already exists in the stack, and bringing it to the top. Let’s say you have an activity for setting global parameters and it has an “OK” button for committing changes. You would want only one such Activity instance, with one set of state, in your back-stack.
Two other launch modes are seldom used and not recommended.
- LaunchMode variants are a way to specify behavior that differs from the default when you declare an activity in the manifest. But there are a surprisingly large number of ways to modify task behavior in intent flags.
- Intent flags are usually used in the code that builds an Intent object for the purpose of launching an activity, so these are more dynamic.
Some are obviously useful, but others are just perplexing (in an area of functionality that is perplexing enough as it is):
- FLAG_ACTIVITY_BROUGHT_TO_FRONT — Used by the system to implement the behavior to be used when an activity has the singleTask or singleInstance launch mode attribute specified.
- FLAG_ACTIVITY_CLEAR_TASK — Indicates the tasks to be cleared before the new activity starts. This means the new activity is the new root activity of the task, and no other activities are stacked on it or under it.
- FLAG_ACTIVITY_CLEAR_TOP — Puts the matching activity on top of the activity stack, if it is in the activity stack of the current task, by finishing all activities on top of the one the Intent object matches. If the specified activity is at the top of the activity stack, it is finished and re-created, unless it is capable of receiving a new intent via the onNewIntent() method. This is a complex combination of effects, especially since the default behavior without using onNewIntent is to both chop off the top of the activity stack and replace the existing matching activity with a new instance. Be sure your use-case supports using this flag.
- FLAG_ACTIVITY_CLEAR_WHEN_TASK_RESET — Indicates that the activity being launched should be on top of the activity stack if the task is reset.
- FLAG_ACTIVITY_EXCLUDE_FROM_RECENTS — Normally the recent applications list displays to the top of each task’s stack of activities. If you use this flag, the activity started with this Intent (and hence the task that would be represented by this activity) is not presented among the recent applications.
- FLAG_ACTIVITY_FORWARD_RESULT — The new activity can provide a result to the activity that launched the current activity. This enables substituting for an activity started with the startActivityForResult method. In other words, “Here, you answer this.”
- FLAG_ACTIVITY_LAUNCHED_FROM_HISTORY — The new activity was, in effect, launched from the “Recent Applications” list.
- FLAG_ACTIVITY_MULTIPLE_TASK — The new activity can be the root of multiple tasks. This is used to launch a launcher so that it can be the bottom or the back-stack for all the activities it launches.
- FLAG_ACTIVITY_NEW_TASK — The new activity is the root of a new task.
- FLAG_ACTIVITY_NO_ANIMATION — Suppresses transition animation.
- FLAG_ACTIVITY_NO_HISTORY — The new activity is not on the back-stack. It is the same as the noHistory attribute.
- FLAG_ACTIVITY_NO_USER_ACTION — Suppresses the onUserLeaveHint callback for the current activity. Assuming this callback is used to clear alerts, the alerts will stay up. This is useful for activity transitions the users did not initiate, such as displaying an incoming call or message.
- FLAG_ACTIVITY_PREVIOUS_IS_TOP — The new activity will not be treated as the top of the activity stack, and the previous top activity will be treated as the top for the purposes of deciding whether an Intent should be delivered to the top activity, or whether a new activity should be created.
- FLAG_ACTIVITY_REORDER_TO_FRONT — If the activity is already running, it will be raised to the top of the activity stack and made visible.
- FLAG_ACTIVITY_RESET_TASK_IF_NEEDED — This activity becomes the task root, even if it is pre-existing activity in a pre-existing task and is not the task root.
- FLAG_ACTIVITY_SINGLE_TOP — Equivalent to the singleTop launch mode: If the activity is already the top of the back-stack of the task, a new Activity is not created.
- FLAG_ACTIVITY_TASK_ON_HOME — Puts that new activity just above Home in the task. This has the effect of making back-navigation from that activity go to Home, rather than to the activity that launched it.
Together, launch modes specified in the manifest and flags set in the Intent objects that cause activities to be launched enable manipulation of navigation by arranging the back-stack, and, in turn, affecting the behavior of the Back button in the Android user experience. While the examples here are simple, with one or two Activity components on the back-stack, your applications will likely need to consider how they arrange the back-stack as they contain more activities.
Navigation in Tablets
Critics have said that the Back button should really be called “Shuffle” because you never know where you will end up. More recently, Google has promulgated some conventions that make navigation less of an adventure for the user.
The original navigation conventions in Android were so simple, app developers had hardly any work to do to implement them. As Android scaled up to tablet size and acquired new features for creating richer user interfaces, the burden on developers grew. Developers now need to be aware of more conventions and to embody those conventions in their code.
You might ask why isn’t there an application or activity class that embodies these conventions and makes life easier for the developers. It’s hard to pick a set of conventions to enshrine in a framework. Android enables a variety of styles and infinite variations on those styles, for better or worse. We can show you one “slice” or path through those choices, but you are free to make your application as distinctive as you like, and branch off from Android’s framework at a variety of levels.
CHOOSING TO USE THE SUPPORT PACKAGE
The Android SDK includes a library commonly referred to as the Support Package or Support Library. It used to be called the Android Compatibility Package. When it was first released, it was used mainly for providing back-compatibility for applications. Recently, it incorporated a utility library that can be used with both “green-field” applications targeted at recent API levels and back-compatible applications.
In creating enterprise applications, you can set reasonable standards for using current versions of Android, even in bring your own device (BYOD) environments. Therefore, we encourage you to develop for and use recent APIs and test for API availability to achieve some back-compatibility. You will save significant effort if you can avoid back-porting, since, among other complications, not all recent APIs are supported by the Support Package. That is how the Support Package has been used in this book.
If you need more back-compatibility than you can reasonably achieve by testing for API availability, use the Support Package’s Activity subclass and Fragment back-port and other classes to create a branch of your code-base for the purpose of back-porting your application. You will also need to find a substitute for the ActionBar class, which is not included in the Support Package. That is one of the reasons back-compatibility is outside the scope of this book, and of this UI framework, which depends on ActionBar for a lot of functionality.
For some mass-market apps that need to hit the market targeting every possible user, back-compatibility dominates decision making about which APIs can be used. In general, however, back-compatibility strategies are outside the scope of this book and need to be tailored to the requirements of specific apps, developers, and user communities.
Here, you use the Support Package only for utility classes, especially for swiping between Fragment objects.
SUMMARY
In this chapter, we combined two previous examples and expanded on them to show how a user interface framework can be created for data-oriented applications. While we used local data to keep our dependencies manageable for the purposes of an example, this framework is applicable to applications that use web APIs as well.
This chapter tied together the classes that form a common user interface idiom in Android: the Action Bar, tabs, fragments, swipe gestures, the option menu, a list of items; and we combined these elements with the declarative layout-driven strategy for scaling from small to large screens. Together these elements form a solid foundation for implementations that do not force an artificial decision to go handset-first or tablet-first and that make use of up-to-date APIs and idioms.