
Chapter 10
WebData Applications
WHAT’S IN THIS CHAPTER?
- Creating a Migrate project
- Interfacing with the Migrate REST proxy
- Setting up a device
- Looking at future directions: MigrateClinic
WROX.COM CODE DOWNLOADS FOR THIS CHAPTER
Please note that all the code examples in this chapter are available at https://github.com/wileyenterpriseandroid/Examples.git and as a part of the book’s code download at www.wrox.com on the Download Code tab.
In this chapter you learn about an implementation of the WebData protocol called Migrate. The discussion walks through a single application — the simple Contacts application introduced in Chapter 5. It then implements the Contacts application on top of the Migrate framework.
Chapter 9 introduced the concept of the WebData API and described Migrate, a generic content provider that can be used as a backend for a wide variety of applications. This chapter looks at what an application that uses such a generic provider might look like. You’ll be writing an application similar to the restfulCachingProviderContacts project from Chapter 5 that uses Migrate instead of its own, private data-synchronization code.
This chapter demonstrates:
- Creating a new project using the Migrate tools
- Converting an existing project to use the Migrate framework
- Installing the Migrate generic content provider on a device and creating an automatically synchronized account to support it
- Running a Migrate-based application
- The future of the Migrate platform
THE MIGRATE CLIENT
Chapter 5 described how the adoption of REST changed the architectural focus for distributed APIs from the content that they carry (in APIs like CORBA, RMI, and SOAP) to the medium over which their content is transported: an unreliable network. Chapter 5 also pointed out that Android’s internal architecture brings similar concerns into the application. An Android application is subject to interruptions in connectivity, access to the CPU, and even power. Although these interruptions may be of some concern in an application designed for a stationary device (a rack mounted server or even a laptop), they are much less likely to occur. With mobile applications, they are an unavoidable part of life.
Given these constraints, it makes a great deal of sense to pull REST-style access up one level. Instead of using REST at the device boundary — only as a means of accessing remote data — what if, as proposed in Chapter 9, you use REST right on the device? What if you pull the REST proxy — made possible by adopting a REST-style architecture — off the network and put it right into the phone?
In such an architecture, the UI — instead of expecting reliable access to a content-specific network library — simply performs RESTful requests against a local proxy for the network. The UI makes its request to a local service and cannot tell that the service is a proxy for an endpoint that is sometimes unreachable. Whether a given record in the cache is out of date with respect to some external, upstream instance of the same data, is simply a piece of local state information.
There is an additional motivation for this approach that has not yet been discussed. Developers who have built several content providers will have noticed that there are substantial internal similarities among them. The code shown in Chapter 5 is very nearly generic already. Most of the specifics that customize the implementation of the Contacts provider shown in that chapter — the things that specialize it to apply to a database of contacts — have been abstracted out into statically defined constants: column names and Java constants that hold them. At some point, a developer who wants to get some work done will begin to look for ways — perhaps along the lines of Ruby on Rails — to avoid writing these hundreds of lines of boilerplate code for each new application.
These two insights together make a framework that provides REST access to application-specific data through a generic, local, device-wide proxy a very appealing idea, to say the least. The ability to create applications by focusing on powerful acquisition, manipulation, and presentation of data, while leaving the details of robust, enterprise-wide synchronization of that data to automation, could save hundreds of developer hours and avoid hundreds of unpleasant bugs.
Chapter 4 assumed the existence of a content provider and built code that revealed its behavior. This chapter takes the same approach. It assumes the presence of the Migrate SDK — a toolkit that supports building Migrate clients — and, by building code, reveals the contents of the toolkit and the architecture of the Migrate itself.
CREATING A MIGRATE PROJECT
This section begins the exploration of the Migrate WebData framework by converting the simplified Contacts program built in Chapter 5 for use in this context. Because that project is familiar, it is a logical starting point. Because it is very simple, the size and complexity of the converted result will be very instructive in evaluating the basic concepts.
Much of the code will, of course, stay the same. The whole point of the WebData API is to provide a foundation to implement arbitrary UIs.
Step 1: Importing the Project
Start by importing the project $CODE/MigrateContacts into Eclipse (see Figure 10-1), as you did for the clients in Chapter 5. Remember to set up the project for Eclipse first as described in Chapter 5 and in $CODE/MigrateContacts/README. Please keep in mind that the project will not immediately compile — it needs a contract class that you will generate shortly.

Step 2: Enabling the Project as a Migrate Client
To enable this project as a Migrate client you need to add the Migrate client library, migrate-api.jar, from the Migrate SDK, by dragging and dropping it on the libs directory, as shown in Figure 10-2.

Step 3: Defining the Information to Be Managed by Migrate
You’ll need to define the information that will be managed by Migrate and synchronized with a network backend. Because this data description will be used in multiple places — the UI code in an Android client; the contract and SQLite tables in the Migrate cache; the JSON messages exchanged between the Migrate cache and a Migrate enterprise backend service; and, perhaps, even the SQL DDL for tables in a database supporting that service — it is desirable that it be automatically generated from a single source. The current implementation of the Migrate framework does this by using Java annotations and introspection on a Java class definition — of course, there’s no reason not to support different language bindings, or web-based definition systems in the future.
This form of definition makes a great deal of sense in applications that represent data internally as POJOs (plain old Java objects, which are objects that do little but represent data). It was made popular by Java frameworks like XDoclet and Hibernate, and its use continues in App Engine. As you saw in Chapter 6, the ability to generate both network and database representations automatically for a data object from the single definition makes sense as a way of saving time and preventing errors. The obvious choice for that single definition, in a Java application is the representation actually used throughout that application and verified by the Java complier. As you’ve read, that’s the class that represents the data — the POJO.
In an Android program, on the other hand, this particular data-definition object will not likely be used. Throughout this book the discussion has advocated the use of a REST-like style all the way up to the UI. In that style, an Android program is likely to use either Cursor or ContentValues objects, instead of POJOs, to represent data for the short period of time that it is in flight between a datastore and the screen.
In either of those representations the application code uses, as demonstrated in Chapter 5, a special file, the data contract, to identify a content provider, its virtual tables, and the columns in those tables. As it is currently implemented, Migrate generates that contract automatically by analyzing a data-definition POJO.
The POJO for the MigrateContacts project resides in the following location:
$CODE/MigrateContacts/src-schema/com/enterpriseandroid/migratecontacts/Contact.java
You need to build this source file using:
cd $CODE/MigrateContacts
ant -f build-schema.xml
Note: Once you have built this file, you won’t use its output class directly in any Android application; instead, you’ll use the Android contract that you generate from it.
Listing 10-1 shows the definition for the Contact data-definition POJO.
LISTING 10-1: The MigrateContacts Contact object
package com.enterpriseandroid.migratecontacts;
import net.migrate.api.annotations.WebDataSchema;

@WebDataSchema(version="1")
public interface Contact {
    public String getFirstname();
    public String getLastname();
    public String getEmail();
    public String getPhoneNumber();
}
The @WebDataSchema annotation on the interface allows the Migrate contract definition tool to identify it as the target for analysis. Data member names and types are inferred from getter methods and their return types.
Step 4: Generating the Contacts Contract
Now you’ll generate the contacts contract. The Migrate contract definition tool is part of the Migrate SDK. At this time it is an ant script named migrate.xml. To use it, copy it from the SDK distribution into the root of your project, as shown in Figure 10-3.

In order to use the contract definition tool, you must configure it by creating an ant properties file. This properties file will supply the parameters specific to the particular project. The configuration file for this project resides in $CODE/MigrateContacts/tools/migrate.properties and is shown in Listing 10-2. Copy this file into place:
cp $CODE/MigrateContacts/tools/migrate.properties $CODE/MigrateContacts/LISTING 10-2: Migrate contract definition tool configuration
migrate.sdk.root=../../migrate-sdk-beta/
migrate.object=com.enterpriseandroid.migratecontacts.Contact
migrate.class.root=build/classes-schema
migrate.gen.root=gen
migrate.endpoint=http://localhost:8080/migrate
The configuration file specifies several things:
- migrate.sdk.root — The directory containing the Migrate SDK.
- migrate.object — This is the fully qualified name of the object that will be used as a template for creating the data description. This is the Java interface definition shown in Listing 10-1.
- migrate.class.root — This is the directory containing a compiled version of the class named in the migrate.object property. Recall the earlier instructions regarding building the migrate schema classes — the ant script places the compiled classes here. Be sure that this property points at the root of the directory containing the class file, not the actual directory containing the file. In this case, for instance, the property’s value is build/classes-schema, not build/classes-schema/com/enterpriseandroid/migratecontacts.
- migrate.gen.root — This is the root of the file tree into which the Migrate tool will put the generated contract file. This example uses the gen directory, the same directory that the Android toolkit uses for its generated files. Although this has a certain elegance, remember that cleaning the project from Eclipse will delete the file. Unlike the files that are automatically generated by the ADK, files generated by the Migrate tool will not be recreated until the tool runs again. Again, the full path to the resulting generated file, as is standard for Java source files, will mirror the fully qualified name of the class it contains. In this case, for instance, the complete pathname for the contract class generated by the Migrate tool is .../gen/com/enterpriseandroid/migratecontacts/ContactContract.java.
- migrate.endpoint — This is the URL for the Migrate service with which the client will synchronize data. Subsequent sections will demonstrate using the Migrate tool to send a copy of the data descriptor it generates to this endpoint.
Developers who are familiar with ant will realize that it is possible to specify or override any of these definitions from the command line. As intrinsic properties of the project, however, it makes a lot of sense to put them in a file, where they can be managed with a version control system.
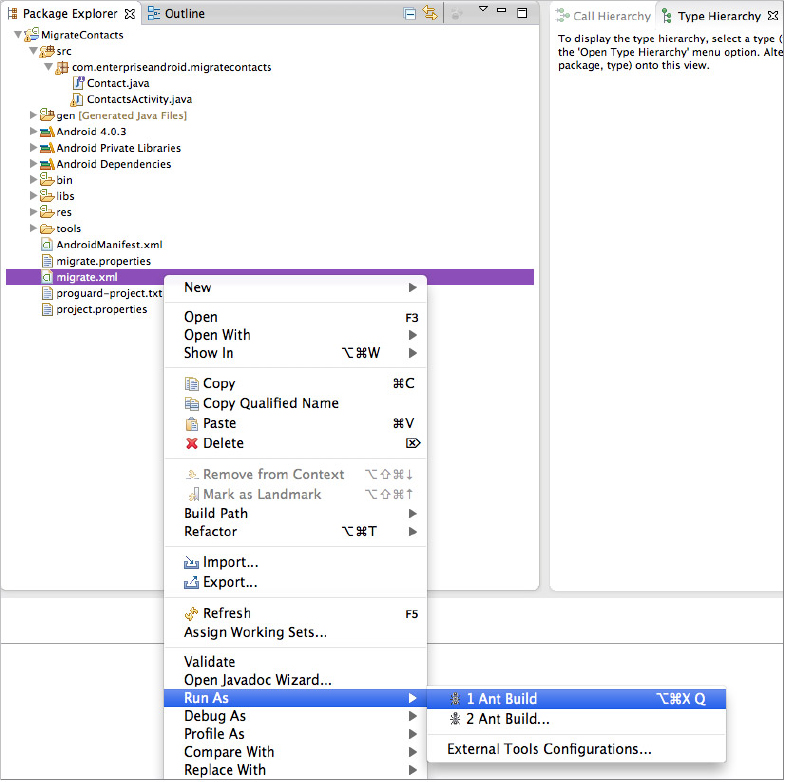
Once you have specified the tool parameters, run the tool to generate the contract file. From Eclipse, select the ant build file, migrate.xml, and run it as an external tool, as shown in Figure 10-4, making sure to select the first target.
The tool should complete successfully, producing the ContactContract class in the gen directory. You may have to refresh the project to see it; it’s shown in Figure 10-5. The MigrateContacts project code should now compile sucessfully, and the errors should go away in Eclipse. Note though, you should not try to run the project yet.
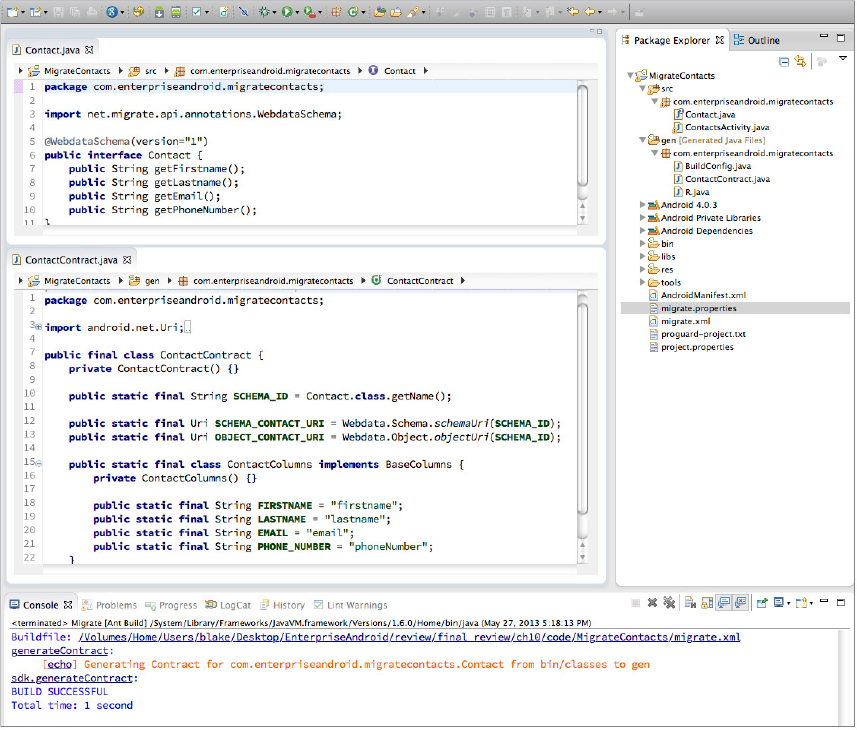
Listing 10-3 examines the newly generated contract.
LISTING 10-3: The SDK-generated contract
/* Generated Source Code - Do not Edit! */
package com.enterpriseandroid.migratecontacts;

import android.net.Uri;
import android.provider.BaseColumns;
import net.migrate.api.WebData;

public final class ContactContract {
    private ContactContract() {}

    public static final String SCHEMA_ID = com.enterpriseandroid.migratecontacts.Contact

    public static final Uri SCHEMA_CONTACT_URI = WebData.Schema.schemaUri(SCHEMA_ID);
    public static final Uri OBJECT_CONTACT_URI = WebData.Object.objectUri(SCHEMA_ID);

    public static final class ContactColumns implements BaseColumns {
        private Columns() {}

        public static final String FIRSTNAME = "firstname";
        public static final String LASTNAME = "lastname";
        public static final String EMAIL = "email";
        public static final String PHONE_NUMBER = "phoneNumber";
    }
}
There are a couple of things to consider here. Certainly there are definitions for column names, exactly as expected. However, in addition, note the definition, early in the file, of a schema ID. This ID identifies to Migrate which of the many datastores Migrate manages that the given application wishes to use.
Finally — and perhaps this is a surprise — notice that there are two URIs in the contract. The first, the schema URI, is the URI for the metatable. The metatable holds data about the datasets that Migrate manages. An application must be able to discover the state of the dataset it intends to use. It will use the row in the metatable identified by the schema ID to find that state. This process is discussed in the next section.
The second URI — the object URI — is for the actual contact data. Like the schema URI, this URI’s authority section also belongs to Migrate. The virtual table it identifies, however, will contain the contact data.
At this point, the Migrate framework has been fully integrated into the MigrateContacts project. All that remains is to write the code that uses it.
INTERFACING WITH THE MIGRATE REST PROXY
Nearly all of the code that comprises the MigrateContacts project is taken directly from its Chapter 5 predecessor, restfulCachingProviderContacts. Notice, on the other hand, that half of the classes and more than half of the code have not been copied to the new project: They’ve been replaced by the Migrate framework and left behind. Only the UI components of the, admittedly simple, application are still needed. So far, so good!
There is one new class that you can find in the migrate-client source repository, SchemaManager. This class replaces the entire data and service sections from the Chapter 5 version of the application. It is instructive to walk through it in order to understand how it works.
The main problem that the client application must solve is very similar to that addressed by SQLiteOpenHelper: the initialization problem. Recall from Chapter 3 that an application newly installed on a device must initialize any SQLite databases that it needs before they are used for the first time. It accomplishes this by requesting instances of the open database exclusively from a subclass of SQLiteOpenHelper. The helper instance determines if the database exists. If getWritableDatabase is called ten million times during the installed life of an application, SQLiteOpenHelper simply returns the cached, open database for all but one of those calls. That single first time it is called, though, it finds that the database does not exist (or needs an update). Since the helper contains the initialization code for the database, it can create or update it before it returns. The calling code is none the wiser.
In a similar manner, the Migrate content provider must initialize its copy of any given schema the first time it encounters it, before it can provide data from that schema to its clients. This initialization is not a request for data from the schema. Instead it is a meta request, asking Migrate to initialize the schema.
Recall from Chapter 3 the oblique process of obtaining a cursor by using the loader manager. When the code needs a cursor, instead of simply asking for it, it undertakes a three-step process. First it initializes the loader manager. Next, it responds to a callback from the manager to onCreateLoader by creating an instance of a loader. Finally, when the loader manager runs the loader, it receives the resulting cursor in a callback to onLoadFinished.
When using the Migrate framework these two processes are combined: First, the Migrate framework must be initialized — using a loader, incidentally. Then once it is initialized, you can query it — using another loader — for the needed data. You’ll explore this in the context of the sample project. ContactsActivity needs to display a list of all contacts. It will ask Migrate, a generic content provider, for a cursor, just as the previous version made the same request of an internal content provider in the original, pre-Migrate implementation. In that original implementation, though, SQLiteOpenHelper invisibly managed initialization when the application was newly installed and the database did not yet exist.
The new Migrate-based version of the program, however, must handle the analogous case, the case in which the Migrate framework has not yet created a table for the contacts data. Listing 10-4 contains the code for the SchemaManager class.
LISTING 10-4: The schema manager
 1 public class SchemaManager extends ContentObserver
 2     implements LoaderManager.LoaderCallbacks<Cursor>
 3 {
 4     public static interface SchemaLoaderListener { void onSchemaLoaded(); }
 5
 6     private static boolean ready;
 7
 8
 9     private final int loaderId = new Random().nextInt();
10     private final Uri uri;
11     private final String user;
12     private final String schema;
13
14     final Activity ctxt;
15     final SchemaLoaderListener listener;
16
17     public SchemaManager(
18         Activity ctxt,
19         String schema,
20         Uri uri,
21         String user,
22         SchemaLoaderListener listener)
23     {
24         super(new Handler());
25         this.ctxt = ctxt;
26         this.schema = schema;
27         this.uri = uri;
28         this.user = user;
29         this.listener = listener;
30     }
31
32     public void initSchema() {
33         if (ready) { listener.onSchemaLoaded(); }
34         else { ctxt.getLoaderManager().initLoader(loaderId, null, this); }
35     }
36
37     @Override
38     public boolean deliverSelfNotifications() { return true; }
39
40    @Override
41     public void onChange(boolean selfChange) {
42         ctxt.getLoaderManager().restartLoader(loaderId, null, this);
43     }
44
45     @Override
46     public Loader<Cursor> onCreateLoader(int id, Bundle args) {
47         return new CursorLoader(
48             ctxt,
49             uri,
50             new String[] { WebData.Schema.STATUS },
51             WebData.Schema.SCHEMA_ID + "=?",
52             new String[] { schema },
53             null);
54     }
55
56     @Override
57     public void onLoadFinished(Loader<Cursor> loader, Cursor data) {
58         if (schemaReady(data)) { listener.onSchemaLoaded(); }
59         else {
60             data.registerContentObserver(this);
61             startSync();
62         }
63     }
64
65     @Override
66     public void onLoaderReset(Loader<Cursor> arg0) { }
67
68     private boolean schemaReady(Cursor data) {
69         ready = data.moveToFirst()
70             && (WebData.Schema.STATUS_ACTIVE
71                 == data.getInt(data.getColumnIndex(WebData.Schema.STATUS)));
72         return ready;
73     }
74
75     private void startSync() {
76         ContentResolver.requestSync(
77             new Account(user, WebData.ACCOUNT_TYPE),
78             WebData.AUTHORITY,
79             new Bundle());
80     }
81 }
Examine this code by walking the path of execution. In order to ensure that Migrate has loaded the necessary schema — and then obtained a cursor to data in that schema — the client must do the following:
Although this process looks convoluted, remember that nearly all of it happens only once. As with the SQLiteOpenHelper — which may, on some occasions, have to copy an entire database — the worst case looks pretty bad. Most of the time, though, most of these steps won’t happen at all. Even when initialization is necessary, it usually completes very quickly and with delays no greater than those imposed by the network.
The rest of the code in the ported version of the simple Contacts application is nearly unchanged. Other than the changes in symbol names due to the automatically generated contract, only three other changes are necessary. They are shown in Listing 10-5.
LISTING 10-5: Porting a client activity
public class ContactsActivity extends BaseActivity
    implements LoaderManager.LoaderCallbacks<Cursor>,
    SchemaManager.SchemaLoaderListener
{
    //  ... code elided
    @Override
    public void onSchemaLoaded() {
        getLoaderManager().initLoader(CONTACTS_LOADER_ID, null, this);
    }

    @Override
    protected void onCreate(Bundle savedInstanceState) {
    // ... code elided
        new SchemaManager(
            this,
            ContactContract.SCHEMA_ID,
            ContactContract.SCHEMA_CONTACT_URI,
            ((ContactsApplication) getApplication()).getUser(),
            this)
        .initSchema();
    }
}
Note that in its onCreate method, the activity initializes the schema manager. This is entirely analogous to initializing a loader manager: It kicks off the process of getting the data that the activity will display, as described previously. The name of the user account, used by the SynchManager to log into the remote service, comes from the application object. You’ll see how that works in a moment.
Next, notice that the activity extends SchemaManager.SchemaLoaderListener. This allows it to receive the callback indicating that the dataset it requires has loaded. Its implementation of the method required by the interface onSchemaLoaded initializes a loader manager instance to get the data cursor. This is the call to initLoader that would have been in onCreate. It has simply been delayed by one layer of indirection.
Just as all requests for databases must be made of the SQLiteOpenHelper, in order for it to be effective, all requests for data from the Migrate service must be made through a schema manager. Both of the application’s activities have been modified to add this new layer of indirection.
Careful observers will notice that there is one additional change in the ported version of the simple Contacts application. In the original version, there were colored bars that provided feedback to the user about the state of a record: synched, synching, failed. Although the information that makes that feature possible is not available in the current implementation of Migrate, it is regarded as essential by the developers, and is scheduled for addition in the near future.
As noted, a Migrate client application must be able to identify the account to use, in order to log in to and synchronize with a remote service. Android’s SyncManager is a powerful and secure tool for managing remote accounts. It safely manages credentials and optimizes the process of synchronizing data. It is, however, completely external to the client application. An installation of Migrate may have to communicate with several different backend services and may do so using accounts that exist only on your private device. An application must be able to discover the account to use in order to synchronize the data. The sample application does that using a standard preferences activity and a specialized Application class so that the information is available application-wide. That is demonstrated in the next section.
Step 5: Starting a Local Migrate Service
This task should be pretty easy if you have run through the examples in Chapter 6. If you have not, we suggest that you do so now. After you have installed the required tools for Chapter 6, simply copy the $MIGRATE_SDK/migrate.war binary to $CATALINA_HOME/webapps directory and restart Tomcat.
Step 6: Publishing Your Application’s Schema
The last step of creating a Migrate-enabled application is publishing its schema into your new local service instance. You do this, once again, using the ant tool. Select the tool, migrate.xml, in Eclipse but instead of running it directly, choose Run As ![]() External Tools
External Tools ![]() Configurations, as shown in Figure 10-6.
Configurations, as shown in Figure 10-6.
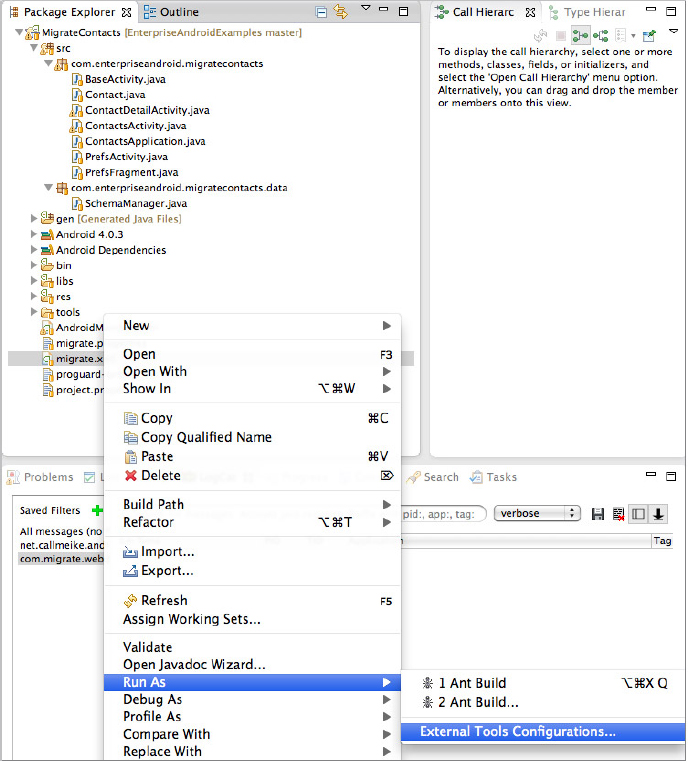
This will bring up a dialog box shown in Figure 10-7. Choose the Targets tab.

In the Targets tab, select the second target, postSchema. Click Run to run the tool. The console should confirm that your schema has been posted to the site you named with the migrate.endpoint property, in the migrate.properties file.
Once you have posted the Migrate schema, you can check the presence of the new metadata by loading the following URL in a browser: http://localhost:8080/migrate/schema/com.enterpriseandroid.migratecontacts.Contact. The response should be JSON that contains recognizable contact fields.
SETTING UP A DEVICE
The first step to running a Migrate client on a device or an emulator, of course, is installing the Migrate generic content provider itself. There are several ways to do this. If you have cloned the open-source project and have it open as an Eclipse project, you can run it as you would any other Android project. It should also soon be possible to download Migrate directly to your emulator from several Android storefronts. For now, you should install the version found in the Migrate SDK.
In this command-line session (for example, in Bash on Linux, MacOS, or cygwin) the shell variables $MIGRATE_SDK and $ADK_HOME point to the root of the installation of the Migrate SDK and the Android Developers Toolkit, respectively.
Before you begin, be sure that the emulator you intend to use is up and running:
$ adb devices
List of devices attached
emulator-5554   device
Or you can just look in the DDMS perspective in Eclipse, and you can find available devices on the left side.
Step 1: Installing the Migrate Client
Start the AVD manager, launch an AVD, and before you continue, ensure the emulator is running. Then install the Migrate client, located in <migrate_sdk>/migrate-client.apk, as follows:
$ cd $MIGRATE_SDKThe adb command that installs an application is adb install. If the Migrate client has already been installed on the emulator, adb will refuse to install it again unless you specify the -r flag, which indicates that you want to reinstall the apk.
$ adb install /migrate-client.apk
2660 KB/s (356476 bytes in 0.130s)
pkg: /data/local/tmp/migrate-client.apk
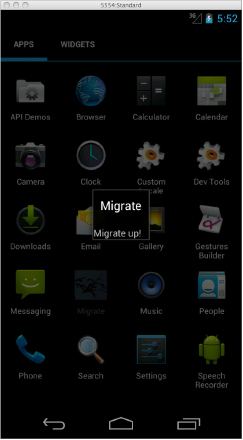
SuccessVerify that Migrate has been installed and start it (see Figure 10-8). If you’re successful, you’ll get a Toast message indicating that Migrate is up, as shown in Figure 10-8.

Step 2: Adding a WebData Account
Next, recall that Migrate depends on the sync manager. In order to work correctly, the manager must be configured with an account. To create this account, use the Settings application shown in Figure 10-9.
From the Settings application (leftmost pane) choose “Add account.” This will bring up a new page showing the types of accounts known to the Account manager (the center pane). Among the choices you should see “webdata SyncAdapter” (at the bottom of the list, in this case), the type of account used by the Migrate framework. Selecting the account type will bring up a dialog (the rightmost pane) that allows you to log into the Migrate service. If this were a real Enterprise application, you would have to provide real credentials here. If you are using the demonstration service, described in Chapter 9, any username and password will work, and you should not change the endpoint URI. The default will work with the local service instance if you are running in the emulator.
Step 3: Turning on Synchronization
Before you can start the Migrate contacts application, you now just need to activate synchronization for your new Migrate account. Do so using Settings ![]() Accounts
Accounts ![]() webdata SyncAdapter
webdata SyncAdapter ![]() Migrate. Then check the sync checkbox.
Migrate. Then check the sync checkbox.
Step 4: Running the Application
Run the MigrateContacts application using Run As Android application, as you’ve done for other Android projects in this book.
Step 5: Configuring an Account in Migrate Contacts (Optional)
Recall that in order to use the Migrate service, the application must know which account to use. In order for it to get data from the Migrate service, it must be configured to use the correct account. You configure this account using the Settings activity, which appears as a wrench in the action bar. Configure the application to use the same account used previously, as shown in Figure 10-10.The application will not work until this account has been configured correctly.

Select the “Preferences” item in the application’s Action Bar. It’s represented by the standard wrench icon (the leftmost pane in Figure 10-10). Since this is a very simple demonstration application, there is only one item in the preferences: the user configuration (the center pane). Selecting the single item brings up a standard preferences edit text dialog that allows you to enter the name of the account configured in the previous section.
Congratulations, you have successfully set up MigrateContacts! Return to the main activity to manage the contacts (see Figure 10-11).

FUTURE DIRECTIONS: MIGRATECLINIC
While MigrateContacts is appealing, it is certainly not ready for prime time yet. In order to be ready for use in real enterprise environments, future implementations of Migrate will have to support things like large data objects, joins between virtual tables, schema versioning, and security (security issues in general are discussed in Chapter 12).
The example code for this chapter includes a second application, MigrateClinic, that hints at the how the Migrate framework might address some of these things.
In order to manage large objects, the Migrate tool will support a new datatype. In the prototype code in Listing 10-6, this type is InputStream.
LISTING 10-6: Proposed Migrate InputStream type
@WebdataSchema(version="1")
public interface XRay {
    public String getSsn();
    public String getDescription();
    public String getNotes();
    public Long getTimestamp();
    public InputStream getXRay();
}
When the Migrate framework encounters a field with this special datatype, it populates it not with the actual data, but instead with a URL. That URL can be used, as demonstrated in Chapter 4, to get an input stream from the Migrate content provider. Listing 10-7 shows the implementation of a Loader that reads the input stream into a bitmap and then displays the result in an ImageView.
There are two classes (XRayLoader, XRayLoaderCallbacks) and one method (populateXRay) in this listing. They are not discussed here in detail because they are nearly identical to their analogs in Chapter 4.
LISTING 10-7: Using the proposed type extension
private static class XRayLoader extends AsyncTaskLoader<Bitmap> {
    private volatile boolean loaded;
    private final Uri uri;

    public XRayLoader(Context context, Uri uri) {
        super(context);
        this.uri = uri;
    }

    @Override
    public Bitmap loadInBackground() {
        Bitmap xray = null;
        InputStream in = null;
        try {
            in = getContext().getContentResolver().openInputStream(uri);
            xray = BitmapFactory.decodeStream(in);
        }
        catch (FileNotFoundException e) { }
        finally {
            if (null != in) { try { in.close(); } catch (IOException e) { } }
        }

        return xray;
    }

    // see bug: http://code.google.com/p/android/issues/detail?id=14944
    @Override
    protected void onStartLoading() {
        if (!loaded) { forceLoad(); }
    }
}

// code omitted...

class XRayLoaderCallbacks implements LoaderManager.LoaderCallbacks<Bitmap> {

    @Override
    public Loader<Bitmap> onCreateLoader(int id, Bundle args) {
        Uri uri = null;
        if (null != args) {
            String s = args.getString(PARAM_XRAY);
            if (null != s) { uri = Uri.parse(s); }
        }
        return (null == uri) ? null : new XRayLoader(XRayActivity.this, uri);
    }

    @Override
    public void onLoadFinished(Loader<Bitmap> loader, Bitmap bm) {
        populateXRay(bm);
    }

    @Override
    public void onLoaderReset(Loader<Bitmap> loader) {
        populateXRay(null);
    }
}

// code omitted...

void populateXRay(Bitmap xray) { xrayView.setImageBitmap(xray); }
The ability to do table joins is also a critical feature for Migrate. As the code in this chapter has shown, Migrate maintains a virtual metatable describing the schemas it supports, at any given time. One possible implementation of table joins simply inserts descriptions for a new view into this metatable. The code to do that might look something like Listing 10-8.
LISTING 10-8: Proposed Migrate view feature
ContentValues view = new ContentValues();
view.put("name", SCHEMA_ID);
view.put("tables", TABLES);
view.put("projection", PROJECTION);
view.put("selection", SELECTION);
Uri schemaUri = resolver.insert(XRayContract.SCHEMA_XRAY_URI, view);
The URI returned by the insert statement is the object URI for the new table. As shown in Listing 10-9, if the insert completes successfully, the new URI could be used as the object URI in any other Migrate contract. The contract is simply created dynamically instead of statically.
LISTING 10-9: Using the proposed Migrate dynamic contract
new SchemaManager(
        activity,
        SCHEMA_ID,
        schemaUri,
        getUser(),
        listener)
    .initSchema();
Dynamic contracts introduce a small additional constraint: The URI for the data is no longer static. It will be null until the new view is created. If the new view cannot be created, perhaps because some parent table cannot be downloaded, it will stay null. The fact that code uses a dynamically created view and must protect itself from a null valued content URI is, actually, not that significant. As demonstrated earlier in this chapter, the application may already have to wait for the data to which the URI refers, to become “ready.” This new constraint simply means that the URI may not be ready either.
The Migrate framework is an attempt to prove a concept. It is useful to engage in speculation of the sort pursued in this section to understand whether or not it is up the task. Certainly, the system has promise.
SUMMARY
The MigrateContacts application is intended as an interesting proof of concept. The process of creating it should reveal some of the details of the WebData architecture and give you substantial insight into its viability as a real tool.
This chapter began by offering several potential strategic advantages for the WebData approach:
- It is an implementation of enterprise-wide data sharing that doesn’t attempt to sweep the challenges of mobile synchronization under the rug.
- It makes good use of the Android components designed for the job: content providers, synchronization manager, service-based threading, and the best networking packages.
- Because it is a single implementation used by multiple clients, it is likely that serious bugs will occur less often in production and be fixed more quickly if they do occur.
- It completely removes the issue of implementing one somewhat complex piece of code from an application.
The list is obviously appealing but so is faster than light travel. What did the exercise of building an actual application demonstrate?
There are some real high points. The ported application started simple and, for the most part, got much simpler. The restfulCachingProviderContacts project is something like 1,700 lines of Java and XML code. MigrateContacts is something like 500 lines, which is almost entirely hooking the provider contract to the application view. At least in this constrained context, the approach is a win. Even the final bit of speculation in the “Future Directions: MigrateClinic” section suggests that Migrate can be extended into a practical and useful platform.