
Meet 1Password
You’ll have an easier time working with 1Password if you set it up correctly from the start and understand how it’s designed to function. In this chapter, I help you decide which version of 1Password to subscribe to (if you haven’t already made up your mind), tell you what’s new in 1Password version 8, cover some preliminary configuration steps that are often ignored or misunderstood, make sure you know which components are supposed to do what and when, and then walk you through creating and using your first few web logins, which for most people are 1Password’s most crucial feature.
The chapter closes with important advice about identifying your best approach to using 1Password logins and some notes about a few tasks that 1Password does not handle.
This chapter is mainly about the Mac, Windows, and Linux versions of 1Password, although much of what you learn here also applies to the mobile versions. To learn more details about 1Password for iOS/iPadOS and Android, see Use 1Password on the Go, later.
License 1Password
By now you’ve most likely subscribed to, downloaded, and installed 1Password. However, if you haven’t yet subscribed, you should understand your licensing options. (And, if you’ve previously owned a standalone 1Password license, you should be aware of changes that will affect how you license the app from now on.)
For most of 1Password’s history, you licensed the software itself for one or more devices or platforms. Apart from any paid upgrades you might opt for, the software was then yours to use indefinitely. For the first few years after 1Password introduced subscriptions, standalone licenses remained available. However, that option no longer exists.
When you sign up for a 1Password account online (or buy a subscription as an in-app purchase on supported platforms), you pay a modest annual fee (starting at $35.88 per year) to use 1Password on all your devices, on any platform. 1Password accounts (described more fully just ahead) also enable you to access your passwords securely from any web browser, and include automatic syncing across all your devices. (If you later cancel your subscription, a local copy of your data stays on your devices, but stops syncing.) 1Password accounts include unlimited app updates for as long as you continue paying for the service.
1Password accounts come in several varieties (see Understand 1Password Accounts, just ahead, for further details):
Individual: The most basic 1Password account, which costs $2.99 per month (billed annually), includes all the features I just mentioned for a single person.
1Password Families: For $4.99 per month (again, billed annually), up to five family members can have all the benefits of a 1Password subscription. (But even with just two family members, you’ll save money over the cost of individual accounts.) Each family member gets a personal vault that isn’t shared, but family accounts also make it possible to share individual passwords and other pieces of data securely with other family members, manage family members’ permissions, and help a family member recover a forgotten password—all things you can’t do with an individual account.
1Password Business: Businesses and other non-family groups can pay as little as $2.00 per user per month for features comparable to those available to families—plus additional administrative controls. There are three business categories:
Teams: Small businesses normally pay $3.99 per user per month, but a Teams Starter Pack costs $19.95 per month for up to 10 users, making the per-user price only $2.00 per month.
Business: Large businesses needing advanced capabilities such as automated deployment, usage reports, and audit trails can opt for 1Password Business accounts, which start at $7.99 per user per month, but also include free family accounts for each employee. (This book doesn’t cover any of the features exclusive to 1Password Business accounts.)
Enterprise: Larger businesses, which may need a dedicated account manager and specialized support services and training, can opt for enterprise programs, prices for which are available on request. (Again, this book doesn’t cover any enterprise-specific features.)
Understand 1Password Accounts
1Password accounts are now the only way to license 1Password, as well as the only way to sync 1Password data. Here are the highlights of 1Password account features, starting with those available to all 1Password account types (Individual, Families, and Business):
Built-in syncing: 1Password accounts include their own sync capability, so you won’t have to rely on Dropbox, iCloud, or another third-party service, as was the case in earlier versions of the app.
Note that, even if you use the sync capability in 1Password accounts, your passwords themselves are not stored in the cloud. Rather, what’s stored in the cloud is an encrypted version of your data that not even AgileBits can read. Your data is not in any way less secure when using a 1Password account than it would have been if you were using Dropbox or iCloud sync.
Web access to your 1Password data: 1Password accounts let you (and, if applicable, any family or team member) view and edit vault data securely in a web browser.
Travel Mode: To avoid having sensitive passwords on your devices when they may be subject to inspection at border crossings, you can activate Travel Mode for your account. Any vault you haven’t previously marked as Safe for Travel will be removed from your devices. You can later disable Travel Mode to restore those items to your devices (see Use Travel Mode).
1Password in Your Browser: A browser extension that AgileBits refers to as “1Password in your browser” lets you use most of the major 1Password features—even if you don’t have the desktop app installed—by communicating directly with your 1Password account. Because it doesn’t need another app to function, 1Password in Your Browser even works on Chromebooks and Linux computers. Due to Apple’s security requirements, the 1Password in Your Browser extension isn’t compatible with Safari, but not to worry: 1Password for Safari adds the same features to Safari, just in a different way. I should emphasize, however, that even though the browser extension doesn’t require the desktop app to be installed, it’s a good idea to install both, as the full app adds useful features not found in the extension alone.
Item history: Using the web interface, you can view previous versions of each item (for example, before a password change) and restore them if necessary. 1Password stores item history for a year.
Documents: 1Password can also store documents, which can then be linked to individual logins or other items (see Documents and Attachments).
Two-factor authentication: For optional added security, you can set up your 1Password account to require a second form of authentication besides your master password. That can be either a one-time password, supplied by an authenticator app (such as Authy, or a copy of 1Password on another device), or a hardware security key such as Yubikey or Titan. (I say nothing more about two-factor authentication for 1Password accounts in this book; use the links to read instructions on 1Password’s website if you’re interested.)
In addition, family and team accounts offer the following:
Secure sharing: Easily share a single item, or a vault containing an arbitrary group of items, with other family or team members. (It’s possible, but a bit more complicated, to share individual 1Password items with others who are not part of a family or team account—and perhaps not even 1Password users at all. See Share Individual 1Password Items.)
Add members: Send an invitation to one or two people, or even an entire organization, and the recipient(s) can join your family or team account quickly and easily.
Automatic deployment: Once people have joined your family or team account, you can give them access to shared vaults, on all their devices, whenever you like, without their having to take any action whatsoever.
Total access control: You can decide, for each user of each vault, which actions that person can perform—including viewing passwords, creating and deleting items, printing items, and more. (The options are considerably more granular for team accounts than for family accounts, however.) In addition, you can at any time suspend or delete a family or team member entirely, or revoke a person’s access to a particular vault.
Account recovery: If one of your family or team members forgets their master password for a shared vault, you can perform a procedure to recover that person’s access.
Learn About 1Password 8
After years of development, extended public beta-testing, and staggered releases across various operating systems, 1Password has finally reached version 8 on every platform. (In fact, it’s well beyond version 8.0; as I write this, the latest nightly build is 8.9.7.) This momentous milestone means that, finally, features and user interface are in sync everywhere—though not without some qualifications and footnotes. That, in turn, makes it easier to use 1Password as you switch among platforms. It also makes my job easier as I write about the app.
Version 8 maintains the essence of earlier versions but changes in a number of ways. For one thing, it adds new features, such as:
Watchtower Dashboard (see Perform a Password Security Audit)
Quick Access window (see Quick Access)
Universal Autofill (see Universal Autofill and Type in Window)
Developer Tools, such as support for SSH keys (see SSH Keys) and biometric unlock on the command line (see Developer Settings)
Secure sharing of individual items (see Share Individual 1Password Items)
1Password 8 also takes a number of features that existed only on some platforms and extends them across most (or all) platforms. In particular, Linux gains many capabilities that previously existed only in 1Password for Mac and Windows.
Along with the new features come under-the-hood changes to 1Password’s infrastructure, as well as more visible changes to its user interface. Predictably, these changes have delighted some users while making others extremely grumpy. I’ve read a lot of feedback along the lines of “1Password 8 was pretty rough during the betas and the early release versions, but now that it has matured and I’ve gotten used to it, I’d never want to go back.” I’ve also heard from a significant number of users who said, “That’s it, I’m out. Where 1Password has gone, I can’t follow.”
Since you bought this edition of this book knowing that it’s about 1Password 8, I’m going to go out on a limb and assume you don’t need to be convinced that you want to use this version (or continue using it, as the case may be). Which is good, because I’m not here to talk you into it. I like 1Password 8 (with, of course, some qualifications) but I’m not an apologist for it. I think you should choose tools that make you happy, and if 1Password 8 doesn’t, then pick something else, with my blessing. Nobody (except, perhaps, your employer) is going to force you to use a password manager you dislike.
However, I do want to explain why 1Password 8 was so controversial in certain quarters, what features from version 7 were lost (either temporarily or permanently), why this book no longer covers 1Password version 7 or earlier, and what you need to know if you haven’t yet made the transition to 1Password 8. (If none of this is of interest to you, feel free to skip ahead to Configure 1Password.)
The Electron Issue
News that the desktop (Mac, Windows, and Linux) versions of 1Password 8 would be built using a framework called Electron produced reactions that, like the eponymous subatomic particle, were negatively charged. (I should amend that: the complaints came mostly from Mac users; it’s much less of a big deal on other platforms.) Virtual barrels of digital ink were spilled decrying this affront to common decency.
In case you’re not a developer and you have no idea what all the fuss is about, let me give you the extremely short and partially accurate version of the story.
Electron is a tool that lets programmers create desktop apps using the same technologies (such as JavaScript and CSS) used to build webpages. Developers like it partly because it lets them employ the same set of skills in multiple places—and it’s particularly handy if whatever desktop app you’re creating already existed as a web app. But another big part of the appeal is that, because Electron is cross-platform, you can write the underlying code for your app once and, with only modest additional effort, build versions that run on Mac, Windows, and Linux (and look nearly identical in each place).
One problem with Electron, however, is that unless developers put in considerable extra effort, the apps don’t look, feel, or act like native apps on any platform. (Technically speaking, they are native in the sense that they run code compiled and packaged according to the rules of each platform, but that distinction is not particularly meaningful for users.)
Electron apps are commonly described as looking and acting exactly like websites. (Electron-based desktop apps that are often cited disapprovingly include Slack, Discord, and WhatsApp.) Now, sure, there are some fantastic and elegant websites out there, but critics who bring up this point don’t mean it as a compliment. Their point is: interface elements like windows, menu commands, buttons, checkboxes, and toolbars appear and behave a certain way in built-from-scratch native apps, but they’re often much different on webpages, owing to the constraints of HTML and browser design. Standard keyboard shortcuts may not work, some windows may not be movable, and various other conventions enforced by existing platform-specific development tools may be ignored. It’s not that the apps don’t work; it’s just that they feel wrong.
But beyond look and feel, a more worrying complaint is that Electron-based apps tend to be huge, far out of proportion to their functionality, and to have both poor performance and massively excessive memory use. The stereotypical Electron app, as described by its detractors, offers little or no functionality beyond what you could get in a web-based version of the same app, while using up astonishing amounts of system resources that can routinely bring the app (and whatever other apps you’re using) to a crawl.
I have seen and used Electron apps that match this stereotype and are unequivocally awful. However, that’s not because Electron is inherently bad. It’s because the developers took the path of least resistance rather than going to the considerable extra effort required to make their Electron-based apps small, fast, resource-efficient, and good citizens of each operating system they run on. With effort, an Electron app can keep all its benefits of cross-platform efficiency and also be extremely well behaved.
The 1Password developers put in that effort. They did their homework, tested and optimized relentlessly, and came up with an app that’s just fine, thanks. Yes, even on a Mac.
To be sure, there are some little quirks and oddities in 1Password that reflect its Electron wrapper and that you would not typically see in a native app. For example, there’s a control that lets you reduce or enlarge the size of the entire interface—not just the text but also every icon, button, and other control. OK, yes, that does seem like something on a webpage. But also: I’m old enough that I have to wear reading glasses when using a laptop, so the option to zoom in isn’t exactly upsetting. (There are also accessibility issues, which I address ahead.)
In short, in my personal and professional opinion, the Electron-ness of 1Password 8 is mostly a nonissue. It had the potential to be awful, but it turned out not to be! Crisis averted.
Missing Features
As I mentioned earlier, 1Password 8 adds important features not found in earlier versions, but as of publication time, it’s also missing some capabilities that 1Password 7 had. Needless to say, if you depend on a feature and find it’s absent when you upgrade to a new version, you’re going to be unhappy. Fair enough. Some of the missing features are in fact gone for good, but others are merely on holiday. Here’s a quick overview:
Standalone licenses: You used to be able to pay a one-time fee to license the 1Password app, and then use it for as long as you liked (assuming it remained compatible with your current operating system). 1Password 8, however, is subscription-only, as is true of many popular apps these days. If you stop paying, you’ll still be able to access your 1Password data, but you won’t be able to edit it, add to it, or autofill items in your browser.
Local vaults: Separate from how 1Password is licensed, in version 7 and earlier it was possible to create a standalone, local vault on a particular device—a vault whose data didn’t live in the cloud. This post by AgileBits discusses the reasoning behind discontinuing local vaults. Although local vaults aren’t going to come back, you should be aware that 1Password stores a local copy of all your data on each device, so you can still access everything if you lose your internet connection.
Local sync: 1Password 7 and earlier let you optionally sync your vaults between devices using a local Wi-Fi connection, bypassing the cloud entirely. Local sync was cumbersome to configure and perform, and prone to glitches, while its sole hypothetical benefit was the lack of dependence on a third-party service. But did it ever solve (or prevent) real-world problems? I’m not sure that it did. I cannot, with a straight face, claim that a local sync of strongly encrypted data is somehow more secure than a cloud-based sync of the same data. If the encryption is solid (and it is), the syncing method genuinely does not matter. I don’t expect local sync ever to return. However, AgileBits has stated that they’re considering an option for self-hosted vaults, so that you could use a server under your control, rather than 1Password.com, to store and sync your data. Whether, when, or in what form that option appears is anyone’s guess.
Search limitations: 1Password’s search feature is now global—it searches both titles and contents of vault items, with no way to constrain it to, for example, only titles. The advanced search feature in the Mac version, which offered much more extensive control over what data to search for and where, is also gone. The loss of advanced searches on Macs also means that smart folders, which depended on that feature and were available only for local vaults, are gone. Of course, there are still numerous other ways to sort, search, tag, and filter your 1Password data.
Limited accessibility features: This one, I have to say, kind of hurts. Because of 1Password’s Electron wrapper, some accessibility features provided by operating systems—such as voice control on macOS—are either unavailable or limited. From the operating system’s point of view, the contents of the 1Password window appear to be a webpage, so individual elements (such as buttons, fields, and menus) may not be addressable by accessibility tools the same way they would be in a completely native app. AgileBits is aware of the problem and appears serious about finding a solution, but I have no further details.
Changing field type: You can’t change a field’s type from, say, Text to Password, or Email to URL. This seems like an obvious, useful thing to be able to do, and AgileBits has stated that it’s on their feature request list, so I wouldn’t be surprised to see it return.
Mobile security options: Previously, the iOS/iPadOS and Android versions of 1Password offered the option of a PIN code you could use in lieu of biometric login, as a less-secure alternative to retyping your whole master password. That option disappeared in 1Password 8, but AgileBits is planning to restore it soon. Similarly, you can choose in a mobile version of 1Password to be prompted for your master password every two weeks, every 30 days, or never (after initially unlocking the app), but other arbitrary options, like requiring a password every day or every 90 days, are no longer present. It seems plausible that such options may return.
Mac launcher utility integration: Prior to 1Password 8, Mac launcher utilities, such as LaunchBar, Alfred, and Quicksilver, could search for and open individual 1Password items, as long as you enabled a special preference. Because of architectural changes in 1Password 8, such utilities would have to rewrite their code in order to offer a comparable feature; so far, only Alfred has done so. See About 1Password and Mac Launcher Utilities.
Why This Edition No Longer Covers 1Password 7
I know there are some users who, despite all the good things about 1Password 8, are unwilling to make that transition. Perhaps they’re miffed about the subscription model, or are philosophically opposed to using cloud storage, or are missing a specific crucial feature from 1Password 7, but whatever the reason, they choose to stick with the older version. If you’re such a person, well, do what you think is best; I won’t try to change your mind. All I can really say is: if that’s your decision, this book is not for you.
Previous editions of this book did cover 1Password 7 (which, although still available for download as of early 2023, is no longer being supported or developed except for “important security updates”), and if you already own an earlier edition, you can keep reading it and using it. However, we won’t offer older editions to new purchasers of this book, since we’ve said explicitly that it covers only 1Password 8.
But why didn’t I just keep all the 1Password 7 stuff in the book, and add the 1Password 8 instructions?
When the previous version of this book was released, an early version of 1Password 8 was available on some, but not all, platforms. (Besides being available everywhere now, it has changed a lot since then!) So, all throughout the book, I had to say things like, “If you’re using 1Password 7 on a Mac, do this. If you’re using 1Password 7 on a PC, do that. If you’re using 1Password 7, but with the classic (1Password 7-style) browser extensions, which no longer exist, do this other thing. If you’re using it with the 1Password in Your Browser extensions, do something else.” And so on, in numerous variations, hundreds of times.
All that was extremely tedious to read (and write). Although there are still a few platform-specific differences, and although there are also different modes of using 1Password 8 (such as working from the browser extension, working from Quick Access, or working from the main app; see Find Your Usage Pattern), having to provide yet another set of instructions for 1Password 7—which, by the way, also differed significantly between macOS and Windows—is just too much.
It’s time for a fresh start. I have embraced 1Password 8, and even though I still hope for some of those missing features to make a reappearance, I know that this new model is the only path with a future. Sooner or later, whether through operating system changes or other factors, 1Password 7 will cease to be a viable option, and I’d rather confront the future now, on my own terms, than be dragged into it kicking and screaming when I eventually have no choice. I won’t judge you if you make a different decision, but Take Control Books is officially done selling or supporting books on 1Password 7.
Moving from 1Password 7 to 1Password 8
Let’s suppose you’re currently using 1Password 7 (or even an earlier version) and you’ve just decided to make the jump to version 8. Once you’ve signed up for a 1Password.com subscription, what’s the actual process for moving your data from local, standalone vaults to your new 1Password account?
AgileBits spells out one version of the steps in support articles for Mac and Windows. But even if you ignore those instructions, 1Password will walk you through all the necessary steps as long as you still have 1Password 7 installed.
The process looks something like this:
Without removing 1Password 7 (or earlier) from your computer, download and install 1Password 8.
Open 1Password 8 and, if prompted to do so, sign in to your account.
The app automatically detects your existing local vault(s) and offers to migrate the data to your 1Password account (Figure 1). Click Move Data to Account to permit this.

Figure 1: When you first run 1Password 8 on a computer that previously had a standalone vault from 1Password 7 or earlier, you’re prompted to move your data to an account. Appearance and wording may vary a bit by platform. Follow the prompts to select the 1Password account you want to use, and then click Move Data.
1Password moves all the items from the local vault(s) to the selected account, in the process converting any folders into tags.
Configure 1Password
You install 1Password the same way as any other software, so I won’t bore you with those details. Instead, in this topic, I help you with other aspects of the setup process. For example, you must choose a master password (unless you’re upgrading from a previous version, in which case you can continue using the same master password). And you should install extensions for any browsers you may use, as well as understand (and perhaps adjust) the way locking and unlocking works.
Get Up and Running
If you’ve never used 1Password before on a given device, the first time you run the app, 1Password presents a series of choices to help you get up and running quickly. Don’t agonize over any of these decisions, because you can always change your mind later.
Although there’s more than one way to go about setting up 1Password, what I consider the optimal series of steps looks like this:
Sign up for a 1Password account. As part of this process, you’ll get a 40-character secret key, which you must keep careful track of; you’ll also create a master password (see Choose a Master Password). 1Password then creates a personalized PDF Emergency Kit with your details; print this out, fill in your master password, and put it in a safe place.
Download the app on each of your devices and install it.
Open the app. Then, assuming you’ve already signed up for an account (as in step 1), click or tap Sign In and follow the prompts.
If prompted to do so on a Mac, optionally turn on Unlock with Touch ID and/or Unlock with Apple Watch.
In macOS, Windows, and Linux, Install Browser Extensions for each browser you use.
Repeat these steps for your other devices.
Choose a Master Password
When you create a 1Password account, you’re prompted to create a master password, which will protect all the other passwords you later store. This password should be both strong and memorable (a tricky combination). Later, in Understand Password Security, I discuss factors to consider when choosing any new password. However, your master password is a special case. In particular, you’ll have to type it often, so it shouldn’t be obnoxiously long or error-prone.
Because I want you to start using 1Password right away, I don’t want you to get hung up on choosing the perfect master password. (Besides, you can change it later. And, once you’ve created your first master password, you can access 1Password’s password generator to more easily devise a better one.) So, here are some quick suggestions:
As 1Password suggests, consider using a full sentence. Your password can include spaces and punctuation, so you can type it just as you normally would. Use at least five words, and for extra security, make your sentence nonsensical (as in, Galloping sloths calculate notorious wallpaper!).
Avoid accented letters and characters that don’t appear in English (such as é, ñ, and ß). Although 1Password can accept any Unicode character, the methods used to enter them vary by platform, and that could lead to frustration later.
For more ideas, read this great blog post from Jeff Goldberg at AgileBits, which discusses techniques for creating better master passwords that are still relatively easy to remember.
In any case, write down your master password and keep it in a safe, hidden place. Then take some time to practice using your master password (by locking and unlocking 1Password, as I explain in a moment) to reinforce it in your memory. Typing it will become second nature soon, but in the meantime, you don’t want to forget it.
Install Browser Extensions
Although it’s possible to use the Quick Access feature built into the 1Password app to fill in logins on webpages (as well as in other apps), a number of things you might want to do in a browser, such as saving credentials and generating new passwords, require the use of a browser extension (which I explain in more detail later in this chapter; see Browser Extensions).
Browser extensions aren’t installed automatically due to browsers’ security features; you must install them manually. I recommend doing so right away.
To install the 1Password in Your Browser extension, go to 1Password’s browser extensions page, click the Install button for your current browser, and follow the prompts. You can then return to the same page and repeat the process for any other browsers you use. If you use Safari on a Mac (see 1Password for Safari, ahead), you can’t install an extension directly; instead, you must download and install the free 1Password for Safari from the Mac App Store.
Once you’ve installed the browser extension, the 1Password ![]() icon should appear on your browser’s toolbar.
icon should appear on your browser’s toolbar.
Lock and Unlock 1Password
1Password has two states: locked (the default) and unlocked. When it’s locked, all your passwords and other personal data are securely protected and inaccessible to you or anyone else. But when you unlock 1Password by entering your master password or using biometrics such as Touch ID, Face ID, or Windows Hello, you (or anyone with access to your device) can freely see, copy, or edit any of the data.
On the one hand, 1Password must be unlocked to do anything useful to you, such as storing or filling in passwords. On the other hand, it must be locked to prevent anyone who isn’t you from seeing your personal information. Although unlocking 1Password is simple, it can be tedious if you have to do it too often.
So, the trick is to make sure 1Password is unlocked enough of the time to be convenient, but locked enough of the time to be safe.
Lock or Unlock Manually
You can manually lock or unlock 1Password at any time, in any of several ways. For example, when you open the main 1Password app, all you see in the locked state is a big password field. Type your master password, press Return or Enter, and you’re in. 1Password also prompts you to enter your master password whenever it’s locked and you attempt to do something (such as saving or entering credentials on a web form) that requires access to your data.
Although you’ll frequently unlock 1Password manually after it’s locked itself automatically (as I explain just ahead), you may also occasionally want to lock it manually—for example, if you step away from your computer in a public place:
Mac: Choose 1Password > Lock 1Password, or press ⌘-Shift-L.
Windows/Linux: Choose Account Name > Lock.
You can also lock or unlock 1Password manually in a few other ways.
Unlock with Touch ID
On any Mac with Touch ID, you can unlock 1Password with your fingerprint.
Before you can unlock 1Password using Touch ID, you must give 1Password permission to use the Touch ID fingerprint(s) that you’ve set up in System Preferences > Touch ID (Monterey or earlier) or System Settings > Touch ID & Password (Ventura or later). Then go to 1Password > Settings > Security and turn on Touch ID. (For additional information, see the AgileBits article About the security of using Touch ID or Apple Watch to unlock 1Password for Mac.)
If the 1Password app is not running and you open it, an alert like the one shown in Figure 2 appears. Rest your finger on the Touch ID sensor to unlock 1Password.
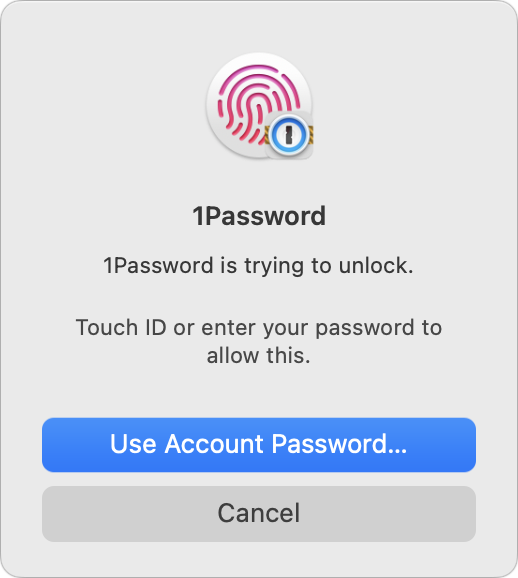
If the 1Password app is already running but locked (Figure 3), click the Fingerprint ![]() icon. When the alert shown in Figure 2 appears, rest your finger on the Touch ID sensor.
icon. When the alert shown in Figure 2 appears, rest your finger on the Touch ID sensor.

 icon.
icon.Unlock with Apple Watch
If you have an Apple Watch already set up, unlocked, and paired with your Mac, you can also use it to unlock 1Password. First, enable Apple Watch support in 1Password by going to 1Password > Settings > Security and select Apple Watch. Then, when you open the 1Password app and it’s locked, you’re automatically prompted to double-click the side button on your Watch to unlock 1Password.
Unlock with Windows Hello
If your PC is compatible with Windows Hello, you can configure 1Password to unlock using face recognition (via your computer’s built-in camera) or fingerprint recognition (via your computer’s fingerprint sensor). You’ll still be required to enter your master password the first time you unlock 1Password after restarting, but thereafter, unlocking requires just a glance or a swipe.
Lock Automatically
1Password can automatically lock your data, too, in any of several situations. The default settings aim for high security by keeping 1Password locked most of the time. If you prefer to relax the settings a bit—most people do—see Security Settings for details. For now, be aware of when 1Password locks your data by default:
When your computer sleeps (Mac) or is locked (PC)
When you switch accounts using Fast User Switching (Mac)
When the screen saver is activated
When your computer is idle for the period of time specified in Settings > Security > “Lock after the computer/system is idle for.”
In some situations, you can set automatic lock differently for browser extensions; see Configure Browser Extension Settings.
Explore the 1Password Components
Once upon a time, 1Password was a standalone desktop app with extensions that enabled it to communicate with various browsers. You still can use 1Password in that manner, but nowadays the increasingly preferred means of using 1Password on a computer is via a more robust browser extension that can function even without the app. Mobile apps for iOS/iPadOS and Android exist too, of course, and you can also access many 1Password features from a web browser without any added software.
All that to say: I used to refer to 1Password as an app, and I still do in some contexts, but that’s no longer an accurate overall representation. It’s sort of an app, sort of a browser extension, and sort of a cloud service. It’s a tool that may run locally on your device, in the cloud, or both; and depending on which variety you use, it may include one or more of several different components.
The 1Password Cloud Service
The 1Password cloud service continuously and automatically synchronizes your logins and other data across your devices. All data is securely encrypted before it leaves your device, and it can’t be accessed—not even by AgileBits employees—without your account key and master password.
Although you can interact with your 1Password account almost entirely using the desktop and mobile apps, you also have the option, should the need arise, to access all your passwords and other secure data using your web browser. (When you set up your account, you also configure a custom URL to use for accessing it.) Only a few activities, such as the initial account setup and using Travel Mode (see Use Travel Mode), require the web interface.
Even though you can get essentially all the features of the 1Password app on the web, the website itself doesn’t provide autofill or login capture capabilities for other websites. For that, you’ll need to have the 1Password app, a browser extension, or both (described just ahead).
The 1Password App
The main 1Password desktop app (Figure 4) shows all your data and provides numerous ways to organize, edit, and search it. It also lets you configure settings, check for updates, and so on.

Even though I refer to it as the “main” app, many 1Password users open it only occasionally, relying more often on either Quick Access or the 1Password in Your Browser extensions (see Find Your Usage Pattern).
To toggle display of the sidebar on a Mac, choose View > Hide Sidebar or View > Show Sidebar, or press ⌘-Shift-D. In Windows or Linux, hide the sidebar by clicking the More ![]() icon and choosing Hide Sidebar from the pop-up menu; display again by clicking More
icon and choosing Hide Sidebar from the pop-up menu; display again by clicking More ![]() and choosing Show Sidebar; you can also toggle the sidebar by pressing Control-Shift-D.
and choosing Show Sidebar; you can also toggle the sidebar by pressing Control-Shift-D.
Quick Access
The desktop versions of 1Password include a special window called Quick Access, which is available systemwide—even when the 1Password app is closed (Figure 5). You can display it by clicking the 1Password ![]() icon on the menu bar (Mac) or in the system tray (Linux), or right-clicking it in the notification area (Windows), then choosing Open Quick Access from the menu. You can also press ⌘- (Mac) or ⌘/Ctrl-Shift-Space; you can customize this shortcut, if you like, in Settings > General. To avoid having to click through a menu each time, you can set Quick Access to open with a single click on the 1Password
icon on the menu bar (Mac) or in the system tray (Linux), or right-clicking it in the notification area (Windows), then choosing Open Quick Access from the menu. You can also press ⌘- (Mac) or ⌘/Ctrl-Shift-Space; you can customize this shortcut, if you like, in Settings > General. To avoid having to click through a menu each time, you can set Quick Access to open with a single click on the 1Password ![]() icon on the menu bar, or in the notification area or system tray; in Settings > General choose Show Quick Access from the “Click the icon to” pop-up menu.
icon on the menu bar, or in the notification area or system tray; in Settings > General choose Show Quick Access from the “Click the icon to” pop-up menu.

Although it looks like a “helper” app, Quick Access is quite powerful on its own, and because it’s available instantly throughout your system and nicely compact, you may choose to use it more often than the main app. It can search and display all your logins, credit cards, identities, secure notes, software licenses, and other 1Password data. Quick Access automatically displays suggested items if the context provides enough clues. Otherwise, to search in Quick Access, just type a portion of an item’s name or contents; matching results appear instantly.
With an item selected (via a mouse or the arrow keys on your keyboard), you can do the following:
Press → or click the “More options”
 pop-up menu to see major commands and their keyboard shortcuts.
Open a login in your default web browser and fill in your stored credentials automatically (Alt/Option-Return).
Autofill credentials on webpages you’ve navigated to manually, as well as in Mac apps (Shift-Return).
Copy the item’s username (⌘/Ctrl-C), password (⌘/Ctrl-Shift-C), or one-time password (⌘-Option-C/Ctrl-Alt-C). (For credit and debit cards, these three keyboard shortcuts copy the card number, verification number, and expiration date, respectively.)
Open an item in a separate window (⌘/Ctrl-O).
Display additional keyboard shortcuts (⌘/Ctrl-/).
Browser Extensions
In order for 1Password to perform tricks like displaying pop-up menus of saved logins in username/password fields and automatically saving the credentials that you enter on webpages, it needs low-level access to your browser. Browser extensions provide these “hooks.” (For help with installing browser extensions, flip back to Install Browser Extensions.)
Previously, 1Password extensions came in two main flavors: 1Password classic extensions, which simply functioned as conduits to the main 1Password app; and the more modern 1Password in Your Browser extensions, which embed most of the functionality of 1Password right in the extension such that you can use it whether or not the main app is installed. As of 1Password 8, only this newer extension type exists. Safari, meanwhile, has its own special extension flavor because of Apple’s security requirements, but it’s functionally equivalent to 1Password in Your Browser.
1Password in Your Browser
1Password’s browser extension, called 1Password in Your Browser, was formerly known as 1Password X (Figure 6). It looks and acts much like the full version of 1Password, can fill and save passwords, and gives you access to many but not all of 1Password’s other features (see the sidebar 1Password App, 1Password in Your Browser, or Both? ahead). Since the extension can’t include the persistent storage and syncing capabilities of a desktop app, it stores its data in (and retrieves data from) the cloud.

Currently, 1Password in Your Browser supports Brave, Chrome, Edge, and Firefox (Safari offers the same features with its own special type of extension; see 1Password for Safari, ahead), and you can use it either on its own or—for best results—in combination with the 1Password app. 1Password in Your Browser is also a huge win for people who use Chromebooks, giving them a way to run 1Password even though there’s no standalone version of the app for Chrome OS.
1Password for Safari
Because of Apple’s design requirements for Safari extensions in macOS, the 1Password in Your Browser extension can’t be installed by itself. Instead, if you want full 1Password integration in Safari, you must install a separate, free app from the Mac App Store called 1Password for Safari, which in turn includes a built-in Safari extension.
After installing the app, you also must enable it in Safari by choosing Safari > Settings/Preferences > Extensions and selecting 1Password for Safari. Safari may then automatically prompt you to give the extension permission to access websites (Figure 7); if not, click the 1Password ![]() icon on the toolbar (and authenticate with your master password, Touch ID, or Apple Watch if necessary). Click Always Allow on Every Website to enable 1Password to enter and save credentials on any site you may visit; any other choice will lead to lots of annoying additional prompts in the future.
icon on the toolbar (and authenticate with your master password, Touch ID, or Apple Watch if necessary). Click Always Allow on Every Website to enable 1Password to enter and save credentials on any site you may visit; any other choice will lead to lots of annoying additional prompts in the future.

By default, 1Password for Safari behaves almost identically to 1Password in Your Browser, with only a few minor differences in settings. So, for the purpose of this book, wherever you see “1Password in Your Browser,” you can assume that whatever I’m describing works the same way in 1Password for Safari, unless otherwise specified.
Using 1Password in Your Browser Inline (or Not)
By default, 1Password’s browser extensions operate inline, which means username and password fields show the 1Password ![]() icon and inline pop-up menus with 1Password controls. (This has become the norm for password managers—LastPass, Dashlane, Keeper, and other such tools use a similar approach.) The rationale appears to be that putting an icon in the login fields is a visual reminder that you can use your password manager to fill them in; it invites you to click, and you don’t have to remember any key combinations or menu commands. For people new to password managers, those apt to forget to use them, or anyone who has difficulty remembering keyboard shortcuts, inline mode can be helpful.
icon and inline pop-up menus with 1Password controls. (This has become the norm for password managers—LastPass, Dashlane, Keeper, and other such tools use a similar approach.) The rationale appears to be that putting an icon in the login fields is a visual reminder that you can use your password manager to fill them in; it invites you to click, and you don’t have to remember any key combinations or menu commands. For people new to password managers, those apt to forget to use them, or anyone who has difficulty remembering keyboard shortcuts, inline mode can be helpful.
However, a downside of inline mode is that, by default, those pop-up menus appear automatically whenever you click or tab into a username or password field. Many people—especially those who, like me, got used to a different way of interacting with a password manager many years ago—find this distracting. I have also very frequently seen these menus pop up in fields that have nothing to do with my username, password, contact information, or other 1Password data. They imply that I should be filling credentials and personal information into fields where they don’t belong, and apart from being irritating, that’s a privacy hazard—you might accidentally fill in personal data in a place that shouldn’t have it.
To turn off the “automatically pop up menus in any field that might theoretically be able to use them” feature, click the 1Password ![]() icon on the toolbar, then click Settings
icon on the toolbar, then click Settings ![]() , choose Settings from the pop-up menu, and under Autofill, turn off “Show autofill menu on field focus.” If this change brings you peace and sanity, let’s just say you would not be the first person to hold that opinion.
, choose Settings from the pop-up menu, and under Autofill, turn off “Show autofill menu on field focus.” If this change brings you peace and sanity, let’s just say you would not be the first person to hold that opinion.
With “Show autofill menu on field focus” turned off, you can still use 1Password inline; you just have to click the 1Password ![]() icon in one of the login fields to display the pop-up menu. Alternatively, you can click the 1Password
icon in one of the login fields to display the pop-up menu. Alternatively, you can click the 1Password ![]() icon on your browser’s toolbar, select the login you want to use, and click Autofill. Or, easier yet—and this is what I do nearly all the time myself—press ⌘/Ctrl-, which uses Quick Access to fill in your credentials (or display a list of options if you have more than one login for the current site).
icon on your browser’s toolbar, select the login you want to use, and click Autofill. Or, easier yet—and this is what I do nearly all the time myself—press ⌘/Ctrl-, which uses Quick Access to fill in your credentials (or display a list of options if you have more than one login for the current site).
In my experience, a keyboard shortcut is nearly always the fastest and most efficient way to fill in my credentials, and I find that vastly less annoying than dealing with the pop-up menus, whether or not they appear automatically. Obviously, you may feel differently, but if you haven’t tried the keyboard shortcut approach, I recommend giving it a whirl for a day or two. You may not want to go back!
It is also possible to turn off the inline icons and their associated pop-up menus completely (click the 1Password ![]() icon on the toolbar, then click Settings
icon on the toolbar, then click Settings ![]() , choose Settings from the pop-up menu, and under Autofill, turn off “Offer to fill and save passwords”)—but I recommend against it. Although you can still autofill credentials using a keyboard shortcut or the 1Password
, choose Settings from the pop-up menu, and under Autofill, turn off “Offer to fill and save passwords”)—but I recommend against it. Although you can still autofill credentials using a keyboard shortcut or the 1Password ![]() icon on the toolbar with this feature disabled, there’s a big negative: 1Password no longer offers to save credentials you enter manually. And, because the inline tool to generate new passwords also disappears, you’ll have to go through several manual steps to create or change a password.
icon on the toolbar with this feature disabled, there’s a big negative: 1Password no longer offers to save credentials you enter manually. And, because the inline tool to generate new passwords also disappears, you’ll have to go through several manual steps to create or change a password.
1Password App, 1Password in Your Browser, or Both?
I’ve mentioned a few times that you can use 1Password in Your Browser (or 1Password for Safari) on its own, and you can use the 1Password app (along with its systemwide Quick Access feature) on its own, but you’ll get the best results by using both together. Let me explain why.
If you use 1Password in Your Browser alone, you’ll be able to fill forms, save credentials, generate new passwords, and search your vault. However, without the app installed, you’ll miss out on these features:
Editing: If you want to edit 1Password items without the full app, you’ll have to go to your 1Password account online.
Syncing lock state: When the standalone app is installed, 1Password can sync its locked/unlocked state among the app itself and all your browsers. To enable this, go to Settings
 > Settings > General in 1Password in Your Browser and turn on “Integrate with 1Password app.”
Using biometric unlock: With the standalone app installed, you can use Touch ID (on Macs that support it), Windows Hello (on PCs that support it), or an Apple Watch (paired with a Mac) to unlock 1Password. You can’t do this with 1Password in Your Browser alone.
Use 1Password in apps: With the standalone app installed, you can use 1Password to fill your credentials into supported apps other than browsers, too. If you have only 1Password in Your Browser, you’ll have to go to a browser, activate 1Password, find your login, and use either copy-and-paste or drag-and-drop to enter your data into other apps.
Persistent local storage: Because the standalone app keeps a local copy of all your data, you can access it even without an internet connection.
Better keyboard shortcuts: Keyboard shortcuts for 1Password in Your Browser are limited by browser support. Quick Access, by comparison, gives you systemwide access to ⌘/Ctrl- and more!
Extra features: The app offers sorting options, direct access to all the Watchtower features, the option to store documents, and advanced developer tools like support for SSH keys and biometric unlock for the 1Password command-line tool.
Conversely, if you have only the 1Password app, you’ll be able to fill in credentials easily using Quick Access, but you won’t have:
Auto save: Because Quick Access can’t see the contents of webpages, it can’t detect when you’ve entered a password manually and offer to save it for you.
Password change shortcut: Although you can manually change any password in the app, the 1Password in Your Browser extension can take you directly to the page on many sites where you can change your password.
1Password Data Vault
The final major component of 1Password is your encrypted data itself, which 1Password refers to as a vault. You can have multiple vaults if you find that arrangement convenient for organizing your passwords. The master copy of each vault is stored in the cloud, and each device has its own copy—unless you’re using 1Password in Your Browser without the desktop app installed.
Learn How Logins Work
In 1Password, a login is a collection of information—typically including a username, password, and URL among other things—that you can use to log in to a site or service. Although logins are most often used for websites where you have password-protected accounts, 1Password treats “login” as a generic term that can be used for almost any type of resource, even if you don’t technically use it to log in to anything.
For the moment, however, let’s focus on logins for websites, which you’ll probably use more than any other item in 1Password. I’ll give you a quick overview of how they work, and then walk you through entering a few in 1Password.
Most websites that require you to log in display a username field, a password field, and a button or icon that you click to submit your credentials. Let’s suppose you’ve visited such a page (Figure 8) after installing 1Password.

One of several things might happen next:
If your credentials aren’t yet in 1Password and you type them manually, then when you type in any of the fields, a pop-up control appears with a Save in 1Password button. Click that, confirm the details, and click Save. 1Password saves not only your username and password but also the URL of the page you visited.
If you don’t already have an account on the site and choose to sign up, you may see a slightly different form (Figure 9), which asks you to enter a username (typically in the form of an email address), pick a password, and confirm that password.

Figure 9: An example sign-up form. You’ll type your preferred username yourself, but then you can use 1Password’s built-in password generator to create a password, fill it into both fields, and save the newly created login with just a few clicks. You can then click the Sign Up (or similar) button to complete the process.
If you had already stored your credentials for the site in 1Password, 1Password can fill in and submit them with a click or keystroke.
That’s the short version, and it’s even easier than it sounds. Once you get the hang of it, you’ll create and enter passwords without even thinking about it. (Later, in Use 1Password for Web Browsing, I go into more detail about the process and talk about several special situations that don’t necessarily fit the mold.)
But enough theory—let’s try it. I need you to think of at least two websites, one for which you already have an account (but which isn’t stored in 1Password yet) and one for which you don’t yet have an account but where you can register for free. Ideally these would be sites you want to visit regularly. If you’re drawing a blank, try Facebook, Gmail, iCloud, IMDb, or Yahoo.
Enter Your First Login
First, make sure your browser’s built-in password autofill feature is off, at least for the moment, so you can see exactly what 1Password is doing. (To do this, check your browser’s preferences or settings—look for a heading such as AutoFill, Passwords, Security, or Advanced.)
Go to a site where you already have an account that isn’t yet in 1Password, and then:
Go to the login page so that you can see the field for username/email address (and, on some sites, the password field).
Fill in your credentials manually (by typing, copy and paste, or however you usually do it). On some sites, you might have to click Next or some other button between entering your username and your password.
If you click the 1Password
 icon in the username or password field, a pop-up control appears (Figure 10) with a Save in 1Password button. Click that, and a dialog (Figure 11) shows you the details that will be stored.
Figure 10: The Save in 1Password prompt appears in each of the username and password fields when you fill in credentials manually. 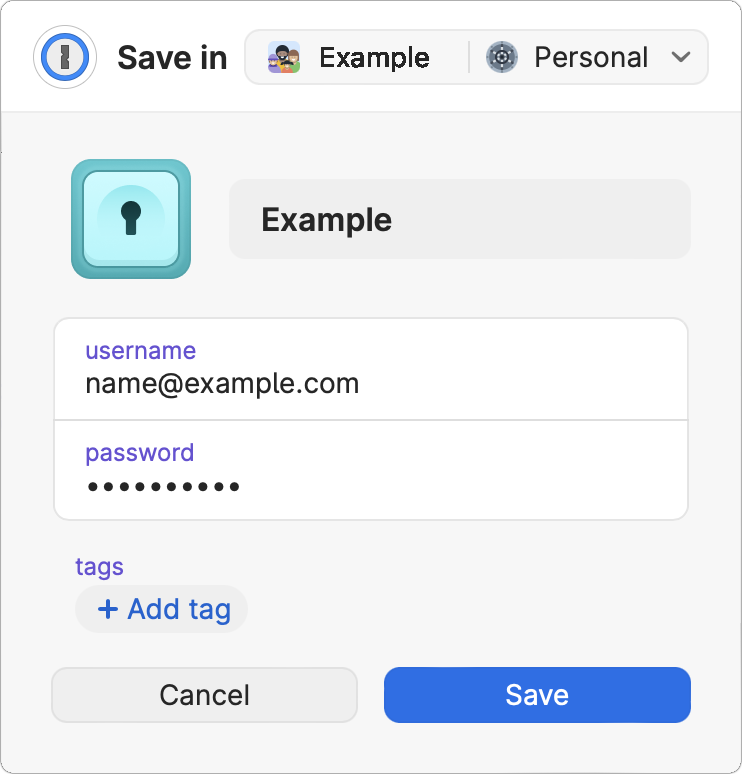
Figure 11: Check the details here, and then click Save. If you have more than one vault, optionally choose a different vault from the vault pop-up menu in the upper-right corner of the dialog.
Optionally edit the site’s name. You can also fill in one or more tags (see Use Tags). Then click Save.
Log out of the website (look for a Log Out or Sign Out link or button), and return to the login page.
It’s time to log in again, but this time with 1Password. To do so, click in the username or password field. An entry for the site appears below the field; click it or select it with the arrow keys and press Return. Then click the Log In, Sign In, or similar button.
1Password logs you in.
That’s it—you now know how to save a site’s credentials and log in to it later using 1Password. Now repeat this process with a few of your other favorite sites. And remember, even though that may seem like quite a few steps, it really takes just a click or two to save your credentials, and a click or two to fill them in later.
Create a New Password
Now let’s use a similar process but with the added step of creating a new password for a site on which you don’t already have an account:
Pick a site (perhaps from the previous list of suggestions) where you don’t already have an account, and go to the registration page so that fields for username/email address and password are visible.
Fill in your username or email address manually, along with any other requested information—except a password.
Click in the password field.
Click Use Suggested Password in the pop-up control (Figure 12). (If you want a shorter or longer password, or a different style of password, than the one shown by default, see Create and Save Logins.)

Figure 12: Click this to accept 1Password’s password suggestion. 1Password fills in the suggested password (repeating it in a second field, if necessary) and displays the Save dialog shown in Figure 11.
If you have more than one vault, optionally choose a different vault from the vault pop-up menu in the upper-right corner of the dialog.
Optionally edit the site’s name. You can also fill in one or more tags (see Use Tags). Then click Save.
Click the button or icon that submits your credentials (such as Submit or Log In).
In most cases, you’ll need to confirm your account by clicking a link in an email message, so be sure to do that before continuing.
Log out (look for a Log Out or Sign Out link or button), and then go to the login page on the same site.
Now, try signing in. To do so, click in the username or password field and click the entry for the site that appears below, or select it with the arrow keys and press Return. Then click the Log In, Sign In, or similar button.
1Password logs you in.
That’s it! You’ve generated, stored, and filled in a new password. You might consider repeating these steps a few times on different websites just to make sure you can complete them quickly in the future.
Find Your Usage Pattern
When I started using 1Password in 2006, I quickly settled into a routine that worked well for me—so well, in fact, that it never occurred to me there might be another way to use 1Password. As I’ve talked to other users, however, I’ve discovered that my approach is just one of many, and people who have adopted other usage patterns are as baffled by my habits as I am by theirs!
There’s no single right way to use 1Password, and it may take some experimentation to find the usage pattern that’s most effective and comfortable for you. What I’d like to do here is acquaint you with some of the major options you might want to try out:
The browser-centric approach: The way I normally use 1Password involves ignoring the 1Password app most of the time. As I go about my business, I visit webpages in a variety of browsers and through a variety of means. Sometimes I use a bookmark or type a few letters of a domain name and let my browser autofill the rest; more often I get to a site by following a link from Twitter, a news reader, a book, or a web search.
When a page requires me to log in, I either click in the username or password field to select the appropriate login or—more often—press ⌘- on a Mac (or, in Windows, Control-). 1Password fills in my credentials, and I continue on my merry way; if I’m using Safari on a Mac, I don’t even have to press Return or click a Log In button. (On sites for which I’ve set up two-step verification, 1Password automatically enters my one-time password too, so I can simply press Return to complete my login.) On those occasions when I need to look up something in 1Password (such as a software license key), I usually press ⌘- (Mac) or Control-Shift-Space (Windows) to open Quick Access, type a few letters of the domain or service, and see what I want in the search results. This works so well for me (even with over 1,000 logins) that I usually don’t bother with favorites or tags, and I seldom open the main 1Password app.
The app-centric approach: Some people prefer the opposite method—they use the main 1Password app as a bookmark manager. To visit a site, they select its entry, hover over the URL, and click the “Open and fill” button that appears. 1Password opens the page in the default browser and fills in the credentials, all in one step.
People who spend more time using the main 1Password app are also more likely to put significant effort into grooming their password collections—making sure each entry is categorized and tagged just so, using lists (smart folders) to show dynamically updated groups of items, and carefully editing logins for maximum clarity (see Search and Organize Your 1Password Items).
The integrator approach: In a variation of the app-centric approach, some users treat 1Password as a bookmark manager but prefer to avoid the main app when possible (perhaps because it takes up too much space on screen or doesn’t open quickly enough for their taste). These people can instead use a keyboard shortcut or click an icon to display Quick Access instantly.
Beyond those basic usage patterns, you may focus on (or avoid) particular types of data, such as passwords, secure notes, credit cards, or software licenses. I think 1Password is most useful when you let it handle all those things, but your needs may be different from mine.
Whichever way you approach 1Password, my suggestion is to avoid making extra work. For example, if you’re already in your browser and your habit is to switch back to the 1Password app to go to a new site, you could save effort by leaning on the browser extensions or Quick Access instead. And, before you put lots of time into organizing your entries, see if a simple search might do the trick. If 1Password isn’t reducing work and aggravation, you might not be using it in the most efficient way.
Check for Updates
AgileBits updates 1Password frequently with bug fixes and new features. Ordinarily, 1Password updates itself as needed, with no further effort required on your part (except to restart the app to apply an update if prompted to do so). If for some reason you want to disable automatic updating, go to Settings > Advanced and uncheck “Install updates automatically.”
While you’re there, you can opt to update only to the latest full version, get early access to new features and bug fixes by installing beta versions, or live on the edge by installing the latest nightly build (even if it hasn’t reached beta status). To specify which type of updates to install, choose Production, Beta, or Nightly from the “Release channel” pop-up menu.
Finally, if you want to check for an update right now, regardless of your auto-update setting, you can do that, too:
On a Mac choose 1Password > Check for Updates.
In Windows or Linux, click the More
 icon and choose Check for Updates from the pop-up menu.
On an iOS/iPadOS device, tap App Store > Updates.
On an Android device, open the Google Play Store app. Tap the profile icon followed by “Manage apps & device.” If 1Password has a label that says “Update available,” tap Update.
I may also update this book from time to time to cover significant changes in 1Password, though book updates won’t be as frequent as updates to the software—if something in the book doesn’t quite match what’s on your screen, it’s likely that AgileBits is slightly ahead of me for the moment. To learn how to check for updates to this book, see Ebook Extras.
Learn What 1Password Isn’t Good For
Before we wrap up this chapter on basics, I want to tell you about a few things you should not plan to rely on 1Password for. Certain types of password activities are better handled by other tools, such as iCloud Keychain in macOS or Credential Manager in Windows.
Here are a few examples:
Network credentials: When you connect to a Wi-Fi network—or to another computer on your local network for file sharing or screen sharing—you may be prompted to fill in a username and/or password. Although you can store those credentials in 1Password, 1Password may be unable to autofill them in login dialogs; if autofill doesn’t work, you’ll have to copy and paste.
Password-protected files: Many common apps, including Microsoft Word and Excel, Apple Pages and Numbers, and Adobe Acrobat, can password-protect individual files. 1Password has no problem storing such passwords, but it can’t enter them for you.
Disk images: In macOS, you can create encrypted disk images to hold sensitive files. macOS can store the passwords for these images so they can be opened without having to manually enter the passwords each time. Again, although you can manually put these passwords in 1Password, it can’t fill them in for you automatically.
In all these cases, the lesson to take away is that you should use 1Password for the things it’s best at, and use other tools for the things they do better. 1Password doesn’t have the same system-level access as the password tools built into macOS, iOS/iPadOS, and Windows, but it’s a far better tool for most password-related tasks.