
Chapter 8 – Things to Consider
“Never advise anyone to go to war or to marry.”
Teradata Mode vs. ANSI Mode
| Teradata Mode | ANSI Mode |
| Transactions are implied (implicit). Explicit Transactions must use the Begin Transaction (BT) and End Transaction (ET) commands. |
All Transactions are explicit and require a COMMIT WORK or COMMIT statement to commit work. |
| All table creates default to SET Tables. | All table creates default to Multiset. |
| Data comparison is NOT case specific. | Data comparison is case specific. |
| Allows truncation of display data. | No truncation of display data allowed. |
Teradata sessions can operate in one of two modes: ANSI mode and Teradata (BTET) mode. The BTET stands for Begin Transaction End Transaction. The choice of mode affects such things as case sensitivity defaults, collating sequences, data conversions and display functions. All SQL can be done in either mode. Above are the major differences.
ANSI Mode Transactions
| Single Statement Transaction | Multi-Statement Transaction |
| UPDATE Employee_Table SET Salary = Salary * 1.1 ; |
UPDATE Employee_Table SET Last_Name = ‘Jones’ WHERE Employee_No = 99 ; |
| COMMIT WORK ; | INSERT INTO Employee_Table ( 88, 10, ‘Hitesh’, ‘Patel’, 75000.00) ; COMMIT ; |
Work is not committed in ANSI mode without the COMMIT or COMMIT WORK statements. If a user logs off without entering the COMMIT statement the work is rolled back. ANSI transactions are always explicit.
Teradata Mode Transactions
| Single Statement Transaction | Multi-Statement Transaction |
| UPDATE Employee_Table SET Salary = Salary * 1.1 ; |
BT ; UPDATE Employee_Table SET Last_Name = ‘Jones’ WHERE Employee_No = 99 ; INSERT INTO Employee_Table ( 88, 10, ‘Hitesh’, ‘Patel’, 75000.00) ; ET ; |
Work is implicitly committed in Teradata mode. If a user wants a Multi-Statement transaction then Begin Transaction (BT) and End Transaction (ET) are used.
Multi-Statement Transaction in BTEQ
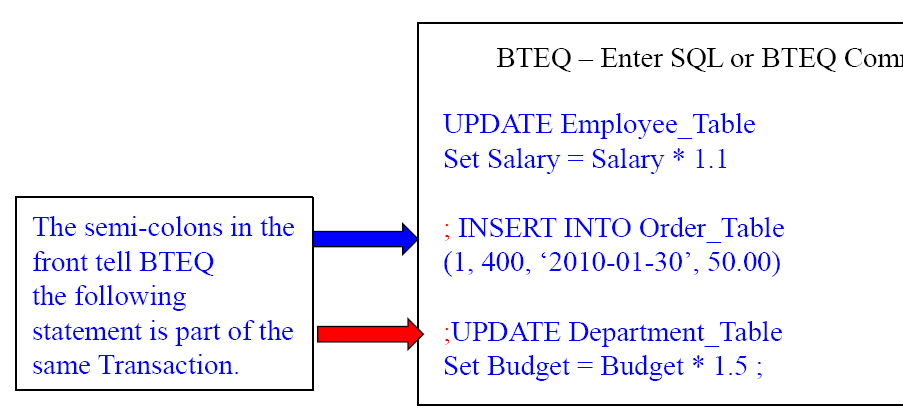
The 3 statements in the example above are considered one transaction in BTEQ because of the placements of the Semi-Colons.
Teradata Mode Default is a Set Table
SET TABLE means that Duplicate ROWS are rejected. If your system is in Teradata mode, then SET tables will be the default. You can be in Teradata mode and explicitly define a Multiset table.
An Example of a Duplicate Row Error

A Set Table will kick out duplicate rows. Every time there is an INSERT or an UPDATE they system has to find all rows with the same value in the Primary Index. Then, the system compares each of those rows, column by column, to see if there is a duplicate row. This can take a lot of time.
Creating a Set Table with a Unique Primary Index
CREATE SET Table Employee_Table6
(
Employee_No INTEGER
,Dept_No INTEGER
,Last_Name CHAR(20)
,First_Name VARCHAR(20)
,Salary DECIMAL(10,2)
,Hire_Date DATE
,Social_Security Char(11)
)
UNIQUE PRIMARY INDEX(Employee_No);
It is very important, when dealing with a SET table, to have either a Unique Primary Index or a Unique Secondary Index. They eliminate the Duplicate Row Check. Because SET tables won't allow duplicate rows, a “Duplicate Row Check” is done on all new INSERTS or UPDATES. But, if any column has a UNIQUE constraint, then the system knows that no row can be a duplicate because the specific column is UNIQUE. This saves a lot of time. Do your best to stay away from the Duplicate Row Check.
Creating a Set Table with a Unique Secondary Index

It is very important, when dealing with a SET table, to have either a Unique Primary Index or a Unique Secondary Index. They eliminate the Duplicate Row Check. Here, we have created a UNIQUE Secondary Index (USI), and this will ensure no duplicate Social_Security values exist. So, the system won't do the duplicate row check.
ANSI mode defaults to a Multiset Table

A MULTISET Table means the table will ALLOW duplicate rows. If your system is in ANSI mode, then MULTISET tables will be the default. In either Teradata mode or ANSI mode, you can specifically state (SET or MULTISET) for the table type desired. The problem with Multiset tables is if you have a Non-Unique Primary Index, and accidentally load the table twice, you have duplicate rows. The next page will show you how to correct that situation.
Using a Volatile Table to Get Rid of Duplicate Rows
Sales_Table
This Multiset table has duplicate rows and we want to get rid of them
CREATE VOLATILE SET TABLE Rid_Of_Dups
AS ( SELECT * FROM Sales_Table)
WITH DATA
ON COMMIT PRESERVE ROWS;
DELETE FROM Sales_Table All;
INSERT INTO Sales_Table
SELECT * from Rid_Of_Dups ;
If you have a Multiset table that accidentally gets unwanted duplicate rows, you can use the technique above to get rid of them. We first create a SET Volatile table, and when the data is copied, the duplicate rows are eliminated. Then, we can delete all the rows from the Multiset table and reinsert the rows from the Volatile, and all is good.
Creating a Volatile Table
CREATE VOLATILE TABLE Dept_Agg_Vol , NO LOG
( Dept_No Integer
,Sum_Salary Decimal(10,2)
)
ON COMMIT PRESERVE ROWS ;
NO Log is the default and it means don't use the Transient Journal, which gives you Rollback capabilities and better data integrity, but since this is a Volatile Table who cares. No Log is faster when doing Maintenance.
ON COMMIT PRESERVE ROWS is NOT the default. You must us these Keywords if you want your data to stay in the Volatile Table after you populate it, otherwise after the load transaction the data is deleted. That is referred to as ON COMMIT DELETE ROWS.
This statement creates a Volatile Table!
You Populate a Volatile Table with an INSERT/SELECT

CREATE VOLATILE TABLE Dept_Agg_Vol, NO LOG
Q( Dept_no Integer
,Sum_Salary Decimal(10,2)
)
ON COMMIT PRESERVE ROWS ;

INSERT INTO Dept_Agg_Vol
SELECT Dept_no
,SUM(Salary)
FROM Employee_Table
GROUP BY Dept_no ;
1) A USER Creates a Volatile Table and then 2) populates the Volatile Table with an INSERT/SELECT Statement. The space to materialize this table comes from the User's Spool space. Now you can query this table all session long. When the session is logged off, the table and the data are automatically deleted.
The Three Steps to Use a Volatile Table
CREATE VOLATILE TABLE Dept_Agg_Vol, NO LOG
( Dept_no Integer
,Sum_Salary Decimal(10,2)
)
ON COMMIT PRESERVE ROWS ;
INSERT INTO Dept_Agg_Vol
SELECT Dept_no
,SUM(Salary)
FROM Employee_Table
GROUP BY Dept_no ;

SELECT * FROM Dept_Agg_Vol
ORDER BY 1;
Only you can see this data because your session number is associated with your Volatile Tables. You can't even see this table if you login and query it from another session!
1) A USER Creates a Volatile Table and then 2) populates the Volatile Table with an INSERT/SELECT Statement, and then 3) Queries it until he/she logs off.
Why Would You Use the ON COMMIT DELETE ROWS?
CREATE VOLATILE TABLE Dept_Agg_Vol, NO LOG
( Dept_No Integer
,Sum_Salary Decimal(10,2)
) ON COMMIT DELETE ROWS ;
BEGIN TRANSACTION ;
INSERT INTO Dept_Agg_Vol
SELECT Dept_No ,SUM(Salary)
FROM Employee_Table GROUP BY Dept_No ;
SELECT * FROM Dept_Agg_Vol
ORDER BY 1 ;
END TRANSACTION ;
These queries run as one Transaction and when it completes, the table and the data are deleted immediately.
If you want to populate a Volatile Table, and then only run one query, then why not have it go away when you are done? That is what will happen in the above example.
The HELP Volatile Table Command Shows your Volatiles
CREATE VOLATILE TABLE Dept_Agg_Vol, NO LOG
( Dept_no Integer
,Sum_Salary Decimal(10,2)
) ON COMMIT DELETE ROWS ;
INSERT INTO Dept_Agg_Vol
SELECT Dept_no
,SUM(Salary)
FROM Employee_Table
GROUP BY Dept_no ;


The HELP Volatile Table command above is exactly what you type in. This shows you all the Volatile tables you have materialized in your current session.
A Volatile Table with a Primary Index
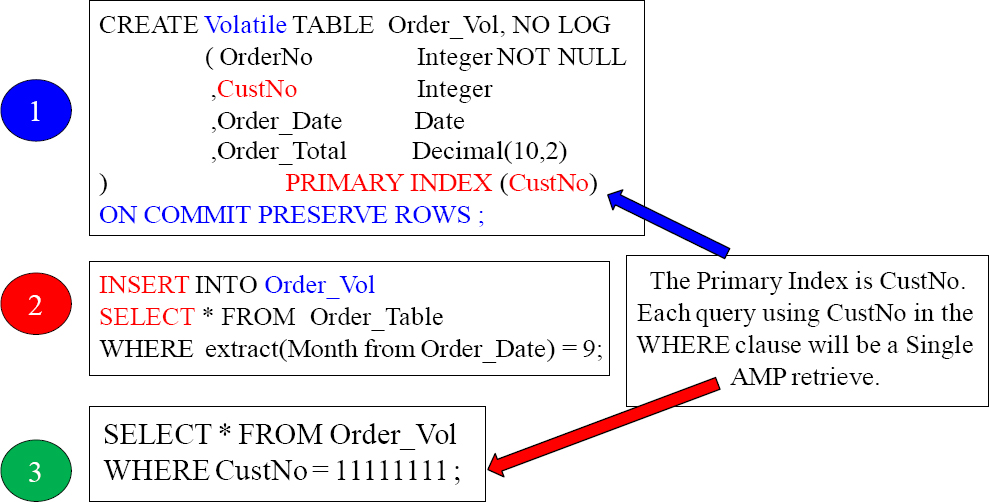
It is a great idea to give your Volatile Table a Primary Index so you can control how it is distributed and the best way you want to query it. In the above example, we knew we would be querying on the column CustNo so we made it the Primary Index. Check out the next page and see how clever our Primary Index of CustNo is for joining tables.
The Joining of Two Tables Using a Volatile Table
SELECT C.CustNo,
,C.CustName
,OV.Order_Total
FROM Customer_Table as C
INNER JOIN Order_Vol as OV
ON C.CustNo = OV.CustNo ;
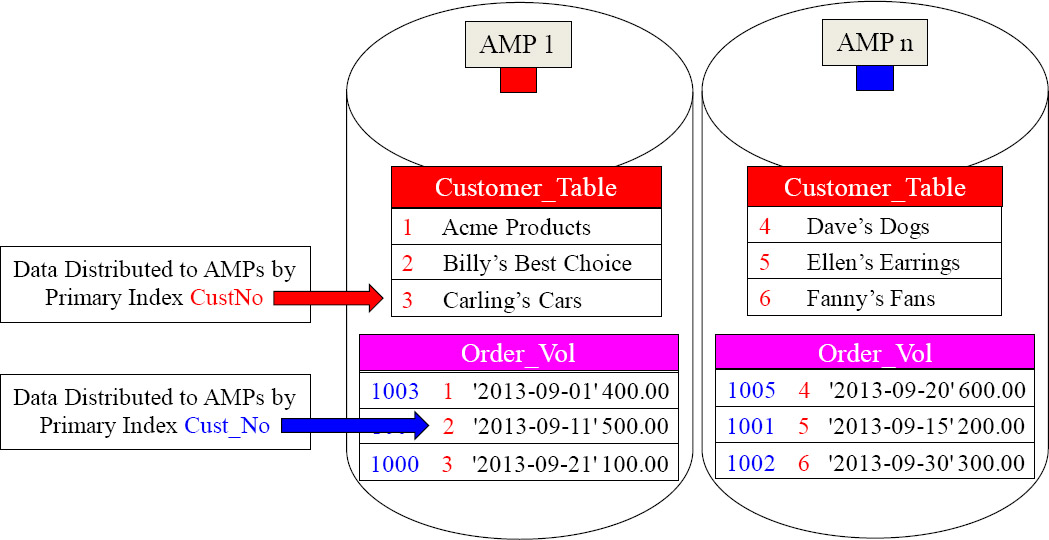
When Teradata does a join, the matching rows need to be on the same AMP. We gave our Volatile Table a great Primary Index, fully knowing we were going to populate it with September orders and then join it to the Customer_Table on the join condition of CustNo. Now, no data movement is required. Brilliant!
Creating a Secondary Index on a Volatile Table

When initially creating a Volatile table, you can define secondary indexes as part of the CREATE VOLATILE TABLE statement. You cannot add secondary indexes (via CREATE INDEX) to a Volatile table after it has been created. Secondary indexes have to be specified with the initial CREATE VOLATILE TABLE statement. You cannot create a join index or a hash index on a VOLATILE table.
You Can Collect Statistics on Volatile Tables
You can Collect Statistics on Volatile Tables. This can help improve query performance. You should consider collecting on:
- All Non-Unique Primary Indexes (NUPI)
- The Unique Primary Index of small tables (less than 1,000 rows per AMP)
- Columns that frequently appear in WHERE search conditions
- Non-indexed columns used in joins
- Partitioning column of a PPI Table
You don't have to collect statistics on Volatile tables, but sometimes you will find if you are having performance problems that collecting statistics on a volatile table can greatly enhance performance. Above, are some great guidelines for collecting statistics on volatile tables.
The New Teradata V14 Way to Collect Statistics
In previous versions, Teradata required that you had to Collect Statistics for each column separately thus always performing a full table scan each time. Those days are over!
| Old Way | New Teradata V14 Way |
| COLLECT STATISTICS COLUMN (OrderNo, CustNo) ON Order_Vol ; COLLECT STATISTICS COLUMN (CustNo) ON Order_Vol ; COLLECT STATISTICS ON Order_Vol Column (Order_Date) ; |
COLLECT STATISTICS COLUMN(OrderNo, CustNo) , COLUMN(CustNo) , COLUMN(Order_Date) ON Order_Vol; |
The new way to collect statistics in Teradata V14 is to do it all at the same time. This is a much better strategy. Only a single table scan is required instead of 3 table scans using the old approach. This is an incredible improvement.
Four Examples of Creating a Volatile Table Quickly
|
This example creates a Volatile Table from the Order_Table, but gives it a new Primary Index.
CREATE VOLATILE TABLE Order_Vol |
This example creates a Volatile Table from the Order_Table, but makes the Volatile a Multiset table.
CREATE MULTISET VOLATILE TABLE |
This example creates a Volatile Table from the Order_Table and copies the STATISTICS.
CREATE VOLATILE TABLE Order_Vol |
This example creates a Volatile Table from the Order_Table and uses a WHERE clause to limit the data
CREATE VOLATILE TABLE Order_Vol |
Above, are four great examples to quickly CREATE a Volatile Table from another table.
Four Advanced Examples of Creating a Volatile Table Quickly
|
This example creates a Volatile Table from the Order_Table, but defaults the Primary Index to the first column in the table.
CREATE VOLATILE TABLE Order_Vol |
This example creates a Volatile Table from the Order_Table, but does NOT put any data in it. You will then need to do an INSERT/SELECT.
CREATE VOLATILE TABLE Order_Vol |
This example creates a Volatile Table from the Order_Table but doesn't take all the columns.
CREATE VOLATILE TABLE Order_Vol |
This example creates a Volatile Table from the Order_Table with the exact same definition, including secondary indexes.
CREATE VOLATILE TABLE Order_Volatile3 |
Above are four advance examples to CREATE a Volatile Table from another table.
Creating Partitioned Primary Index (PPI) Volatile Tables
CREATE VOLATILE TABLE Order_Table_PPI
AS ( SELECT * FROM Order_Table
WHERE Order_Date BETWEEN
DATE ‘2013-01-01’ and ‘2013-06-30’)
WITH DATA
PRIMARY INDEX (Order_Number)
PARTITION BY RANGE_N( ORDER_DATE
BETWEEN Date ‘2013-01-01’ and Date ‘2013-06-30’
EACH INTERVAL ‘1’ DAY)
ON COMMIT PRESERVE ROWS ;
Above, you can see an example of quickly creating a Volatile Partitioned table directly from the actual Order_Table. We only inserted some of the data with our WHERE clause and we partitioned by day.
CREATING A Global Temporary Table
CREATE Global Temporary TABLE Dept_Agg_GLO
( Dept_No Integer
,Sum_Salary Decimal(10,2)
)
ON COMMIT PRESERVE ROWS ;
ON COMMIT PRESERVE ROWS is NOT the default. You must us these Keywords if you want your data to stay in the Volatile Table after you populate it, otherwise after the load transaction the data is deleted. That is referred to as ON COMMIT DELETE ROWS.
The Table Definition stays Permanently. When a user logs off the data Inside the Global Temporary Table is deleted, but the definition stays around ready to be populated again.
This syntax creates a Global Temporary Table, which is stored in the Data Dictionary of Teradata. A Global Temporary Table survives a Teradata Restart.
Using a Simple Global Temporary Table
CREATE Global Temporary TABLE Order_Global
( OrderNo Integer NOT NULL
,CustNo Integer
,Order_Date Date
,Order_Total Decimal(10,2))
ON COMMIT PRESERVE ROWS ;
INSERT INTO Order_Global
SELECT Order No, CustNo,
Order_Date, Order_Total
FROM Order_Table
WHERE
extract(Month from Order_Date) = 9 ;
SELECT * FROM Order_Global
ORDER BY 1;
Many users (TEMP space required) can populate or materialize this table simultaneously with an Insert/Select statement, but a separate copy is made for each user for the purpose of security and integrity.
1) A USER Creates a Volatile Table and then 2) populates the Volatile Table with an INSERT/SELECT Statement, and then 3) Queries it until he/she logs off. All data is deleted when a user logs off, but the table definition stays forever unless dropped.
Two Brilliant Techniques for Global Temporary Tables
CREATE Global Temporary TABLE Order_Global
( OrderNo Integer NOT NULL
,CustNo Integer
,Order_Date Date COMPRESS
,Order_Total Decimal(10,2)) COMPRESS
) Primary Index (CustNo)
ON COMMIT PRESERVE ROWS ;
Give your Global tables a Primary Index and use the COMPRESS Keyword for any column that is Nullable and NOT the Primary Index.
INSERT INTO Order_Global
SELECT OrderNo, Cust_No,
Order_Date, Order_Total
FROM Order_Table
WHERE
extract(Month from Order_Date) = 9 ;
Any user with Temp Space can materialize the table with an Insert/Select statement and the data won't be deleted until they logoff.
SELECT * FROM Order_Global
ORDER BY 1;
The data is deleted when the user does logoff, but the table structure stays permanently.
Give your Global Temporary Tables a Primary Index, and also compress any Nullable column. If a null is present, then Teradata will compress it and save space.
The Joining of Two Tables Using a Global Temporary Table
SELECT C.CustNo,
,C.CustName
,G.Order_Total
FROM Customer_Table as C
INNER JOIN Order_Vol as G
ON C.CustNo = OVCustNo ;
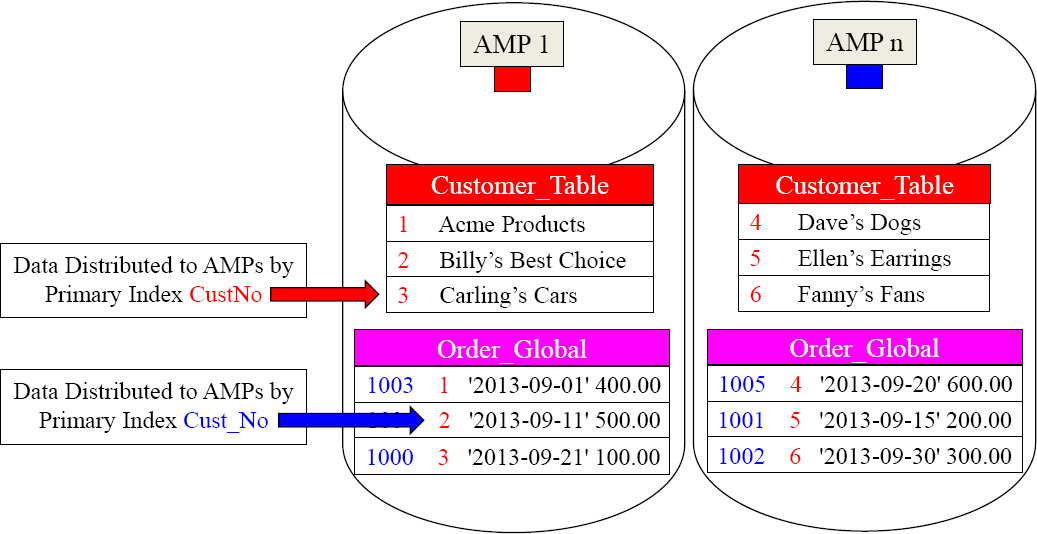
By giving the Global Temporary Table a Primary Index of CustNo, the matching rows are on the same AMPs.
We gave our Global Temporary Table a great Primary Index fully knowing we were going to populate it with September orders, and then join it to the Customer_Table on the join condition of CustNo. Now, no data movement is required. Brilliant!
Making an exact copy a Table
--This table already exists
CREATE SET Table Employee_Table8
(
Employee_No INTEGER
,Dept_No INTEGER
,Last_Name CHAR(20)
,First_Name VARCHAR(20)
,Salary DECIMAL(10,2)
,Hire_Date DATE
,Social_Security Char(11)
) Unique Primary Index (Employee_No)
Unique Index (Social_Security) ;
Make a Copy of the Table with the Data.
CREATE Table Employee_Table10 AS Employee_Table8 WITH DATA
Make a Copy of the Table without the Data.
CREATE Table Employee_Table11 AS Employee_Table8 WITH NO DATA
When you want to make an exact copy of a table, by using the syntax at the top, it will make an exact copy including the INDEXES! You must include the WITH DATA or WITH NO DATA keywords, or it will error.
Making a NOT-So-Exact Copy a Table
This table already exists
CREATE SET Table Employee_Table8
(
Employee_No INTEGER
,Dept_No INTEGER
,Last_Name CHAR(20)
,First_Name VARCHAR(20)
,Salary DECIMAL(10,2)
,Hire_Date DATE
,Social_Security Char(11)
) Unique Primary Index (Employee_No)
Unique Index (Social_Security) ;
Make a copy with some changes and keep the Data.
CREATE Table Employee_Table12AS
(SELECT * FROM Employee_Table8)
WITH DATA
PRIMARY INDEX (Dept_No)
Make a copy with some changes with NO Data.
CREATE Table Employee_Table13 AS
(SELECT * FROM Employee_Table8)
WITH NO DATA
PRIMARY INDEX (Dept_No)
We made a copy of the table, but changed the Primary Index. The syntax above must be used to do this. You must include the WITH DATA or WITH NO DATA keywords or it errors.
Copying a Table
This table already exists
CREATE SET Table Employee_Table8
(
Employee_No INTEGER
,Dept_No INTEGER
,Last_Name CHAR(20)
,First_Name VARCHAR(20)
,Salary DECIMAL(10,2)
,Hire_Date DATE
,Social_Security Char(11)
) Unique Primary Index (Employee_No)
Unique Index (Social_Security) ;
--Make a Copy of a Table
CREATE Table Employee_Table13
AS
(SELECT * FROM Employee_Table8)
WITH DATA ;

No Primary Index? Make the first column a NUPI
By using this way of getting the data, you can supply the table with a new Primary Index. In the example, they didn't take that opportunity. So, the Primary Index will be the first column of the table and it will be a NUPI. You must include the WITH DATA or WITH NO DATA keywords, or it will error.
Troubleshooting Copying and Changing the Primary Index
This table already exists
CREATE SET Table Employee_Table8
(
Employee_No INTEGER
,Dept_No INTEGER
,Last_Name CHAR(20)
,First_Name VARCHAR(20)
,Salary DECIMAL(10,2)
,Hire_Date DATE
,Social_Security Char(11)
) Unique Primary Index (Employee_No)
Unique Index (Social_Security) ;
Make a Copy of a Table
CREATE Table Employee_Table14
AS Employee_Table8
WITH DATA
PRIMARY INDEX (Dept_No) ;
![]()
ERROR This isn't what you want!
Want a new Primary Index for your table? Well, this is NOT the copy syntax that will copy a table with a different Primary Index. You can't use the CREATE TABLE AS Tablename syntax if you want to change the table structure with a new Primary Index.
Copying only specific columns of a table
--This table already exists
CREATE SET Table Employee_Table8
(
Employee_No INTEGER
,Dept_No INTEGER
,Last_Name CHAR(20)
,First_Name VARCHAR(20)
,Salary DECIMAL(10,2)
,Hire_Date DATE
,Social_Security Char(11)
) Unique Primary Index (Employee_No)
Unique Index (Social_Security) ;
-- Copying certain columns of a table
CREATE TABLE Employee_Table16 AS
(Select Employee_No
,Dept_No
,Last_Name
,First_Name
FROM Employee_Table8)
WITH DATA
PRIMARY INDEX (Dept_No) ;
![]()
This copy statement will not error and actually copy only the first four columns and their data. It will also change the Primary Index to a NUPI on Dept_No.
Copying a Table and Keeping the Statistics
--This table already exists
CREATE SET Table Employee_Table8
(
Employee_No INTEGER
,Dept_No INTEGER
,Last_Name CHAR(20)
,First_Name VARCHAR(20)
,Salary DECIMAL(10,2)
,Hire_Date DATE
,Social_Security Char(11)
) Unique Primary Index (Employee_No)
Unique Index (Social_Security) ;
--Make a Copy of a Table
CREATE TABLE Employee_Table16 AS
Employee_Table8 with DATA
AND Statistics ;
![]()
This copy statement will not error and will actually copy the table structure, the data, and have the exact same statistics.
Copying a Table with Statistics
--This table already exists
CREATE SET Table Employee_Table
(
Employee_No INTEGER
,Dept_No INTEGER
,Last_Name CHAR(20)
,First_Name VARCHAR(20)
,Salary DECIMAL(10,2)
,Hire_Date DATE
,Social_Security Char(11)
) Unique Primary Index (Employee_No)
Unique Index (Social_Security) ;

The copy statements above will not error. It will actually copy the table structure with no data, but the Statistics will all be ZEROED. That means that, when you recollect statistics after loading the data, then Teradata will collect on the columns and indexes previously collected on from the previous table.
Copying a table Structure with NO Data but Statistics
--This table already exists
CREATE SET Table Employee_Table2
(
Employee_No INTEGER
,Dept_No INTEGER
,Last_Name CHAR(20)
,First_Name VARCHAR(20)
,Salary DECIMAL(10,2)
,Hire_Date DATE
,Social_Security Char(11)
) Unique Primary Index (Employee_No)
Unique Index (Social_Security) ;
-- Make a Copy of a Table

-- Once the Employee_Table7 is loaded Recollect Statistics on all statistics collected before by Employee_Table2
COLLECT STATISTICS ON Employee_Table7 ;
Once the Employee_Table7 is loaded with data, the user can Recollect Statistics. What is clever here is that originally the statistics on the new table are zeroed. This means they have the columns and indexes listed that were previously collected by the old table, but now actual statistic data. Once the new table is loaded, and the COLLECT STATISTICS command is run again, it will automatically update the true statistics of the new table. But, it will only collect on the columns or indexes the old table had done in the past.
What to COLLECT STATISTICS On?
You don't COLLECT STATISTICS on all columns and indexes because it takes up too much space for unnecessary reasons, but you do collect on:
- All Non-Unique Primary Indexes and All Non-Unique Secondary Indexes
- Non-indexed columns used in joins
- The Unique Primary Index of small tables (less than 1,000 rows per AMP)
- Columns that frequently appear in WHERE search conditions or in the WHERE clause of joins
- Primary Index of a Join Index
- Secondary Indexes defined on any join index
- Join index columns that frequently appear on any additional join index columns that frequently appear in WHERE search conditions
The first time you collect statistics, you collect them at the index or column level. After that, you just collect statistics at the table level, and all previous columns collected previously are collected again. It is a mistake to collect statistics only once and then never do it again. COLLECT STATISTICS each time a table's data changes by 10%.
A Huge Hint that No Statistics Have Been Collected
EXPLAIN SELECT * FROM New_Employee_Table ;
3) We do an all-AMPs RETRIEVE step from SQL_CLASS.New_Employee_Table by way of an all-rows scan with no residual conditions into Spool1 (group_amps), which is built locally on the AMPs. The size of Spool 1 is estimated with low confidence to be 12 rows (684 bytes). The estimated time for this step is 0.03 seconds.
COLLECT STATISTICS ON New_Employee_Table
Column Employee_No ;
EXPLAIN SELECT * FROM New_Employee_Table ;
3) We do an all-AMPs RETRIEVE step from SQL_CLASS.New_Employee_Table by way of an all-rows scan with no residual conditions into Spool1 (group_amps), which is built locally on the AMPs. The size of Spool 1 is estimated with high confidence to be 9 rows (513 bytes). The estimated time for this step is 0.03 seconds.
If you run an Explain on a query, and the row estimate has No Confidence or Low Confidence, then that is a sign that no statistics were collected. Notice how the Explain above changed to High Confidence after we collected statistics on the table.
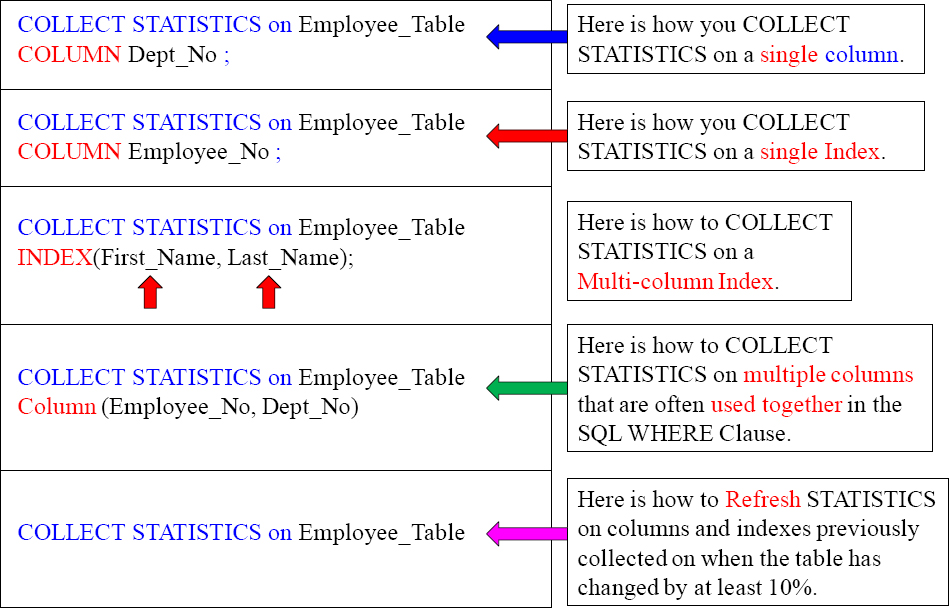
The Basic Syntax for COLLECT STATISTICS
Here is the syntax for collecting on columns and indexes.
![]() COLLECT STATISTICS on <Tablename>
COLLECT STATISTICS on <Tablename>
COLUMN <Column Name > ;
![]() COLLECT STATISTICS on <Tablename>
COLLECT STATISTICS on <Tablename>
INDEX (<Column Name(s)>);A
Here are three actual examples

The example commands above provide good fundamentals and concepts to follow.
COLLECT STATISTICS Examples for a better Understanding
The New Teradata V14 Way to Collect Statistics
In previous versions Teradata required that you had to Collect Statistics for each column separately, thus always performing a full table scan each time. Those days are over!
| Old Way | New Teradata V14 Way |
| COLLECT STATISTICS COLUMN (First_Name, Last_Name) ON Employee_Table ; COLLECT STATISTICS COLUMN (First_Name) ON Employee_Table; COLLECT STATISTICS COLUMN (Dept_No) ON Employee_Table; |
COLLECT STATISTICS COLUMN(First_Name, Last_Name) , COLUMN(First_Name) , COLUMN(Dept_No) ON Employee_Table; |
The new way to collect statistics in Teradata V14 is to do it all at the same time. This is a much better strategy. Only a single table scan is required instead of 3 table scans using the old approach. This is an incredible improvement.
COLLECT STATISTICS Directly From another Table
CREATE TABLE Stats_Test AS
(Select * from Employee_Table)
WITH DATA AND STATISTICS ;
Data and Statistics have been copied

In Teradata V13 and above, you can Collect Statistics directly from another table.
How to Recollect STATISTICS on a Table
Here is the syntax for re-collecting statistics on a table:
COLLECT STATISTICS ON <Tablename> ;
Below is an actual example
COLLECT STATISTICS ON Employee_Table;

The first time you collect statistics you do it for each individual column or index that you want to collect on. When a table changes its data by 10% due to Inserts, Updates, or Deletes, you merely use the command above and it recollects on the same columns and indexes previously collected on.
Examples of COLLECT STATISTICS for V14
To collect sample statistics using the system default sample:
COLLECT STATISTICS USING SYSTEM SAMPLE COLUMN (Product_ID) ON Sales_Table;
To collect sample statistics by scanning 15 percent of the rows and use 100 intervals:
COLLECT STATISTICS USING SAMPLE 15 PERCENT AND MAXINTERVALS 100 COLUMN (Product_ID) AS Product_Stats ON Sales_Table;
To change sample statistics to 20 percent (for Product_ID) and use 250 intervals:
COLLECT STATISTICS USING SAMPLE 20 PERCENT AND MAXINTERVALS 250 COLUMN (Product_ID) AS Prod_Stats ON Sales_Table;
To display the COLLECT STATISTICS statements for a table:
SHOW STATISTICS ON Sales_Table;
To display statistics details – summary section, high bias values, and intervals:
SHOW STATISTICS VALUES COLUMN Product_ID ON Sales_Table;