
State machines are not a new citizen of WF but are now here to stay as a solid part of WF. They have a new type of activity, the StateMachine activity, with two classes to help us define a state machine: state and transition. State helps us define a state that the machine can then be in and a transition helps us define which state changes can occur from a specific state.
In this recipe, we will see how to create a state machine workflow with WF 4.5, execute it, and debug it.
We are going to create a state machine workflow using the following steps:
- First open Visual Studio 2012, create a new project by navigating to Visual C# | Workflow, and use the Workflow Console Application template to create a new project. Name it
WFStateMachineand click on Ok. - Close the
Workflow1.xamlfile that will open on creating the project and rename it toMyStateMachine.xaml. To do this, we can right-click and select Rename or select it with a click and press F2. - Open
Program.csand change theWorkflow1reference to our new name,MyStateMachine. We can also change the instance name to match the new name, as in the following code:class Program { static void Main(string[] args) { // Create and cache the workflow definition Activity MyStateMachineInstance = new MyStateMachine(); WorkflowInvoker.Invoke(MyStateMachineInstance); } - Note that the
MyStateMachineclass appears in red, so we still need to make a minor change. Right-click on onMyStateMachine and select the view code option. - On the XAML designer, change the class name property to
MyStateMachineas follows:
- Note that we could perform this previous step on the designer by clicking on the canvas and pressing F4 (properties), where we can set the
x:Classvalue for the activity. - With this our project will be properly set up and we can proceed to creating our first .NET 4.5 state machine workflow.
Close the XAML view of the
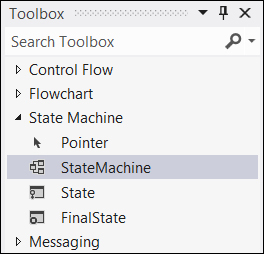
WFStateMachine.xamlfile and open it with a double-click or right-click on View Designer. - Lock the Toolbox pane and unfold the StateMachine section as follows:
- Drag-and-drop a StateMachine section at the center of the MyStateMachine designer. It should look similar to the following screenshot:

- We will select the StateMachine blue canvas from the header, and on the Properties tab change the DisplayName property to
Book process StateMachine. - In the section below the StateMachine section, click on the Variables button to unfold it and enter four variables, NumberOfChapters, BookScore, ChapterScore, and SubmittedChapters, of type int32. Make their scope the current activity so they look as shown in the following screenshot:

- In the MyStateMachine designer, we can observe the Start node and the first state. Change the first and only state by clicking on the name State1 and change it to
Define Book. - Move it just below the Start node and double-click on it to open it.
- In the Entry section, add an Assign task from the Toolbox pane in the Primitives section as shown in the following screenshot:

- In the To section, add the NumberOfChapters variable name; we will observe that we have intelli-sense enabled, which will make our work easier.
- In the Enter a C# expression box, we will enter
newSystem.Random().Next(4, 12). We could also type the expression directly in the Properties panel as follows: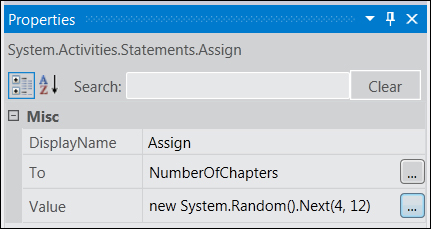
- Next, select a WriteLine activity and drop it immediately below the Assign activity. While we are doing this, we should see a placeholder appearing. When we drop the new activity, we will see that the Assign and WriteLine activities have automatically been surrounded by another activity, a Sequence activity. This is what is called auto surround with sequence.
- In the Text property of the WriteLine activity, add
"The book has been defined". - The Define Book state should now look as follows (do not worry about the Transition(s) section, we will add it in a few moments):

- At the top we will see the navigation breadcrumb. We can click on the Book process State Machine link to go back and see the whole workflow.

- We will add some more states to workflow:
Validate Book,Create Chapter,Accept Chapter,Validate Chapter, andProcess Chapter. - Additionally, we will add a
Finalstate and place it at the bottom of the workflow. - We will now connect the states with transitions. To create a transition, move the cursor to the border of our first state Define Book; a square will appear, indicating that we can create a connector, that is dragging it to another state as follows:

- We will create a transition Validate Book by dragging this square into the Validate Book state.
- Name it by selecting the transition (the line) and change the DisplayName value that appears on the Properties panel to
Propose Book. - We will open the Validate Book activity and drop an Assign activity into its Entry section, after we set its To property to the BookScore variable and its value to the C# expression
new System.Random().Next(1, 10). - From Validate Book we will create two transitions, one going back to the Define Book state and another to the Create Chapter state. We will name the first transition
Book Deniedand the second oneBook Accepted. - Double-click on the Book Denied transition and enter the C# expression in the condition box as
BookScore< 5. - In the Action section, drop a WriteLine activity and set its Text property to
"Book has been denied..". It should now look like the following screenshot:
- Click on the breadcrumb's Book Process state machine to go back to the general view of the workflow.
- Double-click on the Book Accepted transition, set its condition to
BookScore>= 5, and add a WriteLine activity with its Text property as"Book has been accepted!". - In the Create Chapter state, we will add a WriteLine activity in its Entry section with the text
"We create/edit the chapter..". Next, add a Delay activity. On its Properties panel, we will set its duration to the expressionnew TimeSpan(0,0,1). - In the Create Chapter section, we will create a transition called Validate Chapter, naming it
Submit for approval. - On the Submit for approval transition, we will add a WriteLine activity with the text
"Submitting chapter for approval..". - Moving to our next state, that is, Validate Chapter, we will add a WriteLine activity with
"Validating Chapter.."as its text. - Additionally, we will add an Assign task with the ChapterScore variable as its To parameter and
new System.Random().Next(1, 10)as its value. - From this state, we will create two transitions, one to its previous state, Create Chapter, and another to the Process Chapter state, naming them
Chapter DeniedandChapter Accepted, respectively. - For the Chapter Denied transition, include a condition
ChapterScore< 5and add a WriteLine activity in the Action section, setting its text to"The chapter has been denied..". - Give the Chapter Accepted transition a condition of
ChapterScore>= 5, and in the Action section, add a WriteLine activity called the Transaction activity with the text set to"The chapter has been accepted!". - In the Entry section in the Process Chapter state, add an Assign activity with SubmittedChapters as its To parameter and
SubmittedChapters = SubmittedChapters + 1as its value. - From this Process Chapter state, we will create two transitions, one to the Create Chapter state named
Chapters Pendingand another to the FinalState state namedAll Chapters Completed. - On the Chapters Pending transition, we will add
SubmittedChapters<NumberOfChaptersas its condition and a WriteLine activity on its Action panel with its Text property set to"There are chapters to be finished". - For the All Chapters Completed transition, we will set its condition to
SubmittedChapters>= NumberOfChaptersand add a WriteLine activity on the Action panel with the Text set to"All the chapters have been completed, congratulations!!". - In the Final state, we will add a WriteLine activity with the text
"You did it!"and another Delay activity with the expressionnew TimeSpan(0,0,5)as its Duration parameter. - In order to facilitate testing, we will set a debug breakpoint by selecting the first state Define Book and pressing F9. To enter debug mode, press F5 or click on the Start debugging button.
- Observe that we can debug the whole workflow of the states and also their activities as follows:

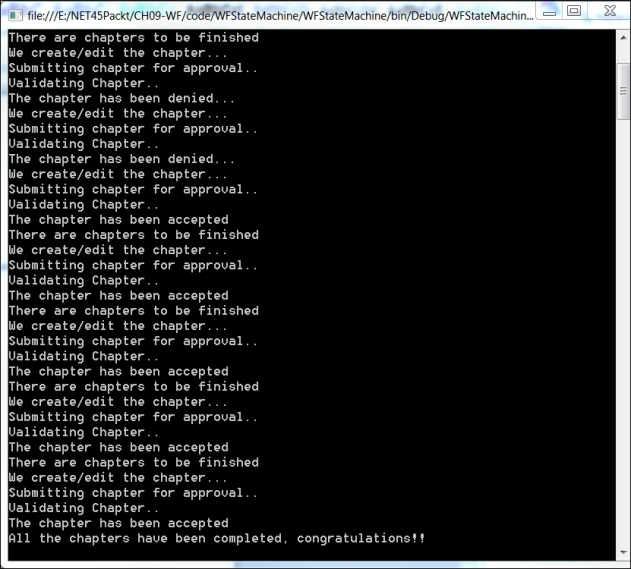
- We can then watch the results through our WriteLine activities on the console as follows:
Following the previous steps, we have successfully created a complete state machine workflow using some of the new capabilities of WF 4.5.
We created a state machine workflow by adding a StateMachine activity and using it as a placeholder for our states and transitions, which we selected from the StateMachine section in our Toolbox pane.
We designed a book process workflow similar to the one used at Packt Publishing but much simpler. The preceding example showcases how to map a process to a workflow that is characterized by having fixed states and transitions between them.
The complete process needed a few more states and transitions to fulfill its intended behavior. We added activities on the state's entry points, but we could also have done so on the exit points.
The specific transition to use at each cycle is decided by examining the condition that we provided. For clarity and illustration purposes, we added a WriteLine activity to all the transitions so we could follow the execution in the console written out.
We have seen some examples of the usage of C# expressions, used the surround with a sequence capability of the improved designer, and used the bookmark to quickly navigate out of the transitions and states.
Finally, we debugged the workflow and saw how easy it has become with the new improvements.