
9
Automation Hub Management
The final thing you need to do as part of a job template is manage collections and execution environments (EEs). Automation hub acts as a repository for both collections and EEs. These are then consumed by the Automation controller.
In this chapter, we will provide an overview of the content that goes into Automation hub before learning how to manage collections. EEs and external registries will also be covered. Finally, you will learn how to integrate Automation hub into the Automation controller so that it consumes the necessary content.
In this chapter, we’re going to cover the following topics:
- Overview of Automation hub and its content sources
- Synchronizing certified and community collections
- Publishing custom collections
- Managing execution environments and registries
- Connecting Automation hub to the Automation controller
Technical requirements
This chapter covers collections and EEs and how to manage them using Configuration as Code (CaC). All the code referenced in this chapter is available at https://github.com/PacktPublishing/Demystifying-Ansible-Automation-Platform/tree/main/ch09. You must have Ansible installed to run the code provided.
It is also possible that either the controller or the user’s command line won’t contain the self-signed certificates from Automation hub. If an error appears stating x509: certificate signed by unknown authority, then follow these steps to add the certificate to the host machine:
- Copy the certificate from Automation hub:
$ sudo scp <hub_fqdn>:/etc/pulp/certs/root.crt /etc/pki/ca-trust/source/anchors/automationhub-root.crt
- Update trusted certificates:
$ sudo update-ca-trust
Overview of Automation hub and its content sources
Automation hub is a repository for the collections and container images that the Automation controller uses. As discussed, in organizations, a credential is used to determine which repository to pull those collections from. Automation hub contains many sources it can pull container images and collections from.
The following diagram shows the sources that are stored in a private Automation hub:
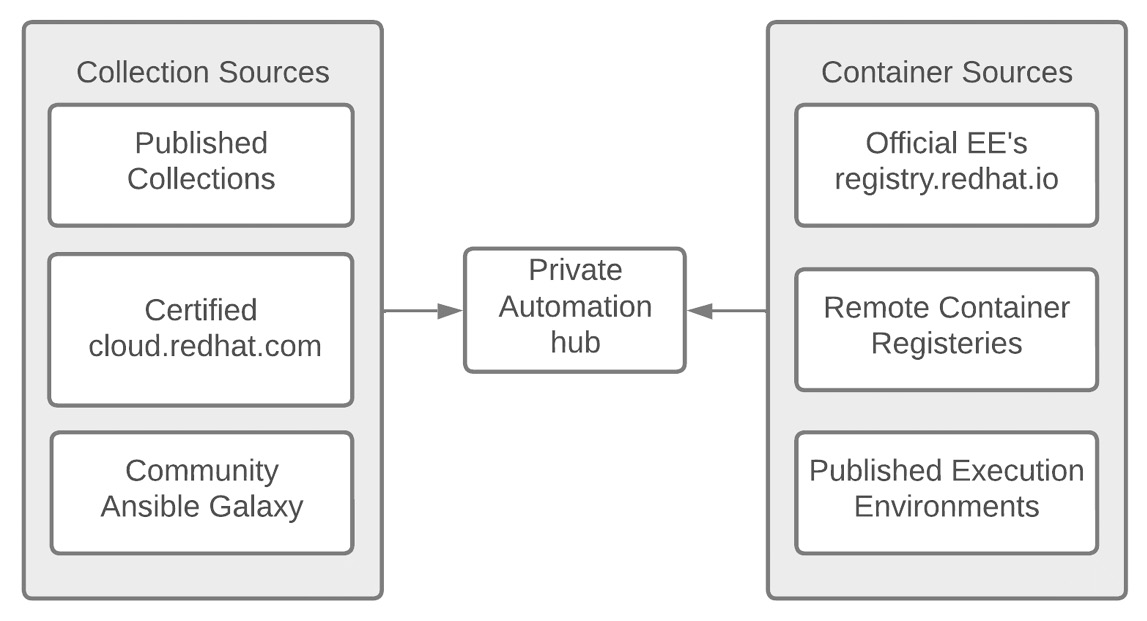
Figure 9.1 – Private Automation hub content sources
Automation hub has three sources for collections, as follows:
- Certified: Certified collections that have been vetted by Red Hat. They are developed, tested, and supported by Red Hat. For some collections, this is in partnership with other companies.
- Published: Collections that have been published to Automation hub. These are collections that anyone who has been granted access to a namespace can publish. These are collections made by you or other team members who share Automation hub.
- Community: These are public collections from https://galaxy.ansible.com. Anyone can publish to Galaxy and it includes a wide range of collections. Some are modules and roles that have been accepted in the official Ansible distribution but are not supported by Red Hat, while some come from authors respected in the community. It is important to know where the collection or role comes from before using it.
In addition, Automation hub has three categories that EEs fall into:
- registery.redhat.io EEs: These are the EEs that ship with Ansible Automation Platform. They currently come in three flavors:
- ee-29-rhel8: Contains the latest version of Ansible 2.9 and all of its dependencies
- ee-minimal-rhel8: Contains the latest supported version of ansible-core and its dependencies
- ee-supported-rhel8: Contains the latest supported version of ansible-core and some of the certified collections come preinstalled
- Published EEs: These are EEs that have been published by authorized users of Automation hub. These can be those that you have made, or that other people with access to your Automation hub have published.
- Remote Registry EEs: These are EEs that come from remote registries. They could be from Quay.io, Docker Hub, or any other container registry. Because they are coming from a third-party source, they should be scrutinized, but they could also be used to link Automation hub to an internal company registry.
During installation, Automation hub pulls the default images from the container registry; that is, https://registery.redhat.io. However, no other content will be preloaded. To load other content, you can use the GUI or the redhat_cop.ah_configuration collection, which is designed to interact with Automation hub, just like ansible.controller and redhat_cop.controller_configuration are built to interact with the Automation controller.
For collections, there are three different sources: the official Red Hat Automation Hub at cloud.redhat.com, Ansible Galaxy at galaxy.ansible.com, and custom collections uploaded by users.
Synchronizing certified and community collections
The community repository pulls from galaxy.ansible.com using a requirements.yml file. This allows you to control and curate which public collections can be used. It takes on the following forms and uses name and version information:
collection/requirements.yml
 ---
collections:
  - name: redhat_cop.ah_configuration
  - name: redhat_cop.tower_configuration
...
A file source can be an actual file or a URL that leads to a tar.gz file.
Documentation about the requirements.yml file can be found at https://docs.ansible.com/ansible/latest/user_guide/collections_using.html#install-multiple-collections-with-a-requirements-file.
To synchronize collections from either the public Automation hub or Ansible Galaxy, perform the following steps in the GUI:
- Log in to the Automation hub.
- Navigate to Collections | Repository Management | Remote.
- For either the community or RH-certified repository, click the three dots on the far right of the page and click Edit.
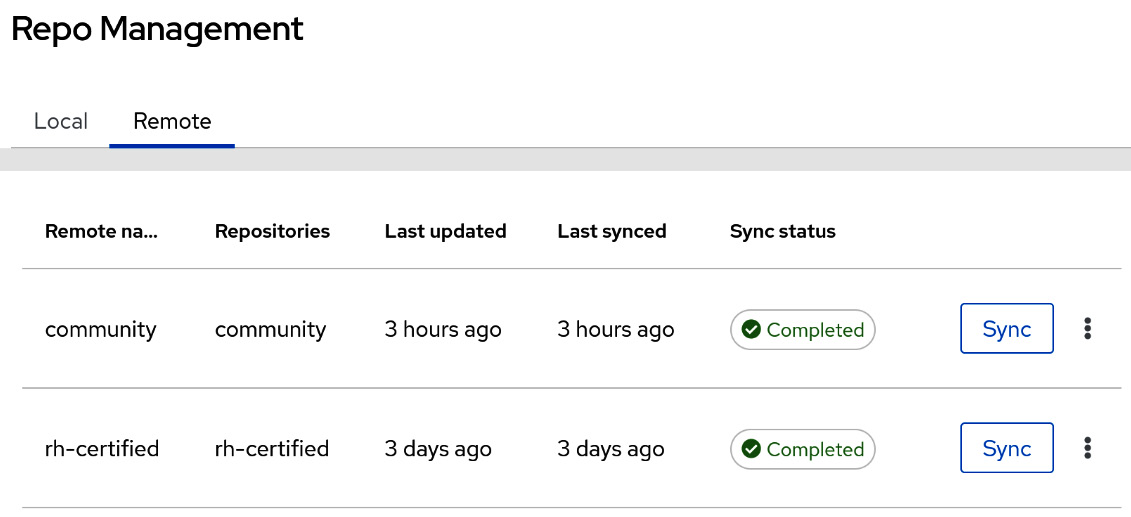
Figure 9.2 – Private Automation hub repository management
- For each of these, there are options that allow Automation hub to go through a proxy or limit the speed that they’re downloaded at. These options are as follows:
- Proxy URL | Proxy username | Proxy password: This is used for proxy settings.
- Client Key | Client Certificate | CA Certificate: This is for authenticating against the proxy.
- TLS Validation: This enforces or ignores TLS validation.
- Rate Limit: The requests per second for downloads.
- Download Concurrency: The number of collections to download concurrently.
- For the community repository, the following options are available:
- URL: This should be https://galaxy.ansible.com/api/, though it can be changed to another Automation hub as an option.
- Username | Password: This option isn’t needed for galaxy.ansible.com, but it can be set for another Automation Hub.
- Requirements File: This is a requirements.yml file that contains a list of community collections to sync. This file is used for syncing with Ansible Galaxy, as described previously.
- For the RH-certified repository, there are the following options:
- URL | SSO URL: The URL for the repository and the single sign-on URL that’s needed to authenticate. These options should be prefilled.
- Username | Password: Either the token or username/password must be used to authenticate to the certified repository. This is your username/password for your Red Hat account on cloud.redhat.com.
- Token: This token value can be retrieved by navigating to https://cloud.redhat.com/ and then Logging in | Ansible Automation Platform | Automation Hub | Connect to Hub | Load token.
- Click Save to save the options. Then, click Sync to sync the collections to Automation hub.
These steps can also be completed using the redhat_cop.ah_configuration repository. To use the modules in that repository, the following options must be used for each module. An example of this is the method that syncs the community repository from a file, including the necessary authentication variables:
//collection/repos.yml
---
- name: Configure community repo from file
  redhat_cop.ah_configuration.ah_repository:
    name: community
    url: https://galaxy.ansible.com/api/
    requirements_file: requirements.yml
    ah_host: https://ah.node
    ah_username: admin
    ah_password: secret123
    ah_path_prefix: galaxy
    validate_certs: false
...
The options for all the modules in the ah_configuration collection use the following options for authentication:
- ah_host: The URL of the host to connect to.
- ah_username: The username to use to authenticate.
- ah_password: The password to use to authenticate.
- ah_token: The token to use in place of a username/password.
- ah_path_prefix: The API path prefix used to connect to Automation hub. For Automation hub, this is galaxy, while for a galaxy_ng installation this is automation-hub.
- validate_certs: This specifies whether or not to validate certificates when connecting to Automation hub.
For the community repository, the requirements.yml file can be supplied or a list of collections to include. You can do so by setting the values for both the RH-certified and community repositories using the same authentication options previously. In the following code, the repositories have been set and synced using the modules for ah_repository and ah_repository_sync. This excerpt can be found in this chapter’s GitHub repository. The following example uses a list of collections as opposed to a file:
//collection/repos.yml
---
- name: Configure community repo
  redhat_cop.ah_configuration.ah_repository:
    name: community
    url: https://galaxy.ansible.com/api/
    requirements:
      - name: redhat_cop.ah_configuration
      - name: redhat_cop.tower_configuration
        version: 2.0.0
The following code will configure the certified repository to gather collections from the Red Hat cloud:
- name: Configure rh-certified repo
  redhat_cop.ah_configuration.ah_repository:
    name: rh-certified
    url: https://cloud.redhat.com/api/automation-hub/
    auth_url: https://sso.redhat.com/auth/realms/redhat-external/protocol/openid-connect/token
    token: aabbcc
To get the token for access to Red Hat Automation hub, follow these steps:
- Log in to console.redhat.com.
- Navigate to Ansible Automation Platform | Automation Hub | Connect to hub | Load Token.
- Copy the token from here.
Once defined, both the certified and community repositories can be synchronized so that they can grab any updates to collections. This is useful as it puts you into a timed event so that you can periodically update the repositories:
- name: Sync community repo
  redhat_cop.ah_configuration.ah_repository_sync:
    name: rh-certified
    wait: true
...
So far, we have dealt with collections that come from other sources. The certified and community collections involve other sources that have been written and published. However, the process of publishing collections that you or someone else in your company has written is different. The next section handles how to manage custom collections that haven’t been published elsewhere.
Publishing custom collections
For custom collections, a namespace is a prerequisite. Namespaces are the first part of a collection’s name – for example, for the redhat_cop.ah_configuration collection, redhat_cop is the namespace. The namespace is created in the GUI using the following options:
- Name: Name of the namespace.
- Owners: The group that owns the namespace. It should have the following permission options:
- "change_namespace"
- "upload_to_namespace"
Note
The namespace owner does not have permission to approve a collection. If approval is required, either the namespace owner must be trusted to approve all collections or someone with the approval role must approve updates to collections in the namespace.
- Company: Name of the company (optional).
- Email: The email used to contact about the collection.
- Avatar or Logo URL: A URL to a PNG of the image to use for the namespace.
- Description: The description of the namespace.
- Resources: The documentation of the namespace in Markdown format.
To create a namespace in the GUI, navigate to Collections | Namespaces | Create. You will be prompted for the Name and Owners details. To fill in the other options after creation, navigate to the namespace by going to View Collections and click the three dots in the right-hand corner. This will allow you to edit the namespace with the other options.
The format for a list of namespaces in the ah_configuration collection is as follows:
//collection/namespace.yml
---
ah_namespaces:
  - name: community_test
    company: Community Test
    email: [email protected]
    avatar_url: https://github.com/ansible/awx-logos/blob/master/awx/ui/client/assets/logo-header.svg
    description: string
    resources: "# Community
A Namespace test with changes"
    links:
      - name: "Nothing"
        url: "https://github.com/ansible/awx"
    groups:
      - name: ansible_admins
        object_permissions:
          - "change_namespace"
          - "upload_to_namespace"
...
The role to create a namespace using this format is redhat_cop.ah_configuration.namespace.
Once a namespace has been created, a collection can be uploaded by navigating to the collection and clicking the Upload collection button.
There are two ways to do this using the ah_configuration collection. One involves using the role with a collection list using a Git repository, while the other involves using a list of tarballs of precompiled collections. Here, you can use the following YAML formats:
//collection/collection_list.yml
---
ah_collections:
  - collection_name: cisco.iosxr
    git_url: https://github.com/ansible-collections/cisco.iosxr
  - collection_name: awx.awx
    collection_local_path: /var/tmp/collections/repo
ah_collection_list:
  - /var/tmp/collections/awx_awx-15.0.0.tar.gz
...
This role uses the following options:
- Collection name: The name of the collection
- Git URL/collection local path: The location where you can find the collection to compile
You can push the list of collections by invoking the redhat_cop.ah_configuration.publish role. This role requires the authentication variables mentioned previously and allows you to automatically approve published collections if needed if you set the ah_auto_approve variable to True.
Using both the namespace and publish roles, a collection can be published with collection/publish.yml. The first step is to make sure the namespace has been created:
- name: Create namespace
  include_role:
    name: redhat_cop.ah_configuration.namespace
The second step takes the collection list and publishes those collections to Automation hub:
- name: Publish Collections
  include_role:
    name: redhat_cop.ah_configuration.publish
  vars:
    ah_auto_approve: true
...
Alternatively, with a compiled tarball, the module can be used to publish a collection. This can be done with the ah_collection module:
//collection/publish.yml
---
- name: Upload collection to automation hub
  redhat_cop.ah_configuration.ah_collection:
    namespace: awx
    name: awx
    path: /var/tmp/collections/awx_awx-15.0.0.tar.gz
…
This is useful when you’re publishing the collection from a repository using a CI/CD workflow. Both using the roles and the module are valid. They are designed to be flexible to accommodate either publishing collections from a list of repositories, or folders, or for each repository to publish its collection.
It is best to decide on a strategy for each collection to publish to Automation hub by using the CI/CD pipeline where they are stored. Custom-created collections will have sporadic updates, depending on when the code needs to be updated.
So far, we have covered putting collections in Automation hub. However, Automation hub also acts as a container registry. This allows you to curate and manage EEs. The second half of this chapter will explore how to manage this portion of Automation hub.
Managing execution environments and registries
Managing EEs in Automation hub focuses on two things: grabbing images from a remote registry and managing images that have been pushed to Automation hub. Upon its initial installation, Automation hub does not have any remote registries configured.
How to add a remote EE registry
A remote container registry is easy to interact with. If needed, authentication credentials are provided; this is the base for adding a remote container.
Two popular registries you should add are as follows:
- Quay.io: This is a public registry. One of the images you should use here is the EE for AWX (https://quay.io/repository/ansible/awx-ee).
- registery.redhat.io: This is the official container registry for Red Hat. Automation hub will automatically index any EEs listed there.
For a remote registry, the following fields are used, though only name and url are required:
- name: The name of the registry to remove or modify
- url: The URL of the remote registry
- username: The username to authenticate to the registry with
- password: The password to authenticate to the registry with
- tls_validation: Whether to validate TLS when connecting to the remote registry
- proxy_url: The proxy URL to use for the connection
- proxy_username: The proxy URL to use for the connection
- proxy_password: The proxy URL to use for the connection
- download_concurrency: Number of concurrent collections to download
- rate_limit: Limits the total download rate in requests per second
To set a remote registry in the GUI, follow these steps:
- Authenticate to Automation hub.
- Navigate to Execution Environments | Remote Registries | Add remote registry.
- Fill the form with variables.
- Click Save.
- For the Red Hat registry, by clicking the three dots at the end, you can view the available index execution environments:
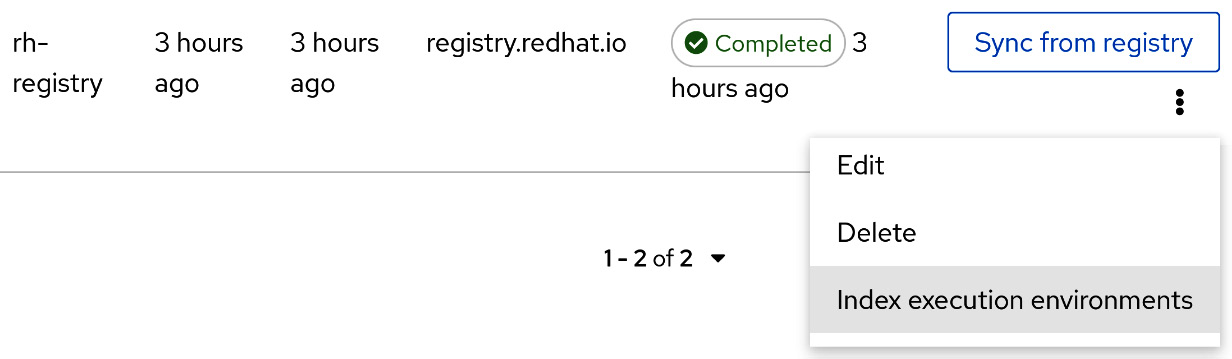
Figure 9.3 – Automation hub remote registry
To set a remote registry using modules, use the following task from the file:
//ee/registry_module.yml
---
    - name: Configure Red Hat registry
      redhat_cop.ah_configuration.ah_ee_registry:
        name: rh-registry
        url: registry.redhat.io
The module takes the same inputs mentioned previously. The role will also take a list item of these variables:
//ee/registery_module.yml
---
    ah_ee_registries:
      - name: quay
        url: https://quay.io/
You should use the following role with this variable:
  roles:
    - redhat_cop.ah_configuration.ee_registries
That covers the basics for adding EEs sourced from an external registry. With a source set, they can be regularly synchronized.
How to synchronize an EE registry
Synchronizing an EE allows you to get updates from the remote registry with Automation hub.
Using the UI, on the same page that an EE registry was added to, click the Sync from registry button, as shown in Figure 9.2.
To do this with modules, use the following task in Ansible:
//ee/registery_module.yml
---
    - name: Sync rh-registry without waiting
      ah_ee_registry_sync:
        name: rh-registry
        wait: false
The redhat_cop.ah_configuration.ee_registries_sync roles takes the ah_ee_registries list input to run the sync module as well.
How to add a remote or local EE to Automation hub
Automation hub acts as its own registry. This means that containers can be pushed to it using commands, or by the hub pulling containers from remote registries.
To push a local container to Automation hub, follow these steps. You can review the commands mentioned here by rereading Chapter 8, Creating Execution Environments:
- Retag the image with the remote registry in its name. You can also rename the image here:
$ podman tag localhost/base_ee ah.node/base_ee
- Push the new image to Automation hub:
$ podman push --tls-verify=false ah.node/base_ee
Alternatively, you can use the redhat_cop.ee_utilities roles to push EEs. A third option is to use the containers.podman.podman_image module.
For a remote execution environment, the following fields are used. Only name, upstream_name, and registry are required:
- name: The name of the EE to use. This can be different from the remote name.
- upstream_name: The name of the EE in the remote registry.
- registry: The remote registry to pull from, including the repository; for example, ansible/awx-ee.
- tags_to_include: Tags to include from the external registry.
- tags_to_exclude: Tags in the external registry to exclude.
- description: Description of the EE.
- groups: Groups that have access to containers in the namespace. In this example, an EE called cheddar/awx-ee would grant access to all the containers in the cheddar namespace.
To add an EE from a remote registry to the GUI, follow these steps:
- Authenticate to Automation hub.
- Navigate to Execution Environments | Execution Environments | Add execution environment.
- Fill in the form with variables.
- Click Save.
At the time of writing, there isn’t a module or role for adding an EE to Automation Hub with a role or module. However, the redhat_cop.ah_configuration collection may have created one after this book is published.
Now that we’ve added remote registries and EEs, let’s learn how to maintain them.
Best practices for maintaining execution environments
It is a best practice to regularly update EEs, similar to synchronizing the registry.
With registry.redhat.io added, synchronized, and indexed, the following execution environments should auto-populate:
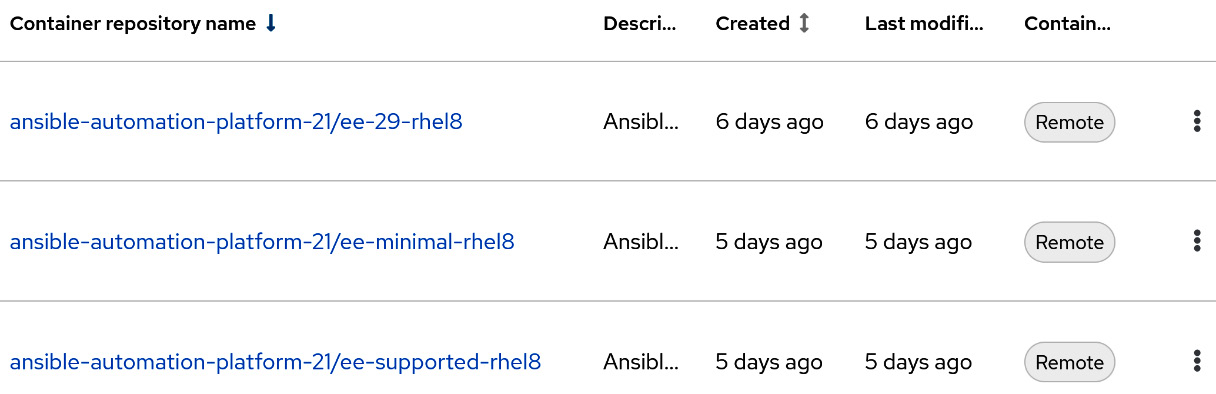
Figure 9.4 – Automation hub execution environments
These are the official execution environments that are regularly updated with bug fixes and Common Vulnerabilities and Exposures (CVEs) updates.
Using a CI/CD to build execution environments, as discussed in Chapter 8, Creating Execution Environments, allows for regular updates of EEs when new versions of the base image are released. There is no notification or set schedule for the updates, however the current cadence appears to be every 2-3 weeks.
It is also recommended to either match the EE tag with the one it was built with, or to have that noted somewhere that it can be accessed. This allows for easier troubleshooting if issues arise.
All of these are puzzle pieces. For example, there is a source for base images. It is better to use the EEs from the Red Hat registry as they can be updated versus the static ones that the automation controller has upon being installed. From there, the customized EEs provide more flexibility for different tasks in the controller. However, Automation hub is merely a repository for information that can be used in the controller. The next step is to transfer that information to the Automation controller.
Connecting Automation hub to the Automation controller
The Automation controller provides mechanisms for consuming content from Automation hub. These include both collections and execution environments.
In Chapter 5, Configuring the Basics after Installation, we covered credentials and organizations – specifically, Galaxy credentials. When the Automation controller and Automation hub are installed together, this creates a default Automation Hub container registry credential. If this is not present, a container registry and Ansible Galaxy credential are used to authenticate the controller to Automation hub.
Using credentials to pull collections
The Ansible Galaxy credentials are used in an organization on an automation controller, the order of which determines which collections are pulled. It is recommended that you use the Published, Certified, Community, Galaxy order. This ensures that any self-published collections are pulled first, that a certified collection is prioritized over community ones, and that previously synced community collections are pulled last.
When a project is synchronized on the Automation controller, it uses a collections/requirements.yml file to list collections to install alongside the project. This is the same file that we mentioned when building EEs. These take precedence over those installed in the EE. The Automation controller will use the Galaxy credentials in the organization to find and download any collection that’s required.
Adding execution environments to the Automation controller with the GUI
To use execution environments, they must be added to the Automation controller. These can then be used in organizations, projects, inventories, and job templates. Automation hub has a shortcut for adding EE to the controller in the GUI.
To add an EE from Automation hub to the Automation controller, follow these steps:
- Authenticate to Automation hub.
- Navigate to Execution Environments | Execution Environments. Then, click on the three dots to the right of the EE you want to add. Next, click Use in Controller and click on the controller’s URL; for example, https://controller.node. After that, authenticate to the Automation controller; a form will appear so that you can add the EE:

Figure 9.5 – Automation hub – Use in Controller
This can also be done in the controller UI, as follows:
- Authenticate to the Automation controller.
- Navigate to Execution Environments and click Add.
The following fields are used to add EEs:
- Name: The name to use for the EEs.
- Image: The URL of the container image to use, including the tag. For example, you could use ah.node/ansible-automation-platform-21/ee-minimal-rhel8:latest.
- Description: Description of the EE.
- Organization: The organization the EE is limited to. Leave this blank to make it globally available.
- Credential: The credential to use to authenticate to the container registry.
- Pull: What the pull behavior should be. Here, you have the following options:
- Always: Always pull the EE image.
- Missing: Only pull the EE when it’s missing.
- Never: Never pull the EE image.
With the EE in the Automation controller, it can be used for tasks. However, this is not the only way to add an EE. The other option is to use modules.
Adding execution environments to the Automation controller with modules
Using a module to add an EE is useful for a playbook where you create an EE, publish it to a registry such as Automation hub, and then add it to the controller.
The following is an excerpt from the controller/controller_ee_modules.yml file:
    - name: Create EE
      ansible.controller.execution_environment:
        name: "My EE"
        image: quay.io/ansible/awx-ee
The module uses the same fields as the GUI does, only with the module option in lowercase. While the module is useful for adding a single execution environment, maintaining it is best done with the configuration role.
Adding execution environments to the Automation controller with roles
Using a role to add and manage EEs on the controller is useful for maintaining CaC. The following is an excerpt from the controller/configs/execution_enviroments.yml configuration file:
controller_execution_environments:
  - name: "My EE"
    image: quay.io/ansible/awx-ee
    pull: always
The role list uses the same fields as the GUI does, only with the module option in lowercase.
The redhat_cop.controller_configuration.execution_environments role takes the configuration file as input and adds the EEs to the Automation controller.
With the options to add EEs to the Automation controller with the GUI, modules, and roles, EEs can be used with jobs, projects, and inventories.
Summary
In this chapter, you learned how to manage Automation hub, as well as about the collections and EEs that are used in job templates on the Automation controller. Keeping execution environments and collections up to date is important so that playbooks can be run and kept up to date.
The previous chapters covered projects, inventories, credentials, and role-based access control (RBAC). All of those pieces are related to job templates, which run playbooks inside the Automation controller. Workflows are a series of job templates. Projects, workflows, and job templates will be covered in the next chapter.