
5
Wrangling Problem Code by Applying Behavioral Patterns
Do you want to have some fun that doesn’t involve code for once? Next time you find yourself in a tall building with an elevator, get with three or four friends and ride to the top floor. Here’s the fun part: have everyone in your group face the back of the elevator. As other people get on the elevator, they will almost always follow your lead and face the rear. This is because human behavior follows patterns! There are entire fields of study devoted to this fact, including psychology, sociology, and the applied fields of marketing and human relations.
Software is a human invention, so it should come as no surprise that software can be made to follow behavioral patterns too. Behavioral patterns are patterns that deal with algorithms implemented within your classes and how those classes interact and share responsibilities for executing those algorithms.
As our story continues, Kitty and Phoebe will be facing challenges that will require them to learn and implement four of the most popular behavioral patterns:
- The Command pattern
- The Iterator pattern
- The Observer pattern
- The Strategy pattern
As you ride along with them on their journey, you will learn how to diagram and implement the four most popular behavioral patterns using the C# language.
Technical requirements
Throughout this book, I assume you know how to create new C# projects in your favorite Integrated Development Environment (IDE), so I won’t spend any time on the mechanics of setting up and running projects in the chapters themselves. There is a short tutorial on the three most popular IDEs in Appendix 1 of this book. Should you decide to follow along, you’ll need the following:
- A computer running the Windows operating system. I’m using Windows 10. Since the projects are simple command-line projects, I’m pretty sure everything here would also work on a Mac or Linux, but I haven’t tested the projects on those operating systems.
- A supported IDE such as Visual Studio, JetBrains Rider, or Visual Studio Code with C# extensions. I’m using Rider 2021.3.3.
- Some versions of the the .NET SDK. Again, the projects are simple enough that our code shouldn’t be reliant on any particular version. I happen to be using the .NET Core 6 SDK, and my code’s syntax may reflect that.
You can find the completed project files for this chapter on GitHub at https://github.com/Kpackt/Real-World-Implementation-of-C-Design-Patterns/tree/main/chapter-5.
Meanwhile, back at the bicycle factory
“W00t!” Phoebe exclaimed. Kitty was startled and amazed. Her sister had somehow managed to pronounce the hacker slang word while intimating excitement in such a way that Kitty could hear the zeros that replaced the phonetics of the double-o. “What?” Kitty inquired. Phoebe didn’t answer right away, so Kitty looked up and found Phoebe dancing in circles. Phoebe was clad in dirty coveralls and had her hair pulled back in a ponytail. The sight of a dancing Phoebe was not unusual. Kitty realized there was a line of 10 robotic arms bolted to the floor. The arms were mimicking Phoebe’s dance moves to the best of their limited ability.
The unchoreographed ballet of arms was unimpressive by the standards of the Vaganova academy. However, within the context of a hand-built robotic factory created by two fourth-year college students in an abandoned warehouse, it was an astonishing achievement. “That’s amazing!” Kitty laughed. The sisters held hands and danced in circles, which almost caused a large collision as the robots attempted their emulation. They stopped dancing and laughed again. “So, we’re done?” Kitty asked. “No. Right now, they just mimic what they see,” Phoebe replied. “What do you mean by see? Vision was never a part of our specification,” Kitty pointed out. “I know,” said Phoebe. “I found one of Boomer’s old Xbox’s in a crate upstairs. It had a Kinect attached to it, so I dusted it off and connected it to our test client program.” Boomer is Kitty and Phoebe’s cousin. He is a year older than Kitty and graduated from the University of Las Vegas last year. He went to college on an eSports scholarship and is now a pro. Naturally, he always had the best gaming gear.
Kitty remembered that Kinect was a camera system Microsoft sold years earlier as part of its Xbox console game platform. It provided a rudimentary computer vision system that was capable of recognizing the shape of a human body. There had been games based on the idea that you could move in front of the camera and the characters in your game would act according to how they “saw” you move. Naturally, being a Microsoft technology, the SDKs were readily available for C#.
“What a neat idea!” Kitty exclaimed. Phoebe breathlessly continued, “So, we have a good object structure from our work with Creational patterns and we also have the skeleton of a working system in place because of our structural patterns.” Kitty countered, “True, but we have not done much with the actual command and control system that drives the robots. The robots can function on their own with our test programs. They can even make bicycle parts by themselves." Phoebe finished Kitty’s thought in a way only sisters can do: “What they can’t do is work together! I did some more reading last night. It turns out there is a whole collection of patterns that will enable the robots to work together. They are called Behavioral patterns! I think we can use them to control a lot of our systems and orchestrate the robots so that they may work together.” Phoebe walked to the whiteboard and explained the next steps needed to code a control system for the necessary robotics.
The Command pattern
At this point, Phoebe has designed two different models of the robotic arm. One set of arms was large and bolted to the floor. These arms were stationary. The second set of arms was mounted on tracks and could move. These were mainly used for moving the parts, materials, and partially finished bicycles around to different stations. Once at a station, the larger arms would do most of the real work.
The larger arms that were bolted to the floor had interchangeable attachments that allowed them to perform different tasks. Phoebe designed this behavior based on the Decorator pattern. Remember, a decorator allows you to add new behavior to an existing class without you having to modify it directly. This is done by creating a new class that wraps around the structure of the original class, then adds the additional behavior. In this case, the decorators are physical hardware. Phoebe marveled at the patterns. She understood how working with the patterns might be considered a design philosophy as much as a software engineering practice. Phoebe remembered that patterns were devised by architects of the physical world at a time when software engineering was only done by scientists in top-secret military labs.
Each of the large stationary robotic arms could affix a different attachment for welding or another for buffing and polishing. Each arm could be programmed to take a handoff of materials brought by the smaller, mobile track-mounted robots.
Phoebe drew out her idea for Kitty, explaining how she could model a command for the necessary robotics in a way that was flexible.
“Think of it this way, Kitty,” Phoebe began. “When we order clothes and shoes online, we pick out the clothes we want to buy. We decide which dresses went want, as well as their color and size. Then, we tell the store where we’d like the clothes to be shipped. Finally, we give the retailer the payment details and a way to contact us if there are questions or problems. The order is a structure that holds all of that information. That’s what I want to do here. I want a pattern where I can send a command. The command should contain everything that the robot needs to know so that it can do its job. The command shouldn’t be tightly coupled to the robot’s control API. In effect, I should be able to send a command to any piece of hardware we have. It isn’t specific to any one robot, or even the attachment it’s using at the time.”
“I see,” said Kitty. “So, the order that contains all the information for the clothes we want to buy could just as easily be sent to any store in the world. We are the senders of the command. We compile the information and send it to a receiver. The receiver isn’t unique to a single store and that receiver could be anything equipped to receive our command. We’re packaging up everything needed to complete an order or a command and it’s up to the receiver to act on it.”
“You’ve got it, sis!” Phoebe beamed. They were excited to get started. Phoebe brought up a diagram she had found online that showed the pattern in its generic form, as shown here:
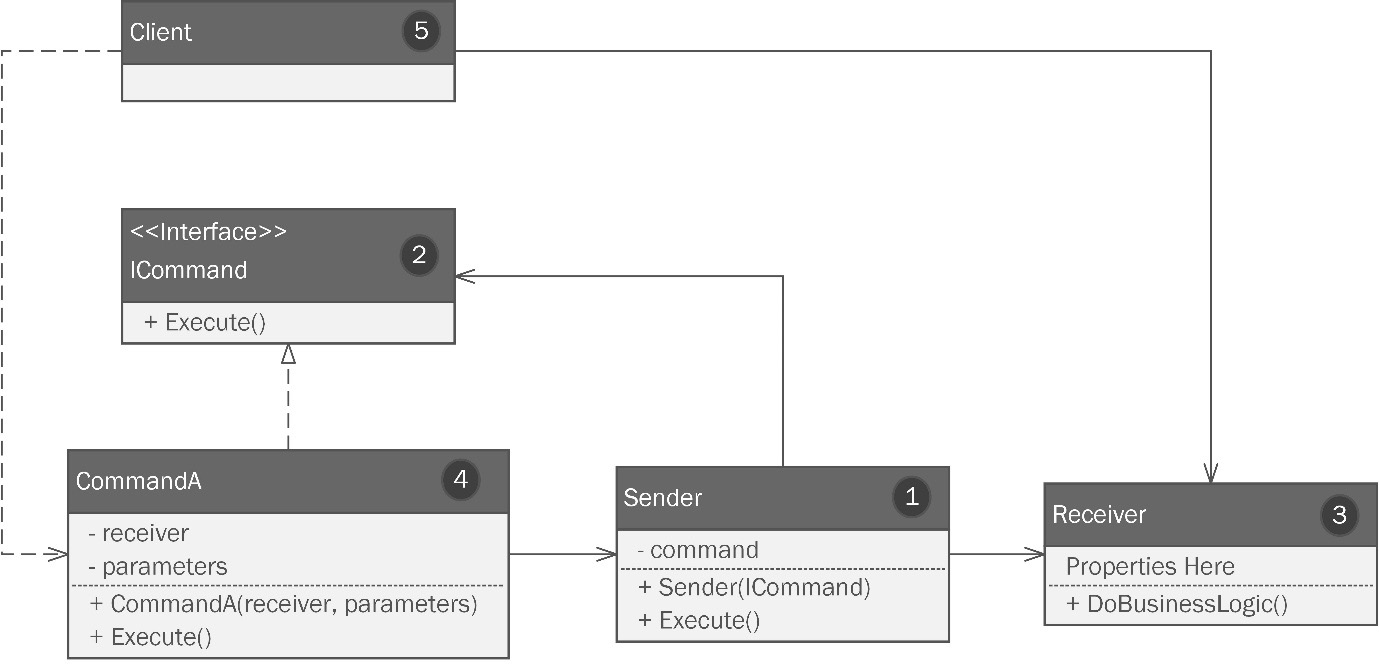
Figure 5.1 – The Command pattern.
Let’s review the different parts of the pattern, which have been numbered appropriately:
- A Sender object is responsible for invoking a request. For example, when Phoebe orders a dress online, the website is gathering the necessary information and is responsible for sending the order.
- The ICommand interface defines a single method that’s used to execute a command. The sender doesn’t create the command. Instead, it receives it in the constructor, or it can be set as a property.
- The Receiver class contains business logic and performs the actual work. The shop that receives the online order is the receiver when Phoebe orders online. The business logic might be different from store to store. Each might have a different process for the way the order is picked, pulled, settled, then shipped. The logic is up to the receiver. It receives the command that contains what it needs to perform the logic independently from the sender.
- Concrete command classes implement the ICommand interface, but also contain a reference to the receiver that will execute the command, along with any properties or parameters needed to execute the command.
- The client instantiates the concrete command class (4) and passes in or sets any parameters or properties needed by the command, including an instance of the receiver.
Applying the Command pattern
Phoebe drew her pattern idea while adapting what she had learned from the generic example. The following is her drawing:

Figure 5.2 – Phoebe’s drawing of the Command pattern.
Kitty studied the diagram for a few minutes. Phoebe watched her closely. Kitty always got a look on her face before an idea clicked. After a minute, there it was. “I got this!” Kitty said as she walked to her corner of the warehouse and she started to work. After a few hours, she produced the implementation of the Command pattern. You can review this in the CommandExample project in this chapter’s code, which can be found in this book’s GitHub repository.
Coding the Command pattern
Kitty started by creating the ICommand interface:
public interface ICommand
{
    public void Execute();
}
Next, she made a concrete command that implements this interface:
public class BuildFrameCommand : ICommand
{
    private AssemblyLineReceiver _assemblyLineReceiver;
Remember, a command object has everything a receiver needs to execute the intent, except the business logic. If you remember Phoebe’s explanation, it even includes a private field to hold the receiver itself. A command is self-contained. In addition to the receiver, it needs the information on the bicycle that the command is responsible for building. Kitty added a project reference to BumbleBikesLibrary, which we covered in Chapter 3, Getting Creative with Creational Patterns. We extended the library to include the IPaintableBicycle interface that was created using the Bridge pattern in Chapter 3, Getting Creative with Creational Patterns. As a reminder, always use an interface wherever you can. Concrete objects should come into play as late as possible. This keeps your design flexible and honors SOLID principles:
private IPaintableBicycle _bicycle;
Next comes a constructor where we pass in the receiver and IPaintableBicycle:
    public BuildFrameCommand(AssemblyLineReceiver
        assemblyLineReceiver, IPaintableBicycle bicycle)
    {
        _assemblyLineReceiver = assemblyLineReceiver;
        _bicycle = bicycle;
    }
Lastly, we have the Execute() method, which is required by the ICommand interface. All it does is run the business logic contained within the receiver:
    public void Execute()
    {
        _assemblyLineReceiver.DoBusinessLogic(_bicycle);
    }
}
The BuildFrameCommand class is done. Now, we need a sender. As mentioned previously, there isn’t much going on in the sender. All it needs is a command, which Kitty specified as ICommand, and a method to execute the command, which Kitty has specified as DoCommand(). The DoCommand() method executes the command. This seems a little counterintuitive; you’d think the receiver executes the command. It does, but not directly. If you coded it to execute more directly, you’d likely be tightly coupling the sender, receiver, and command logic together, which is exactly what we want to avoid:
public class Sender
{
    private ICommand _command;
    public Sender(ICommand command)
    {
        _command = command;
    }
    public void DoCommand()
    {
        _command.Execute();
    }
}
Kitty finishes up with the receiver, which she calls AssemblyLineReceiver. The idea behind this class is that it acts as a master control for the whole assembly line. This is a major part of the orchestration that the girls are trying to achieve.
The AssemblyLineReceiver class needs a project reference to the work we did with the Façade pattern in Chapter 3, Getting Creative with Creational Patterns. As you may recall, the Façade pattern allows us to present a myriad of complicated APIs as a single, easy-to-use point of contact. In this case, the APIs for the robotics came from the manufacturers. The microcontrollers for the different robot arm attachments (the welder, the buffer, and the grabber) all came from different manufacturers with different APIs. In Chapter 3, Getting Creative with Creational Patterns, Kitty and Phoebe wrote a Façade pattern to make this easier to use and to insulate them from repercussions inflicted by future changes to the third-party code, which will evolve independently of the business requirements of Bumble Bike’s manufacturing process.
The Façade pattern also contained an encapsulation of how the line of floor-mounted robots should work. The girls have opted to use quaternions, a struct common to the gaming industry, to represent the spatial layout of their assembly line. The quaternion struct can be found in the System.Numerics library of the .NET framework.
The first part of the AssemblyLineReceiver class just sets up what we need to use for the façade:
public class AssemblyLineReceiver
{
    private readonly RobotArmFacade _robotArmFacade;
    private const int NumberOfAssemblyStations = 20;
    private const float ConsistentY = 52.0f;
    private const float ConsistentZ = 128.0f;
    private const float ConsistentW = 90.0f;
    private readonly Quaternion[] _assemblyStations;
Quaternions are a complicated concept. I’m not selling short your intelligence; I’m paraphrasing the documentation for Unity 3D, a popular video game framework written in C#. In video game work with Unity, you can’t swing a virtual cat without hitting a quaternion. The position and angle of the virtual cat would be defined using a quaternion. The Unity documentation straight-up tells you that quaternions are an advanced mathematical concept. The short version is that a quaternion is a combination of three points in space represented as X, Y, and Z, along with a rotational vector represented as W. Since we don’t need to get into the guts of quaternions in a book on patterns, we have simplified the layout of the assembly line by deciding it is a straight line. As such, only one coordinate in the quaternion is different from station to station, and for us, that is the X coordinate. The remainder can be held constant at a standard height (Y) and a standard depth (Z) within the confines of the factory floor. We will also hold the rotation constant at 90 degrees for the sake of simplicity. To summarize, to represent where a robot sits on the assembly line, we have four coordinates (X, Y, Z, and W) but we keep three constant. Only X varies as you move from one end of the assembly line to the other.
The location of each assembly for the stations is held in an array of quaternions. 10 arms can service 20 stations. In the receiver’s constructor, we set up our façade, along with the locations of each station, by populating the _assemblyStations arrays with 20 quaternions:
    public AssemblyLineReceiver(RobotArmFacade
        robotArmFacade)
    {
        _robotArmFacade = robotArmFacade;
        _assemblyStations = new Quaternion
            [NumberOfAssemblyStations];

        for (var i = 0; i < NumberOfAssemblyStations; i++)
        {
            var xPosition = i * 25.0f;
            _assemblyStations[i] = new Quaternion
                (xPosition, ConsistentY, ConsistentZ,
                    ConsistentW);
        }
    }
That was a lot of setup, but it is also a nice example of how patterns can be combined. They are all pieces of the bigger puzzle. Next, we will look at the interesting part: the code that performs the business logic. This is going to look familiar.
The girls had this code in their test Program.cs file in the FacadeExample code we saw back in Chapter 4, Fortify Your Code with Structural Patterns. The logic itself isn’t really important. In this case, it’s a set of steps to move a bicycle frame from station to station as it is assembled and painted. The key takeaway is that this is where the actual business logic lives. It is kept separate from the sender. In our earlier example, store owners would not want Phoebe telling them how best to pick, pack, and ship the dress she selected. The business logic is not driven by the sender. Likewise, we don’t want the logic in the command itself. The command represents everything needed to perform the logic. It’s the order, not the store workers, executing the order.
In Kitty’s program, the DoBusinessLogic method takes the IPaintableBicycle object (essentially the order for the bicycle) and uses the façade to manipulate the robots to manufacture the bicycle:
    public void DoBusinessLogic(IPaintableBicycle bicycle)
    {
        // Now let's follow an abbreviated imaginary
        // assembly of a bicycle frame by controlling a robot
        // arm.
        // grabber gets the frame parts and takes them to
        // station 1
        _robotArmFacade.ActiveAttachment =
            ArmAttachments.Grabber;
        _robotArmFacade.MoveTo(_assemblyStations[0]);
        _robotArmFacade.Actuate();
        _robotArmFacade.MoveTo(_assemblyStations[1]);
… see the rest in the sample code.
Let’s move on to the last part, which is the client.
Testing the Command pattern’s code
Rather than showing you all of Kitty’s client code, which is extensive and complex, I’ll just show you her simple test program for the logic found in Program.cs in the sample code.
Remember, it is the client’s job to create the command. In this example, Phoebe’s job, as the customer, is to pick out a dress online, specify its color, and give her payment and shipping details. Here, the client is specifying what type of bicycle to build and draws on the Bridge pattern. It can also specify the paint job. Here, we’re going with a simple black paint job that is standard for our mountain bike:
var blackPaintJob = new BlackPaintJob();
var standardMountainBike = new PaintableMountainBike
    (blackPaintJob);
We need access to the control logic for the robot arm façade:
var robotArmFacade = new RobotArmFacade(new
    WelderAttachmentApi(), new BuffingApi(), new
        GrabbingApi());
We must create a command and pass in the data needed to complete the command:
var cmd = new BuildFrameCommand(new AssemblyLineReceiver
    (robotArmFacade), standardMountainBike);
Finally, we must make a sender object and set everything in motion by calling the DoCommand method on the sender. As promised, the sender initiates the action, but it doesn’t perform any action itself. When Phoebe chooses a dress online, she submits the order. It is the receiver that does the work:
var sender = new Sender(cmd);
sender.DoCommand();
The Command pattern is one of the most useful and popular of all the patterns we’ll discuss. The GoF book, along with many others, discusses how it can be applied to the user interface layer of a desktop or web application. Commands within a UI can be created and sent to other parts of the program from several different parts of the UI. An easy example of this is when you save a file – you typically have a File menu option in your program. You likely also have a menu bar with a Save button, and a key combination such as Ctrl/Command + S. Those are all senders. The Command pattern allows you to encapsulate the receiver logic in one place.
You can use the Command pattern any time you have logic to perform an action and you want to isolate it from tightly coupling to anything that may want to call that logic. The giving, receiving, and execution of commands in the real world is a pattern familiar to anyone who has been a parent giving a command and their child executing it. The command is initiated by a sender and executed by a receiver. The chain of events represents a pattern of behavior we all understand and recognize.
A full bicycle order would, in reality, comprise many of these commands. Here, we have built the frame and painted it. Kitty will build the rest of the logic needed to control the assembly process using commands, so we’ll leave her to do that while we explore more patterns.
Next, we’ll address another fundamental concept in C#: collections. While discussing collections, we’ll focus on a pattern you have used many times maybe without even knowing it was a pattern: the Iterator pattern.
The Iterator pattern
Things were going well for Kitty as she worked on the control system, making liberal use of the Command pattern. Then, she hit something of a roadblock. Kitty’s command receiver logic was just taking bicycle orders from the customer ordering systems, such as direct sales, and the dealerships. The requests were processed in the order they were received. Due to this, Kitty and Phoebe noticed a slowdown. While the algorithms in AssemblyLineReceiver were optimized to efficiently produce bicycles, Kitty failed to consider the painting process.
The costliest part of the painting process in terms of time and money was setting everything up to paint a bicycle. This was very easy earlier when each bicycle was only allowed to be built in one color. Now, Bumble Bikes supports custom paint jobs. The sisters were losing time and money on custom jobs because the paint equipment had to be thoroughly cleaned and reset when a custom order was placed. The paint system would have to mix the colors requested, apply them to the custom order, and then reset to a more common color such as red or black. This was happening many times per day, so when a custom job request was received, it held up all the other bicycles behind it. Phoebe pointed out that when her father had done printing work many years ago, he would group his jobs based on ink color requirements to minimize the number of times he had to clean and re-ink the press. The sisters needed to group their orders by paint job type so that they could do all the custom work in batches and only need to clean and reset once per day. They could have adjusted customer expectations concerning delivery dates on custom paint requests, but that isn’t an abnormal retail situation. Kitty needed to figure out how to group the paint orders efficiently and flexibly.
Kitty’s first thought was to incorporate Language Integrated Query (LINQ), a feature unique to .NET languages that allows you to filter lists the way you may do with any query language such as SQL or MongoDB Query Language (MQL). Many developers like LINQ query syntax because it negates the need to create and manage a loop by working directly against a collection. Kitty did some research and discovered that, anecdotally, LINQ is likely between 2x and 10x slower than a traditional foreach loop. While it is neat, it could be a problem at the scale she hoped her software might one day require.
In C# work, foreach loops against collections and allows you to iterate over its elements – that is, you can process each item in the collection, one at a time. Collections in C# are strongly typed, meaning every object in the collection, such as a List, is of the same type. The incoming orders for bicycles were stored in a database and loaded into a List<BicycleOrder> in batches throughout the day. The code for the BicycleOrder class looks like this:
public class BicycleOrder
{
    public Customer Customer { get; set; }
    public IPaintableBicycle Bicycle { get; set; }
    public BicycleOrder(Customer customer,
        IPaintableBicycle bicycle)
    {
        Customer = customer;
        Bicycle = bicycle;
    }
}
The standard iterator that’s used by C# in the foreach loop is what returns the orders in the order they were added. This is to say, they operate first-in, first-out (FIFO). The first order you add to the list is the first one that the foreach loop processes. What Kitty needed was an iterator that gave her all the regular paint job orders first, and the custom paint jobs last. In short, she needed a custom iterator. Iterators in C# follow the Iterator pattern. This should hardly be surprising, though you may not have known it was a pattern at play. The Iterator pattern is shown graphically using UML in the following diagram:

Figure 5.3 – A custom iterator follows the Iterator pattern, which is partly already implemented for you in C#.
Let’s review the different parts of the pattern, which have been numbered appropriately:
- The IEnumerator interface is part of the .NET framework, so this time, you won’t need to make it from scratch. The interface requires one property, Current, which returns the current element in the iteration. The required MoveNext() method is the mechanism used to advance the iteration to the next element.
- IEnumerable is another interface that comes with C#, so again, you don’t need to create it. It requires a method, GetEnumerator(), which is what provides an instance of our custom enumerator.
- A concrete iterator that implements the IEnumerator interface will have the collection in a private field with the class. Collections, and by extension iterators, work using generics, as indicated by <T>. This means they can adapt to any type, including any classes you create. The class has a constructor that takes a concrete collection. By this, we mean the collection you intend to iterate that was implemented in ConcreteCollection.
- A concrete collection.
As described, a standard iterator just gives you a way to work through a collection. Every collection in C# – and there are many – has a common iterator that steps through the collection in order. Any time your business logic requires your iteration to be anything besides FIFO, it is best to encapsulate the algorithm in a custom iterator. We have reached one of those times. Maybe your iterator will have a novel algorithm for moving through the collection. A contrived example might be to have an iterator that only iterates on odd or even elements in the collection. Maybe you need an iterator that iterates strings in alphabetical order. Kitty’s problem is a real-world one – she needs the collection to be filtered and sorted based on paint requirements before a normal iteration.
Applying the Iterator pattern
Let’s look at how Kitty applied the pattern, as shown in the following diagram. Please note that IEnumerable and IEnumerator are part of the .NET framework and do not require actual implementation:

Figure 5.4 – Kitty’s implementation of the Iterator pattern.
Iterators always have the same parts. Our concrete collection is called OrderCollection, which ultimately implements the C# IEnumerable interface via an abstract class called IteratorAggregate. The concrete iterator is a class called PaintJobIterator, which inherits from an abstract base class that will implement the requirements of the interface. The PaintJobIterator class contains the logic that will sort the collection based on the type of paint job. The custom jobs will be done last so that we can get our standard order bicycles shipped right away. Our customers are okay with waiting an extra day for their custom paint jobs, so those are done last.
The OrderCollection and PaintJobIterator classes inherit from the IteratorAggregate and Iterator base classes, respectively. These classes are just abstract classes that implement the respective interfaces. They are useful if you intend to create more than one custom iterator within your project.
Coding the Iterator pattern
We’ve seen the code for the BicycleOrder class already. This contains a reference to another class called Customer, which is pretty much what you’d expect. Kitty used the MailAddress class from System.Net.Mail. Everything else is just strings:
public class Customer
{
    public string FirstName { get; set; }
    public string LastName { get; set; }
    public string CompanyName { get; set; }
    public MailAddress Email { get; set; }
    public string ShippingAddress { get; set; }
    public string ShippingCity { get; set; }
    public string ShippingState { get; set; }
    public string ShippingZipCode { get; set; }

}
Remember that the IEnumerator and IEnumerable interfaces are part of the .NET framework from System.Collections, so we don’t code those. However, Kitty did opt to make abstract classes for them. The first is in the Iterator.cs file:
public abstract class Iterator : IEnumerator
{
    object IEnumerator.Current => Current();
    public abstract int Key();
    public abstract bool MoveNext();
    public abstract void Reset();
    protected abstract object Current();
}
This is just an abstract class that implements the IEnumerator interface. Kitty has another for the IEnumerable interface in the IteratorAggregate.cs file. One method is required to comply with that interface:
public abstract class IteratorAggregate : IEnumerable
{
    public abstract IEnumerator GetEnumerator();
}
So far, this is just boilerplate code. Now, let’s move on to the good parts. The first part is the customized collection Kitty called OrdersCollection. This is just a wrapper around a List<BicycleOrder>:
public class OrdersCollection : IteratorAggregate
{
    public List<BicycleOrder> Orders { get; set; }
A simple parameterless constructor ensures we start with an empty list:
    public OrdersCollection()
    {
        Orders = new List<BicycleOrder>();
    }
Here, we have a simple pass-through to the Add method of List. Pop quiz: does this look like another pattern we’ve covered already? Maybe the Decorator pattern?
    public void AddOrder(BicycleOrder order)
    {
        Orders.Add(order);
    }
Here’s the magical part. When we implement our collection, we need the GetEnumerator method to return our custom iterator, which we haven’t written yet. We are overriding the abstract method in the abstract IteratorAggregate class mentioned earlier and we are returning PaintOrderIterator, as shown here:
    public override IEnumerator GetEnumerator()
    {
        return new PaintOrderIterator(this);
    }
}
Finally, we have the heart of this pattern – the actual iterator itself:
public class PaintOrderIterator : Iterator
{
Most of the contents in this class are implementations of the requirements expressed in the IEnumerator interface, which we express in the abstract Iterator class we saw earlier. First, we can see a private field that holds a reference to the OrdersCollection class we just saw:
private readonly OrdersCollection _orders;
As the iterator moves through the collection, we need to track its position:
private int _position;
A constructor takes in OrdersCollection and sets the private field, as well as the initial position. The initial position starts at -1 because we haven’t begun iterating yet and if we set it to 0, we’d be indicating an actual position in the collection:
    public PaintOrderIterator(OrdersCollection orders)
    {
        _orders = SeparateCustomPaintJobOrders(orders);
        _position = -1;
    }
We may need a way to get the private _position field. We’ll use a read-only Key() method for this:
    public override int Key()
    {
        return _position;
    }
The iterator is invoked via a foreach loop, which invokes the MoveNext() method to move the iteration forward until it reaches the end of the collection:
    public override bool MoveNext()
    {
        var updatedPosition = _position + 1;
        if (updatedPosition < 0 || updatedPosition >=
            _orders.Orders.Count) return false;
        _position = updatedPosition;
        return true;
    }
The interface requires that have a way to reset the iterator position back to the beginning of the collection:
    public override void Reset()
    {
        _position = 0;
    }
Current() gives us the current iteration’s object in the collection. Don’t confuse this with the Key() method we saw a minute ago. Key() gives you the numeric index or the position, whereas Current() gives you the contents at the key’s position:
    protected override object Current()
    {
        return _orders.Orders[_position];
    }
Here’s our customization. All we’re doing here is reordering the collection before the iteration takes place. Kitty made two lists. One will hold BicycleOrder objects, where the class in the PaintJob property is a standard paint job, while the other will hold the custom paint job orders. When we have separated them, it is simply a matter of recombining the list with the custom jobs at the end:
    private OrdersCollection SeparateCustomPaintJobOrders
        (OrdersCollection orders)
    {
        var customPaintJobOrders = new List
            <BicycleOrder>();
        var standardPaintJobOrders = new List
            <BicycleOrder>();
        foreach (var order in orders.Orders)
        {
            var paintJob = order.Bicycle.PaintJob;
If you remember when we built this during our coverage of the Bridge pattern, standard one-color paint jobs are expressed with the IPaintJob interface. Then again, so are custom paint jobs. Our custom paint job was defined in the CustomGradientPaintJob class, which is a different implementation of IPaintJob. Kitty used an abstract class in between the IPaintJob interface and the actual implementation. The intermediary class is called CustomGradientPaintJob, which means we can detect the base class of the paint job and act accordingly:
            bool isCustom = paintJob.GetType().IsSubclassOf
                (typeof(CustomGradientPaintJob));
            if(isCustom)
            {
                customPaintJobOrders.Add(order);
            }
            else
            {
                standardPaintJobOrders.Add(order);
            }
        }
Now that we have a list of regular paint orders and a list of custom paint orders, we can replace the contents of the original orders list:
orders.Orders.Clear();
Then, we can add the standard orders back in:
orders.Orders.AddRange(standardPaintJobOrders);
This is followed by the custom paint orders:
        orders.Orders.AddRange(customPaintJobOrders);
        return orders;
    }
}
Done! Now, all Kitty needs is a quick program to test with in Program.cs. When I say quick, it’s a few lines long because we need to create all the parts in the test program, including the customer, the bikes, the order list, and the custom iterator via a foreach loop. Remember that we’re pulling in some classes from different packages. The Customer class uses System.Net.Mail, which is part of the .NET framework. The bicycles are going to be from BumbleBikesLibrary.PaintableBicycles, while the paint jobs are going to be from BumbleBikesLibrary.PaintableBicycle.CommonPaintJobs:
using System.Net.Mail;
using BumbleBikesLibrary.PaintableBicycle;
using BumbleBikesLibrary.PaintableBicycle.CommonPaintJobs;
using IteratorExample;
An iterator needs something to iterate, so let’s make our empty OrdersCollection class:
var orders = new OrdersCollection();
Now, we need a customer. In real life, there would be several, but for our example, we’ll just use one:
var dealership = new Customer
{
    FirstName = "John",
    LastName = "Galt",
    CompanyName = "Atlas Cycling",
    Email = new MailAddress("[email protected]"),
    ShippingAddress = "123 Singleton Drive",
    ShippingCity = "Dallas",
    ShippingState = "Tx",
    ShippingZipCode = "75248"
};
Now, we need bicycles to put in the orders. Let’s not waste time and make one with a custom paint job! This way, we know there’s one at the front of the list. When the iterator reorders the list, all these should be at the end:
var amarilloPeacockPaintjob = new
     AmarilloPeacockPaintJob();
var bicycle0 = new PaintableMountainBike
    (amarilloPeacockPaintjob);
Once you have a bicycle with a paint job and a customer, you can make an order and add it to the orders list:
var order0 = new BicycleOrder(dealership, bicycle0);
orders.AddOrder(order0);
Next, let’s do the same thing with some standard paint jobs that will wind up at the front of the list when we iterate. First, let’s add a turquoise cruiser bike:
var turquoisePaintJob = new BluePaintJob();
var bicycle1 = new PaintableCruiser(turquoisePaintJob);
var order1 = new BicycleOrder(dealership, bicycle1);
orders.AddOrder(order1);
How about a white road bike?
var whitePaintJob = new WhitePaintJob();
var bicycle2 = new PaintableRoadBike(whitePaintJob);
var order2 = new BicycleOrder(dealership, bicycle2);
orders.AddOrder(order2);
To keep things interesting, let’s add another custom bike. This time, we’ll add a recumbent model with a custom gradient paint job:
var bicycle3 = new PaintableRecumbent
    (amarilloPeacockPaintjob);
var order3 = new BicycleOrder(dealership, bicycle3);
orders.AddOrder(order3);
Here’s a standard red road bike:
var redPaintJob = new RedPaintJob();
var bicycle4 = new PaintableRoadBike(redPaintJob);
var order4 = new BicycleOrder(dealership, bicycle4);
orders.AddOrder(order4);
That should be enough for a meaningful test.
Trying out the new iterator
Now, let’s try out our iterator. If all goes well, this should look exactly like any of the iterations you see in C#:
foreach (BicycleOrder order in orders)
{
    Console.WriteLine(order.Bicycle.PaintJob.Name);
}
The foreach loop is almost anti-climactic, isn’t it? That’s how we know we did a good job. You can’t tell that our custom iterator is any different from any of the common iterators that ship with C# or .NET. The regular foreach loop contains the mechanism to pull out our custom iterator and use it to move through the collection via the MoveNext() and Current methods we have in our concrete classes. When Kitty runs the test program, she can see what we’d hoped for:

Figure 5.5 – Kitty’s test run of her custom iterator.
As Kitty learned, the Iterator pattern is one of the most important patterns in our daily work. It isn’t very complex, despite having a few different parts. You can use this pattern any time you need to process any kind of collection in a manner other than the standard FIFO processing order.
You should always be watching for chances to use this pattern. Watching… Hey, that reminds me of our next pattern!
The Observer pattern
Our worst fear is becoming a reality. Bumble Bikes has become so popular that Kitty and Phoebe are starting to have logistics problems. “Don’t get me wrong,” Phoebe said. “This is a good problem to have. We could be more profitable if we could optimize our shipping costs. The hardest part is the first mile. How can we be more efficient at getting our bikes to a national shipper’s depot?” Kitty arranged a Zoom call with ExFed, a small business owner who provides packing and shipping support as a service. Cathy, the ExFed representative near Phoebe’s factory in Dallas, and John, the representative based in Alpine, where Kitty’s factory was located, listened carefully to Bumble Bikes’ predicament.
“The key to a good logistics workflow,” Cathy said, “is to make sure every time a truck leaves your factory, it’s full of bikes. When the truck comes back, it should be full of raw materials for the next batch of bikes.” The girls had not considered the second part of what Cathy had explained. John concurred. The four worked out some details on the call after Phoebe had explained how her automated factory worked.
“You’ve already got a signal going to your raw materials supplier that tells them when you consume the materials to make a bike,” John pointed out. Cathy picked up on his train of thought and completed it. “Right – all we’d need to do is get a signal to our systems that lets us know when you have a truckload of bicycles for us to pick up. Our trucks can take the bicycles to the national shipper’s depot where they ship out like any other freight.”
Phoebe said, “No problem! We’ll just add another decorator class to our bicycle object.” John and Cathy stared blankly at their respective cameras. “Phoebe! They don’t speak nerd as we do!” Kitty chided. “Besides, that won’t work. The raw material usage is reported for every bicycle. We don’t want to send a pickup signal for every bicycle. That would be inefficient.”
“It would,” John said. “If you did that, you’d risk us leaving with a half-loaded truck. Based on the dimensions of your packaging, we need at least 10 bicycles in every load to make our service cost-effective.”
“What we need,” Kitty began, “is something that sends a signal when there are at least 10 bicycles ready to be picked up.”
“Right,” said Cathy. “You need to have someone at the end of the assembly line count the bicycles and when they get 10, click a button on our website. After that, it will take about 30 minutes to get the truck to your dock.”
Phoebe rolled her eyes imperceptibly. Her sister smirked. Think about all those normal people in the world who don’t speak nerd, and don’t understand software automation. What difficult and unfulfilled lives they must lead! Phoebe and Kitty knew they were going to find a way to automate their supply requests.
“But during that delay,” continued Phoebe, “we’ve probably made another 5 to 10 bicycles. Is that a problem?”
“No,” said John. “We need just a minimum of 10.”
John and Cathy dropped off the call with a list of to-dos and a virtual handshake deal to handle Bumble Bikes’ first-mile logistics. Kitty and Phoebe stayed on Zoom and continued brainstorming. “Cathy said we needed someone to count bicycles as they come off the assembly line. I don’t want to pay someone to just sit around and observe.”
“That’s it! Kitty, you’re a genius!” Phoebe exclaimed. Kitty beamed quizzically. She wasn’t sure what she’d done to merit this rare moment of sisterly praise.
Phoebe realized this situation was calling for the Observer pattern. Cathy had envisioned a person observing the process and reacting when the bicycle count reached a minimum of 10 bicycles. To automate this, the girls will have to write software that can observe the production process and generate a signal to the logistics company when the requisite bicycle inventory has been reached. A generic diagram of the Observer pattern is as follows:
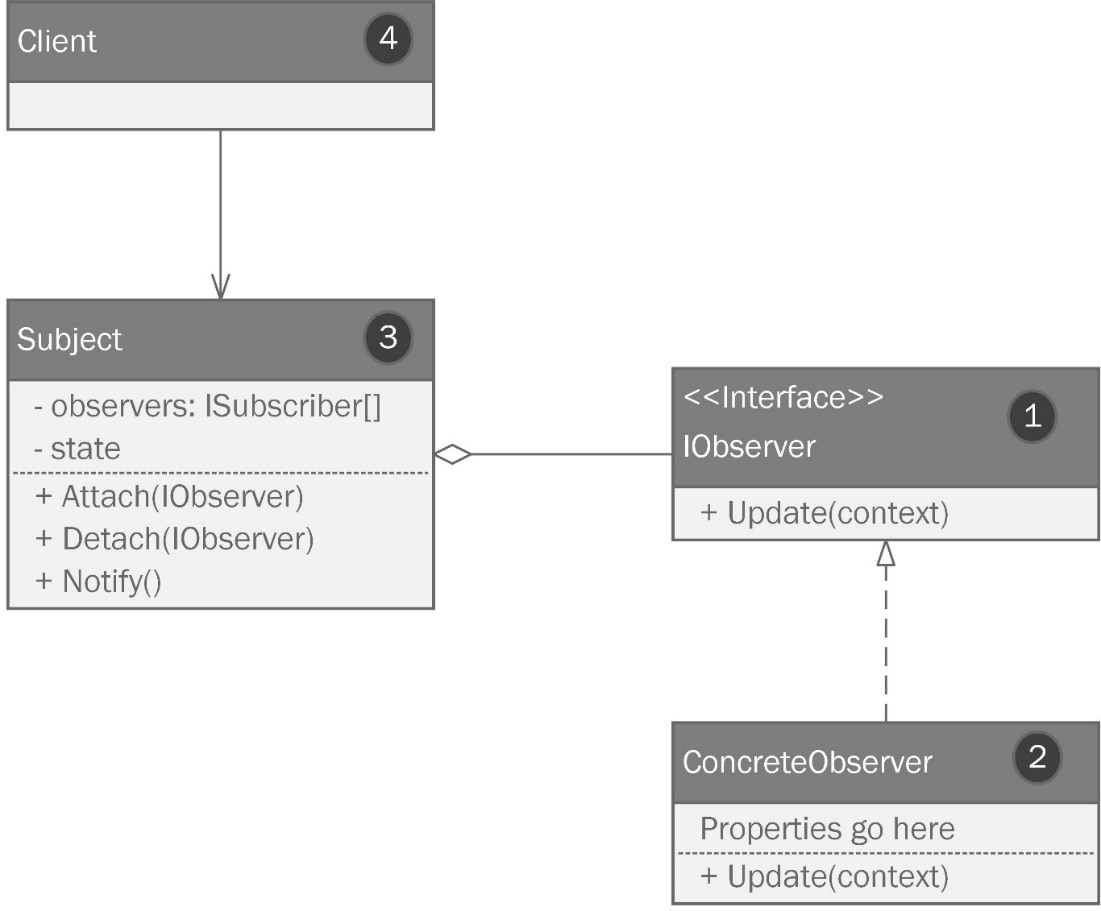
Figure 5.6 – The Observer pattern
There are two basic parts to the Observer pattern – a subject and one or more observers. Let’s review the different parts of the pattern, which have been numbered appropriately:
- An interface describes the method requirement of the observer. This interface defines a public Update() method. Update() is called whenever the observer “sees” something interesting happen in the object it is observing.
- Our concrete observer contains the implementation logic for the behavior that happens when the observer “sees” some interesting change in the subject’s state.
- The subject is doing some useful piece of work and maintains its state while the observer waits. Note that the observers are contained inside a collection within the subject. Also, note that the state property is private. We’ll need some way to let the observers know something interesting happened. For this, we have a function called Notify(). When a triggering condition takes place, the Notify() method can iterate over each attached observer and call its Update() method.
- The whole process is invoked by some larger program we’ll call the client.
Applying the Observer pattern
Kitty brings up Zoom’s whiteboard and they collaborate on their implementation of the Observer pattern that will solve this problem, as shown in the following diagram:

Figure 5.7 – Phoebe and Kitty’s implementation of the Observer pattern that can signal ExFed’s trucks to pick up an order of bicycles.
This one is pretty simple – we need a subject and an observer. The girls used an interface, ILogisticsObserver, to prevent tight coupling between the LogisticsSubject class and the concrete observer class called ExFedObserver.
Once they had drawn the diagram, they each opened their favorite IDE, which contains a collaborative coding feature. This means the girls can code together as though they were sitting next to each other.
Coding the Observer pattern
Phoebe makes short work of the ILogisticsObserver interface:
public interface ILogisticsObserver
{
    public void SchedulePickup();
}
Kitty follows up with a concrete observer that consumes Phoebe’s interface:
public class ExFedObserver : ILogisticsObserver
{
    public void SchedulePickup()
    {
        Console.WriteLine("ExFed has been notified that a
            shipment is ready for pick up.");
    }
}
I left out the actual API call because Kitty and Phoebe were worried that I might accidentally reveal their API key. As we all know, only amateurs check API keys into GitHub, and the code won’t work without it, so I put it in a Console.WriteLine statement as a substitute.
The LogisticsSubject class is where the real action lies. It’s a little longer, so the girls work on it together:
public class LogisticsSubject
{
Kitty adds a List<ILogisticsObserver> field to hold all the observers. She follows that with a typical constructor, which initializes the field:
    private readonly List<ILogisticsObserver>
        _logisticsObservers;
    public LogisticsSubject()
    {
        _logisticsObservers = new
            List<ILogisticsObserver>();
    }
Phoebe adds an Attach method that allows us to add one or more observers, which are objects that conform to the ILogisticObserver interface:
    public void Attach(ILogisticsObserver observer)
    {
        _logisticsObservers.Add(observer);
        PrintObserversCount();
    }
Likewise, she also adds a method that can remove the observer from the list:
    public void Detach(ILogisticsObserver observer)
    {
        _logisticsObservers.Remove(observer);
        PrintObserversCount();
    }
Kitty realizes their testing will be easier if they have a way to see the observers in the list, so she adds a quick method to provide some output for the initial runs. The method simply prints the number of observers stored within the private _logisticsObservers field:
    private void PrintObserversCount()
    {
        switch (_logisticsObservers.Count)
        {
            case < 1:
                Console.WriteLine("There are no
                    observers.");
                break;
            case 1:
                Console.WriteLine("There is 1 observer");
                break;
            default:
                Console.WriteLine("There are " +
                    _logisticsObservers.Count + "
                        observers.");
                break;
        }
    }
Lastly, we need to notify our observers. The generic UML diagram specified a Notify() method. We called ours NotifyPickupAvailable(). It simply iterates through the observers and calls the SchedulePickup() method on each one in the list:
    public void NotifyPickupAvailable()
    {
        foreach (var observer in _logisticsObservers)
        {
            observer.SchedulePickup();
        }
    }
}
Following her sister’s lead, Phoebe writes the test program in Program.cs. First, she creates an instance of LogisticsSubject:
var logisticsSubject = new LogisticsSubject();
Then, she makes the observer and attaches it to the subject:
var exFed = new ExFedObserver();
logisticsObserver.Attach(exFed);
Next, let’s simulate making 100 bikes. Each time we have 10, we’ll send a notification:
var pickupOrder = new List<Bicycle>();
for (var i = 0; i < 99; i++)
{
    var bike = new MountainBike();
Here, Phoebe is just simulating a passage of time in an attempt to keep it a real simulation. She wishes her robots could build a bike in 3 seconds. After the delay, she writes out the bike with the ToString method and adds the bike to the pickupOrder list:
    Thread.Sleep(3000);
    Console.WriteLine(bike.ToString());
    pickupOrder.Add(bike);
Our observer logic checks whether we have enough bikes. If so, it triggers the NotifyPickupAvailable() method, which loops through all the observers and calls their SchedulePickup() methods:
    if (pickupOrder.Count > 9)
    {
        logisticsSubject.NotifyPickupAvailable();
In the real world, 30 minutes would pass before a truck arrived at Bumble Bikes to take their inventory. However, no one wants to simulate that, so we’ll simply pretend we did and clear out the order:
        pickupOrder.Clear();
    }
}
When we are done making bikes for the day, we can detach. Phoebe understands the importance of work-life balance for her factory robots:
logisticsSubject.Detach(exFed);
As the girls’ software operation saw more and more patterns in use, the number of problems left to solve was dwindling rapidly. They were moving into the phase you’ll see in every software project, where the work shifts from developing new code to maintaining it. Usually, about this time, the senior developers start to get bored because all the big problems have been solved. Those developers must now make a choice: stick with the project or find another project with new challenges. That’s what happens in most software shops. Surely Phoebe, being the brilliant owner of a bicycle manufacturing startup, would never succumb to the temptations fostered by monotony?
The Strategy pattern
“I’m BORED!” Phoebe yelled across the room at her sister. Kitty had come up from Alpine to go over some spreadsheets with Lexi, the head of accounting for Bumble Bikes. Phoebe and Lexi had been friends for many years, so when Phoebe had the chance to recruit her, she took it. Lexi, who was used to Phoebe’s peculiarities, smiled at Kitty, folded her laptop, and said, “I’ll have this done for you tomorrow.”
As Lexi left the office, Phoebe flopped upside down on the couch, flipping through channels on the TV with the sound off. She wound up on channel 52,381, which was The Bike Channel. Bumble Bikes advertised heavily on this channel, and at that moment, a talking head was reviewing bike computers. A bike computer is an electronic device that reports your speed and distance traveled. Fancy models can keep track of your cadence, which is the pace at which you pedal. Some even track your heart rate and the electrical wattage produced by the effort a rider imposes on the pedals.
Phoebe’s face was starting to turn red. She had been upside down too long and blood had rushed to her head. She flopped the rest of the way over and revealed that look she got when she had a million-dollar idea.
Her sister could see it without even looking at her. “What?” Kitty asked.
Phoebe stared at the ceiling a little longer, her eyes flitting back and forth. She was inventing something in her mind. Kitty looked up and could see the wheels turning in Phoebe’s head.
“Bike computers!” Phoebe yelled at last. “Why are they so boring? I mean really! All they do is tell jocks how great they are. Who needs a computer for that?” It was an odd statement, but coming from Phoebe, it rated at most a 4 on a scale from 1 being something such as a pizza order to 10, which might be a non-sequitur completion of an engineering problem she’d given up on privately a week prior.
“What if a bike computer did something cool, like what we have with our car computers? Sure, it would be track speed, distance, wattage, and whatever jocks pay for in a bike computer. but It would also have navigation routes, trail, and road conditions. This is information a rider would want to know and have so that they can complete their next epic ride,” Phoebe blurted. This was usually the part where Phoebe ran to her lab and ordered a stack of pizzas and fizzy water. Then, she would disappear for a few days. The sister’s recent success gave the girls the ability to move their labs to their respective factories. Phoebe’s lab had a bathroom and a bed that stretched between the far wall and what looked like a Van de Graaff generator. “Why does she need that?” Kitty thought silently. She’d long since given up asking out loud. The bed, covered in pizza boxes from previous engineering adventures, appeared to have never been slept in.
Kitty didn’t respond to her sister’s question concerning the use of a bike computer. She knew it was a question that wasn’t meant to be answered. When Kitty came in the next morning, she noticed a stack of discarded pizza boxes and empty cans of fizzy water littered throughout the office. A small black box was mounted to a handlebar assembly on Phoebe’s workbench. Phoebe was asleep in her lab.
Curious, Kitty fiddled with the buttons on the box’s apparent interface. Phoebe had made a small computer with some sensors attached. Kitty was able to find the navigation feature that had captured Phoebe’s imagination. It was crudely designed, but functional. “Hey, sis,” Phoebe muttered sleepily. “It’s not working yet. I’m stuck on the navigation.” Phoebe’s head flopped back down on the pillow. Kitty continued fiddling with the navigation. She saw the problem: the UI on the navigation allowed you to pick from several kinds of terrains. You could search for routes on paved roads, gravel trails, or mountain trails. However, the search results consistently showed only paved roads. It was easy to figure out why.
Phoebe was leveraging well-known GPS APIs to compute her route. Naturally, these were favoring paved roads. Phoebe was able to create a façade for the API and a decorator that slightly altered the default behavior so that the API stayed away from recommending busy highways, even when they were the most direct route.
For the next few hours, Kitty researched alternative mapping APIs that would focus more on the roads less traveled and gave preference to those inaccessible to cars. She found that each time she added different APIs and pathfinding algorithms, her code started to become complex. She could easily see the beginnings of a big ball of mud on her growing plate of spaghetti.
After some refactoring and some thinking, she settled upon a strategy that should work. Spoiler alert: strategy is the name of the pattern she used. This pattern is easy to explain because the pattern means the same thing as the word pattern means in plain English. If you’re trying to achieve a complicated objective, you create a strategy. In software engineering, the Strategy pattern refers to working with a set of algorithms flexibly and interchangeably. An algorithm is simply a set of steps you can follow to solve a problem that gives a consistent result within a reasonable amount of time. If you were to create an algorithm to create a peanut butter and jelly sandwich, the steps would be simple:
- Put two slices of bread on a plate.
- Open the peanut butter.
- Using a dull knife, spread peanut butter on one side of one slice of bread.
- Close the peanut butter jar.
- Open the jelly.
- Using a different dull knife (don’t you hate it when someone uses the same knife and gets peanut butter in your jelly?), spread some jelly on one side of the second slide of bread.
- Close the jelly jar.
- Place the first slice of bread on top of the second so that the peanut butter and jelly meet between the slices of bread.
That’s an algorithm. If you follow that algorithm, I can guarantee that you’ll always wind up with a peanut butter and jelly sandwich. This algorithm can be completed in a few minutes, which to me, is a reasonable amount of time. I could easily make a second algorithm to make a turkey sandwich, and another to make a cheese sandwich. If I encapsulate each algorithm using a common interface, I can choose a sandwich-making strategy based on what kind of sandwich I desire.
Kitty has a situation where she needs an algorithm to get from point A to point B. She needs three different strategies, which are coded as three different algorithms. The first algorithm will find a path strictly on paved roads. The second will try to make use of gravel or unpaved roads. The third will find a path with no roads at all, but that is otherwise passable on a bicycle. She needs these routes from A to B to follow a common interface, and she needs the algorithms themselves to follow a common interface so that she can swap them as appropriate.
We can express this with UML, as shown in the following diagram:
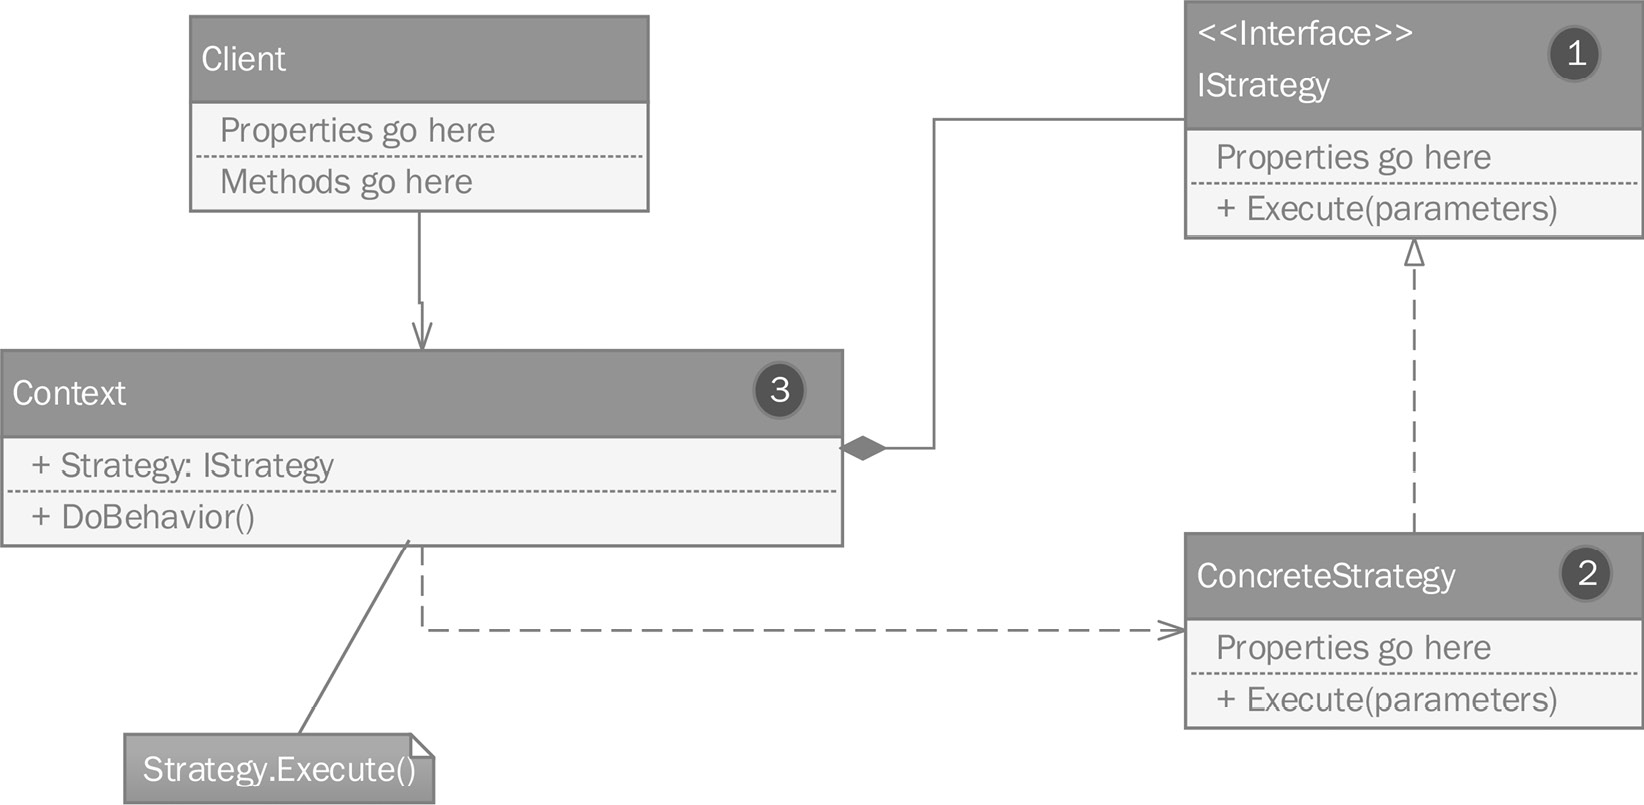
Figure 5.8 – The Strategy pattern.
Let’s review the different parts of the pattern, which have been numbered appropriately:
- The IStrategy interface defines a method that implements your algorithm. In our case, it will be called Run, and we can pass in any data the algorithm may need, such as the geospatial coordinates of your starting and ending locations.
- A concrete strategy object that implements the IStrategy interface will implement your algorithm.
- A context object holds the strategy and can execute it with some method. We have called ours DoBehavior().
The key here is that all the algorithms follow the IStrategy interface. This means I can pass any algorithm contained in a concrete strategy object containing a Run method to invoke the algorithm. At this point, the algorithms are interchangeable.
Applying the Strategy pattern
Kitty comes up with a diagram for her implementation, as shown here:

Figure 5.9 – Kitty’s drawing of their implementation of the Strategy pattern.
Kitty looked over at Phoebe who was in a deep sleep. Maybe with the Strategy pattern, she could fix up this software before she wakes up.
Coding the Strategy pattern
Phoebe already had the data structures at the bottom of the diagram. She had typed INavigationRoute:
public interface INavigationRoute
{
    public string RouteDetails { get; set; }
}
She also had a concrete NavigationRoute class. Unfortunately, Karina, the attorney representing Bumble Bikes, will not allow me to show this part of the code. That’s okay. We’re here for the pattern. Neither the interface nor the class is part of the pattern. They’re just structures used in the implementation. In place of Kitty’s highly proprietary data structure, I’ll give you a simple string:
public class NavigationRoute : INavigationRoute
{
    public string RouteDetails { get; set; }
}
Let’s move on to the code that is part of the strategy. We’ll start with the INavigationStrategy interface. This interface is used to conform your algorithms to a common structure so that they can become interchangeable:
public interface InavigationStrategy
{
    public InavigationRoute FindRoute(string parameters);
}
As mentioned previously, Kitty needs three concrete implementations. The first is for finding routes on paved roads. Phoebe had this one working, so Kitty simply refactored it to fit the interface:
public class RoadNavigationStrategy : INavigationStrategy
{
    public INavigationRoute FindRoute(string parameters)
    {
        // This is where your amazing algorithm goes.  But
        // since this is a book on patterns and not
        // algorithms...
        return new NavigationRoute
        {
            RouteDetails = "I'm a road route."
        };
    }
}
Then, Kitty created an algorithm to find gravel road routes:
public class GravelNavigationStrategy : INavigationStrategy
{
    public INavigationRoute FindRoute(string parameters)
    {
        // This is where your amazing algorithm goes.  But
        // since this is a book on patterns and not
        // algorithms...
        return new NavigationRoute
        {
            RouteDetails = "I'm a gravel route."
        };
    }
}
At this point, I predict you will not be surprised by the third implementation:
public class MountainNavigationStrategy :
    INavigationStrategy
{
    public INavigationRoute FindRoute(string parameters)
    {
        // This is where your amazing algorithm goes.  But
        // since this is a book on patterns and not
        // algorithms...
        return new NavigationRoute
        {
            RouteDetails = "I'm a mountain route."
        };
    }

}
The only thing left is the NavigationContext class:
public class NavigationContext
{
Kitty used a simple property to hold her navigation strategy. Naturally, she declared the interface, not a concrete object:
    public INavigationStrategy NavigationStrategy { get;
        set; }
Next is a standard constructor. She set the default to a road navigation strategy since that is the default for Phoebe’s device:
    public NavigationContext()
    {
        NavigationStrategy = new RoadNavigationStrategy();
    }
Finally, we have a method to start the algorithms on finding the path we’re looking for based on the current strategy in the NavigationStrategy property:
    public void StartNavigation()
    {
There was a lot of cool business logic here. Eventually, Kitty generates the route using the strategy:
        var route = NavigationStrategy.FindRoute
            ("parameters go here");
        Console.WriteLine(route.RouteDetails);
    }
}
Honestly, this is the most innovative set of algorithms I have ever seen. Too bad the lawyers got involved. However, we did get to see the pattern, which turned out to be very simple compared to some of the more complicated patterns we’ve seen.
The Strategy pattern is used when you need to be able to choose from a set of related algorithms all aimed at a common objective. Whether it’s making sandwiches or devising a novel set of interchangeable geospatial pathfinding algorithms, using a Strategy pattern will help keep your code maintainable and easy to read. Kitty can easily add more algorithms as she thinks of them, without breaking any of the existing strategies.
Summary
Behavioral patterns work with algorithms in ways that keep your software manageable. In this chapter, we looked at four very useful and popular patterns that can be employed to solve a variety of design problems.
The Command pattern can be used to isolate instructions from the objects responsible for executing them. This is one of the most common causes of the antipatterns we discussed in Chapter 1, There’s a Big Ball of Mud on Your Plate of Spaghetti. Tightly coupling logic with concrete structures yields software that is brittle and prone to grow in complexity. The Command pattern will help you avoid this trap.
The Iterator pattern is used any time you need to iterate over a collection in some manner not handled by the standard .NET iterator. This pattern works with a collection and starts with the first item before iterating in a straight line to the last. This can take the form of manipulating the collection before processing, or it might be a novel way of moving through the collection to meet a business requirement. Some of the basic building blocks for this pattern are built into the .NET framework within the System.Collections namespace. Before building an iterator, you should check if one already exists.
The Observer pattern consists of a subject and one or more observers. The subject notifies the observers of a particular trigger condition within the subject’s state. The Observer pattern is widely used with a myriad of applications. Many software developers who have used event listeners have seen and understand the power of this technique.
The last pattern we discovered was the Strategy pattern. We use the Strategy pattern any time we have a set of algorithms with a common purpose. The Strategy pattern works by conforming the algorithms to a common interface that is injected into a context. Then, the algorithms can be used interchangeably as business needs require.
In the next chapter, a fateful turn of events will force Kitty and Phoebe to enlist the help of a stranger. Bumble Bikes began as a passion project and turned into a business venture, but it will quickly become a humanitarian outreach. Too few software developers, engineers, and architects understand they have a superpower that can change the world. The stakes are high, and Kitty and Phoebe are stretched too thin. They need someone who understands SOLID principles and patterns to head up a very important project. Will this understated stranger be up to the task? Would you be?
Questions
Answer the following questions to test your knowledge of this chapter:
- Which pattern is used to make algorithms with a common purpose interchangeable within a context?
- Which pattern is used to encapsulate and send instructions to a receiver, while avoiding tight coupling between the data needed to execute the instruction and the logic that executes the instruction?
- Which pattern involves a subject and an observer? Please note that if you miss this question, it will go on your permanent record.
- Which pattern is used to process collections in a way other than FIFO?
- What two interfaces from the .NET framework are useful when implementing the Iterator pattern?
