
8
One Site, Multiple Languages
In the previous chapter, we explored Joomla’s SEO options to make your website shine on search engines.
We’ll now explore one of the most powerful features included in Joomla: multilingual management. In fact, the CMS can handle multiple languages for a website in a single installation.
After reading this chapter, you will be able to do the following:
- Understand how multilanguage management works in Joomla
- Configure a multilingual website
- Handle content in multiple languages
Building a multilingual website
Many businesses need to offer their website in more than one language to reach audiences in different countries, offering them a localized version of the website's content.
There are different ways to build a multilanguage website. One of the fastest (though not the best for quality) is to install a plugin that automatically translates the website content into many other languages through Google Translate or other online translation services. Besides the limits of automated translation, this type of translation service translates content on the fly, although there are limitations to automated translations.
Another approach to providing a multilanguage website, used in Joomla version 1.5, is to create an exact copy of all the website content with extensions such as Joom!Fish, Josetta, and FaLang. The quality offered by this approach is generally better than automated translations if the content is translated by professionals or native speakers of the target language. This method produces duplicates of the website in additional languages so that the website keeps the same structure, appearance, and quantity of content.
Since version 3, Joomla includes complete functionality to handle multilingual websites, providing the opportunity to assign content, menu items, and templates to a specific language. It also supports Left-to-Right (LTR) and Right-to-Left (RTL) languages, allowing you to handle multiple languages in a single installation of Joomla and create customized experiences and content for each of the languages in which the website is available.
In the next section, we will go through the setup process for a multilingual website.
How to set up a multilingual website
The first thing to do in order to create a multilingual website is to install one or more additional languages to our Joomla instance. To do so, from System Dashboard, click on Languages. The screen will show the installed languages, as displayed in Figure 8.1.
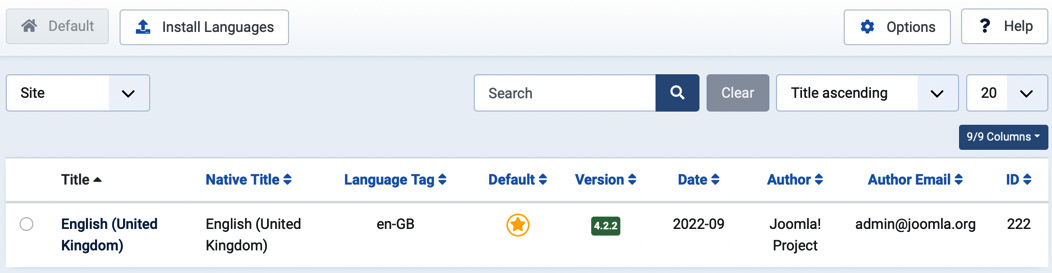
Figure 8.1 – Languages
In our example, we’re going to create a website in two languages, English (United Kingdom) and Italian (Italy). The same process also applies to creating websites with more than two languages, independent of the chosen languages.
By default, the website has only one language, in our case, English. This is the language used by Joomla to display its interface. In the case of multiple languages, you can select which one should be used as the default language for either the frontend or backend.
Let’s install Italian as an additional language. To do so, click on Install Languages in the toolbar and search for the desired language pack among the over 70 available.

Figure 8.2 – Languages | Install Languages
From the list of available languages shown in Figure 8.2, let’s click on the Install button next to the Italian language.
The language will appear in the list of available languages for the website. During the installation of the language pack, we automatically created Italian as Content Language. This means that the website is aware of the possibility of hosting content in Italian in addition to English.
To check which languages are available, from System Dashboard, click on Content Languages, and you will see a list like the one in Figure 8.3.

Figure 8.3 – Content Languages
As seen in Figure 8.3, the Italian language is installed and configured, but not yet active. We need to enable it by clicking on its status icon to make it Published.
If the language is not listed, you can click on the + New button and manually create a new content language.
From the same screenshot, we can see also that for each language the system handles a Title, Native Title, Language Tag, URL Language Code (used in URLs), and Image (flag). All of those parameters are customizable; just click on the language title. Furthermore, the Content Language screen allows you to customize Meta Description and the site name for the specific language, as displayed in Figure 8.4.

Figure 8.4 – Content Languages | Edit Language
Language tags can be reused across languages that share the same base language (e.g., German – Germany, German – Austria).
With the preceding steps, we have ensured that Joomla can manage content in both English and Italian and can display its interface in both languages.
Now, let’s make the website multilingual and ensure that Joomla can detect user language preference to show them the relevant version of the website. To do so, we need to enable two plugins:
- Language Filter
- Language Code
Let’s explore them.
Plugin: System – Language Filter
The System – Language Filter plugin is responsible for the correct language being set in the system. It builds the correct URLs and redirects the user after logging in to the page displayed the correct language. The plugin is disabled by default, so we need to enable it when building a multilanguage website.
From System Dashboard, click on Plugins and filter by type for System, then select System - Language Filter from the list. We’ll see the plugin configuration screen, as shown in Figure 8.5.

Figure 8.5 – System - Language Filter plugin
Let’s explore the options offered by the plugin:
- Language Selection for new Visitors: Allows you to choose the language in which to display the website to new visitors, either through the default site language or by detecting the user’s language from their browser.
- Automatic Language Change: Allows you to automatically change the content language shown to the user when their language changes.
- Item Associations: Allows associations between items when switching languages.
- Add Alternate Meta Tags: Add alternate meta tags to menu items that have other menu items associated with them in other languages.
- Add x-default Meta Tag: Improve SEO by adding the x-default meta tag. This tag is added to pages that are not targeted at any specific languages.
- x-default Language: Select the x-default language for your website.
- Remove URL Language Code: Decide whether or not to remove the language code from the URL structure. For example, the Italian version of your website will not show yourwebsite.tld/it/ in its URLs. This is valid only for the site’s default language.
- Cookie Lifetime: Choose the expiration period of the technical cookie used to detect and remember the preferred language of the user.
The default settings represent the recommended setup for most cases; we just need to enable the plugin by changing its Status to Enabled, then clicking Save & Close. Let’s now move on to the second plugin called System – Language Code.
Plugin: System – Language Code
This plugin is used to improve the HTML markup of the produced pages, adding the language code, and allows you to replace short tags. It does not require any setup but needs to be enabled from the website’s backend.
From System Dashboard, click on Plugins and filter by type for System, then select System – Language Code from the list. Change its status to Enabled, then click Save & Close.
Our website is now ready to host and manage content in multiple languages. We’ll now explore a tool that helps us make our multilanguage website fully operational.
Checking your website’s multilanguage status
Creating a multilingual website is not that easy. That’s why Joomla includes a tool for administrators that allows backend users to check the configuration status for multiple languages. This tool is a backend module called Multilanguage Status. When enabled, it shows a Multilingual Status icon in the top bar of the backend system, as shown in Figure 8.6. If it’s not enabled, you just need to publish it from the Administrator Modules list.

Figure 8.6 – Multilingual Status icon
By clicking on the Multilingual Status icon, we can check the progress of making the website multilingual, as shown in Figure 8.7.

Figure 8.7 – Multilingual Status
As you can see from the screenshot, our website is not yet completely ready. The module suggests the following required actions:
- Remove the module that holds the menu item for the home page for all the languages.
- Publish a home page assigned to the English language.
- Publish a home page assigned to the Italian language.
- Publish a Language Switcher module, assigned to all languages. This is optional but highly recommended.
The table at the bottom of the screen shows the status on a per-language basis so that you know what is missing to complete your multilingual website.
Let’s proceed with the required steps.
Remove the module that holds the home for all languages
The first step is to hide the module that holds the home menu item for all languages. How can we identify this menu item? We start by looking for the menu that holds the menu item listed as home for all languages. That’s made easy, as Menu Dashboard holds the menu where the home page is marked by the home symbol, as displayed in Figure 8.8.

Figure 8.8 – Menu Dashboard displaying the menu holding the home item
By clicking on the menu name in the list of menu items, we can easily spot the menu item assigned as the home page for all the languages, as shown in Figure 8.9.

Figure 8.9 – Home menu item
The yellow home symbol shows that the menu item is assigned as the home page for all the languages. Now that we have found out which menu holds the home menu item assigned to all languages, we need to unpublish the module that displays this menu. To do so, let’s move to Content | Site Modules and filter by type by selecting Menu, as displayed in Figure 8.10.
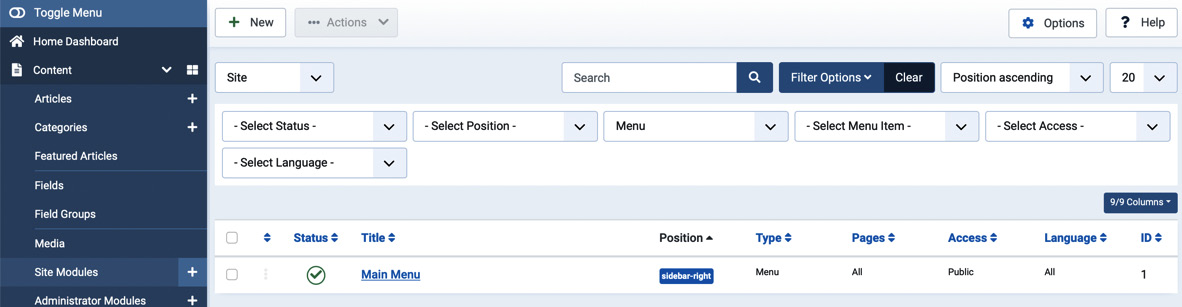
Figure 8.10 – Modules | Menu
To unpublish the module, just click on the green check in the Status column. We have now completed the first step of those proposed by the Multilingual Status module, so let’s proceed with the next ones.
Publishing home pages for each language
Each language of a multilingual website should have a home page assigned, to be shown to visitors once the specific language has been selected. That means that we need to create a menu item marked as Home but assigned to a specific language. Let’s see how.
Let’s suppose that we already have the articles for each of the languages, called Home page italiana (for Italian) and English Home Page (for English). We now need to create a menu item for each of them.
While creating a new menu item, we select Articles | Single Article, then choose the article called Home page italiana. For this menu item, we also need to select the Default Page option and select Italian (it-IT) as the language, as displayed in Figure 8.11.
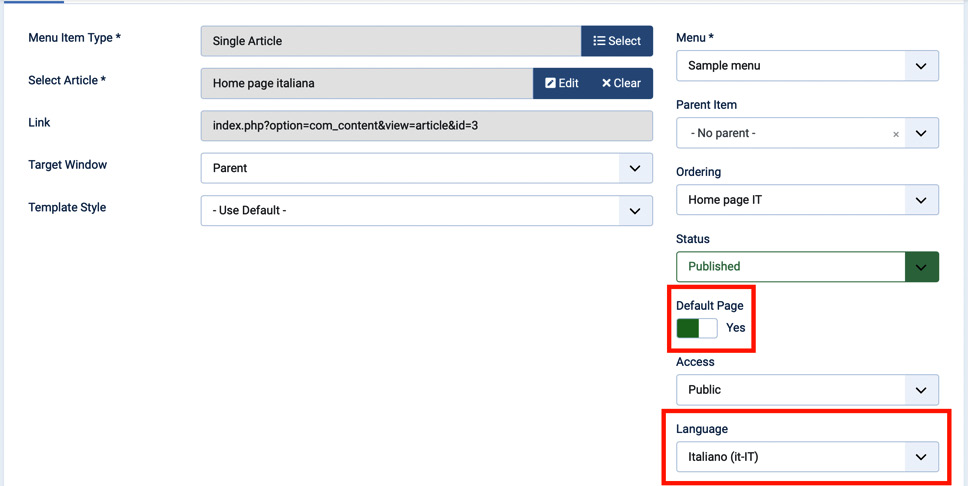
Figure 8.11 – Setting a home page for the Italian language
In the menu items list, this item will look like Figure 8.12, with the Italian flag, and the respective menu will show the language tag (e.g., it-IT) near the menu name in the sidebar.

Figure 8.12 – Home page for the Italian language
We have now set the home page for Italian. We need to repeat the same process for the English language.
A home page for each menu
Each menu in Joomla can hold just one menu item marked as the home page. That means if you have a website in two languages, you should have at least two different menus, one for each language.
As a tip, you can create a menu for each language to hold the home menu items assigned to the respective language. Then use a single menu to hold all the other menu items of the website for all the languages. Selecting the language of each menu item, in fact, makes it visible only when the selected language is the active one, hiding it while using other languages.
With the home menu items for both languages, we completed the second step of those listed in the Multilingual Status module. To complete the procedure, we need to publish the Language Switcher module.
Publishing the Language Switcher module
The Language Switcher module, as the name suggests, is a particular module for the website’s frontend that allows visitors to choose their desired language among those available on the website. It can be configured to show language flags or language names and is generally published on the top bar of the website, allowing users to spot it immediately.
In Content | Site Modules, click on New, then choose Language Switcher as the module type. We can then see the module configuration page, as in Figure 8.13.

Figure 8.13 – Language Switcher module
Let’s explore the module configuration options:
- Pre-text: Allows you to specify custom text to be shown prior to the language selection part
- Post-text: Allows you to specify custom text to be shown after the language selection part
- Use Dropdown: Choose whether the language switcher should be displayed as a drop-down list of languages
- Use Image Flags: Choose whether the language switcher should display country flags for each language
- Active Language: Decide whether or not to show the current language in the list of available languages
- Horizontal Display: Choose whether the list of languages should be displayed as a horizontal list or a vertical one
All the other options are like other modules that we explored earlier in Chapter 4. What we need to focus on is the Language option, which, for the language switcher, should be set to All, to make it visible on the website regardless of the active language.
The Language Switcher module can be placed in a position of your choosing, based on the frontend template you are using. When published in the frontend, the module will look like in Figure 8.14.

Figure 8.14 – Language Switcher
As you can see, the module will show the flags of the available languages, highlighting the currently active language, and allowing visitors to select their desired language.
With this step, we completed the setup of our website as a multilingual one. In fact, the Multilingual Status module doesn’t show any additional messages, as seen in Figure 8.15.
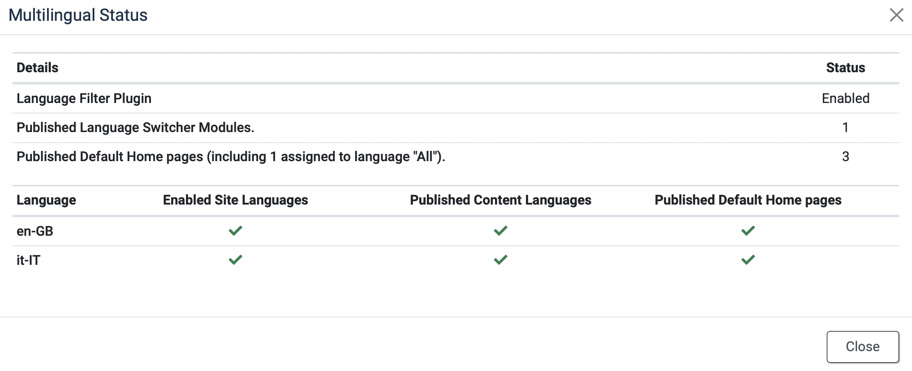
Figure 8.15 – Multilingual Status module when the setup is completed
Let’s now see how to organize content for the different languages in which our website is available.
Managing content in multiple languages
After completing the setup of the website, we need to add content to each language. This can be easily done by simply selecting the language to which each content item should be assigned.
While creating or editing an article, in fact, we can see a new field called Language, which allows you to choose the language to assign to the article, as displayed in Figure 8.16.

Figure 8.16 – Assigning a language to an article
The dropdown highlighted in Figure 8.16 will list the languages enabled on the website; in our example, we can find: English (en-GB), Italian (it-IT), and All.
When All is assigned to content, it is available in all the languages of the website.
Language assignment
It is good practice to assign a language to each piece of content when working on a multilingual website. This allows you to show only the correct content to your visitors and prevents showing content in mixed languages.
In the next section, we will explore Multilingual Associations, the way to connect the same content in different languages.
Multilingual Associations
In many cases, the same content should be made available in multiple languages. This will result in having the same article written in multiple languages and assigned to the respective language. For example, you may have the About Us page in both English and Italian. It would be convenient, in such cases, to connect the same content in different languages, allowing visitors to switch languages and see the respective version of the same content. This can be done in Joomla through a specific component, called Multilingual Associations, which you can find under the Components menu of the website backend. The component will show the active associations between pieces of content in different languages. Let’s now see how it works.
On our website, we have two articles called English Home Page and Home Page Italiana, respectively, the first assigned to English and the latter assigned to the Italian language. We want to associate them both. To do so, let’s open the English Home Page article and click on the Associations button shown in the toolbar, as displayed in Figure 8.17.

Figure 8.17 – The Associations button visible on the article editing screen
The displayed screen allows us to configure the multilingual association for the article, as shown in Figure 8.18.

Figure 8.18 – Multilingual Associations | Edit Association
On this screen, we can continue to edit the original article, called Reference, and create a new version of the article in another language (the right part of the screen). Such content is called Target. If the target content is already available, we can click on the Select Target button, which allows us to select the article in the target language (Italian, in our example). In Figure 8.19, we can see the same screen after selecting the article called Home Page Italiana as the target article.

Figure 8.19 – Multilingual Associations | Edit Association | Target selected
Once the setup has been completed, we just need to click on Save Target. If the original article has been modified during the setup process, we should save it by clicking on Save Reference.
Going back to Articles, we can see that the Association column is populated with the respective associated language for the articles that we linked, as displayed in Figure 8.20.

Figure 8.20 – Articles with associations
Each article may have one or more associations. If a website handles more than two languages, an article may have as many associations as languages published on the website. Articles may also have no associations; this can happen when content is available in just one language within the website, or it’s specific to a region and it’s not necessary to publish it in multiple languages.
Associations are available not only for articles and their categories but also for contacts and their categories, news feeds and their categories, as well as menu items. Using associations correctly allows your users to easily switch the language and see the respective version of the same page.
The Multilingual Associations component allows you to check all the associations configured in your website, filtering by type of item and language, as displayed in Figure 8.21.

Figure 8.21 – Multilingual Associations | Articles | English (en-GB)
Now we can assign content to a specific language and handle associations of content between languages.
If you open an article with active associations, you will then see a tab called Associations, in which you can check and change the target content for each language, as shown in Figure 8.22.

Figure 8.22 – Articles | Associations
Let’s now explore how to customize the visitor experience based on their language.
A different website for each language
Once a website is set as multilingual, Joomla automatically adds to each item an additional option that allows the administrator to assign the item to a specific language or to all languages. This is valid for articles, modules, menu items, and templates. This option practically allows you to create a different website for each language, given that you can choose the template, the modules, and the menu items that you want to display based on the language.
This is one of the major advantages of the built-in multilanguage management feature of Joomla. Each language can offer a tailored experience to website visitors, showing relevant content for their location/culture, eventually switching from LTR to RTL layouts, and much more. You can easily hide non-relevant parts such as modules or menu items, by simply assigning them to the correct language. This will prevent them from being displayed in other languages.
Exercises
It’s time to apply the knowledge acquired in this chapter and use the multilanguage management features.
Exercise 1 – Set up a multilingual website
- From your backend, install the French and Italian languages, as Language Packs.
- Check that the respective content languages have been created correctly and enable them. Your website now has three languages: English (en-GB), French (fr-FR), and Italian (it-IT).
- Enable the Language Filter and Language Code system plugins.
- Check the status of your setup through the Multilingual Status module and proceed with any missing steps. Remember that you need to create articles that serve as the home page for each language and that each of these articles should be assigned to one language.
- Create three menus called English Menu, Italian Menu, and French Menu.
- Create a menu item in each of them, showing the respective article that should serve as the home page. Each of these menu items should be marked as Default Page and assigned to a specific language. You now have the three home pages, one for each language.
- Finally, publish a Language Switcher module, hiding its title and making it display flags using a horizontal layout placed in the topbar position of the Cassiopeia template.
- Check your website frontend to ensure that all three language flags are displayed.
Exercise 2 – Multilingual Associations
Let’s use the Multilingual Associations feature to link the home page articles of the three languages:
- In Articles, open the article you wrote to serve as the home page for English and click on the Associations button.
- Select French (fr-FR) as the target language and click on Select Target to see the list of available articles.
- From the list, select the article you wrote to serve as the home page for French.
- Once done, select Italian (it-IT) as the target language and click on Select Target to see the list of available articles, then pick the article you wrote as the home page for Italian. In this way, you connected the three articles as associated content.
- To check the result, open your website and ensure that the English language is enabled from the Language Switcher module.
- Click on the different language flags to verify that the associated article is shown in the respective languages.
Summary
In this chapter, we explored the multilanguage management features of Joomla and understood how to configure a multilingual website, associating content to languages and customizing the experience for each language.
In the next chapter, we’ll get to know one of the newest features included in Joomla: Task Scheduler.
Further reading
- Managing multi-regional and multilingual websites: https://developers.google.com/search/docs/specialty/international/managing-multi-regional-sites