
7
SEO at Its Best
In the previous chapter, we explored users and how to manage their permissions in the CMS. We’ll now look at the SEO features offered by Joomla to ensure your website has a high ranking on search engines.
After reading this chapter, you will be able to do the following:
- Recognize the available on-page SEO options
- Improve the optimization of your website for search engines
- Handle 404 errors
Exploring on-page SEO features
While building a website, it’s crucial to keep an eye on Search Engine Optimization (SEO) in order to allow your website to reach a high rank on Search Engine Results Pages (SERPs).
The most important thing to optimize is the content of your website, which should be written with users’ research intent and their needs in mind. The quality of content is crucial to achieving a good placement in results.
Besides content/articles, there are many options that allow you to optimize your website for search engines. Some options affect the website at a global level, while others are applied to single articles or pages; this refers to on-page SEO.
Let’s start to present the major optimization features included in Joomla.
Optimizing an article
As we introduced in Chapter 2, article management features allow you to adjust some additional aspects of your content that may improve the optimization of your article for search engines, as we can see in Figure 7.1.
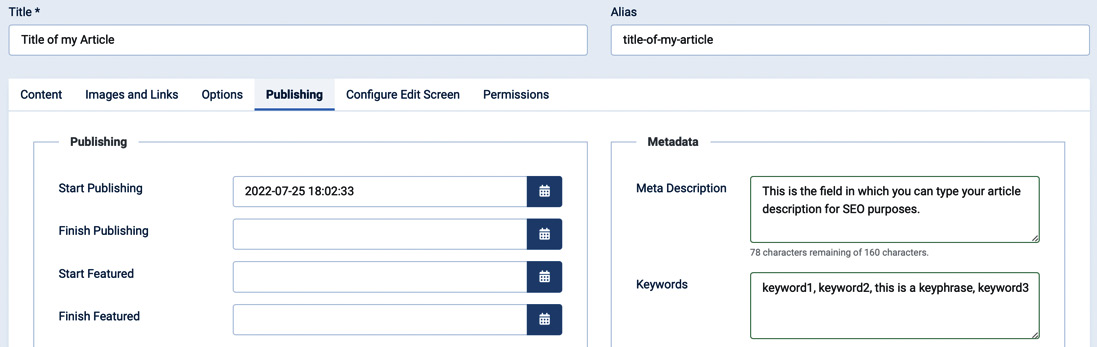
Figure 7.1 – SEO options for articles
The first item that can be optimized is Title. It’s very important as it corresponds to the title tag in the page markup and should be structured to be descriptive and concise. The title should not exceed 60-70 characters.
Heavily linked to the title is Alias, which is the option that allows you to build your article URL. The alias should be structured to be user-friendly and should contain the main keyword.
Another option useful to optimize your article is the Meta Description field. You can find this field under the Publishing tab while writing or editing an article. As the hint included under the field suggests, the description text should not exceed 160 characters. The field should contain a summary of the article content, including the most important keyword, and it’s used to populate the Meta Description tag in the page markup. The content of this field is visible on SERPs below the page title.
On this screen, we can also define Keywords for the article. Even though, according to many experts, including keywords doesn’t really affect the rankings, Joomla allows you to specify the keywords in this field, for each of the articles on your website. As usual, just put a few keywords and phrases and ensure those keywords are contained in the article text to achieve a good keyword density. Keywords are also used from the module that shows similar articles to propose relevant articles.
Of course, the most important thing that should be optimized is the text of the article, ensuring that it’s relevant, up to date, and well structured.
Using the proper markup (for example, headers, tables, lists, and so on), checking that all internal and external links are valid, adding alternative (and relevant) text for all the images, and ensuring that each article contains at least one Header 1 (H1) header, and contains around 300 words will make your content successful on search engines.
While editing your articles, you can also define which is the title shown in the browser tab/window, as well as the HTML <title> tag. To do so, just check the Browser Page Title field in the Options tab, as displayed in Figure 7.2.

Figure 7.2 – Articles | Browser Page Title
Priority of options
The SEO options specified in the menu item configuration override the options specified in articles.
Articles may include images, and they play an important role in page optimization. Let’s see how.
Optimizing images
If your content includes images, you should optimize them to achieve good results in SERPs. Images can enrich articles, but can also damage their performance, due to their weight or size. Here are some useful tips to optimize images in your content:
- Ensure all images are in a modern format such as WEBP or PNG and are compressed.
- Make sure that the image file size is not excessive. The smaller the better. A huge file size would decrease your page speed.
- Reduce the number of images included in every article. If you include many images in an article, its load times would increase noticeably When you want to show several images, it’s recommended to use thumbnails and load original, bigger images when the user clicks on them.
- Use descriptive filenames. For example, if you are uploading a photograph of Westminster Abbey, a filename such as westminster-abbey.jpg is better than image001.jpg and will increase the opportunities of the image being seen in the search engine results.
- Ensure that all images have alternative text. This will improve the accessibility and SEO of your content. Alternative text can be inserted when inserting the images in the content, through the Media Manager.
Alternative text
When adding an image to your content, as best practice and to ensure the accessibility of your article, you should add alternative text. The alternative text is used by screen readers to describe the image and should include a description of what the image shows. Alternative text is included in the markup of your page and is parsed by search engines, so it can also be used to optimize your content, describe your image, and help search engines to determine what your image is about. Decorative images, as well as images that are part of the template, should not include alternative text.
- Make sure that all images are lazy loaded. You can enable lazy load for your images while selecting them in the Media Manager.
What is lazy load?
Lazy load is a technology that makes sure that images are loaded only when it is the moment to display them. Let’s think of a long page of news in which many articles are displayed and each of them has an introductory image. If such a page has 10 articles, it also loads 10 cover images for these articles. Downloading and rendering 10 images together while loading the page would increase the overall time to display the page to the user.
When lazy load is enabled, only the images that are in the visible part of the screen are loaded, only loading the others at the moment in which the user scrolls the page. Doing so increases page performance, as only the visible images are loaded immediately. This works only when the image’s width or height is specified.
Having seen the opportunities to optimize articles and images, we’ll now move on to optimization features offered by menus.
SEO options offered by menus
Not all pages display a single article, in fact, many of them are the output of a component. That’s why Joomla offers some SEO options directly on the menu items creation screen.
While creating or editing a menu item, besides the Title and Alias fields, you will see two tabs dedicated to SEO options: Page Display and Metadata.
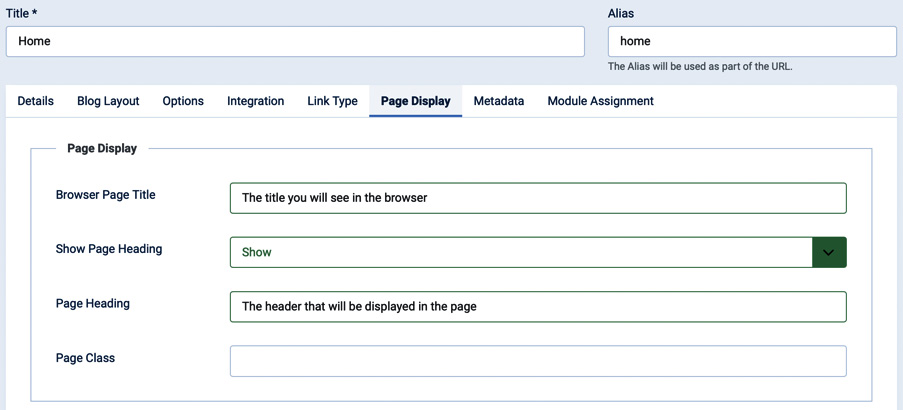
Figure 7.3 – Menu item | Page Display
Let’s start exploring Page Display, shown in Figure 7.3:
- Browser Page Title: Specify a title for the page to be displayed as the browser tab name. It also affects the HTML markup of the generated page, as it changes the <title> tag.
- Show Page Heading: Decide whether or not to show the page header on the page. It’s rendered as H1 in the markup of the page. If not selected, it won’t be displayed.
- Page Heading: Specify the text you want to be displayed as the title for the page, before the article title. It’s an optional field. If this field is empty, the browser page title is used as a fallback when Show Page Heading is set to Show.
- Page Class: Unrelated to SEO, allows you to specify a CSS class to display the page.
After these controls, we’ll move to the Metadata tab, displayed in Figure 7.4.

Figure 7.4 – Menu item | Metadata
The Metadata tab offers just two options:
- The first one, Meta Description, allows you to input the description text for your page. As also seen with articles, the Meta Description field can accommodate up to 160 characters of text that can be used to summarize the content of the page.
- The second option is dedicated to command robots, which we’ll explore in the next section.
Robots management
A webmaster has the chance to instruct search engines on what they should and should not index on a specific website. These instructions are provided through a simple text file called robots.txt that should be placed in the website root folder.
This file generally contains a set of rules that allow or disallow indexing specific pages or sections of a website. For example, it is advisable to disable indexing of the backend section of the website; or, in certain circumstances, it can be useful to disable indexing of images or a specific type of file (such as PDFs). Or you may want to index a specific section of the website. All these commands can be provided through the robots.txt file.
Joomla comes with a default robots.txt file out of the box that includes the following content:
# If the Joomla site is installed within a folder
# eg www.example.com/joomla/ then the robots.txt file
# MUST be moved to the site root
# eg www.example.com/robots.txt
# AND the joomla folder name MUST be prefixed to all of the
# paths.
# eg the Disallow rule for the /administrator/ folder MUST
# be changed to read
# Disallow: /joomla/administrator/
#
# For more information about the robots.txt standard, see:
# https://www.robotstxt.org/orig.html
User-agent: *
Disallow: /administrator/
Disallow: /api/
Disallow: /bin/
Disallow: /cache/
Disallow: /cli/
Disallow: /components/
Disallow: /includes/
Disallow: /installation/
Disallow: /language/
Disallow: /layouts/
Disallow: /libraries/
Disallow: /logs/
Disallow: /modules/
Disallow: /plugins/
Disallow: /tmp/
As you can easily understand from reading the file, Joomla asks the search engines to not index several system folders, such as /administrators, /plugins, and /tmp, for security reasons.
Beyond this set of default rules, the CMS allows you to specify a custom rule for each article and menu item.
In fact, in the Publishing tab, while writing or editing an article, we have a field called Robots that allows us to define the indexing rules for search engines, as displayed in Figure 7.5.

Figure 7.5 – Article | Publishing | Robots
The same option is also available at the menu item level, as displayed in Figure 7.4, allowing you to choose the indexing options for each menu item.
For example, you may want to avoid indexing the menu item that points to a reserved area of your website. In this case, you can select noindex, nofollow or noindex, follow.
In this way, you will have full control over the indexing activities of your website.
In the next section, we’ll show you how to build SEO-friendly URLs.
SEO-friendly URLs
Another important task in your website optimization is to make sure it produces URLs that are friendly for users and search engines.
By default, Joomla produces URLs like this: yourwebsite.tld/index.php/alias-of-the-menu-item. As you can see, this kind of URL is not friendly as it contains the /index.php/ string in the path.
Both users and search engines would prefer a URL such as the following: yourwebsite.tld/about-us. Immediately, you know that the page provides information about the company and the search engine can read that.
Friendly URLs can be useful to improve the SEO of the website, as they may include the major keywords, creating a direct correspondence between the URL and the page title or main topic.
To enable SEO-friendly URLs, you need to go to the Global Configuration | Site tab and operate in the SEO group of options, displayed in Figure 7.6.

Figure 7.6 – Global Configuration | SEO options
Each option is well documented with the inline help. To make our website produce SEO-friendly URLs, we need to enable the first two options:
- Search Engine Friendly URLs
- Use URL Rewriting
URL rewriting
The URL rewriting feature requires a valid .htaccess file in the root folder of your Joomla installation. By default, Joomla comes with the .htaccess file disabled and named htaccess.txt. Prior to enabling the Use URL Rewriting feature, you need to rename the htaccess.txt file in .htaccess.
If you are using a different type of server, for example, Nginx, there wouldn’t be the .htaccess file and you need to work directly on your server configuration as specified at https://docs.joomla.org/Nginx. If you are using Windows hosting, then you will have to rename the web.config.txt file in web.config.
After enabling the URL rewriting options, the URLs of your website will be optimized and easy to remember. Page URLs will be then built upon the content of the Alias field in your menu items. Articles’ aliases will be used to define the URLs of articles within category views.
The other options in the SEO group displayed in Figure 7.6 allow you to enable page suffixes in URLs, for example, if you want to show .html at the end of the URL. Another option allows you to use Unicode aliases, which disable the transliteration feature of Joomla while building the URL structure. The last option of the group allows you to choose whether or not to include the name of the website in the title of the page.
In the next section, we’ll explore another useful feature that is useful to improve your website presence in the search engine, managing and fixing 404 errors.
Handling 404 errors
404 errors (page not found) are critical to websites since they can result in lost visits, a bad user experience, and page-ranking loss in search engines. A 404 error happens when a page is not available due to an incorrectly typed URL or because the page has been removed. Besides the unpleasant experience offered to users that couldn’t find what they are looking for, as mentioned, multiple 404 errors may result in damage to the SERP ranking, so as webmasters, we need to prevent and avoid a wrong or unavailable URL being indexed by search engines.
Joomla has an integrated tool that supports webmasters dealing with 404 errors. This feature is called Redirects and it includes a component and a system plugin.
When the System – Redirect plugin is enabled, it automatically collects all the 404 errors that occurred on the website and populates the list of errors shown in the Redirects component. To use the Redirects feature, let’s enable the plugin, by clicking on the link shown in the error notice that appears when you open the Redirects component for the first time, as displayed in Figure 7.7.

Figure 7.7 – Redirects component
To open the Redirects component, you need to click on Redirects from System Dashboard of your website.
If you can’t see the warning about Redirect System Plugin, from the System Dashboard, click on Plugins, then filter by Type, select System, and look for the System – Redirect plugin.
Once the plugin is enabled, the system will start collecting 404 errors occurring on the website, allowing you to correct them in the Redirects component, pointing the expired URL to a new, valid one.
For each link, you can customize the rule, as displayed in Figure 7.8.
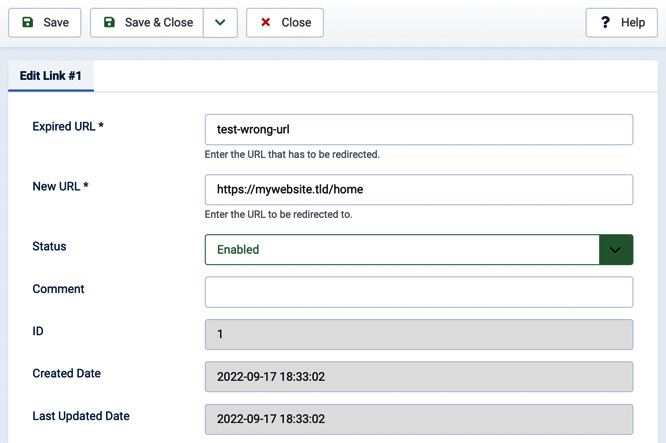
Figure 7.8 – Redirects | Edit Link
Let’s explore the fields shown:
- Expired URL: Shows the URL that threw a 404 error.
- New URL: Enter the new URL to specify where to redirect users. A 301 - Permanent Redirect rule will be created for the old URL to redirect the user to this new one.
- Status: Decide whether the rule should be enabled or not.
- ID: Unique identification number of the link.
- Created Date: First detection date of the error or date/time when the rule was created.
- Last Updated Date: Date and time of the last modification.
The Redirects component allows you to create custom rules manually, so you can enter your rules even before a 404 error is triggered by your users. This is particularly useful when you are rebuilding a website and there are massive changes to URL structure.
Note: URL redirects
The Redirects feature is very useful and allows you to handle errors, preventing bad user experiences and keeping SERP rankings. This feature records all 404 errors triggered on your website. This may result in a huge table in your database if your website is targeted by cyber-attacks that try to navigate to non-existent pages (e.g., /wp-admin or /wp-login.php and many more).
So, the recommendation is to enable the plugin to detect 404 errors only after changes in your website URL structure or after migration and disable it after having handled the majority of 404 errors. Alternatively, you could keep the plugin enabled, but you should regularly check the Redirects component and purge invalid links that aren’t useful to redirect.
Furthermore, it’s recommended to use .htaccess for redirects, where possible, as it’s better for performance.
With the Redirects feature, we completed this chapter related to SEO functionalities included in Joomla.
Exercises
It’s time to apply the knowledge acquired in this chapter.
Exercise 1 – Friendly URLs
Access your web space via FTP, navigate to the root folder of your website (generally public_html or www), and rename the htaccess.txt file to .htaccess.
Now, access your website’s backend and navigate to Global Configuration and look for the SEO group of options in the Site tab. Enable the following options: Search Engine Friendly URLs and Use URL Rewriting. Now navigate to your website’s frontend and check the URLs of the pages.
Exercise 2 – Article SEO
In your Joomla backend, open the article titled MyArticle and navigate to the SEO options. Type a Meta Description in the related field and specify a Page Browser Title in the appropriate field in Options.
Summary
In this chapter, we explored the features to optimize a Joomla website for search engines. We discovered the on-page optimization functionalities and how to improve the friendliness of website URLs. We got to know the Redirects component and how to handle 404 errors, as well as how to manage indexing rules for a website.
In the next chapter, we’ll discover how to build and manage a multilingual website with Joomla’s core features.
Further reading
- Introduction to robots.txt: https://developers.google.com/search/docs/crawling-indexing/robots/intro?hl=en
- Create a robots.txt file: https://developers.google.com/search/docs/crawling-indexing/robots/create-robots-txt?hl=en