
20
Augmented Reality in Unity
Nowadays, new technologies expand the fields of the application of Unity, from gaming to all kinds of software, such as simulations, training, apps, and so on. In the latest versions of Unity, we saw lots of improvements in the field of augmented reality, which allows us to add a layer of virtuality on top of our reality, thereby augmenting what our device can perceive to create games that rely on real-world data, such as the camera’s image, our real-world position, and the current weather. This can also be applied to work environments, such as when viewing the building map or checking the electrical ducts inside a wall. Welcome to the extra section of this book, where we are going to discuss how to create Augmented Reality (AR) applications using Unity’s AR Foundation package.
In this chapter, we will examine the following AR Foundation concepts:
- Using AR Foundation
- Building for mobile devices
- Creating a simple AR game
By the end of this chapter, you will be able to create AR apps using AR Foundation and will have a fully functional game that uses its framework so that you can test the framework’s capabilities.
Let’s start by exploring the AR Foundation framework.
Using AR Foundation
When it comes to AR, Unity has two main tools to create applications: Vuforia and AR Foundation. Vuforia is an AR framework that can work in almost any mobile device and contains all the needed features for basic AR apps, but with a paid subscription, we get more advanced features. On the other hand, the completely free AR Foundation framework supports the latest AR native features of our devices but is supported only in newer ones. Picking between one or the other depends a lot on the type of project you’re going to build and the target audience. However, since this book aims to discuss the latest Unity features, we are going to explore how to use AR Foundation to create our first AR app for detecting the positions of images and surfaces in the real world. So, we’ll start by exploring its API.
In this section, we will examine the following AR Foundation concepts:
- Creating an AR Foundation project
- Using tracking features
Let’s start by discussing how to prepare our project so that it can run AR Foundation apps.
Creating an AR Foundation project
Something to consider when creating AR projects is that we will not only change the way we code our game, but also the game design aspect. AR apps have differences, especially in the way the user interacts, and also limitations, such as the user being in control of the camera all the time. We cannot simply port an existing game to AR without changing the very core experience of the game. That’s why, in this chapter, we are going to work on a brand-new project; it would be too difficult to change the game we’ve created so far so that it works well in AR.
In our case, we are going to create a game where the user controls a player moving a “marker,” a physical image you can print that will allow our app to recognize where the player is in the real world. We will be able to move the player while moving that image, and this virtual player will automatically shoot at the nearest enemy. Those enemies will spawn from certain spawn points that the user will need to place in different parts of the home. As an example, we can put two spawn points on the walls and place our player marker on a table in the middle of the room so that the enemies will go toward them. In the following image, you can see a preview of what the game will look like:

Figure 20.1: Finished game. The Cylinder is an enemy spawner, the Capsule is the enemy, and the Cube is the player. These are positioned in a marker image displayed by the cellphone
We’ll start creating a new URP-based project in the same manner we created our first game. Something to consider is that AR Foundation works with other pipelines, including built-in ones, in case you want to use it in already existing projects. If you don’t remember how to create a project, please refer to Chapter 1, Creating a Unity Project.
Once you’re in your new blank project, install the AR Foundation package from the Package Manager, just like we’ve installed other packages previously—that is, from Window | Package Manager. Remember to set the Package Manager so that it shows all packages, not only the ones in the project (the Packages button at the top-left part of the window needs to be set to Unity Registry) and also the preview versions (click on the wheel icon, then Project Settings, and check Enable Pre-release Packages on the window that appears).
At the time of writing this book, the latest stable release is 4.2.3, but we are going to explore the 5.0.0 preview 13 version. Remember to open the package version list by clicking the triangle button at the left to see the preview versions. If you find a newer version than mine, you can try using that one, but as usual, if something works differently from what we want, please install 5.0.0-pre.13. As usual, if a warning prompting you to enable the new input system appears, click Yes:

Figure 20.2: Installing AR Foundation
Before we install any other needed packages, now is a good moment to discuss some core ideas of the AR Foundation framework. This package, by itself, does nothing; it defines a series of AR features that mobile devices offer, such as image tracking, cloud points, and object tracking, but the actual implementation of how to do that is contained in the Provider packages, such as Apple ARKit XR Plugin and Google ARCore XR plugin packages. This is designed like this because, depending on the target device you want to work with, the way those features are implemented changes. As an example, in iOS, Unity implements those features using AR Kit, while in Android, it uses AR Core; they are platform-specific frameworks. Remember to install the same version of these platform packages as the AR Foundation one (5.0.0 preview 13 in this case).
Something to consider here is that not all iOS or Android devices support AR Foundation apps. You might find an updated list of supported devices when searching for AR Core- and AR Kit-supported devices on the internet. At the time of writing, the following links provide the supported devices lists:
- iOS: https://www.apple.com/lae/augmented-reality (at the bottom of the page)
- Android: https://developers.google.com/ar/devices
Also, there isn’t a PC Provider package, so the only way to test AR Foundation apps so far is directly on the device, but testing tools are going to be released soon. In my case, I will be creating an app for iOS, so aside from the AR Foundation package, I need to install the ARKit XR plugin.
However, if you want to develop for Android, install the ARCore XR plugin instead (or both if you’re targeting both platforms). Also, I will be using the 4.1.7 version of these packages. Usually, the versions of the AR Foundation and Provider packages match but apply the same logic as when you picked the AR Foundation version. In the following screenshot, you can see the ARKit package in the Package Manager:
Now that we have the needed plugins, we need to prepare a scene for AR, as follows:
- Create a new Scene in File | New Scene and select the Basic (URP) template.
- Delete Main Camera; we are going to use a different one.
- In the GameObject | XR menu, create an AR Session GameObject.
- In the same menu, create an XR Origin (Mobile AR) object that has a Camera inside it.
- Select the Main Camera inside XR Origin.
- Set the Render Mode property of the AR Camera Manager component to After Opaques. This is a workaround for a bug that prevents the camera from being rendered properly in another mode in the current versions.
- Your hierarchy should look as follows:

Figure 20.3: Starter AR Scene
The AR Session object will be responsible for initializing AR Framework and will handle all the update logic for the AR systems. The XR Origin object will allow the framework to locate tracked objects such as images and point clouds in a relative position to the scene. The devices inform the positions of tracked objects relative to what the device considers “the origin.” This is usually the first area of your house you were pointing at when the app started detecting objects, so the XR Origin object will represent that point in your physical space. Finally, you can check the camera inside the origin, which contains some extra components, with the most important being Tracked Pose Driver, which will make your Camera object move along with your device. Since the device’s position is relative to the Session Origin object’s point, the camera needs to be inside the origin object.
One extra step in case you are working on a URP project (our case) is that you need to set up the render pipeline so that it supports rendering the camera image in the app. To do that, go to the Settings folder that was generated when we created the project, look for the URP-HighFidelity-Renderer file, and select it. In the Renderer Features list, click the Add Renderer Feature button and select AR Background Renderer Feature. In the following screenshot, you can see what the Forward Renderer asset should look like:

Figure 20.4: Adding support for URP
And that’s all! We are ready to start exploring the AR Foundation components so that we can implement tracking features.
Using tracking features
For our project, we are going to need two of the most common tracking features in AR (but not the only ones): image recognition and plane detection. The first one consists of detecting the position in the real world of a specific image so that we can place digital objects on top of it, such as the player. The second one, plane detection, consists of recognizing real-life surfaces, such as floors, tables, and walls, so that we have a reference of where we can put objects, such as the enemy’s spawn points. Only horizontal and vertical surfaces are recognized (just vertical surfaces on some devices).
The first thing we need to do is tell our app which images it needs to detect, as follows:
- Add an image to the project that you can print or display on a mobile device. Having a way to display the image in the real world is necessary to test this. In this case, I will use the following image:

Figure 20.5: Image to track
Try to get an image that contains as many features as you can. This means an image with lots of little details, such as contrasts, sharp corners, and so on. Those are what our AR systems use to detect it; the more detail, the better the recognition. If your device has trouble detecting our current image, try other images (the classic QR code might help).
- Consider that some devices might have trouble with certain images, such as the image suggested in this book. If this generates issues when testing, please try using another one. You will be testing this on your device in the upcoming sections of this chapter, so just keep this in mind.
- Create a Reference Image Library, an asset containing all the images we wish our app to recognize, by clicking the + button in Project Panel and selecting XR | Reference Image Library:

Figure 20.6: Creating a Reference Image Library
- Select the Reference Image Library asset we created and click the Add Image button to add a new image to the library.
- Drag the texture to the texture slot (the one that says None).
- Turn Specify Size on and set Physical Size to the size that your image will be printed in real life, in meters. Try to be accurate here; on some devices not having this value right might result in the image not being tracked:

Figure 20.7: Adding an image to be recognized
Now that we’ve specified the images to be detected, let’s test this by placing a cube on top of the real-life image:
- Create a Prefab of a cube and add the AR Tracked Image component to it.
- Remember to set a small scale, like 0.1, on each axis, given that the default cube will be 1 meter by 1 meter, which will be huge in AR.
- Add the AR Tracked Image Manager component to the XR Origin object. This will be responsible for detecting images and creating objects in its position.
- Drag the Image Library asset created in the previous steps to the Serialized Library property of the component to specify the images to recognize.
- Drag the Cube Prefab to the Tracked Image Prefab property of the component:

Figure 20.8: Setting up the Tracked Image Manager
And that’s all! Later in the Building for mobile section in this chapter, when we will create an iOS or Android build, we will see a cube spawning in the same position that the image is located in the real world. Remember that you need to test this in the device, which we will do in the next section, so for now, let’s keep coding our test app:
Figure 20.9: Cube located on top of the image being displayed by the cellphone
Let’s also prepare our app so that it can detect and display the plane surfaces the camera has recognized. This is simply done by adding the AR Plane Manager component to the XR Origin object.

Figure 20.10: Adding the AR Plane Manager component
This component will detect surface planes over our house as we move the camera over it. It can take a while to detect them, so it’s important to visualize the detected areas to get feedback about this to ensure it’s working properly. We can manually get information about the plane from a component reference to the AR Plane Manager, but luckily, Unity allows us to visualize planes easily. Let’s take a look:
- Create a Prefab of a plane, first by creating the plane in GameObject | 3D Object | Plane.
- Add a Line Renderer to it. This will allow us to draw a line over the edges of the detected areas.
- Set the Width property of Line Renderer to a small value such as
0.01, the Color gradient property to black, and uncheck Use World Space:
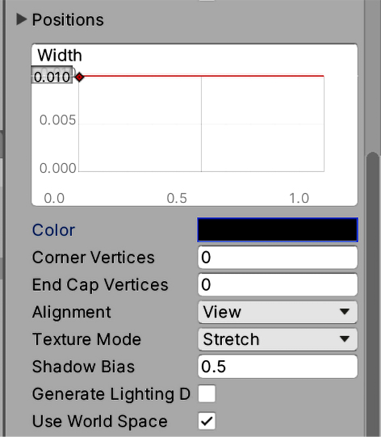
Figure 20.11: Setting the Line Renderer
- Remember to create a material with the proper shader (Universal Render Pipeline/Unlit) and set it as the material of the Line Renderer component under the Materials list property:
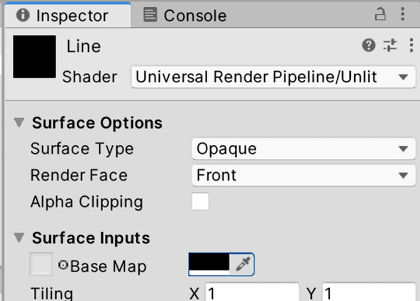
Figure 20.12: Creating the Line Renderer material
- Also, create a transparent material and use it in the MeshRenderer plane. We want to see through it so that we can easily see the real surface beneath:
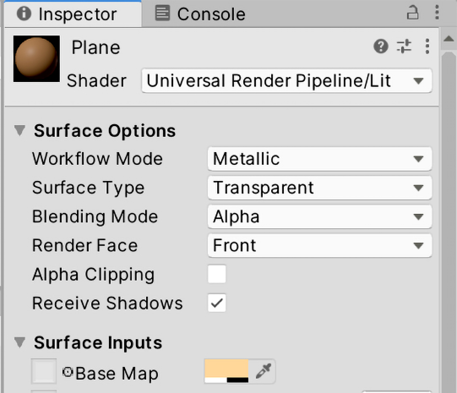
Figure 20.13: Material for the detected plane
- Add the AR Plane and AR Plane Mesh Visualizer components to the Plane Prefab.
- Drag the Prefab to the Plane Prefab property of the AR Plane Manager component of the XR Origin object:
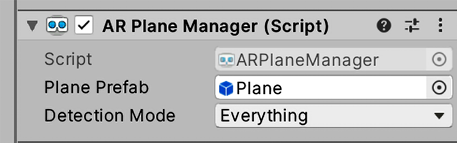
Figure 20.14: Setting the plane visualization Prefab
Now, we have a way to see the planes, but seeing them is not the only thing we can do (sometimes, we don’t even want them to be visible). The real power of planes resides in placing virtual objects on top of real-life surfaces, tapping into a specific plane area, and getting its real-life position. We can access the plane data using the AR Plane Manager or by accessing the AR Plane component of our visualization planes, but something easier is to use the AR Raycast Manager component.
The AR Raycast Manager component provides us with the equivalent to the Physics.Raycast function of the Unity Physics system, which, as you may recall, is used to create imaginary rays that start from one position and go toward a specified direction in order to make them hit surfaces and detect the exact hit point. The version provided by AR Raycast Manager, instead of colliding with physics colliders, collides with tracked objects, mostly Point Clouds (we are not using them) and the “planes” we are tracking. We can test this feature by following these steps:
- Add the AR Raycast Manager component to the XR Origin object.
- Create a custom script called
SpawnerPlacerin the XR Origin object. - In the Awake cache, add the reference to
ARRaycastManager. You will need to add theusing UnityEngine.XR.ARFoundation;line to the top of the script for this class to be usable in our script. - Create a private field of the
List<ARRaycastHit>type and instantiate it; the Raycast function is going to detect every plane our ray hit, not just the first one:

Figure 20.15: List to store hits
- Under Update, check if the touch screen is pressed (
Touchscreen.current.primaryTouch.press.isPressed). You will need theusing UnityEngine.InputSystem;using at the top of the file to use the new input system. - Inside the
ifstatement from the previous step, add another condition for calling theRaycastfunction of AR Raycast Manager, passing the position of the touch as the first parameter and the list of hits as the second (Touchscreen.current.primaryTouch.position.ReadValue()). - This will throw a Raycast toward the direction the player touches the screen and store the hits inside the list we provided. This will return
trueif something has been hit, andfalseif not. - Add a public field to specify the Prefab to instantiate in the place we touched. You can just create a Sphere Prefab and assign it to this field to test this; there’s no need to add any special component to the Prefab here. Remember to set a small scale.
- Instantiate the Prefab in the Position and Rotation fields of the Pose property of the first hit stored in the list. The hits are sorted by distance, so the first hit is the closest one. Your final script should look as follows:

Figure 20.16: Raycaster component
In this section, we learned how to create a new AR project using AR Foundation. We discussed how to install and set up the framework, as well as how to detect real-life image positions and surfaces, and then how to place objects on top of them.
As you may have noticed, we never hit Play to test this, and sadly at the time of writing this book, we cannot test this in the Editor. Instead, we need to test this directly on the device. Due to this, in the next section, we are going to learn how to do builds for mobile devices such as Android and iOS.
Building for mobile devices
Unity is a very powerful tool that solves the most common problems in game development very easily, and one of them is building the game for several target platforms. Now, the Unity part of building our project for such devices is easy to do, but each device has its non-Unity-related nuances when installing development builds. In order to test our AR app, we need to test it directly on the device. So, let’s explore how we can make our app run on Android and iOS, the most common mobile platforms.
Before diving into this topic, it is worth mentioning that the following procedures change a lot over time, so you will need to find the latest instructions on the internet. The Unity Learn portal site (https://learn.unity.com/tutorial/how-to-publish-to-android-2) may be a good alternative in case the instructions in this book fail but try the steps here first.
In this section, we will examine the following mobile building concepts:
- Building for Android
- Building for iOS
Let’s start by discussing how to build our app so that it runs on Android phones.
Building for Android
Creating Android builds is relatively easy compared to other platforms, so we’ll start with Android. Remember that you will need an Android device capable of running AR Foundation apps, so please refer to the link regarding Android-supported devices we mentioned in the Using AR Foundation section of this chapter. The first thing we need to do is check if we have installed Unity’s Android support and configured our project to use that platform. To do that, follow these steps:
- Close Unity and open Unity Hub.
- Go to the Installs section and locate the Unity version you are working on.
- Click the wheel icon button at the top-right corner of the Unity version you are using and click Add Modules:

Figure 20.17: Adding modules to the Unity version
- Make sure Android Build Support and the sub-options that are displayed when you click the arrow on its left are checked. If not, check them and click the Continue button at the bottom-right to install them:

Figure 20.18: Adding Android support to Unity
- Accept all the terms and conditions prompts by checking the Accept Terms checkbox and clicking the Continue button.
- Open the AR project we created in this chapter.
- Go to Build Settings (File | Build Settings).
- Select the Android platform from the list and click the Switch Platform button at the bottom-right part of the window:

Figure 20.19: Switching to Android builds
To build an app on Android, there are some requirements we need to meet, such as having the Java SDK (not the regular Java runtime) and Android SDK installed, but luckily, the new versions of Unity take care of that. Just to double-check that we have installed the needed dependencies, follow these steps:
- Go to Unity Preferences (Edit | Preferences on Windows or Unity | Preferences on Mac).
- Click External Tools.
- Check that all the options that say …Installed with Unity on the Android section are checked. This means we will be using all the dependencies installed by Unity:

Figure 20.20: Using installed dependencies
There are some additional Android ARCore-specific related settings to check that you can find at https://developers.google.com/ar/develop/unity-arf/quickstart-android. These can change if you are using newer versions of AR Core. You can apply them by following these steps:
- Go to Player Settings (Edit | Project Settings | Player).
- Uncheck Multithreaded Rendering and Auto Graphics API from the Other Settings section.
- Remove Vulkan from the Graphics APIs list if it’s there.
- Set Minimum API Level to Android 7.0:

Figure 20.21: AR Core settings
- Set the Scripting Backend to IL2CPP.
- Check the ARM64 checkbox to give support to Android 64-bit devices.
- Check Override Default Bundle Identifier and set something custom, like
com.MyCompany.MyARApp. - Go to Edit | Project Settings and select the XR Plug-in Management option.
- Check Google ARCore under Plug-in Providers to make sure it will be enabled in our build; if not we won’t see anything:

Figure 20.22: ARCore plugin enabled
Now, you can finally build the app from File | Build Settings like usual, by using the Build button. This time, the output will be a single APK file that you can install by copying the file to your device and opening it. Remember that in order to install APKs that weren’t downloaded from the Play Store, you need to set your device to allow Install Unknown Apps. The location for that option varies a lot, depending on the Android version and the device you are using, but this option is usually located in the Security settings. Some Android versions prompt you to view these settings when installing the APK.
Now, we can copy and install the generated APK build file every time we want to create a build. However, we can let Unity do that for us using the Build and Run button. This option, after building the app, will look for the first Android device connected to your computer via USB and will automatically install the app. For this to work, we need to prepare our device and PC, as follows:
- On your device, find the build number in the Settings section of the device, whose location, again, can change depending on the device. On my device, it is located in the About Phone | Software Information section:

Figure 20.23: Locating the build number
- Tap it a few times until the device says you are now a programmer. This procedure enables the hidden developer option in the device, which you can now find in the settings.
- Open the developer options and turn on USB Debugging, which allows your PC to have special permissions on your device. In this case, it allows you to install apps.
- Install the USB drivers from your phone manufacturer’s site onto your computer if using Windows. For example, if you have a Samsung device, search for
Samsung USB Driver. Also, if you can’t find that, you can look forAndroid USB Driverto get the generic drivers, but that might not work if your device manufacturer has their own. On Mac, this step is usually not necessary. - Connect your device (or reconnect it if it’s already connected). The option to Allow USB Debugging for your computer will appear on the device. Check Always Allow and click OK:
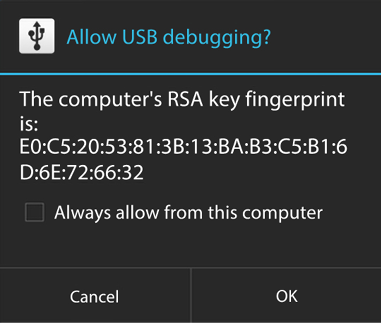
Figure 20.24: Allowing USB debugging
- Accept the Allow Data prompt that appears.
- If these options don’t appear, check that the USB Mode of your device is set to Debugging and not any other.
- In Unity, build with the Build and Run button, and save the
apkinto a folder. Be patient because this will take a while the first time.
Please remember to try another image if you have trouble detecting the image where we instantiate the player (the Unity logo, in my case). This might vary a lot, according to your device’s capabilities.
And that’s all! Now that you have your app running on your device, let’s learn how to do the same for the iOS platform.
Building for iOS
When developing on iOS, you will need to spend some money. You will need to run XCode, a piece of software you can only run on macOS X. Due to this, you’ll need a device that can run it, such as a MacBook, a Mac mini, and so on. There may be ways to run macOS X on PCs, but you will need to find this out and try it for yourself. Besides spending on a Mac and an iOS device (iPhone, iPad, iPod, and so on), you’ll need to pay for an Apple Developer account, which costs 99 USD per year, but only if you are planning to release the game; for testing purposes, you can continue without it.
To create an AR Foundation iOS build, you should do the following:
- Get a Mac computer and an iOS device.
- Create an Apple Developer account (at the time of writing this book, you can create one at https://developer.apple.com/).
- Install the latest XCode from the App Store onto your Mac.
- Check if you have iOS build support in Unity Install on the Unity Hub. Please refer to the Building for Android section for more information about this step.
- Switch to the iOS platform under Build Settings, by selecting iOS and clicking the Switch Platform button:

Figure 20.25: Switching to iOS build
- Go to Edit | Project Settings and select the Player option.
- In Other Settings, set the Camera Usage Description property if not already. This will be a message shown to the user to tell them why we need access to their camera:

Figure 20.26: Message regarding camera usage
- Go to Edit | Project Settings and select the XR Plug-in Management option.
- Check Apple ARKit under Plug-in Providers to make sure it will be enabled in our build; if not, we won’t see anything:
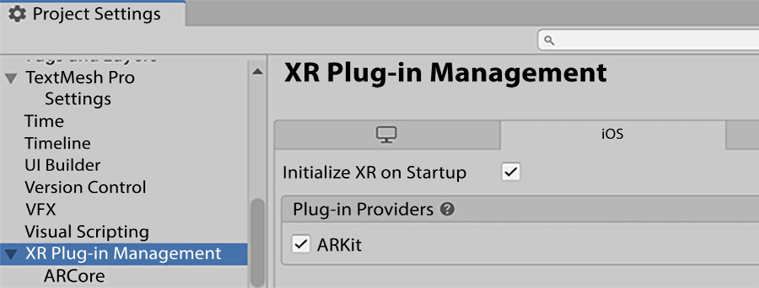
Figure 20.27: ARKit plugin enabled
- Click the Build button in the Build Settings window, create a folder for the build, and wait for the build to finish. A folder containing the generated files should open when finished.
You will notice that the result of the build process will be a folder containing an XCode project. Unity cannot create the build directly, so it generates a project you can open with the XCode software we mentioned previously. The step you need to follow to create a build with the XCode version being used in this book (13.4.1) are as follows:
- Double-click the
.xcodeprojfile inside the generated folder:
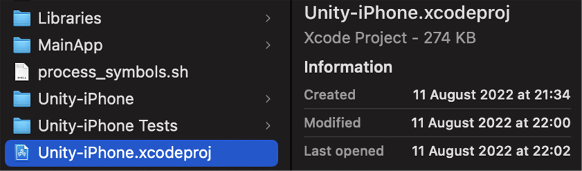
Figure 20.28: XCode project file
- Go to XCode | Preferences.
- In the Accounts tab, hit the + button at the bottom-left part of the window and log in with the Apple account you registered as an Apple developer:

Figure 20.29: Account settings
- Connect your device and select it from the top-left part of the window, which should now say Any iOS device. You might need to unblock your device first, click on the Trust button, and wait for XCode to finish setting up your device to see your device in the list:

Figure 20.30: Selecting the device
- XCode might ask you to install certain updates to support your device; please install them if needed.
- In the left panel, click the folder icon and then the Unity-iPhone settings to display the project settings.
- From the TARGETS list, select Unity-iPhone and click on the Signing & Capabilities tab.
- Check Automatically manage signing and click on the Enable Automatic button on the prompt.
- In the Team settings, select the option that says Personal Team.
- If you see a Failed to register bundle identifier error, just change the Bundle Identifier setting for another one, always respecting the format (
com.XXXX.XXXX), and then click on Try Again until it is solved.
Once you find one that works, set it in Unity (Bundle Identifier under Player Settings) to avoid needing to change it in every build:

Figure 20.31: Setting up your iOS project
- Hit the Play button at the top-left part of the window and wait for the build to complete. You might be prompted to enter your password a couple of times in the process, so please do so.
- When the build completes, remember to unlock the device. A prompt will ask you to do that. Note that the process won’t continue unless you unlock the phone. If that fails click Cancel Running and try again, this time with the device unlocked; remember to select your device in the list again. Also, try to use the latest XCode available to support the latest iOS versions installed on your device.
- If you see a Fetching Debug Symbols prompt that never ends, restart your device.
- After completion, you may see an error saying that the app couldn’t be launched but that it was installed anyway. If you try to open it, it will say you need to trust the developer of the app, which you can do by going to the settings of your device.
- From there, go to General | VPN & Device Management and select the first developer in the list.
- Click the blue Trust… button and then Trust.
- Try to open the app again.
- Please remember to try another image if you’re having trouble detecting the image where we instantiate the player (the pebbles image, in my case). This might vary a lot, depending on your device’s capabilities.
In this section, we discussed how to build a Unity project that can run on iOS and Android, thus allowing us to create mobile apps—AR mobile apps, specifically. Like any build, there are methods we can follow to profile and debug, as we saw when we looked at PC builds, but we are not going to discuss that here. Now that we have created our first test project, we will convert it into a real game by adding some mechanics to it.
Creating a simple AR game
As we discussed previously, the idea is to create a simple game where we can move our player while moving a real-life image, and also put in some enemy spawners by just tapping where we want them to be, such as a wall, the floor, a table, and so on. Our player will automatically shoot at the nearest enemy, and the enemies will shoot directly at the player, so our only task will be to move the player so that they avoid bullets. We are going to implement these game mechanics using scripts very similar to the ones we used in this book’s main project.
In this section, we will develop the following AR game features:
- Spawning the player and enemies
- Coding the player and enemy behavior
First, we are going to discuss how to make our player and enemies appear on the app, specifically in real-world positions, and then we will make them move and shoot each other to create the specified gameplay mechanics. Let’s start with spawning.
Spawning the player and enemies
The first thing we need to do in order to implement our game’s gameplay is to spawn objects to interact with. Let’s start with the player, since that’s the easiest one to deal with: we will create a Prefab with the graphics we want the player to have (in my case, just a cube), a Rigidbody with Is Kinematic checked (the player will move), and an AR Tracked Image script. We will set that Prefab as them Tracked Image Prefab of the AR Tracked Image Manager component in the XR Origin object. This will put the player on the tracked image. Remember to set the size of the player in terms of real-life sizes. In my case, I scaled the player to 0.05, 0.05, 0.05. Since the original cube is 1 meter in size, this means that my player will be 5x5x5 centimeters.
Your Player Prefab should look as follows:

Figure 20.32: The starting “Player” Prefab
The enemies will require a little bit more work, as shown here:
- Create a Prefab called
Spawnerwith the graphic you want your spawner to have (in my case, a cylinder) and its real-life size (small scale). - Add a custom script that spawns a Prefab every few seconds, such as the one shown in the following screenshot.
- You will notice the usage of
Physics.IgnoreCollisionto prevent theSpawnerGameObject from colliding with the spawned GameObject, getting the colliders of both objects, and passing them to the function. You can also use the Layer Collision Matrix to prevent collisions, just like we did in this book’s main project, if you prefer to:
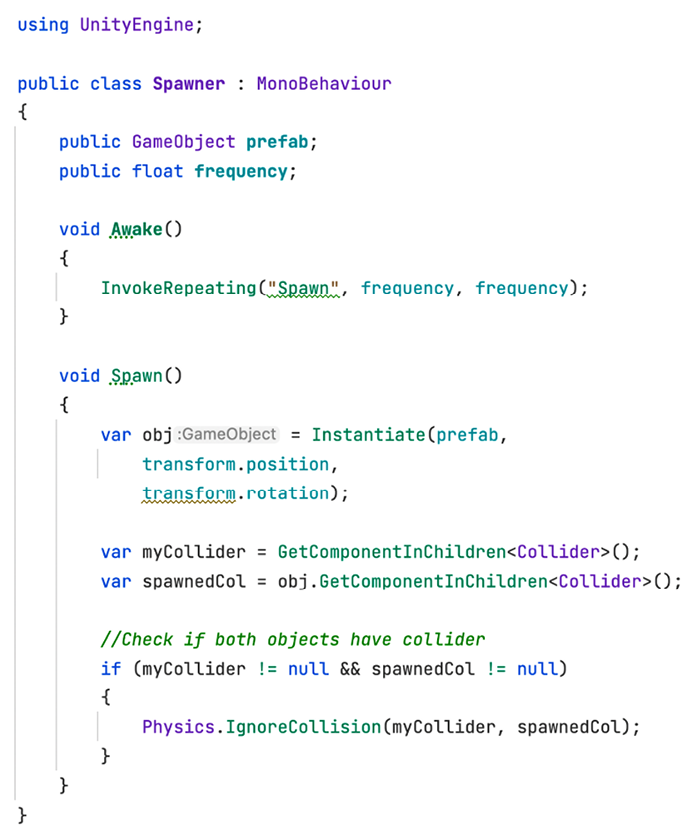
Figure 20.33: Spawner script
- Create an
EnemyPrefab with the desired graphic (a capsule, in my case) and aRigidbodycomponent with the Is Kinematic checkbox checked. This way, the enemy will move but not with physics. Remember to consider the real-life size of the enemy. - Set the Prefab property of the Spawner so that it spawns our enemy at our desired time frequency:

Figure 20.34: Configuring the Spawner
- Set the Prefab of
SpawnerPlacerin the XR Origin object so that it spawns the Spawner Prefab we created earlier.
And that’s all for the first part. If you test the game now, you will be able to tap on the detected planes in the app and see how the Spawner starts creating enemies. You can also look at the target image and see our cube player appear.
Now that we have the objects in the scene, let’s make them do something more interesting, starting with the enemies.
Coding the player and enemy behavior
The Enemy must move toward the player in order to shoot at them, so it will need to have access to the player’s position. Since the enemy is instantiated, we cannot drag the player reference to the Prefab. However, the player has also been instantiated, so we can add a PlayerManager script to the player that uses the Singleton pattern (as we did in Chapter 8, Win and Lose Conditions).
To do that, follow these steps:
- Create a
PlayerManagerscript similar to the one shown in the following screenshot and add it to the player:

Figure 20.35: Creating the PlayerManager script
- Now that the enemy has a reference to the player, let’s make them look at the player by adding a
LookAtPlayerscript, as shown here:

Figure 20.36: Creating the LookAtPlayer script
- Also, add a simple
MoveForwardscript like the one shown in the following screenshot to make the enemy not only look at the player but also move toward them. Since theLookAtPlayerscript is making the enemy face the player, this script moving along the Z axis is just enough:

Figure 20.37: Creating the MoveForward script
Now, we will take care of the player movement. Remember that our player is controlled by moving the image, so here, we are actually referring to the rotation, since the player will need to automatically look and shoot at the nearest enemy. To do this, follow these steps:
- Create an
Enemyscript and add it to the Enemy Prefab. - Create an
EnemyManagerscript like the one shown in the following screenshot and add it to an emptyEnemyManagerobject in the scene:

Figure 20.38: Creating the EnemyManager script
- In the
Enemyscript, make sure to register the object in the all list ofEnemyManager, as we did previously withWavesManagerin this book’s main project:

Figure 20.39: Creating the Enemy script
- Create a
LookAtNearestEnemyscript like the one shown in the following screenshot and add it to the Player Prefab to make it look at the nearest enemy:

Figure 20.40: Looking at the nearest Enemy
Now that our objects are rotating and moving as expected, the only thing missing is shooting and damaging:
- Create a
Lifescript like the one shown in the following screenshot and add it to both the Player and Enemy components. Remember to set a value for the amount of life field. You will see this version ofLifeinstead of needing to check if the life reached zero every frame. We have created aDamagefunction to check that damage is dealt (theDamagefunction is executed), but the other version of this book’s project also works:

Figure 20.41: Creating a Life component
- Create a
BulletPrefab with the desired graphics, the collider with the Is Trigger checkbox on the collider checked, aRigidbodycomponent with Is Kinematic checked (a kinematic trigger collider), and the proper real-life size. - Add the
MoveForwardscript to the Bullet Prefab to make it move. Remember to set the speed. - Add a
Spawnerscript to both the Player and the Enemy components and set the Bullet Prefab as the Prefab to spawn, as well as the desired spawn frequency. - Add a
Damagerscript like the one shown in the following screenshot to the Bullet Prefab to make bullets inflict damage on the objects they touch. Remember to set the damage:

Figure 20.42: Creating a Damager script – part 1
- Add an
AutoDestroyscript like the one shown in the following screenshot to the Bullet Prefab to make it despawn after a while. Remember to set the destroy time:

Figure 20.43: Creating a Damager script – part 2
And that’s all! As you can see, we basically created a new game using almost the same scripts we used in the main game, mostly because we designed them to be generic (and the game genres are almost the same). Of course, this project can be improved a lot, but we have a nice base project to create amazing AR apps.
Summary
In this chapter, we introduced the AR Foundation Unity framework, explored how to set it up, and how to implement several tracking features so that we can position virtual objects on top of real-life objects. We also discussed how to build our project so that it can run on both iOS and Android platforms, which is the only way we can test our AR apps at the time of writing. Finally, we created a simple AR game based on the game we created in the main project but modified it so that it’s suitable for use in AR scenarios.
With this new knowledge, you will be able to start your path as an AR app developer, creating apps that augment real objects with virtual objects by detecting the positions of the real objects. This can be applied to games, training apps, and simulations. You may even be able to find new fields of usage, so take advantage of this new technology and its new possibilities!
Well, this is the end of this journey through Unity 2022. I’m really glad you reached this point in the book. I hope this knowledge will help you to improve or start your game development career with one of the most versatile and powerful tools on the market: Unity. I hope to see your creations someday! See you on the road!