2
Architecture Overview and Definitions
Kubernetes is an amazing technology; however, as we saw in the last chapter, it is not a simple technology. I consider Kubernetes not only as container orchestration, but besides that, it is also a platform with standard interfaces to integrate containers with the broader infrastructure, including storage, networks, and hypervisors. That said, you must consider all the prerequisites and aspects involved in an OpenShift self-managed cluster.
In this chapter, we will walk through the main concepts related to the Kubernetes and OpenShift architecture. The main purpose here is you think before doing and make important decisions, to avoid rework later.
The following main topics will be covered in the chapter:
- Understanding the foundational concepts
- OpenShift architectural concepts and best practices
- Infrastructure/cloud provider
- Network considerations
- Other considerations
- OpenShift architectural checklists
Let's get started!
Technical requirements
As we are covering the architecture side of OpenShift in this chapter, you still don't need access to any specific hardware or software to follow this chapter, but this will be expected some chapters ahead. However, it is important you have some pre-existing knowledge of OpenShift and Kubernetes for you to achieve the best possible result from this chapter.
Prerequisites
This chapter is intended to be for Information Technology (IT) architects that already have some basic knowledge of Kubernetes or OpenShift use. That said, we are not covering in this chapter basic concepts such as what a Pod, Service, or Persistent Volume is. But if you don't know these basic concepts yet, don't freak out! We have prepared a list of recommended training and references for you in the last chapter of this book. We suggest you to take the Kubernetes Basics and Kube by Example before moving forward with this chapter.
Understanding the foundational concepts
Let's start by understanding the main concepts related to Kubernetes and OpenShift components and servers. First, any OpenShift cluster is composed of two types of servers: master and worker nodes.
Master nodes
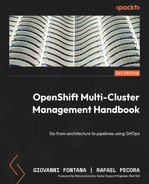
This server contains the control plane of a Kubernetes cluster. Master servers on OpenShift run over the Red Hat Enterprise Linux CoreOS (RHCOS) operating system and are composed of several main components, such as the following:
- Application programming interface (API) server (kube-apiserver): Responsible for exposing all Kubernetes APIs. All actions performed on a Kubernetes cluster are done through an API call—whenever you use the command-line interface (CLI) or a user interface (UI), an API call will always be used.
- Database (etcd): The database stores all cluster data. etcd is a highly available distributed key-value database. For in-depth information about etcd, refer to its documentation here: https://etcd.io/docs/latest/.
- Scheduler (kube-scheduler): It is the responsibility of kube-scheduler to assign a node for a Pod to run over. It uses complex algorithms that consider a large set of aspects to decide which is the best node to host the Pod, such as computing resource available versus required node selectors, affinity and anti-affinity rules, and others.
- Controller manager (kube-controller-manager): Controllers are an endless loop that works to ensure that an object is always in the desired state. As an illustration, think about smart home automation equipment: a controller is responsible for orchestrating the equipment to make sure the environment will always be in the desired programmed state—for example, by turning the air conditioning on and off from time to time to keep the temperature as close as possible to the desired state. Kubernetes controllers have the same function— they are responsible for monitoring objects and responding accordingly to keep them at the desired states. There are a bunch of controllers that are used in a Kubernetes cluster, such as replication controller, endpoints controller, namespace controller, and serviceaccounts controller. For more information about controllers, check out this page: https://kubernetes.io/docs/concepts/architecture/controller/
These are the components of the Kubernetes control plane that runs on the master nodes; however, OpenShift has some additional services to extend Kubernetes functionality, as outlined here:
- OpenShift API Server (openshift-apiserver): This validates and configures data for OpenShift exclusive resources, such as routes, templates, and projects.
- OpenShift controller manager (openshift-controler-manager): This works to ensure that OpenShift exclusive resources reach the desired state.
- OpenShift Open Authorization (OAuth) server and API (openshift-oauth-apiserver): Responsible for validating and configuring data to authenticate a user, group, and token with OpenShift.
The following figure shows the main control plane components of Kubernetes and OpenShift:
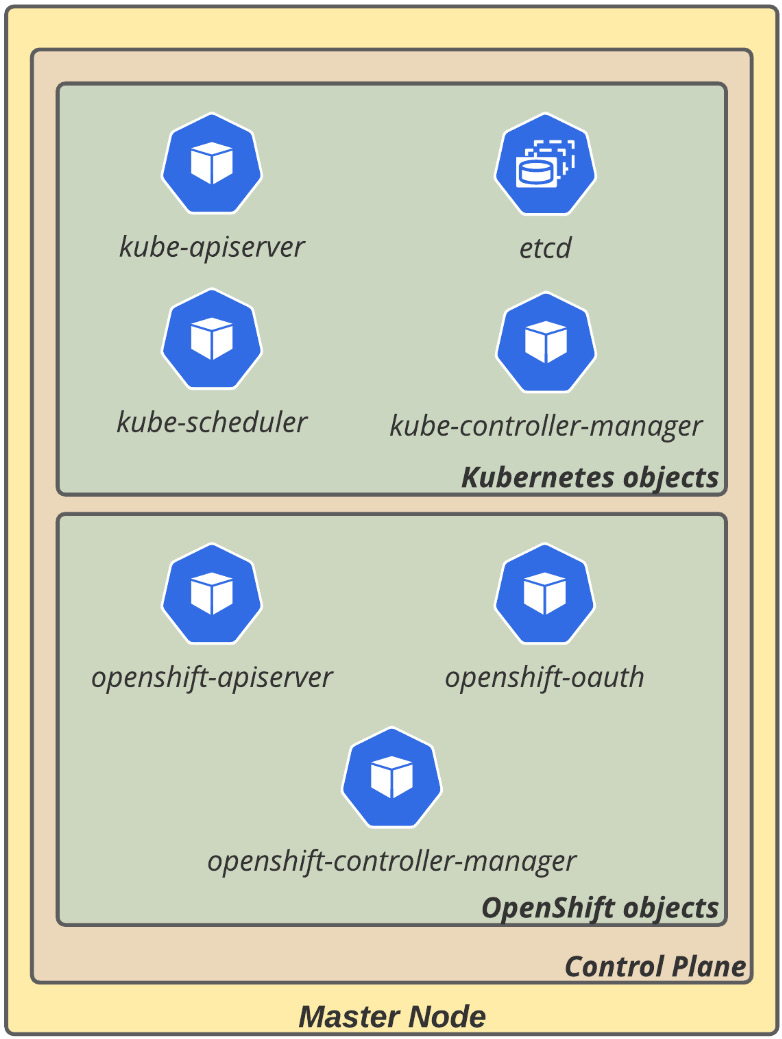
Figure 2.1 – OpenShift control plane components
These components can be found in multiple namespaces, as you can see in the following table:

What Are Operators?
If you've never heard about Operators, you may be thinking: What are Operators, after all? Operators are nothing more than a standard method to package, deploy, and maintain Kubernetes applications and objects. They use Custom Resource Definitions (CRDs) to extend the Kubernetes API functionality and also some standards for the application's life cycle: deploy, patch, keep the desired state, and even auto-pilot it (autoscaling, tuning, failure detections, and so on). Check out this link for more information: https://kubernetes.io/docs/concepts/extend-kubernetes/operator/.
Bootstrap node
The bootstrap node is a temporary server—used only during cluster deployment—that is responsible for injecting the cluster's components into the control plane. It is removed by the installation program when the bootstrap is finished successfully. As it is a temporary server that lives only during the deployment, it is usually not considered in the OpenShift architecture.
Workers
Workers are the servers where the workloads themselves run. On OpenShift, workers can run over RHCOS or Red Hat Enterprise Linux (RHEL). Although RHEL is also supported for OpenShift workers, RHCOS, in general, is preferred for the following reasons:
- Immutable: RHCOS is a tight operating system designed to be managed remotely by OpenShift Container Platform itself. This enables consistency and makes upgrades a much easier and safer procedure, as OpenShift will always know and manage the actual and desired states of the servers.
- rpm-ostree: RHCOS uses the rpm-ostree system, which enables transactional upgrades and adds consistency to the infrastructure. Check out this link for more information: https://coreos.github.io/rpm-ostree/.
- CRI-O container runtime and container tools: RHCOS's default container runtime is CRI-O, which is optimized for Kubernetes (see https://cri-o.io/). It also comes with a set of tools to work with containers, such as podman and skopeo. During normal functioning, you are not encouraged to access and run commands on workers directly (as they are managed by the OpenShift platform itself); however, those tools are helpful for troubleshooting purposes—as we will see in detail in Chapter 6 of this book, OpenShift Troubleshooting, Performance, and Best Practices.
- Based on RHEL: RHCOS is based on RHEL—it uses the same well-known and safe RHEL kernel with some services managed by systemd, which ensures the same level of security and quality you would have by using the standard RHEL operating system.
- Managed by Machine Config Operator (MCO): To allow a high level of automation and also keep secure upgrades, OpenShift uses the MCO to manage the configurations of the operating system. It uses the rpm-ostree system to make atomic upgrades, which allows safer and easier upgrade and rollback (if needed).
In the following figure, you can view how these objects and concepts are used in an OpenShift worker node:
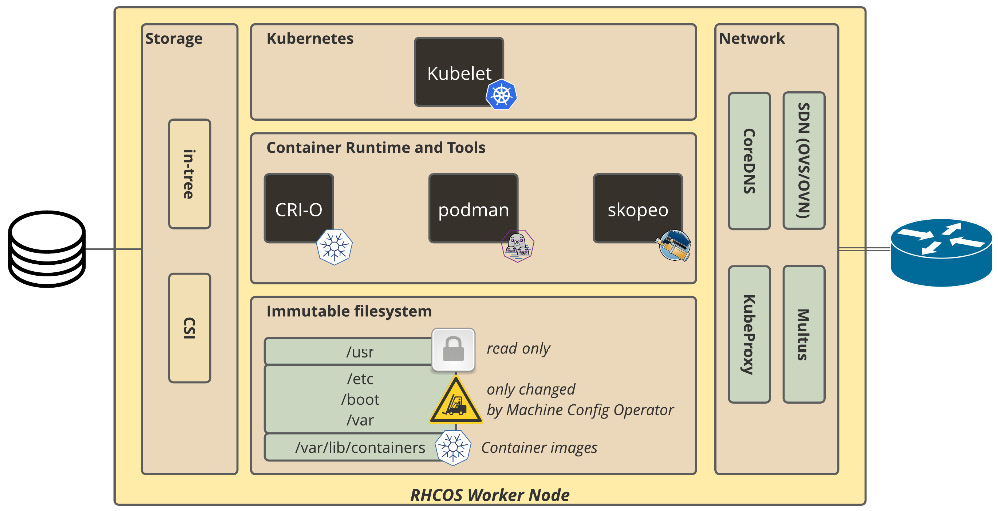
Figure 2.2 – RHCOS worker node
Types of workers
There are some common types of workers, the most usual being these:
- Application workers: Responsible for hosting the workloads—this is where the application containers run.
- Infrastructure workers: This type of server is usually used to host the platform infrastructure tools, such as the ingress (routers), internal registry, the monitoring stack (Prometheus and Grafana), and also the logging tool (Elasticsearch and Kibana).
- Storage workers: Container storage solutions, such as Red Hat OpenShift Data Foundation, usually require some dedicated worker nodes to host their Pods. In such cases, a best practice is to use a dedicated node group for them.
In the next section, we will see how to use different types of workers to design a highly available and resilient OpenShift cluster.
Highly available cluster
It is not uncommon for OpenShift clusters to become critical for the enterprise—sometimes, they start small but become large really quickly. Due to that, you should consider in your OpenShift cluster architecture non-functional requirements (NFRs) such as high availability (HA) from day one. A highly available cluster is comprised of the following aspects:
- Master nodes: etcd uses a distributed consensus algorithm named Raft protocol, which requires at least three nodes to be highly available. It is not the focus of this book to explain the Raft protocol, but if you want to understand it better, refer to these links:
- Raft description: https://raft.github.io/
- Illustrated example: http://thesecretlivesofdata.com/raft/
- Infrastructure worker nodes: At least two nodes are required to have ingress highly available. We will discuss later in this chapter what you should consider for other infrastructure components such as monitoring and logging.
- Application worker nodes: At least two nodes are also required to be considered highly available; however, you may have as many nodes as required to provide enough capacity for expected workloads. In this chapter, we will walk through some sizing guidance to determine the number of workers required for a workload, if you have an estimated required capacity.
The following figure shows what a highly available cluster architecture looks like:

Figure 2.3 – OpenShift highly available cluster
Now that we are on board with the foundational concepts of Kubernetes and OpenShift, let's dive further and look at OpenShift's architecture, along with some best practices.
OpenShift architectural concepts and best practices
In this section, we will discuss the main concepts related to the OpenShift architecture design and some best practices you should consider. In general, when we are designing an architecture for an OpenShift cluster, the aspects in the following table need to be defined accordingly:
Details of how to address these aspects (deployment, configurations, and so on) will be covered from Chapter 5, OpenShift Deployment, onward. Another key point to note is that we are still focusing on one single OpenShift cluster only—the main objective here is to help you to define a standard cluster architecture that best fits your case. In the next chapter, we will explore aspects you need to consider when working with multiple environments, clusters, and providers.
In the following sections, we are going to walk through each of these points, highlighting the most important items you need to cover.
Installation mode
You already know from the previous chapter that we have three installation modes with OpenShift, as follows:
- Installer-provisioned infrastructure (IPI)
- User-provisioned infrastructure (UPI)
- Provider-agnostic (if you haven't seen it, review the OpenShift installation modes section from the last chapter)
Here, we will briefly discuss important aspects you need to consider from each option to drive the best decision for your case.
IPI
This mode is a simplified opinionated method for cluster provisioning and is also a fully automated method for installation and upgrades. With this model, you can make the operational overhead lower; however, it is less flexible than UPI.
You can see an example of IPI here:
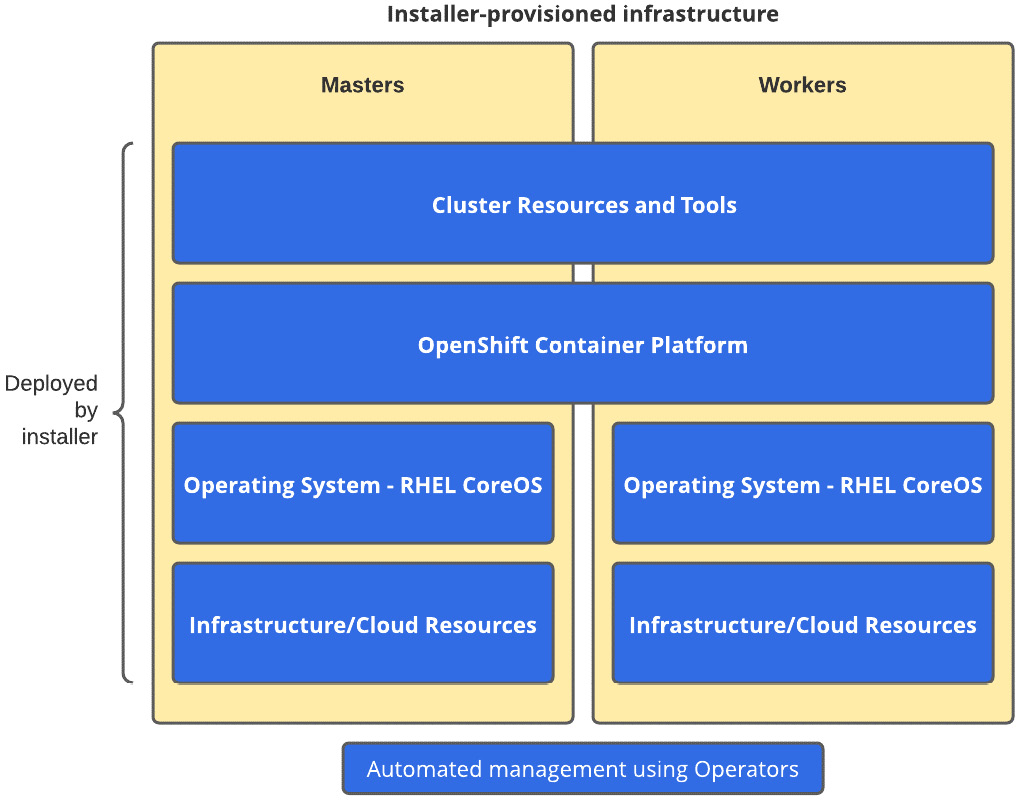
Figure 2.4 – IPI
Figure 2.4 shows all layers that are automated by the installer during the cluster deployment.
UPI
In this mode, you provision the servers manually—you are also responsible for managing them. As such, you have more flexibility within the infrastructure layer. In this mode, OpenShift still has some level of integration with the infrastructure or cloud provider to provide storage services for the platform.
Agnostic installer
This mode is similar to UPI; however, there is no integration between OpenShift and the infrastructure or cloud provider. Therefore, in this mode, you will not have any storage plugins installed with the platform—you will need to deploy an in-tree or Container Storage Interface (CSI) plugin on day two to provide persistent volumes to your workloads (we are going to cover storage-related aspects later in this chapter).
You can see an example of UPI/an agnostic installer here:
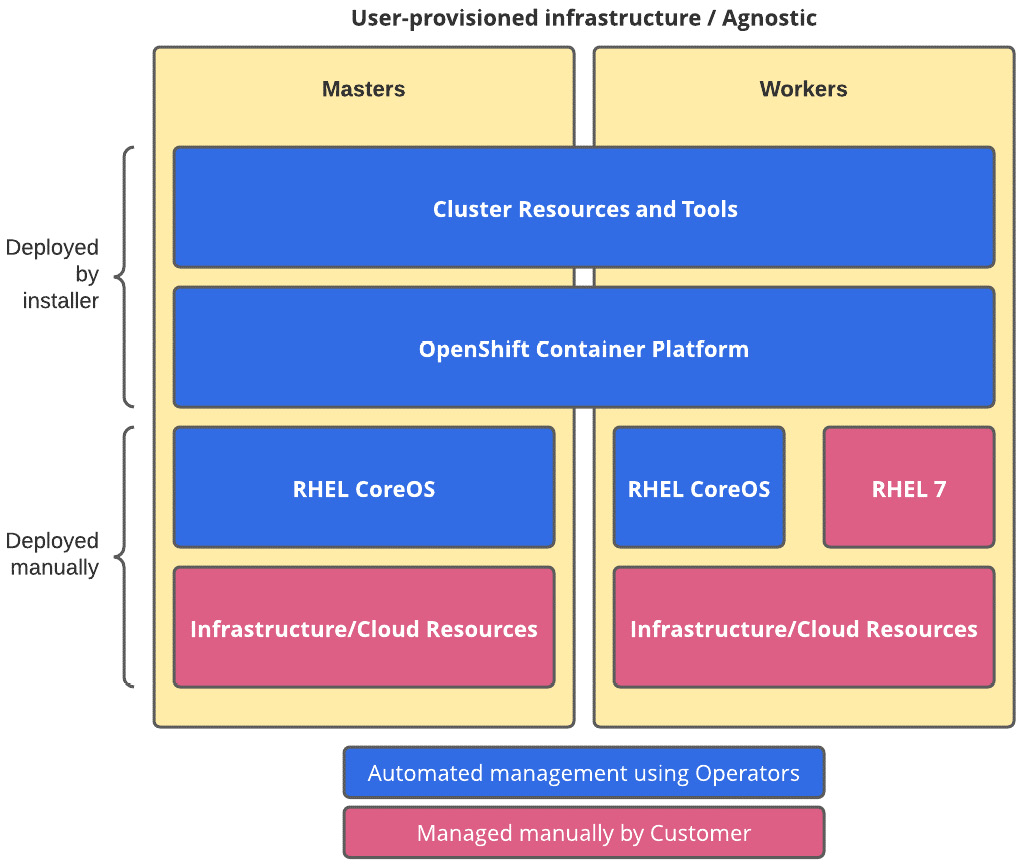
Figure 2.5 – UPI/Agnostic installer
As you can see in Figure 2.5, with UPI or an agnostic installer, there are some layers you are responsible for providing, as prerequisites, to deploy a cluster (and also maintain it on day two), as opposed to IPI, from Figure 2.4, which is fully automated.
Computing
From a computing perspective, the following are important attributes that must be considered during the architecture design:
- Nodes and cluster sizing: Define the number and size of worker nodes to host workloads expected for the platform. Some important factors need to be considered here to have a resilient cluster—this topic will be covered later in this chapter.
- Environment segmentation: It is possible to have one cluster only that provides a segregated group of nodes for specific reasons. Sometimes, it makes sense to have a dedicated group of nodes to provide services for specific environments in one single cluster—it is possible to have one single cluster with nodes dedicated for a development environment, another group for staging, and another one for production, for instance. That said, this is a crucial decision that needs to be made—going for one cluster for each environment or having one single cluster that serves multiple environments. We are going to explore this point in the next chapter and see what the pros and cons of each case are.
Master nodes' sizing
To define the master nodes' size, we recommend you follow Red Hat's benchmark, based on expected cluster load and number of nodes, as follows:

Infrastructure node sizing
Similarly, infrastructure nodes' size also has a benchmark, based on expected cluster size, as follows:

However, the preceding table does not consider OpenShift logging. Therefore, if you are planning to use it, add at least four more virtual CPUs (vCPUs) and 16 GB to the nodes on which Elasticsearch instances will be hosted.
Worker nodes' sizing
There isn't just one algorithm to estimate the size of an OpenShift cluster. The sizing algorithm we listed here is based on our personal experience along the years working with it, and also great articles and resources we have studied so far—some good references on this topic are available at the end of this chapter in the Further reading section.
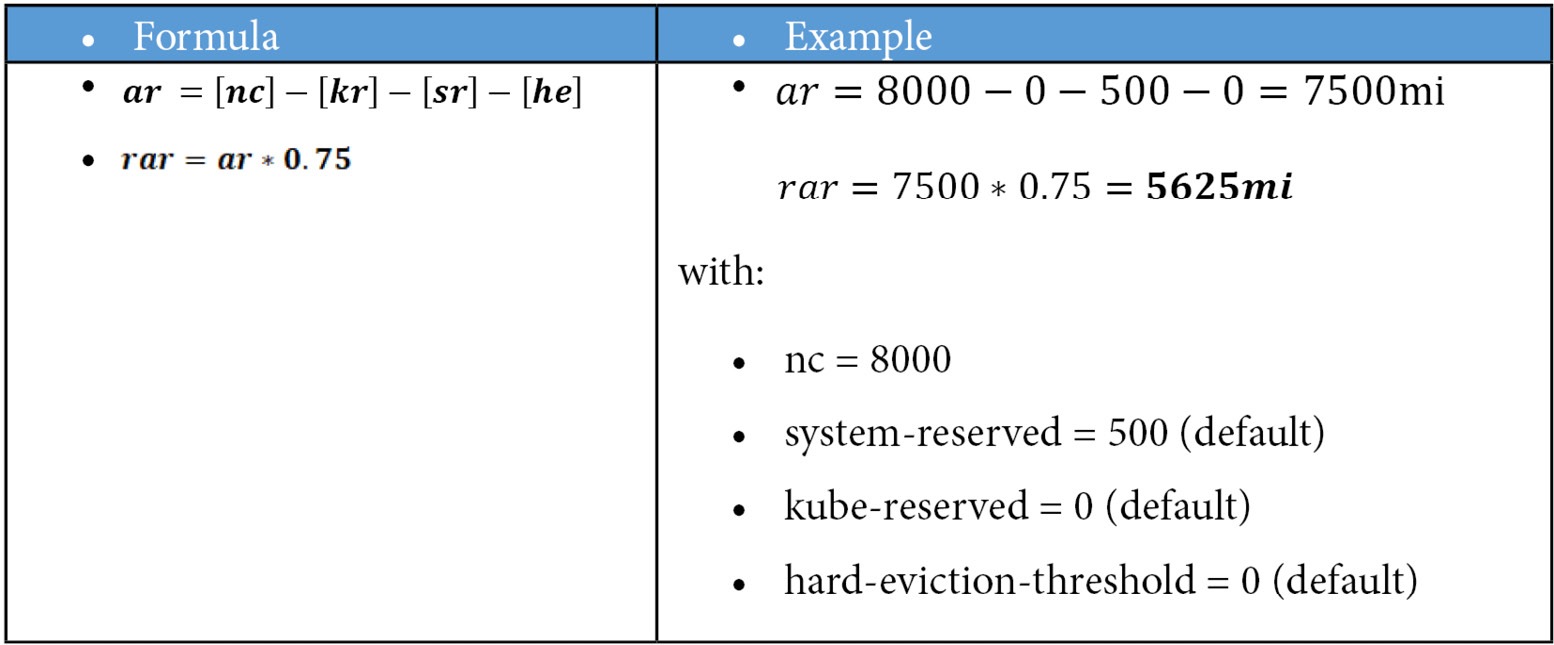
Allocatable resources
The sizing estimation rationale for computing resources needs to consider the nodes' allocatable resources. The allocatable resource is the real amount that can be used for workloads in a node, considering the number of resources that are reserved for the operating system and kubelet. The calculation of allocatable resources is given by the following formula:

OpenShift Default Values
The default values for OpenShift workers are as follows (at the time of this writing):
CPU:
- system-reserved = 500m (*)
- kube-reserved = 0m (*)
- hard-eviction = 0m (*)
Memory:
- system-reserved = 1Gi
- kube-reserved = 0Gi
- hard-eviction = 100Mi
(*) "m" stands for millicore, a standard Kubernetes unit that represents one vCPU divided into 1,000 parts.
Recommended allocatable resources
Besides the standard aforementioned allocatable resources, it should also be considered as a best practice to keep at least 25% of resources available in a node, for resilience purposes. I'll explain: when one node goes down, the native Kubernetes resilience mechanism, after some time, will move the Pods to other nodes with available resources—that means if you don't plan to have extra capacity on the nodes, this resilience mechanism is at risk. You should also consider extra capacity for autoscaling at peak times and future growth. Therefore, it is recommended you consider this extra capacity in the calculation of workers' computing sizing, as follows:

Important Note
Usually, some level of CPU overcommitment is—somewhat—handled well by the operating system. That said, the extra capacity mentioned previously doesn't always apply to the CPU. However, this is a workload-dependent characteristic: most container applications are more memory- than CPU-bound, meaning that CPU overcommitment will not have a great impact on overall application performance, while the same does not happen with memory—but again, check your application's requirement to understand that.
Let's use an example to make this sizing logic clear.
Example
Imagine that you use servers with 8 vCPUs and 32 GB random-access memory (RAM) as the default size. A worker of this size will have, in the end, the following recommended allocatable resources:
- CPU
- Memory:

Legend:
ar = allocatable resources
nc = node capacity
kr = kube-reserved
sr = system-reserved
he = hard-eviction threshold
Therefore, a worker with 8 vCPUs and 32 GB RAM will have approximately 5 vCPUs and 23 GB RAM considered as the usable capacity for applications. Considering an example in which an application Pod requires on average 200 millicores and 1 GB RAM, a worker of this size would be able to host approximately 23 Pods (limited by memory).
Aggregated logging
You can optionally deploy the OpenShift Logging tool that is based on Elasticsearch, Kibana, and Fluentd. The following diagram explains how this tool works:
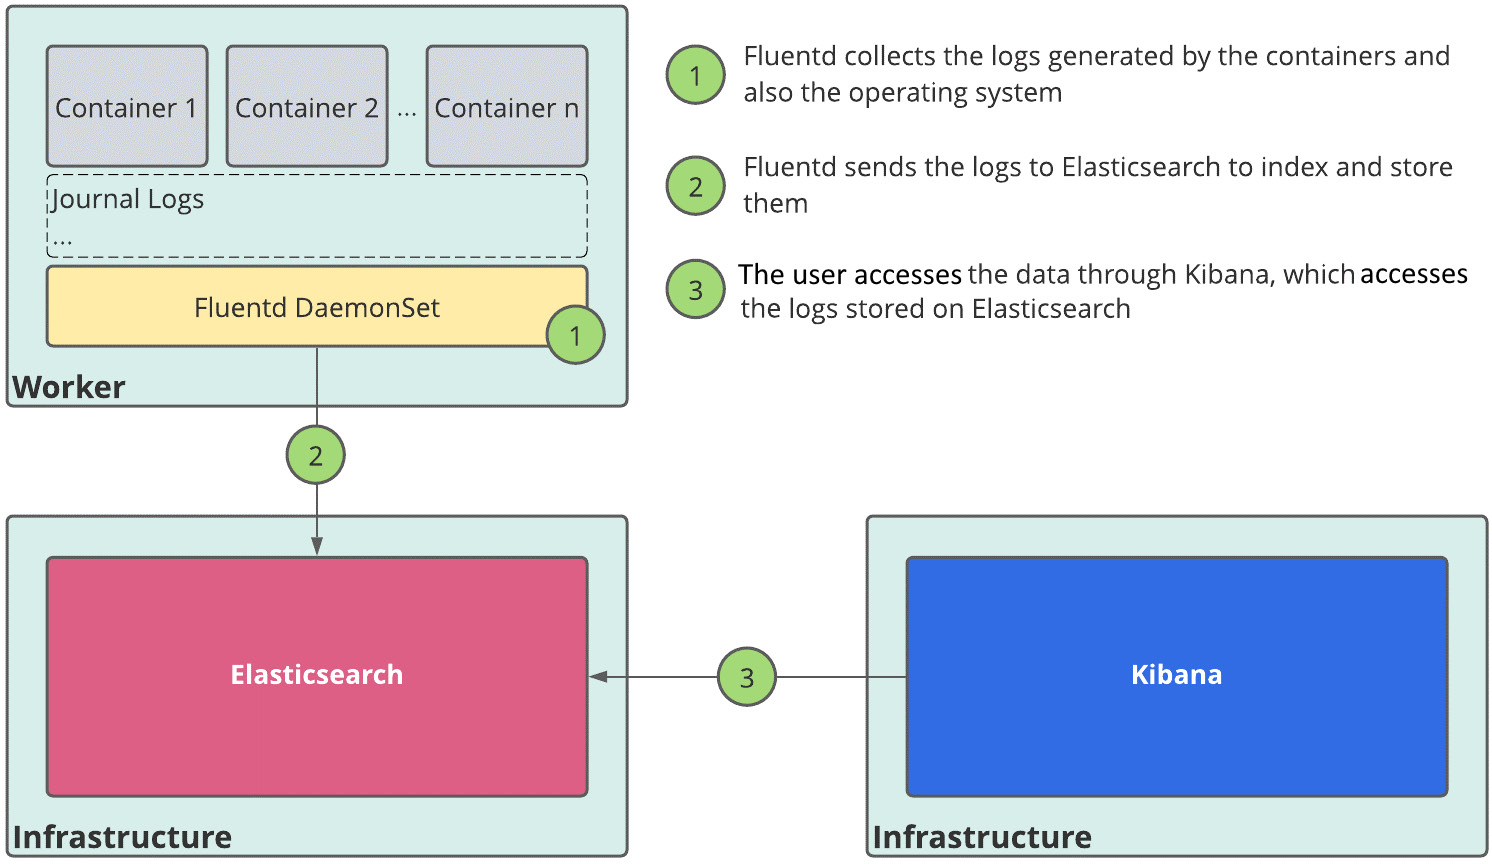
Figure 2.6 – OpenShift Logging components
You are not required to use OpenShift Logging, though, if you have your logging solution and want to keep it. You only need to configure the ClusterLogForwarder, as you are going to see in later chapters of this book (from Chapter 5, OpenShift Deployment, onward).
Monitoring
Another important tool that any container orchestration platform needs to have is a monitoring tool that can monitor your infrastructure and applications. OpenShift comes natively with a monitoring solution based on Prometheus, AlertManager, and Grafana. The following diagram explains the monitoring components:
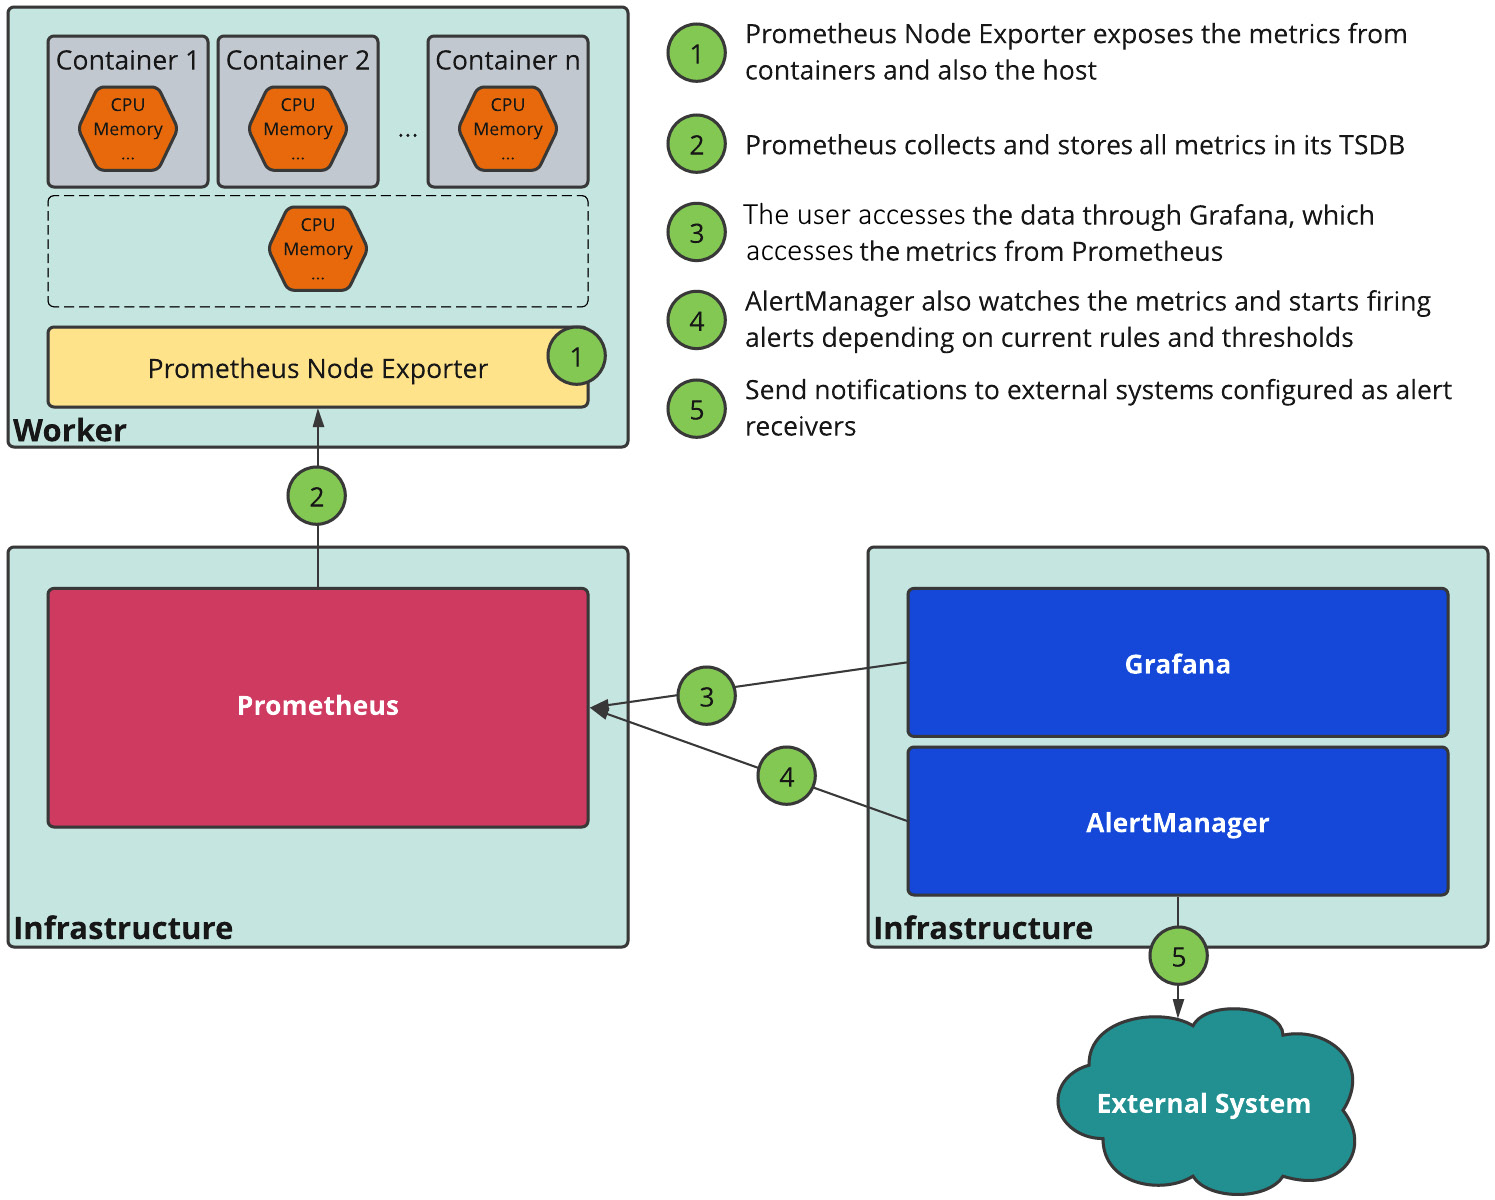
Figure 2.7 – OpenShift monitoring components
OpenShift monitoring is not optional; it is used by many internal platform components. However, if you do not intend to use it in favor of another monitoring tool, you may keep it using ephemeral storage. On the other hand, if you are planning to use it, we recommend you provide persistent storage to save the monitoring metrics.
Storage
Containers are stateless by nature, but this does not mean that it is not possible to have stateful containers on OpenShift. There are multiple ways to mount storage volumes inside containers and enable stateful workloads. In the following sections, we will walk through the common storage requirements of an OpenShift cluster that you should consider in your architectural design.
Storage backends
There are two types of storage implementations: in-tree and CSI plugins.
In-tree volume plugins
In-tree plugins are implementations that allow a Kubernetes platform to access and use external storage backends. The name in-tree comes from the fact that these implementations are developed and released in the main Kubernetes repositories, as in-tree modules. There are several types of supported in-tree plugins with OpenShift, as follows (*):

(*) At the time this book was written. Check the currently supported options at https://access.redhat.com/articles/4128421.
CSI drivers
With more and more storage providers supporting Kubernetes, the development and maintenance of in-tree plugins became difficult and was no longer the most efficient model. The CSI has been created in this context: to provide a standard way to extend Kubernetes storage capabilities using API interfaces—as such, you can easily add new CSI plugins for different storage providers and use them with OpenShift. With CSI, it is possible to also have interesting features such as snapshots, resizing, and volume cloning; however, it is up to the storage provider to implement these features or not, so check with them if they have a CSI driver implementation available and which operations are implemented and supported.
Important Note
Red Hat supports the CSI APIs and implementation from the OpenShift side; however, support of the storage side is a storage vendor's responsibility. Check with your storage vendor if there is a supported CSI option for OpenShift.
Storage requirements
Now that you have learned about the types of storage plugins available for OpenShift, let's review the storage requirements you usually have with an OpenShift cluster.
Server disks
OpenShift servers use one disk with 120 GB by default. Large clusters require master nodes with low latency and high throughput disks, which can provide at least 500 sequential input/output operations per second (IOPS) (usually solid-state drive (SSD) or Non-Volatile Memory Express (NVMe) disks). We are also going to see in-depth details about this in Chapter 5, OpenShift Deployment.
OpenShift internal registry
This depends on the number and size of application images to be stored on it. If you do not have an estimated value for the images, an initial size of 200 GB is usually enough for the first few weeks. As a best practice, consider setting image pruner policies to automatically delete images that are no longer used—we are going to cover these best practices with examples in Chapter 5, OpenShift Deployment.
Volume type used by OpenShift internal registry: RWX
OpenShift Logging
This depends on the number of logs generated by the applications. Here is an example of the volume size required for an application that generates 10 lines of logs per second (lines-per-second); the lines have 256 bytes (bytes-per-line) on average, considering a retention period of 7 days for the logs:

This means that one single Pod of that application will consume nearly 1.5 GB over 7 days (the period for which a log will be stored on Elasticsearch). Another important thing to consider is Elasticsearch's replication factor, which will require more storage depending on the replication factor selected. There following replication factors are available:
- FullRedundancy: Replicates the primary shards for each index to every Elasticsearch node
- MultipleRedundancy: Replicates the primary shards for each index to 50% of the Elasticsearch nodes
- SingleRedundancy: Makes one copy of the primary shards for each index
- ZeroRedundancy: Does not make a copy of the primary shards
Volume type used by OpenShift Logging: RWO
OpenShift monitoring
OpenShift monitoring is installed by default with the platform using ephemeral storage (also known as emptyDir), meaning that, for some reason, when the Prometheus pod gets restarted, all metrics data will be lost. To avoid losing metrics data, consider a persistent volume for Prometheus and AlertManager Pods.
Red Hat has a benchmark based on various tests performed, as represented here. This empirical data is good guidance to estimate the volume required for Prometheus:
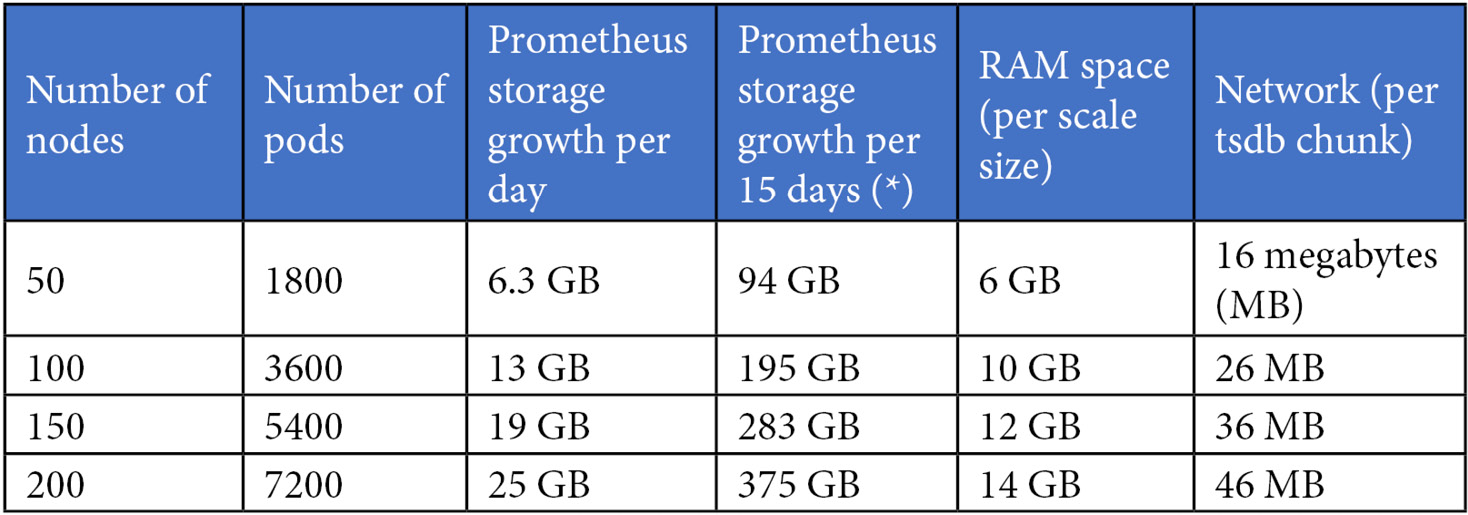
(*) 15 days is the default retention period.
You also need to consider volumes for AlertManager: typically, a volume size of 20 GB is enough for most cases.
By default, an HA configuration is composed of two Prometheus replicas and three AlertManager replicas.
Using the preceding reference, we can estimate the volumes required for OpenShift monitoring. For example, let's say that we are planning a cluster that will have no more than 50 nodes and 1,800 Pods. In that case, we'd need to use the following formula:
Volume type used by OpenShift monitoring: RWO
Note
The preceding requirements are based on empirical data. The real consumption observed can be higher depending on the workloads and resource usage. For more information, refer to the official documentation: https://docs.openshift.com/container-platform/latest/scalability_and_performance/scaling-cluster-monitoring-operator.html.
At this time, you don't need to know in-depth details about the OpenShift components such as logging or monitoring, as we are only covering the amount of storage required (or estimated) for them. These tools will be covered in detail later in this book.
Example
As we have already addressed sizing guidelines for an OpenShift cluster, let's use an example to make it clearer. Imagine that we are designing an OpenShift cluster architecture that is planned to host a three-tier Node.js application with the following capacity:
- Up to 20 Pods on the frontend consume 300 millicores and 1 GB RAM each at peak load. Each pod generates 30 lines of logs per second (256 bytes per line). Stateless Pods.
- Up to 4 Pods on the backend need 500 millicores and 1 GB RAM each at peak load. Each pod generates 10 lines of logs per second (256 bytes per line). Stateless Pods.
- 1 MongoDB database instance with 8 GB RAM and 2 vCPUs. It generates 1 line of logs per second (256 bytes per line). An RWO volume is required of 500 GB.
Our logging stack is configured with ZeroRedundancy (there is no data replication).
Compute sizing
First, let's see the total amount of CPU and memory required (for workloads only), as follows:
We will assume nodes with 4 vCPUs and 16 GB RAM by default. As we saw in this chapter, we need to apply the following formula to define the recommended allocatable resources:
- CPU

Note
We are considering, in this case, that some level of CPU overcommit is acceptable, and due to that, we are not considering the 25% of extra capacity here (recommended allocatable resources).
- Memory


That means we will need 3 nodes with 4 vCPU and 16 GB RAM to provide the capacity required for this application.
Storage sizing
Now, let's calculate the number of volumes required, as follows:
- Virtual machines (VMs): 3 (nodes) * 120 GB (recommended per server) = 360 GB disk
- Workload: 500 GB RWO
- Internal registry: 200 GB RWX
- Logging: 106 GB RWO (see next)
Frontend:

Backend:

MongoDB:

Total:

- Monitoring: 248 GB RWO (as we saw in the previous section about the sizing for monitoring in a cluster up to 50 nodes and 1,800 Pods)
Summary
The following table summarizes the servers required for this cluster, considering three additional servers dedicated to hosting the OpenShift infrastructure components (Logging, Monitoring, Registry, and Ingress).

In the previous table, the bootstrap node is not being considered as it is a temporary node that is removed after cluster installation.
And finally, the requirements for Persistent Volumes are summarized in the following table:

Now that we already know some best practices to observe in an OpenShift cluster, let's discuss in the next section some surrounding aspects you should also consider when designing an OpenShift architecture.
Infrastructure/cloud provider
As the OpenShift platform is integrated with the infrastructure or cloud provider, some prerequisites are also required, but for now, during the architecture design phase, you basically need to define which provider you will go for and be aware that they have specific prerequisites. We are not covering these pre requisites in this chapter, as this is going to be explained in depth in Chapter 5, OpenShift Deployment.
In that chapter, we will practice the deployment process itself, starting by preparing the infrastructure or cloud prerequisites, setting up installer parameters, storage, network, the virtualization/cloud layer, and so on. However, during the architecture design phase, in general, you don't need to go deeper into these details yet, but just choose which provider to go for and keep in mind some specifications you will have to fulfill for the provider you have chosen.
Network considerations
An OpenShift cluster uses an SDN layer to allow communication between workloads and cluster objects. The default plugin used with OpenShift at the time this book was written is OpenvSwitch (OvS), but OpenShift is also compatible (and supported) with the OVN-Kubernetes plugin. Check this link to better understand the differences between the plugins: https://docs.openshift.com/container-platform/latest/networking/openshift_sdn/about-openshift-sdn.html#nw-ovn-kubernetes-matrix_about-openshift-sdn.
Within the SDN, there are two virtual subnets—the first one has the Internet Protocol (IP) addresses that a Pod inside the cluster uses, while the second is always used when you create a service object. The default values for these subnets are listed in the following table:

Important Note
The preceding ranges are customizable during the platform installation process only! You cannot modify these after installation.
Make sure these two ranges don't conflict with the existing one in your physical infrastructure. If you have conflicts, you may experience routing problems between Pods on OpenShift and external services that have a real IP within these ranges. The reason is simple: OpenShift SDN will always think that anything with an IP within the Pods' range is a pod inside the cluster—and in this case, the SDN will never deliver this package to the external network (network address translation, or NAT). Therefore, a pod on OpenShift will never be able to communicate with a real service out of the cluster that has an IP within the Pods' or services' range. So, be careful to define these two ranges with ones that will never be used in your infrastructure.
Let's move on to some other important aspects you need to consider from the network perspective, then!
VPC/VNet
If you are deploying OpenShift on Amazon Web Services (AWS), Azure, or Google Cloud Platform (GCP), you may choose to install an OpenShift cluster in a new or existing VPC/virtual network (VNet). If you go for existing VPC/VNet components such as subnets, NAT, internet gateways, route tables, and others, these will no longer be created automatically by the installer—you will need to configure them manually.
DNS
Depending on the installation method and the provider, different DNS requirements are needed. Again, we are going to cover this point in detail later in this book, but keep in mind that a set of DNS requirements depends on the provider and installation method you choose.
Load balancers
The IPI in on-premises environments already comes with an embedded highly available load balancer included. In cloud environments, OpenShift uses load balancers provided by the cloud provider (for example, AWS Elastic Load Balancing (ELB), Azure's Network LB, GCP's Cloud Load Balancing). With UPI, you need to provide an external load balancer and set it up before cluster deployment.
DHCP/IPMI/PXE
If you go for OpenShift on bare metal, observe other requirements specified for this type of environment. DHCP, IPMI, and PXE are optional; however, they are recommended to have a higher level of automation. Therefore, consider that in your cluster architectural design.
Internet access
The OpenShift platform needs download access from a list of websites—the Red Hat public registries to download the images used with it, either using a proxy or direct access. However, it is possible to install it on restricted networks as well. Additional work is required, though: you need to establish an internal registry first and mirror all required images from Red Hat's registries to there. If you use a proxy, also check the proxy's performance to avoid timeout errors during the image pulling process with OpenShift.
Well, we've covered great content so far, from foundation concepts to best practices you need to observe related to the installation mode, computing, network, and storage. We are almost done with the most important aspects of an OpenShift cluster architecture, but we can't miss some considerations related to authentication and security. See in the following section some final considerations we brought to this chapter to help you with your cluster's architecture design.
Other considerations
Finally, there are a few more things that you should also consider during the design phase of your OpenShift cluster.
SSL certificates
OpenShift uses SSL for all cluster communication. During the platform installation, self-signed certificates are generated; however, it is possible to replace the API and ingress certificates. At this point, you only need to know that this is possible; later in this book, you will see how to do it.
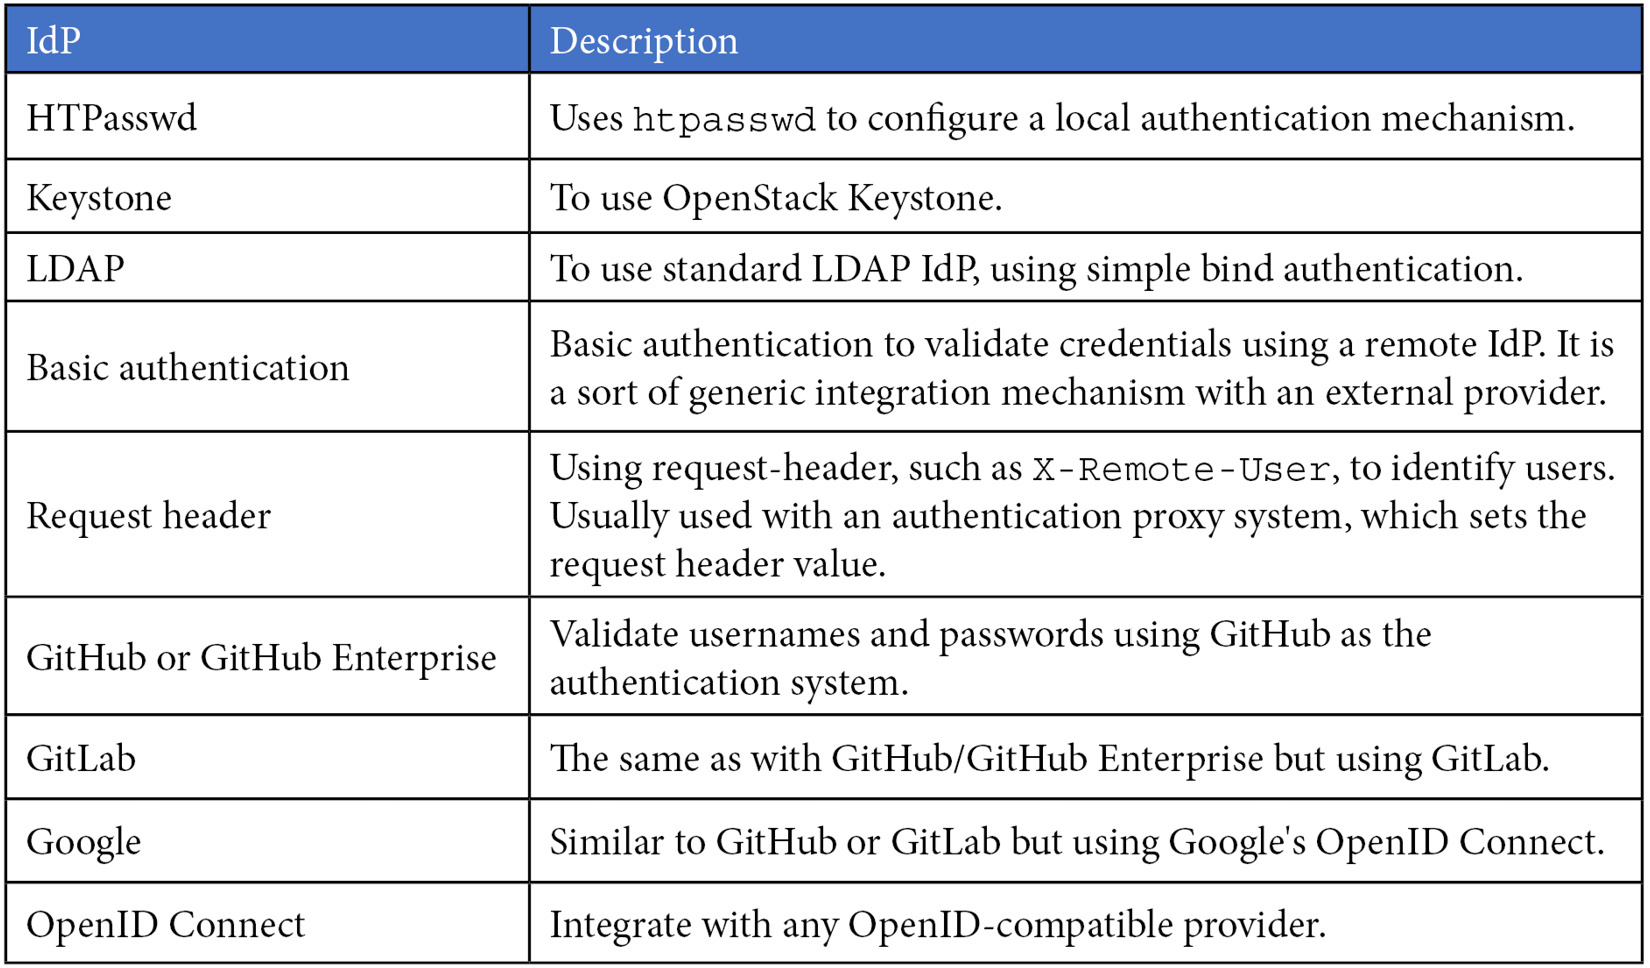
IdPs
OpenShift is deployed using a temporary kubeadmin user. It is highly recommended you configure new IdPs to allow users to log in to the platform using a convenient and safe authentication method. There are several supported IdPs with OpenShift; here is a current list of supported options (at the time of writing this book):
To wrap up this chapter and give you a quick reference guide, look at the OpenShift architectural checklists we provide next.
OpenShift architectural checklists
These checklists will help you define the main decisions you may need to take during the OpenShift architecture design and can also be used as a summary of the concepts covered in this chapter.
Here's a checklist for installation mode and computing:

Here's a checklist of additional tools:

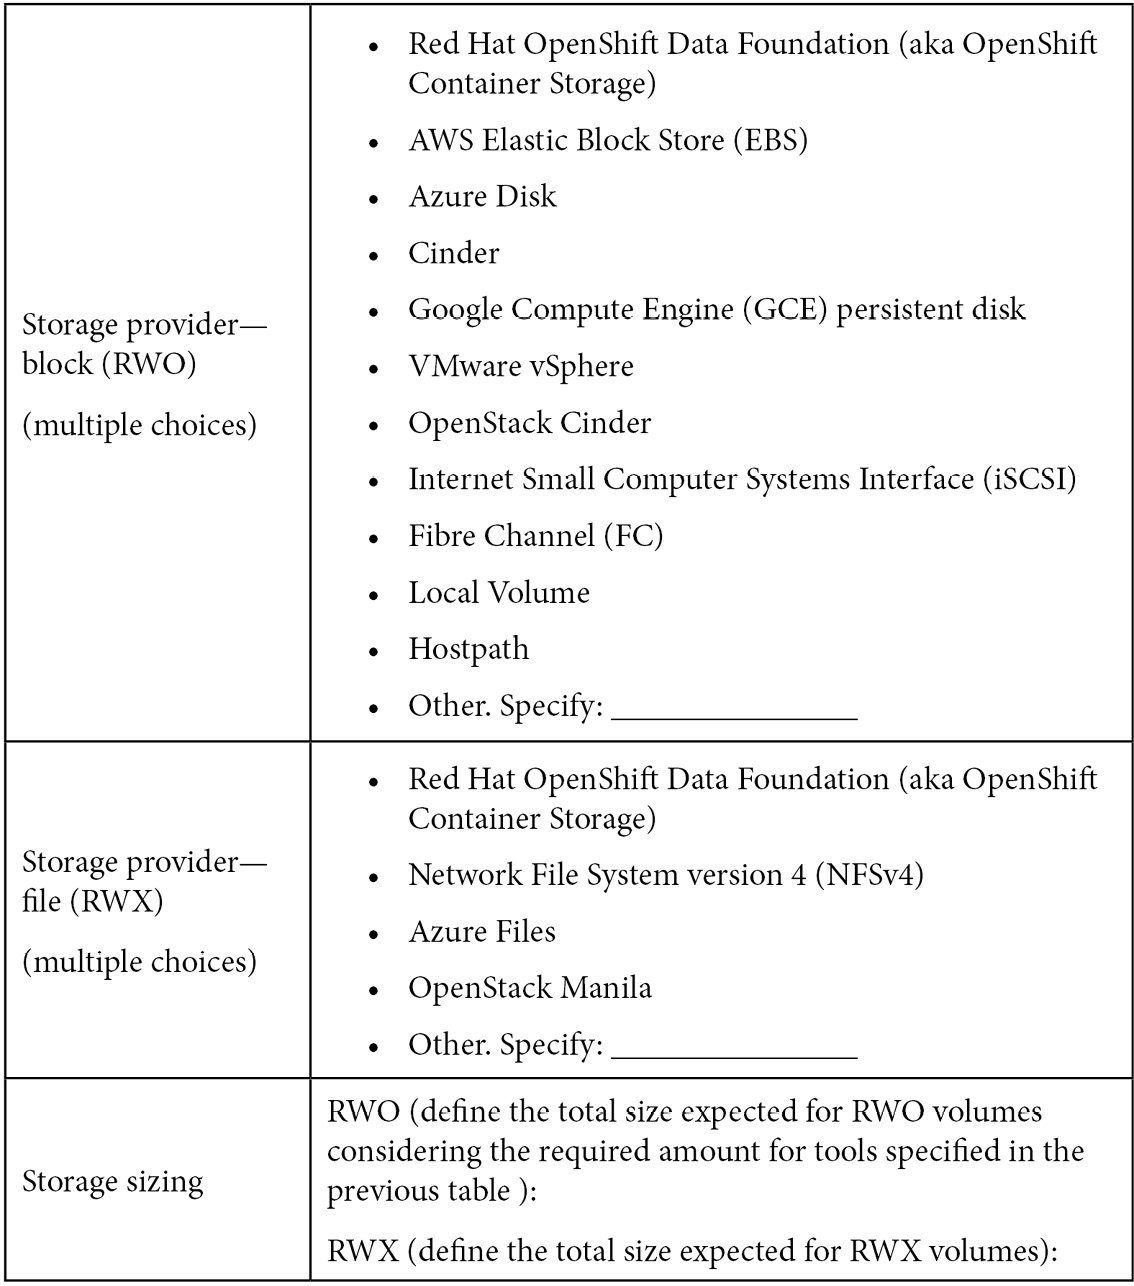
Here's a checklist for storage:
Here's a checklist for the network:

Here's a checklist for other general considerations:

Summary
In this chapter, we went through some of the most important aspects you need to consider and define before starting a cluster deployment, at the architectural design phase. You now understand the different choices you have with the platform and how to estimate the number and size of your nodes and storage.
Check the next chapter—Chapter 3, Multi-Tenant Considerations—to acquire more knowledge about the multi-tenant aspects of the OpenShift architecture.
Further reading
If you want to go deeper into the topics we covered in this chapter, look at the following references:
- etcd documentation: https://etcd.io/docs/latest/
- Kubernetes official documentation: https://kubernetes.io/docs/home/
- About Kubernetes Operators: https://kubernetes.io/docs/concepts/extend-kubernetes/operator/
- Documentation about rpm-ostree: https://coreos.github.io/rpm-ostree/
- CSI drivers supported by Open Container Platform (OCP): https://docs.openshift.com/container-platform/4.8/storage/container_storage_interface/persistent-storage-csi.html#csi-drivers-supported_persistent-storage-csi
- Graphical explanation about allocatable resources: https://learnk8s.io/allocatable-resources
- How to plan your environment according to application requirements: https://docs.openshift.com/container-platform/latest/scalability_and_performance/planning-your-environment-according-to-object-maximums.html#how-to-plan-according-to-application-requirements_object-limits
- Recommended host practices, sizing, and others: https://docs.openshift.com/container-platform/latest/scalability_and_performance/recommended-host-practices.html