
Chapter 9: Planning, Implementing, and Administering Conditional Access and Azure Identity Protection
The previous chapter covered how to take modern authentication a step further by discussing how we can utilize passwordless authentication methods. This chapter will cover Conditional Access policies. This will include planning for and testing these policies to verify that they are working correctly and providing the proper controls. In addition, we will discuss Azure Active Directory (AD) Identity Protection and using sign-in and user risk conditions with policies.
In this chapter, we're going to cover the following main topics:
- Planning and implementing Conditional Access policies and controls
- Configuring Smart Lockout thresholds
- Implementing and managing a user risk policy
- Monitoring, investigating, and remediating elevated risky users
Technical requirements
In this chapter, we will continue to explore configuring a tenant for use of Microsoft 365 and Azure. There will be exercises that will require access to Azure AD. If you have not yet created trial licenses for Microsoft 365, please follow the directions provided within Chapter 1, Preparing for Your Microsoft Exam.
Planning and implementing Conditional Access policies and controls
Up to this point, the focus has been on planning, configuration, and implementation of the identities within Azure AD and hybrid identity infrastructures. We have discussed how to use multi-factor authentication (MFA) to decrease the amount we rely on passwords as a source of authentication. In this chapter, we discuss advanced capabilities to protect our identities and resources. The first of these solutions is the use of Conditional Access policies. Conditional Access policies enforce additional verification actions based on a signal that a user or device may be potentially compromised. The foundation of Conditional Access policies is the zero-trust methodology. So, before we discuss planning and implementing Conditional Access, let's discuss the main points of zero trust.
Zero-trust methodology
As we have moved as companies to using cloud providers such as Microsoft, the responsibility for securing the physical infrastructure for cloud services is provided by these cloud providers. If we are adhering to a defense-in-depth (DiD) security posture, Microsoft is responsible for the physical first layer of defense, making the first layer that we are responsible for as a company the identity and access layer. Therefore, the statements identity is the new perimeter and identity is the new control plane have become extremely important in securing cloud infrastructure. Therefore, the concept of a zero-trust methodology becomes the core concept that a company should adhere to when securing identity and access.
A zero-trust methodology is a process of continuously requiring someone on the network to verify that they are who they say they are. The concept seems to be straightforward and simple, but if you were to constantly ask users to enter their username and password, they would get frustrated. To avoid this frustration, zero-trust implementation utilizes various signals that alert to potential anomalous behavior, leaked credentials, or insecure devices that trigger the need for a user to reverify their identity. These signals lead to a decision on what is needed to provide access to applications, files, or websites. This workflow is shown in the following diagram:

Figure 9.1 – Diagram of the zero-trust model workflow
The next sections will describe each of these components of the workflow in more detail.
Signal
As stated in the previous section, the signal is a state that the user or device is in that triggers a potential need for a user to reverify their identity. This state could be that the user has been identified to be at risk of having a compromised password, that they are at an Internet Protocol (IP) address that has been flagged as vulnerable, or that their device is not compliant with current security patches. These are only a few examples of signals that may be reviewed to trigger a decision to request more information. Microsoft utilizes several tools within Azure and Microsoft 365 to identify vulnerabilities and risks of users and devices that create these signals. Once a signal has been identified to require more information to verify a user's identity, a decision is then made as to what happens next.
Decision
As stated in the previous section, when a signal is triggered, a decision is made on what we are going to require or allow to provide access to the resources requested. There are several options here, and this is where a company creates policies on how zero trust is going to be handled, depending on the resource being requested access. This could include a user reverifying that they have not been compromised by requiring MFA before they are given access. The policies may limit or block access to that application entirely until the user or device changes the status or location that they are requesting access to. The least likely policy decision is to allow access if a user or device is seen as having an at-risk status. An allow-access decision is generally used in a policy that identifies a user or device as being in a trusted location. Once a decision is made within the policy, the policy then enforces the workflow.
Enforcement
Enforcement is the action of a decision based on the user or device signal as defined by the company policy. As stated in the previous section, multiple enforcements could take place. The level of access and enforcement of zero trust is usually dependent on the application and information being accessed. If the application contains highly sensitive information that the company cannot have exposed, the level of zero-trust enforcement should be at the highest level by either blocking access, limiting the level of access, or requiring additional verification from the user, such as MFA and/or a password reset. The ability of a company to identify risks and vulnerabilities of users and determine a plan for protecting access to their applications is a critical factor in the success of implementing a zero-trust model for identity and access management (IAM).
As stated previously, the principles of zero trust are an important aspect of protecting access to applications within a cloud and hybrid infrastructure. Decreased access and ability to protect physical access and increased access to applications from various locations across public internet connections require a company to do their due diligence in identifying various scenarios whereby users may request access to company resources and the numerous devices that they may use to access these. Policies that identify potential vulnerabilities and threats that can make a correct decision on how to enforce zero trust will protect the company while maintaining a positive user experience (UX).
Conditional Access policies
The solution within Microsoft that enforces the zero-trust methodology is Conditional Access. As you will notice in the following diagram, the flow from signal to decision to enforcement is the same. The policies that we determine for our company is what then enforces these Conditional Access requirements.
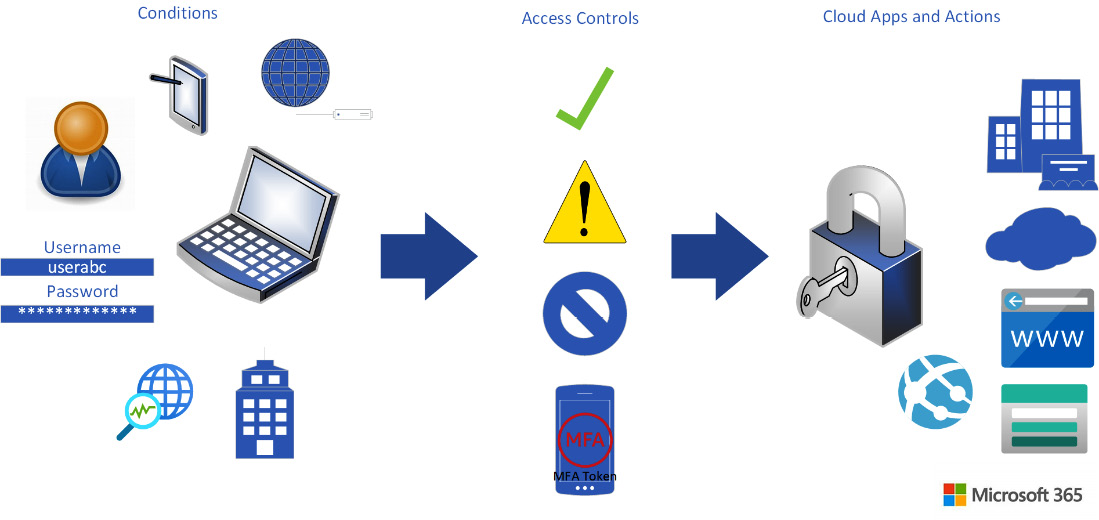
Figure 9.2 – Conditional Access workflow
A key aspect to putting Conditional Access policies in place is to properly plan and understand how they would potentially affect the UX. There is a balance that a company should attempt to maintain between the enforcement of policies to secure and protect data and the ability of a user to have access to applications and data that they need to be effective in their required tasks. The next sections will go through the steps to plan, test, and implement Conditional Access policies in your company.
Preparation and planning
Before we can create a Conditional Access policy, we need to make sure that we are able to do so. There are a couple of areas that we need to address for implementing such a solution: licensing, and security defaults. For licensing, Conditional Access policy features are available with an Azure AD Premium P1 level license. This level of Azure AD licensing is included with Microsoft 365 Business Premium, Office 365 E3/A3, Microsoft 365 E3/A3, Office 365 E5/A5, and Microsoft 365 E5/A5. These licenses must be assigned to users for whom we are attempting to enforce Conditional Access policies. A full list of licensing requirements can be found at this link: https://docs.microsoft.com/azure/active-directory/conditional-access/overview.
In addition to having the proper licenses, we will be required to turn off Azure AD Security Defaults. Security Defaults is a feature that is turned on when we create our Azure AD tenant that provides a baseline level of protection to require—for example—users to enroll in MFA, enforce MFA for administrators, and block the use of legacy authentication for applications. Security Defaults was discussed in Chapter 7, Planning and Implementing Azure Multi-Factor Authentication and Self-Service Password Reset. In that chapter, we were verifying that this feature was enabled. To be able to implement Conditional Access, navigate back to Security Defaults and turn it off. When you do this, there will be reasons that appear, and you will see a selection for using Conditional Access policies. Once Security Defaults is no longer active, Conditional Access policies can be created.
Once we have proper licensing assigned and Security Defaults turned off, we can begin our planning for Conditional Access policies. Some commonly used Conditional Access policies can be found in the Microsoft documentation at this link: https://docs.microsoft.com/azure/active-directory/conditional-access/plan-conditional-access. The key to planning for Conditional Access is to understand the groups of users that are to access company applications and data, the devices that they are using to access that data and those applications, the locations that they may be accessing that data and those applications from, and the applications being used to access the company data.
The next sections will go through the configuration of Conditional Access policies based on this information.
Creating a Conditional Access policy
Once we have gone through the planning process of having the proper licensing and turned off Security Defaults, we are now ready to create a policy. Conditional Access policies can be created from an aspect of allowing access based on a condition, denying access, or allowing access after going through additional verification. We will step through the configuration for each of these types of conditions in the next sections.
Conditional Access policy to allow access from a trusted location
This exercise will step through how to create a Conditional Access policy to allow access to cloud apps from a trusted location. Before we can configure this Conditional Access policy, we need to create a trusted location. To do so, follow these steps:
- In the Microsoft Azure search bar, type trusted to find Azure AD Named locations, as illustrated in the following screenshot:
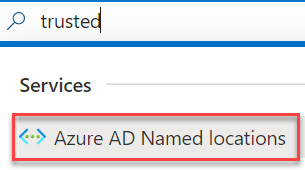
Figure 9.3 – Searching for Azure AD Named locations
- Select + New location when the Configure locations tile opens, as illustrated in the following screenshot:
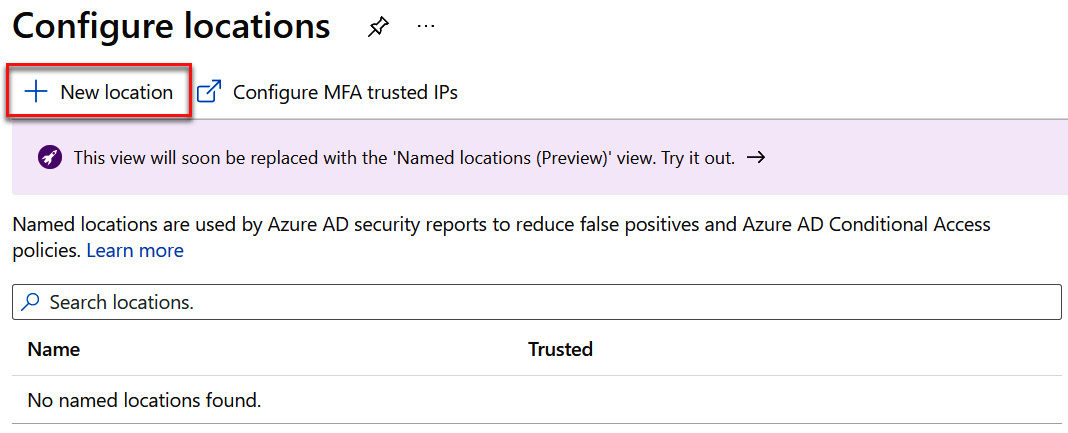
Figure 9.4 – Adding a new location
- Name your location—for example, Company headquarters. For this exercise, enter your local IP address range by going to https://www.whatsmyip.org/, and then select the Mark as trusted location checkbox. After this is complete, click Create, as illustrated in the following screenshot:
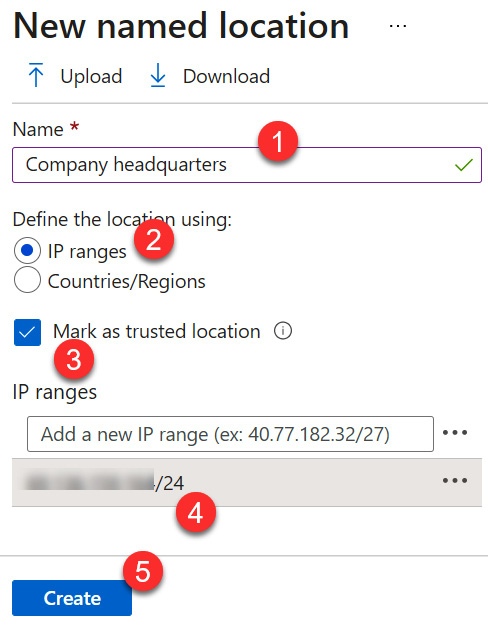
Figure 9.5 – Configuring a named location
Note
You must add a subnet range rather than just the IP address.
- Company headquarters is now a trusted location, as we can see in the following screenshot:
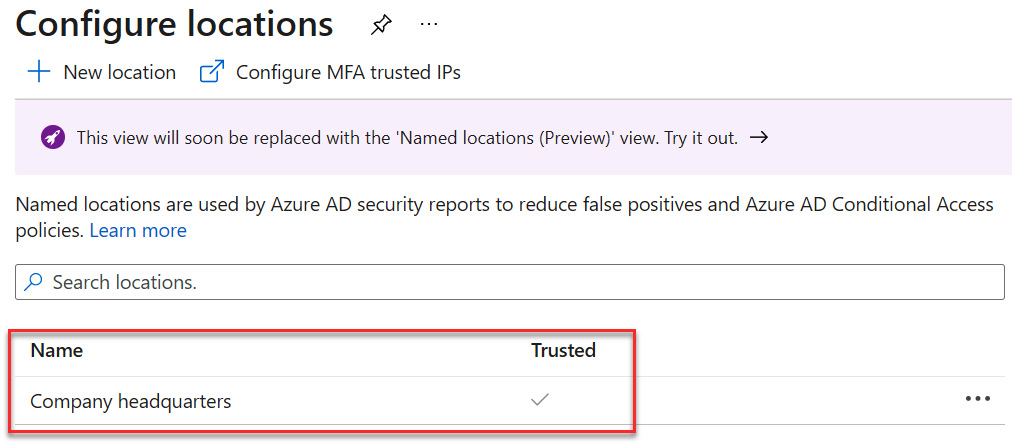
Figure 9.6 – Company headquarters as a trusted location
The following steps will go through the configuration of a Conditional Access policy that allows access to cloud apps when accessing from a trusted location:
- Search for Azure AD Conditional Access to access Conditional Access and select this, as illustrated in the following screenshot:
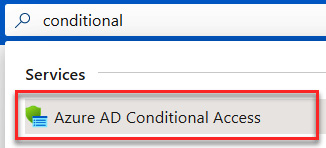
Figure 9.7 – Searching for Azure AD Conditional Access
- Select + New policy to create a Conditional Access policy, as illustrated in the following screenshot:
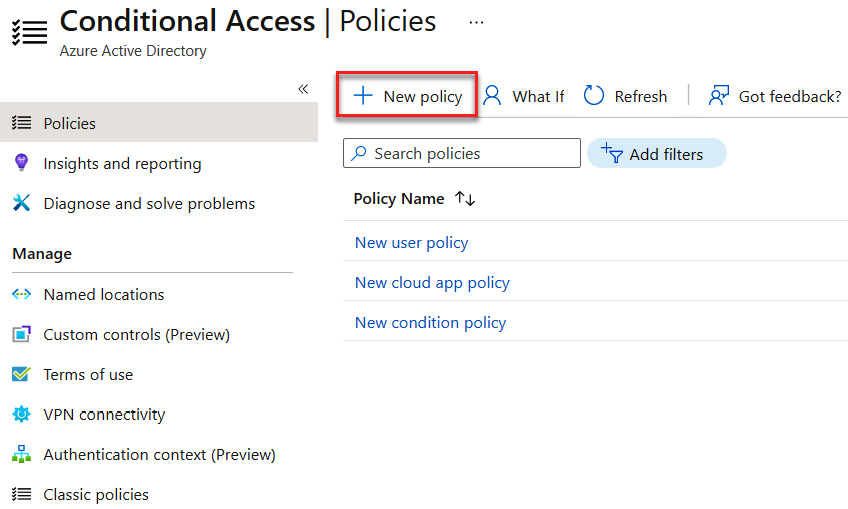
Figure 9.8 – Creating a new policy
- Enter a name for your policy—for example, Access from Trusted location. This is demonstrated in the following screenshot:

Figure 9.9 – Naming the policy
- Select Users and groups under Assignments. Here, you can select everyone in Azure AD by selecting All users, or specific users and groups under Select users and groups. Options here include All guest and external users, Directory roles, and/or Users and groups. For this exercise, we will select Users and groups, Sales group, and then click Select, as illustrated in the following screenshot:

Figure 9.10 – Selecting a group
- After clicking Select, the Sales group entry will appear under the included users and groups, as illustrated in the following screenshot:
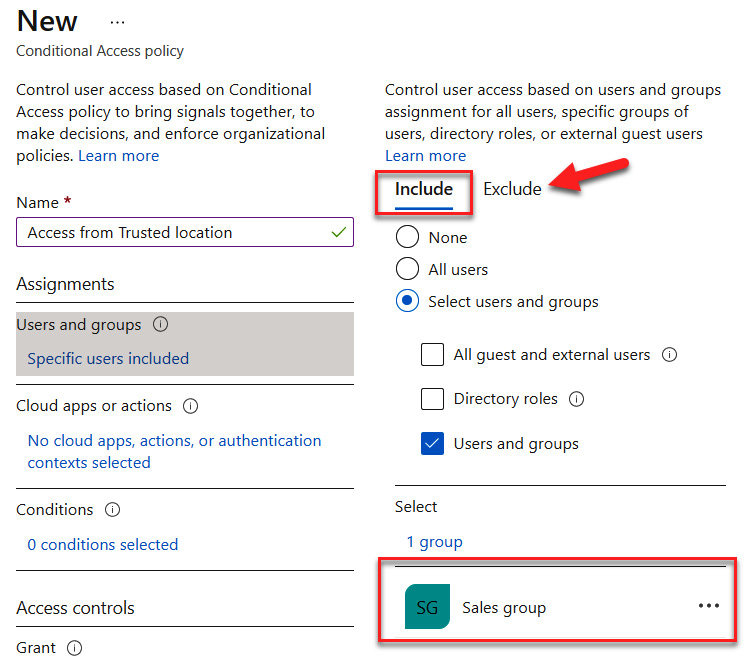
Figure 9.11 – Including the Sales group and understanding where to exclude groups
Note
There is also an Exclude tab. It is recommended that if the administrator is a part of the included group, they should be added as an excluded assignment to avoid being locked out of resources.
- Next, we configure cloud apps or actions, which is a similar process to including users and groups. The following screenshot shows Office 365 being selected as a cloud app:
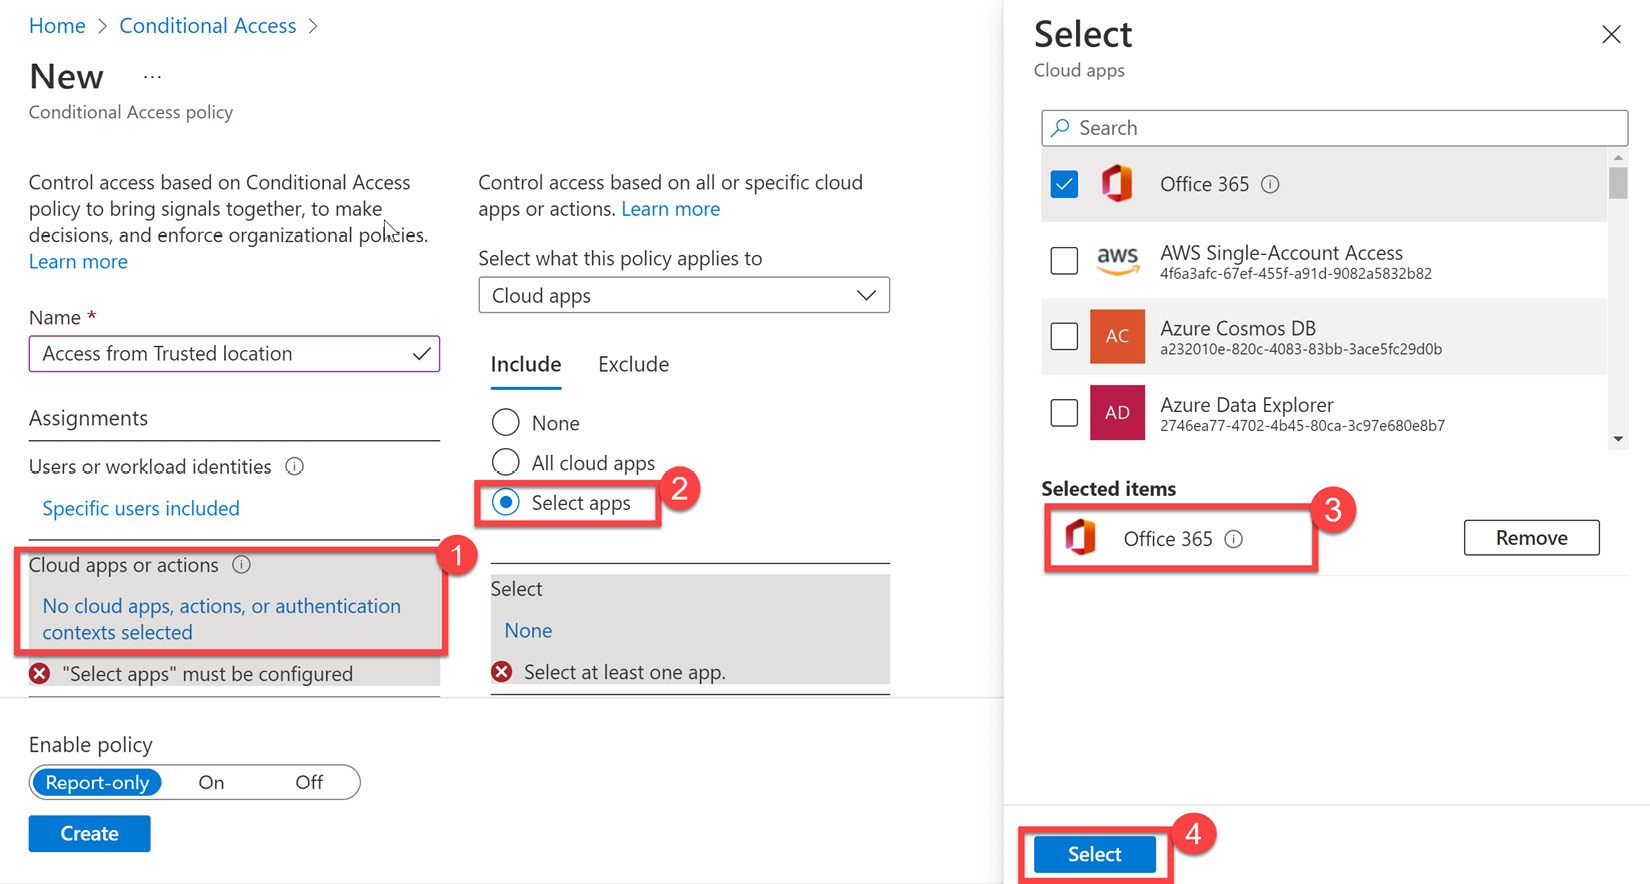
Figure 9.12 – Selecting Office 365 as a cloud app
The following screenshot shows All cloud apps being selected. Use this as the preferred setting for this exercise.
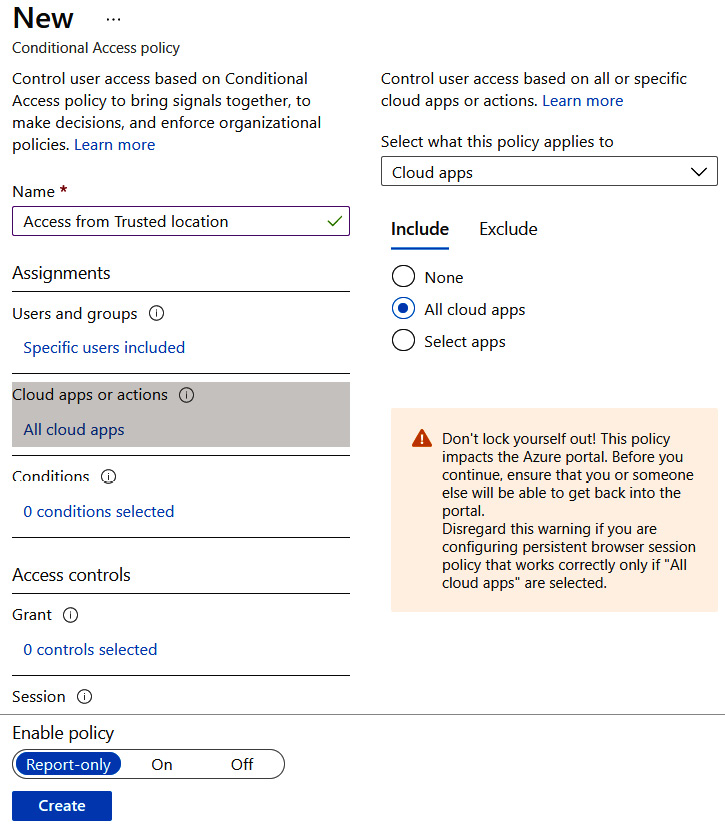
Figure 9.13 – Configuring all cloud apps
- Next, we will navigate to Conditions and select Locations, as illustrated in the following screenshot:
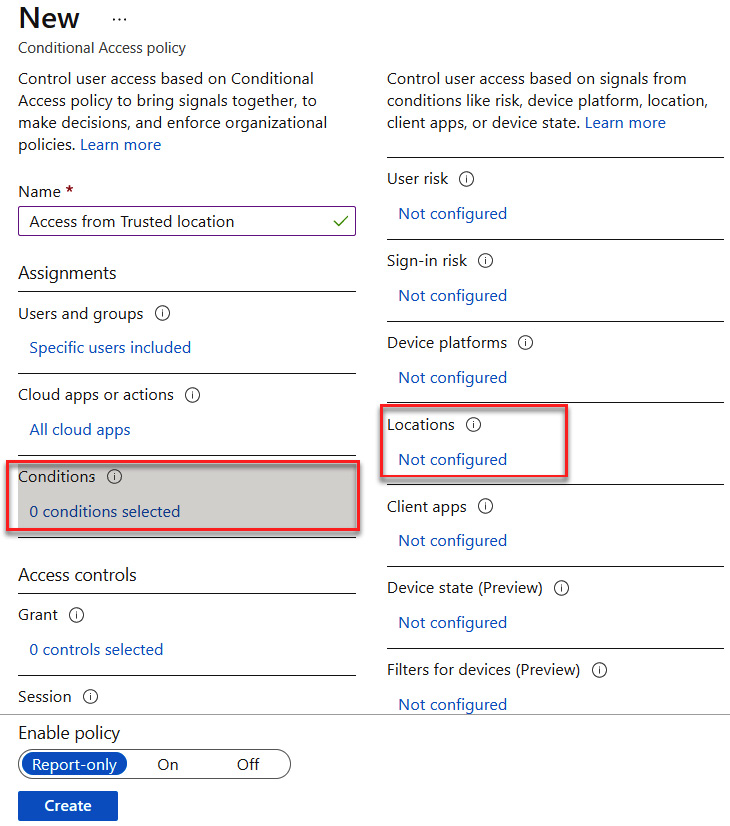
Figure 9.14 – Configuring the Locations condition
- Select Yes under Configure and choose Selected locations, as illustrated in the following screenshot:
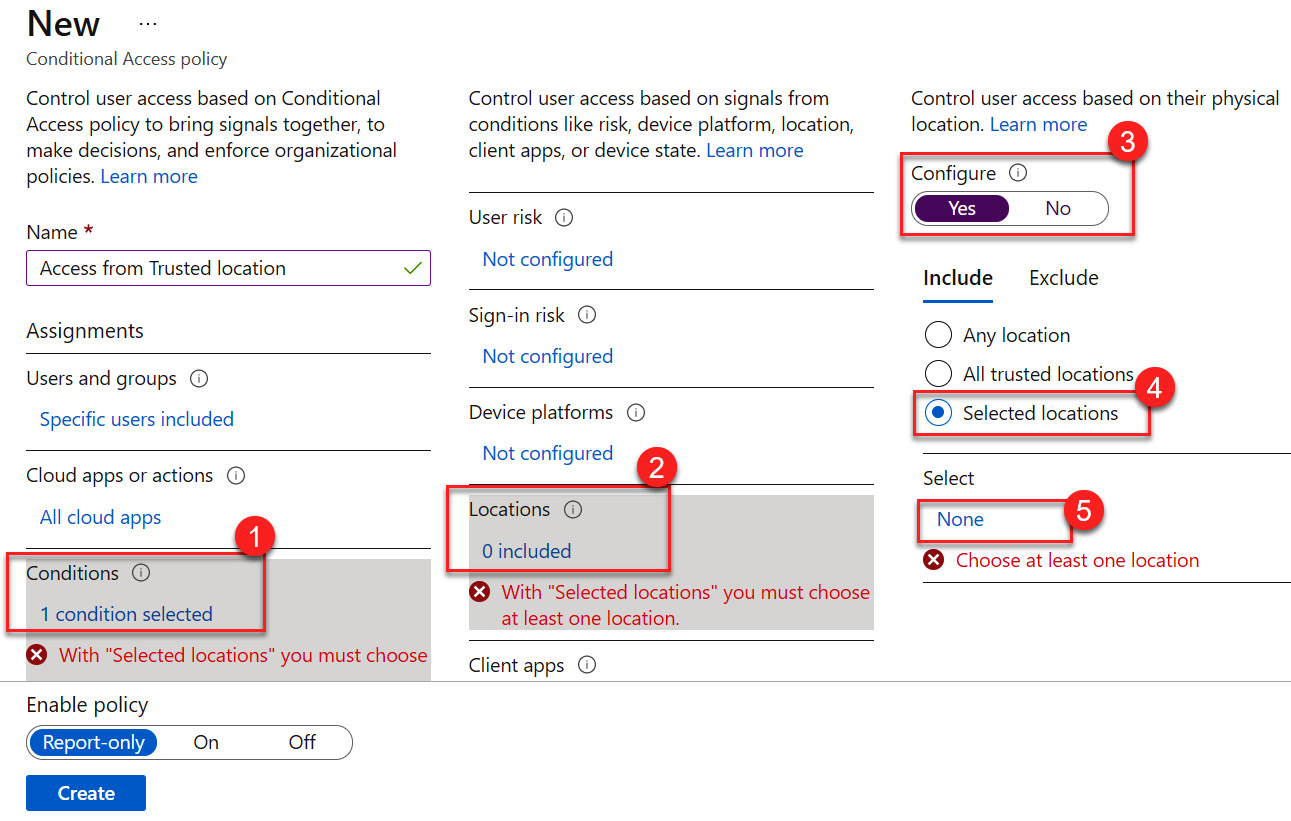
Figure 9.15 – Choosing a selected location
- In the Selected locations tile, choose the trusted location that we created and click Select, as illustrated in the following screenshot:
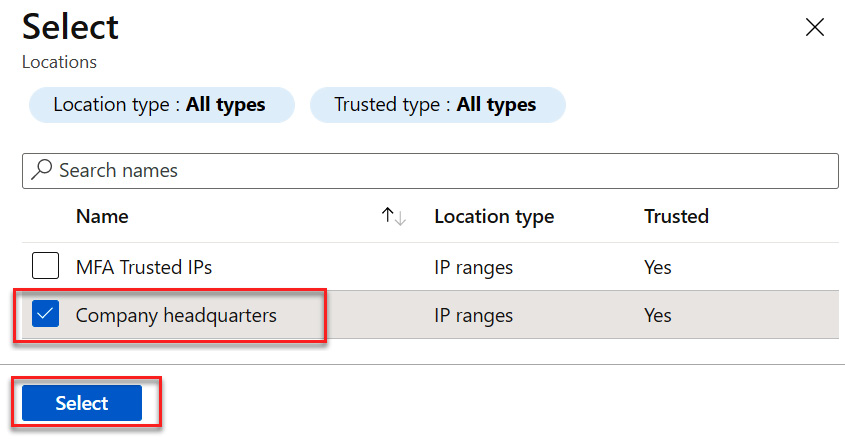
Figure 9.16 – Selecting a location
- The location has now been selected. Next, we will configure the access controls. Select the link under Grant. Select the controls that you will require for access to the cloud apps. For this exercise, we will leave all of these boxes unchecked, choose Grant access, and then click Select. Since no controls were selected, the 0 controls selected message will remain, as illustrated in the following screenshot. The next exercises will explore more of these grant access controls:
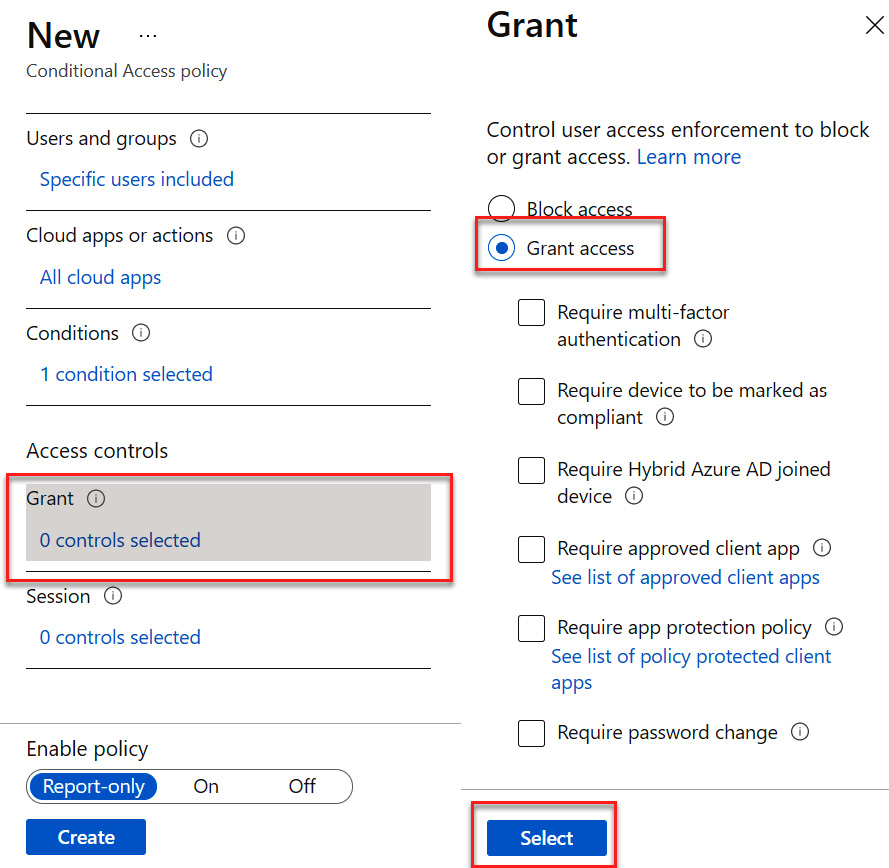
Figure 9.17 – Granting access
- Select Session controls. For this control, select Persistent browser session and Always persistent. Click Select to save, as illustrated in the following screenshot:
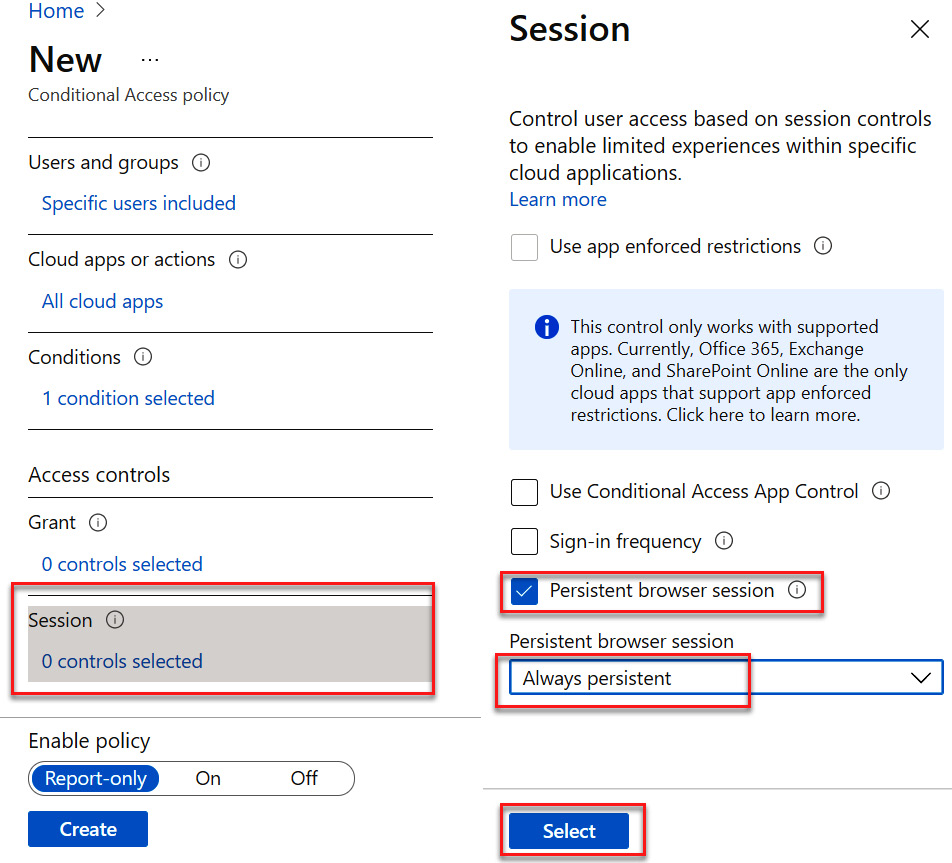
Figure 9.18 – Configuring Session controls
- The final settings should match those shown in the following screenshot. Leave Enable policy set to Report-only for now and click Create, as illustrated in the following screenshot:
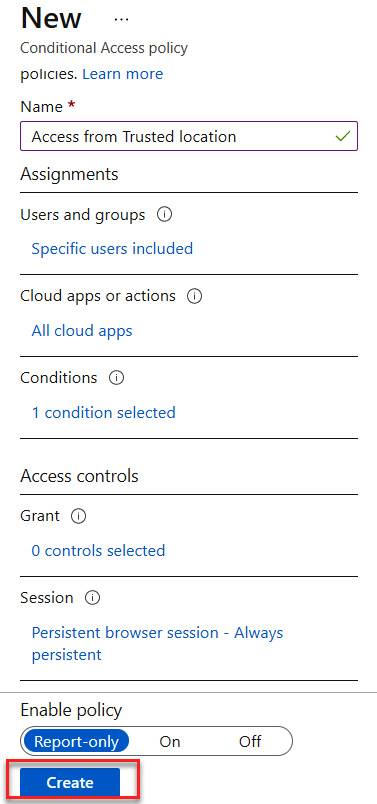
Figure 9.19 – Creating a Conditional Access policy
The following screenshot shows that our Conditional Access policy has been created. This policy will allow access to the trusted location without any additional controls when accessing cloud apps:
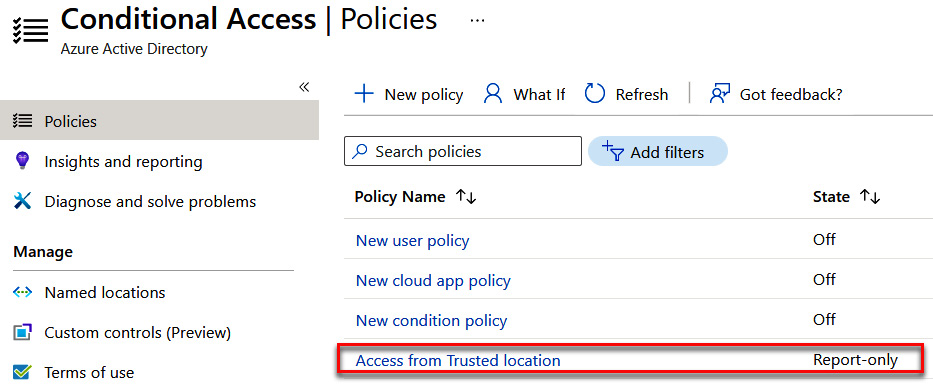
Figure 9.20 – New policy created
Next, we will set up a Conditional Access policy that will deny access when certain devices are used.
Conditional Access policy to deny access from certain devices
The following steps will go through the configuration of a Conditional Access policy that allows access to cloud apps when accessing from a trusted location:
- Search for Azure AD Conditional Access to access Conditional Access and select this, as illustrated in the following screenshot:

Figure 9.21 – Searching for Azure AD Conditional Access
- Select + New policy to create a Conditional Access policy, as illustrated in the following screenshot:

Figure 9.22 – Creating a new policy
- Enter a name for your policy—for example, Deny Access from Android devices. This is demonstrated in the following screenshot:

Figure 9.23 – Naming the policy
- Select Users and groups under Assignments. Here, you can select everyone in Azure AD by selecting All users, or specific users and groups under Select users and groups. Options here include All guest and external users, Directory roles, and/or Users and groups. For this exercise, we will select Users and groups, Sales group, and then click Select, as illustrated in the following screenshot:
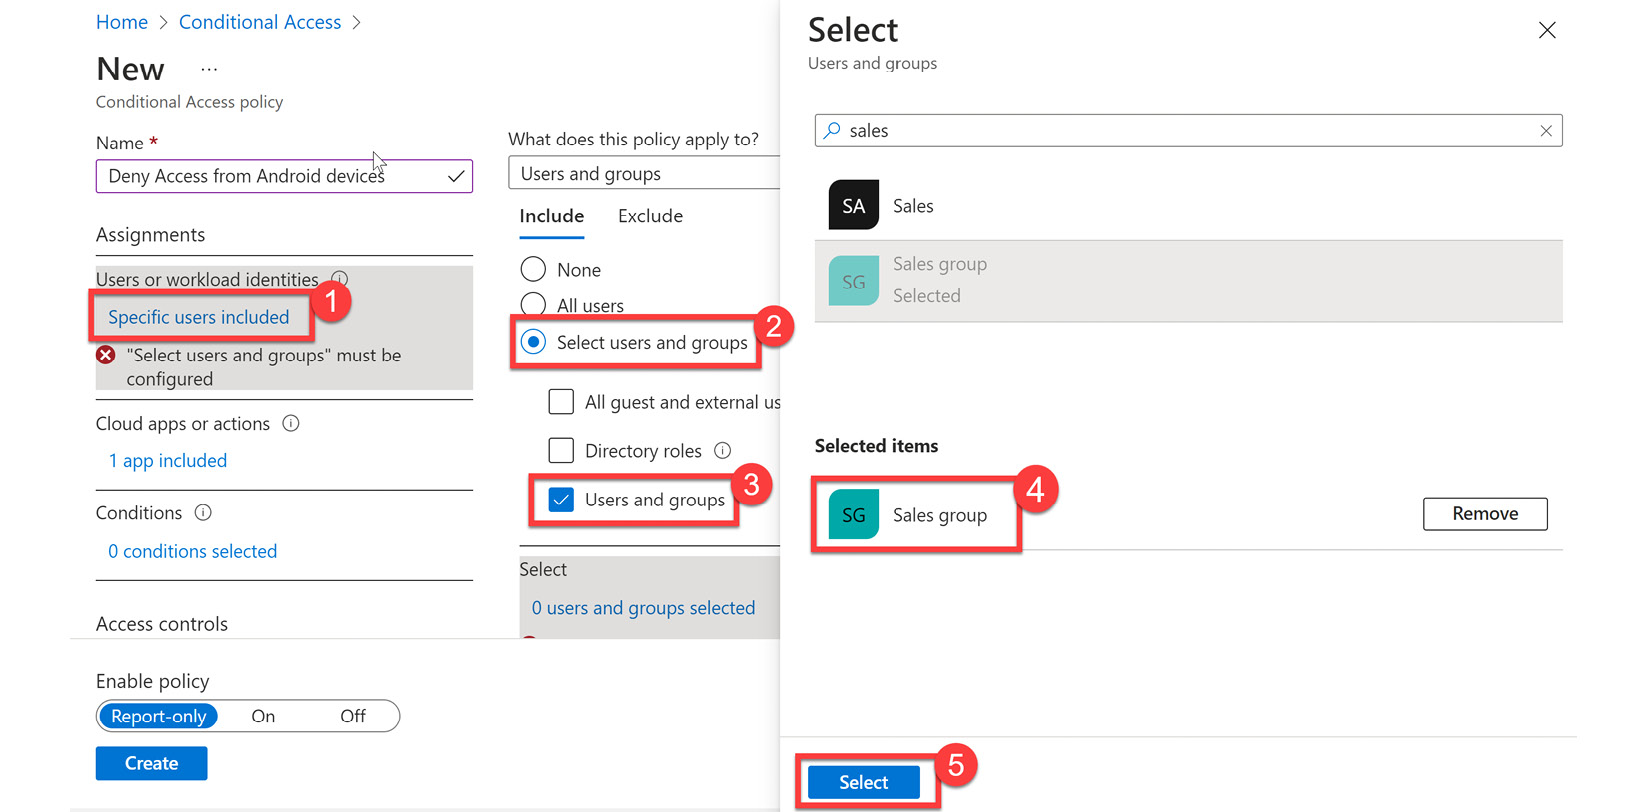
Figure 9.24 – Selecting a group
- After clicking Select, the Sales group will appear under the included users and groups, as illustrated in the following screenshot:
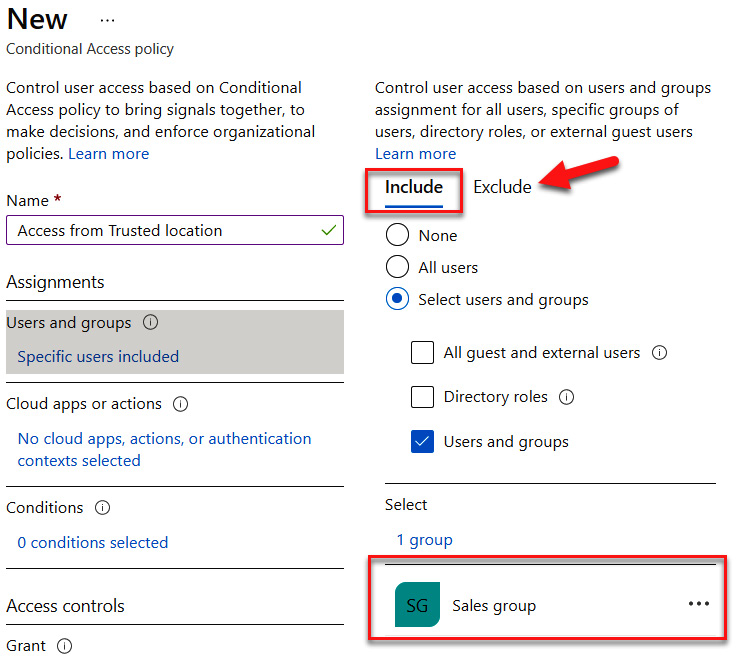
Figure 9.25 – Including the Sales group and understanding where to exclude users and groups
- Next, we configure cloud apps or actions. The following screenshot shows All cloud apps being selected. Use this as the setting for this exercise:
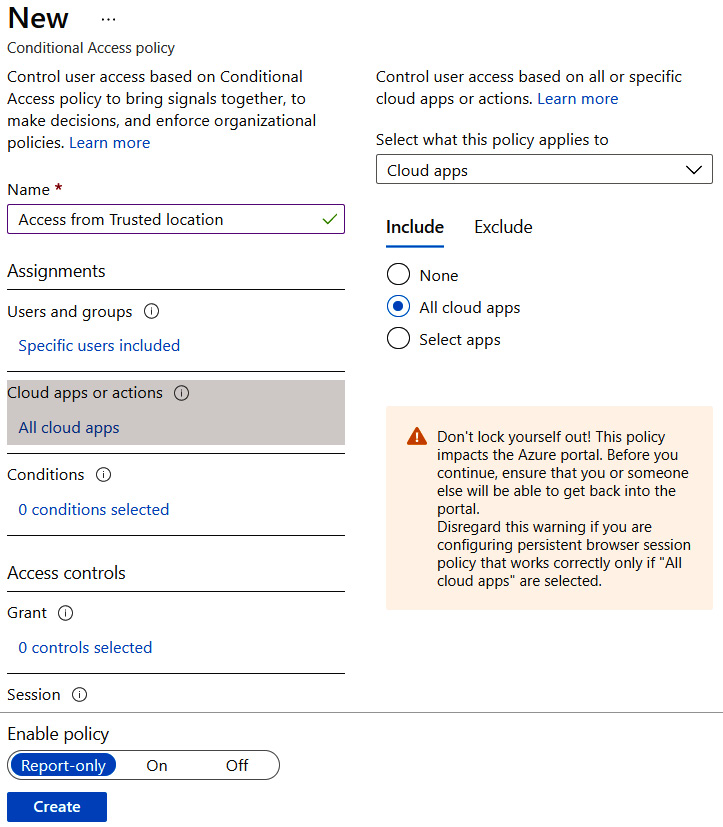
Figure 9.26 – Configuring all cloud apps
- Next, we will navigate to Conditions and select Device platforms. Select Not configured under Device platforms. Change Configure to Yes, select Device platforms, and choose Android, as illustrated in the following screenshot. Then, click Done to save:
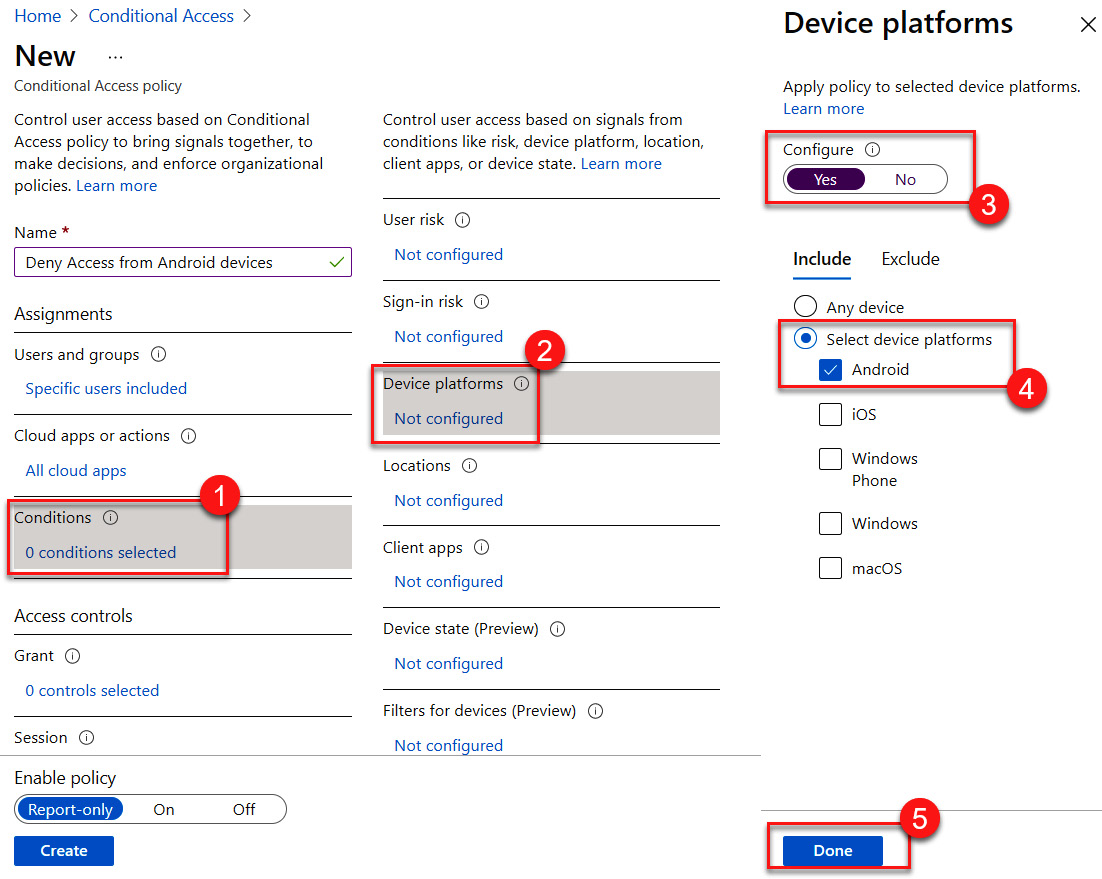
Figure 9.27 – Configuring the Android device platform
- Under Access controls, select 0 controls selected under Grant. Select Block access and click Select to save, as illustrated in the following screenshot:
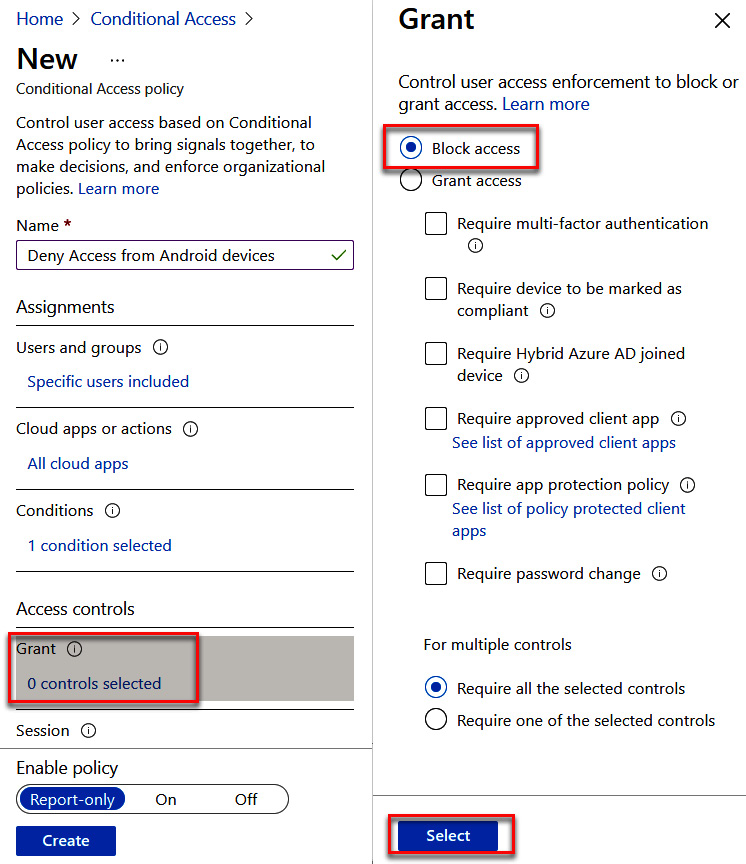
Figure 9.28 – Block access configuration
- View the configuration, leave Enable policy set to Report-only, and click Create to create a Conditional Access policy. The following screenshot shows the settings that you should have:
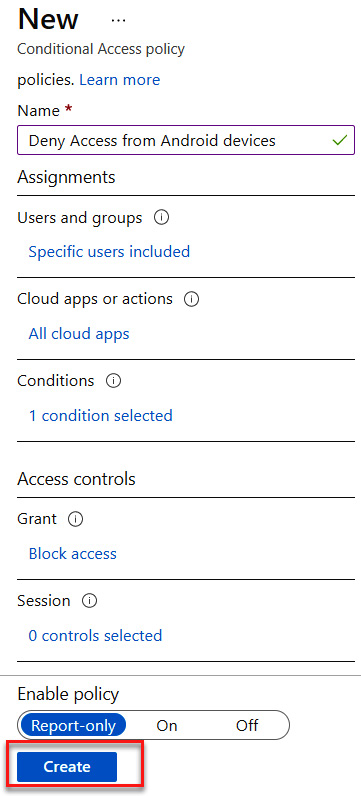
Figure 9.29 – Deny access policy configuration
The next policy that we will create will be to allow cloud apps after MFA authentication.
The following screenshot shows that the Deny Access from Android devices policy has been created:
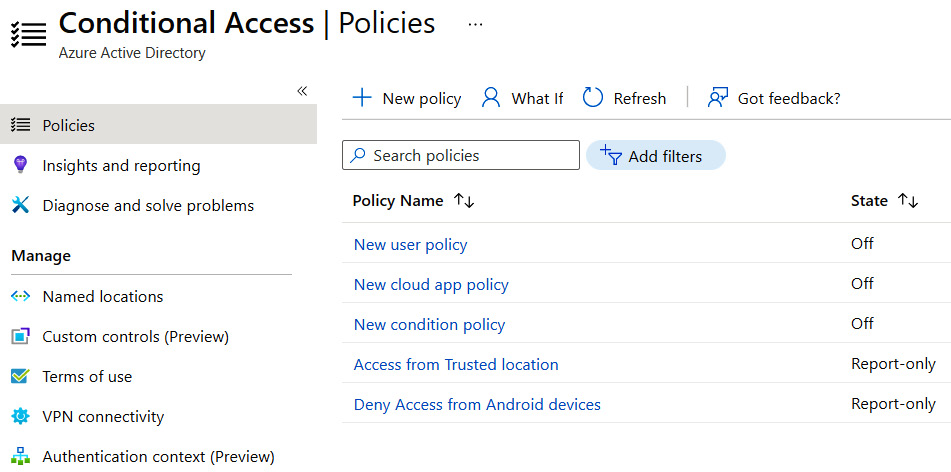
Figure 9.30 – New policy created
The final Conditional Access policy that we will cover will set up different grant access controls based on verification with MFA.
Conditional Access policy to allow access to cloud apps after verifying with MFA
The following steps will go through the configuration of a Conditional Access policy that allows access to cloud apps when accessing from a trusted location:
- Search for Azure AD Conditional Access to access Conditional Access and select it, as illustrated in the following screenshot:
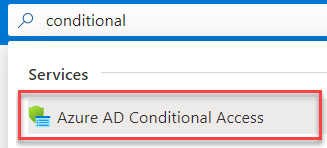
Figure 9.31 – Searching for Azure AD Conditional Access
- Select + New policy to create a Conditional Access policy, as illustrated in the following screenshot:
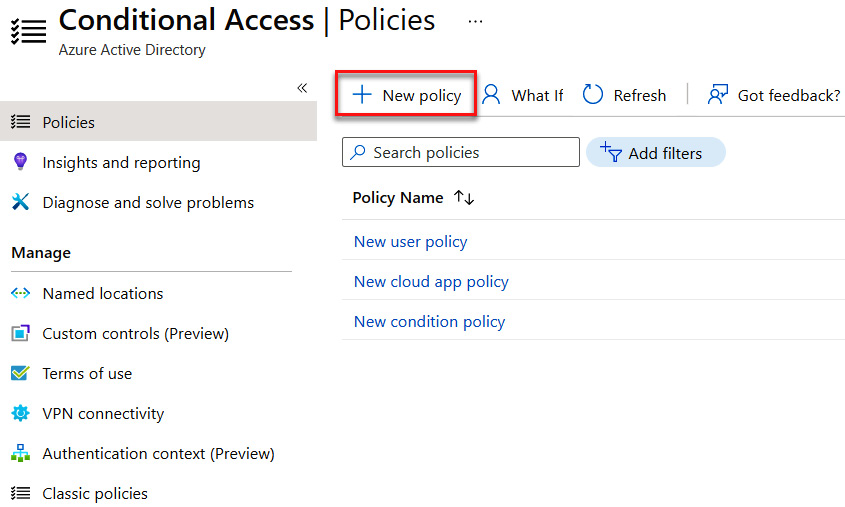
Figure 9.32 – Creating a new policy
- Enter a name for your policy—for example, Device compliance app policy. This is demonstrated in the following screenshot:
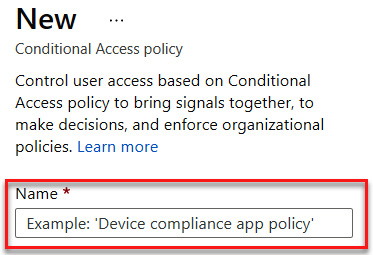
Figure 9.33 – Naming the policy
- Select Users and groups under Assignments. Here, you can select everyone in Azure AD by selecting All users, or specific users and groups under Select users and groups. Options here include All guest and external users, Directory roles, and/or Users and groups. For this exercise, we will select Users and groups, Sales group, and then click Select, as illustrated in the following screenshot:
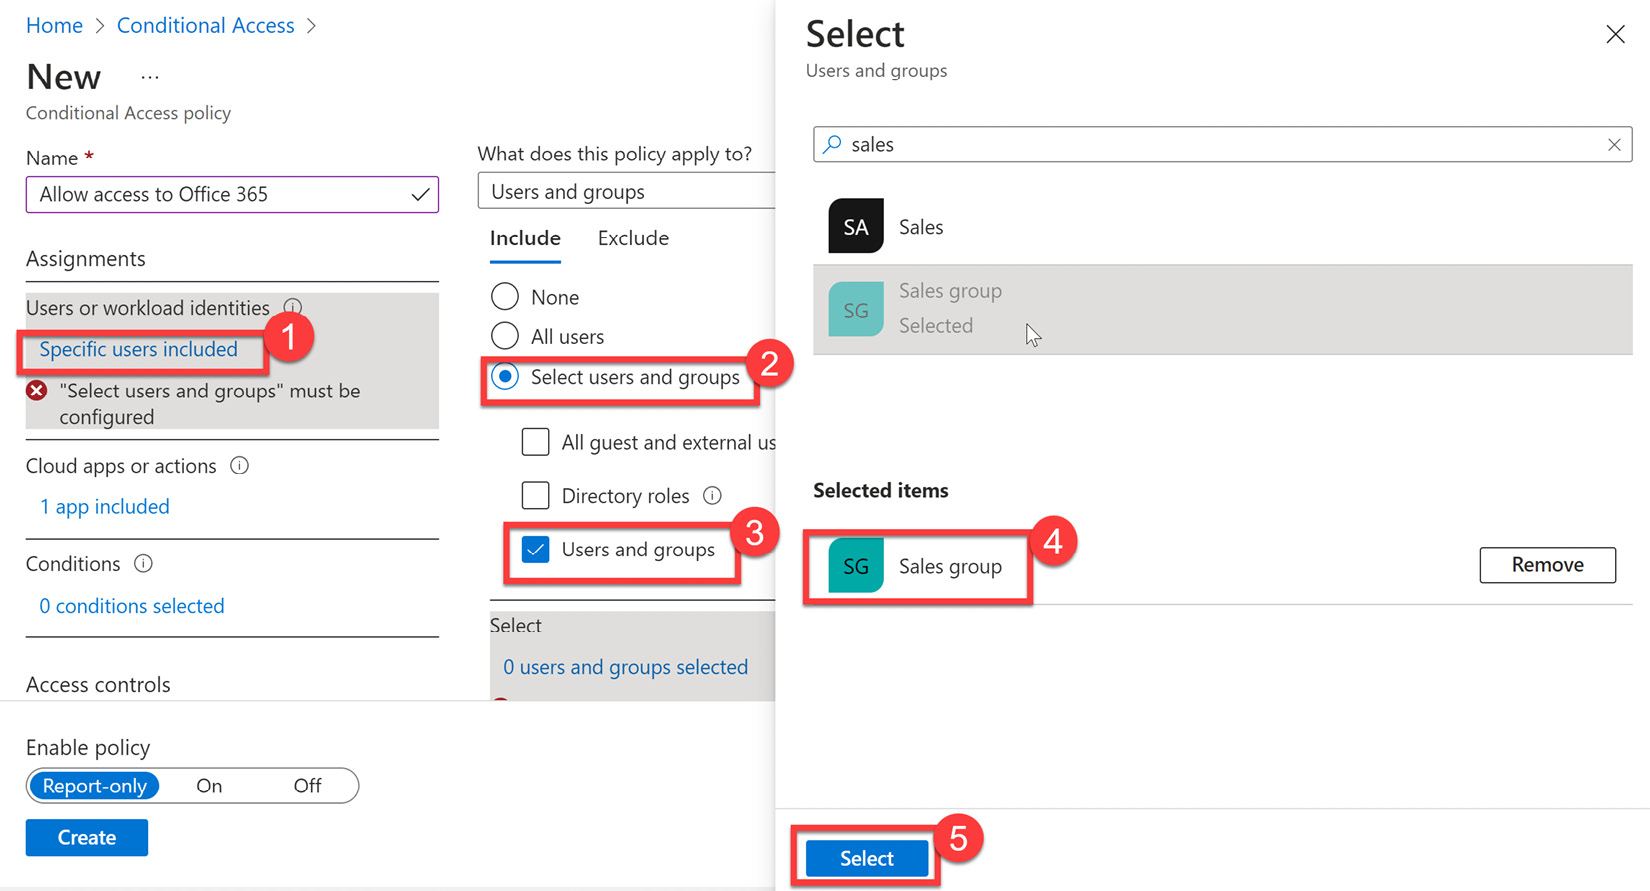
Figure 9.34 – Selecting a group
- After clicking Select, Sales group will appear under the included users and groups. Something to note in the following screenshot is that there is also an Exclude tab. It is recommended that if the administrator is part of the included group, they be added as an excluded assignment to avoid being locked out of resources.
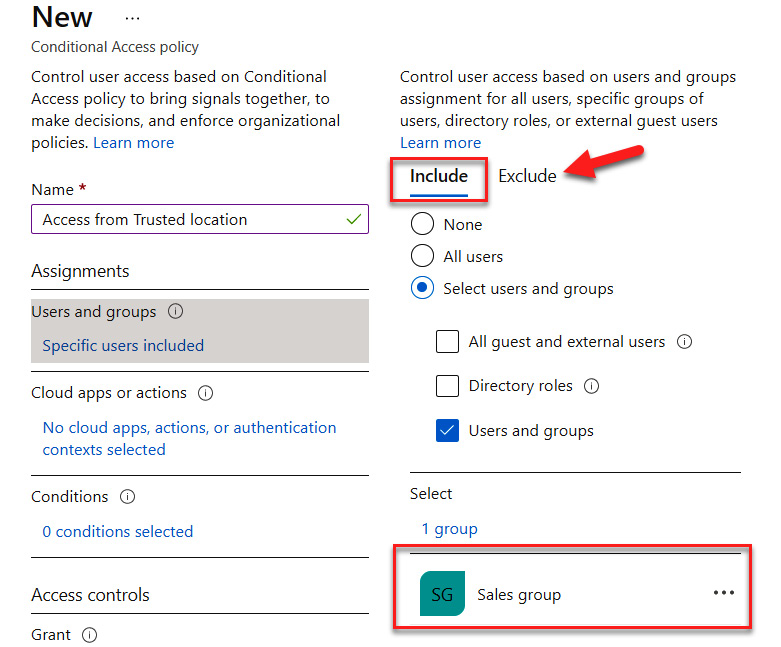
Figure 9.35 – Including the Sales group and understanding where to exclude users and groups
- Next, we configure cloud apps or actions, which is a similar process to including users and groups. The following screenshot shows Office 365 being selected as a cloud app. Use this as the preferred setting for this exercise:
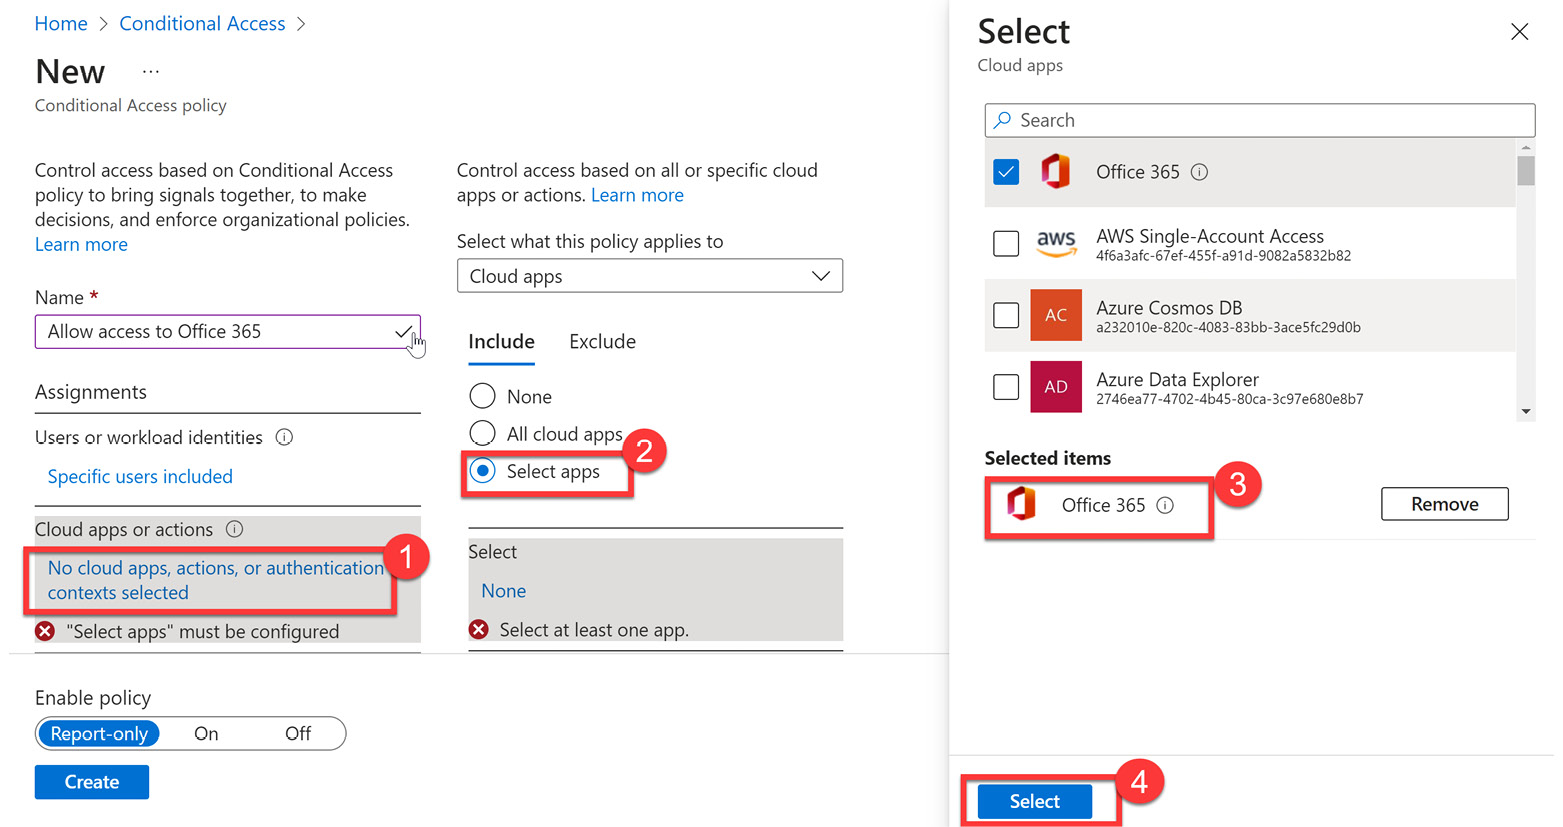
Figure 9.36 – Selecting Office 365 as a cloud app
- Next, we will navigate to Conditions and select Locations. Change Configure to Yes, and then choose Exclude and Selected locations. Choose Company headquarters and click Select to save, as illustrated in the following screenshot. This will configure all locations except the company headquarters to be within the scope of this policy.
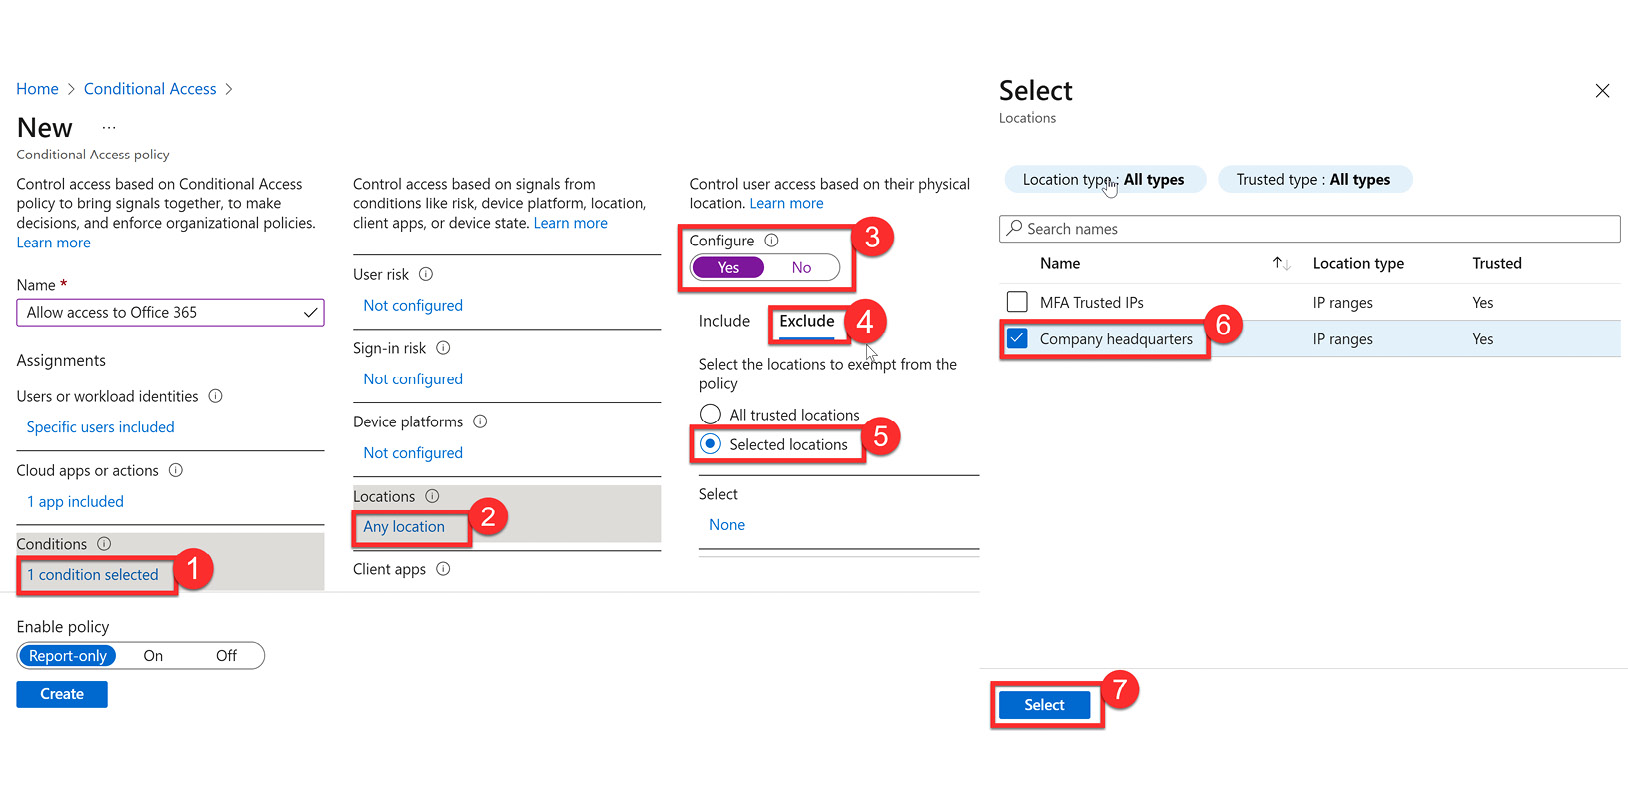
Figure 9.37 – Excluding the Company headquarters location
- Select Device platforms under Conditions. Change Configure to Yes, and choose iOS and Windows for the selected device platforms, as illustrated in the following screenshot. Click Done to save.
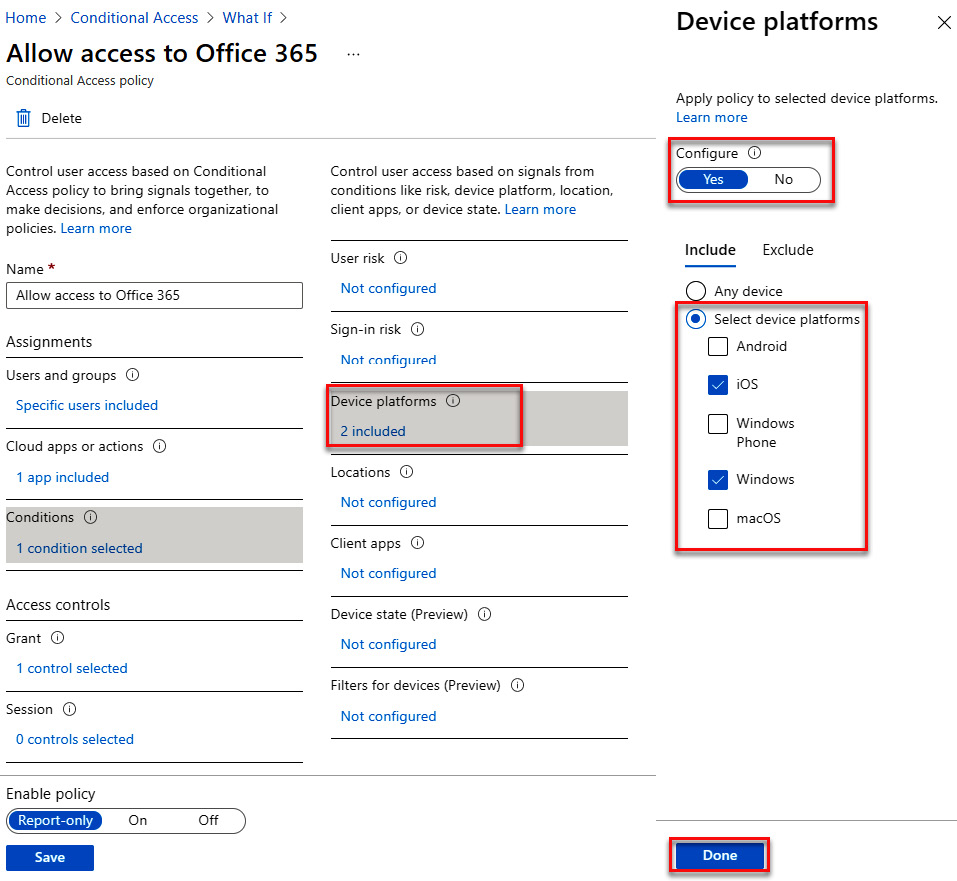
Figure 9.38 – Configuring device platforms
- Under Access controls, select Grant. Choose Grant access and select Require multi-factor authentication, as illustrated in the following screenshot. Click Select to save.
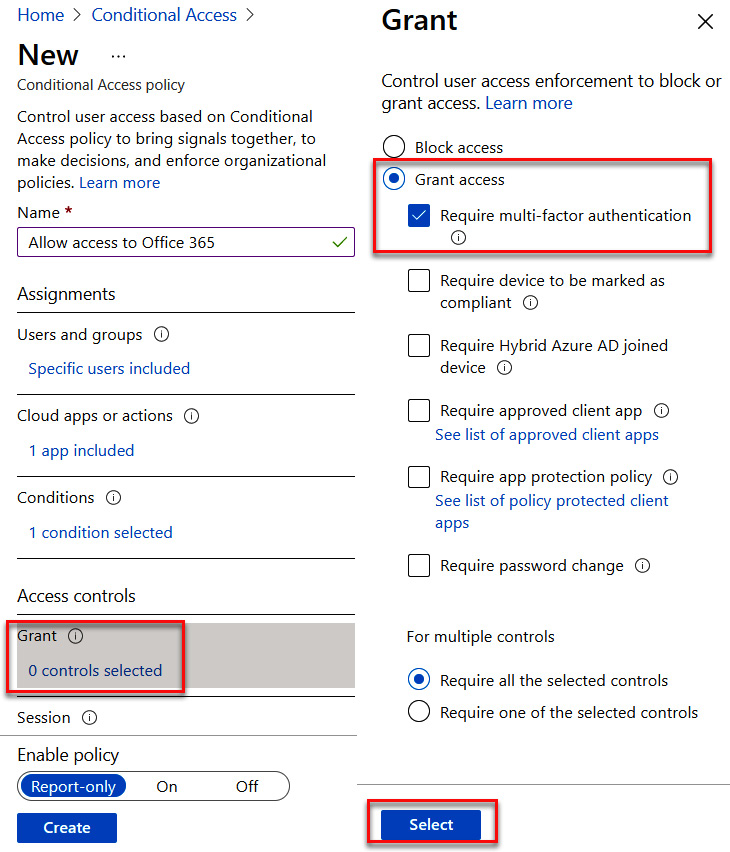
Figure 9.39 – Granting access but requiring MFA
Note
You can select multiple grant controls here to meet your needs. When you use multiple controls, you can choose whether only one or all of those control conditions must be met to grant access.
- The Conditional Access policy is ready to be created. Set Enable policy to Report-only and select Create, as illustrated in the following screenshot:
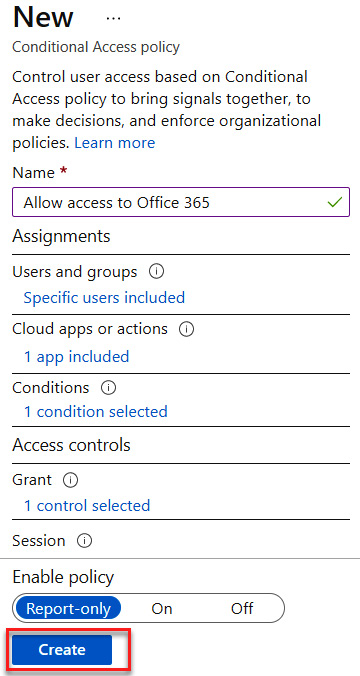
Figure 9.40 – Creating allow access to Office 365 policy
We have now created three new Conditional Access policies, as shown in the following screenshot:
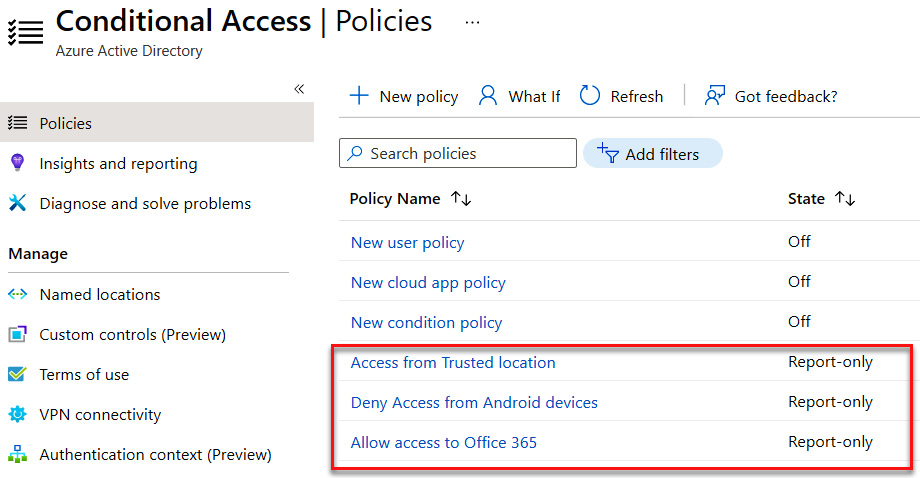
Figure 9.41 – New Conditional Access policies
In the next section, we will show how to test and view the actions of these policies using the What If function.
Testing a Conditional Access policy with What If
In the previous sections, we created three new Conditional Access policies. When we created these policies, we enabled them as Report-only. This allows us to test these policies before turning them on and unintentionally locking users out of their applications. This section will show how we can test these policies for different users, devices, and locations and evaluate the Conditional Access policies that are initiated to verify that the proper actions are taking place to enforce verification, grant access, or deny access. These are the steps we need to follow:
- The following screenshot shows how to access What If. Select What If on the Conditional Access | Policies tile.
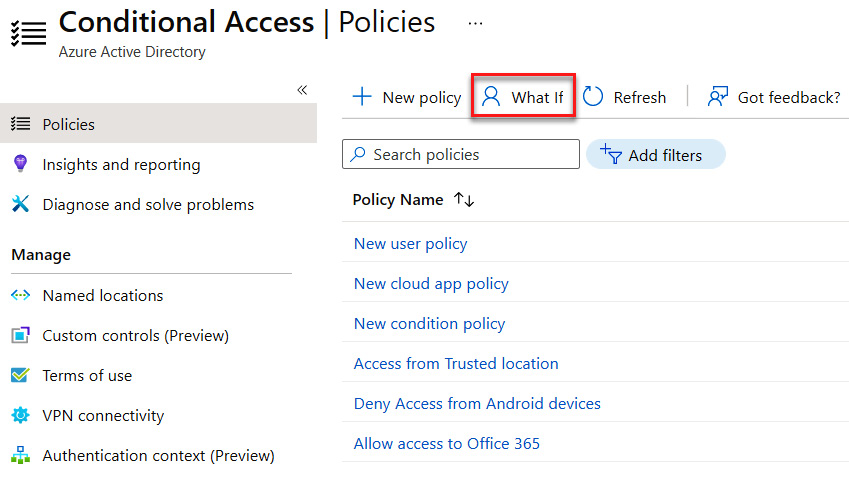
Figure 9.42 – Selecting What If
- On the What If tile, we will select a user. Our Conditional Access policy used the Sales group as the scope of the policy. Choose a user who is a member of your Sales group. Leave Cloud apps, actions, or authentication context on Any cloud app. For the IP address field, use your whatsmyip address and select your country. Under Device platform, select Android. Leave the remaining fields unselected and choose What If. The following screenshot shows the correct configuration:
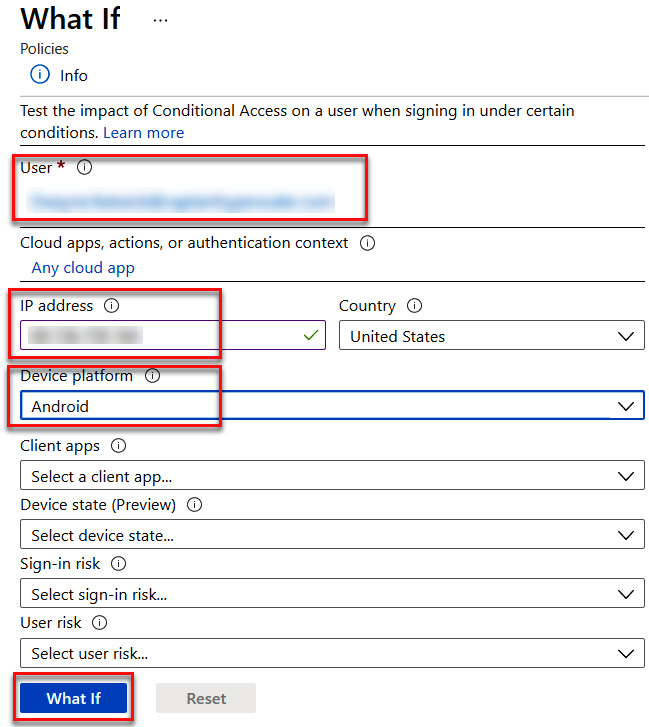
Figure 9.43 – What If configuration
After choosing What If, the results will appear at the bottom of the tile with the policies that will apply and the policies that will not apply. As you see in the following screenshot, two of our created policies will apply to these settings:
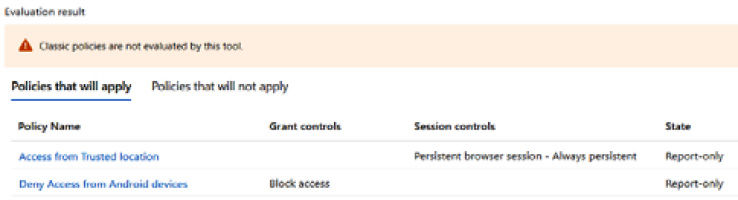
Figure 9.44 – Policies that will apply to the What If configuration
The following screenshot shows the policies that will not apply:
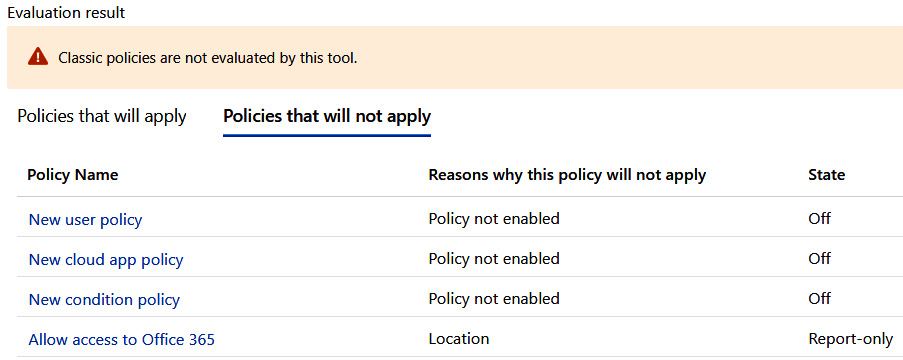
Figure 9.45 – Policies that will not apply to the What If configuration
- Next, select Reset and add the same user. Leave IP address and Country blank, and select What If to get the evaluation results, as illustrated in the following screenshot:
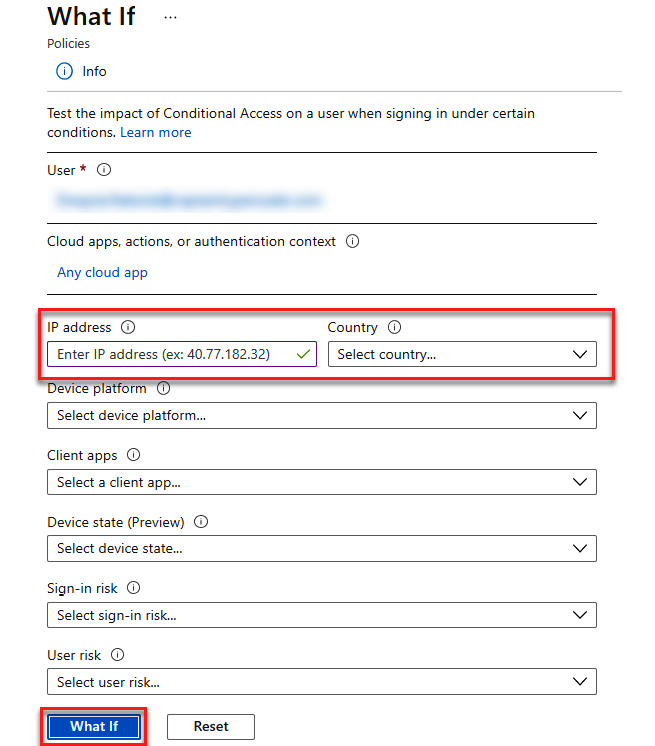
Figure 9.46 – What If for all locations and apps
- The evaluation results will show that all three of our Conditional Access policies will apply. The following screenshot shows the results:
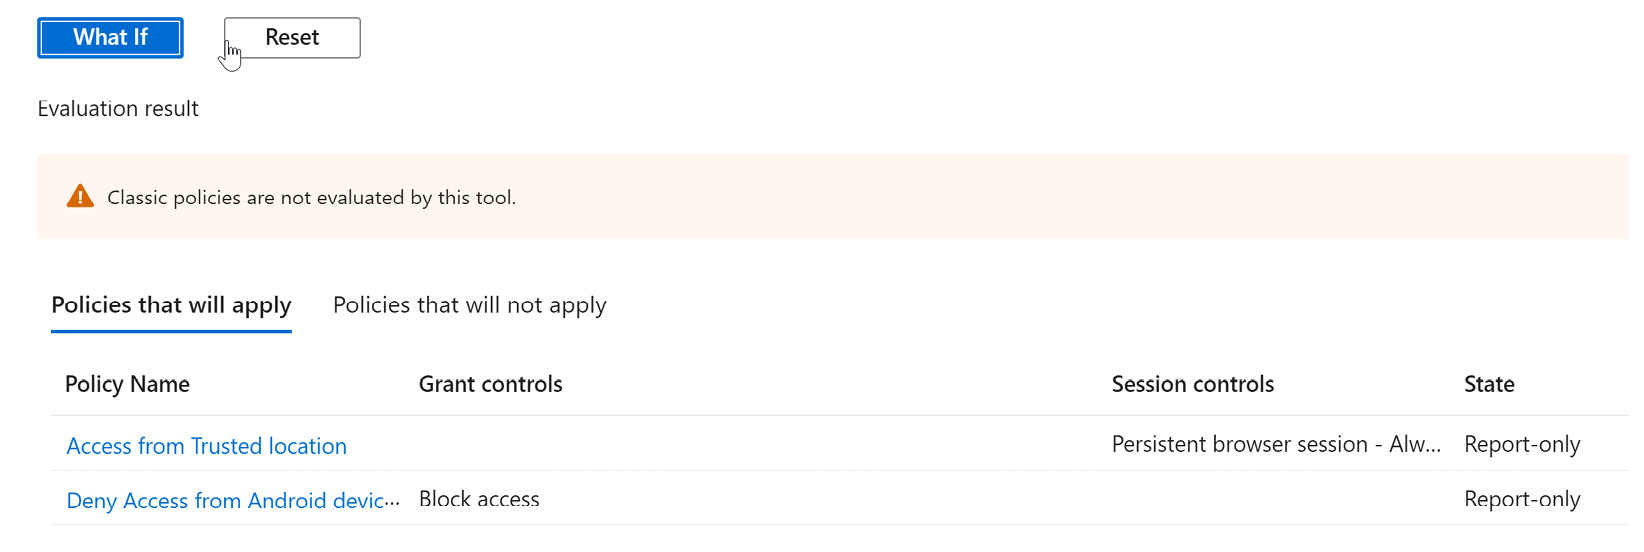
Figure 9.47 – What If results for all locations
At this point, we have configured Conditional Access policies and tested how they would affect a user. If the results within What If are acceptable, we can now go back into the policies and move Enable policy to the On position. This will then enforce the policy for the users, devices, and locations that we have in scope for Conditional Access policies.
The next section will discuss the use and configuration of Smart Lockout.
Configuring Smart Lockout thresholds
In the previous sections, we went through the process of creating Conditional Access policies to protect against unauthorized users accessing applications and data while enforcing the zero-trust model for IAM. This section discusses how you can configure Smart Lockout to assist in preventing identity attacks.
Smart Lockout is a part of Azure AD Password Protection. The following screenshot shows how you can search and access this feature:

Figure 9.48 – Searching for Smart Lockout
Smart Lockout is used to protect users in a company from having their identity compromised through a brute-force dictionary attack. These attacks are executed by using the known username, which is generally an email address, and then automating login attempts with commonly used passwords. These attempts generally happen multiple times per minute in order to find a successful attempt. Smart Lockout is a way to configure the threshold of the number of attempts in a predetermined amount of time before that user's username is locked out and requires a password reset and verification code to regain access. In addition to setting a lockout threshold, you also have the ability to create a banned password list that you want users to avoid within Azure AD. The following screenshot shows the configurable settings for Password Protection and Smart Lockout. These settings can also be utilized in a hybrid identity infrastructure by turning Password protection for Windows Server Active Directory to the Yes position. Once the configuration is complete, you should change the mode to Enforced to execute the use of Smart Lockout.
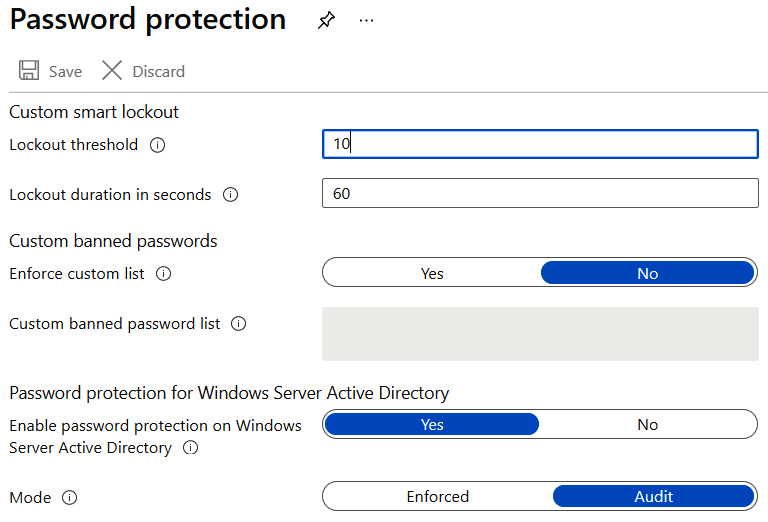
Figure 9.49 – Password protection settings
Password protection and Smart Lockout are configurable features that protect the identity of our users and help to ensure unauthorized access to our applications and resources. These features, as with Conditional Access policies, require planning and configuration for them to be effective.
In the next section, we will look at how Azure AD Identity Protection can help us to monitor suspicious activity on user accounts and how we can also use it to manage additional Conditional Access policies.
Implementing and managing a user risk policy
In order to implement and manage a user risk policy, your company requires an Azure Active Directory Premium P2 license. This license provides the advanced identity security feature of Azure AD Identity Protection.
Azure AD Identity Protection
Azure AD Identity Protection provides additional capabilities within Azure AD to monitor user activity and recognize, through Microsoft's machine learning (ML) capabilities, anomalous and suspicious activity on user accounts. The following screenshot shows how to search for and access Azure AD Identity Protection within the Azure portal:
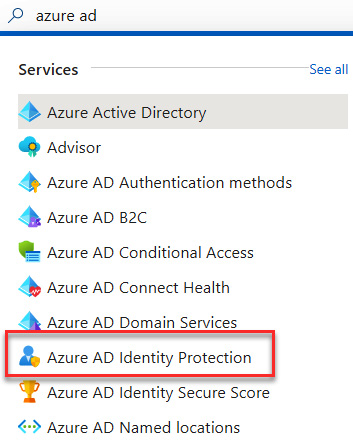
Figure 9.50 – Searching for Azure AD Identity Protection
Azure AD Identity Protection provides feedback in two areas: user risk and sign-in risk. Both are related to user behavior, but it is important to understand the differences between them, which are outlined as follows:
- User risk is concerned with activities that pertain directly to a user. This is primarily seen in the form of potentially leaked credentials, or something identified through threat intelligence (TI) attack patterns being targeted on a particular user.
- Sign-in risk identifies that a request for authentication likely isn't requested by the authorized identity owner. Some examples of a sign-in risk would include login attempts from anonymous IP addresses, atypical travel, suspicious browsers, and IP addresses linked with malware, among others.
Additional information and examples can be found at this link: https://docs.microsoft.com/en-us/azure/active-directory/identity-protection/concept-identity-protection-risks. It is important to identify the difference between user risk and sign-in risk for the exam.
The following screenshot shows the Protect and Report menus of Azure AD Identity Protection. We will discuss reports in the next section. To protect against attackers gaining access to resources, policies can be put in place to block access or require additional verification when a user or sign-in is flagged at a certain risk level—Low, Medium, or High.
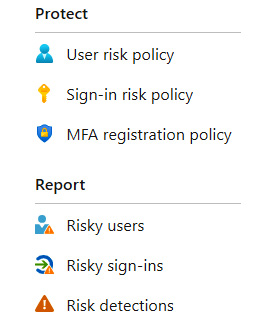
Figure 9.51 – Azure AD Identity Protection menu
These policies work the same as the Conditional Access policies that we discussed previously in this chapter. User and sign-in risk policies can be standalone policies within Azure AD Identity Protection or integrated into Conditional Access policies.
Once we have our protection in place, we also want to understand the level of risk for our users and sign-ins. The final section of our chapter will show how Azure AD Identity Protection can be used to monitor, investigate, and remediate risky users.
Monitoring, investigating, and remediating elevated risky users
If you are utilizing resources that are touching the internet, then someone is scanning them and attempting to gain access to them. There is an abundance of bad actors that have automated tools to scan usernames and attempt to authenticate with common passwords. Azure AD Identity Protection utilizes the Microsoft Threat Intelligence database and ML tools to look for these threats, identify the users affected, and identify the type of threat that exists. This information feeds into the Identity Protection overview dashboard shown in the following screenshot:
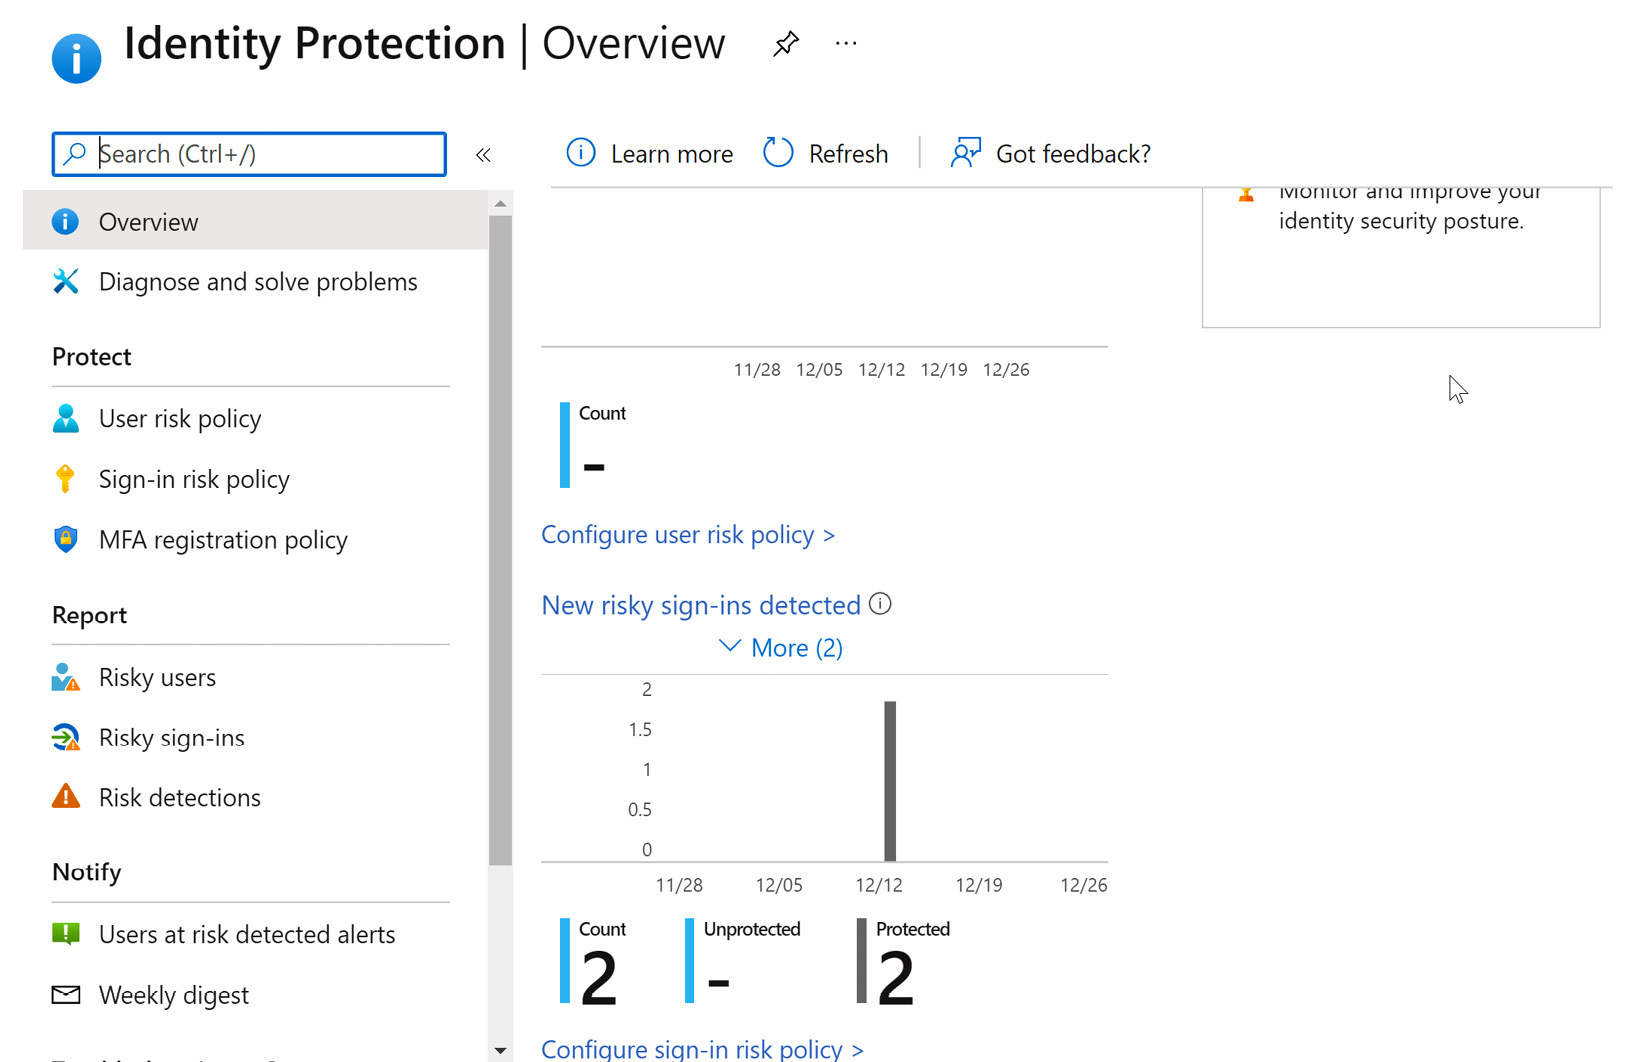
Figure 9.52 – Identity Protection overview
The Report section of the Identity Protection menu provides additional information on users who are at risk and what their risk level is, and allows you to drill down and investigate potential attacks that may have taken place on those user accounts. The following screenshot shows how you can view this information and select a user for more information:
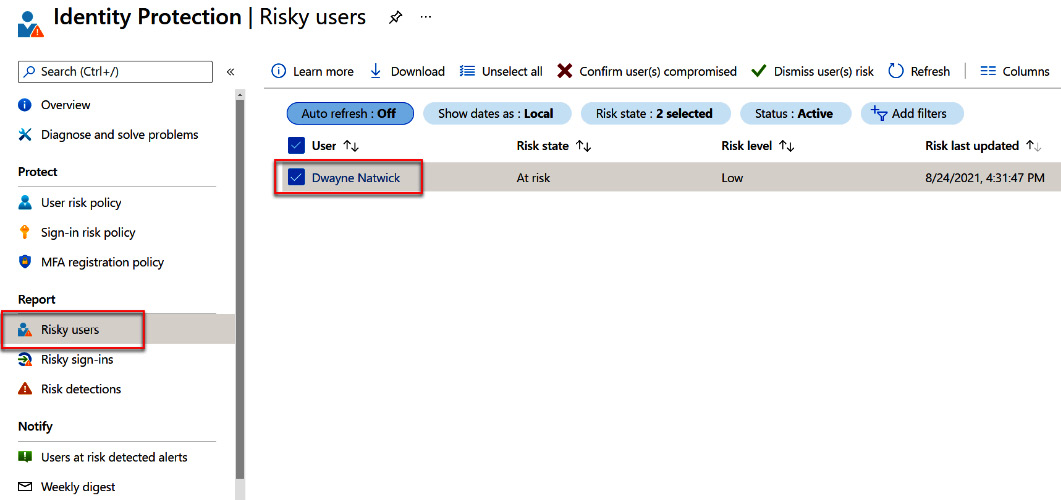
Figure 9.53 – Viewing user risk information
Once you open the details, you can view the Basic info tab, which provides the level of administrative roles that the user has, their status and level of risk, and when the last event took place. This information is shown in the following screenshot:
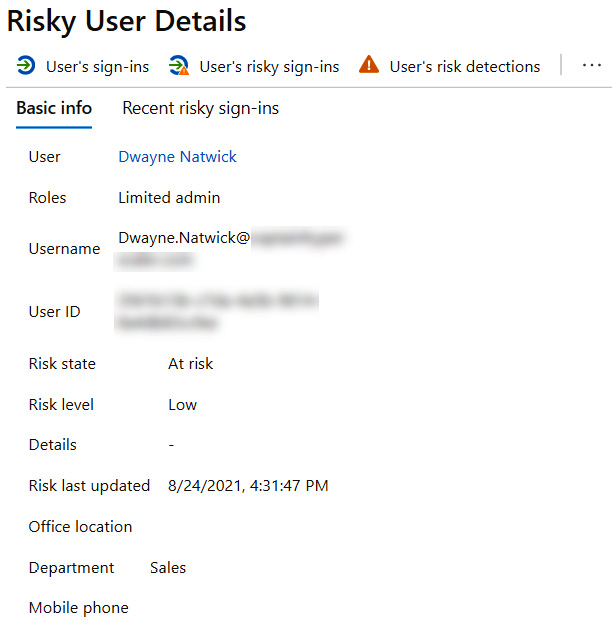
Figure 9.54 – Risky user details
Moving on to recent risky sign-ins, this provides a deeper level of information about the risk activity that took place. In the following screenshot, you can see that although risk activity took place, that attack failed. This explains why the Risk level setting was set to Low for this user, even though they were attacked. This view also shows the IP address that was identified as the source of the attack, and scrolling to the right also shows the location that the IP address is associated with. If a Conditional Access policy applied to this user that was triggered by this event, that would also be reflected here. The next two screenshots show all of the information that is provided, starting with this one:
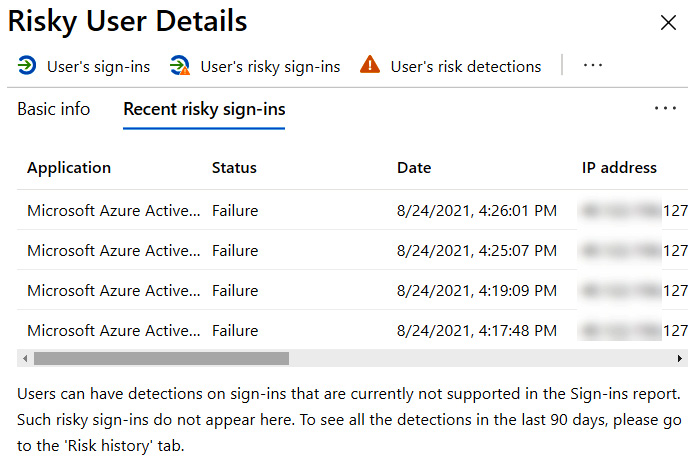
Figure 9.55 – Risky sign-in details
This screenshot shows the additional risky sign-in details of location, risk state, and whether there was a Conditional Access policy applied:
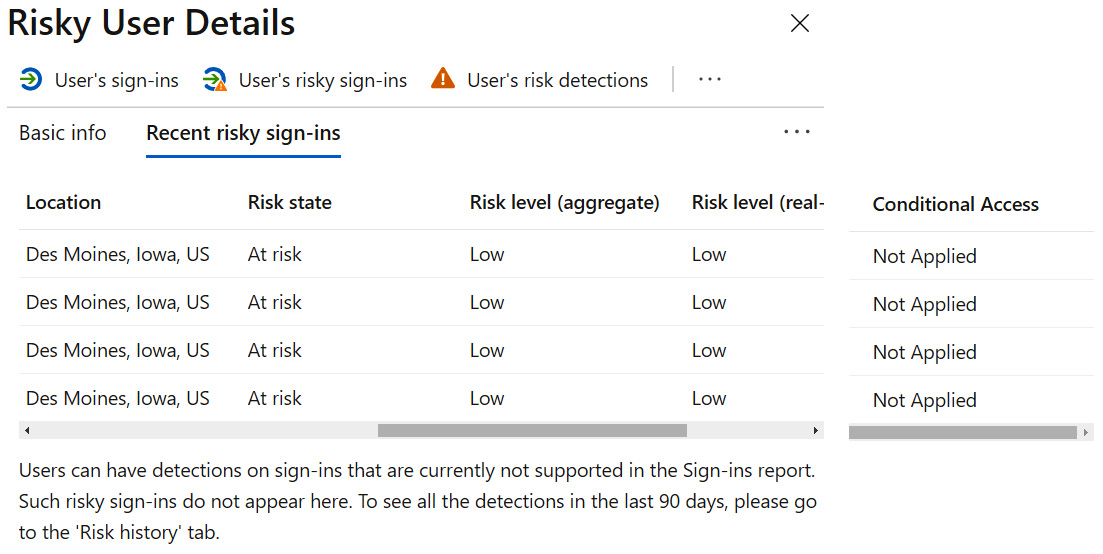
Figure 9.56 – Additional risky sign-in details
A final area to discuss is what to do once we have identified users at risk and what we need to do to protect these users and our company. The following screenshot shows the selection menu for actionable items for remediating this particular user. This includes resetting their password, confirming or dismissing that the user was compromised, blocking the user entirely, or taking additional steps to investigate in Azure Defender.

Figure 9.57 – Actionable items to remediate risk
Taking these steps will protect our Azure AD users and also our company from compromised identities.
Next, we will provide a summary of what was discussed in this chapter.
Summary
In this chapter, we discussed advanced solutions to protect identity and enforce the zero-trust model with Conditional Access policies and Azure Identity Protection. We went through the process of creating Conditional Access policies and then tested scenarios of how they would be applied with the What If function. We discussed how to configure Smart Lockout within Password Protection to protect against password brute-force dictionary attacks. Finally, we discussed how to license and use Identity Protection to identify and protect against user-credential leaks and risky sign-ins. In the next chapter, we will discuss the implementation of single sign-on (SSO) for enterprise applications in our hybrid infrastructure.