
Chapter 21: Migrating to GitHub
If you are not a start-up, then you always have existing tools and processes that must be considered when moving to a new platform. In this chapter, we will discuss different strategies related to migrating to GitHub from different platforms.
In this chapter, we will cover the following:
- Picking the right migration strategy
- Achieving compliance with low-fidelity migrations
- Synchronizing requirements for a smooth transition
- Migrating from Azure DevOps with the GitHub Enterprise Importer
- Migrating pipelines using Valet
Picking the right migration strategy
When migrating to a new platform, you have different options:
- High-fidelity migration: You try to migrate as much as possible to the new platform.
- Clean cut-over migration: You only migrate the bare minimum that is necessary to start working on the new platform.
High-fidelity migrations to complex platforms have different problems. The main problem is that there is not a 1-to-1 mapping of all entities and that things just work differently on different platforms. By migrating everything over, you influence the way people use the new system. The data is optimized for the old system using old processes. Also, the time, costs, and complexity involved in a high-fidelity migration are not linear. The more you try to get to 100% fidelity, the more complex and expensive it gets, and 100% is normally not achievable at all (see Figure 21.1).
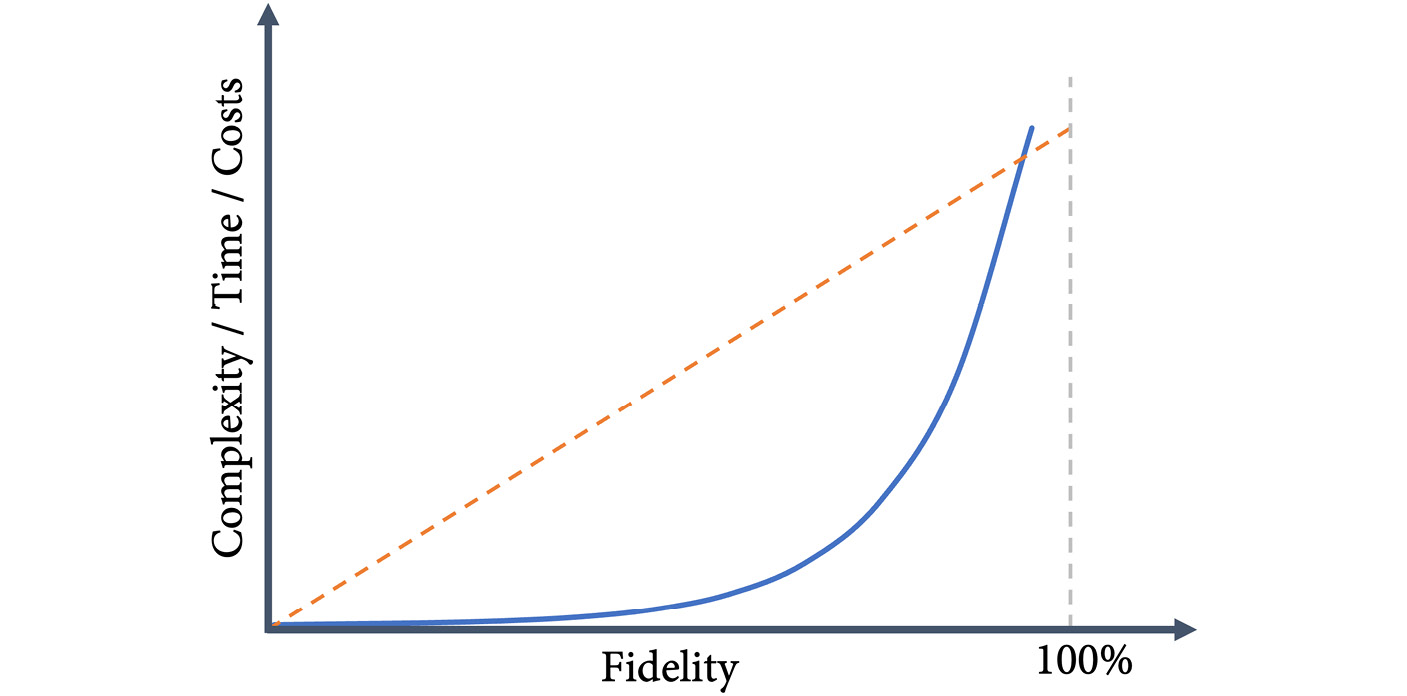
Figure 21.1 – Complexity, time, and costs for different levels of fidelity
Clean cut-over migrations are optimal if you want to achieve a change in behavior and use the new platform optimally. In the case study in this book, I assume a clean cut-over migration: the teams start on the new platform and only move over what is absolutely necessary.
The reality is somewhere in between these two extremes. If you want to accelerate software delivery, you start with a clean cut-over migration, but to scale in your enterprise and drive adoption, you provide some migration paths and tooling for the teams to move over fast. And there will be some dormant projects/products that you may want to archive for later reactivation. Keep all the old systems running or just migrate them over.
Achieving compliance with low-fidelity migrations
One concern that many customers have is end-to-end traceability for compliance reasons. In many highly-regulated industries, you have to provide end-to-end traceability for all requirements and final functional tests. The problem with low-fidelity migration is that you will get a cut in that traceability chain.
But that does not mean that the only solution is high-fidelity migration. You can still do a clean cut-over and keep the old systems in read-only mode running for as long as necessary. In the new system, you must achieve end-to-end traceability anyway. To stay compliant, you need a mapping of the old system identifiers to the new system for the requirements that span both systems.
In the case of an audit, you can provide reports from both systems – both the old and the new. For some requirements, you might have to look at both reports, but that will still provide valid traceability if you have identifiers that allow mapping between the systems.
The inconvenience of keeping the old system running is normally far less than trying to perform a high-fidelity migration, but this depends on many things, such as the licenses of the old system.
Synchronizing requirements for a smooth transition
One option that is interesting in this context, especially for big enterprises with many different tools, is the synchronization of requirements across different platforms with a product like Tasktop (https://www.tasktop.com/). Tasktop has connectors to many products like Jira, Salesforce, ServiceNow, IBM Rational, IBM DOORS, Polarion ALM, Azure DevOps, and many more. Synchronizing requirements and work items between tools enables multiple use cases:
- Work in both tools – the old and the new – at the same time during a migration period. This gives you more time for the migration and allows you to move over one team after the other while maintaining full traceability.
- Give different roles and teams the freedom to work using the tools they prefer. Your project managers prefer Jira, the architects IBM Rational, operations ServiceNow, and your developers want to switch to GitHub? You can enable these kinds of workflows by synching data between these tools.
Especially in complex environments where you have a large product that multiple teams work on simultaneously, synchronizing requirements and work items can help you to optimize migration.
Migrating your code
The easiest thing to do when moving to GitHub is migrating your code, especially when the code is already stored in another Git repository. Just clone the repository using --bare to make sure the repository is in a clean state:
$ git clone --bare <URL to old system>
Then push the code to the repository:
$ git push --mirror <URL to new repository>
If the repository already contains code, you must add the --force parameter to override. You can also use the GitHub CLI to create a repository on the fly when pushing an existing one:
$ gh repo create <NAME> --private --source <local path>
Since in Git the author information is matched using an email address, you just have to create user accounts in GitHub for all users and assign them the email address used in your previous Git system. The authors will then be resolved correctly.
You can also import code using the GitHub Importer. Besides Git, the following repository types are supported:
- Subversion
- Mercurial
- Team Foundation Version Control (TFVC)
The GitHub Importer takes the URL to the source system and creates a new repository. Files larger than 100 MB can be excluded or added to the Git Large File Storage (LFS).
To import a repository using the GitHub Importer, click the plus next to your profile picture and select Import repository (see Figure 21.2):
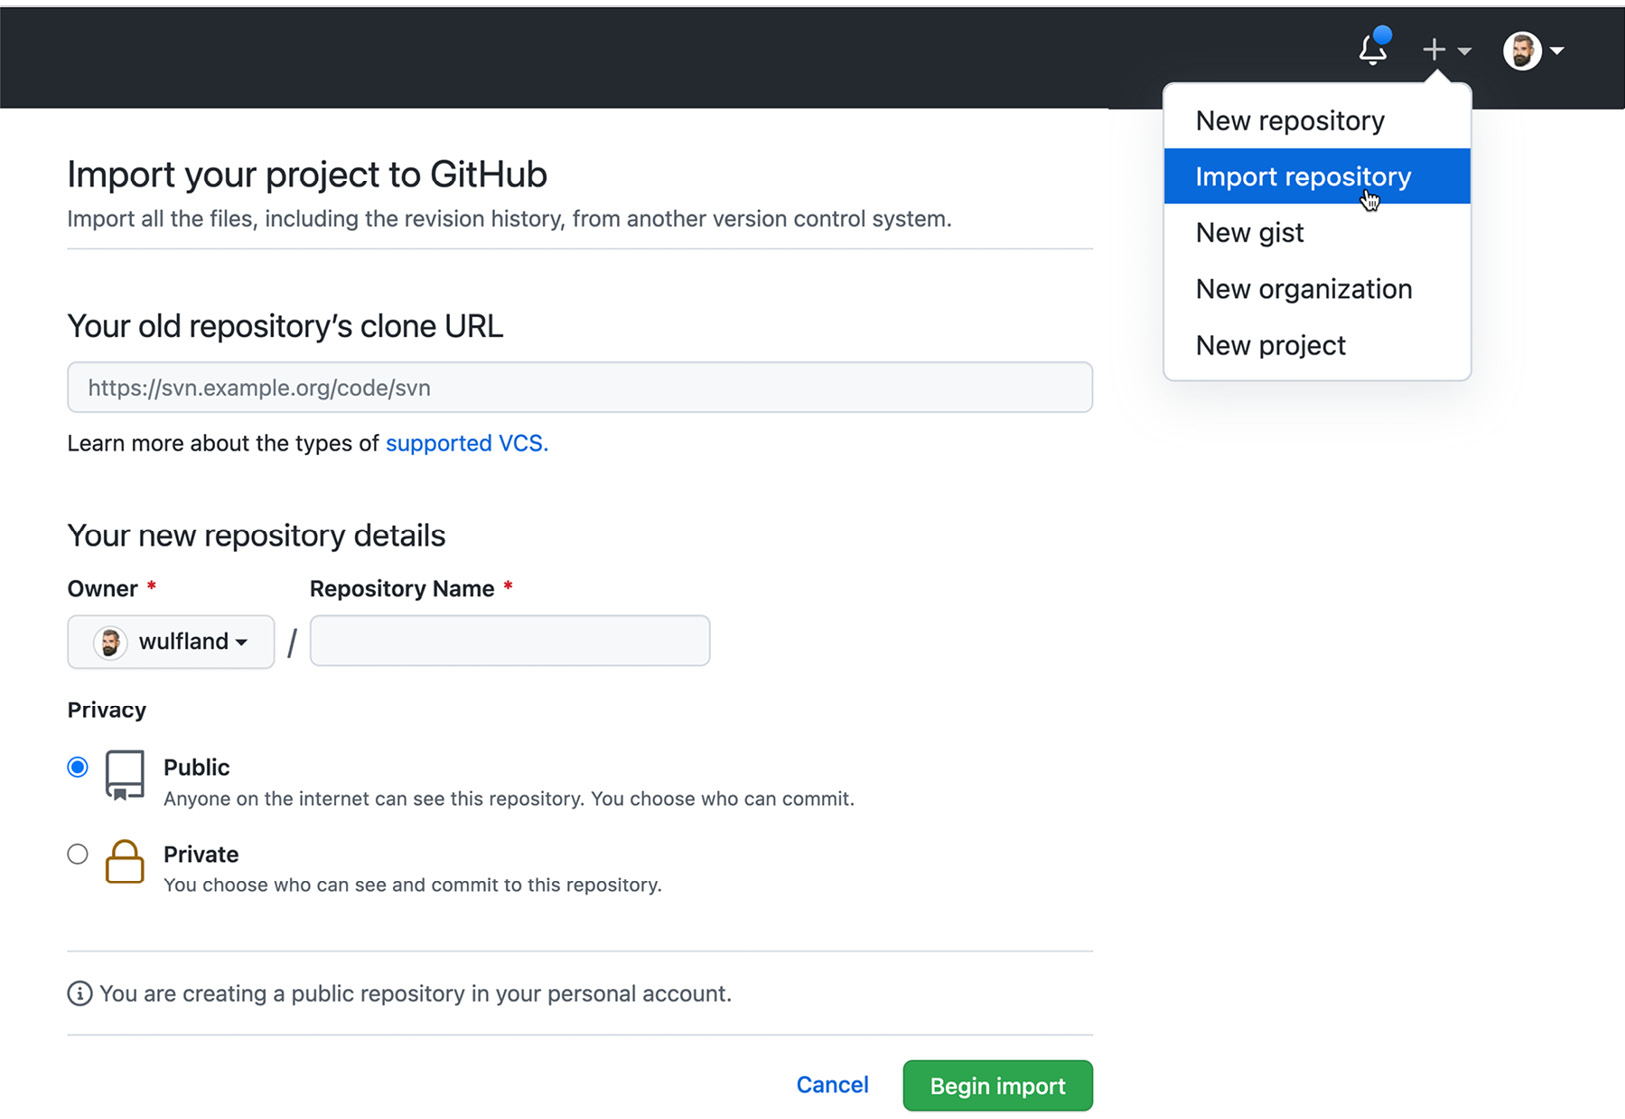
Figure 21.2 – Importing a repository
If you migrate from Subversion, you can use git-svn (https://git-scm.com/docs/git-svn) to sync your changes between a Git and a Subversion repository:
$ git svn <command>
If you migrate from Azure DevOps/Team Foundation Server, the best way is to migrate to Git from TFVC first, and then migrate to GitHub. There is also a tool similar to git-svn: git-tfs (https://github.com/git-tfs/git-tfs). This allows you also to sync changes between Git and TFVC or directly migrate to GitHub:
$ git tfs <command>
Note
Git is optimized for short-lived branches – TFVC isn’t. You should not just migrate your code and all branches over. Use the chance for a clean cut-over and start with a new branching model. Migrating code to Git can be a first step to keeping parts of your history, but you should adjust your branching model after the migration.
Migrating your code to GitHub is not the challenge. There are many tools that can help you. The challenge is to get from an older branching model to a new one that is optimized for your new platform and offers accelerated software delivery performance (see Chapter 11, Trunk-Based Development).
The challenge lies in the things that are not directly stored in Git: pull requests, linked work items, and pipelines. These need more attention than just the Git repository itself.
Migrating from Azure DevOps or GitHub
If you migrate from GitHub to GitHub or from Azure DevOps to GitHub, you can use the GitHub Enterprise Importer (GEI) (see https://github.com/github/gh-gei). It is an extension for the GitHub CLI and can be installed using extension install:
$ gh extension install github/gh-gei
$ gh gei --help
You can set the Personal Access Tokens (PAT) as environment variables to authenticate to the source and target system:
$ export ADO_PAT=<personal access token>
$ export GH_SOURCE_PAT=<personal access token>
$ export GH_PAT=<personal access token>
You could also pass them to generate-script using --github-source-pat and --ado-pat parameters.
To create the migration script, execute one of the following commands depending on whether you want to migrate from GitHub or Azure DevOps:
$ gh gei generate-script --ado-source-org <source> --github-target-org <target>
$ gh gei generate-script --github-source-org <source> --github-target-org <target>
This will generate a PowerShell script migrate.ps1 that can be used for the actual migration. The script will call gh gei migrate-repo for all team projects found in Azure DevOps or GitHub organization. This will queue the actual migration. It then gets the status by executing gh gei wait-for-migration --migration-id with the output of the previous command.
GEI currently supports the following:
- Azure DevOps (ADO)
- GitHub Enterprise Server (GHES) 3.4.1+
- GitHub Enterprise Cloud
For Azure DevOps, the following items will be migrated:
- Git source
- Pull requests
- User history for pull requests
- Work item links on pull requests
- Attachments on pull requests
- Branch protections for the repository
For GitHub Enterprise Server and Cloud, the following items are migrated additionally:
- Issues
- Milestones
- Wikis
- Project boards at the repository level
- GitHub Actions workflows (secrets and workflow run history not included)
- Commit comments
- Active webhooks
- Repository settings
- Branch protections
- GitHub Pages settings
- User history for the above data
See https://docs.github.com/en/early-access/github/migrating-with-github-enterprise-importer for more information. Note that GEI is still in beta and might change frequently.
If you are using GitHub Enterprise Server, you can also use ghe-migrator to import data, either from another server instance, or from GitHub Enterprise Cloud. See https://docs.github.com/en/[email protected]/admin/user-management/migrating-data-to-and-from-your-enterprise/about-migrations for more information on data export and import on GitHub Enterprise Server.
Migrating your pipelines
To migrate your pipelines to GitHub Actions, you can use a tool called Valet. It supports the following sources:
- Azure DevOps (Classic pipelines, YAML pipelines, and releases)
- Jenkins
- Travis CI
- Circle CI
- GitLab CI
Valet is a Ruby-based command-line tool that gets installed using Docker.
Note
Valet is still in private beta at the time of writing and is still subject to change. Valet is not intended to be a 100% effective solution that can migrate everything! It is extensible and you will have to write your own transformers and probably still need to do some manual steps after the migration.
The distribution of Valet happens by pulling down a container image and using the two scripts valet and valet-update to interact with it:
$ docker pull ghcr.io/valet-customers/valet-cli
You have to authenticate to ghcr.io once you have access to the private beta using your username and a PAT token with read:packages access:
$ docker login ghcr.io -u <USERNAME>
The best way is to install Valet as a GitHub CLI extension, but you still need Docker running on your machine and you have to be authenticated to the registry. To install Valet as a GitHub CLI extension, execute the following command:
$ gh extension install github/gh-valet
You can now easily update Valet using gh valet update.
Valet is configured using environment variables. The easiest way to do this is to set these in a file called .env.local in the folder that you are using Valet in. This, for example, is the configuration for migrating pipelines from Azure to GitHub Enterprise Cloud:
GITHUB_ACCESS_TOKEN=<GitHub PAT>
GITHUB_INSTANCE_URL=https://github.com
AZURE_DEVOPS_PROJECT=<project name>
AZURE_DEVOPS_ORGANIZATION=<org name>
AZURE_DEVOPS_INSTANCE_URL=https://dev.azure.com/<org>
- gh valet audit will analyze the source download information about all pipelines supported. It will create an audit summary report (Markdown) with all the pipelines, build steps, and environments found. You can use an audit to plan your migrations.
- gh valet dry-run will convert the pipelines to a GitHub Actions workflow file and output the YAML file.
- gh valet migrate will convert the pipeline to a GitHub Actions workflow file and create a pull request in the target GitHub repository containing the changes to the workflow file.
- gh valet forecast forecasts the usage of GitHub Actions based on historical pipeline utilization.
To run an audit using the previous configuration and create a report, just run the following command:
$ gh valet audit azure-devops --output-dir .
This will generate an audit_summary.md report and three files for every supported pipeline: a .config.json file containing the configuration, a .source.yml file containing the source pipeline converted to YAML, and a .yml file containing the transformed GitHub Actions workflow that will later be migrated. To execute the migration for one pipeline, run valet migrate:
$ valet migrate azure-devops pipeline
--target-url https://github.com/<org>/<repo-name>
--pipeline-id <definition-id>
Remember that this is a best-effort migration! Not everything can be migrated. For example, the following elements cannot be migrated:
- Secrets
- Service connections
- Unknown tasks
- Self-hosted runners
- Variables from Key Vault
You can write your own transformers for pipeline steps, either for unknown steps or to override existing behavior from Valet. Create a new Ruby file (.rb) and add a function in the following format:
transform "taskname" do |item|
end
For Azure DevOps tasks, the name includes the version number. To see what the item object contains, you can output it to the console using puts item.
Here is a sample transformer that would override the DotNetCoreCLI task version 2 and replace it with a run step on Bash that uses the globstar syntax to iterate all .csproj files and execute the command using the arguments from the source pipeline:
transform "DotNetCoreCLI@2" do |item|
if(item["command"].nil?)
item["command"] = "build"
end
{shell: "bash",
run: "shopt -s globstar; for f in ./**/*.csproj; do dotnet #{ item['command']} $f #{item['arguments'] } ; done"}
end
To use your custom transformers, you can use the --custom-transformers parameter. You can specify individual transformers or entire directories if you have many transformers:
$ valet migrate azure-devops pipeline
--target-url https://github.com/<org>/<repo-name>
--pipeline-id <definition-id>
--custom-transformers plugin/*
Each workflow system is different! Make sure to spend time analyzing how you want your pipelines to be transformed to optimize for the new platform instead of just trying to migrate everything over. If you’ve figured that out, then Valet will be a great tool that can help you to transition your teams faster to GitHub.
Summary
GitHub is a complex, fast-growing ecosystem that is challenging for any kind of migration. When migrating, make sure to focus on optimizing for productivity on the new platform rather than on migrating everything over and then letting your teams deal with the mess. Depending on the size of your organization and the source platforms, your migration story might look completely different.
In this chapter, you’ve learned about the different tools from GitHub and partners that can help you facilitate your migration.
In the next chapter, we’ll talk about organizing your teams and repositories for optimal collaboration.
Further reading
These are the links from this chapter that you can use to get more information on the topics discussed:
- GitHub Importer: https://docs.github.com/en/get-started/importing-your-projects-to-github/importing-source-code-to-github/importing-a-repository-with-github-importer
- GitHub Enterprise Importer CLI: https://github.com/github/gh-gei and https://docs.github.com/en/early-access/github/migrating-with-github-enterprise-importer
- GitHub Enterprise Server Importer: https://docs.github.com/en/[email protected]/admin/user-management/migrating-data-to-and-from-your-enterprise/about-migrations
- ghe-migrator: https://docs.github.com/en/[email protected]/admin/user-management/migrating-data-to-and-from-your-enterprise/about-migrations
- Tasktop: https://www.tasktop.com/
- git-svn: https://git-scm.com/docs/git-svn
- git-tfs: https://github.com/git-tfs/git-tfs