In the previous section, we laid out a stimulating foundation on software testing, how to leverage the Docker technology for the software testing, and the unique benefits of the container technology during the testing phase. In this section, we will introduce you to the steps required to prepare the Jenkins environment for testing with Docker, and then, demonstrate how Jenkins can be extended to integrate and automate testing with Docker using the well-known hit count use case.
In this section, we will take you through the steps to install jenkins, GitHub plugin for Jenkins and git, and the revision control tool. These steps are as follows:
- We begin with adding the Jenkins' trusted PGP public key:
$ wget -q -O -
    https://jenkins-ci.org/debian/jenkins-ci.org.key |
    sudo apt-key add -
Here, we are using
wgetto download the PGP public key, and then we add it to the list of trusted keys using the apt-key tool. Since Ubuntu and Debian share the same software packaging, Jenkins provides a single common package for both Ubuntu and Debian. - Add the Debian package location to the
aptpackage source list, as follows:$ sudo sh -c 'echo deb http://pkg.jenkins-ci.org/debian binary/ > /etc/apt/sources.list.d/jenkins.list'
- Having added the package source, continue to run the
apt-getcommand update option to resynchronize the package index from the sources:$ sudo apt-get update - Now, install
jenkinsusing theapt-getcommand install option, as demonstrated here:$ sudo apt-get install jenkins - Finally, activate the
jenkinsservice using theservicecommand:$ sudo service jenkins start - The
jenkinsservice can be accessed through any web browsers by specifying the IP address (10.1.1.13) of the system in which Jenkins is installed. The default port number for Jenkins is8080. The following screenshot is the entry page or Dashboard of Jenkins:
- In this example, we are going to use GitHub as the source code repository. Jenkins does not support GitHub by default and hence, we need to install the GitHub plugin. During the installation, sometimes Jenkins does not populate the plugin availability list, and hence, you have to force it to download the list of available plugins. You can do so by performing the following steps:
- Select Manage Jenkins on the left-hand side of the screen, which will take us to a Manage Jenkins page, as shown in the following screenshot:

- On the Manage Jenkins page, select Manage Plugins and this will take us to the Plugin Manager page, as shown in the following screenshot:

- Here, on the Plugin Manager page, select the Advanced tab, go to the bottom of this page, and you will find the Check now button in the right-hand side corner of the page. Click on the Check now button to start the plugin updates. Alternatively, you can directly go to the Check now button on the Advanced page by navigating to
http://<jenkins-server>:8080/pluginManager/advanced, wherein<jenkins-server>is the IP address of the system in which Jenkins is installed.
- Select Manage Jenkins on the left-hand side of the screen, which will take us to a Manage Jenkins page, as shown in the following screenshot:
- Having updated the available plugin list, let's continue to install the GitHub plugin, as depicted in the following substeps:
- Select the Available tab in the Plugin Manager page, which will list all the available plugins.
- Type
GitHub pluginas the filter, which will list just the GitHub plugin, as shown in the following screenshot: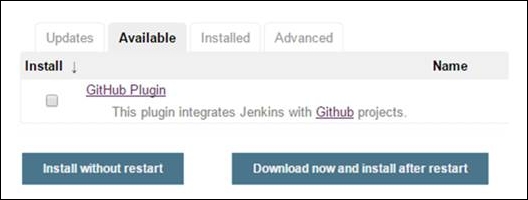
- Select the checkbox, and click on Download now and install after restart. You will be taken to a screen that will show you the progress of the plugin installation:

- After all the plugins have successfully downloaded, go ahead and restart Jenkins using
http://< jenkins-server >:8080/restart, where<jenkins-server>is the IP address of the system in which Jenkins is installed.
- Ensure that the
gitpackage is installed, otherwise install thegitpackage using theapt-getcommand:$ sudo apt-get install git - So far, we have been running the Docker client using the
sudocommand, but unfortunately, we could not invokesudoinside Jenkins because sometimes it prompts for a password. To overcome thesudopassword prompt issue, we can make use of the Docker group, wherein any user who is part of the Docker group can invoke the Docker client without using thesudocommand. Jenkins installation always sets up a user and group calledjenkinsand runs the Jenkins server using that user and group. So, we just need to add thejenkinsuser to the Docker group to get the Docker client working without thesudocommand:$ sudo gpasswd -a jenkins docker Adding user jenkins to group docker
- Restart the
jenkinsservice for the group change to take effect using the following command:$ sudo service jenkins restart * Restarting Jenkins Continuous Integration Server jenkins [ OK ]
We have set up a Jenkins environment that is now capable of automatically pulling the latest source code from the http://github.com repository, packaging it as a Docker image, and executing the prescribed test scenarios.

In this section, we will explore how to automate testing using Jenkins and Docker. As mentioned earlier, we are going to use GitHub as our repository. We have already uploaded the Dockerfile, test_hitcount.py, and hitcount.py files of our previous example to GitHub at https://github.com/thedocker/testing, which we are to use in the ensuing example. However, we strongly encourage you to set up your own repository at http://github.com, using the fork option that you can find at https://github.com/thedocker/testing, and substitute this address wherever applicable in the ensuing example.
The following are the detailed steps to automate the Docker testing:
- Configure Jenkins to trigger a build when a file is modified in the GitHub repository, which is illustrated in the following substeps:
- Connect to the Jenkins server again.
- Select either New Item or create new jobs:

- In the following screenshot, give a name to the project (for example,
Docker-Testing), and select the Freestyle project radio button:
- In the next screenshot, select the Git radio button under Source Code Management, and specify the GitHub repository URL in the Repository URL text field:

- Select Poll SCM under Build Triggers to schedule GitHub polling for every
15minute interval. Type the following line of codeH/15 * * * *in the Schedule textbox, as shown in the following screenshot. For testing purposes, you can reduce the polling interval:
- Scroll down the screen a little further, and select the Add build step button under Build. In the drop-down list, select Execute shell and type in the text, as shown in the following screenshot:

- Finally, save the configuration by clicking on the Save button.
- Go back to the Jenkins Dashboard, and you can find your test listed on the dashboard:

- You can either wait for the Jenkins schedule to kick-start the build, or you can click on the clock icon on the right-hand side of the screen to kick-start the build immediately. As soon as the build is done, the Dashboard is updated with the build status as a success or failure, and the build number:

- If you hover the mouse closer to the build number, you will get a drop-down button with options, such as Changes, Console Output, and so on, as shown in the following screenshot:

- The Console Output option will show the details highlighted for the build, as follows:
Started by user anonymous
Building in workspace /var/lib/jenkins/jobs/Docker-Testing/workspace
Cloning the remote Git repository
Cloning repository https://github.com/thedocker/testing/
. . . OUTPUT TRUNCATED . . .
+ docker build -t docker_testing_using_jenkins .
Sending build context to Docker daemon 121.9 kB

Sending build context to Docker daemon
Step 0 : FROM python:latest
. . . OUTPUT TRUNCATED . . .
Successfully built ad4be4b451e6
+ docker run --rm docker_testing_using_jenkins
.
----------------------------------------------------------------------
Ran 1 test in 0.000s

OK
Finished: SUCCESS
- Evidently, the test failed because of the wrong module name error_hitcount, which we deliberately introduced. Now, let's experiment a negative scenario by deliberately introducing a bug in test_hitcount.py and observe the effect on Jenkins build. As we have configured Jenkins, it faithfully polls the GitHub and kick-starts the build:

Apparently, the build failed as we expected.
- As a final step, open Console Output of the failed build:
Started by an SCM change
Building in workspace /var/lib/jenkins/jobs/Docker-Testing/workspace
. . . OUTPUT TRUNCATED . . .
ImportError: No module named 'error_hitcount'


----------------------------------------------------------------------
Ran 1 test in 0.001s

FAILED (errors=1)
Build step 'Execute shell' marked build as failure
Finished: FAILURE
Evidently, the test failed because of the wrong module name
error_hitcount, which we deliberately introduced.
Cool, isn't it? We automated our testing using Jenkins and Docker. Besides, we are able to experience the power of testing automation using Jenkins and Docker. In a large-scale project, Jenkins and Docker can be combined together to automate the complete unit testing needs, and thus, to automatically capture any defects and deficiencies introduced by any developers.