
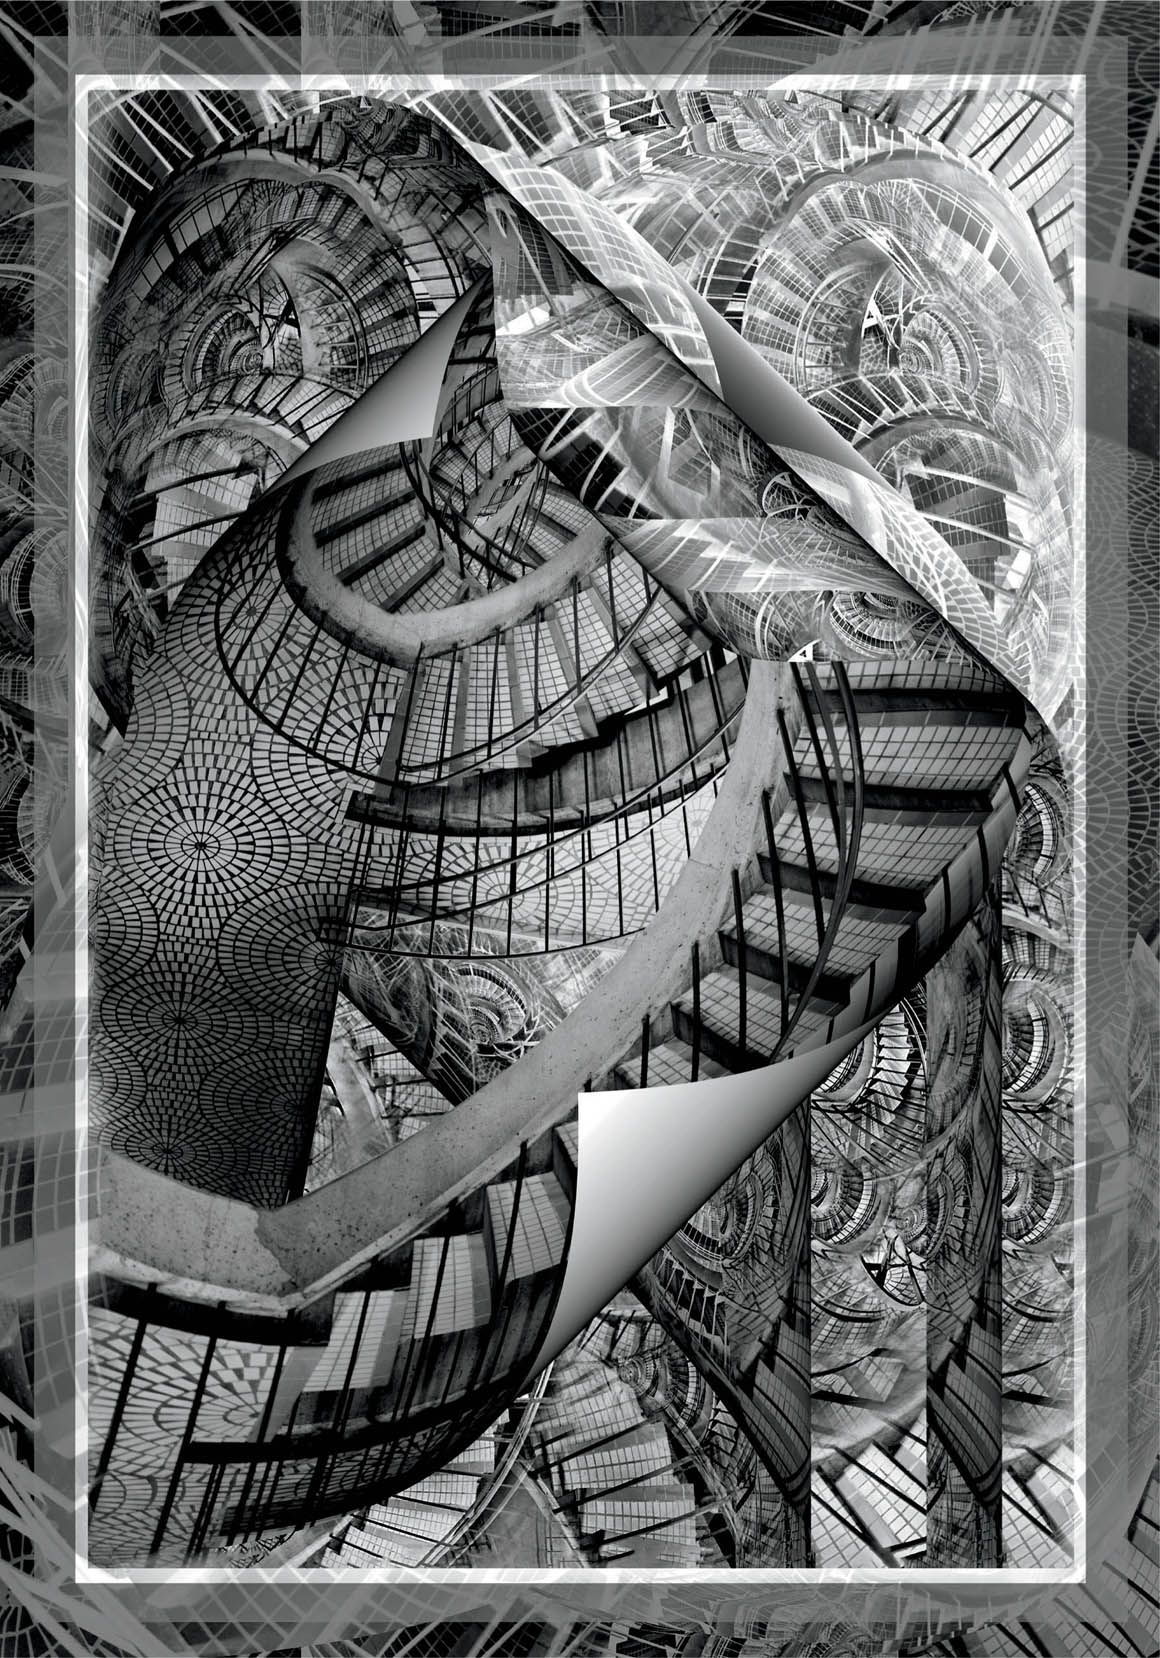
Down the Rabbit Hole—In this wild and wacky composite,
I intentionally used a number of different vanishing points. Take a look at the image and see if you can identify some!
The sense of depth in this image is partly enhanced by the variety of vanishing points. For example, the entry point to the image is the dark staircase that arcs up and around from the lower left. While this staircase starts out with a conventional vanishing point, the spirals in the other image quadrants are anything but straightforward, and each section of the image has its own vanishing point and perspective.
The compositional idea of Down the Rabbit Hole is to be both complicated yet remain cohesive. This is tough to pull off. If you look at an individual area, you’ll see more and more detail as you magnify the area. At the same time, there’s a broader architecture where pillars of light and dark support spirals that seem to go on forever.
Composite and self-composite of three images. Primary Staircase: Nikon D850, 25mm Zeiss Otus, 1/125 of a second at f/1.4 and ISO 1250, hand held; Background Images: Nikon D300, 10.5mm Nikkor fisheye, 10 and 13 seconds at f/22 and ISO 100, tripod mounted.

Of the great strands of human curiosity and experimentation that led to the development of photography, few inventions were more important than the camera obscura. A simple device, the camera obscura is a dark room or box with a hole on one side. The scene outside the camera obscura is projected onto a wall opposite the hole.
Starting in the early Renaissance, mathematicians and artists, such as Filippo Brunelleschi, rediscovered the principles of single-point perspective, which had been known to the Romans but lost in the Dark Ages.
As time went by, artists interested in painting realistic scenes began using portable camera obscura devices to project single-point perspective renderings so this could be incorporated into their work. For example, Johannes Vermeer enthusiastically used a portable camera obscura in creating the perspective projections in his paintings.
Before the invention of the camera obscura and widespread adoption of single-point perspective, most art was rendered as basically flat or following a cartoon-like map structure. Occasional elements, such as tables or chairs, were rendered in perspective, but there was no consistent method for achieving this.
Single-point perspective was so incredibly effective as a way to present the world that it has basically taken over our sense of visual reality. It has changed the way we collectively see the world.
Paintings with a single vanishing point appear absolutely real, and we sense them as accurate representations of three-dimensional reality. But, of course, this is an illusion. A painting, like a photograph, is a two-dimensional object that can appear to present three-dimensional reality based on a visual convention—but it can never be three-dimensional reality itself. It’s odd—and ultimately delusional—that we have come to automatically accept single-point perspective as reality itself.
When it comes to photography, we have one-upped the camera obscura. There’s no need to project the lines of perspective onto a wall for tracing and transfer. The vanishing point and related projections are captured optically using the pinhole effect, and can be saved for future use, either chemically or digitally. Perspective is already baked into the mechanics of photographic rendition, as well as into our consciousness.
Nonetheless, single-point perspective with a vanishing point remains a convention—a method of mapping three dimensions onto a two-dimensional space—and only one way of depicting three-dimensional reality. As a matter of photographic composition, one can use the absolute certainty of the viewer’s belief in the veracity of perspective to shift the way the viewer sees reality.
If you are using single-point perspective in your image without considering how it is being used and, most importantly, what the alternatives are, it’s time to change things up a bit. The results can be startling!

Flowers at Giverny—In the late-afternoon light in Monet’s garden at Giverny, I was thrilled to see the beautiful assortment of radiant flowers under this arbor. The way the flower beds were planted looked like a living Impressionist painting.
As I was setting up my camera and tripod, I realized that I wanted to add a dash of Monet-type blur to the foreground of the image I was previsualizing. To do this, I used as low an ISO as possible to extend the length of the exposure.
The entry point of this composition is at roughly the lower middle third of the image where the flowers are mostly orange and yellow. From there, the viewer’s gaze moves right down the center of the arbor, past the purple flowers, toward the vanishing point that falls in the center of the image, slightly above the horizontal axis.
Nikon D850, 28-300mm Nikkor at 122mm, 2 seconds at f/29 and ISO 31, tripod mounted.
Working with the Vanishing Point
A good working definition of a vanishing point is the point at which receding parallel lines appear to meet when rendered in linear perspective. There is more to this definition than meets the eye. For one thing, the parallel lines in question only “appear,” or seem, to meet. In many perspective renditions, the vanishing point is implied and does not actually appear anywhere in the image. The viewer’s brain assigns a position to the vanishing point, even if it isn’t seen, by following the perspective rendition.
As I’ve mentioned, one of the progenitors of today’s camera is the camera obscura. The projective device of the pinhole in the camera obscura has been improved and enhanced using optical science and lenses. The projection of the camera obscura on the back wall of the box or room is now captured using a digital sensor (or film).
This literal one-to-one correspondence between the camera obscura and today’s cameras has led artists and critics astray! The mistake that is made is to assume that because today’s cameras have camera-obscura functionality, they can only render perspective the way a camera obscura does. David Hockney’s quip that photography is like a “paralysed Cyclops”—or is seeing things with only one, fixed eye—comes from this misapprehension.
True, the easiest and default mode when photographing the kind of subject that responds well to perspective—such as landscapes and architecture—is to fall back on basic single-point perspective. But even within the realm of single-point perspective, the photographer has choices as to where the vanishing point is and how to apply that perspective. As I’ll also discuss later in this chapter, multi-point perspective is possible photographically. Once refraction and curvature enter the picture, the vanishing point becomes a complex issue, and multiple vanishing points are possible. In addition, the Photoshop darkroom provides a number of very effective ways to alter the “rules” of perspective.
The simplest relationship to the vanishing point and single-point perspective is to have one vanishing point pretty much in the middle of the image. This central vanishing point is likely to be raised a bit above the midline of the image, just as the horizon line tends to be raised when looking across the landscape, and in some cases tends toward the top of the image.
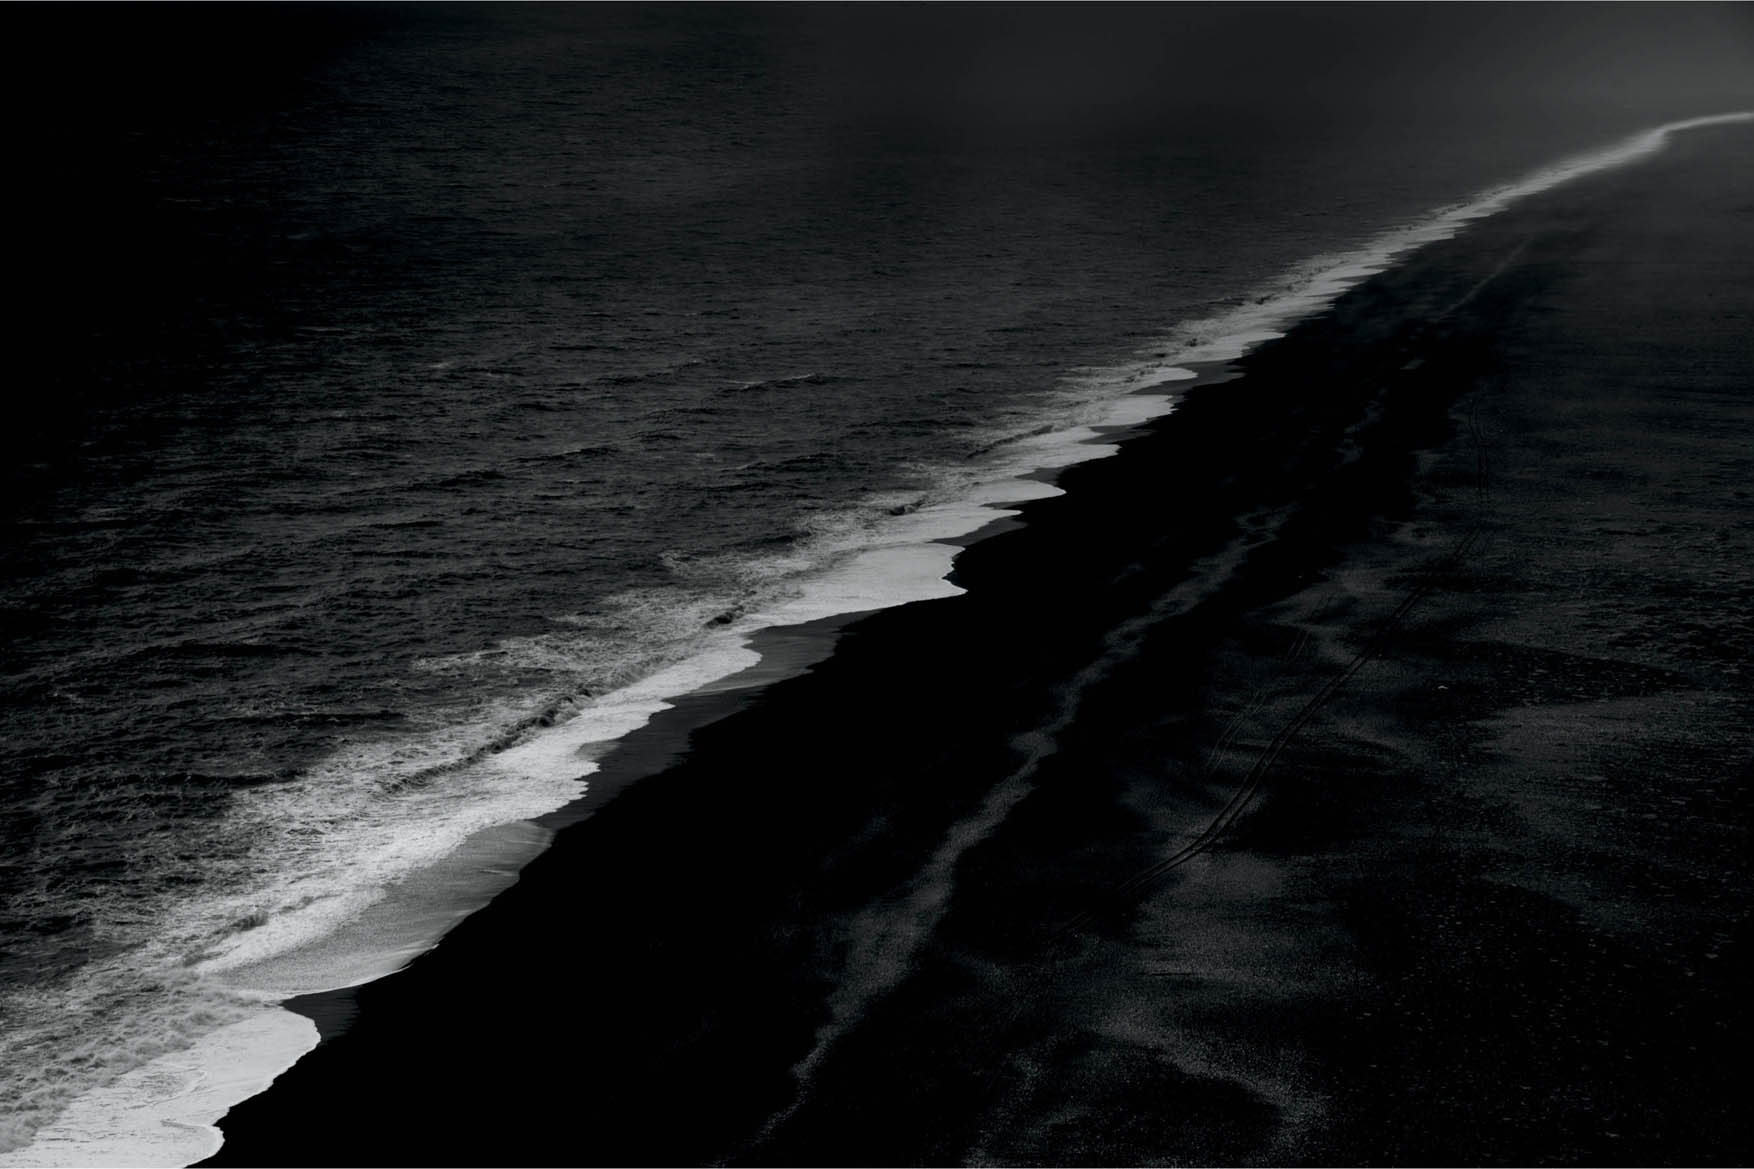
Black Sand Beach—Looking down on Reynisfjara Beach on Iceland’s southern coast, I previsualized a composition where the white line of the surf operated as a border between the black sand of the beach and the dark patterns of the North Atlantic Ocean.
To accomplish this visual idea, I underexposed the image by 3 EV. This served to capture resolution in the white surf line while rendering the beach sand and ocean very dark.
My other goal was to sight the surf line as a diagonal across the frame from the lower-left corner to the upper right. To accomplish this, I needed to change the angle at which I held the camera so that the vanishing point for the entire image was near the upper-right corner of the frame.
Nikon D850, 28-300mm Nikkor at 70mm, 1/800 of a second at f/8 and ISO 64, hand held.
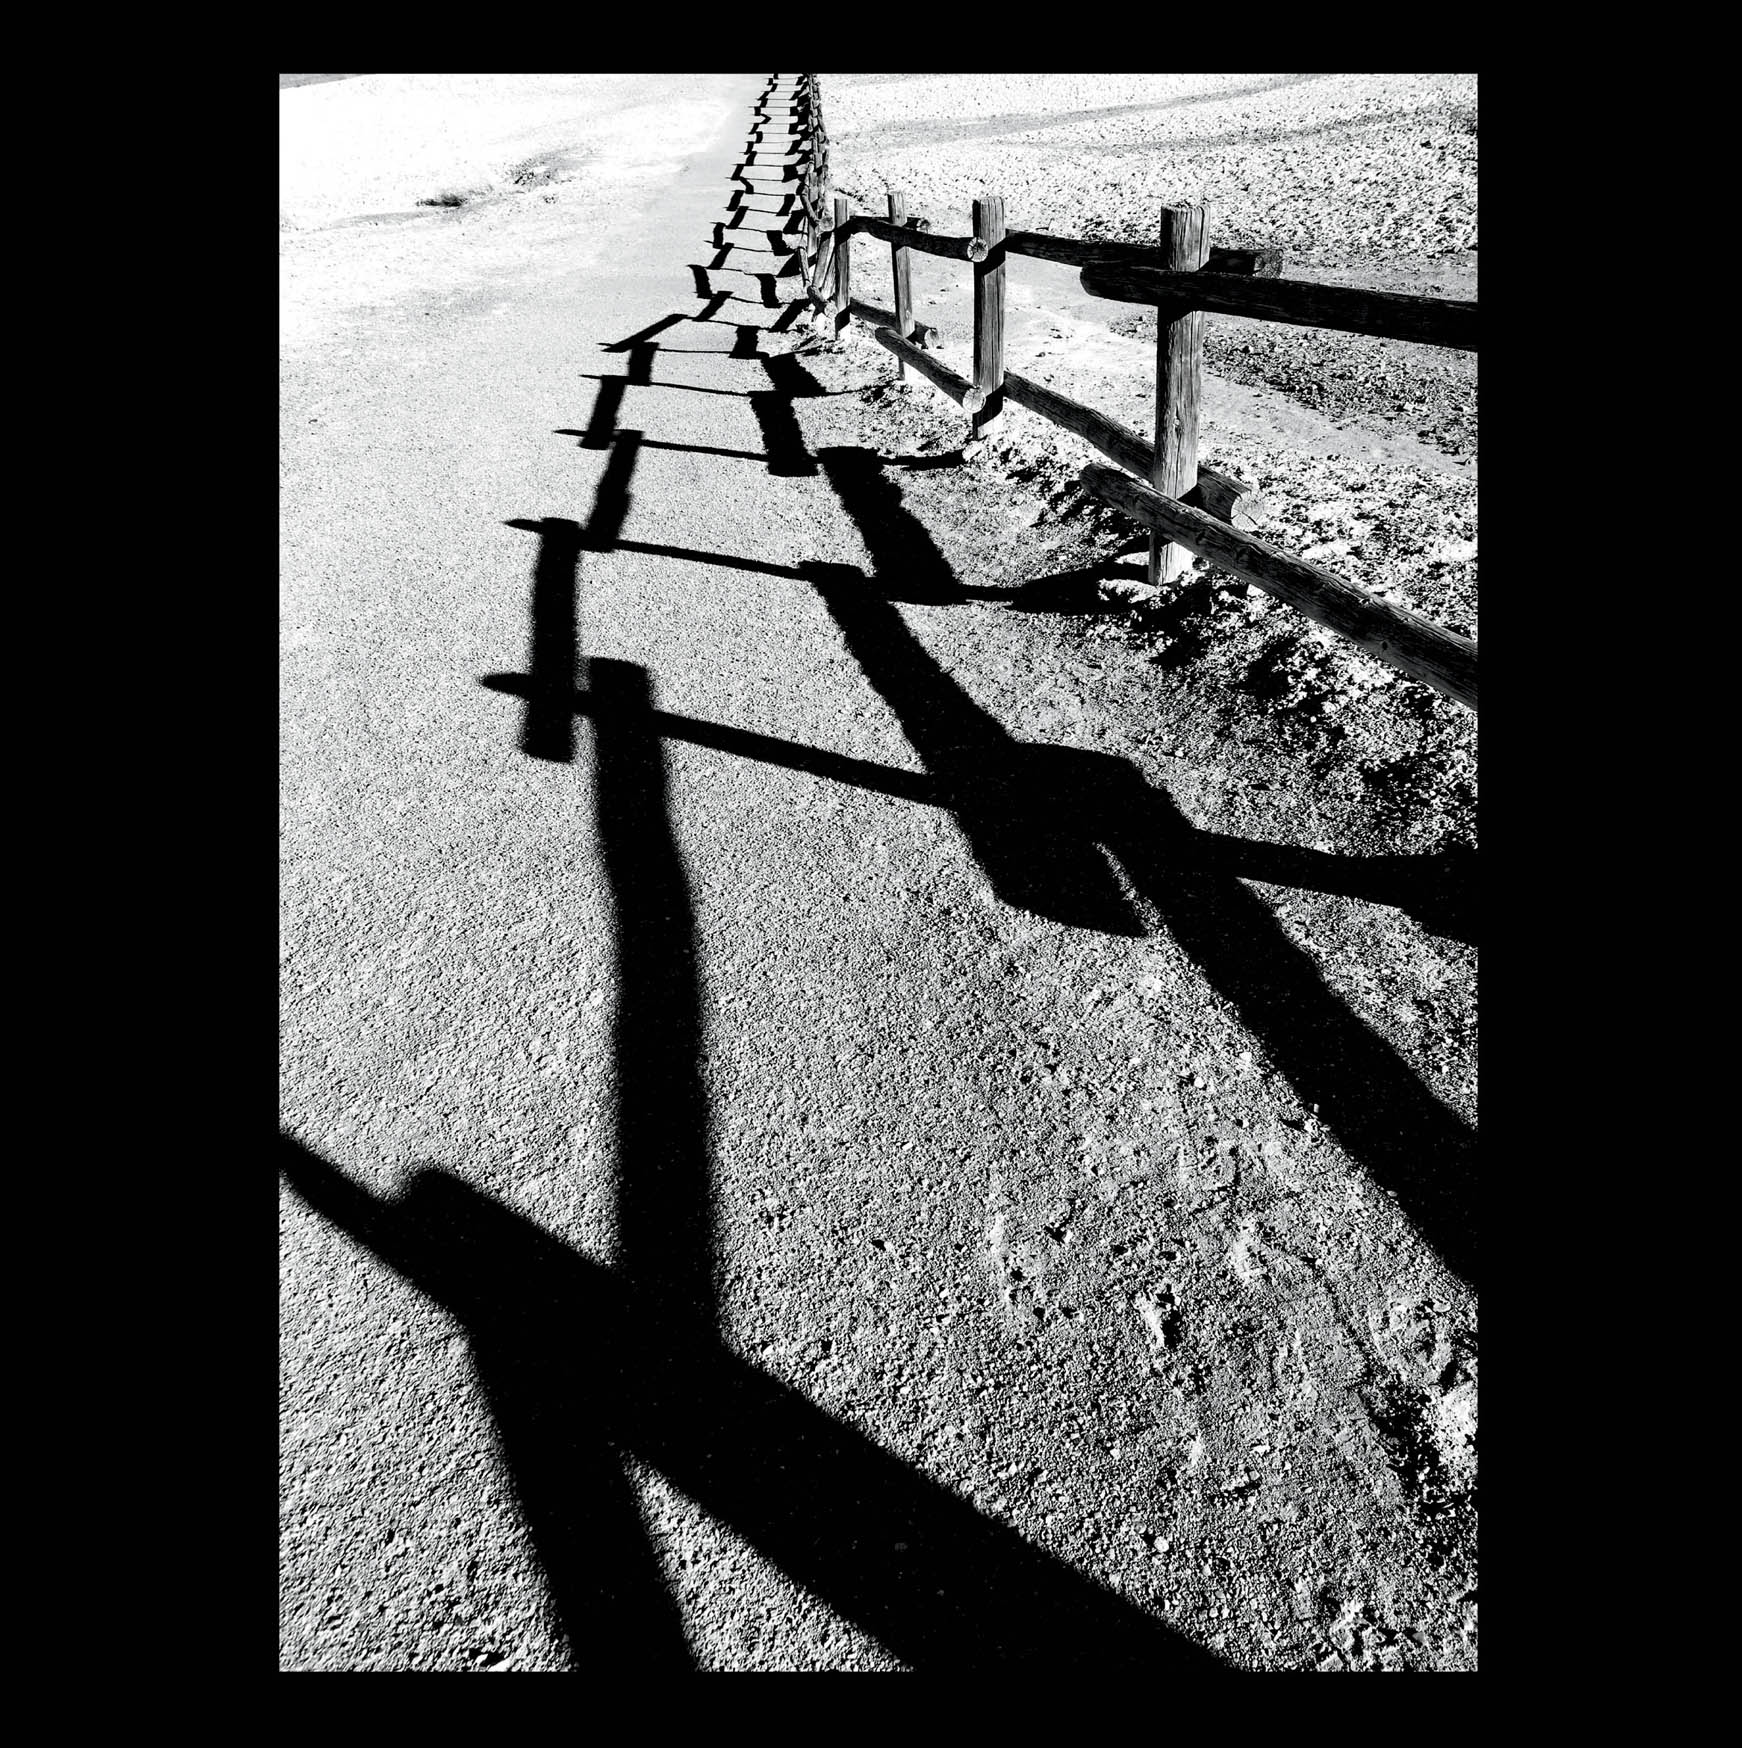
Fence Shadow—In the middle of the day the shadows were strong near Furnace Creek in Death Valley National Park, California. I was intrigued by the fence and shadow line that you can see here.
To make this image, I got down low on my belly on the gravel path and placed the vanishing point at the upper center of the image. At first glance, this appears to be a pretty straightforward single-point perspective rendition. But if you look more closely, as the fence line approaches the vanishing point, it appears to curve upward. This portion of the fence and shadow combined can also be visually interpreted as a front-facing ladder that leads up and out of the image.
The initial entry point to this image is the strong, dark shadow at the bottom of the image. The eye then follows the shadow rails toward the vanishing point. What gives the image a visual kick is the curvature as the shadow approaches the vanishing point. This could almost be considered a visual pun.
iPhone 6s, converted to black and white in Snapseed.
There’s certainly no rule that says that even a single vanishing point needs to be in the middle of the image, and often it isn’t.
Move your camera, and use your feet to “scootch” around and try different positions to experiment with changing the vanishing point (see page 61).
As with a number of photographic issues, very small changes in camera position can have a big impact on the final image. Even if the vanishing point doesn’t itself change, its location in relationship to the boundary frame of the image will move as you shift your camera’s position.
- If the camera’s angle in relationship to the subject is shifted to the left, the vanishing point will probably move to the right.
- If the camera’s angle in relationship to the subject is shifted to the right, the vanishing point will probably move to the left.
- If you move the angle of the camera up in relation to the subject, most likely the vanishing point will go downward.
- If you move the angle of the camera down in relation to the subject, most likely the vanishing point will go upward.
It’s worth taking the time to get a feeling for how the camera angle in relationship to the subject can impact the location of the vanishing point. Even in the simplest images, location of the vanishing point plays a big role in how your viewers will perceive the “reality” that your image has captured.
The vast majority of images—particularly landscape and architectural studies—show a world with a single vanishing point. Just because you only have one doesn’t mean you are out of options!
Understand the importance of the vanishing point to your image, and to the way your viewers visually interpret the relationship of your image to the world, and to their overall sense of the reality of your work. Keeping this importance in mind, it is important to work with your camera when photographing to find compositions where the location of the vanishing point best complements your compositional intent.
Multi-Point Perspective
If one vanishing point is good, then two should be better, and multiple vanishing points should be great—at least, so you’d think.
We have been trained since early childhood via almost all the media that we see—televisions, movie screens, books, our mobile phones—to view the world in a single-point rendition. Any image with more than one vanishing point automatically seems weird and feels uncomfortable.
If you look for them, out in the world there are many scenes that do have more than one vanishing point. The most common scenario is when something splits our vision. This could be a building, a fence, maybe a post, a rock, or even a car. The key issue is that we see something differently on either side of the object that splits our vision. Any time we see something like this, visual parts of our brains tend to work overtime, and it can be like decoding a visual puzzle.

The Alameda and El Dorado—If you stand at the corner of many streets and hold yourself in exactly the right position, it’s fairly easy to encounter a scene with two vanishing points. It’s a little harder than you might think to capture these two vanishing points photographically, but it can be done with the aid of a wide-angle lens.
At the meeting of these two streets in Berkeley, California, the angle of intersection is particularly acute. The white picket fence comes together in a V-shape, making the two-point perspective particularly obvious. It also helps that the vanishing points of both perspectives are very similar.
I used a 21mm wide-angle lens to make this image showing a simple example of two vanishing points. My camera was on a tripod and it was tricky to find the right position so I could see both vanishing points equally. One inch to the left or right, or up or down, would have completely changed the whole image. Both paths are not exactly the same in terms of geometry or what is at the vanishing point, but they are similar enough that at first glance they look the same.
What happens to the viewer looking at this photo? Initially, many people see the image as mirrored, and assume that it is manipulated and is not “real.” Closer inspection shows that, in fact, this is a real street corner with two different paths that are not exactly the same. At this point, some degree of visual vertigo sets in. Depending on the viewer, the sense is that one is going to be “dumped” out of the image, or that one’s eyes are going to continually focus back and forth between the two vanishing points.
Either scenario creates a visual “ping-pong” effect, which was my idea when I made this image of an apparently mundane street corner.
Nikon D850, 21mm Zeiss Distagon, five exposures with shutter speeds ranging from 1/13 of a second to 2 seconds at f/22 and ISO 64, tripod mounted.
To make an image that captures real-world, multi-point perspective, most likely you’ll want to use a wide-angle lens. The best approach is to use a fairly wide-angle lens in the 21mm–28mm range. This moderate to extreme wide-angle lens will often work better than a wide-angle lens with distortion, such as a fisheye lens.
The problem with using a fisheye lens, and with curvature appearing at the edges of your image due to an extreme wide-angle lens, is that the viewer’s eye notices this distortion immediately and assumes that the multiple vanishing points are related to this distortion rather than occurring naturally.
The idea of an image with more than one vanishing point is to create a sense of being off balance because the multiple perspective renditions contrast with the normality of the photo. The distortion inherent in a fisheye lens goes against this because the viewer expects things to be distorted, and they know right off the bat that they are not looking at a “normal” photo.
As with many aspects of composition, small movements in the camera position make all the difference with multi-point perspective images (for more about moving the camera to enhance composition, turn to pages 61 and 116).
For example, the photo on page 167 shows a street corner where a fence meets in a V-shape. This was photographed as two-point perspective as I pointed the camera directly at the area a little above the level of the fencing where the fence meets at the corner post. If I had moved the camera even a tiny bit in any direction, the image wouldn’t have worked visually.
Wherever I am out and about in the world, I look for vistas that have multiple vanishing points. I believe that having more than one vanishing point adds interest and intrigue to an image. If there’s an effective way to integrate multiple vanishing points into the purpose of a composition, then I know I am well on my way to making a compelling image.

Pont Neuf, Toulouse—The so-called “Pont Neuf,” or “New Bridge,” across the Garrone River in Toulouse, France, was finished in 1632. The bridge is shown here during spring with high water running through the arches.
The image has a very distinct vanishing point that the viewer’s eye latches onto, following the line of the bridge from right to left. This vanishing point is reinforced by the geometrically diminishing circles of the bridge arches and their reflections. This is the kind of single-point perspective we are used to, except that it is less common to have it run from right to left—more typically, it goes from left to right.
There is also a second vanishing point in this image. Take a look through the largest arch under the bridge! Once the second vanishing point is seen, it is hard for the viewer not to split their attention between the vista through the arch and the vanishing point along the span of the bridge.
Nikon D810, 28-300mm Nikkor zoom at 28mm, seven exposures with shutter speeds ranging from 1/250 to 1/4 of a second at f/14 and ISO 64, tripod mounted.
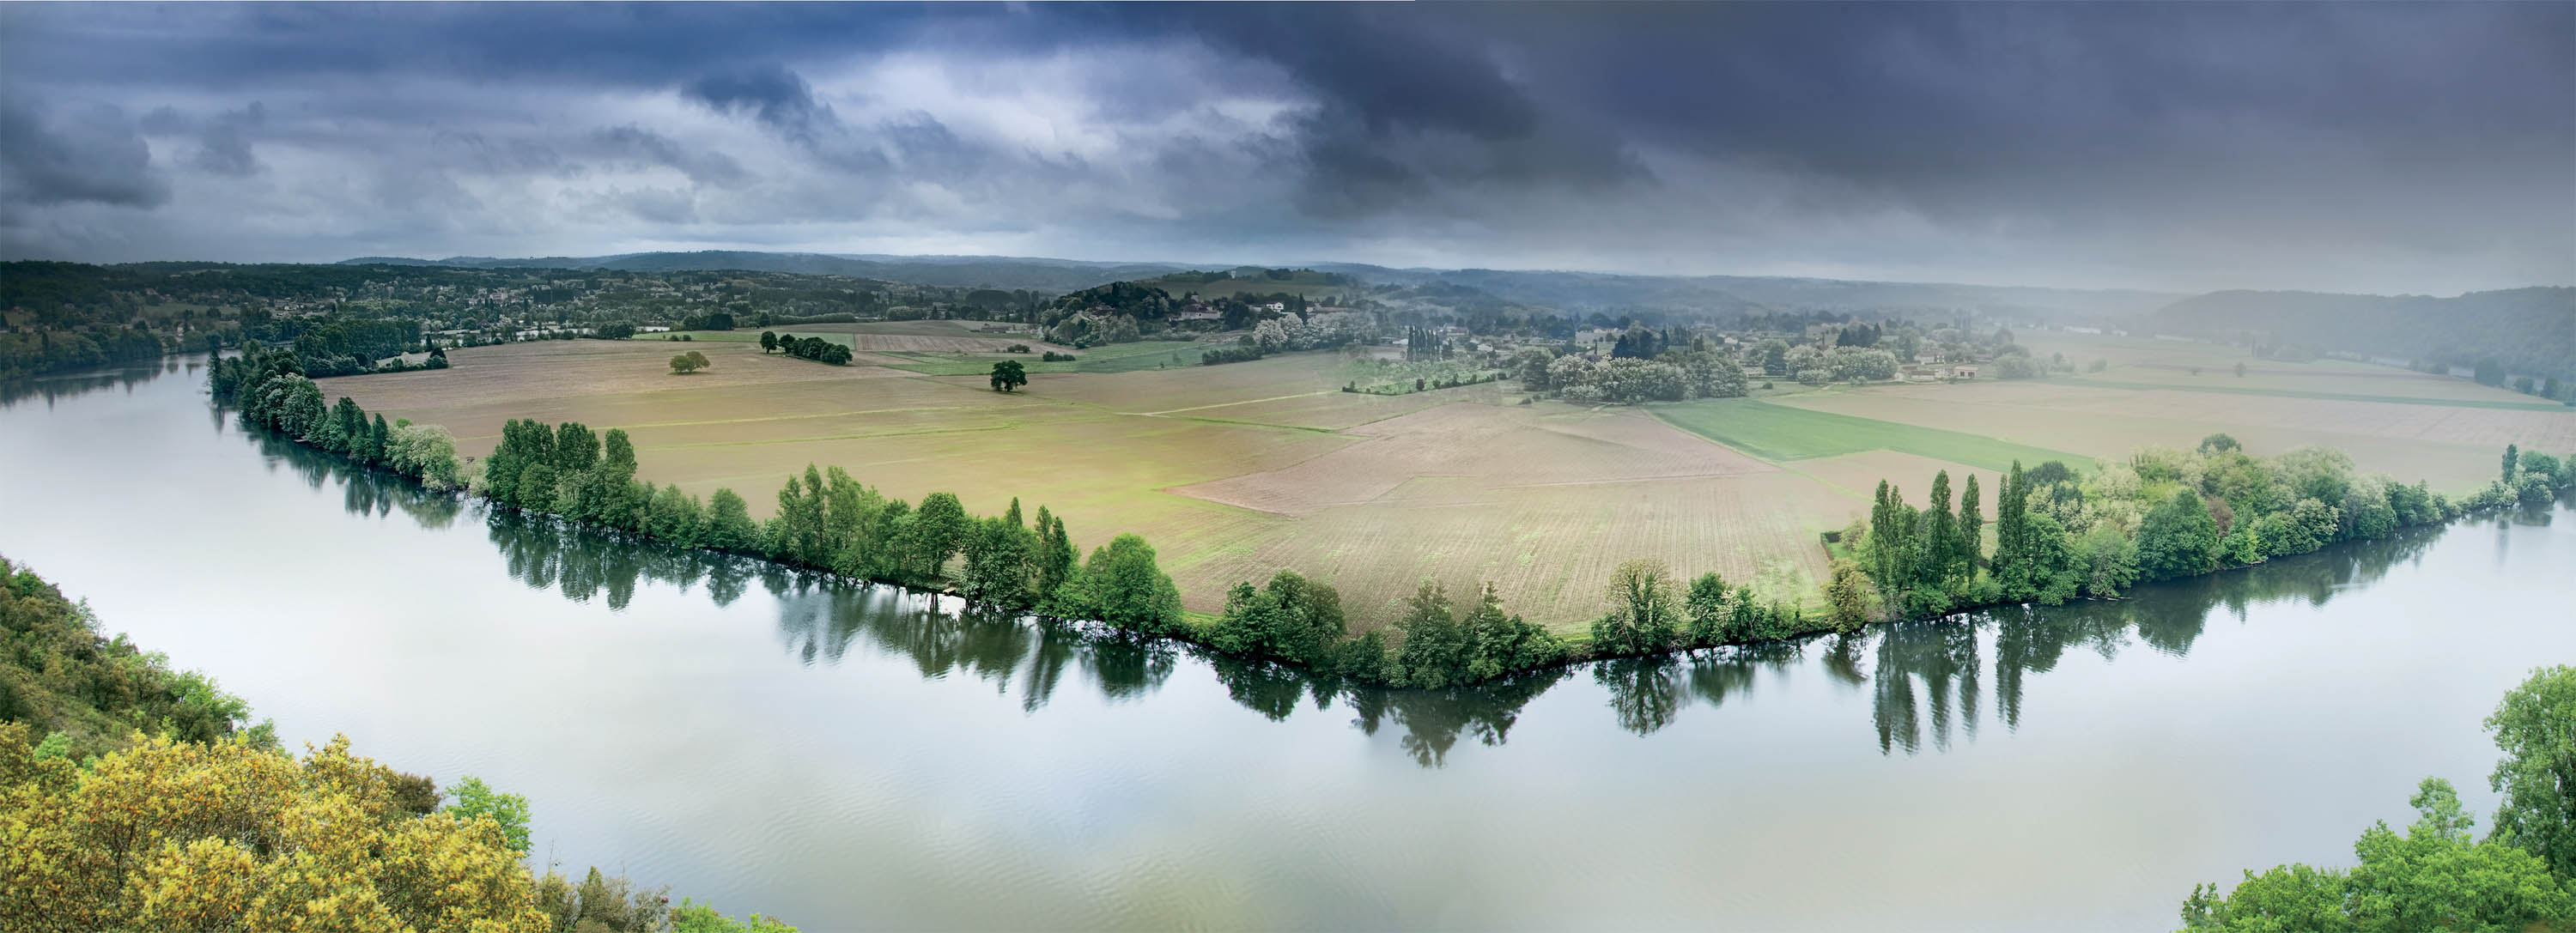
Bend in the River, Dordogne—Based in the ancient monastery town of Cadouin, France, I was exploring the surrounding countryside of the Dordogne. My hosts, who ran an organic strawberry farm, told me about an excellent hidden overlook above a bend in the Dordogne River. Apparently, this was not a very well-known spot, and would take a bit of effort to find.
On a bright but cloudy day with intermittent rain, I set out with my detailed Michelin map to try to find this location. Following my map and intuition through picturesque, cliffside villages, I came across the right spot, opposite an abandoned hotel. The tumble-down hotel building was gloomy and I couldn’t see the river. I knew I was close, but didn’t know which way to go until I noticed an unmarked trail leading away from the hotel’s parking lot.
Setting out on the trail with my camera, backpack, and tripod, I found my way to the top of the bluff that my hosts had described to me. The storm was blowing in with large raindrops starting to fall on my camera and tripod.
To make this image, I ignored the rain and mounted my camera vertically on the tripod and photographed three sets of exposures. The idea was to stitch the bracketed sets together to make a panorama.
The panorama shows a wide-angle view, but without the distortion that an extreme wide-angle lens would give. There are three vanishing points, the most important one in the center of the image, roughly located where the camera was pointed. The other two vanishing points follow the curvature of the river with the view to left into the brighter sky, and the view to the right into the oncoming squall.
Nikon D800, 28-300mm Nikkor zoom at 28mm, three sets each of five bracketed exposure sets, each set with shutter speeds ranging from 1/125 of 1/8 a second, all exposures at f/11 and ISO 100, tripod mounted; bracketed sets merged into a panorama using Photoshop.
Refraction, Curvature, and the Perspective Model
It’s a fundamental principle of photography that you cannot actually photograph an object. All you can photograph is the light reflected or emitted from the object. This implies that any model of perspective is using reflected or emitted light rather than the actual scene itself.
With it understood that one is capturing light, then it is clear that you can alter the perspective of almost anything if you can curve or bend the light. The most common way to play with light is to use reflection and refraction. A reflection mirrors existing light, and thus will create multiple perspective points if the camera is correctly positioned.
A refraction alters light by bending it. For example, when light passes through a bottle filled with liquid, the light within the bottle bends and any objects in the bottle, such as a spoon, will appear distorted. A curtain blowing in the breeze with shadows projected onto it follows normal perspective for the curtain, but no longer follows normal perspective for the shadows because they will appear curved (for an example, see pages 86–87).
Another example is a reflection in a curved surface, such as a building with large, curved panes of mirrored glass. The reflections in this building no longer follow normal rules of perspective and may show other buildings and scenery that wiggles across the glass. This mirrored scene in no way follows what we think of as normal perspective. The response is not to understand that this is an alternative projection, but rather to see it as a weird reflection.
When working in my studio, I often try to see what weird effects I can come up with using mirroring, curvature, and reflection. The odder the visual effect, the more impact the image has. This is true out in the wider world as well as in the studio.

Window on the Ancient Abbey—Exploring the historic and picturesque village of Conques in the southwest of France, my photography workshop group and I walked across the central square. While we were looking at the Abbaye Sainte-Foy de Conques, a World Heritage Site, some of us noticed a small wine bar across the way with a second-story window looking out on the square.
Checking in with the proprietor, we got permission to photograph from the window. I ran up the ancient, cramped stairs to the second floor, opened the windows, and was intrigued to notice the reflections on the left and right.
Setting up for this shot was a little nerve-racking because space was limited, there was a two-story drop out the window, and it was hard to position the tripod so it was stable in the space, and so that I was able to get exactly the right camera position. Notice how the towers at the top of each reflection are complete with a little bit of sky above them. I worked hard for this! Small movements of the camera position in this kind of situation have a huge impact on the final composition.
This image has three apparent vanishing points: the Abbaye straight ahead, and the two reflected church facades, one on the left and one on the right.
Nikon D800, 16mm Nikkor fisheye, seven exposures with shutter speeds ranging from 1/8,000 to 1/40 of a second at f/6.3 and ISO 200, tripod mounted.
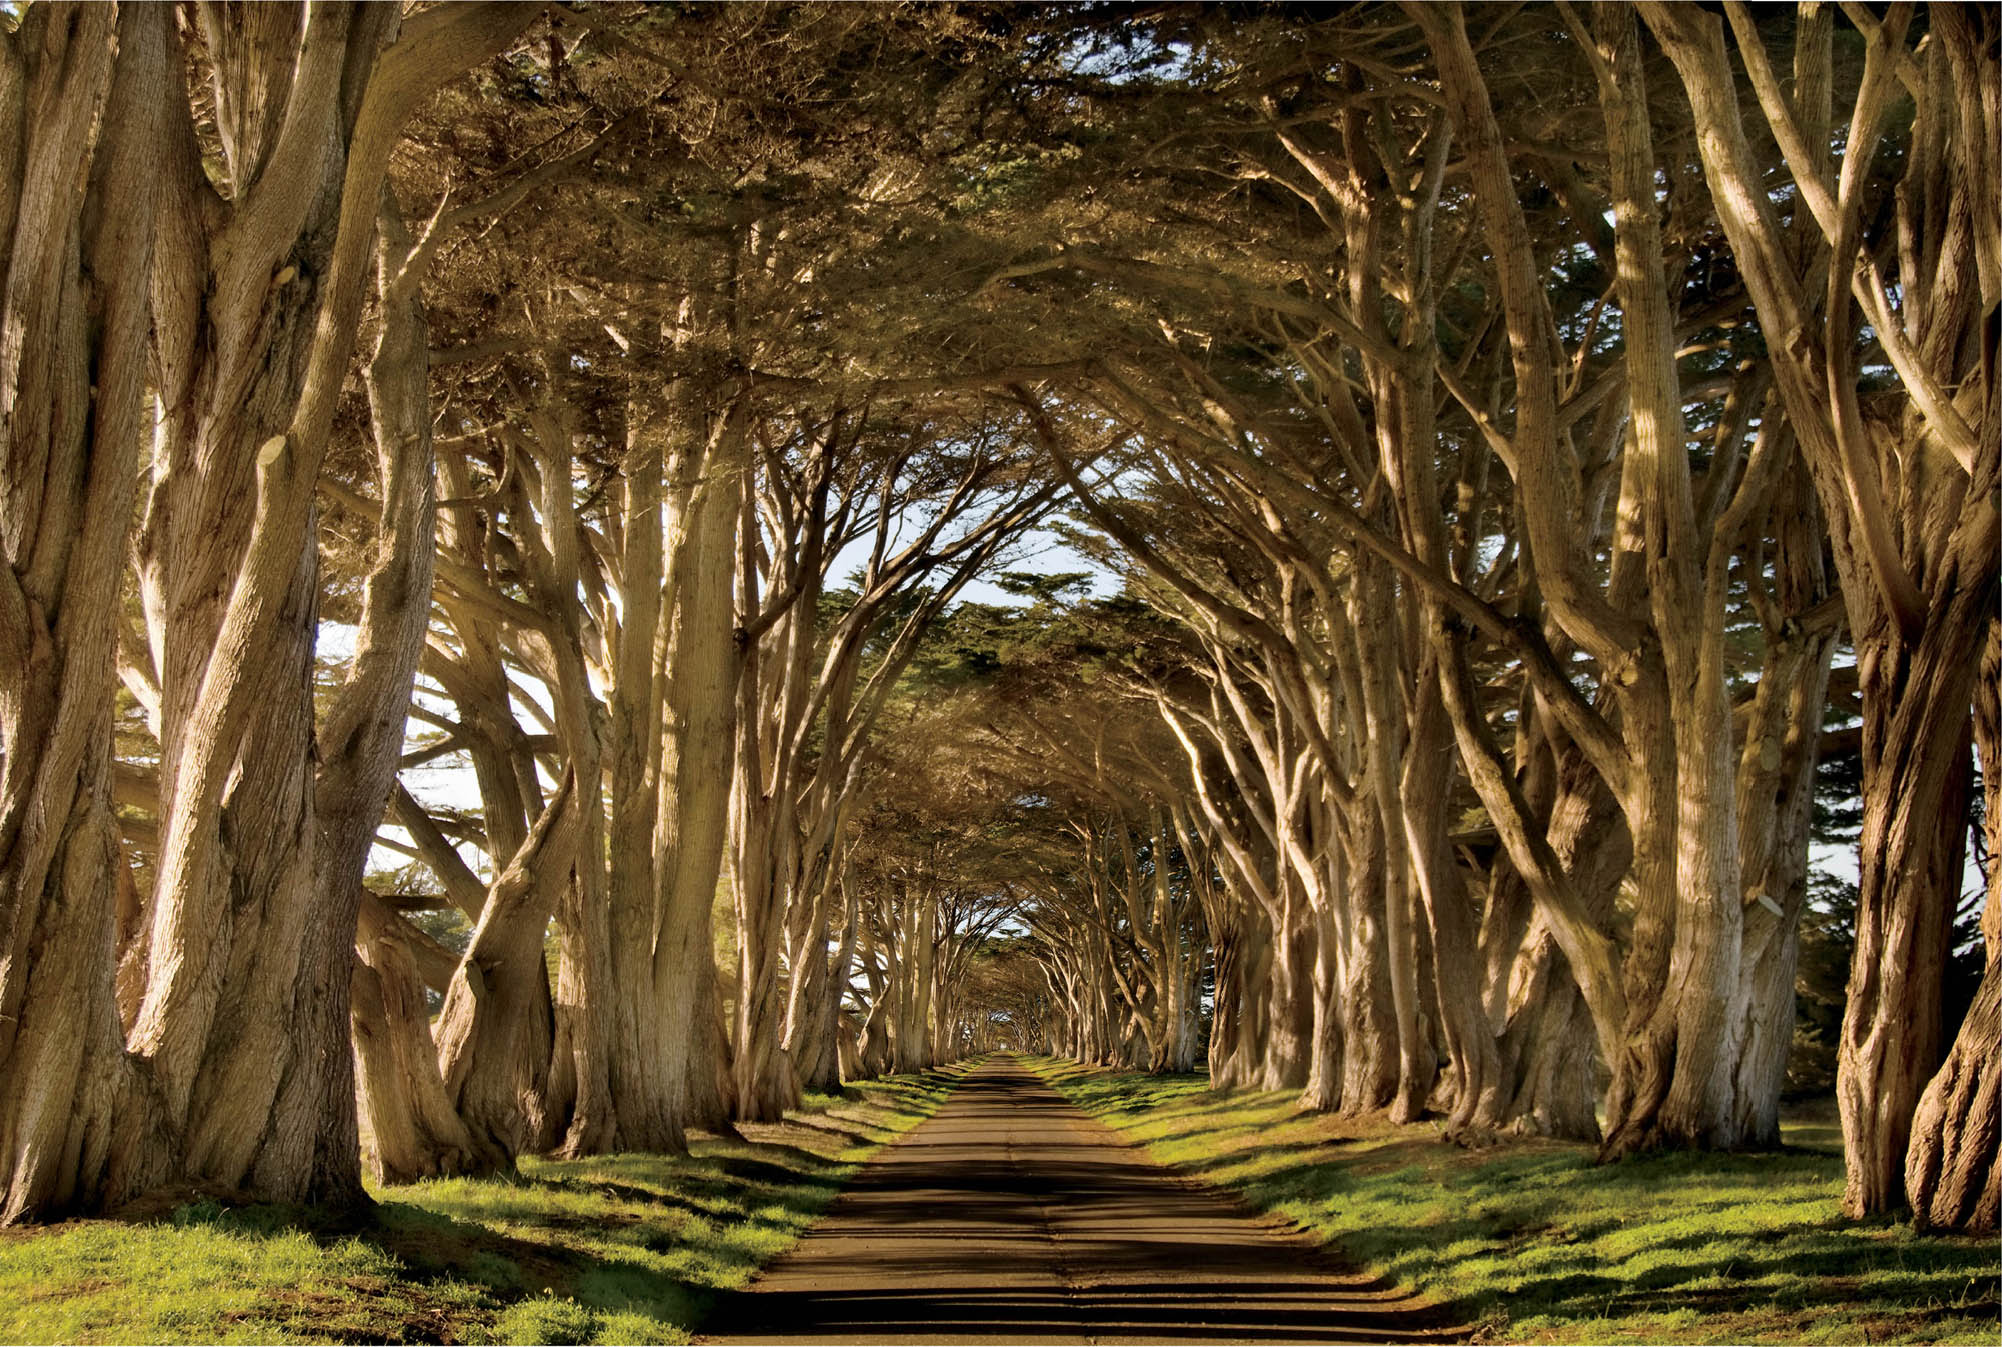
The Destination Recedes—This tunnel of Monterey cypress trees (Cupressus macrocarpa) leading away from the Marconi Station in Point Reyes National Seashore, California, presents an obvious single vanishing point. Don’t be fooled! True, the vanishing point following a road down a row of trees is likely to be a great example of single-point perspective.
In this case, I took the single-point perspective and extended it to the max. Let me explain!
In the actual row of trees you can see the end of the aisle about 2/3 of the way down the road. There, the tunnel of trees opens to the sky. I composited the image with a resized version of itself several times, placing each successive reduced image in the center of the image further down. This creates an illusion of a tree-lined vanishing point that seems to go on an impossible distance.
In some sense, this is a double-fractal image. Not only did the trees grow in a fractal fashion, but also my extension of the vanishing point was created using fractals (to find out more about fractals, turn to page 128).
If you look at the magnification on the upper right, you’ll see that it appears almost the same as the entire image. In fact, this portion of the image is actually a small area of the original image, as shown in the diagram at the lower right.
Nikon D300, 18-200 Nikkor zoom at 40mm, 1/250 of a second at f/6.3 and ISO 100, hand held; composited with itself in Photoshop.
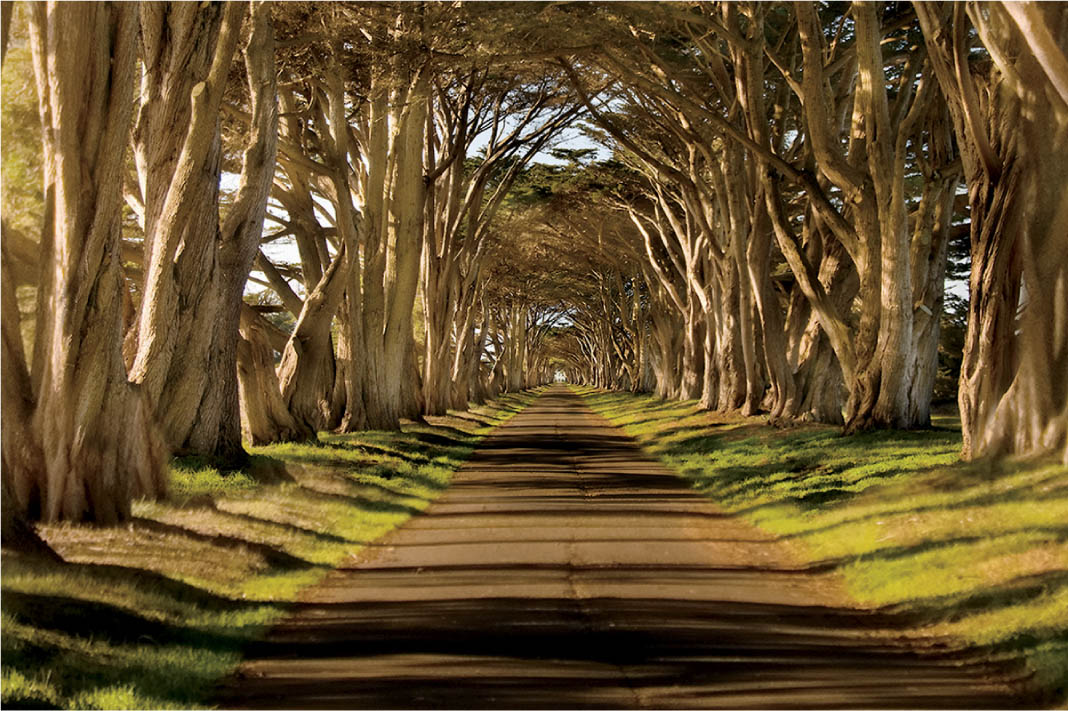
The image shown above is not the original image that you see to the left! It is a small, magnified portion of the image.
At first glance, this magnification looks like the original. Look hard to find the differences. The vanishing point is the same in both images. Does this also remind you of fractals? For more about fractals, turn to page 128.
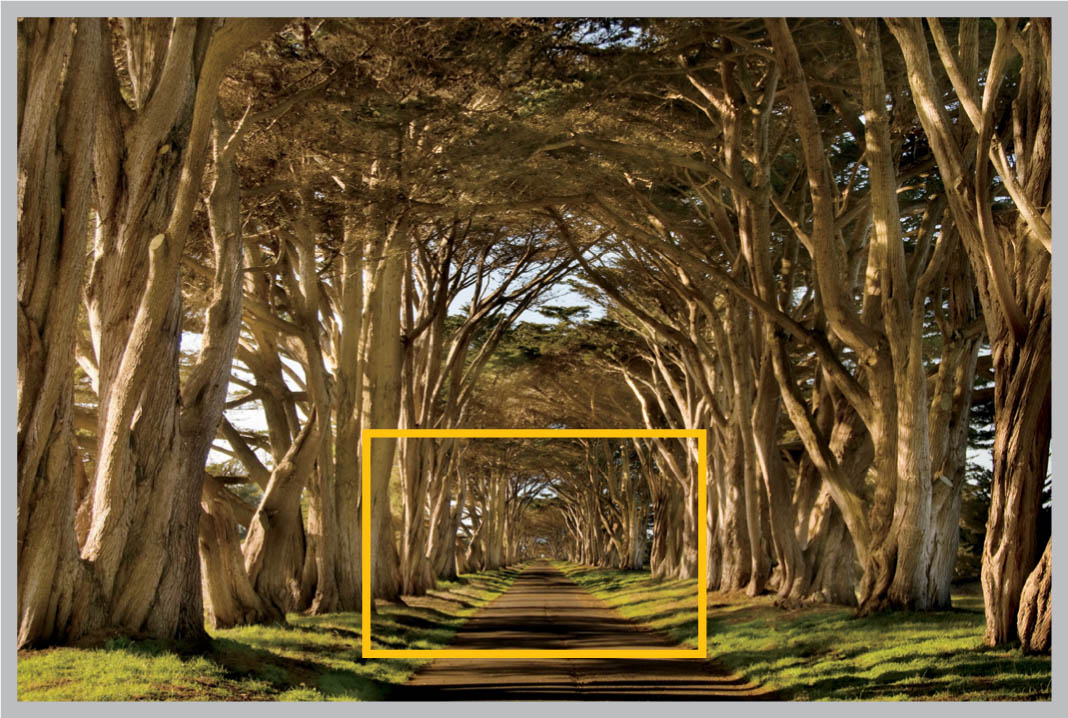
The yellow rectangle shows the area from where the magnified version (top) of the original image was taken. Proportionally, it is the same as the original image (left).
Changing Perspective in Post-Production
Last but not least, it is possible to change perspective using Photoshop or other postproduction tools. The advantage of changing perspective in post-production is essentially that the sky is the limit. You can modify all aspects of the perspective in your image as much as you want.
The disadvantages of modifying perspective in post-production are that it is surprisingly difficult to pull off with élan, and the results are all too likely to look artificial, faked, and “Photoshopped.” It’s often best to look for situations where what you are doing is enhancing or modifying reality, rather than creating from scratch.
One of my favorite techniques for modifying perspective in post-production involves duplicating an image, horizontally or vertically mirroring the duplicate, and then using portions of the mirrored duplicate to composite with the original image.
In addition, many photo-manipulation software tools allow you to alter perspective. For example, Photoshop’s Edit ►Transform menu provides a number of tools that can be used to alter the perspective in an image. These tools include Distort, Perspective, Skew, and Warp.
Photo-manipulation tools, such as the transformation tools in Photoshop, allow the image manipulator to alter perspective in a variety of ways either locally, for a portion of an image, or globally, for an entire image.
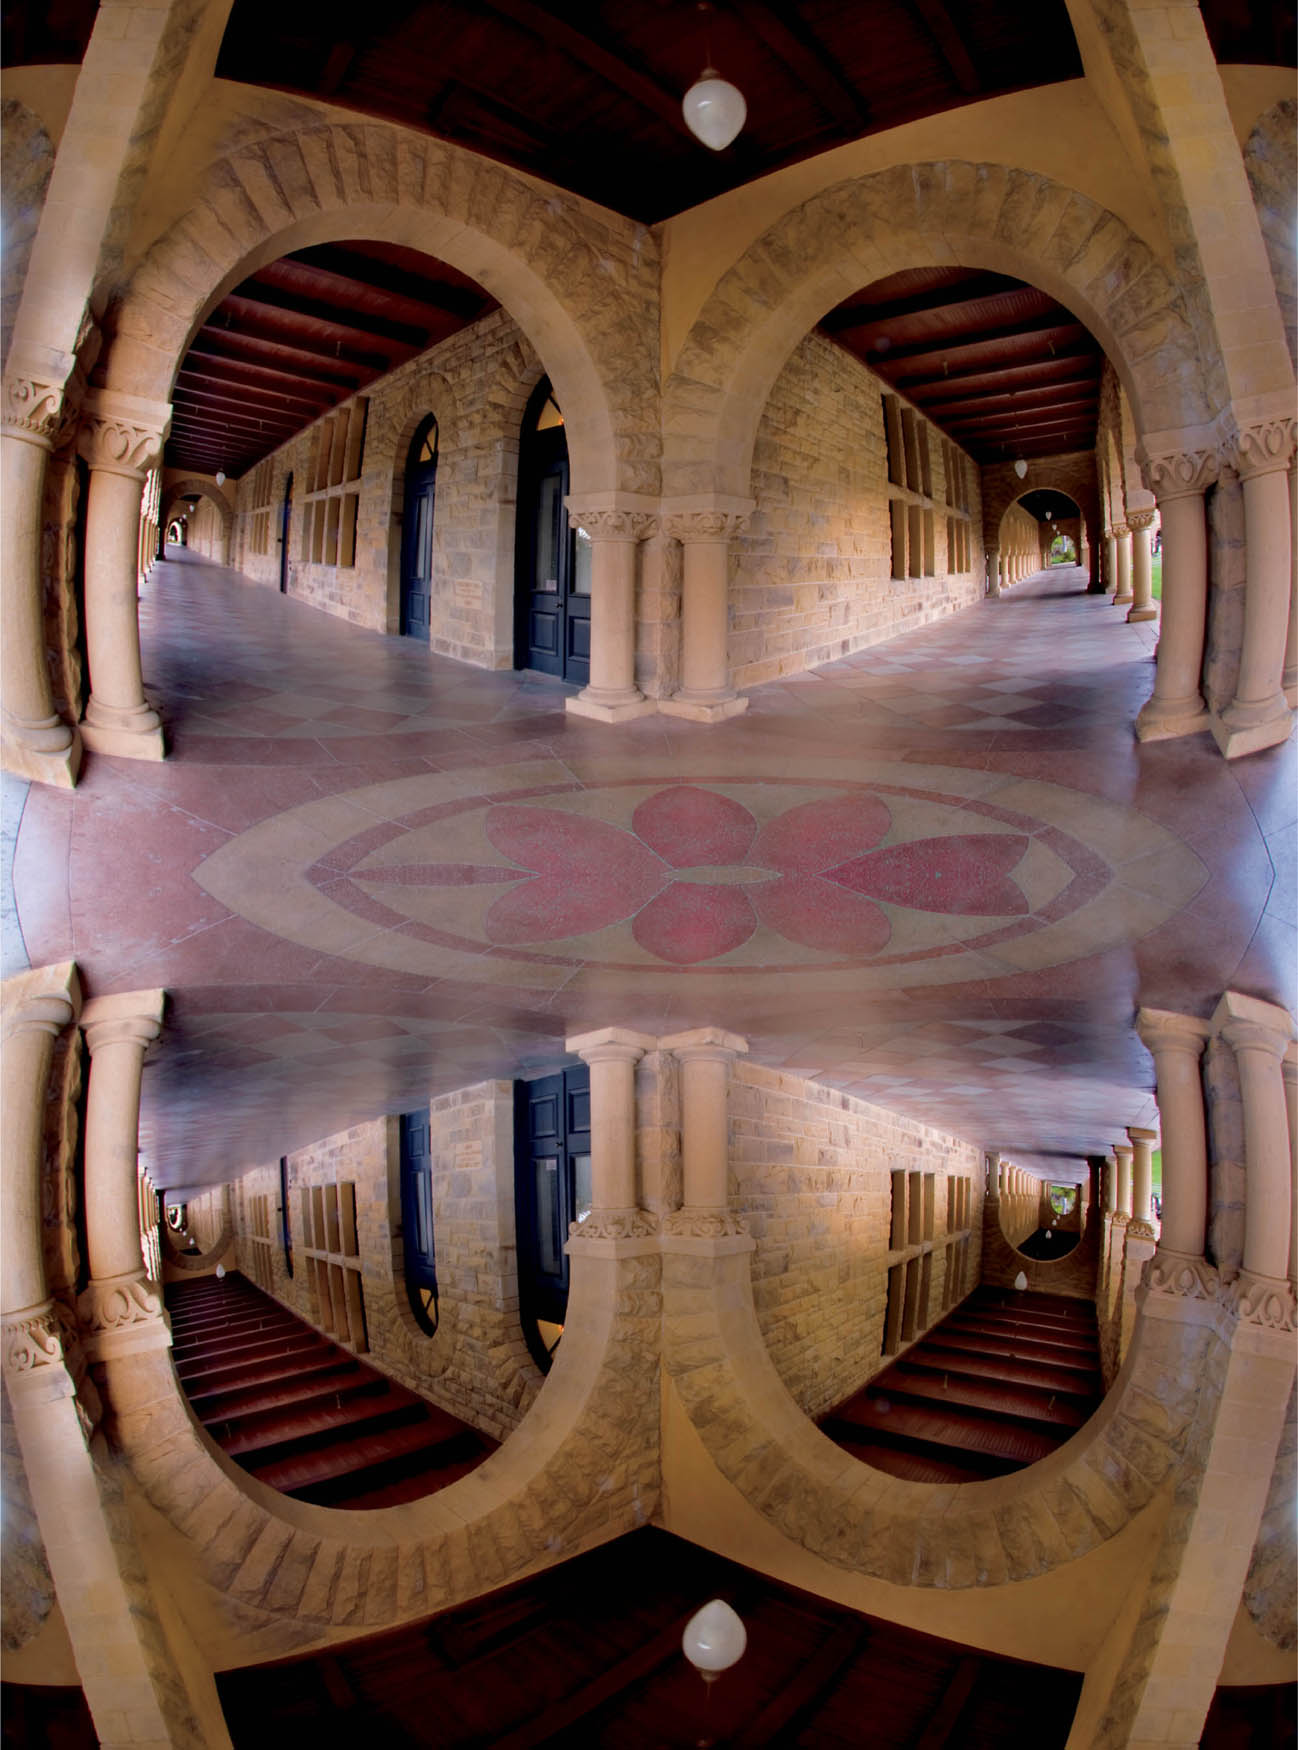
Quad—This is an evening photograph of covered pedestrian arcades at Stanford University in Palo Alto, California. The walkways presented two corridors meeting at a right angle, which lent themselves to a two-point perspective image when I used a fisheye lens.
My tripod was located behind a puddle from recent rains. As I looked at the scene, it occurred to me that if only the puddle were bigger and reflections more complete,
I would have four vanishing points.
Voila! No sooner said than done. Well, not quite. I spent some time working in Photoshop. First, I duplicated the original image, flipped it horizontally, and then rotated it. Carefully combining portions of the duplicate with the original to be as seamless as possible, I created the full image with four vanishing points that you see here.
Nikon D300, 10.5mm Nikkor fisheye, 2 seconds at f/20 and ISO 100, tripod mounted; composited with itself in Photoshop.