
Chapter 10
Get Your Arduino Online
Ingredients
- 1 Arduino
- 1 Arduino USB cable
- Your computer
- A home wifi network and the password for it
Special items
- 1 SparkFun WiFi Shield (ESP8266)
- 1 set of Arduino R3 Stackable Headers
- Soldering iron
- Roll of solder (lead free)
- Small piece of tape (any kind will do)
Optional items
- 1 breadboard
- 1 set of Break Away Headers
Until now, your smart objects sensed things nearby and communicated with you with blinking lights or numbers on your screen. We can make the Arduino even smarter by letting it surf the Internet! Once online, it can nab weather reports, monitor your environment, and even send emails at the push of a button!
Concepts: Connecting to the Internet with a WiFi Board
To get online, we need to get your Arduino on to your home wifi network. And to do that we need to add some wifi parts to your Arduino. We do that with a new circuit board about the same size as an Arduino that piggybacks on top of your Arduino. In Arduino-speak, these add-on boards are known as “shields.” I like to think that shields give Arduinos superpowers.
This particular superpower will be key to the rest of the book; all of the other projects use this board for exciting jobs. So let’s take a moment to get one of these little guys up and running.
The SparkFun WiFi Shield is the key link between your Arduino and the Internet. There are links for ordering the wifi board, and the rest of these parts, at http://keefe.cc/arduino-online.
Steps
As with the “Electric Candle” project, we need to solder some headers onto the wifi board. Again, soldering is a whole lot easier than you might think. And there are some great tutorials online, complete with videos. One of my favorite guides is here: http://keefe.cc/soldering.
To help solder the headers on this board, I made a little mounting platform using parts in the “Optional items” section under “Ingredients”—a set of “Break Away Headers.” Note that unlike the stackable headers, these are just pins; they don’t have any holes.

Figure 10-1: Two kinds of headers: break-away (left) and stackable (right)
You can break these headers into smaller sections (hence the name). I broke off four groups of five pins and pushed the long ends of each group into the breadboard at rows 1 and 20.
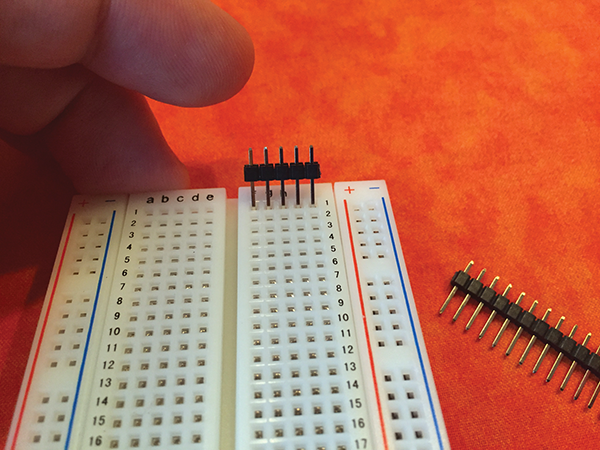
Figure 10-2: Inserting the break-away headers into the breadboard
When you’re done, it’ll look like this:

Figure 10-3: Positioning the break-away headers in rows 1 and 20 to make a soldering base
Then I line up the set stackable headers, their pins pointing up, onto the breadboard setup in the same pattern as holes on the wifi shield—if the shield is facing down. That pattern looks like Figure 10-4
Now the pins correspond to the holes on the face-down wifi shield. Note that we’re ignoring the holes on the “middle” end of the wifi shield.
Slide the board onto the pins, making sure the side with the electronic components is facing down toward the breadboard.

Figure 10-4: Line up the stackable headers onto your breadboard platform.
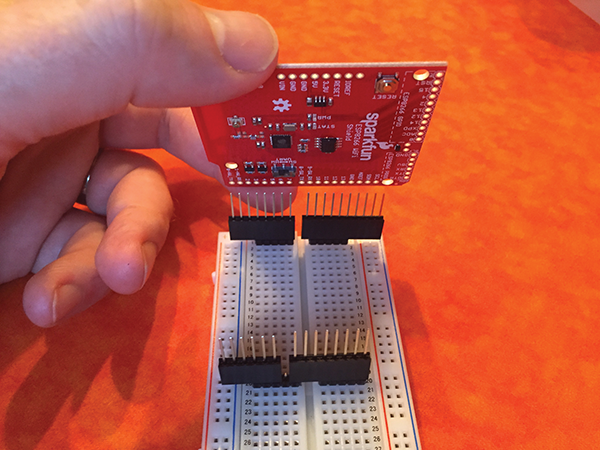
Figure 10-5: Slide the wifi board onto the long pins, with the electronics on the board facing the breadboard.

Figure 10-6: Arranging the pins this way does the most important job in soldering: holding the board for you so you can focus on the soldering!
Wire Up the Parts
You’ve accomplished all of the wiring with your awesome soldering job. Nice work.
Before we put the wifi board and the Arduino together, place a small piece of tape on top of the Arduino’s USB port—the shiny box you plug the USB cable into. That box actually is connected to “ground,” and we want to keep that separated from the metal contacts on the underside of the wifi board so it doesn’t accidentally complete a circuit we don’t want.
Electrical tape tends to stick to metal better, but any tape will do the trick.
Then carefully press the shield straight down onto your Arduino, making sure all of the pins from the wifi board go into all of the pins on the Arduino.

Figure 10-7: The wifi board pressed onto the Arduino. Note that all of the wifi board pins line up with all of the Arduino’s holes. To the left, you can also see the blue tape I put on top of the USB port.
Then connect your Arduino to your computer to load up the code.
Load Up the Code
As we’ve seen before, in the “A Gentle Touch” project, sometimes we need to add to Arduino’s knowledge, and that’s often true when we add a new part like this. So we’ll need the “library” for the wifi shield.
Remember that a “library” isn’t a comprehensive as it sounds. It is a little bit of code containing commands for a particular task. Here’s how to get the library for the wifi board.
- Download the “wifi” library by putting this link into an Internet browser: http://bit.ly/sparkfun-wifi.
- That should download a compressed file with a ridiculously long name called
SparkFun_ESP8266_AT_ArduinoLibrary-master.zip. It will probably end up in your “Downloads” folder. Don’t unzip it! - At this point, if you see a folder and not a “.zip” file, your browser may have “helpfully” unzipped the file and deleted the original. Check out the “Was Your File Politely Deleted?” note in the “A Gentle Touch” project.
- Start your Arduino software (if it’s not running already).
- From the menu bar, select Sketch → Include Library → Add .ZIP Library . . .

Figure 10-8: Adding a downloaded library on a Mac (it’s in the same spot in the Windows version)
- Navigate to the place your browser saved
SparkFun_ESP8266_AT_ArduinoLibrary-master.zip(it’s very likely in your “Downloads” folder). - Select
SparkFun_ESP8266_AT_Arduino_Library-master.zipand click the “Choose” button. - Great! Now quit your Arduino software and restart it.
Fortunately, the library you just installed also comes with the code we need to get up and running. Start from the Arduino software menu bar and select File → Examples → SparkFun ESP8266 AT Library → ESP8266_Shield_Demo.
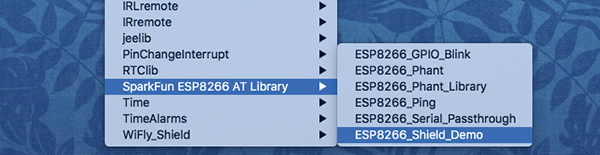
Figure 10-9: Finding the Demo Sketch under File → Examples. Shown on a Mac, but it’ll be in the same spot no matter your computer.
To make this code work, though, you need to add some information about your own wifi network. Look for this section of the code:
//////////////////////////////
// WiFi Network Definitions //
//////////////////////////////
// Replace these two character strings with the name and
// password of your WiFi network.
const char mySSID[] = "yourSSIDhere";
const char myPSK[] = "yourPWDhere";
Replace the yourSSIDhere with the name of your wifi network, such as “Keefe Family WiFi,” and replace the yourPWDhere with the password for your network. Be sure to keep the double quotes around each.
Save your sketch using File → Save. (You’ll be prompted to save it with a new name.)
Before you upload your sketch to the Arduino, look for the little switch on the surface of the wifi board marked “UART.” If it’s not already, slide it to “SW.”
Now upload your sketch using Sketch → Upload or the arrow button at the top of the window.
Make It Go
It’s the Moment of Truth!
Open the Serial Monitor window with Tools → Serial Monitor. You should see
Press any key to begin.That’s not quite true. You need to put your cursor in the input box at the top of the Serial Monitor window and then press Return or Enter to begin. Do this any time the program says “Press any key.”
If everything is in order, you’ll see
ESP8266 Shield Present
Mode set to station
Connected to: [Your wifi network name]
My IP: 192.168.1.2
Press any key to connect client.
. . . (and a whole bunch of other text) . . .
<body>
<div>
    <h1>Example Domain</h1>
    <p>This domain is established to be used for illustrative examples in
    documents. You may use this domain in examples without prior
    coordination or asking for permission.</p>
    <p><a href="http://www.iana.org/domains/example">More information. . .</a></p>
</div>
</body>
</html>
0,CLOSED
Press any key to test server.
That text scrolling by actually lives on the Internet, on a site called “example.com”—so your Arduino is connected to the Internet! You are ready for the next chapters.
If that didn’t happen, check out the “Fixes” below.
Fixes
If you’re having trouble getting your Arduino on the Internet, try these steps:
- Generally, while playing with this board, there are three things I try when I need to jump-start the Arduino, in this order:
- Close and reopen the Serial Monitor window. This restarts the code on your Arduino.
- Press the reset button on the wifi board. This also restarts the code.
- Unplug the Arduino from your computer, wait five seconds, and plug it in again.
- Try those steps if you get
Press any key to beginbut didn’t get to see all the scrolling text after you pressedReturn. Sometimes it takes a couple of attempts to get online. - Also try those steps if the board doesn’t connect to either your wifi or to the Internet right away. Check that your wifi network name and password are entered correctly in the right spot in the code.
- If you have trouble uploading your code to your Arduino—and getting a lot of orange text in your lower Arduino window instead—be sure the little switch on the wifi board is switched to “SW,” not “HW,” and also double-check that your “Arduino Uno” selections are set correctly under Tools → Board and Tools → Port.
- If you’re getting random characters in your Serial Monitor window, be sure the drop-down menus at the bottom of that window are set to “Both NL & CR” and “9600 baud.”
- On occasion, I’ve had the entire board just “hang” and not respond to anything. Unplugging the Arduino’s USB cable from the computer, waiting a couple of seconds, and plugging it back in has done the trick.
- The blue light on the surface of the wifi board provides a little extra information about what’s going on:
- Regular flashing means the board is not connected to the wifi network.
- Fast flashing means it’s logging into the wifi network.
- Steady means it’s connected!
What’s Going On?
Just like a laptop computer, the Arduino now has wifi capabilities, which gives it Internet capabilities. The steps it is taking are, essentially:
Arduino → WiFi board → WiFi network → The Internet → example.com
Once it gets there, example.com sends a web page back. Viewed by the Arduino, it’s not all nice and pretty, like when you go to http://example.com in a browser:
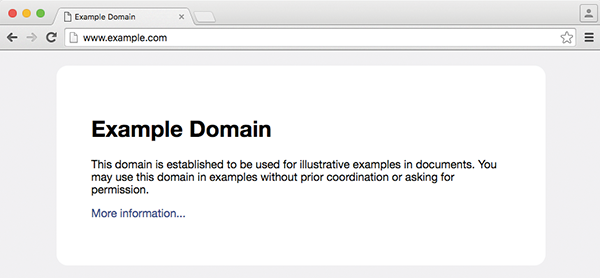
Figure 10-10: The website “example.com” in a browser
Instead, you’re seeing the underlying text, in Hypertext Markup Language (HTML) that your browser turns pretty. Still, you’re seeing the same web page.
Code Corner
A Quick Tour
Okay, there’s a lot going on in this sketch, and you’ve already done a lot. But here’s a quick guide to what’s happening:
- In the beginning of the program, there are a bunch of variables to make the program work. Some variables you customized with your own information.
- The
void setup()section runs a whole lot of functions, which are used to get the wifi board up and running. - The
void loop()has just one function inside:serverDemo(). - Most of the code here is defining the functions called in
void setup()andvoid loop().
String Things
In several places you’ll see mention of a string. Strings are special things in coding that represent words, such as “Hello.” The computer, an Arduino in our case, knows to handle them as a string of characters—letters, numbers, or symbols—that should be used together.
Strings are often contained in " quote marks, which distinguish them from variables, so string "hello" is different from variable hello.
The quote marks also let the computer know when numbers should be treated like words, not something you could add or subtract. This comes up a lot with U.S. zip codes, where you might want the string "02134" instead of the integer 2134.
So when you see String, think “characters” or “words.”
Taking It Further
Other Websites
It might seem natural to test out other sites like “google.com” by adjusting the code, and you are absolutely right. Trouble is, that clean, basic Google home page actually has, at last check, 267 lines of code behind it—and many of them are loooong lines! All of that text quickly overwhelms your little Arduino.
In the next chapter, we’ll make some precision requests of sites that will get us little bursts of useful information.
What’s That “Test Server” Thing?
You may have noticed that the program actually continues beyond where I stopped, with
Press any key to test server.Beyond this point, the wifi board actually switches from looking at websites to being a website—at least within your own home. If you’d like to see how, press Return or Enter here. It should respond with something like
Server started! Go to 192.168.1.2The line of numbers may be different for you, but whatever they are, copy the lot of them (in my case 192.168.1.2), switch to a web browser on your computer, and paste them into the location bar at the top of the browser, where you’d normally put a website address:

Figure 10-11: Put the numbers in the spot you usually type a web address.
Hit return, and you should see a bunch of numbers like
A0: 339
A1: 332
A2: 339
A3: 335
A4: 368
A5: 375
The super-cool thing? Those numbers are actually readings from the Arduino’s six analog pins—A0 through A5! They’re pretty random at the moment, because nothing is attached to those pins. But add a sensor circuit, and those values would change with the sensor.