
Chapter 4. Programming your infrastructure: the command line, SDKs, and CloudFormation
- Understanding the idea of infrastructure as code
- Using the CLI to start a virtual server
- Using the JavaScript SDK for Node.js to start a virtual server
- Using CloudFormation to start a virtual server
Imagine that you want to create room lighting as a service. To switch off the light in a room with software, you need a hardware device like a relay that can break the circuit. This hardware device must have some kind of interface that lets you send it commands like on and off via software. With a relay and an interface, you can offer room lighting as a service. This also applies to virtual server as a service. If you want to start a virtual server via software, you need hardware that can handle and fulfill your request. AWS provides infrastructure that can be controlled via an interface called an application programming interface (API). You can control every part of AWS over the API. Calling the API is possible with SDKs for most programming languages, the command line, and more sophisticated tools.
The examples in this chapter are not all covered by the Free Tier. A special warning message appears when an example incurs costs. As long as you don’t run the other examples longer than a few days, you won’t pay anything for them. Keep in mind that this applies only if you created a fresh AWS account for this book and nothing else is going on in your AWS account. Try to complete the examples of the chapter within a few days; you’ll clean up your account at the end of each example.
On AWS, everything can be controlled via an API. You interact with AWS by making calls to the REST API using the HTTPS protocol, as figure 4.1 illustrates. Everything is available through the API. You can start a server with a single API call, create 1 TB of storage, or start a Hadoop cluster over the API. By everything, we mean everything. You’ll need some time to understand the consequences of this. By the time you finish this book, you’ll ask why the world wasn’t always that easy. Let’s look at how the API works.
Figure 4.1. Interacting with AWS by making calls to the REST API

To list all the files in the S3 object store, you can send a GET request to the API endpoint:
GET / HTTP/1.1
Host: BucketName.s3.amazonaws.com
Authorization: [...]
The response will look like this:
HTTP/1.1 200 OK
x-amz-id-2: [...]
x-amz-request-id: [...]
Date: Mon, 09 Feb 2015 10:32:16 GMT
Content-Type: application/xml

<?xml version="1.0" encoding="UTF-8"?>
<ListBucketResult xmlns="http://s3.amazonaws.com/doc/2006-03-01/">
[...]
</ListBucketResult>
Calling the API directly using plain HTTPS requests is inconvenient. The easy way to talk to AWS is by using the command-line interface or SDKs, as you learn in this chapter. But the API is the foundation of all those tools.
4.1. Infrastructure as code
Infrastructure as code describes the idea of using a high-level programming language to control IT systems. In software development tools like automated tests, code repositories, and build servers are increasing the quality of software engineering. If your infrastructure can be treated as code, you can apply the same techniques to infrastructure code that you do to your application code. In the end, you’ll improve the quality of your infrastructure by using automated tests, code repositories, and build servers.
Warning
Don’t mix up the terms infrastructure as code and infrastructure as a service (IaaS)! IaaS means renting servers, storage, and network with a pay-per-use pricing model.
4.1.1. Automation and the DevOps movement
DevOps (Development operations) is an approach driven by software development to bring development and operations closer together. The goal is to deliver rapidly developed software to the customer without a negative impact on quality. Communication and collaboration between development and operations are therefore necessary.
Multiple deploys per day are possible only if your pipeline from code changes to deployment is fully automated. If you commit into the repository, the source code is automatically built and tested against your automated tests. If the build passes the tests, it’s automatically installed in your testing environment. Perhaps some integration tests are triggered. After the integration tests have been passed, the change is propagated into production. But this isn’t the end of the process; now you need to carefully monitor your system and analyze the logs in real time to ensure that the change was successful.
If your infrastructure is automated, you can spawn a new system for every change introduced to the code repository and run the integration tests isolated from other changes that were pushed to the repository at the same time. Whenever a change is made to the code, a new system is created (servers, databases, networks, and so on) to run the change in isolation.
4.1.2. Inventing an infrastructure language: JIML
For the purpose of understanding infrastructure as code in detail, let’s invent a new language to describe infrastructure: JSON Infrastructure Markup Language (JIML). Figure 4.2 shows the infrastructure that will be created.
Figure 4.2. From JIML blueprint to infrastructure: infrastructure automation

The infrastructure consists of the following:
- Load balancer (LB)
- Virtual servers
- Database (DB)
- DNS entry
- Content delivery network (CDN)
- Bucket for static files
To reduce issues with syntax, let’s say JIML is based on JSON. The following JIML program creates the infrastructure shown in figure 4.2. The $ indicates a reference to an ID.
Listing 4.1. Infrastructure description in JIML
{
  "region": "us-east-1",
  "resources": [{
    "type": "loadbalancer",
    "id": "LB",
    "config": {

      "server": {
        "cpu": 2,
        "ram": 4,
        "os": "ubuntu",
        "waitFor": "$DB"
      },
      "servers": 2
    }
  }, {
    "type": "cdn",
    "id": "CDN",
    "config": {
      "defaultSource": "$LB",
      "sources": [{
        "path": "/static/*",
        "source": "$BUCKET"
      }]
    }
  }, {
    "type": "database",
    "id": "DB",
    "config": {
      "password": "***",
      "engine": "MySQL"
    }
  }, {
    "type": "dns",
    "config": {
      "from": "www.mydomain.com",
      "to": "$CDN"
    }
  }, {
    "type": "bucket",
    "id": "BUCKET"
  }]
}
How can this JSON be turned into AWS API calls?
1. Parse the JSON input.
2. The JIML interpreter creates a dependency graph by connecting the resources with their dependencies.
3. The JIML interpreter derives a linear flow of commands from the dependency graph by traversing the tree from the bottom (leaves) to the top (root). The commands are expressed in a pseudo language.
4. The commands in pseudo language are translated into AWS API calls by the JIML runtime.
Let’s look at the dependency graph created by the JIML interpreter, shown in figure 4.3.
Figure 4.3. The JIML interpreter figures out the order in which resources need to be created.

Traverse the dependency graph from bottom to top and from left to right. The nodes at the bottom have no children: DB ![]() and bucket
and bucket ![]() . Nodes without children have no dependencies. The server
. Nodes without children have no dependencies. The server ![]() nodes depend on the DB
nodes depend on the DB ![]() node. The LB
node. The LB ![]() depends on the server
depends on the server ![]() nodes. The CDN
nodes. The CDN ![]() node depends on the LB
node depends on the LB ![]() node and the bucket
node and the bucket ![]() node. Finally, the DNS
node. Finally, the DNS ![]() node depends on the CDN node.
node depends on the CDN node.
The JIML interpreter turns the dependency graph into a linear flow of commands using pseudo language. The pseudo language represents the steps that are needed to create all the resources in the correct order. The nodes at the bottom have no dependencies and are therefore easy to create; that’s why they’re created first.
Listing 4.2. Linear flow of commands in pseudo language

The last step—translating the commands of the pseudo language into AWS API calls—is skipped. You already learned everything you need to know about infrastructure as code: it’s all about dependencies.
Now that you know how important dependencies are to infrastructure as code, let’s see how you can use the command line to create infrastructure. The command line is one tool to implement infrastructure as code.
4.2. Using the command-line interface
The AWS command-line interface (CLI) is a convenient way to use AWS from your command line. It runs on Linux, Mac, and Windows and is written in Python. It provides a unified interface for all AWS services. Unless otherwise specified, the output is in JSON format.
You’re now going to install and configure the CLI. After that, you can get your hands dirty.
4.2.1. Installing the CLI
How you proceed depends on your OS. If you’re having difficulty installing the CLI, consult http://mng.bz/N8L6 for a detailed description of many installation options.
Linux and Mac OS X
The CLI requires Python (2.6.5 and greater, 2.7.x and greater, 3.3.x and greater, or 3.4.x and greater) and pip. pip is the recommended tool for installing Python packages. To check your Python version, run python --version in your terminal. If you don’t have Python installed or your version is too old, you’ll need to find an alternate way to install Python. To find out if you have pip already installed, run pip --version in your terminal. If a version appears, you’re fine; otherwise, execute the following to install pip:
$ curl "https://bootstrap.pypa.io/get-pip.py" -o "get-pip.py"
$ sudo python get-pip.py
Verify your pip installation by running pip --version in your terminal again. Now it’s time to install the AWS CLI:
$ sudo pip install awscli
Verify your AWS CLI installation by running aws --version in your terminal.
Windows
The following steps guide you through installing the AWS CLI on Windows using the MSI Installer:
1. Download the AWS command-line interface (32-bit or 64-bit) MSI installer from http://aws.amazon.com/cli/.
2. Run the downloaded installer, and install the CLI by going through the installation wizard.
3. Run PowerShell as administrator by searching for the PowerShell entry in the Start menu and choosing Run as Administrator from its context menu.
4. Type Set-ExecutionPolicy Unrestricted into PowerShell, and press Enter to execute the command. This allows you to execute the unsigned PowerShell scripts from our examples.
5. Close the PowerShell window; you don’t need to work as administrator any longer.
6. Run PowerShell via the PowerShell entry in the Start menu.
7. Verify whether the CLI is working by executing aws --version in PowerShell.
4.2.2. Configuring the CLI
To use the CLI, you need to authenticate. Until now, you’ve used the root AWS account. This account can do everything, good and bad. It’s strongly recommended that you not use the AWS root account (you’ll learn more about security in chapter 6), so let’s create a new user.
To create a new user, open the AWS Management Console at https://console.aws.amazon.com. Click Services in the navigation bar, and click the IAM (AWS Identity and Access Management) service. A page opens as shown in figure 4.4; select Users at left.
Figure 4.4. IAM users (empty)

Follow these steps to create a new user:
1. Click Create New Users to open the page shown in figure 4.5.
Figure 4.5. Creating an IAM user

2. Enter mycli as the user name for the first user.
3. Leave the other fields blank, and select Generate an Access Key for Each User.
4. Click the Create button.
The page shown in figure 4.6 opens. Click Show User Security Credentials to display the User Security Credentials box—it’s visible only once! You now need to copy the credentials to your CLI configuration. Read on to learn how this works.
Figure 4.6. Creating an IAM user: showing credentials

Open the terminal on your computer (PowerShell on Windowso or a Bash shell on OS X and Linux, not the AWS Management Console), and run aws configure. You’re asked for four pieces of information:
- AWS access key ID —Copy and paste this value from the User Security Credentials box (your browser window).
- AWS secret access key —Copy and paste this value from the User Security Credentials box (your browser window).
- Default region name —Enter us-east-1.
- Default output format —Enter json.
In the end, the terminal should look like this:
$ aws configure
AWS Access Key ID [None]: AKIAJXMDAVKCM5ZTX7PQ
AWS Secret Access Key [None]: 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
Default region name [None]: us-east-1
Default output format [None]: json
The CLI is now configured to authenticate as the user mycli. Switch back to the browser window and click Close to finish the user-creation wizard. The page shown in figure 4.7 opens.
Figure 4.7. IAM users

Next you need to deal with authorization to determine what the user mycli is allowed to do. At the moment, the user isn’t allowed to do anything (which is the default). Click the mycli user to see the page shown in figure 4.8.
Figure 4.8. IAM user mycli without any permissions

In the Permissions section, in the Managed Policies box, click the Attach Policy button. The page shown in figure 4.9 opens.
Figure 4.9. Attaching a managed policy to an IAM user
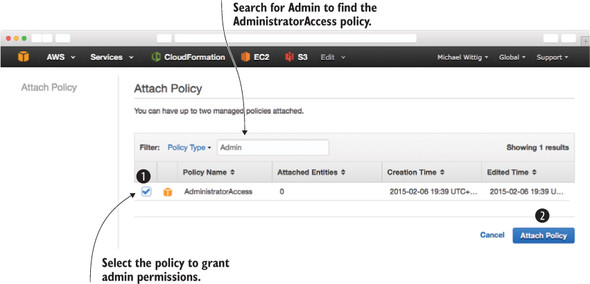
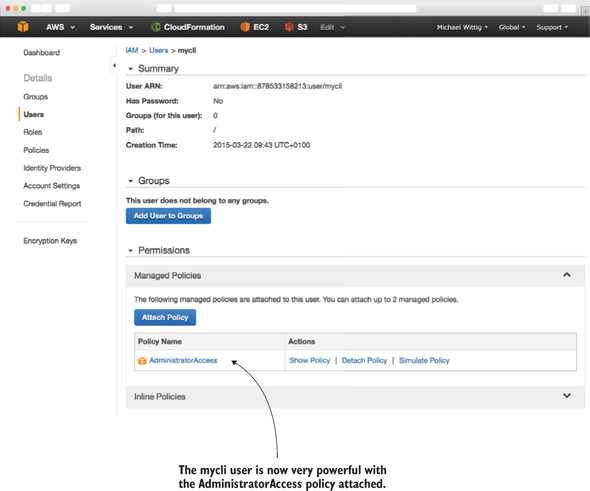
Select the policy AdministratorAccess by searching for Admin. Click Attach Policy. Now your mycli user looks like figure 4.10.
Figure 4.10. IAM user mycli with admin permissions
It’s time to test whether the CLI works. Switch to the terminal window and enter aws ec2 describe-regions to get a list of all available regions:
$ aws ec2 describe-regions
{
  "Regions": [
    {
      "Endpoint": "ec2.eu-central-1.amazonaws.com",
      "RegionName": "eu-central-1"
    },
    {
      "Endpoint": "ec2.sa-east-1.amazonaws.com",
      "RegionName": "sa-east-1"
    },
    [...]

    {
      "Endpoint": "ec2.ap-southeast-2.amazonaws.com",
      "RegionName": "ap-southeast-2"
    },
    {
      "Endpoint": "ec2.ap-southeast-1.amazonaws.com",
      "RegionName": "ap-southeast-1"
    }
  ]
}
It works! You can begin to use the CLI.
4.2.3. Using the CLI
Suppose you want to get a list of all EC2 instances of type t2.micro. Execute aws in your terminal, as shown here:

To use the AWS CLI, you need to specify a service and an action. In the previous example, the service is ec2 and the action is describe-instances. You can add options with --key value:
$ aws <service> <action> [--key value ...]
An important feature of the CLI is the help keyword. You can get help at three levels of detail:
- aws help —Shows all available services
- aws <service> help —Shows all actions available for a certain service
- aws <service> <action> help —Shows all options available for the particular service action
Sometimes you need temporary computing power, like a Linux server to test something via SSH. To do this, you can write a script that creates a virtual server for you. The script will run on your local computer and output how you connect to the server via SSH. After you complete your tests, the script should be able to terminate the virtual server. The script is used like this:

Your server runs until you press the Enter key. When you press Enter, the server is terminated.
The limitations of this solution are as follows:
- It can handle only one server at a time.
- There’s a different version for Windows than for Linux and Mac OS X.
- It’s a command-line application, not graphical.
Nonetheless, the CLI solution solves the following use cases:
- Creating a virtual server
- Getting the public name of a virtual server to connect via SSH
- Terminating a virtual server if it’s no longer needed
Depending on your OS, you’ll use either Bash (Linux and Mac OS X) or PowerShell (Windows) to script.
One important feature of the CLI needs explanation before you can begin. The --query option uses JMESPath, which is a query language for JSON, to extract data from the result. This can be useful because usually you only need a specific field from the result. Look at the following JSON to see JMESPath in action. This is the result of aws ec2 describe-images and shows a list of available AMIs. To start an EC2 instance, you need the ImageId, and with JMESPath you can extract that information:
{
  "Images": [
    {
      "ImageId": "ami-146e2a7c",
      "State": "available"
    },
    {
      "ImageId": "ami-b66ed3de",
      "State": "available"
    }
  ]
}
To extract the first ImageId, the path is Images[0].ImageId; the result of this query is "ami-146e2a7c". To extract all State, the path is Images[*].State; the result of this query is ["available", "available"]. With this short introduction to JMESPath, you’re well equipped to extract the data you need.
All code can be found in the book’s code repository on GitHub: https://github.com/AWSinAction/code. You can download a snapshot of the repository at https://github.com/AWSinAction/code/archive/master.zip.
Linux and Mac OS X can interpret Bash scripts, whereas Windows prefers PowerShell scripts. We’ve created two versions of the same script.
Linux and Mac OS X
You can find the following listing in /chapter4/server.sh in the book’s code folder. You can run it either by copying and pasting each line into your terminal or by executing the entire script via chmod +x server.sh && ./server.sh.
Listing 4.3. Creating and terminating a server from the CLI (Bash)


Windows
You can find the following listing in /chapter4/server.ps1 in the book’s code folder. Right-click the server.ps1 file and select Run with PowerShell to execute the script.
Listing 4.4. Creating and terminating a server from the CLI (PowerShell)


Why should you script?
Why should you script instead of using the graphical AWS Management Console? A script can be reused and will save you time in the long run. You can build new architectures quickly with ready-to-use modules from your former projects. By automating your infrastructure creation, you can also enhance the automation of your deployment pipeline.
Another benefit is that a script is the most accurate documentation you can imagine (even a computer understands it). If you want to reproduce on Monday what you did last Friday, a script is worth its weight in gold. If you’re sick and a coworker needs to take care of your tasks, they’ll appreciate your scripts.
4.3. Programming with the SDK
AWS offers software development kits (SDKs) for a number of programming languages:
|
|
An AWS SDK is a convenient way to make calls to the AWS API from your favorite programming language. The SDK takes care of things like authentication, retry on error, HTTPS communication, and JSON (de)serialization. You’re free to choose the SDK for your favorite language, but in this book all examples are written in JavaScript and run in the Node.js runtime environment.
Node.js is a platform to execute JavaScript in an event-driven environment and easily build network applications. To install Node.js, visit https://nodejs.org and download the package that fits your OS. Linux users can also install Node.js via package manager (https://github.com/joyent/node/wiki/Installing-Node.js-via-package-manager).
After Node.js is installed, you can verify that everything works by typing node--version into your terminal. Your terminal should respond with something similar to v0.12.*. Now you’re ready to run our JavaScript examples, like the Node Control Center for AWS.
Your Node.js installation comes with a important tool called npm, which is the package manager for Node.js. Verify the installation by running npm --version in your terminal.
To run a JavaScript script in Node.js, enter node script.js in your terminal. We use Node.js in this book because it’s easy to install, it requires no IDE, and the syntax is familiar to most programmers.
Don’t be confused by the terms JavaScript and Node.js. If you want to be precise, JavaScript is the language and Node.js is the execution environment. But don’t expect anybody to make that distinction. Node.js is also called node.
To understand how the AWS SDK for Node.js (JavaScript) works, let’s create a Node.js (JavaScript) application that controls EC2 servers via the AWS SDK.
4.3.1. Controlling virtual servers with SDK: nodecc
The Node Control Center for AWS (nodecc) is an advancement in managing multiple temporary EC2 servers with a text UI written in JavaScript. nodecc has the following features:
- It can handle multiple servers.
- It’s written in JavaScript and runs in Node.js, so it’s portable across platforms.
- It uses a textual UI.
Figure 4.11 shows what nodecc looks like.
Figure 4.11. Node Control Center for AWS: start screen

You can find the nodecc application at /chapter4/nodecc/ in the book’s code folder. Switch to that directory and run npm install in your terminal to install all needed dependencies. To start nodecc, run node index.js. You can always go back with the left arrow key. You can quit the application by pressing Esc or q.
The SDK uses the same settings you created for the CLI, so you’re using the mycli user when running nodecc.
4.3.2. How nodecc creates a server
Before you can do anything with nodecc, you need at least one server. To start a server, choose the AMI, as figure 4.12 shows.
Figure 4.12. nodecc: creating a server (step 1 of 2)

The code that fetches the list of the available AMIs is located at lib/listAMIs.js.
Listing 4.5. /lib/listAMIs.js

The code is structured in such a way that each action is implemented in the lib folder. The next step to create a server is to choose the subnet in which the server should be started. You haven’t learned about subnets yet, so for now select one randomly; see figure 4.13. The corresponding script is located at lib/listSubnets.js.
Figure 4.13. nodecc: creating a server (step 2 of 2)

After you select the subnet, the server is created by lib/createServer.js, and you see a Starting screen. Now it’s time to find out the public name of the newly created server. Use the left arrow key to switch to the navigation section.
4.3.3. How nodecc lists servers and shows server details
One important use case that nodecc must support is showing the public name of a server that you can use to connect via SSH. Because nodecc handles multiple servers, the first step is to select a server, as shown in figure 4.14.
Figure 4.14. nodecc: listing servers

Look at lib/listServers.js to see how a list of servers can be retrieved with the AWS SDK. After you select the server, you can display its details; see figure 4.15. You could use the PublicDnsName to connect to the instance via SSH. Press the left arrow key to switch back to the navigation section.
Figure 4.15. nodecc: showing server details

4.3.4. How nodecc terminates a server
To terminate a server, you first have to select it. To list the servers, use lib/listServers.js again. After the server is selected, lib/terminateServer.js takes care of termination.
That’s nodecc: a text UI program to control temporary EC2 servers. Take some time to think about what you could create by using your favorite language and the AWS SDK. Chances are high that you might come up with a new business idea!
4.4. Using a blueprint to start a virtual server
Earlier, we talked about JIML to introduce the concept of infrastructure as code. Luckily, AWS already offers a tool that does much better than JIML: AWS CloudFormation. CloudFormation is based on templates, which up to now we’ve called blueprints.
Note
We use the term blueprint when discussing infrastructure automation in general. Blueprints used for AWS CloudFormation, a configuration management service, are called templates.
A template is a description of your infrastructure in JSON that can be interpreted by CloudFormation. The idea of describing something rather than listing the necessary actions is called a descriptive approach. Descriptive means you tell CloudFormation how your infrastructure should look and how it’s connected. You aren’t telling CloudFormation what actions are needed to create that infrastructure, and you don’t specify the sequence in which the actions need to be executed. Again, it’s all about dependencies—but CloudFormation offers you more benefits:
The benefits of CloudFormation are as follows:
- It’s a consistent way to describe infrastructure on AWS. If you use scripts to create your infrastructure, everyone will solve the same problem differently. This is a hurdle for new developers and operators trying to understand what the code is doing. CloudFormation templates are a clear language to define infrastructure.
- It can handle dependencies. Ever tried to register a web server with a load balancer that wasn’t yet available? At first glance, you’ll miss a lot of dependencies. Trust us: never try to set up complex infrastructure using scripts. You’ll end up in dependency hell!
- It’s replicable. Is your test environment an exact copy of your production environment? Using CloudFormation, you can create two identical infrastructures and keep them in sync.
- It’s customizable. You can insert custom parameters into CloudFormation to customize your templates as you wish.
- It’s testable. Your infrastructure is testable if you can create it from a template. Just start a new infrastructure, run your tests, and shut it down again.
- It’s updatable. CloudFormation supports updates to your infrastructure. It will figure out the parts of the template that have changed and apply those changes as smoothly as possible to your infrastructure.
- It minimizes human failure. CloudFormation doesn’t get tired—even at 3:00 a.m.
- It’s the documentation for your infrastructure. A CloudFormation template is a JSON document. You can treat it as code and use a version control system like Git to keep track of the changes.
- It’s free. Using CloudFormation comes at no additional charge.
We think CloudFormation is one of the most powerful tools available to manage infrastructure on AWS.
4.4.1. Anatomy of a CloudFormation template
A basic CloudFormation template is structured into five parts:
1. Format version—The latest template format version is 2010-09-09, and this is currently the only valid value. Specify this; the default is the latest version, which will cause problems if a new format version is introduced in the future.
2. Description—What is this template about?
3. Parameters—Parameters are used to customize a template with values: for example, domain name, customer ID, and database password.
4. Resources—A resource is the smallest block you can describe. Examples are a virtual server, a load balancer, or an elastic IP address.
5. Outputs—An output is comparable to a parameter, but the other way around. An output returns something from your template, such as the public name of an EC2 server.
A basic template looks like the following listing.
Listing 4.6. CloudFormation template structure

Let’s take a closer look at parameters, resources, and outputs.
Format version and description
The only valid AWSTemplateFormatVersion value at the moment is "2010-09-09". Always specify the format version. If you don’t, the latest version is assumed by CloudFormation. As mentioned earlier, this means that if a new format version is introduced in the future, you’ll get into serious trouble.
Description isn’t mandatory, but we encourage you to take some time to document what the template is about. A meaningful description will help you in the future to remember what the template is for. It will also help your coworkers.
Parameters
A parameter has at least a name and a type. We encourage you to add a description as well, as shown in the following listing.
Listing 4.7. CloudFormation parameter structure

Valid types are listed in table 4.1.
Table 4.1. CloudFormation parameter types
|
Type |
Description |
|---|---|
| String CommaDelimitedList | A string or a list of strings separated by commas |
| Number List<Number> | An integer or float or a list of integers or floats |
| AWS::EC2::Instance::Id List<AWS::EC2::Instance::Id> | An EC2 instance ID (virtual server) or a list of EC2 instance IDs |
| AWS::EC2::Image::Id List<AWS::EC2::Image::Id> | An AMI ID or a list of AMIs |
| AWS::EC2::KeyPair::KeyName | An Amazon EC2 key-pair name |
| AWS::EC2::SecurityGroup::Id List<AWS::EC2::SecurityGroup::Id> | A security group ID or a list of security group IDs |
| AWS::EC2::Subnet::Id List<AWS::EC2::Subnet::Id> | A subnet ID or a list of subnet IDs |
| AWS::EC2::Volume::Id List<AWS::EC2::Volume::Id> | An EBS volume ID (network attached storage) or a list of EBS volume IDs |
| AWS::EC2::VPC::Id List<AWS::EC2::VPC::Id> | A VPC ID (virtual private cloud) or a list of VPC IDs |
| AWS::Route53::HostedZone::Id List<AWS::Route53::HostedZone::Id> | A DNS zone ID or a list of DNS zone IDs |
In addition to using the Type and Description properties, you can enhance a parameter with the properties listed in table 4.2.
Table 4.2. CloudFormation parameter properties
|
Property |
Description |
Example |
|---|---|---|
| Default | A default value for the parameter | |
| NoEcho | Hides the parameter value in all graphical tools (useful for passwords) | "NoEcho": true |
| AllowedValues | Specifies possible values for the parameter | "AllowedValues": ["1", "2", "3"] |
| AllowedPattern | More generic than AllowedValues because it uses a regular expression | "AllowedPattern": "[a-zA-Z0-9]*" allows only a–z, A–Z, and 0–9 with any length |
| MinLength, MaxLength | Used in combination with the String type to define minimum and maximum length | |
| MinValue, MaxValue | Used in combination with the Number type to define lower and upper bounds |
A parameter section of a CloudFormation template could look like this:

Now you should have a better feel for parameters. If you want to know everything about them, see http://mng.bz/jg7B or follow along in the book and learn by doing.
Resources
A resource has at least a name, a type, and some properties, as shown in the following listing.
Listing 4.8. CloudFormation resources structure

When defining resources, you need to know about the type and the properties of that type. In this book, you’ll get to know a lot of resource types and their respective properties. An example of a single EC2 server is shown in the next listing. If you see {"Ref": "NameOfSomething"}, think of it as a placeholder for what’s referenced by the name. You can reference parameters and resources to create dependencies.
Listing 4.9. CloudFormation EC2 server resource

Now you’ve described the server, but how can you output its public name?
Outputs
A CloudFormation template’s output includes at least a name (like parameters and resources) and a value, but we encourage you to add a description as well. You can use outputs to pass data from within your template to the outside (see the following listing).
Listing 4.10. CloudFormation outputs structure
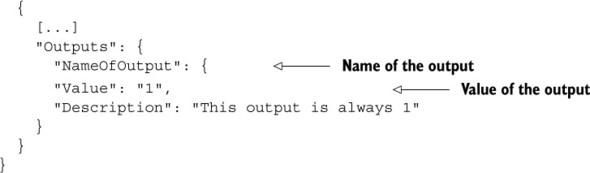
Static outputs aren’t very useful. You’ll mostly use values that reference the name of a resource or an attribute of a resource, like its public name, as shown in the next listing.
Listing 4.11. CloudFormation outputs example

You’ll get to know the most important attributes of Fn::GetAtt later in the book. If you want to know about all of them, see http://mng.bz/q5I4.
Now that we’ve taken a brief look at the core parts of a CloudFormation template, it’s time to make one of your own.
4.4.2. Creating your first template
Suppose you’ve been asked to provide a virtual server for a developer team. After a few months, the developer team realizes the virtual server needs more CPU power, because the usage pattern has changed. You can handle that request with the CLI and the SDK, but as you learned in section 3.4, before the instance type can be changed, you must stop the instance. The process will be as follows: stop the instance, wait for the instance to stop, change the instance type, start the instance, and wait for the instance to start.
A descriptive approach like that used by CloudFormation is simpler: just change the InstanceType property and update the template. InstanceType can be passed to the template via a parameter. That’s it! You can begin creating the template, as shown in the next listing.
Listing 4.12. Template to create an EC2 instance with CloudFormation


You can find the full code for the template at /chapter4/server.json in the book’s code folder. Please don’t worry about VPC, subnets, and security groups at the moment; you’ll get to know them in chapter 6.
You can find the template on GitHub. You can download a snapshot of the repository at https://github.com/AWSinAction/code/archive/master.zip. The file we talk about is located at chapter4/server.json. On S3, the same file is located at https://s3.amazonaws.com/awsinaction/chapter4/server.json.
If you create an infrastructure from a template, CloudFormation calls it a stack. You can think of template versus stack much like class versus object. The template exists only once, whereas many stacks can be created from the same template.
Open the AWS Management Console at https://console.aws.amazon.com. Click Services in the navigation bar, and then click the CloudFormation service. Figure 4.16 shows the initial CloudFormation screen with an overview of all the stacks.
Figure 4.16. Overview of CloudFormation stacks

The following steps will guide you through creating your stack:
1. Click the Create Stack button to start a four-step wizard.
2. Give the stack a name like server1.
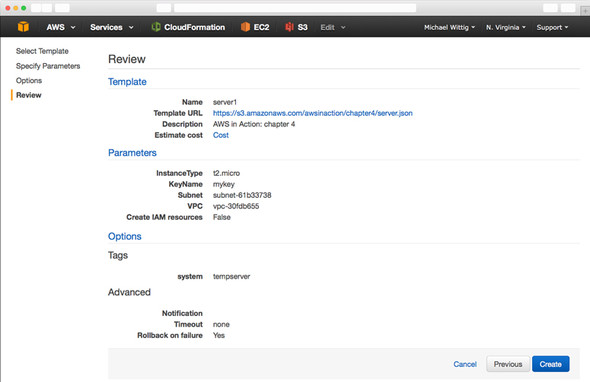
3. Select Specify an Amazon S3 Template URL, and enter https://s3.amazonaws.com/awsinaction/chapter4/server.json as shown in figure 4.17.
Figure 4.17. Creating a CloudFormation stack: selecting a template (step 1 of 4)

In the second step, you define parameters:
1. InstanceType: Select t2.micro.
2. KeyName: Select mykey.
3. Subnet: Select the first value in the drop-down list. You’ll learn about subnets later.
4. VPC: Select the first value in the drop-down list. You’ll learn about VPCs later.
Figure 4.18 shows the parameters step. Click Next after you’ve chosen a value for every parameter to proceed with the next step.
Figure 4.18. Creating a CloudFormation stack: defining parameters (step 2 of 4)

In the third step, you can define tags for the stack. All resources created by the stack will be tagged with these tags automatically. Create a new tag by typing system for the Key value and tempserver for Value. Click Next. Step 4 displays a summary of the stack, as shown in figure 4.19.
Figure 4.19. Creating a CloudFormation stack: summary (step 4 of 4)
Click Create. The stack is now created. If the process is successful, you’ll see the screen shown in figure 4.20. As long as Status is CREATE_IN_PROGRESS, you need to be patient. When Status is CREATE_COMPLETE, select the stack and click the Outputs tab to see the public name of the server.
Figure 4.20. The CloudFormation stack has been created.

It’s time to test the new feature: instance type modification. Select the stack and click the Update Stack button. The wizard that starts is similar to the one you used during stack creation. Figure 4.21 shows the first step of the wizard.
Figure 4.21. Updating the CloudFormation stack: summary (step 1 of 4)

Check that Use Existing Template is selected as the Source. In step 2, you need to change InstanceType: choose t2.small to double or t2.medium to quadruple the computing power of your server.
Warning
Starting a virtual server with instance type t2.small or t2.medium will incur charges. See http://aws.amazon.com/ec2/pricing to find out the current hourly price.
Step 3 is about sophisticated options during the update of the stack. You don’t need any of these features now, so skip the step by clicking Next. Step 4 is a summary; click Update. The stack now has Status UPDATE_IN_PROGRESS. After a few minutes, Status should change to UPDATE_COMPLETE. You can select the stack and get the public name by looking at the Outputs tab.
If you don’t want to write plain JSON to create templates for your infrastructure, there are a few alternatives to CloudFormation. Tools like Troposphere, a library written in Python, help you to create CloudFormation templates without having to write JSON. They add another abstraction level on top of CloudFormation to do so.
There are also tools that allow you to use infrastructure as code without needing CloudFormation. Terraform and Ansible let you describe your infrastructure as code, for example.
When you changed the parameter, CloudFormation figured out what needed to be done to achieve the end result. That’s the power of a descriptive approach: you say what the end result should look like, not how the end result should be achieved.
Delete the stack by selecting it and clicking the Delete Stack button.
4.5. Summary
- Use the command-line interface (CLI), one of the SDKs, or CloudFormation to automate your infrastructure on AWS.
- Infrastructure as code describes the approach to program the creation and modification of your infrastructure including virtual servers, networking, storage, and more.
- You can use the CLI to automate complex processes in AWS with scripts (Bash and PowerShell).
- You can use SDKs for nine programming languages to embed AWS into your applications and create applications like nodecc.
- CloudFormation uses a descriptive approach in JSON: you only define the end state of your infrastructure, and CloudFormation figures out how this state can be achieved. The major parts of a CloudFormation template are parameters, resources, and outputs.