Chapter 9. Host Posture Validation and Remediation: Cisco Clean Access Agent and Network Scanner
This chapter covers the following topics:
- Understanding Cisco NAC Appliance Setup
- Cisco Clean Access Agent
- Agent Policy Enforcement
- Network Scanning
After you have implemented the Cisco NAC Appliance architecture appropriately in your environment and configured the necessary roles and role assignments, you will be able to configure agent policy enforcement. This configuration includes various checks, rules, and requirements as well as various scanning policies. After agent policies are configured, you will be able to ensure that systems connecting to your network will be required to authenticate, be interrogated, and comply with your policies prior to gaining access to the network.
Understanding Cisco NAC Appliance Setup
When setting up the Cisco NAC Appliance for policy enforcement, you will typically proceed through a few steps to complete the configuration process. Here is a list of high-level steps that will be explained further throughout this chapter.
Step 1. Obtain and install updates on the NAC Appliance Manager (NAM).
Step 2. Enable and enforce the use of the Cisco Clean Access (CCA) Agent and scanning per role and operating system.
Step 3. Manage the certified list and exemptions.
Step 4. Configure role-based policies such as access and bandwidth restrictions as discussed in Chapter 8, "The Building Blocks: Roles, Authentication, Traffic Policies, and User Pages."
Step 5. Configure network scanning, agent scanning, or a combination of both mechanisms.
Step 6. Install the necessary Nessus plug-ins as required for your scanning needs.
Step 7. Configure agent scanning rules and requirements.
Step 8. Test the configuration and verify that all mechanisms are fully functioning as expected.
Step 9. Continue to fine-tune the configuration as well as the certified list and any additional exemptions.
Now that you have a process to follow, the chapter proceeds by explaining each major step and providing configuration guidance throughout the remaining sections of this chapter.
Cisco NAC Appliance Updates
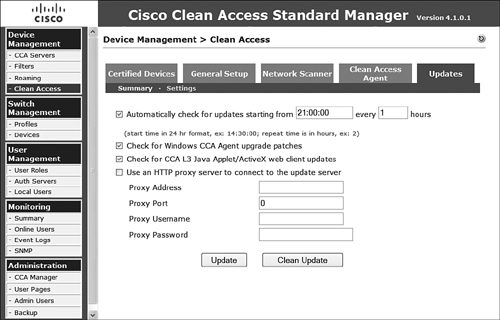
Prior to configuring your policy requirements, be certain that you have the most up-to-date checks, rules, and software updates available from the Cisco NAC Appliance Updates Server. You can view the current versions and numbers of each updated object by navigating the NAC Appliance Manager menu under Device Management > Clean Access and then selecting the Updates tab. A sample Updates tab screen is displayed in Figure 9-1.
Figure 9-1. Updates Tab Screen as Displayed on the NAC Appliance Manager

To ensure that you are always up to date with the most current software and policy components, you must set up automatic updating. Automatic updating is configured via the Device Management > Clean Access > Updates > Settings menu option as displayed in Figure 9-2.
Figure 9-2. Configuring Automatic Update Retrieval
The following is the list of configurable update options:
- Automatically Check for Updates Starting From Checking this option and providing a starting time and a repeat time in hours will allow NAM to automatically begin downloading updates at that time and repeat future checks at the specified interval.
- Check for Windows CCA Agent Upgrade Patches Selecting this option ensures that the automatic retrieval process will look for software updates for the CCA agent.
- Check for CCA L3 Java Applet/ActiveX Web Client Updates Selecting this option downloads and updates to the Java and ActiveX clients.
- Use an HTTP Proxy Server to Connect to the Update Server Selecting this option and then configuring the proxy address, proxy port, proxy username, and proxy password will allow the NAC Appliance Manager to pull the updates if it is behind a proxy.
- Update button Clicking this button will schedule automatic updates as configured on the form as well as immediately checking for updates.
- Clean Updates Clicking this button will allow you to remove all unsupported and invalid checks and rules installed by Cisco. You will want to verify your rules and requirements after performing this task to ensure that nothing you had been using was removed.
After you have completed the configuration of the automatic update retrieval process and performed an update, you can continue with the configuration by proceeding to the General Setup tab.
General Setup
Now that you have successfully retrieved the most recent updates from Cisco, you can continue the configuration by selecting the General Setup tab on the NAC Appliance menu. From here you can configure the web login parameters and the agent login parameters.
Web Login
The web login page of the General Setup tab provides the ability to configure how users authenticating via the web login page will be processed and what options they will have and be able to see on this page. The configuration options, as displayed in Figure 9-3, are as follows:
- User Role Select the appropriate user role from the drop-down selection tool to choose what role to apply.
- Operating System Select the operating system from the drop-down list to ensure that only users with the desired operating system are allowed to use web login. By default, ALL is selected.
- Show Network Scanner User Agreement Page to Web Login Users Selecting this option presents users with an agreement page that they must accept to continue on the network. This page is presented after both authentication and scanning occurs.
- Enable Pop-Up Scan Vulnerability Reports from User Agreement Page Selecting this check box enables web login users to see the results of their scan after completion.
- Require Users to Be Certified at Every Web Login Checking this box forces network scanning on every login. By default, scanning occurs on only the first login until the system's MAC address is cleared from the certified devices list.
- Exempt Certified Devices from Web Login Requirement by Adding to MAC Filters This check box, when selected, causes the MAC of the system (after first authentication and certification) to be added to the authentication pass-through list so that they will not require authentication at next login.
- Block/Quarantine Users with Vulnerabilities in Role Selecting this check box and then selecting the Quarantine Role option from the associated drop-down will cause the user to be placed in quarantine for 4 minutes so that the vulnerability can be addressed prior to attempting reauthentication and recertification. If Block Access is selected instead of Quarantine Role, the user will be denied access and will be presented with the blocked access page. The blocked access page dialog box becomes available for configuration after this option is selected. The quarantine time is definable and is 4 minutes by default.
Figure 9-3. Web Login Configuration on the General Setup Tab
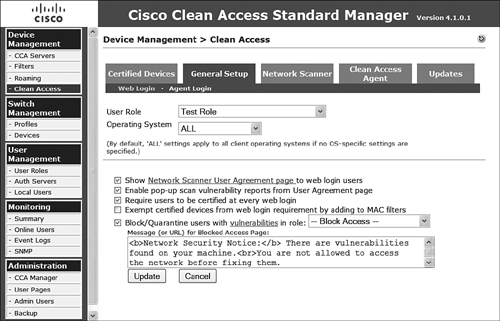
On completion of the form configuration as necessary, clicking the Update button commits the changes.
Agent Login
The Agent Login page of the General Setup tab provides the ability to configure how users authenticating via the CCA Agent will be processed and what options they will have and be able to see on this page. Figure 9-4 shows the configuration options.
Figure 9-4. Agent Login Configuration on the General Setup Tab

The following explains the options on this page:
- User Role Select the appropriate user role from the drop-down selection tool to choose what role to apply.
- Operating System Select the operating system from the drop-down to ensure that only users with the desired operating system are allowed to use web login. By default, ALL is selected.
- Require Use of Clean Access Agent Selecting this option redirects users accessing the web login page to the download page for the CCA Agent software and enforces the use of this agent while disallowing the use of web login for users in the selected OS and user role. The text box below this selection is the dialog box that will be presented to the user required to install the CCA Agent. You can configure this dialog box as necessary.
- Allow Restricted Network Access in Case User Cannot Use Clean Access Agent Selecting this check box allows the users some level of access to the network if they bypass the installation of the required CCA Agent. This provides users who are unable to install the agent on the local system, due to permissions issues, the ability to access the network until the installation can be performed. Selecting this option provides a configurable message to the user and allows the administrator to assign the role that this user will be placed into and therefore inherit access limitations.
- Show Network Policy to Clean Access Agent Users Checking this box presents to users the selected web page that they are required to accept before proceeding. You can host this link externally as http://url or locally by uploading the page to NAM as https://nam_ip_address/upload/filename.htm.
- Logoff Clean Access Agent Users from Network on Their Machine Logoff or Shutdown This check box, when selected, automatically performs a NAC Appliance logoff forcing a reauthentication upon the next Windows login. This is applicable only for in-band deployments.
- Refresh Windows Domain Group Policy After Login Selecting this check box ensures that a Windows Group Policy Object update occurs on the system running the CCA Agent at login.
- Automatically Close Login Success Screen After This option allows the automatic closing of the login success screen after a definable number of seconds. Setting the number to zero seconds prevents the screen from appearing at all.
- Automatically Close Logout Success Screen After This option allows the automatic closing of the logout success screen after a definable number of seconds. Setting the number to zero seconds prevents the screen from appearing at all.
On completion of the form configuration as necessary, clicking the Update button commits the changes.
Certified Devices
After configuring the authentication options for your users, you may begin to think about the other devices in your network that might not be able to run the agent but will require access to the network through the NAC Appliance. Devices you might consider are printers and video conference systems as well as select other user-based systems. The Certified Devices tab on the NAC Appliance menu allows you to configure the exemptions for these devices. Additionally, you can view the currently certified devices list among other options in the following discussion.
Certified List
The Certified List option (see Figure 9-5) on the Certified Devices menu allows the administrator to view and search for the devices that have been granted access to the network.
Figure 9-5. Certified List of Devices
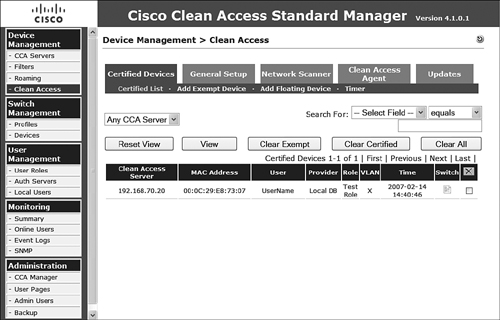
This list is filterable by NAS or globally if desired. The list includes the following information:
- NAS enforcing the policy
- MAC address of the system
- User authenticated
- Authentication provider
- Role
- VLAN
- Time
- Switch to which the system is connected
There is also an option per device to kick the user and remove it from the list. In addition to kicking a single user, the administrator can use the various buttons on the page to clear all exempt systems, clear the certified systems, or clear all systems.
Add Exempt Device
The devices in your network that are not capable of authenticating and posturing can be added as exempt devices. The Add Exempt Device page allows you to add MAC addresses of devices that are not required to meet the NAC Appliance requirements. The configuration of such devices is shown in Figure 9-6. After exempt devices are configured, they will be listed as such in the certified list, as illustrated in Figure 9-7. These devices are exempt from all NAS servers. If you want to locally exempt a system, you should perform the same configuration on the specific NAS.
Figure 9-6. Configuring Exempt Devices

Figure 9-7. Certified List Including Exempt Devices

Add Floating Device
Floating devices are one that will be listed as exempt for a single user session. After the user logs out, the system removes the exempt status. Floating device configuration is also used to ensure that systems hidden behind a shared network device, such as a router, virtual private network (VPN) concentrator, or firewall, which would normally share the same MAC address from the NAS perspective, are not considered to be a single device. Using this option, you can opt to identify each session via IP rather than MAC and ensure that each system is authenticated and scanned accordingly. This requires each system to be translated to its own IP address. Port Address Translation and Network Address Translation are not supported unless the user is always granted the same unique IP address.
To configure floating devices, simply navigate to the Add Floating Device option under Certified Devices and configure the list as follows:
Step 1. Enter each floating device on its own line using the following formatting rules:
— Format must be MAC TYPE DESCRIPTION.
— MAC uses xx:xx:xx:xx:xx:xx format.
— TYPE is ether 1 or 0. 1 sets the system as the device hiding other MAC addresses and lets the system know to never exempt the system by MAC. 0 sets the system as exempt only for the current session.
— DESCRIPTION cannot have any spaces.
Step 2. Click Add Device to commit the changes.
Figure 9-8 shows a sample configuration screen. After it is complete, the floating device list will be displayed in a table at the bottom of the configuration page.
Figure 9-8. Creating Floating Devices

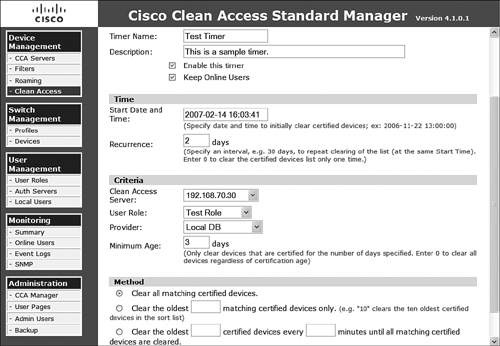
Timer
If desired, you can configure automatically occurring processes that will clear the certified device list as necessary without manual interaction. To configure this setting, navigate to the Timers option of the Certified Devices tab. Initially you are presented with a list of any configured timers. To create a new timer, select the New option and proceed as follows:
Step 1. Provide a timer name.
Step 2. Provide a description.
Step 3. Select Enable This Timer to make sure that this automated process will run.
Step 4. Select Keep Online Users to ensure that you do not drop any currently active users if necessary.
Step 5. Provide a start date and time for the automated process.
Step 6. Provide a recurrence interval in days to allow the job to run every day as necessary.
Step 7. Define the criteria for the job:
— Select all or a specific NAS.
— Select the role that should be matched or all user roles.
— Select the type of authentication provider that was used for the session.
— Provide a minimum number of days the system in question has been certified or enter 0 to consider all systems.
Step 8. Select one of the following methods:
— Clear All Matching Certified Devices.
— Clear the Oldest number Matching Certified Devices Only, where number is definable.
— Clear the Oldest number Certified Devices Every minutes Minutes Until All Matching Devices Are Cleared. This option repeatedly clears a certain definable number of devices every definable number of minutes until the list is cleared according to the matching parameters configured.
Step 9. Click Add to commit the actions.
Figure 9-9 shows a sample timer configuration screen. After it is completed, the floating device list will be displayed in the list option under the Timer menu.
Figure 9-9. Creating a Timer
Cisco Clean Access Agent
Cisco Clean Access Agent is required for the most robust level of interrogation and interaction the NAC Appliance can enforce. Clean Access Agent allows the system to collect vulnerability assessment data and provides remediation options to the interrogated system as defined by centrally configured policies. Clean Access Agent is available for Windows systems, and its use can be enforced, as illustrated earlier in this chapter, by configuring the agent login configuration page. The user is prompted to download and install Clean Access Agent to be granted network access. Prior to granting access, Clean Access Agent can look for installed software, registry keys, files, processes and services. In addition, it can require the update of several antivirus and antispyware packages as well as perform various other installations and provide guidance to the user in remediating other issues manually if necessary.
Agent Installation Process
Each NAS will obtain the latest copy of Cisco Clean Access Agent from NAM when it becomes available. The users required to use Clean Access Agent are asked on initial install to download and install the agent. In addition, if desired, Clean Access Agent can be distributed via any number of other methods, such as login script, manual installation, or software distribution systems such as BigFix or Microsoft System Management Server (SMS). After installation, Clean Access Agent can automatically receive and install updates as configured centrally by the NAC Appliance administrator.
Sample Agent Installation
Now you will examine the user-side experience relating to installing Cisco Clean Access Agent.
Step 1. The user attempts to access a website via a web browser. Any other application connection attempt will result in a failed connection until web authentication occurs because the system has not yet been granted access.
Step 2. The web browser displays a message, shown in Figure 9-10, that the user is about to be redirected to the network authentication page.
Figure 9-10. Redirection to the Web Authentication Page User Message

Step 3. The browser automatically displays the web login page from the local NAS and requires the user to authenticate and click Continue, as displayed in Figure 9-11.
Figure 9-11. Web Login Page

Step 4. The web login occurs as configured. Figure 9-12 illustrates the network security notice page with the included button to download Clean Access Agent, which has been configured as a requirement for this deployment.
Figure 9-12. Network Security Notice and Cisco Clean Access Agent Download Button

Step 5. On clicking the Agent download button, the user is prompted to run or save Clean Access Agent downloaded from the local NAS, as illustrated in Figure 9-13.
Figure 9-13. Downloading the Clean Access Agent Locally

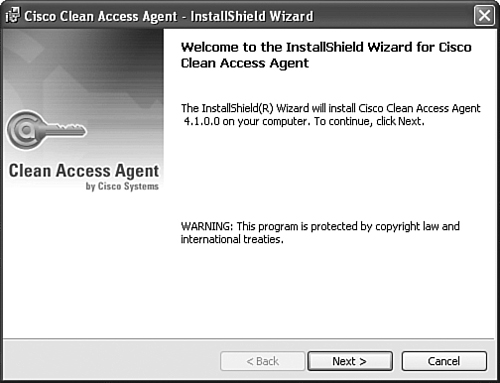
Step 6. On running the installer, the user continues through the installer's steps, as illustrated in Figure 9-14.
Figure 9-14. Installing Clean Access Agent
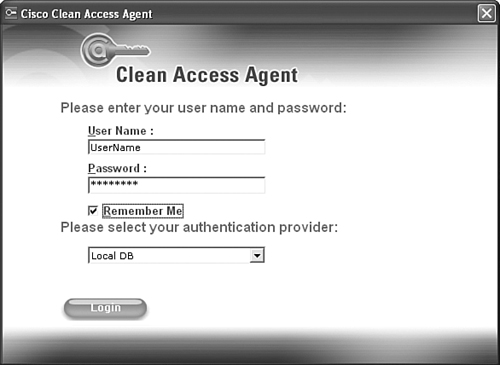
Step 7. After installing Clean Access Agent, the system will start the agent application and prompt the user to authenticate using this mechanism, as shown in Figure 9-15.
Figure 9-15. Authenticating with the Agent
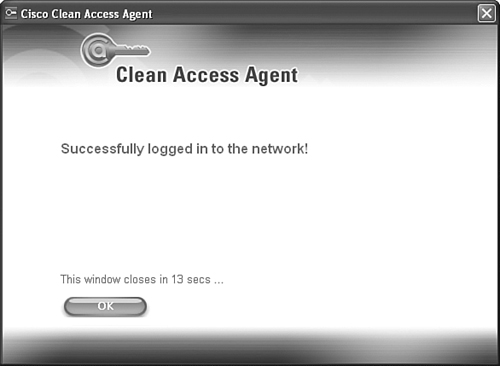
Step 8. After successful authentication and interrogation, the user is granted access and notified via Clean Access Agent, as displayed in Figure 9-16.
Figure 9-16. Successful Authentication Notification from Clean Access Agent
The system and user are now successfully authenticated and postured, which allows NAC Appliance to apply the necessary access restrictions and permissions centrally defined for that user, system, and operating system. If you like, you can view the system in the certified devices list as viewed on the specific NAS or NAM.
Agent Distribution
After Clean Access Agent is deployed, you can force the users to automatically upgrade to the latest version. Additionally, you can upload the necessary patches to NAM when necessary. To perform these tasks, you must navigate to Device Management > Clean Access > Clean Access Agent > Distribution. From here, you can configure the distribution using the following options as displayed in Figure 9-17:
- Current Clean Access Agent Patch Is a Mandatory Upgrade Selecting this option and clicking the Update button forces the user to upgrade Clean Access Agent. Not selecting this check box offers the upgrade as optional and allows the user to defer installation to a later time.
- Do Not Offer Current Clean Access Agent Patch to Users for Upgrade This option allows you to retain your current agent version deployment and not offer the agent upgrade to any users.
- Clean Access Agent Setup/Patch to Upload Browsing to the patch allows you to manually upload a Clean Access Agent installer in the form of setup.tar.gz or upgrade.tar.gz.
- Version This retains the same version information here for the manual upload.
- Upload button This uploads the file that was located using the browse function previously.
Figure 9-17. Configuring Agent Distribution

Other important information pertinent to the Clean Access Agent distribution methodology is configured under the Installation option below the Clean Access Agent tab. On this page, shown in Figure 9-18, you can configure the following related agent installer configuration information:
- Discovery Host This by default is the NAM DNS name or IP address. This must be configured as a reachable IP on the trusted side of each NAS. This is the address Cisco Clean Access Agent uses to attempt to discover the NAS in a Layer 3 deployment. This is also the address that NAS monitors for destination traffic to identify Cisco Clean Access Agent systems. Although this is typically set to the NAM address, it can be changed to any routable and reachable trusted side address to limit the exposure the NAM has to actual client communication.
- Direct Installation Options When the installer is invoked by the NAC Appliance authentication mechanisms, the following options for the installer can be set:
— No UI No user input is required. This is a silent install.
— Reduced UI The user can see the installation, but it requires no user input or selections.
— Full UI The user is required to interact with the installer to complete the installation.
- Run Agent After Installation Choose Yes or No.
- Stub Installation Options When the installer is executed via a stub installer as downloaded for installation by a third-party software distribution system, you can configure how much interaction is required by the end user. The same options that were available to the direct installer are also configurable for the stub installer. Using the stub Clean Access Agent allows a domain administrator to install Clean Access Agent such that on connection to the network, the necessary permissions are granted to the full Clean Access Agent.
Figure 9-18. Installation Options for the Agent Installer as Well as the Agent Download Options

Alternative Agent Installation Methods
Another alternative to installing Clean Access Agent via the web authentication page is to distribute it through your typical software delivery mechanism, such as login scripts, BigFix, or Microsoft SMS. To retrieve the installer files from NAM, you must navigate to the Installation option under the Clean Access Agent tab. At the bottom of this configuration page, you can download either the CCAA MSI Stub or the CCAA EXE Stub file as necessary for your software distribution mechanism. After it is downloaded, your software distribution system administrator has to appropriately script and test the automated installation process as with any other package currently distributed via this mechanism. The download options can be seen in Figure 9-18.
Agent Policy Enforcement
After Clean Access Agent authenticates to NAC Appliance, it is interrogated using mechanisms available to the current Clean Access Agent. The system will either have to meet the requirements or be brought into compliance in order to access the network. If the system does not meet requirements, access will be prevented or degraded if the administrator has configured the system for such access. The following sections cover the configuration of requirements, rules, and checks that will interrogate and remediate the end-user's system.
Requirements, Rules, and Checks
You must map requirements, rules, and checks to implement the necessary remediation actions that you will define for your network-attached systems. Requirements implement decisions (remediation actions) as a result of what you determine systems must have to be considered compliant. Rules are mapped to a requirement in order to define the necessary guidelines that must be met to in turn meet the requirement. Checks are single parameters that must exist for custom rules to be met, such as the existence of a registry key or process.
Creating and Enforcing a Requirement
The following seven types of definable requirements are available:
- File Distribution
- Link Distribution
- Local Check
- AV Definition Update
- AS Definition Update
- Windows Update
- Launch Program
The seven options define what outcome will occur when a requirement is not met. After the necessary configuration between rules and requirements is defined, the administrator can assign the requirement to a specific normal login user role. At this point, on authentication, users are placed into the Temporary role until they meet the requirements tied to their specific normal login role.
A common requirement configured in a customer environment is an antivirus update. The following list steps through the necessary process to create that requirement:
Step 1. Before proceeding, you must ensure that your current antivirus product is supported by navigating to the Clean Access Agent > Rules > AV/AS Support Info page. You can select your specific antivirus vendor from the drop-down list and verify that your currently deployed antivirus is supported, as illustrated in Figure 9-19. After you verify that it is supported, you can continue with your configuration steps.
Figure 9-19. Antivirus and Antispyware Support Verification

Step 2. Prior to creating the requirement, you have to create the necessary rules that are the building blocks of the requirement. Remaining on the Rules page, select the New AV Rule option. All the substeps listed here are displayed in Figure 9-20 for configuring this specific antivirus rule.
Figure 9-20. New Antivirus Rule Configuration

a. Enter a rule name, such as Trend_Micro_AV_Definition.
b. Select Trend Micro, Inc. from the Antivirus Vendor drop-down list.
c. Select Virus Definition from the Type drop-down list.
d. Select the appropriate OS.
e. Enter a description.
f. Select the appropriate check boxes for the virus definitions you want to verify.
Step 3. After adding the rule, you are returned to the rule list page that contains all configured rules. It should be noted that you can edit, copy, and delete individual rules from this listing page.
Step 4. Now that you have a rule, you can create a requirement by navigating to the Requirements option under the Clean Access Agent tab. Select New Requirement. The substeps configured here for the new requirement are displayed in Figure 9-21.
Figure 9-21. New Antivirus Requirement Configuration

a. Select AV Definition Update from the Requirement Type drop-down list.
b. Select the appropriate enforcement type:
- Mandatory The client absolutely must comply with this requirement to proceed on the network.
- Optional The user can bypass this requirement or comply as desired.
- Audit The requirement is checked, but the user is not notified of either a pass or fail outcome. The system reports the results back for administrative review.
c. Select the priority. The priority is where in the order of requirement enforcement the requirement is placed. Failure at any point causes the system to fail the requirements check.
d. Select the appropriate antivirus vendor name from the list.
e. Provide a requirement name.
f. Provide a description.
g. Select the operating systems on which the requirement should be evaluated.
h. Click the Add Requirement button.
Step 5. After completion of that page, you are returned to the requirement list page where you can reorder, edit, and delete individual requirements.
Step 6. You can now associate the rules with your new requirement. Navigate to Requirement-Rules under the Requirements option. All substeps here are displayed in Figure 9-22.
a. Select the requirement name from the drop-down list.
b. Select the appropriate operating system.
c. Select the appropriate option for Requirement Met If:
- All Selected Rules Succeed All rules must be met.
- Any Selected Rule Succeeds At least one rule must be met.
- No Selected Rule Succeeds No rules must be met.
d. Set the number of days the client antivirus definition can be older than what NAM lists as current.
e. Select the rule you created earlier regarding the Trend_Micro_AV_Definition or select the appropriate pr_rule provided by Cisco.
f. Click the Update button to commit the mapping.
Figure 9-22. Requirement-Rules Mapping

Step 7. Now that you have configured the requirement that relies on the mapped rules, you must choose to enforce the requirement on the chosen role. Navigate to Role-Requirements to configure this requirement assignment. The configuration of the following substeps is displayed in Figure 9-23.
a. Select the type of role you want to apply to the requirements as either Normal Login Role or Quarantine Role.
b. Select the User role to map the requirement.
c. Check the boxes in front of the requirement or requirements you want to map to this role.
d. Click the Update button to commit the change.
Figure 9-23. Role-Requirement Mapping

Note
You might notice many of the rules and checks are prefaced with pr_ and pc_. pr_ indicates a Cisco-deployed preconfigured rule, and pc_ indicates a Cisco-deployed preconfigured check.
Many requirement types, rules, and checks are preconfigured and automatically updated by Cisco in addition to the unlimited number of configurations you can make yourself. Becoming familiar with the configuration of custom rules will provide you with extremely granular control over the policy you want to enforce.
Creating Checks
Checks are logic that allows the Cisco Clean Access Agent to verify that a registry key, file, service, or application exists and, if pertinent, whether it is running or not running. To create a new check, you simply navigate to the New Check option under the Rules menu option. You will now configure a simple application check to verify that ftpserv.exe is running on the system you are interrogating. The following steps are illustrated in Figure 9-24.
Step 1. Select Application Check from the Check Category drop-down list.
Step 2. Leave the default and only option of Application Status for this check type.
Step 3. Name the check.
Step 4. Provide the application name.
Step 5. Select Running in the Operator drop-down list.
Step 6. Provide a check description.
Step 7. Select the appropriate operating systems for this particular check.
Step 8. Select Automatically Create Rule Based on This Check.
Step 9. Click the Add Check button.
Step 10. Navigate to the Check List menu option and scroll to the bottom to see your check.
Step 11. Navigate to the Rule List menu option and scroll to the bottom to locate the created rule.
Step 12. Select Edit Rule to better understand the creation of the new rule. This rule is displayed in Figure 9-25.
Figure 9-24. Creating an Application Check for ftpserv.exe

Figure 9-25. Dynamically Created Rule for ftpserv.exe Running

Creating a Custom Rule
Creating a custom rule is slightly more complex than creating an antivirus or antispyware rule because you are required to understand rule logical operators. In the previous example, you dynamically created a rule from a new check. A custom rule, as displayed in Figure 9-25, can be simple and require matching a single check or can be complex and use logical application of multiple checks.
When creating a custom rule, you are required to enter a rule expression as the matching parameters. These matching parameters are configured checks. If you want to evaluate multiple checks in a single rule, you are required to use logical operators. The checks are grouped in a rule expression by using parentheses. You can use the following operators:
- "&" for AND
- "|" for OR
- "!" for NOT
Note
When creating a custom rule from a check, it should be noted that to complete the steps necessary to enforce this action, you have to create a requirement, map the rule to that requirement, and then perform the appropriate role-to-requirement mapping.
Network Scanning
Cisco NAC Appliance has the capability to perform a network scan using the Nessus scanning engine with or without the Cisco Clean Access Agent installed on the system to be scanned. The scans and updates are manual processes, and the results will vary depending on other security products and personal firewalls installed on the scanned system. On completion of a network scan of the system attempting access to the network, NAC Appliance can notify the user of the vulnerability, warn the user with a user agreement page, block the user from the network, or assign the Quarantine role. Many Nessus scans (plug-ins) are available today from http://www.nessus.org, including virus and worm detection as well as detecting the presence of network applications such as instant messengers and file-sharing applications. To use scanning, you must load the Nessus plug-ins and then configure scanning.
Nessus Plug-Ins
Nessus plug-ins must be downloaded from http://www.nessus.org due to a licensing requirement by Tenable, the owner of Nessus. After you download the plug-ins, you must rename them plugins.tar.gz before uploading. If you are uploading a single plug-in, it must be named myplugin.nasl. Perform the following steps in Figure 9-26 to complete a Nessus plug-in upload.
Step 1. Navigate to Clean Access > Network Scanner > Plugin Updates.
Step 2. Browse to the plug-in file (which is named plugins.tar.gz), and then click the Upload button.
Figure 9-26. Uploading Nessus Plug-Ins

When this is completed, you can continue to configure scanning on your NAC Appliance.
Scanning Setup
Now that you have loaded Nessus plug-ins into your NAM, you can configure scanning to occur from the NAS systems as desired. To select the plug-ins you want to use per user role and operating system, as shown in Figure 9-27, perform the following steps:
Step 1. Navigate to Clean Access > Network Scanner > Plugins.
Step 2. Select the user role to configure scanning.
Step 3. Select the associated operating system.
Step 4. In the Show drop-down box, select the plug-in group you want to view. After a plug-in group is selected, the bottom of the page will display the available plug-ins.
Step 5. Select the plug-ins you want to enable as well as any dependent plug-ins required for other selected plug-ins.
Step 6. Select the check box next to Enable Scanning with Select Plugins.
Step 7. Click the Update button.
Figure 9-27. Configuring Network Scanning by User Role and Operating System

If you are using the more complex plug-ins that can employ some additional configuration, you can navigate to the Options menu to perform additional configuration as required. Figure 9-28 shows a sample configuration option.
Figure 9-28. Configuring Advanced Scanning Configuration Options

Vulnerability Handling
When NAS scans a system and locates a vulnerability as a result, it can warn the user, block access, or assign the Quarantine role. This is all configured per scanning plug-in on the Vulnerabilities menu. The following configuration for a single plug-in is shown in Figure 9-29.
Step 1. Navigate to Network Scanner > Scan Setup > Vulnerabilities.
Step 2. Select the plug-in you want to configure.
Step 3. Select —NEVER—, HOLE, HOLE, WARN, or HOLE, WARN, INFO from the drop-down menu to identify the Nessus scan result that should be returned as a matching parameter from the resulting scan.
Step 4. Click the Edit icon next to the particular plug-in. Doing so presents additional configuration options.
Step 5. Enter the instruction, which is the test field that will be presented to users.
Step 6. Enter a link, which is the URL that can assist users in remediating their system.
Step 7. Click the Update button to continue.
Figure 9-29. Configuring Vulnerability Handling per Plug-In

After completing the plug-in vulnerability handling, you return to the Vulnerabilities page, which will show your configuration, as seen in Figure 9-30.
Figure 9-30. Vulnerabilities List Page

User Agreement Configuration
You can also configure a user agreement page that will be presented to the users so that they can be certified for network access. They are required to agree to this text before proceeding. Figure 9-31 illustrates the simple configuration of this page, which includes role-specific and OS-specific information, an informational message to present to the user, the acknowledgment instructions, and the labels for accepting or declining the user agreement.
Figure 9-31. User Agreement Page for Network Scanning

Testing the Scanning Setup
After you have completed the configuration of network scanning, you can test the configuration from the Test menu item. Figure 9-32 illustrates the configuration parameters and testing results of the plug-ins you configured.
Figure 9-32. Testing Scanning in Your Network
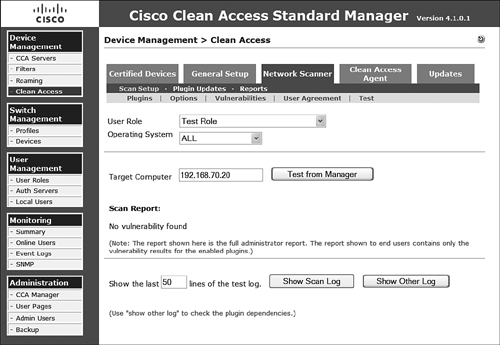
The configuration parameters include providing a user role, operating system, and target computer IP address, and the ability to show the log. Clicking the Test from Manager button on the test page begins the scan. While scanning is occurring, the user experience is unaffected. Figure 9-33 illustrates the user experience when using the CCA Agent, which is not required. If the CCA Agent were not installed, the scanning would have been completely transparent.
Figure 9-33. Scanning User Experience While Using the CCA Agent

Summary
Configuring the Cisco Clean Access Agent can be a complex task, but the granular requirements can make for an extremely secure and up-to-date computing environment. Properly configuring your NAC Appliance is extremely important, but when it is completed, you can rest assured that your corporate-controlled assets (as well as uncontrolled assets such as contractor systems) will be brought into compliance before they can access critical systems.