
ENTRY–LEVEL DVD AUTHORING
This chapter will discuss “entry-level” authoring, systems, and techniques, generally found in entry-level DVD authoring systems such as DVDit!, iDVD, and SpruceUp. The design of entry-level DVD authoring systems, as shown in Figure 4.1, is primarily driven by cost factors. In general an entry-level DVD authoring system must be based on a low-cost personal computer platform, and use software to perform MPEG video compression. Most entry-level DVD authoring systems use PCM or MPEG audio, and Dolby Digital and DTS formats are generally not supported.
As shown in Figure 4.1, video and audio from a DV camera are transferred to a personal computer using an IEEE-1394 (FireWire) link. The video and audio can be edited using a software non-linear editing tool such as Apple iMovie or Adobe Premiere. The video is compressed into the MPEG format using a software encoder, which generally operates at less than real-time. An off-the-shelf graphics package, like Adobe PhotoShop, is used to create menu graphics, or the menus are created entirely within the DVD-Video authoring software. DVDVideo authoring software is used to combine the MPEG video, PCM or MPEG audio, and simple menu graphics to create a valid DVD-Video disc image. DVD disc images are either stored on a local hard drive, written to a CD-R or CD-RW disc, or written to DVD-R for general media using a relatively inexpensive DVD-R/RW drive. If DVD-R media are produced, the production system should also include one or more DVD-Video players connected to video and audio monitoring equipment to provide some quality assurance capabilities.

Figure 4.1 Block Diagram of an Entry-Level DVD-Video Authoring System
Entry-Level DVD-Video Authoring Systems & Software
As of the publication date of this book several entry-level DVD-Video authoring systems and third-party software tools were on the market. The following sections will provide background information on each of these systems and products. Over the next few years it is likely that DVD-Video authoring capabilities will become standard features on higher-end multimedia computers. A number of inexpensive after-market products will also become available combining DV capture boards, a DVD-R/RW drive and low-cost DVD authoring software. Apple has recently made a major commitment to the DVD-Video format with the release of the iDVD product line, and several major PC vendors, including Compaq, have made similar commitments for the Windows platform. One enabling technology that has made entry-level DVD-Video systems affordable is the new DVR-103 Pioneer DVD-R drive, also known as the Apple SuperDrive. The after-market version of the DVR-103 is priced below $1,000, while the OEM version, called the DVR-A03, is even cheaper when included as part of a turnkey system.
Apple iDVD
Apple’s entry-level DVD system, called iDVD, is based on a 733 MHz PowerMac G4 platform, with 256 Mb of RAM, a 60 Gb IDE hard drive, and an Apple DVD-R SuperDrive. The iDVD system uses Mac OS 9 and includes Mac iTunes, iDVD, iMovie, and QuickTime 4 software.
The iDVD system is very tightly integrated which is essential for an entry-level PC. The system has two 400 Mbps FireWire ports that can be used to capture video and audio directly from most DV cameras. Once the video and audio elements are captured they can be edited using the iMovie software to create QuickTime files, which can be imported directly into the iDVD software. The iDVD graphical users interface, shown in Figure 4.2, is surprisingly simple. Apple has distilled the process of creating a DVD title down to five easy steps,
1. Select a Theme
2. Create and Fill Media Folders
3. Create and Fill Slide Shows
4. Preview the Disc
5. Burn a DVD-R
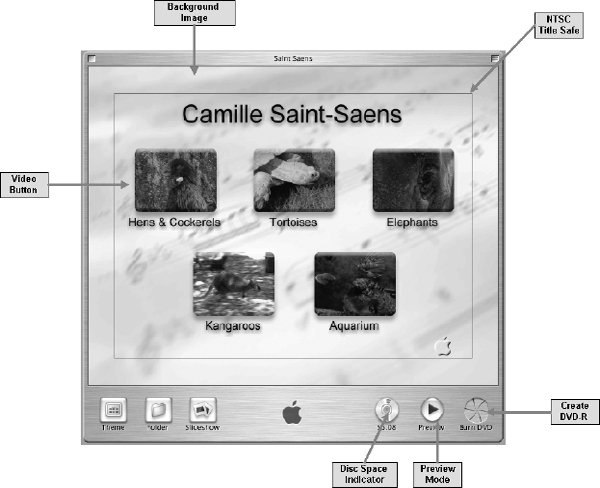
Figure 4.2 Apple iDVD Graphical Users Interface (See color insert for color version of this figure.)
iDVD uses “Themes” to create a common look and feel for the DVD title. Approximately 20 predefined Themes come standard with iDVD, and you can create custom Themes as well. A Theme consists of a background image, a specific font style, color, and size, and a specific button shape and size. Buttons are used to launch the playback of video clips and slide shows or to branch to Folders.
“Folders” are used by iDVD as containers for media elements, and to organize the presentation of the content on the DVD disc. A Folder can hold additional Folders or individual media elements. iDVD Folders can have up to six buttons each, and there can be no more than 99 media elements used in the title. iDVD arranges the buttons in each Folder, and automatically creates the Left, Right, Up, and Down navigation commands as well. Each Folder can use the common project Theme, have its own unique Theme, or use a different background image if required. The DVD Menu key is programmed to take the user up one level in the Folder structure, and the DVD Title key is programmed to take the user to the top-level Folder.
“Slide Shows” are collection of still images that are presented in a linear fashion. Individual images can be displayed for a fixed amount of time, or indefinitely waiting for a user action. Previous (<<) and Next (>>) buttons are automatically created on each still image by iDVD to allow the viewer to navigate through the slideshow in a sequential fashion.
Adding video clips or photographs to a title is a simple process of selecting them in the Apple Finder and dropping them into the appropriate iDVD Folder. iDVD only accepts QuickTime video, so if you have files in any other format you will have to convert them to QuickTime before using them. Buttons are created in the order that the elements are dropped in, but you can change a button’s position by clicking on it and dragging it to a different position on the screen. When video clips or slide shows are associated with a button, you can select which frame of video, or still image to use as a thumbnail image on the button.
iDVD has a Preview Mode that allows you to check your work at any time during the title creation process. Pressing the Preview button brings up a small remote control that allows you to navigate through the title. Video clips, slide shows, and folders are displayed just as they will be on the final disc image. The quality of the video clips may be different in Preview Mode than it is on the final disc, since the Preview Mode displays the uncompressed media elements, rather than the MPEG-2 encoded versions used on a DVD disc.
The beauty of iDVD is its simplicity. Just about any consumer who can use a Mac, can now create a DVD title — it really is that simple. DVD discs created by iDVD will work in over 90 percent of the DVD-Video players, and near 100% of the DVD-ROM computer installed base. With a suggested retail price of $3,499 the iDVD system is not cheap. Due to its price tag, only high-end consumers will buy this system. If you want to develop corporate or professional DVD titles you will need to upgrade to DVD Studio Pro, as the iDVD software is really not suited for anything more complicated than putting home movies on DVD.
Compaq MyMovieStudio
Compaq MyMovieStudio is a turnkey, consumer-oriented Windows PC that can be used for a wide variety of multimedia functions, including entry-level DVD-Video title authoring. MyMovieStudio Pro is included with the Presario 7000T, as well as other models from Compaq. These models include several third-party hardware and software items required for DVD-Video title development including the following.
Digital Video Center Standard on every Presario 7000 series PC, the Digital Video Center provides a standard IEEE 1394 port, making it easily to plug in video peripherals, such as DV cameras.
Pinnacle StudioDV With the StudioDV non-linear video editing software, digital video can be captured directly from a DV camera to the PC hard drive. With a drag-and-drop interface it is easy to select only the scenes you want, and combine them with transitions to create professional looking video segments. Additional features include the ability to add voice-over narrations, titles, custom soundtracks, transitions between scenes, etc.
Sonic Solutions DVDit! DVDit! is used to author DVD-Video titles using AVI files, MPEG files, and digital still images. DVDit! can also be used to create buttons, links, and menus. It then automatically converts the media files into the correct format for DVD, and writes them to a hard drive, CD-R, or DVD-R for General disc.
Pioneer DVR-103 DVD-R Writer The MyMovieStudio system can optionally include a Pioneer DVR-103 DVD-R writer to allow final DVD disc images to be written directly onto DVD-R for General media, which can be played in most DVD-Video players as well as DVDROM personal computers.
Sonic Solutions DVDit!
The heart of the Compaq MyMovieStudio system, at least as far as DVD-Video title development is concerned, is the Sonic Solutions DVDit! software. Figure 4.3 shows the graphical users interface for DVDit!.
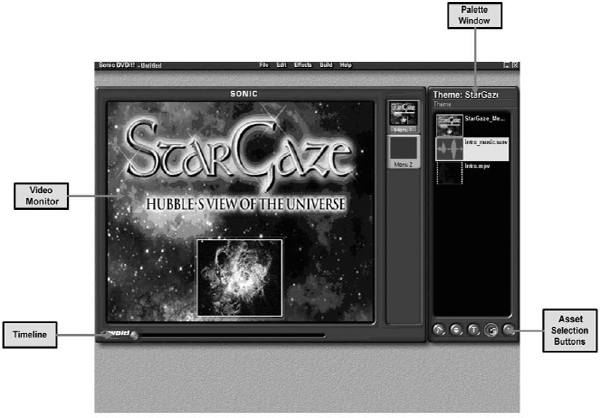
Figure 4.3 Sonic Solutions DVDit! Graphical User Interface (See color insert for color version of this figure.)
The process of developing a DVD title using DVDit! is simple, and includes the following steps.
1. Import Media Assets The first step is to import all unique media elements (video, audio, and graphics) into the Palette window. DVDit! has a collection of background images and button graphics so it may only be necessary to import the video and audio clips. Sonic Solutions offers several “Theme Packs” to add additional background and button graphics to DVDit!.
2. Create Menus The next step is to create the interactive menus required for a project. Creating a menu is simple. Drag a background graphic from the Palette window into a menu box of the Video window. Add interactive buttons by dragging graphics from the Palette window on top of the menu graphic. Buttons can be repositioned and resized, as well as have custom text added to the menu. Text can be created in any installed font, and can be positioned and resized easily. Once the “look” of the menu is set up right, actions associated with each menu button are defined by dragging a media element or another menu icon on top of the desired menu button. Menu buttons can be used to jump to other menus, to play still images, or to play video clips. Unlike other entry-level DVD authoring tools DVDit! can’t import menus in the Photoshop (.psd) format.
3. Simulate the Operation After you have created all the menus and assigned the appropriate actions to each menu button, you can begin testing the title using the Remote Control window. This real time preview feature is one of the strength’s of DVDit!. Using the Remote Control window to test a project as it is created can save you a lot of time and effort.
4. Build Final Disc Image Once the title has been tested you can begin to build the final DVD disc image. This non real-time process converts all the media elements into the format required by the DVD-Video specification. The final disc image can be written directly to a DVD-R using a Pioneer DVD-R writer. If the final playback device is a personal computer, the disc image can be written to a CD-R, CD-RW, DVD-R, DVD-RW or DVD-RAM disc.
DVDit! uses the same basic internal scripting language used by all Sonic Solutions DVD authoring tools. Thus projects can be imported into professional tools like DVD Creator or DVD Fusion if they need additional features that are not directly supported by DVDit!. DVDit! also includes a non real-time MPEG video encoder that converts AVI files into the MPEG-1 or MPEG-2 video streams required by the DVD-Video specification.
SpruceUp
Spruce Technologies SpruceUp is a software program designed to run on Microsoft Windows 98 SE, Millennium Edition (ME), NT 4.0, and 2000. It imports MPEG video and audio files from third-party equipment such as video capture applications and non-linear editors. SpruceUp provides tools to design entry-level DVD-Video titles with menus and up to 99 multimedia segments. Completed projects are compiled to create a final disc image that can be used with set-top DVD players, as well as personal computers with CD-ROM and DVD-ROM drives.
SpruceUp is designed to take DVD-compliant MPEG video and audio files, combine them with menus, and create DVD titles that can be played back on PCs and set-top DVD players. Video sources can be from a wide variety of non-linear editors, video-capture cards, and MPEG encoders. SpruceUp provides tools to add chapter points, providing the ability to provide random access to scenes within a video segment. SpruceUp is not an editor, and so it cannot directly link the end of one video segment to the start of another. Any effects, such as transitions between scenes or text graphics must be added using a video editing application, such as from Adobe or Ulead. Figure 4.4 shows the SpruceUp user interface with four main work areas.

Figure 4.4 SpruceUp’s Graphical User Interface (See color insert for color version of this figure.)
Creating a DVD title using SpruceUp consists of the following steps.
1. Load Assets SpruceUp uses three types of assets: video movies (with audio), backgrounds, and buttons. These assets are managed in the Main window’s Media Gallery, each with its own tab along the top.
2. Create Menus Most DVD titles contain at least one menu, and it is generally the first thing to appear when the title starts playing. A menu is made up of a background image, one or more buttons linked to movies, and optionally some text explaining what to do.
3. Define Clip Properties The Clip Properties window provides tools to perform a number of movie related functions, including play the movie, either at real time or by manually “scrubbing” through it, set a frame to use as a thumbnail image on menus, add chapter points and set thumbnail points for each, capture a frame from the movie to use as a background, create buttons automatically from chapter points, and add URLs and other items to the chapter points.
4. Simulate the Operation SpruceUp has a built in simulation mode in which the operation of the title can be fully tested.
5. Export Exporting a title is the process of having SpruceUp compile it into a DVD-compliant format and write it to CD-R/RW, DVD-R or to a hard drive. If necessary SpruceUp includes a royalty-free DVD player called Syzygy that, when included with a title, allows it to be played back on all Windows systems with a CD-ROM drive.
Entry-Level DVD Authoring Tool Summary
Each of the three major entry-level DVD authoring tools has their own unique strengths and weaknesses. Apple iDVD is the only product that will work on a Mac, and it is clearly the easiest tool for entry-level authors to use. The process of creating a DVD title using iDVD has been simplified so much that there are a number of things that simply can’t be done with the tool, so professional developers will find its features somewhat lacking. Sonic Solutions has sold over 500,000 copies of DVDit!, mostly through bundles with third-party video capture and editing products. This makes DVDit! the best selling DVD authoring tool ever. However most of the copies of DVDit! sold to date are the LE version, which has a limited feature set. Sonic offers more capabilities in the SE and PE versions of DVDit!, but authors will have to pay an upgrade fee to gain access to the more powerful versions of the product. SpruceUp is perhaps the most powerful of the three entry-level DVD authoring tools, but it is the least well known. Spruce has not done as good a job as Sonic in licensing SpruceUp to third parties for bundling with video capture and editing products. SpruceUp’s $129 price tag is a little high for most authors who are used to paying less than $100 for off the shelf software products.
Entry-Level DVD-Video Authoring Process
Figure 4.5 shows a block diagram of the entry-level DVD-Video authoring process. The three major steps in the process are Import Assets, Create Menus, and Simulation and Disc Image Build.
Generally most entry-level DVD-Video authoring systems are designed to hide as much of the DVD-Video complexity and terminology from the author as possible. Most entry-level systems also severely restrict DVD-Video features, such as multi-angle video, multi-track audio, and subpicture streams. This chapter will illustrate the entry-level DVD-Video production process using SpruceUp. Entry-level DVD-Video authoring tools from Apple, Sonic Solutions, and others have very similar features and essentially use the same basic concepts to transform video, audio, and still image elements into a working DVD-Video title.
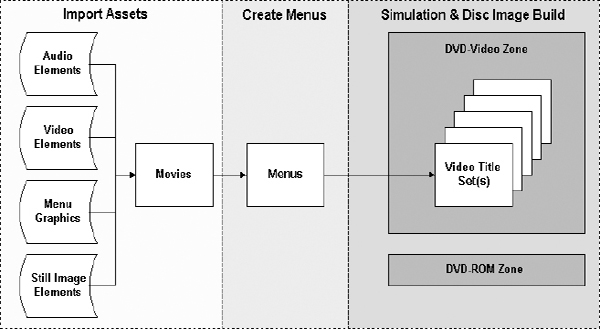
Figure 4.5 Block Diagram of the Entry-Level DVD-Video Authoring Process
Typically an entry-level DVD-Video authoring system will ask a few basic questions each time a new project is started, and in general the information required is limited to the type of video (NTSC or PAL), the type of output media (hard disk, CD-R, DVD-R, etc.), and the location of the working directory and files for the project. Figure 4.6 shows the Project Preferences screen from SpruceUp, in which this information is defined prior to starting a new DVD project.
The DVD-Video specification does not allow the use of both NTSC and PAL video assets in the same project, so if you have different media types you will need to convert all of them into a consistent format before you start the DVD authoring process.
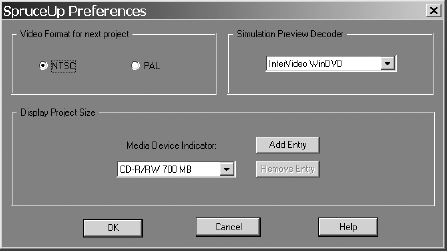
Figure 4.6 SpruceUp’s Project Preferences Screen
Import Assets
Once a new DVD project has been created and its basic parameters defined, the next step is to import all of the media elements into the authoring tool. Media elements can include video, audio, still image, and graphic files. Typically this is done with a drag-and-drop process in which media files are highlighted in Windows Explorer or the Mac Finder and then dropped on top of the DVD authoring tool. In general entry-level DVD-Video authoring tools will automatically segregate different types of media elements, and organize them as Backgrounds, Buttons, and Multimedia Elements. Background and Button graphics are used to create interactive menus, while Multimedia Elements are used to create individual movie clips that can be played back. Figure 4.7 shows an example of how video elements that have been imported into SpruceUp are organized and presented to the author.

Figure 4.7 SpruceUp’s Media Element Gallery Display
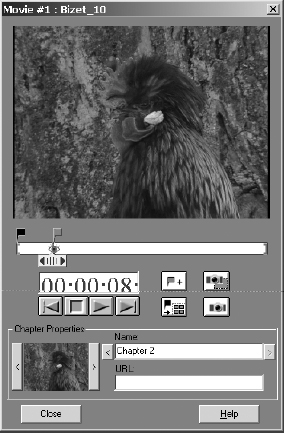
Figure 4.8 SpruceUp Movie Properties Selection (See color insert for color version of these two figures.)
Video Elements
The DVD-Video specification requires that all video be compressed in either the MPEG-1 or MPEG-2 formats. Some entry-level DVD-Video authoring tools, such as Sonic Solutions DVDit! and Apple’s iDVD, include software for MPEG transcoding. These transcoders allow video files in the AVI or MOV formats to be imported into the authoring tool, where they will eventually be encoded into the MPEG format. Other entry-level tools, such as SpruceUp, require the video files to be in the MPEG format before they can be imported into the authoring tool. All video elements should be edited before they are imported into the authoring tool. Most entry-level DVD authoring tools do not provide any video editing functions, although some will allow you to define chapter or scene indexes within a video clip after it has been imported. Figure 4.8 shows how chapter points can be defined within a video clip using SpruceUp.
Audio Elements
According to the DVD-Video specification, all DVD-Video titles must have at least one audio track in either the Dolby Digital or Linear PCM format. Most entry-level DVD-Video authoring tools support audio in both the Linear PCM format (.wav) as well as the MPEG format (.mpa). A few tools, such as SpruceUp, also support the Dolby Digital (.ac3) format. Audio elements can be imported using drag-and-drop or through file name associations. For example when the video elements are imported in SpruceUp, the tool will look for audio files in the same directory. If they have the same file name as the video clip they will automatically be imported into the project and associated with the video clip. In Sonic Solutions DVDit!, audio elements are imported separately from the video and then manually associated with a video element by dragging and dropping the audio on top of the video.
Audio elements should be edited before they are imported into an entry-level DVD-Video authoring tool. An audio element should be the same length as the video element that it will be paired with. Most tools will not provide any mechanism to edit the audio once it has been imported, and even the volume levels of audio elements can’t be changed within most entry-level DVD-Video authoring tools. If audio and video elements with different lengths are combined the results may not be what the author intends. If the audio is shorter than the video, the combined segment may end as soon as the audio is over, even if there are video frames that have not been displayed.
Still Image Elements
According to the DVD-Video specification, all still images used in menus or slide shows must be stored as MPEG I frames on the disc. Thus when a still image is imported into an entry-level DVD-Video authoring tool it will eventually be converted to the MPEG format. Generally this conversion process is done after all the menus and still image slide show movies have been created, so that only those still images actually used in the project need to be converted. Most entry-level DVD-Video authoring tools will accept a variety of still image file formats including .bmp, .tga, .tif, and .jpg. If possible use .bmp or .tif files, as these are uncompressed file formats that will deliver the highest level of quality. Still images that are to be displayed full screen should have a resolution of at least 720 540 pixels for NTSC and 768 576 for PAL, and a 4:3 aspect ratio. Images with different resolutions or different aspect ratios will be automatically converted to the correct size for a DVD-Video title by the authoring tool, which may result in poor quality results. While most entry-level DVD-Video authoring tools will accept JPEG files, it is not a good idea to use a compressed image since it will be compressed again when the tool converts it to the MPEG format.
Still images can be used as menu backgrounds, menu buttons, or as elements in a still image slide show. Once a still image element is imported into the authoring tool it can be used many different times, and for different purposes, so it is possible to have a single image used as a menu background, a menu button and an element in a slide show.
Once all the video, audio, and still image elements have been imported into the authoring tool, the process of designing the menus can start. DVD-Video menus are designed to allow the viewer to interact with the title and control the presentation order of media elements. Menus are not required for a DVD-Video title, but most consumers expect a DVD-Video title to have at least one chapter menu, which will allow them to jump directly to specific items of content. A DVD-Video menu is created using a background image, one or more button graphics, and text to provide additional information to the viewer. One popular technique for menu buttons is to display a single frame from the video clip to which the button is linked. This display frame along with some descriptive text provides enough information to the viewer to tell them what the button will do.
Figure 4.9 shows a sample menu created using SpruceUp. In this sample I used one of the predefined background images available in SpruceUp, along with single frames from each video clip linked to a button, and text that describes the purpose of the menu as well as the purpose of each button. Each text element includes a drop shadow to make it look more attractive.
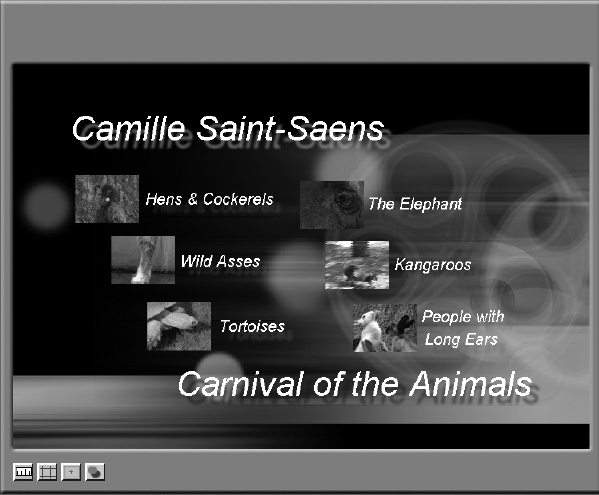
Figure 4.9 Sample DVD-Video Menu Created Using SpruceUp (See color insert for color version of this figure.)
This sample menu has a total of six buttons, with each button linked to a specific video clip. The addition of the “Camille Saint-Saens” and “Carnival of the Animals” text at the top and bottom of the menu along with the names of each song to the right of the button provide all the information the viewer needs to understand the menu organization.
Most entry-level DVD-Video authoring tools restrict what you can accomplish with menus. The Up, Down, Left, and Right navigation commands assigned to a button are usually automatically generated by the authoring tool, as is the highlight information which tells the end user which button is active. These limitations make it much easier to design and implement DVD-Video menus, although it also means that the author has less control over how the menus will work. For example, in the sample menu shown in Figure 4.9 there are six buttons that are arranged in a diagonal pattern. When this menu was created SpruceUp automatically assigned Left, Right, Up, and Down commands as shown in Figure 4.10. Since the alignment of the menu buttons is quite regular in the vertical dimension the assignment of the Left and Right commands to each button makes sense. However, the alignment of the menu buttons in the horizontal dimension is not regular, so the assignments of the Up and Down commands are not what most viewers would expect. For example pressing the Up key while button 1 is highlighted will jump to button 6, and pressing the Up key while button 4 is highlighted will also jump to button 6. This button navigation implementation is inconsistent, and the only way to correct it is to move the button positions around until the automatic button navigation routing algorithm yields the desired results.
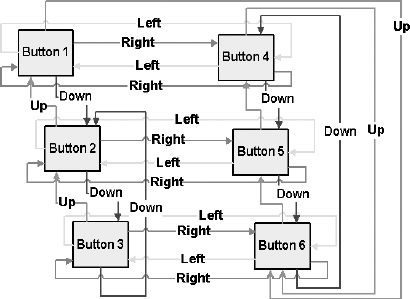
Figure 4.10 Button Navigation Commands Automatically Created by an Entry-Level DVD Authoring Tool (See color insert for color version of this figure.)
This is an excellent example of the limitations of entry-level DVD authoring tools. In an effort to hide the concept of button navigation commands (Left, Right, Up, and Down) and thus simplify the authoring process, entry-level tools can create menus with inconsistent user interfaces. The best way to avoid this problem is to design menus with buttons aligned in both the vertical and horizontal directions.
Simulation, Disc Image Build & Disc Burn
The last step in the entry-level DVD authoring process is to simulate the operation of the project, build a disc image, and then transfer it to the desired media. Most entry-level DVD authoring tools include built in simulation features to test the operation of the project. These simulation tools essentially turn the authoring PC into a DVD-Video player for playback testing. Generally a software MPEG-2 decoder is used, so the quality of video playback may be poor in emulation mode. Playback quality depends on the power and speed of the host systems CPU, as well as the number of other application programs running at the same time. The emulation program should be used to test every button on every menu, and to review every media element used on the project. Figure 4.11 shows SpruceUp’s simulation mode.
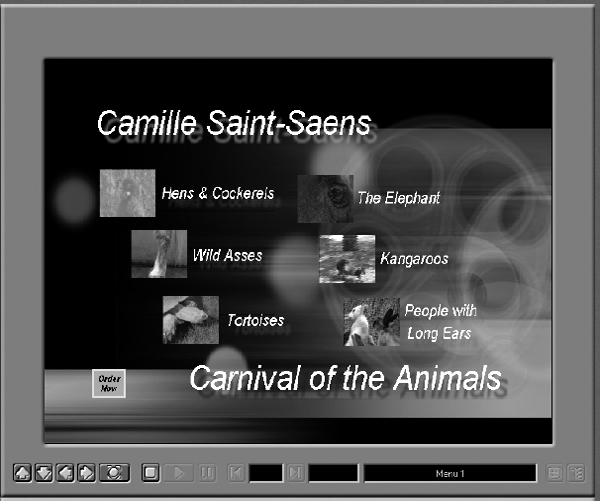
Figure 4.11 Entry-Level DVD Authoring Tool Simulation Display (See color insert for color version of this figure.)
At the bottom of the Simulation user interface there are controls for the Up, Down, Left, Right, and Enter buttons, as well as Play, Pause, Stop, Next, Previous, Title, and Menu buttons. Using these controls, it is fairly easy to test the DVD project to ensure that it will work correctly on a DVD-Video player.
Once simulation has been completed the process of building the final disc image can be started. This process is required even if the project will not be transferred to optical media. The disc build process takes all of the media elements used in the project and puts them into the DVD-Video format. At the end of the disc build project a Video_TS directory will be created on the authoring system’s local hard drive, and it will contain all of the DVD files created for the project. The project can be played back on the authoring system simply by using a DVD-Video player application and pointing it to the Video_TS directory that was created.
Most entry-level DVD-Video titles will be distributed on some form of removable optical media, such as DVD-R, DVD-RAM, or CD-R, as opposed to professional authoring for mass replicated discs. In general entry-level DVD authoring tools can be used to transfer the final disc image to a variety of removable media.
Figure 4.12 shows an example of the SpruceUp’s Disc Build user interface. In this example a final disc image is being built in the DVD-Video format, and will be transferred to a standard CD-R disc along with the Syzygy player and an autorun file. Windows systems will detect the Autorun file on the CD-R, and automatically launch the Syzygy player, which will then start to play the DVD-Video disc image stored on the CD-R. This “DVD-on-CD” publishing technique allows the development of high quality titles that can be played on any Windows personal computer with a CD-ROM drive and at least a 300 Mhz Pentium CPU.

Figure 4.12 SpruceUp Disc Build and Disc Creation Process Window (See color insert for color version of this figure.)
Some entry-level DVD authoring tools provide special features to enhance the playback of the project on personal computers. Several authoring tools can put DVD-Video playback application programs on the target disc so that the project can be played back on computer systems that do not have DVD-ROM drives or DVD-Video playback software. For example SpruceUp includes an option to include the Syzygy DVD player on the output media along with the final disc image. An Autorun file is also placed on the disc to automatically launch the Syzygy player, which then starts playing the DVD-Video image from the disc. The ability to store DVD-Video disc images and a free DVD-Video player application on a CD-R is key to inexpensive distribution of projects. This is generally called a “DVD on CD” application and it can be used on most Windows personal computers that have a CD-ROM drive. “DVD on CD” applications can’t be used on DVD-Video players, since these players will only play Audio-CD or Video-CD content from a CD-R disc. Figure 4.13 shows a “DVD on CD” application, being played back using the Syzygy player.
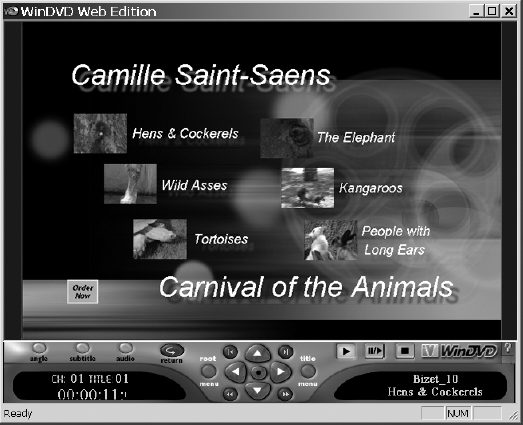
Figure 4.13 “DVD on CD” Application Created Using SpruceUp (See color insert for color version of this figure.)
In addition to the “DVD on CD” capability offered by many entry-level DVD authoring tools, some tools also offer WebDVD support. WebDVD is simply the integration of the DVD-Video format with the Internet. WebDVD titles can deliver broadcast quality video and audio elements stored on an optical disc (CD or DVD) along with graphics, text, and realtime data delivered from the Internet. Some entry-level DVD authoring tools can be used to assign an http: address to a button, menu, or media element. During playback, a web browser can be automatically launched and pointed to the associated URL.
Entry-Level DVD Authoring Summary
This chapter has covered the steps required to author a DVD-Video title, using entry-level DVD authoring tools. There are a number of different entry-level DVD-Video authoring tools on the market today, and they all have slightly different user interfaces, features, and capabilities. It is not practical to show you how to author a DVD-Video title for every authoring tool available today. However, almost all tools use the same basic steps to complete the authoring process.
1. Media Identification
a. Import Video Elements
b. Import Audio Elements
c. Import Still Image and Graphic Elements
2. Media Association
a. Create Menus
b. Associate Video, Audio, and Still Image Elements with Menu Buttons
3. Media Organization and Simulation
a. Link Menu Buttons and Media Elements
b. Test and verify correct operation via Emulation program
4. Export
a. Add WebDVD or DVD-ROM files
b. Build DVD Disc Image
c. Write Disc Image to Media
Over the past five years the cost of developing DVD-Video titles has dropped dramatically. With the release of the Pioneer DVR-A03 DVD-R (repackaged as the Apple DVD-R Super-Drive) it is now possible for the average person to publish DVD titles that will work in the vast majority of DVD-Video players installed throughout the world (Table 6.9 provides a detailed list of DVD-Video players that have problems playing DVD-R discs). Prices will continue to drop over the next several years, and at some point in the near future DVD-R drives will be a standard feature on personal computers, and DVD-Video authoring tools will be as easy to use as today’s word processing programs.
Many DVD developers and industry insiders have predicted that lowering the cost of DVD-Video authoring hardware and software will put them out of business, as the average person will be able to develop their own titles and thus not require an independent developer. I disagree with this conclusion. I believe that the need for independent DVD developers will increase dramatically over the next several years as more and more consumers want their existing VHS, BetaMax, SVHS, Hi-8 and film content transferred to DVD. DVD offers the average consumer better quality than any previous home entertainment format, although it will never be better than the original source material, as well as a longer life than any tape-based format. When consumers start to create DVD titles from their own home movie content, DVD-Video players will become as ubiquitous as televisions, and demand for both professional and amateur DVD titles will increase dramatically.