
Share & Subscribe to Calendars
A conference room schedule, a time-off calendar, the lineup of family events—many calendars are meant to be shared. When coworkers and family members can all see what’s coming up, add events, and set alarms for themselves as needed, you avoid a host of hassles.
Calendar offers many ways to do this. You can use iCloud to share with other iCloud users. You can share a calendar with others who use the same CalDAV or Exchange calendar service. You can publish or subscribe to read-only calendars, too.
Because a shared calendar is accessed on the server where it’s hosted (iCloud, for instance), not on your Mac, it doesn’t matter if your Mac is off. Your shared calendars are always good to go.
Share an iCloud Calendar
Once you Connect Calendar to iCloud, you can use Calendar to share an iCloud calendar with others using two different methods:
Share with other iCloud users: With this technique, you invite people specifically by email address. Each invitee can edit the calendar, unless you turn off that privilege.
Share a public calendar: In this case, you get a URL that you can share with anyone. Anyone with the URL can view the calendar in any calendar app that can subscribe to it, but all they can do is view it—editing is not possible. Examples of apps that can subscribe to this sort of URL are Apple’s Calendar, Google Calendar, and Microsoft Outlook for Mac or Windows.
To share an iCloud calendar, follow these steps:
Working in the Calendars list, hover your pointer over the calendar’s name to see and click a Share Calendar
 icon.
icon.To share with other iCloud users, click the Share With field, type the email address of a person who you want to invite, and then press Tab or Return. Make sure to use the email address associated with their iCloud account. To invite another person, click below the last name and then click in the new Shared With field that appears. If invitees’ info is in your Contacts app, you can type their names instead of their email addresses (Figure 44).

Figure 44: Click in the Share With field and type the email address (or name, if it’s listed in Contacts) of someone you want to invite to share the calendar. By default, each person who you’ve added is able to view and edit the calendar. To restrict any invitee to just viewing, hover over their name, click the tiny downward-pointing caret that appears, and choose View Only.
If you want to share the calendar publicly (remember, this is a read-only version of the calendar), select the Public Calendar checkbox and then copy the web address that appears below it so that you can paste it and send it to your invitees, for example by emailing it. Alternatively, click the Share
 button, choose how you’d like to send the link, and follow the prompts.
Click Done.
If you invited people by iCloud email address or name in Step 2, they each receive an email message and a Calendar notification asking them to join the shared calendar (Figure 45). They can accept the invitation on any device that uses their iCloud account or at iCloud.com.

After you generate a public calendar URL in Step 3 and send the URL to iCloud users, as long as Safari is set as their default web browser, they can click the link to be stepped through the subscription process. Otherwise, they can follow the directions for Setting up a Subscription, ahead. Anyone can access a public iCloud calendar using Calendar on a Mac (see Setting up a Subscription), Microsoft Outlook on a Windows computer, or any other app that supports the iCalendar file (.ics) format—for details on which apps these are, read the Lifewire article, What is an ICS File?.
If you no longer want to share, one of these techniques should do the trick:
Stop sharing with one person: Click the Share Calendar
icon next to the calendar’s name, click their name in the list, and then press Delete.Stop sharing the calendar, period: Control-click (right-click) its name in the Calendars list, and then choose Stop Sharing (or for a public calendar, choose Unpublish). Calendar asks you if you’re sure. If you are, click Stop Sharing (or Stop Publishing).
Stop sharing someone else’s calendar: Control-click (right-click) its name in the Calendars list, and then click Unsubscribe.
Subscribe to a Calendar
As a parent, for years I’ve painstakingly entered all vacations, teacher planning days, late-start days, and early-finish days from my children’s school calendar. (Nothing spoils a work day faster than a no-school day you didn’t know about!) Imagine my delight when I could finally subscribe to the school calendar. Once I did that, school events automatically appeared in Calendar and updated anytime a date changed.
There’s no option to edit a calendar you subscribe to. You’re a viewer, through and through.
Whether you’re looking for your favorite sports team’s schedule or a calendar of regional events, it’s always worth it to see if there’s a calendar you can subscribe to before you start entering events by hand. Often you can find a link to a team’s calendar on its website. Go to the schedule page and look for a button that says something like “Sync to Calendar” or “Add to Calendar” (Figure 46). Click this to skip straight to the end of Step 2 in the instructions just ahead for setting up a subscription.

Setting up a Subscription
To subscribe to a calendar:
Choose File > New Calendar Subscription.
Enter the calendar’s URL (for instance,
webcal://sports.yahoo.com/nba/teams/por/ical.ics), and then click Subscribe.Type a name in the Name field (if it’s not already filled in) and then click the color-coded pop-up menu to choose a color (Figure 47).
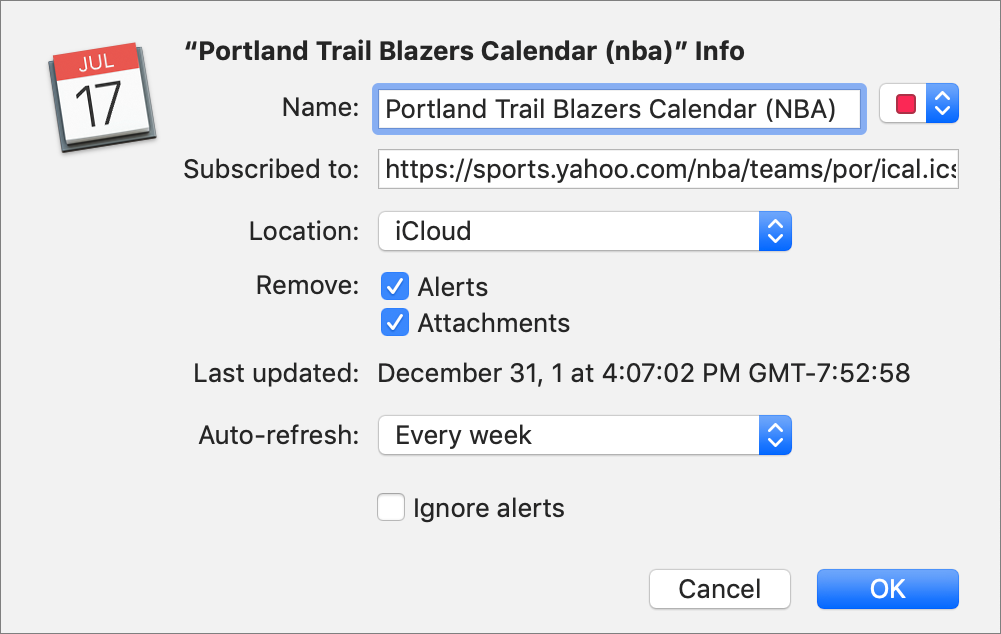
Figure 47: Determine the details of your calendar subscription in this dialog. Next, click the Location pop-up menu to choose an account for the subscription, for example, iCloud if you want the calendar to appear on all your iCloud-connected devices, or On My Mac if you prefer to keep it local.
If you want events to include their original alerts and attachments, deselect the Remove Alerts and Attachments checkboxes.
To determine how frequently the calendar updates, click the Auto-refresh pop-up menu and choose an option, from No (in other words, don’t auto-refresh) to Every Week.
If you don’t want to get alerts from this calendar, select the Ignore Alerts checkbox.
Click OK.
To rename or make other changes to your calendar subscription later, Control-click (right-click) its name in the Calendars list and choose Get Info.
Unsubscribing from a Calendar
Anytime you want to stop subscribing to a calendar, Control-click (right-click) its name in the Calendars list and choose Unsubscribe.