Chapter 8. Custom API Servers
As an alternative to CustomResourceDefinitions, you can use a custom API server. Custom API servers can serve API groups with resources the same way the main Kubernetes API server does. In contrast to CRDs, there are hardly any limits to what you can do with a custom API server.
This chapter begins by listing a number of reasons why CRDs might not be the right solution for your use case. It describes the aggregation pattern that makes it possible to extend the Kubernetes API surface with a custom API server. Finally, you’ll learn to actually implement a custom API server using Golang.
Use Cases for Custom API Servers
A custom API server can be used in place of CRDs. It can do everything that CRDs can do and offers nearly infinite flexibility. Of course, this comes at a cost: complexity of both development and operation.
Let’s look at some limits of CRDs as of the time of this writing (when Kubernetes 1.14 was the stable release). CRDs:
-
Use
etcdas their storage medium (or whatever the Kubernetes API server uses). -
Do not support protobuf, only JSON.
-
Support only two kinds of subresources: /status and /scale (see “Subresources”).
-
Do not support graceful deletion.1 Finalizers can simulate this but do not allow a custom graceful deletion time.
-
Add significantly to the Kubernetes API server’s CPU load, because all algorithms are implemented in a generic way (for example, validation).
-
Implement only standard CRUD semantics for the API endpoints.
-
Do not support cohabitation of resources (i.e., resources in different API groups or resources of different names that share storage).2
A custom API server, in contrast, does not have these restrictions. A custom API server:
-
Can use any storage medium. There are custom API servers, such as:
-
The metrics API server, which stores data in memory for maximum performance
-
API servers mirroring a Docker registry in OpenShift
-
API servers writing to a time series database
-
API servers mirroring cloud APIs
-
API servers mirroring other API objects, like projects in OpenShift that mirror Kubernetes namespaces
-
-
Can provide protobuf support like all native Kubernetes resources do. For this you must create a .proto file by using go-to-protobuf and then using the protobuf compiler
protocto generate serializers, which are then compiled into the binary. -
Can provide any custom subresource; for example, the Kubernetes API server provides /exec, /logs, /port-forward, and more, most of which use very custom protocols like WebSockets or HTTP/2 streaming.
-
Can implement graceful deletion as Kubernetes does for pods.
kubectlwaits for the deletion, and the user can even provide a custom graceful termination period. -
Can implement all operations like validation, admission, and conversion in the most efficient way using Golang, without a roundtrip through webhooks, which add further latency. This can matter for high performance use cases or if there is a large number of objects. Think about pod objects in a huge cluster with thousands of nodes, and two magnitudes more pods.
-
Can implement custom semantics, like the atomic reservation of a service IP in the core v1
Servicekind. At the moment the service is created, a unique service IP is assigned and directly returned. To a limited degree, special semantics like this can of course be implemented with admission webhooks (see “Admission Webhooks”), though those webhooks can never reliably know whether the passed object was actually created or updated: they are called optimistically, but a later step in the request pipeline might cancel the request. In other words: side effects in webhooks are tricky because there is no undo trigger if a request fails. -
Can serve resources that have a common storage mechanism (i.e., a common
etcdkey path prefix) but live in different API groups or are named differently. For example, Kubernetes stores deployments and other resources in the API groupextensions/v1and then moves them to more specific API groups likeapps/v1.
In other words, custom API servers are a solution for situations where CRDs are still limited. In transitional scenarios where it is important to not break resource compatibility when moving to new semantics, custom API servers are often much more flexible.
Example: A Pizza Restaurant
To learn how custom API servers are implemented, in this section we will look at an example project: a custom API server implementing a pizza restaurant API. Let’s take a look at the requirements.
We want to create two kinds in the restaurant.programming-kubernetes.info API group:
Topping-
Pizza toppings (e.g., salami, mozzarella, or tomato)
Pizza-
The type of pizza offered in the restaurant
The toppings are cluster-wide resources and hold only a floating-point value for the cost of one unit of the topping. An instance is as simple as:
apiVersion:restaurant.programming-kubernetes.info/v1alpha1kind:Toppingmetadata:name:mozzarellaspec:cost:1.0
Each pizza can have an arbitrary number of toppings; for example:
apiVersion:restaurant.programming-kubernetes.info/v1alpha1kind:Pizzametadata:name:margheritaspec:toppings:-mozzarella-tomato
The list of toppings is ordered (like any list in YAML or JSON), but the order does not really matter for the semantics of the type. The customer will get the same pizza in any case. We want to allow duplicates in the list in order to allow, say, a pizza with extra cheese.
All this can be implemented easily with CRDs. Now let’s add some requirements that go beyond the basic CRD capabilities:3
-
We want to allow only toppings in a pizza specification that have a corresponding
Toppingobject. -
We also want to assume that we first introduced this API as a
v1alpha1version but eventually learned that we want another representation of the toppings in thev1beta1version of the same API.
In other words, we want to have two versions and convert seamlessly between them.
The full implementation of this API as a custom API server can be found at the book’s GitHub repository. In the rest of this chapter, we will go through all the major parts of that project and learn how it works. In the process, you’ll see a lot of the concepts presented in the previous chapter in a different light: namely, the Golang implementation that is also behind the Kubernetes API server. A number of design decisions highlighted in CRDs also will become clearer.
Hence, we highly recommend you read through this chapter even if you don’t plan to go the route of a custom API server. Maybe the concepts presented here will be made available for CRDs as well in the future, in which case having knowledge of custom API servers will be useful to you.
The Architecture: Aggregation
Before going into the technical implementation details, we want to take a higher-level view of the custom API server architecture in the context of a Kubernetes cluster.
Custom API servers are processes serving API groups, usually built using the generic API server library k8s.io/apiserver. These processes can run inside or outside of the cluster. In the former case, they run inside pods, with a service in front.
The main Kubernetes API server, called kube-apiserver, is always the first point of contact for kubectl and other API clients. API groups served by a custom API server are proxied by the kube-apiserver process to the custom API server process. In other words, the kube-apiserver process knows about all of the custom API servers and the API groups they serve, in order to be able to proxy the right requests to them.
The component doing this proxying is inside the kube-apiserver process and is called kube-aggregator. The process of proxying API requests to the custom API server is called API aggregation.
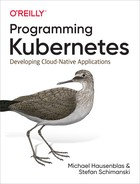
Let’s look a bit more into the path of requests targeted at a custom API server, but coming in at the Kubernetes API server TCP socket (see Figure 8-1):
-
Requests are received by the Kubernetes API server.
-
They pass the handler chain consisting of authentication, audit logging, impersonation, max-in-flight throttling, authorization, and more (the figure is just a sketch and is not complete).
-
As the Kubernetes API server knows the aggregated APIs, it can intercept requests to the HTTP path /apis/
aggregated-API-group-name. -
The Kubernetes API server forwards the request to the custom API server.

Figure 8-1. Kubernetes main API server kube-apiserver with an integrated kube-aggregator
The kube-aggregator proxies requests under the HTTP path for an API group version (i.e., everything under /apis/group-name/version). It does not have to know the actual served resources in the API group version.
In contrast, the kube-aggregator serves the discovery endpoints /apis and /apis/group-name of all aggregated custom API servers itself (it uses the defined order explained in the following section) and returns the results without talking to the aggregated custom API servers. Instead it uses the information from the APIService resource. Let’s look at this process in detail.
API Services
For the Kubernetes API server to know about the API groups a custom API server serves, one APIService object must be created in the apiregistration.k8s.io/v1 API group. These objects list only the API groups and versions, not resources or any further details:
apiVersion:apiregistration.k8s.io/v1beta1kind:APIServicemetadata:name:namespec:group:API-group-nameversion:API-group-versionservice:namespace:custom-API-server-service-namespacename:-API-server-servicecaBundle:base64-caBundleinsecureSkipTLSVerify:boolgroupPriorityMinimum:2000versionPriority:20
The name is arbitrary, but for clarity we suggest you use a name that identifies the API group name and version—e.g., group-name-version.
The service can be a normal ClusterIP service in the cluster, or it can be an ExternalName service with a given DNS name for out-of-cluster custom API servers. In both cases, the port must be 443. No other service port is supported (at the time of this writing). Service target port mapping allows any chosen, preferably nonrestricted, higher port to be used for the custom API server pods, so this is not a major restriction.
The certificate authority (CA) bundle is used for the Kubernetes API server to trust the contacted service. Note that API requests can contain confidential data. To avoid man-in-the-middle attacks, it is highly recommended that you set the caBundle field and not use the insecureSkipTLSVerify alternative. This is especially important for any production cluster, including a mechanism for certificate rotation.
Finally, there are two priorities in the APIService object. These have some tricky semantics, described in the Golang code documentation for the APIService type:
// GroupPriorityMininum is the priority this group should have at least. Higher// priority means that the group is preferred by clients over lower priority ones.// Note that other versions of this group might specify even higher// GroupPriorityMinimum values such that the whole group gets a higher priority.//// The primary sort is based on GroupPriorityMinimum, ordered highest number to// lowest (20 before 10). The secondary sort is based on the alphabetical// comparison of the name of the object (v1.bar before v1.foo). We'd recommend// something like: *.k8s.io (except extensions) at 18000 and PaaSes// (OpenShift, Deis) are recommended to be in the 2000sGroupPriorityMinimumint32`json:"groupPriorityMinimum"`// VersionPriority controls the ordering of this API version inside of its// group. Must be greater than zero. The primary sort is based on// VersionPriority, ordered highest to lowest (20 before 10). Since it's inside// of a group, the number can be small, probably in the 10s. In case of equal// version priorities, the version string will be used to compute the order// inside a group. If the version string is "kube-like", it will sort above non// "kube-like" version strings, which are ordered lexicographically. "Kube-like"// versions start with a "v", then are followed by a number (the major version),// then optionally the string "alpha" or "beta" and another number (the minor// version). These are sorted first by GA > beta > alpha (where GA is a version// with no suffix such as beta or alpha), and then by comparing major version,// then minor version. An example sorted list of versions:// v10, v2, v1, v11beta2, v10beta3, v3beta1, v12alpha1, v11alpha2, foo1, foo10.VersionPriorityint32`json:"versionPriority"`
In other words, the GroupPriorityMinimum value determines where the group is prioritized. If multiple APIService objects for different versions differ, the highest value rules.
The second priority just orders the versions among each other to define the preferred version to be used by dynamic clients.
Here is a list of the GroupPriorityMinimum values for the native Kubernetes API groups:
varapiVersionPriorities=map[schema.GroupVersion]priority{{Group:"",Version:"v1"}:{group:18000,version:1},{Group:"extensions",Version:"v1beta1"}:{group:17900,version:1},{Group:"apps",Version:"v1beta1"}:{group:17800,version:1},{Group:"apps",Version:"v1beta2"}:{group:17800,version:9},{Group:"apps",Version:"v1"}:{group:17800,version:15},{Group:"events.k8s.io",Version:"v1beta1"}:{group:17750,version:5},{Group:"authentication.k8s.io",Version:"v1"}:{group:17700,version:15},{Group:"authentication.k8s.io",Version:"v1beta1"}:{group:17700,version:9},{Group:"authorization.k8s.io",Version:"v1"}:{group:17600,version:15},{Group:"authorization.k8s.io",Version:"v1beta1"}:{group:17600,version:9},{Group:"autoscaling",Version:"v1"}:{group:17500,version:15},{Group:"autoscaling",Version:"v2beta1"}:{group:17500,version:9},{Group:"autoscaling",Version:"v2beta2"}:{group:17500,version:1},{Group:"batch",Version:"v1"}:{group:17400,version:15},{Group:"batch",Version:"v1beta1"}:{group:17400,version:9},{Group:"batch",Version:"v2alpha1"}:{group:17400,version:9},{Group:"certificates.k8s.io",Version:"v1beta1"}:{group:17300,version:9},{Group:"networking.k8s.io",Version:"v1"}:{group:17200,version:15},{Group:"networking.k8s.io",Version:"v1beta1"}:{group:17200,version:9},{Group:"policy",Version:"v1beta1"}:{group:17100,version:9},{Group:"rbac.authorization.k8s.io",Version:"v1"}:{group:17000,version:15},{Group:"rbac.authorization.k8s.io",Version:"v1beta1"}:{group:17000,version:12},{Group:"rbac.authorization.k8s.io",Version:"v1alpha1"}:{group:17000,version:9},{Group:"settings.k8s.io",Version:"v1alpha1"}:{group:16900,version:9},{Group:"storage.k8s.io",Version:"v1"}:{group:16800,version:15},{Group:"storage.k8s.io",Version:"v1beta1"}:{group:16800,version:9},{Group:"storage.k8s.io",Version:"v1alpha1"}:{group:16800,version:1},{Group:"apiextensions.k8s.io",Version:"v1beta1"}:{group:16700,version:9},{Group:"admissionregistration.k8s.io",Version:"v1"}:{group:16700,version:15},{Group:"admissionregistration.k8s.io",Version:"v1beta1"}:{group:16700,version:12},{Group:"scheduling.k8s.io",Version:"v1"}:{group:16600,version:15},{Group:"scheduling.k8s.io",Version:"v1beta1"}:{group:16600,version:12},{Group:"scheduling.k8s.io",Version:"v1alpha1"}:{group:16600,version:9},{Group:"coordination.k8s.io",Version:"v1"}:{group:16500,version:15},{Group:"coordination.k8s.io",Version:"v1beta1"}:{group:16500,version:9},{Group:"auditregistration.k8s.io",Version:"v1alpha1"}:{group:16400,version:1},{Group:"node.k8s.io",Version:"v1alpha1"}:{group:16300,version:1},{Group:"node.k8s.io",Version:"v1beta1"}:{group:16300,version:9},}
So using 2000 for PaaS-like APIs means that they are placed at the end of this list.4
The order of the API groups plays a role during the REST mapping process in kubectl (see “REST Mapping”). This means it has actual influence on the user experience. If there are conflicting resource names or short names, the one with the highest GroupPriorityMinimum value wins.
Also, in the special case of replacing of an API group version using a custom API server, this priority ordering might be of use. For example, you could replace a native Kubernetes API group with a modified one (for whatever reason) by placing the custom API service at a position with a lower GroupPriorityMinimum value than the one in the upper table.
Note again that the Kubernetes API server does not need to know the list of resources for either of the discovery endpoints /apis, and /apis/group-name, or for proxying. The list of resources is returned only via the third discovery endpoint, /apis/group-name/version. But as we have seen in the previous section, this endpoint is served by the aggregated custom API server, not by kube-aggregator.
Inner Structure of a Custom API Server
A custom API server resembles most of the parts that make up the Kubernetes API server, though of course with different API group implementations, and without an embedded kube-aggregator or an embedded apiextension-apiserver (which serves CRDs). This leads to nearly the same architectural picture (shown in Figure 8-2) as the one in Figure 8-1:
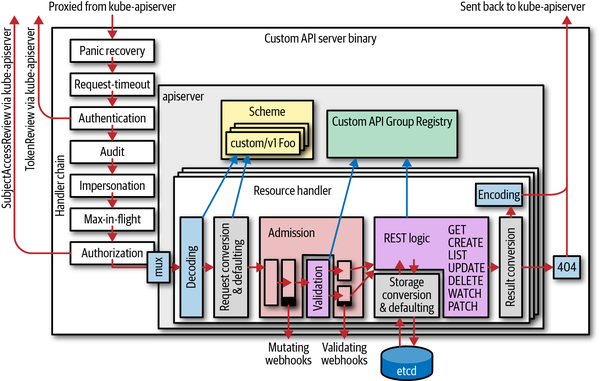
Figure 8-2. An aggregated custom API server based on k8s.io/apiserver
We observe a number of things. An aggregated API server:
-
Has the same basic internal structure as the Kubernetes API server.
-
Has its own handler chain, including authentication, audit, impersonation, max-in-flight throttling, and authorization (we will explain throughout this chapter why this is necessary; see, for example, “Delegated Authorization”).
-
Has its own resource handler pipeline, including decoding, conversion, admission, REST mapping, and encoding.
-
Calls admission webhooks.
-
Might write to
etcd(it can use a different storage backend, though). Theetcdcluster does not have to be the same as the one used by the Kubernetes API server. -
Has its own scheme and registry implementation for custom API groups. The registry implementation might differ and be customized to any degree.
-
Does authentication again. It usually does client certificate authentication and token-based authentication, calling back to the Kubernetes API server with a
TokenAccessReviewrequest. We will discuss the authentication and trust architecture in more detail shortly. -
Does its own auditing. This means the Kubernetes API server audits certain fields, but only on the meta level. Object-level auditing is done in the aggregated custom API server.
-
Does its own authentication using
SubjectAccessReviewrequests to the Kubernetes API server. We will discuss authorization in more detail shortly.
Delegated Authentication and Trust
An aggregated custom API server (based on k8s.io/apiserver) is built on the same authentication library as the Kubernetes API server. It can use client certificates or tokens to authenticate a user.
Because an aggregated custom API server is architecturally placed behind the Kubernetes API server (i.e., the Kubernetes API server receives requests and proxies them to the aggregated custom API server), requests are already authenticated by the Kubernetes API server. The Kubernetes API server stores the result of the authentication—that is, the username and group membership—in HTTP request headers, usually X-Remote-User and X-Remote-Group (these can be configured with the --requestheader-username-headers and --requestheader-group-headers flags).
The aggregated custom API server has to know when to trust these headers; otherwise, any other caller could claim to have done authentication and could set these headers. This is handled by a special request header client CA. It is stored in the config map kube-system/extension-apiserver-authentication (filename requestheader-client-ca-file). Here is an example:
apiVersion:v1kind:ConfigMapmetadata:name:extension-apiserver-authenticationnamespace:kube-systemdata:client-ca-file:|-----BEGIN CERTIFICATE-----...-----END CERTIFICATE-----requestheader-allowed-names:'["aggregator"]'requestheader-client-ca-file:|-----BEGIN CERTIFICATE-----...-----END CERTIFICATE-----requestheader-extra-headers-prefix:'["X-Remote-Extra-"]'requestheader-group-headers:'["X-Remote-Group"]'requestheader-username-headers:'["X-Remote-User"]'
With this information, an aggregated custom API server with default settings will authenticate:
-
Clients using client certificates matching the given client-ca-file
-
Clients preauthenticated by the Kubernetes API server whose requests are forwarded using the given requestheader-client-ca-file and whose username and group memberships are stored in the given HTTP headers
X-Remote-GroupandX-Remote-User
Last but not least, there is a mechanism called TokenAccessReview that forwards bearer tokens (received via the HTTP header Authorization: bearer token) back to the Kubernetes API server in order to verify whether they are valid. The token access review mechanism is disabled by default but can optionally be enabled; see “Options and Config Pattern and Startup Plumbing”.
We will see in the following sections how delegated authentication is actually set up. While we’ve gone into detail about this mechanism here, inside an aggregated custom API server this is mostly done automatically by the k8s.io/apiserver library. But knowing what is going on behind the curtain is certainly valuable, especially where security is involved.
Delegated Authorization
After authentication has been done, each request must be authorized. Authorization is based on the username and group list. The default authorization mechanism in Kubernetes is role-based access control (RBAC).
RBAC maps identities to roles, and roles to authorization rules, which finally accept or reject requests. We won’t go into all the details here about RBAC authorization objects like roles and cluster roles, or role bindings and cluster role bindings (see “Getting the Permissions Right” for more). From an architectural point of view it is enough to know that an aggregated custom API server authorizes requests using delegated authorization via SubjectAccessReviews. It does not evaluate RBAC rules itself but instead delegates evaluation to the Kubernetes API server.
Let’s look at delegated authorization in more detail now.
A subject access review is sent from the aggregated custom API server to the Kubernetes API server on a request (if it does not find an answer in its authorization cache). Here is an example of such a review object:
apiVersion:authorization.k8s.io/v1kind:SubjectAccessReviewspec:resourceAttributes:group:appsresource:deploymentsverb:createnamespace:defaultversion:v1name:exampleuser:michaelgroups:-system:authenticated-admins-authors
The Kubernetes API server receives this from the aggregated custom API server, evaluates the RBAC rules in the cluster, and makes a decision, returning a SubjectAccessReview object with a status field set; for example:
apiVersion:authorization.k8s.io/v1kind:SubjectAccessReviewstatus:allowed:truedenied:falsereason:"rulefooallowedthisrequest"
Note here that it is possible that both allowed and denied are false. This means that the Kubernetes API server could not make a decision, in which case another authorizer inside an aggregated custom API server can make a decision (API servers implement an authorization chain that is queried one by one, with delegated authorization being one of the authorizers in that chain). This can be used to model nonstandard authorization logic—that is, if in certain cases there are no RBAC rules but an external authorization system is used instead.
Note that for performance reasons, the delegated authorization mechanism maintains a local cache in each aggregated custom API server. By default, it caches 1,024 authorization entries with:
-
5minutes expiry for allowed authorization requests -
30seconds expiry for denied authorization requests
These values can be customized via --authorization-webhook-cache-authorized-ttl and --authorization-webhook-cache-unauthorized-ttl.
We’ll see in the following sections how delegated authorization is set up in code. Again, as with authentication, inside an aggregated custom API server delegated authorization is mostly done automatically by the k8s.io/apiserver library.
Writing Custom API Servers
In the previous sections we looked at the architecture of aggregated API servers. In this section we want to look at the implementation of an aggregated custom API server in Golang.
The main Kubernetes API server is implemented via the k8s.io/apiserver library. A custom API server will use the very same code. The main difference is that our custom API server will run in-cluster. This means that it can assume that a kube-apiserver is available in the cluster and use it to do delegated authorization and to retrieve other kube-native resources.
We also assume that an etcd cluster is available and ready to be used by the aggregated custom API server. It is not important whether this etcd is dedicated or shared with the Kubernetes API server. Our custom API server will use a different etcd key space to avoid conflicts.
The code examples in this chapter refer to the example code on GitHub, so look there for the complete source code. We will show only the most interesting excerpt here, but you can always go to the complete example project, experiment with it, and—very important for learning—run it in a real cluster.
This pizza-apiserver project implements the example API shown in “Example: A Pizza Restaurant”.
Options and Config Pattern and Startup Plumbing
We’ll start with a couple of option structs that are bound to flags. Take them from k8s.io/apiserver and add our custom options. Option structs from k8s.io/apiserver can be tweaked in-code for special use cases, and the provided flags can be applied to a flag set in order to be accessible to the user.
In the example we start very simply by basing everything on the RecommendedOptions. These recommended options set up everything as needed for a “normal” aggregated custom API server for simple APIs, like this:
import(...informers"github.com/programming-kubernetes/pizza-apiserver/pkg/generated/informers/externalversions")constdefaultEtcdPathPrefix="/registry/restaurant.programming-kubernetes.info"typeCustomServerOptionsstruct{RecommendedOptions*genericoptions.RecommendedOptionsSharedInformerFactoryinformers.SharedInformerFactory}funcNewCustomServerOptions(out,errOutio.Writer)*CustomServerOptions{o:=&CustomServerOptions{RecommendedOptions:genericoptions.NewRecommendedOptions(defaultEtcdPathPrefix,apiserver.Codecs.LegacyCodec(v1alpha1.SchemeGroupVersion),genericoptions.NewProcessInfo("pizza-apiserver","pizza-apiserver"),),}returno}
The CustomServerOptions embed RecommendedOptions and add one field on top. NewCustomServerOptions is the constructor that fills the CustomServerOptions struct with default values.
Let’s look into some of the more interesting details:
-
defaultEtcdPathPrefixis theetcdprefix for all of our keys. As a key space, we use /registry/pizza-apiserver.programming-kubernetes.info, clearly distinct from Kubernetes keys. -
SharedInformerFactoryis the process-wide shared informer factory for our own CRs to avoid unnecessary informers for the same resources (see Figure 3-5). Note that it is imported from the generated informer code in our project and not fromclient-go. -
NewRecommendedOptionssets everything up for an aggregated custom API server with default values.
Let’s take a quick look at NewRecommendedOptions:
return&RecommendedOptions{Etcd:NewEtcdOptions(storagebackend.NewDefaultConfig(prefix,codec)),SecureServing:sso.WithLoopback(),Authentication:NewDelegatingAuthenticationOptions(),Authorization:NewDelegatingAuthorizationOptions(),Audit:NewAuditOptions(),Features:NewFeatureOptions(),CoreAPI:NewCoreAPIOptions(),ExtraAdmissionInitializers:func(c*server.RecommendedConfig)([]admission.PluginInitializer,error){returnnil,nil},Admission:NewAdmissionOptions(),ProcessInfo:processInfo,Webhook:NewWebhookOptions(),}
All of these can be tweaked if necessary. For example, if a custom default serving port is desired, RecommendedOptions.SecureServing.SecureServingOptions.BindPort can be set.
Let’s briefly go through the existing option structs:
-
Etcdconfigures the storage stack that reads and write toetcd. -
SecureServingconfigures everything around HTTPS (i.e., ports, certificates, etc.) -
Authenticationsets up delegated authentication as described in “Delegated Authentication and Trust”. -
Authorizationsets up delegated authorization as described in “Delegated Authorization”. -
Auditsets up the auditing output stack. This is disabled by default, but can be set to output an audit log file or to send audit events to an external backend. -
Featuresconfigures feature gates of alpha and beta features. -
CoreAPIholds a path to a kubeconfig file to access the main API server. This defaults to using the in-cluster configuration. -
Admissionis a stack of mutating and validating admission plug-ins that execute for every incoming API request. This can be extended with custom in-code admission plug-ins, or the default admission chain can be tweaked for the custom API server. -
ExtraAdmissionInitializersallows us to add more initializers for admission. Initializers implement the plumbing of, for example, informers or clients through the custom API server. See “Admission” for more about custom admission. -
ProcessInfoholds information for event object creation (i.e., a process name and a namespace). We have set it topizza-apiserverfor both values. -
Webhookconfigures how webhooks operate (e.g., general setting for authentication and admission webhook). It is set up with good defaults for a custom API server that runs inside of a cluster. For API servers outside of the cluster, this would be the place to configure how it can reach the webhook.
Options are coupled with flags; that is, they are conventionally on the same abstraction level as flags. As a rule of thumb, options do not hold “running” data structures. They are used during startup and then converted to configuration or server objects, which are then run.
Options can be validated via the Validate() error method. This method will also check that the user-provided flag values make logical sense.
Options can be completed in order to set default values, which should not show up in the flags’ help text but which are necessary to get a complete set of options.
Options are converted to a server configuration (“config”) by the Config() (*apiserver.Config, error) method. This is done by starting with a recommended default configuration and then applying the options to it:
func(o*CustomServerOptions)Config()(*apiserver.Config,error){err:=o.RecommendedOptions.SecureServing.MaybeDefaultWithSelfSignedCerts("localhost",nil,[]net.IP{net.ParseIP("127.0.0.1")},)iferr!=nil{returnnil,fmt.Errorf("error creating self-signed cert: %v",err)}[...omittedo.RecommendedOptions.ExtraAdmissionInitializers...]serverConfig:=genericapiserver.NewRecommendedConfig(apiserver.Codecs)err=o.RecommendedOptions.ApplyTo(serverConfig,apiserver.Scheme);iferr!=nil{returnnil,err}config:=&apiserver.Config{GenericConfig:serverConfig,ExtraConfig:apiserver.ExtraConfig{},}returnconfig,nil}
The config created here contains runnable data structures; in other words, configs are runtime objects, in contrast to the options, which correspond to flags. The line o.RecommendedOptions.SecureServing.MaybeDefaultWithSelfSignedCerts creates self-signed certificates in case the user has not passed flags for pregenerated certificates.
As we’ve described, genericapiserver.NewRecommendedConfig returns a default recommended configuration, and RecommendedOptions.ApplyTo changes it according to flags (and other customized options).
The config struct of the pizza-apiserver project itself is just a wrapper around the RecommendedConfig for our example custom API server:
typeExtraConfigstruct{// Place your custom config here.}typeConfigstruct{GenericConfig*genericapiserver.RecommendedConfigExtraConfigExtraConfig}// CustomServer contains state for a Kubernetes custom api server.typeCustomServerstruct{GenericAPIServer*genericapiserver.GenericAPIServer}typecompletedConfigstruct{GenericConfiggenericapiserver.CompletedConfigExtraConfig*ExtraConfig}typeCompletedConfigstruct{// Embed a private pointer that cannot be instantiated outside of// this package.*completedConfig}
If more state for a running custom API server is necessary, ExtraConfig is the place to put it.
Similarly to option structs, the config has a Complete() CompletedConfig method that sets default values. Because it is necessary to actually call Complete() for the underlying configuration, it is common to enforce that via the type system by introducing the unexported completedConfig data type. The idea here is that only a call to Complete() can turn a Config into a completeConfig. The compiler will complain if this call is not done:
func(cfg*Config)Complete()completedConfig{c:=completedConfig{cfg.GenericConfig.Complete(),&cfg.ExtraConfig,}c.GenericConfig.Version=&version.Info{Major:"1",Minor:"0",}returncompletedConfig{&c}}
Finally, the completed config can be turned into a CustomServer runtime struct via the New() constructor:
// New returns a new instance of CustomServer from the given config.func(ccompletedConfig)New()(*CustomServer,error){genericServer,err:=c.GenericConfig.New("pizza-apiserver",genericapiserver.NewEmptyDelegate(),)iferr!=nil{returnnil,err}s:=&CustomServer{GenericAPIServer:genericServer,}[...omittedAPIinstallation...]returns,nil}
Note that we have intentionally omitted the API installation part here. We’ll come back to this in “API Installation” (i.e., how you wire the registries into the custom API server during startup). A registry implements the API and storage semantics of an API group. We will see this for the restaurant API group in “Registry and Strategy”.
The CustomServer object can finally be started with the Run(stopCh <-chan struct{}) error method. This is called by the Run method of the options in our example. That is, CustomServerOptions.Run:
-
Creates the config
-
Completes the config
-
Creates the
CustomServer -
Calls
CustomServer.Run
This is the code:
func(oCustomServerOptions)Run(stopCh<-chanstruct{})error{config,err:=o.Config()iferr!=nil{returnerr}server,err:=config.Complete().New()iferr!=nil{returnerr}server.GenericAPIServer.AddPostStartHook("start-pizza-apiserver-informers",func(contextgenericapiserver.PostStartHookContext)error{config.GenericConfig.SharedInformerFactory.Start(context.StopCh)o.SharedInformerFactory.Start(context.StopCh)returnnil},)returnserver.GenericAPIServer.PrepareRun().Run(stopCh)}
The PrepareRun() call wires up the OpenAPI specification and might do other post-API-installation operations. After calling it, the Run method starts the actual server. It blocks until stopCh is closed.
This example also wires a post-start hook named start-pizza-apiserver-informers. As the name suggests, a post-start hook is called after the HTTPS server is up and listening. Here, it starts the shared informer factories.
Note that even local in-process informers of resources provided by the custom API server itself speak via HTTPS to the localhost interface. So it makes sense to start them after the server is up and the HTTPS port is listening.
Also note that the /healthz endpoint returns success only after all post-start hooks have finished successfully.
With all the little plumbing pieces in place, the pizza-apiserver project wraps everything up into a cobra command:
// NewCommandStartCustomServer provides a CLI handler for 'start master' command// with a default CustomServerOptions.funcNewCommandStartCustomServer(defaults*CustomServerOptions,stopCh<-chanstruct{},)*cobra.Command{o:=*defaultscmd:=&cobra.Command{Short:"Launch a custom API server",Long:"Launch a custom API server",RunE:func(c*cobra.Command,args[]string)error{iferr:=o.Complete();err!=nil{returnerr}iferr:=o.Validate();err!=nil{returnerr}iferr:=o.Run(stopCh);err!=nil{returnerr}returnnil},}flags:=cmd.Flags()o.RecommendedOptions.AddFlags(flags)returncmd}
With NewCommandStartCustomServer the main() method of the process is pretty simple:
funcmain(){logs.InitLogs()deferlogs.FlushLogs()stopCh:=genericapiserver.SetupSignalHandler()options:=server.NewCustomServerOptions(os.Stdout,os.Stderr)cmd:=server.NewCommandStartCustomServer(options,stopCh)cmd.Flags().AddGoFlagSet(flag.CommandLine)iferr:=cmd.Execute();err!=nil{klog.Fatal(err)}}
Note especially the call to SetupSignalHandler: it wires Unix signal handling. On SIGINT (triggered when you press Ctrl-C in a terminal) and SIGKILL, the stop channel is closed. The stop channel is passed to the running custom API server, and it shuts down when the stop channel is closed. Hence, the main loop will initiate a shutdown when one of the signals is received. This shutdown is graceful in the sense that running requests are finished (for up to 60 seconds by default) before termination. It also makes sure that all requests are sent to the audit backend and no audit data is dropped. After all that, cmd.Execute() will return and the process will terminate.
The First Start
Now we have everything in place to start the custom API server for the first time. Assuming you have a cluster configured in ~/.kube/config, you can use it for delegated authentication and authorization:
$cd$GOPATH/src/github.com/programming-kubernetes/pizza-apiserver$etcd&$go run . --etcd-servers localhost:2379--authentication-kubeconfig ~/.kube/config--authorization-kubeconfig ~/.kube/config--kubeconfig ~/.kube/config I0331 11:33:25.70232064244plugins.go:158]Loaded3mutating admission controller(s)successfully in the following order: NamespaceLifecycle,MutatingAdmissionWebhook,PizzaToppings. I0331 11:33:25.70234464244plugins.go:161]Loaded1validating admission controller(s)successfully in the following order: ValidatingAdmissionWebhook. I0331 11:33:25.71414864244secure_serving.go:116]Serving securely on[::]:443
It will start up and start serving the generic API endpoints:
$ curl -k https://localhost:443/healthz
ok
We can also list the discovery endpoint, but the result is not very satisfying yet—we have not created an API, so the discovery is empty:
$curl -k https://localhost:443/apis{"kind":"APIGroupList","groups":[]}
Let’s take a look from a higher level:
-
We have started a custom API server with the recommended options and config.
-
We have a standard handler chain that includes delegated authentication, delegated authorization, and auditing.
-
We have an HTTPS server running and serving requests for the generic endpoints: /logs, /metrics, /version, /healthz, and /apis.
Figure 8-3 shows this from 10,000 feet.
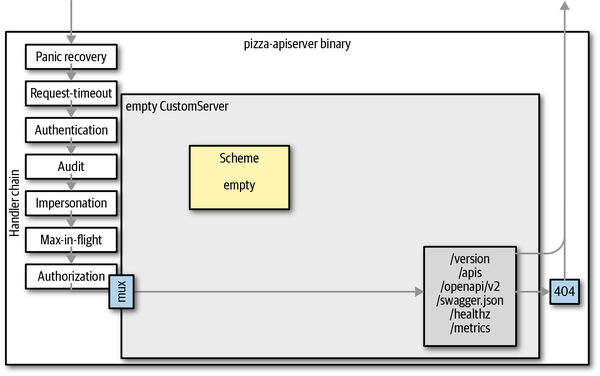
Figure 8-3. The custom API server without APIs
Internal Types and Conversion
Now that we’ve set up a running custom API server, it’s time to actually implement APIs. Before doing so, we have to understand API versions and how they are handled inside of an API server.
Every API server serves a number of resources and versions (see Figure 2-3). Some resources have multiple versions. To make multiple versions of a resource possible, the API server converts between versions.
To avoid quadratic growth of necessary conversions between versions, API servers use an internal version when implementing the actual API logic. The internal version is also often called hub version because it is a kind of hub that every other version is converted to and from (see Figure 8-4). The internal API logic is implemented just once for that hub version.
Figure 8-4. Conversion from and to the hub version
Figure 8-5 shows how the API servers make use of the internal version in the life-cycle of an API request:
-
The user sends a request using a specific version (e.g.,
v1). -
The API server decodes the payload and converts it to the internal version.
-
The API server passes the internal version through admission and validation.
-
The API logic is implemented for internal versions in the registry.
-
etcdreads and writes the versioned object (e.g.,v2—the storage version); that is, it converts from and to the internal version. -
Finally, the result is converted to the request version, in this case,
v1.
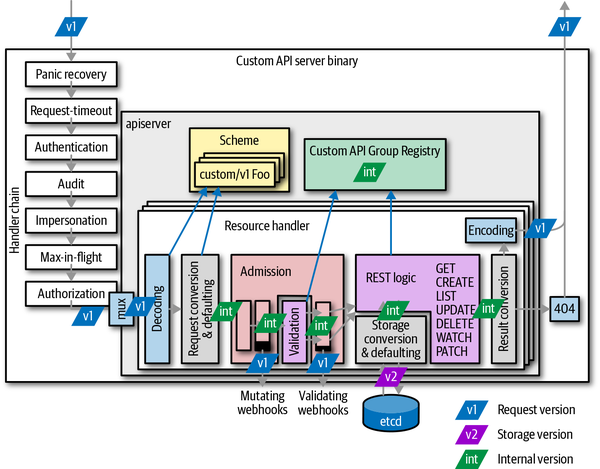
Figure 8-5. Conversion of API objects during the lifecycle of a request
On each edge between the internal hub version and the external version, a conversion takes place. In Figure 8-6, you can count the number of conversions per request handler. In a writing operation (like creation and update), at least four conversions are done, and even more if admission webhooks are deployed in the cluster. As you can see, conversion is a crucial operation in every API implementation.

Figure 8-6. Conversions and defaulting during the lifecycle of a request
In addition to conversion, Figure 8-6 also shows when defaulting takes place. Defaulting is the process of filling in unspecified field values. Defaulting is highly coupled with conversion, and is always done on the external version when it comes in from the user’s request, from etcd or from an admission webhook, but never when converted from the hub to the external version.
Warning
Conversion is crucial for the API server mechanics. It is also crucial that all conversions (back and forth) must be correct in the sense of being roundtrippable. Roundtrippable means that we can convert back and forth in the version graph (Figure 8-4) starting with random values, and we never lose any information; that is, conversions are bijective, or one-to-one. For example, we must be able to go from a random (but valid) v1 object to the internal hub type, then to v1alpha1, back to the internal hub type, and then back to v1. The resulting object must be equivalent to the original.
Making types roundtrippable often requires a lot of thought; it nearly always drives the API design of new versions and also influences the extension of old types in order to store the information that new versions carry.
In short: getting roundtripping right is hard—very hard at times. See “Roundtrip Testing” to learn how roundtripping can be tested effectively.
Defaulting logic can changed during the lifecycle of an API server. Imagine you add a new field to a type. The user might have old objects stored on disk, or the etcd may have old objects. If that new field has a default, this field value is set when the old, stored objects are sent to the API server, or when the user retrieves one of the old objects from etcd. It looks like the new field has existed forever, while in reality the defaulting process in the API server sets the field values during the processing of the request.
Writing the API Types
As we have seen, to add an API to the custom API server, we have to write the internal hub version types and the external version types and convert between them. This is what we’ll look at now for the pizza example project.
API types are traditionally placed into the pkg/apis/group-name package of the project with pkg/apis/group-name/types.go for internal types and pkg/apis/group-name/version/types.go for the external versions). So, for our example, pkg/apis/restaurant, pkg/apis/restaurant/v1alpha1/types.go, and pkg/apis/restaurant/v1beta1/types.go.
Conversions will be created at pkg/apis/group-name/version/zz_generated.conversion.go (for conversion-gen output) and pkg/apis/group-name/version/conversion.go for custom conversions written by the developer.
In a similar way, defaulting code will be created for defaulter-gen output at pkg/apis/group-name/version/zz_generated.defaults.go and at pkg/apis/group-name/version/defaults.go for custom defaulting code written by the developer. We have both pkg/apis/restaurant/v1alpha1/defaults.go and pkg/apis/restaurant/v1beta1/defaults.go in our example.
We go into more detail about conversion and defaulting in “Conversions” and “Defaulting”.
With the exception of conversion and defaulting, we’ve seen most of this process already for CustomResourceDefinitions in “Anatomy of a type”. Native types for the external versions in our custom API server are defined exactly the same way.
In addition, we have pkg/apis/group-name/types.go for the internal types, the hub types. The main difference is that in the latter the SchemeGroupVersion in the register.go file references runtime.APIVersionInternal (which is a shortcut for "__internal").
// SchemeGroupVersion is group version used to register these objectsvarSchemeGroupVersion=schema.GroupVersion{Group:GroupName,Version:runtime.APIVersionInternal}
Another difference between pkg/apis/group-name/types.go and the external type files is the lack of JSON and protobuf tags.
Tip
JSON tags are used by some generators to detect whether a types.go file is for an external version or the internal version. So always drop those tags when copying and pasting external types in order to create or update the internal types.
Last but not least, there is a helper to install all versions of an API group into a scheme. This helper is traditionally placed in pkg/apis/group-name/install/install.go. For our custom API server pkg/apis/restaurant/install/install.go, it looks as simple as this:
// Install registers the API group and adds types to a schemefuncInstall(scheme*runtime.Scheme){utilruntime.Must(restaurant.AddToScheme(scheme))utilruntime.Must(v1beta1.AddToScheme(scheme))utilruntime.Must(v1alpha1.AddToScheme(scheme))utilruntime.Must(scheme.SetVersionPriority(v1beta1.SchemeGroupVersion,v1alpha1.SchemeGroupVersion,))}
Because we have multiple versions, the priority has to be defined. This order will be used to determine the default storage version of the resource. It used to also play a role in version selection in internal clients (clients that return internal version objects; refer back to the note “Versioned Clients and Internal Clients in the Past”). But internal clients are deprecated and are going away. Even code inside an API server will use an external version client in the future.
Conversions
Conversion takes an object in one version and converts it into an object in another version. Conversion is implemented through conversion functions, some of them manually written (placed into pkg/apis/group-name/version/conversion.go by convention), and others autogenerated by conversion-gen (placed by convention into pkg/apis/group-name/version/zz_generated.conversion.go).
Conversion is initiated via a scheme (see “Scheme”) using the Convert() method, passing the source object in and the target object out:
func(s*Scheme)Convert(in,outinterface{},contextinterface{})error
The context is described as follows:
// ...an optional field that callers may use to pass info to conversion functions.It is used only in very special cases and is usually nil. Later in the chapter we will look at the conversion function scope, which allows us to access this context from within conversion functions.
To do the actual conversion, the scheme knows about all the Golang API types, their GroupVersionKinds, and the conversion functions between GroupVersionKinds. For this, conversion-gen registers generated conversion functions via the local scheme builder. In our example custom API server, the zz_generated.conversion.go file starts like this:
funcinit(){localSchemeBuilder.Register(RegisterConversions)}// RegisterConversions adds conversion functions to the given scheme.// Public to allow building arbitrary schemes.funcRegisterConversions(s*runtime.Scheme)error{iferr:=s.AddGeneratedConversionFunc((*Topping)(nil),(*restaurant.Topping)(nil),func(a,binterface{},scopeconversion.Scope)error{returnConvert_v1alpha1_Topping_To_restaurant_Topping(a.(*Topping),b.(*restaurant.Topping),scope,)},);err!=nil{returnerr}...returnnil}...
The function Convert_v1alpha1_Topping_To_restaurant_Topping() is generated. It takes a v1alpha1 object and converts it to the internal type.
Note
The preceding complicated type conversion turns the typed conversion function into a uniformly typed func(a, b interface{}, scope conversion.Scope) error. The scheme uses the latter types because it can call them without the use of reflection. Reflection is slow due to the many necessary allocations.
The manually written conversions in conversion.go take precedence during generation in the sense that conversion-gen skips generation for types if it finds a manually written function in the packages with the Convert_source-package-basename_KindTo_target-package-basename_Kind conversion function naming pattern. For example:
funcConvert_v1alpha1_PizzaSpec_To_restaurant_PizzaSpec(in*PizzaSpec,out*restaurant.PizzaSpec,sconversion.Scope,)error{...returnnil}
In the simplest case, conversion functions just copy over values from the source to the target object. But for the previous example, which converts a v1alpha1 pizza specification to the internal type, simple copying is not enough. We have to adapt the different structure, which actually looks like the following:
funcConvert_v1alpha1_PizzaSpec_To_restaurant_PizzaSpec(in*PizzaSpec,out*restaurant.PizzaSpec,sconversion.Scope,)error{idx:=map[string]int{}for_,top:=rangein.Toppings{ifi,duplicate:=idx[top];duplicate{out.Toppings[i].Quantity++continue}idx[top]=len(out.Toppings)out.Toppings=append(out.Toppings,restaurant.PizzaTopping{Name:top,Quantity:1,})}returnnil}
Clearly, no code generation can be so clever as to foresee what the user intended when defining these different types.
Note that during conversion the source object must never be mutated. But it is completely normal and, often for performance reasons, highly recommended to reuse data structures of the source in the target object if the types match.
This is so important that we reiterate it in a warning, because it has implications not only for the implementation of conversion but also for callers of conversions and consumers of conversion output.
Warning
Conversion functions must not mutate the source object, but the output is allowed to share data structures with the source. This means that consumers of conversion output have to make sure not to mutate an object if the original object must not be mutated.
For example, assume you have a pod *core.Pod in the internal version, and you convert it to v1 as podv1 *corev1.Pod, and mutate the resulting podv1. This might also mutate the original pod. If the pod came from an informer, this is highly dangerous because informers have a shared cache and mutating pod makes the cache inconsistent.
So, be aware of this property of conversion and do deep copies if necessary to avoid undesired and potentially dangerous mutations.
While this sharing of data structures leads to some risk, it also can avoid unnecessary allocations in many situations. Generated code goes so far that the generator compares source and target structs and uses Golang’s unsafe packages to convert pointers to structs of the same memory layout via a simple type conversion. Because the internal type and the v1beta1 types for a pizza in our example have the same memory layout, we get this:
funcautoConvert_restaurant_PizzaSpec_To_v1beta1_PizzaSpec(in*restaurant.PizzaSpec,out*PizzaSpec,sconversion.Scope,)error{out.Toppings=*(*[]PizzaTopping)(unsafe.Pointer(&in.Toppings))returnnil}
On the machine language level, this is a NOOP and therefore as fast as it can get. It avoids allocating a slice in this case and copying item by item from in to out.
Last but not least, some words about the third argument of conversion functions: the conversion scope conversion.Scope.
The conversion scope provides access to a number of conversion metalevel values. For example, it allows us to access the context value that is passed to the scheme’s Convert(in, out interface{}, context interface{}) error method via:
s.Meta().Context
It also allows us to call the scheme conversion for subtypes via s.Convert, or without considering the registered conversion functions at all via s.DefaultConvert.
In most conversion cases, though, there is no need to use the scope at all. You can just ignore its existence for the sake of simplicity until you hit a tricky situation where more context than the source and target object is necessary.
Defaulting
Defaulting is the step in an API request’s lifecycle that sets default values for omitted fields in incoming objects (from the client or from etcd). For example, a pod has a restartPolicy field. If the user does not specify it, a value will default to Always.
Imagine we are using a very old Kubernetes version around the year 2014. The field restartPolicy was just introduced to the system in the latest release at that time. After an upgrade of your cluster, there is a pod in etcd without the restartPolicy field. A kubectl get pod would read the old pod from etcd and the defaulting code would add the default value Always. From the user’s point of view, magically the old pod suddenly has the new restartPolicy field.
Refer back to Figure 8-6 to see where defaulting takes place today in the Kubernetes request pipeline. Note that defaulting is done only for external types, not internal types.
Now let’s look at the code that does defaulting. Defaulting is initiated by the k8s.io/apiserver code via the scheme, similarly to conversion. Hence, we have to register defaulting functions into the scheme for our custom types.
Again, similarly to conversions, most defaulting code is just generated with the defaulter-gen binary. It traverses API types and creates defaulting functions in pkg/apis/group-name/version/zz_generated.defaults.go. The code doesn’t do anything by default other than calling defaulting functions for the substructures.
You can define your own defaulting logic by following the defaulting function naming pattern SetDefaultsKind:
funcSetDefaultsKind(obj*Type){...}
In addition, and unlike with conversions, we have to call the registration of the generated function on the local scheme builder manually. This is unfortunately not done automatically:
funcinit(){localSchemeBuilder.Register(RegisterDefaults)}
Here, RegisterDefaults is generated inside package pkg/apis/group-name/version/zz_generated.defaults.go.
For defaulting code, it is crucial to know when a field was set by the user and when it wasn’t. This is not that clear in many cases.
Golang has zero values for every type and sets them if a field is not found in the passed JSON or protobuf. Imagine a default of true for a boolean field foo. The zero value is false. Unfortunately, it is not clear whether false was set due to the user’s input or because false is just the zero value of booleans.
To avoid this situation, often a pointer type must be used in the Golang API types (e.g., *bool in the preceding case). A user-provided false would lead to a non-nil boolean pointer to a false value, and a user-provided true would lead to the non-nil boolean pointer and a true value. A not-provided field leads to nil. This can be detected in the defaulting code:
funcSetDefaultsKind(obj*Type){ifobj.Foo==nil{x:=trueobj.Foo=&x}}
This gives the desired semantics: “foo defaults to true.”
Tip
This trick of using a pointer works for primitive types like strings. For maps and arrays, it is often hard to reach roundtrippability without identifying nil maps/arrays and empty maps/arrays. Most defaulters for maps and arrays in Kubernetes therefore apply the default in both cases, working around encoding and decoding bugs.
Roundtrip Testing
Getting conversions right is hard. Roundtrip tests are an essential tool to check automatically in a randomized test that conversions behave as planned and do not lose data when converting from and to all known group versions.
Roundtrip tests are usually placed with the install.go file (for example, into pkg/apis/restaurant/install/roundtrip_test.go) and just call the roundtrip test functions from API Machinery:
import(..."k8s.io/apimachinery/pkg/api/apitesting/roundtrip"restaurantfuzzer"github.com/programming-kubernetes/pizza-apiserver/pkg/apis/restaurant/fuzzer")funcTestRoundTripTypes(t*testing.T){roundtrip.RoundTripTestForAPIGroup(t,Install,restaurantfuzzer.Funcs)}
Internally, the RoundTripTestForAPIGroup call installs the API group into a temporary scheme using the Install functions. Then it creates random objects in the internal version using the given fuzzer, and then converts them to some external version and back to internal. The resulting objects must be equivalent to the original. This test is done hundreds or thousand of times with all external versions.
A fuzzer is a function that return a slice of randomizer functions for the internal types and their subtypes. In our example, the fuzzer is placed into the package pkg/apis/restaurant/fuzzer/fuzzer.go and contains a randomizer for the spec struct:
// Funcs returns the fuzzer functions for the restaurant api group.varFuncs=func(codecsruntimeserializer.CodecFactory)[]interface{}{return[]interface{}{func(s*restaurant.PizzaSpec,cfuzz.Continue){c.FuzzNoCustom(s)// fuzz first without calling this function again// avoid empty Toppings because that is defaultediflen(s.Toppings)==0{s.Toppings=[]restaurant.PizzaTopping{{"salami",1},{"mozzarella",1},{"tomato",1},}}seen:=map[string]bool{}fori:=ranges.Toppings{// make quantity strictly positive and of reasonable sizes.Toppings[i].Quantity=1+c.Intn(10)// remove duplicatesfor{if!seen[s.Toppings[i].Name]{break}s.Toppings[i].Name=c.RandString()}seen[s.Toppings[i].Name]=true}},}}
If no randomizer function is given, the underlying library github.com/google/gofuzz will generically try to fuzz the object by setting random values for base types and diving recursively into pointers, structs, maps, and slices, eventually calling custom randomizer functions if they are given by the developer.
When writing a randomizer function for one of the types, it is convenient to call c.FuzzNoCustom(s) first. It randomizes the given object s and also calls custom functions for substructures, but not for s itself. Then the developer can restrict and fix the random values to make the object valid.
Warning
It is important to make fuzzers as general as possible in order to cover as many valid objects as possible. If the fuzzer is too restrictive, the test coverage will be bad. In many cases during the development of Kubernetes, regressions were not caught because the fuzzers in place were not good.
On the other hand, a fuzzer only has to consider objects that validate and are the projection of actual objects definable in the external versions. Often you have to restrict the random values set by c.FuzzNoCustom(s) in a way that the randomized object becomes valid. For example, a string holding a URL does not have to roundtrip for arbitrary values if validation will reject arbitrary strings anyway.
Our preceding PizzaSpec example first calls c.FuzzNoCustom(s) and then fixes up the object by:
-
Defaulting the
nilcase for toppings -
Setting a reasonable quantity for each topping (without that, the conversion to
v1alpha1will explode in complexity, introducing high quantities into a string list) -
Normalizing the topping names, as we know that duplicated toppings in a pizza spec will never roundtrip (for the internal types, note that v1alpha1 types have duplication)
Validation
Incoming objects are validated shortly after they have been deserialized, defaulted, and converted to the internal version. Figure 8-5 showed earlier how validation is done between mutating admission plug-ins and validating admission plug-ins, long before the actual creation or update logic is executed.
This means validation has to be implemented only once for the internal version, not for all external versions. This has the advantage that it obviously saves implementation work and also ensures consistency between versions. On the other hand, it means that validation errors do not refer to the external version. This can actually be observed with Kubernetes resources, but in practice it is no big deal.
In this section, we’ll look at the implementation of validation functions. The wiring into the custom API server—namely, calling validation from the strategy that configures the generic registry—will be covered in the next section. In other words, Figure 8-5 is slightly misleading in favor of visual simplicity.
For now it should be enough to look at the entry point into the validation inside the strategy:
func(pizzaStrategy)Validate(ctxcontext.Context,objruntime.Object,)field.ErrorList{pizza:=obj.(*restaurant.Pizza)returnvalidation.ValidatePizza(pizza)}
This calls out to the ValidateKind(obj *Kind) field.ErrorList validation function in the validation package of the API group pkg/apis/group/validation.
The validation functions return an error list. They are usually written in the same style, appending return values to an error list while recursively diving into the type, one validation function per struct:
// ValidatePizza validates a Pizza.funcValidatePizza(f*restaurant.Pizza)field.ErrorList{allErrs:=field.ErrorList{}errs:=ValidatePizzaSpec(&f.Spec,field.NewPath("spec"))allErrs=append(allErrs,errs...)returnallErrs}// ValidatePizzaSpec validates a PizzaSpec.funcValidatePizzaSpec(s*restaurant.PizzaSpec,fldPath*field.Path,)field.ErrorList{allErrs:=field.ErrorList{}prevNames:=map[string]bool{}fori:=ranges.Toppings{ifs.Toppings[i].Quantity<=0{allErrs=append(allErrs,field.Invalid(fldPath.Child("toppings").Index(i).Child("quantity"),s.Toppings[i].Quantity,"cannot be negative or zero",))}iflen(s.Toppings[i].Name)==0{allErrs=append(allErrs,field.Invalid(fldPath.Child("toppings").Index(i).Child("name"),s.Toppings[i].Name,"cannot be empty",))}else{ifprevNames[s.Toppings[i].Name]{allErrs=append(allErrs,field.Invalid(fldPath.Child("toppings").Index(i).Child("name"),s.Toppings[i].Name,"must be unique",))}prevNames[s.Toppings[i].Name]=true}}returnallErrs}
Note how the field path is maintained using Child and Index calls. The field path is the JSON path, which is printed in case of errors.
Often there is an additional set of validation functions that differs slightly for updates (while the preceding set is used for creation). In our example API server, this could look like the following:
func(pizzaStrategy)ValidateUpdate(ctxcontext.Context,obj,oldruntime.Object,)field.ErrorList{objPizza:=obj.(*restaurant.Pizza)oldPizza:=old.(*restaurant.Pizza)returnvalidation.ValidatePizzaUpdate(objPizza,oldPizza)}
This can be used to verify that no read-only fields are changed. Often an update validation calls the normal validation functions as well and only adds checks relevant for the update.
Note
Validation is the right place to restrict object names on creation—for example, to be single-word only, or to not include any non-alpha-numeric characters.
Actually, any ObjectMeta field can technically be restricted in a custom way, though that’s not desirable for many fields because it might break core API machinery behavior. A number of resources restrict the names because, for example, the name will show up in other systems or in other contexts that require a specially formatted name.
But even if there are special ObjectMeta validations in place in a custom API server, the generic registry will validate against generic rules in any case, after the custom validation has passed. This allows us to return more specific error messages from the custom code first.
Registry and Strategy
So far, we have seen how API types are defined and validate. The next step is the implementation of the REST logic for those API types. Figure 8-7 shows the registry as a central part of the implementation of an API group. The generic REST request handler code in k8s.io/apiserver calls out to the registry.

Figure 8-7. Resource storage and generic registry
Generic registry
The REST logic is usually implemented by what is called the generic registry. It is—as the name suggests—a generic implementation of the registry interfaces in the package k8s.io/apiserver/pkg/registry/rest.
The generic registry implements the default REST behavior for “normal” resources. Nearly all Kubernetes resources use this implementation. Only a few, specifically those that do not persist objects (e.g., SubjectAccessReview; see “Delegated Authorization”), have custom implementations.
In k8s.io/apiserver/pkg/registry/rest/rest.go you will find many interfaces, loosely corresponding to HTTP verbs and certain API functionalities. If an interface is implemented by a registry, the API endpoint code will offer certain REST features. Because the generic registry implements most of the k8s.io/apiserver/pkg/registry/rest interfaces, resources that use it will support all the default Kubernetes HTTP verbs (see “The HTTP Interface of the API Server”). Here is a list of those interfaces that are implemented, with the GoDoc description from the Kubernetes source code:
CollectionDeleter-
An object that can delete a collection of RESTful resources
Creater-
An object that can create an instance of a RESTful object
CreaterUpdater-
A storage object that must support both create and update operations
Exporter-
An object that knows how to strip a RESTful resource for export
Getter-
An object that can retrieve a named RESTful resource
GracefulDeleter-
An object that knows how to pass deletion options to allow delayed deletion of a RESTful object
Lister-
An object that can retrieve resources that match the provided field and label criteria
Patcher-
A storage object that supports both get and update
Scoper-
An object that must be specified and indicates what scope the resource
Updater-
An object that can update an instance of a RESTful object
Watcher-
An object that should be implemented by all storage objects that want to offer the ability to watch for changes through the
WatchAPI
Let’s look at one of the interfaces, Creater:
// Creater is an object that can create an instance of a RESTful object.typeCreaterinterface{// New returns an empty object that can be used with Create after request// data has been put into it.// This object must be a pointer type for use with Codec.DecodeInto([]byte,// runtime.Object)New()runtime.Object// Create creates a new version of a resource.Create(ctxcontext.Context,objruntime.Object,createValidationValidateObjectFunc,options*metav1.CreateOptions,)(runtime.Object,error)}
A registry implementing this interface will be able to create objects. In contrast to NamedCreater, the name of the new object either comes from ObjectMeta.Name or is generated via ObjectMeta.GenerateName. If a registry implements NamedCreater, the name can also be passed through the HTTP path.
It is important to understand that the implemented interfaces determine which verbs will be supported by the API endpoint that is created while installing the API into the custom API server. See “API Installation” for how this is done in the code.
Strategy
The generic registry can be customized to a certain degree using an object called a strategy. The strategy provides callbacks to functionality like validation, as we saw in “Validation”.
The strategy implements the REST strategy interfaces listed here with their GoDoc description (see k8s.io/apiserver/pkg/registry/rest for their definitions):
RESTCreateStrategy-
Defines the minimum validation, accepted input, and name generation behavior to create an object that follows Kubernetes API conventions.
RESTDeleteStrategy-
Defines deletion behavior on an object that follows Kubernetes API conventions.
RESTGracefulDeleteStrategy-
Must be implemented by the registry that supports graceful deletion.
GarbageCollectionDeleteStrategy-
Must be implemented by the registry that wants to orphan dependents by default.
RESTExportStrategy-
Defines how to export a Kubernetes object.
RESTUpdateStrategy-
Defines the minimum validation, accepted input, and name generation behavior to update an object that follows Kubernetes API conventions.
Let’s look again at the strategy for the creation case:
typeRESTCreateStrategyinterface{runtime.ObjectTyper// The name generator is used when the standard GenerateName field is set.// The NameGenerator will be invoked prior to validation.names.NameGenerator// NamespaceScoped returns true if the object must be within a namespace.NamespaceScoped()bool// PrepareForCreate is invoked on create before validation to normalize// the object. For example: remove fields that are not to be persisted,// sort order-insensitive list fields, etc. This should not remove fields// whose presence would be considered a validation error.//// Often implemented as a type check and an initailization or clearing of// status. Clear the status because status changes are internal. External// callers of an api (users) should not be setting an initial status on// newly created objects.PrepareForCreate(ctxcontext.Context,objruntime.Object)// Validate returns an ErrorList with validation errors or nil. Validate// is invoked after default fields in the object have been filled in// before the object is persisted. This method should not mutate the// object.Validate(ctxcontext.Context,objruntime.Object)field.ErrorList// Canonicalize allows an object to be mutated into a canonical form. This// ensures that code that operates on these objects can rely on the common// form for things like comparison. Canonicalize is invoked after// validation has succeeded but before the object has been persisted.// This method may mutate the object. Often implemented as a type check or// empty method.Canonicalize(objruntime.Object)}
The embedded ObjectTyper recognizes objects; that is, it checks whether an object in a request is supported by the registry. This is important to create the right kind of objects (e.g., via a “foo” resource, only “Foo” resources should be created).
The NameGenerator obviously generates names from the ObjectMeta.GenerateName field.
Via NamespaceScoped the strategy can support cluster-wide or namespaced resources by returning either false or true.
The PrepareForCreate method is called with the incoming object before validation.
The Validate method we’ve seen before in “Validation”: it’s the entry point to the validation functions.
Finally, the Canonicalize method does normalization (e.g., sorting of slices).
Wiring a strategy into the generic registry
The strategy object is plugged into a generic registry instance. Here is the REST storage constructor for our custom API server on GitHub:
// NewREST returns a RESTStorage object that will work against API services.funcNewREST(scheme*runtime.Scheme,optsGettergeneric.RESTOptionsGetter,)(*registry.REST,error){strategy:=NewStrategy(scheme)store:=&genericregistry.Store{NewFunc:func()runtime.Object{return&restaurant.Pizza{}},NewListFunc:func()runtime.Object{return&restaurant.PizzaList{}},PredicateFunc:MatchPizza,DefaultQualifiedResource:restaurant.Resource("pizzas"),CreateStrategy:strategy,UpdateStrategy:strategy,DeleteStrategy:strategy,}options:=&generic.StoreOptions{RESTOptions:optsGetter,AttrFunc:GetAttrs,}iferr:=store.CompleteWithOptions(options);err!=nil{returnnil,err}return®istry.REST{store},nil}
It instantiates the generic registry object genericregistry.Store and sets a few fields. Many of these fields are optional and store.CompleteWithOptions will default them if they are not set by the developer.
You can see how the custom strategy is first instantiated via the NewStrategy constructor and then plugged into the registry for create, update, and delete operators.
In addition, the NewFunc is set to create a new object instance, and the NewListFunc field is set to create a new object list. The PredicateFunc translates a selector (which could be passed to a list request) into a predicate function, filtering runtime objects.
The returned object is a REST registry, just a simple wrapper in our example project around the generic registry object to make the type our own:
typeRESTstruct{*genericregistry.Store}
With this we have everything to instantiate our API and wire it into the custom API server. In the following section we’ll see how to create an HTTP handler out of it.
API Installation
To activate an API in an API server, two steps are necessary:
-
The API version must be installed into the API type’s (and conversion and defaulting functions’) server scheme.
-
The API version must be installed into the server HTTP multiplexer (mux).
The first step is usually done using init functions somewhere centrally in the API server bootstrapping. This is done in pkg/apiserver/apiserver.go in our example custom API server, where the serverConfig and CustomServer objects are defined (see “Options and Config Pattern and Startup Plumbing”):
import(..."k8s.io/apimachinery/pkg/runtime""k8s.io/apimachinery/pkg/runtime/serializer""github.com/programming-kubernetes/pizza-apiserver/pkg/apis/restaurant/install")var(Scheme=runtime.NewScheme()Codecs=serializer.NewCodecFactory(Scheme))
Then for each API group that should be served, we call the Install() function:
funcinit(){install.Install(Scheme)}
For technical reasons, we also have to add some discovery-related types to the scheme (this will probably go away in future versions of k8s.io/apiserver):
funcinit(){// we need to add the options to empty v1// TODO: fix the server code to avoid thismetav1.AddToGroupVersion(Scheme,schema.GroupVersion{Version:"v1"})// TODO: keep the generic API server from wanting thisunversioned:=schema.GroupVersion{Group:"",Version:"v1"}Scheme.AddUnversionedTypes(unversioned,&metav1.Status{},&metav1.APIVersions{},&metav1.APIGroupList{},&metav1.APIGroup{},&metav1.APIResourceList{},)}
With this we have registered our API types in the global scheme, including conversion and defaulting functions. In other words, the empty scheme of Figure 8-3 now knows everything about our types.
The second step is to add the API group to the HTTP mux. The generic API server code embedded into our CustomServer struct provides the InstallAPIGroup(apiGroupInfo *APIGroupInfo) error method, which sets up the whole request pipeline for an API group.
The only thing we have to do is to provide a properly filled APIGroupInfo struct. We do this in the constructor New() (*CustomServer, error) of the completedConfig type:
// New returns a new instance of CustomServer from the given config.func(ccompletedConfig)New()(*CustomServer,error){genericServer,err:=c.GenericConfig.New("pizza-apiserver",genericapiserver.NewEmptyDelegate())iferr!=nil{returnnil,err}s:=&CustomServer{GenericAPIServer:genericServer,}apiGroupInfo:=genericapiserver.NewDefaultAPIGroupInfo(restaurant.GroupName,Scheme,metav1.ParameterCodec,Codecs)v1alpha1storage:=map[string]rest.Storage{}pizzaRest:=pizzastorage.NewREST(Scheme,c.GenericConfig.RESTOptionsGetter)v1alpha1storage["pizzas"]=customregistry.RESTInPeace(pizzaRest)toppingRest:=toppingstorage.NewREST(Scheme,c.GenericConfig.RESTOptionsGetter,)v1alpha1storage["toppings"]=customregistry.RESTInPeace(toppingRest)apiGroupInfo.VersionedResourcesStorageMap["v1alpha1"]=v1alpha1storagev1beta1storage:=map[string]rest.Storage{}pizzaRest=pizzastorage.NewREST(Scheme,c.GenericConfig.RESTOptionsGetter)v1beta1storage["pizzas"]=customregistry.RESTInPeace(pizzaRest)apiGroupInfo.VersionedResourcesStorageMap["v1beta1"]=v1beta1storageiferr:=s.GenericAPIServer.InstallAPIGroup(&apiGroupInfo);err!=nil{returnnil,err}returns,nil}
The APIGroupInfo has references to the generic registry that we customized in “Registry and Strategy” via a strategy. For each group version and resource, we create an instance of the registry using the implemented constructors.
The customregistry.RESTInPeace wrapper is just a helper that panics when the registry constructors return an error:
funcRESTInPeace(storagerest.StandardStorage,errerror)rest.StandardStorage{iferr!=nil{err=fmt.Errorf("unable to create REST storage: %v",err)panic(err)}returnstorage}
The registry itself is version-independent, as it operates on internal objects; refer back to Figure 8-5. Hence, we call the same registry constructor for each version.
The call to InstallAPIGroup finally leads us to a complete custom API server ready to serve our custom API group, as shown earlier in Figure 8-7.
After all this heavy plumbing, it is time to see our new API groups in action. For this we start up the server as shown in “The First Start”. But this time the discovery info is not empty but instead shows our newly registered resource:
$curl -k https://localhost:443/apis{"kind":"APIGroupList","groups":[{"name":"restaurant.programming-kubernetes.info","versions":[{"groupVersion":"restaurant.programming-kubernetes.info/v1beta1","version":"v1beta1"},{"groupVersion":"restaurant.programming-kubernetes.info/v1alpha1","version":"v1alpha1"}],"preferredVersion":{"groupVersion":"restaurant.programming-kubernetes.info/v1beta1","version":"v1beta1"},"serverAddressByClientCIDRs":[{"clientCIDR":"0.0.0.0/0","serverAddress":":443"}]}]}
With this, we have nearly reached our goal to serve the restaurant API. We have wired the API group versions, conversions are in place, and validation is working.
What’s missing is a check that a topping mentioned in a pizza actually exists in the cluster. We could add this in the validation functions. But traditionally these are just format validation functions, which are static and do not need other resources to run.
In contrast, more complex checks are implemented in admission—the topic of the next section.
Admission
Every request passes the chain of admission plug-ins after being unmarshaled, defaulted, and converted to internal types; refer back to Figure 8-2. More precisely, requests pass admission twice:
-
The mutating plug-ins
-
The validating plug-ins
Admission plug-ins can be both mutating and validating and therefore can potentially get called twice by the admission mechanism:
-
Once in the mutation phase, called for all mutating plug-ins sequentially
-
Once in the validation phase, called (potentially parallelized) for all validating plug-ins
More precisely, a plug-in can implement both the mutating and the validating admission interface, with two different methods for both cases.
Note
Before the separation into mutating and validating, there was just one call to each plug-in. It was nearly impossible to keep an eye on which mutation each plug-in did and which admission plug-in order therefore made sense to lead to consistent behavior for the user.
This two-step architecture at least ensures that a validation is done at the end for all plug-ins, which guarantees consistency.
In addition, the chain (i.e., the order of plug-ins for both admission phases) is the same. Plug-ins are always enabled or disabled for both phases at the same time.
Admission plug-ins, at least those implemented in Golang as described in this chapter, work with internal types. In contrast, webhook admission plug-ins (see “Admission Webhooks”) are based on external types and involve conversion on the way to the webhook and back (in case of mutating webhooks).
But after all this theory, let’s get into the code.
Implementation
An admission plug-in is a type implementing:
-
The admission plug-in interface
Interface -
Optionally the
MutatingInterface -
Optionally the
ValidatingInterface
All three can be found in the package k8s.io/apiserver/pkg/admission:
// Operation is the type of resource operation being checked for// admission controltypeOperationstring.// Operation constantsconst(CreateOperation="CREATE"UpdateOperation="UPDATE"DeleteOperation="DELETE"ConnectOperation="CONNECT")// Interface is an abstract, pluggable interface for Admission Control// decisions.typeInterfaceinterface{// Handles returns true if this admission controller can handle the given// operation where operation can be one of CREATE, UPDATE, DELETE, or// CONNECT.Handles(operationOperation)bool.}typeMutationInterfaceinterface{Interface// Admit makes an admission decision based on the request attributes.Admit(aAttributes,oObjectInterfaces)(errerror)}// ValidationInterface is an abstract, pluggable interface for Admission Control// decisions.typeValidationInterfaceinterface{Interface// Validate makes an admission decision based on the request attributes.// It is NOT allowed to mutate.Validate(aAttributes,oObjectInterfaces)(errerror)}
You see that the Interface method Handles is responsible for filtering on the operation. The mutating plug-ins are called via Admit and the validating plug-ins are called via Validate.
The ObjectInterfaces gives access to helpers usually implemented by a scheme:
typeObjectInterfacesinterface{// GetObjectCreater is the ObjectCreater for the requested object.GetObjectCreater()runtime.ObjectCreater// GetObjectTyper is the ObjectTyper for the requested object.GetObjectTyper()runtime.ObjectTyper// GetObjectDefaulter is the ObjectDefaulter for the requested object.GetObjectDefaulter()runtime.ObjectDefaulter// GetObjectConvertor is the ObjectConvertor for the requested object.GetObjectConvertor()runtime.ObjectConvertor}
The attributes passed to the plug-in (via Admit or Validate or both) basically contain all the information extractable from a request that is important to implementing advanced checks:
// Attributes is an interface used by AdmissionController to get information// about a request that is used to make an admission decision.typeAttributesinterface{// GetName returns the name of the object as presented in the request.// On a CREATE operation, the client may omit name and rely on the// server to generate the name. If that is the case, this method will// return the empty string.GetName()string// GetNamespace is the namespace associated with the request (if any).GetNamespace()string// GetResource is the name of the resource being requested. This is not the// kind. For example: pods.GetResource()schema.GroupVersionResource// GetSubresource is the name of the subresource being requested. This is a// different resource, scoped to the parent resource, but it may have a// different kind.// For instance, /pods has the resource "pods" and the kind "Pod", while// /pods/foo/status has the resource "pods", the sub resource "status", and// the kind "Pod" (because status operates on pods). The binding resource for// a pod, though, may be /pods/foo/binding, which has resource "pods",// subresource "binding", and kind "Binding".GetSubresource()string// GetOperation is the operation being performed.GetOperation()Operation// IsDryRun indicates that modifications will definitely not be persisted for// this request. This is to prevent admission controllers with side effects// and a method of reconciliation from being overwhelmed.// However, a value of false for this does not mean that the modification will// be persisted, because it could still be rejected by a subsequent// validation step.IsDryRun()bool// GetObject is the object from the incoming request prior to default values// being applied.GetObject()runtime.Object// GetOldObject is the existing object. Only populated for UPDATE requests.GetOldObject()runtime.Object// GetKind is the type of object being manipulated. For example: Pod.GetKind()schema.GroupVersionKind// GetUserInfo is information about the requesting user.GetUserInfo()user.Info// AddAnnotation sets annotation according to key-value pair. The key// should be qualified, e.g., podsecuritypolicy.admission.k8s.io/admit-policy,// where "podsecuritypolicy" is the name of the plugin, "admission.k8s.io"// is the name of the organization, and "admit-policy" is the key// name. An error is returned if the format of key is invalid. When// trying to overwrite annotation with a new value, an error is// returned. Both ValidationInterface and MutationInterface are// allowed to add Annotations.AddAnnotation(key,valuestring)error}
In the mutating case—that is, in the implementation of the Admit(a Attributes) error method—the attributes can be mutated, or more precisely, the object returned from GetObject() runtime.Object can.
In the validating case, mutation is not allowed.
Both cases permit the call to AddAnnotation(key, value string) error, which allows us to add annotations that end up in the audit output of the API server. This can be helpful in order to understand why an admission plug-in mutated or rejected a request.
Rejection is signaled by returning a non-nil error from Admit or Validate.
Tip
It is good practice for mutating admission plug-ins to also validate the changes in the validating admission phase. The reason is that other plug-ins, including webhook admission plug-ins, might add further changes. If an admission plug-in guarantees that certain invariants are fulfilled, only the validation step can make sure this is really the case.
Admission plug-ins have to implement the Handles(operation Operation) bool method from the admission.Interface interfaces. There is a helper in the same package called Handler. It can be instantiated using NewHandler(ops ...Operation) *Handler and implements the Handles method by embedding Handler into the custom admission plug-in:
typeCustomAdmissionPluginstruct{*admission.Handler...}
Admission plug-ins should always check the GroupVersionKind of the passed object first:
func(d*PizzaToppingsPlugin)Admit(aadmission.Attributes,oObjectInterfaces,)error{// we are only interested in pizzasifa.GetKind().GroupKind()!=restaurant.Kind("Pizza"){returnnil}...}
and similarly for the validating case:
func(d*PizzaToppingsPlugin)Validate(aadmission.Attributes,oObjectInterfaces,)error{// we are only interested in pizzasifa.GetKind().GroupKind()!=restaurant.Kind("Pizza"){returnnil}...}
The full example admission implementation looks like this:
// Admit ensures that the object in-flight is of kind Pizza.// In addition checks that the toppings are known.func(d*PizzaToppingsPlugin)Validate(aadmission.Attributes,_admission.ObjectInterfaces,)error{// we are only interested in pizzasifa.GetKind().GroupKind()!=restaurant.Kind("Pizza"){returnnil}if!d.WaitForReady(){returnadmission.NewForbidden(a,fmt.Errorf("not yet ready"))}obj:=a.GetObject()pizza:=obj.(*restaurant.Pizza)for_,top:=rangepizza.Spec.Toppings{err:=_,err:=d.toppingLister.Get(top.Name)iferr!=nil&&errors.IsNotFound(err){returnadmission.NewForbidden(a,fmt.Errorf("unknown topping: %s",top.Name),)}}returnnil}
It takes the following steps:
-
Checks that the passed object is of the right kind
-
Forbids access before the informers are ready
-
Verifies via the toppings informer lister that each topping mentioned in the pizza specification actually exists as a
Toppingobject in the cluster
Note here that the lister is just an interface to the informer in-memory store. So these Get calls will be fast.
Registering
Admission plug-ins must be registered. This is done through a Register function:
funcRegister(plugins*admission.Plugins){plugins.Register("PizzaTopping",func(configio.Reader)(admission.Interface,error){returnNew()},)}
This function is added to the plug-in list in the RecommendedOptions (see “Options and Config Pattern and Startup Plumbing”):
func(o*CustomServerOptions)Complete()error{// register admission pluginspizzatoppings.Register(o.RecommendedOptions.Admission.Plugins)// add admisison plugins to the RecommendedPluginOrderoldOrder:=o.RecommendedOptions.Admission.RecommendedPluginOrdero.RecommendedOptions.Admission.RecommendedPluginOrder=append(oldOrder,"PizzaToppings")returnnil}
Here, the RecommendedPluginOrder list is prepopulated with the generic admission plug-ins, which every API server should keep enabled to be a good API convention citizen in the cluster.
It is best practice not to touch the order. One reason is that getting the order right is far from trivial. Of course, adding a custom plug-in at a location other than the end of the list is fine, if it is strictly necessary for the plug-in behavior.
The user of the custom API server will be able to disable a custom admission plug-in with the usual admission chain configuration flags (--disable-admission-plugins, for example). By default our own plug-in is enabled, because we don’t explicitly disable it.
Admission plug-ins can be configured using a configuration file. To do so, we parse the output of the io.Reader in the Register function shown previously. The --admission-control-config-file allows us to pass a configuration file to the plug-in, like so:
kind:AdmissionConfigurationapiVersion:apiserver.k8s.io/v1alpha1plugins:-name:CustomAdmissionPluginpath:custom-admission-plugin.yaml
Alternatively, we can do inline configuration to have all our admission configuration in one place:
kind:AdmissionConfigurationapiVersion:apiserver.k8s.io/v1alpha1plugins:-name:CustomAdmissionPluginconfiguration:your-custom-yaml-inline-config
We briefly mentioned that our admission plug-in uses the toppings informer to check for the existence of toppings mentioned in the pizza. We have not talked about how to wire that into the admission plug-in. Let’s do this now.
Plumbing resources
Admission plug-ins often need clients and informers or other resources to implement their behavior. We can do this resource plumbing using plug-in initializers.
There are a number of standard plug-in initializers. If your plug-in wants to be called by them, it has to implement certain interfaces with callback methods (for more on this, see k8s.io/apiserver/pkg/admission/initializer):
// WantsExternalKubeClientSet defines a function that sets external ClientSet// for admission plugins that need it.typeWantsExternalKubeClientSetinterface{SetExternalKubeClientSet(kubernetes.Interface)admission.InitializationValidator}// WantsExternalKubeInformerFactory defines a function that sets InformerFactory// for admission plugins that need it.typeWantsExternalKubeInformerFactoryinterface{SetExternalKubeInformerFactory(informers.SharedInformerFactory)admission.InitializationValidator}// WantsAuthorizer defines a function that sets Authorizer for admission// plugins that need it.typeWantsAuthorizerinterface{SetAuthorizer(authorizer.Authorizer)admission.InitializationValidator}// WantsScheme defines a function that accepts runtime.Scheme for admission// plugins that need it.typeWantsSchemeinterface{SetScheme(*runtime.Scheme)admission.InitializationValidator}
Implement some of these and the plug-in gets called during launch, in order to get access to, say, Kubernetes resources or the API server global scheme.
In addition, the admission.InitializationValidator interface is supposed to be implemented to do a final check that the plug-in is properly set up:
// InitializationValidator holds ValidateInitialization functions, which are// responsible for validation of initialized shared resources and should be// implemented on admission plugins.typeInitializationValidatorinterface{ValidateInitialization()error}
Standard initializers are great, but we need access to the toppings informer. So, let’s look at how to add our own initializers. An initializer consists of:
-
A
Wants*interface (e.g.,WantsRestaurantInformerFactory), which should be implemented by an admission plug-in:// WantsRestaurantInformerFactory defines a function that sets// InformerFactory for admission plugins that need it.typeWantsRestaurantInformerFactoryinterface{SetRestaurantInformerFactory(informers.SharedInformerFactory)admission.InitializationValidator} -
The initializer struct, implementing
admission.PluginInitializer:func(irestaurantInformerPluginInitializer)Initialize(pluginadmission.Interface,){ifwants,ok:=plugin.(WantsRestaurantInformerFactory);ok{wants.SetRestaurantInformerFactory(i.informers)}}In other words, the
Initialize()method checks that the passed plug-in implements the corresponding custom initializerWants*interface. If that is the case, the initializer will call the method on the plug-in. -
Plumbing of the initializer constructor into
RecommendedOptions.ExtraAdmissionInitializers(see “Options and Config Pattern and Startup Plumbing”):func(o*CustomServerOptions)Config()(*apiserver.Config,error){...o.RecommendedOptions.ExtraAdmissionInitializers=func(c*genericapiserver.RecommendedConfig)([]admission.PluginInitializer,error,){client,err:=clientset.NewForConfig(c.LoopbackClientConfig)iferr!=nil{returnnil,err}informerFactory:=informers.NewSharedInformerFactory(client,c.LoopbackClientConfig.Timeout,)o.SharedInformerFactory=informerFactoryreturn[]admission.PluginInitializer{custominitializer.New(informerFactory),},nil}...}This code creates a loopback client for the restaurant API group, creates a corresponding informer factory, stores it in the options
o, and returns a plug-in initializer for it.
As promised, admission is the last step in the implementation to complete our custom API server for the restaurant API group. Now we want to see it in action, but not artificially on the local machine, but rather in a real Kubernetes cluster. This means we have to take a look at the deployment of an aggregated custom API server.
Deploying Custom API Servers
In “API Services”, we saw the APIService object, which is used to register the custom API server API group versions with the aggregator inside the Kubernetes API server:
apiVersion:apiregistration.k8s.io/v1beta1kind:APIServicemetadata:name:namespec:group:API-group-nameversion:API-group-versionservice:namespace:custom-API-server-service-namespacename:custom-API-server-servicecaBundle:base64-caBundleinsecureSkipTLSVerify:boolgroupPriorityMinimum:2000versionPriority:20
The APIService object points to a service. Usually, this service will be a normal cluster IP service: that is, the custom API server is deployed into the cluster using pods. The service forwards the requests to the pods.
Let’s look at the Kubernetes manifest to implement this.
Deployment Manifests
We have the following manifests (found in the example code on GitHub) that will be part of an in-cluster deployment of a custom API service:
-
An
APIServicefor both versionsv1alpha1:apiVersion:apiregistration.k8s.io/v1beta1kind:APIServicemetadata:name:v1alpha1.restaurant.programming-kubernetes.infospec:insecureSkipTLSVerify:truegroup:restaurant.programming-kubernetes.infogroupPriorityMinimum:1000versionPriority:15service:name:apinamespace:pizza-apiserverversion:v1alpha1…and
v1beta1:apiVersion:apiregistration.k8s.io/v1beta1kind:APIServicemetadata:name:v1alpha1.restaurant.programming-kubernetes.infospec:insecureSkipTLSVerify:truegroup:restaurant.programming-kubernetes.infogroupPriorityMinimum:1000versionPriority:15service:name:apinamespace:pizza-apiserverversion:v1alpha1Note here that we set
insecureSkipTLSVerify. This is OK for development but inadequate for any production deployment. We’ll see how to fix this in “Certificates and Trust”. -
A
Servicein front of the custom API server instances running in the cluster:apiVersion:v1kind:Servicemetadata:name:apinamespace:pizza-apiserverspec:ports:-port:443protocol:TCPtargetPort:8443selector:apiserver:"true" -
A
Deployment(as shown here) orDaemonSetfor the custom API server pods:apiVersion:apps/v1kind:Deploymentmetadata:name:pizza-apiservernamespace:pizza-apiserverlabels:apiserver:"true"spec:replicas:1selector:matchLabels:apiserver:"true"template:metadata:labels:apiserver:"true"spec:serviceAccountName:apiservercontainers:-name:apiserverimage:quay.io/programming-kubernetes/pizza-apiserver:latestimagePullPolicy:Alwayscommand:["/pizza-apiserver"]args:---etcd-servers=http://localhost:2379---cert-dir=/tmp/certs---secure-port=8443---v=4-name:etcdimage:quay.io/coreos/etcd:v3.2.24workingDir:/tmp -
A namespace for the service and the deployment to live in:
apiVersion:v1kind:Namespacemetadata:name:pizza-apiserverspec:{}
Often, the aggregated API server is deployed to some nodes reserved for control plane pods, usually called masters. In that case, a DaemonSet is a good choice to run one custom API server instance per master node. This leads to a high availability setup. Note, that API servers are stateless, which means they can easily be deployed multiple times and no leader election is necessary.
With these manifests, we are nearly done. As is so often the case, though, a secure deployment needs some more thought. You might have noticed that the pods (defined via the preceding deployment) use a custom service account, apiserver. This can be created via another manifest:
kind:ServiceAccountapiVersion:v1metadata:name:apiservernamespace:pizza-apiserver
This service account needs a number of permissions, which we can add via RBAC objects.
Setting Up RBAC
The service account of an API service first needs some generic permissions to participate in:
- namespace lifecycle
-
Objects can be created only in an existing namespace, and are deleted when the namespace is deleted. For this the API server has to get, list, and watch namespaces.
- admission webhooks
-
Admission webhooks configured via
MutatingWebhookConfigurationsandValidatedWebhookConfigurationsare called from each API server independently. For this the admission mechanism in our custom API server has to get, list, and watch these resources.
We configure both by creating an RBAC cluster role:
kind:ClusterRoleapiVersion:rbac.authorization.k8s.io/v1metadata:name:aggregated-apiserver-clusterrolerules:-apiGroups:[""]resources:["namespaces"]verbs:["get","watch","list"]-apiGroups:["admissionregistration.k8s.io"]resources:["mutatingwebhookconfigurations","validatingwebhookconfigurations"]verbs:["get","watch","list"]
and binding it to our service account apiserver via a ClusterRoleBinding:
apiVersion:rbac.authorization.k8s.io/v1kind:ClusterRoleBindingmetadata:name:pizza-apiserver-clusterrolebindingroleRef:apiGroup:rbac.authorization.k8s.iokind:ClusterRolename:aggregated-apiserver-clusterrolesubjects:-kind:ServiceAccountname:apiservernamespace:pizza-apiserver
For delegated authentication and authorization, the service account has to be bound to the preexisting RBAC role extension-apiserver-authentication-reader:
apiVersion:rbac.authorization.k8s.io/v1kind:RoleBindingmetadata:name:pizza-apiserver-auth-readernamespace:kube-systemroleRef:apiGroup:rbac.authorization.k8s.iokind:Rolename:extension-apiserver-authentication-readersubjects:-kind:ServiceAccountname:apiservernamespace:pizza-apiserver
and the preexisting RBAC cluster role system:auth-delegator:
apiVersion:rbac.authorization.k8s.io/v1kind:ClusterRoleBindingmetadata:name:pizza-apiserver:system:auth-delegatorroleRef:apiGroup:rbac.authorization.k8s.iokind:ClusterRolename:system:auth-delegatorsubjects:-kind:ServiceAccountname:apiservernamespace:pizza-apiserver
Running the Custom API Server Insecurely
Now with all manifests in place and RBAC set up, let’s deploy the API server to a real cluster.
From a checkout of the GitHub repository, and with configured kubectl with cluster-admin privileges (this is needed because RBAC rules can never escalate access):
$cd$GOPATH/src/github.com/programming-kubernetes/pizza-apiserver$cdartifacts/deployment$kubectl apply -f ns.yaml# create the namespace first$kubectl apply -f .# creating all manifests described above
Now the custom API server is launching:
$kubectl get pods -A NAMESPACE NAME READY STATUS AGE pizza-apiserver pizza-apiserver-7779f8d486-8fpgj 0/2 ContainerCreating 1s$# some moments later$kubectl get pods -A pizza-apiserver pizza-apiserver-7779f8d486-8fpgj 2/2 Running 75s
When it is running, we double-check that the Kubernetes API server does aggregation (i.e., proxying of requests). First check via APIServices whether the Kubernetes API server thinks that our custom API server is available:
$ kubectl get apiservices v1alpha1.restaurant.programming-kubernetes.info
NAME                                            SERVICE             AVAILABLE
v1alpha1.restaurant.programming-kubernetes.info pizza-apiserver/api True
This looks good. Let’s try to list pizzas, with logging enabled to see whether something goes wrong:
$kubectl get pizzas --v=7 ... ... GET https://localhost:58727/apis?timeout=32s ... ... GET https://localhost:58727/apis/restaurant.programming-kubernetes.info/ v1alpha1?timeout=32s ... ... GET https://localhost:58727/apis/restaurant.programming-kubernetes.info/ v1beta1/namespaces/default/pizzas?limit=500 ... Request Headers: ... Accept: application/json;as=Table;v=v1beta1;g=meta.k8s.io, application/json ... User-Agent: kubectl/v1.15.0(darwin/amd64)kubernetes/f873d2a ... Response Status:200OK in6milliseconds No resources found.
This looks very good. We see that kubectl queries the discovery information to find out what a pizza is. It queries the restaurant.programming-kubernetes.info/v1beta1 API to list the pizzas. Unsurprisingly, there aren’t any yet. But we can of course change that:
$cd../examples$# install toppings first$ls topping*|xargs -n1kubectl create -f$kubectl create -f pizza-margherita.yaml pizza.restaurant.programming-kubernetes.info/margherita created$kubectl get pizza -o yaml margherita apiVersion: restaurant.programming-kubernetes.info/v1beta1 kind: Pizza metadata: creationTimestamp:"2019-05-05T13:39:52Z"name: margherita namespace: default resourceVersion:"6"pizzas/margherita uid: 42ab6e88-6f3b-11e9-8270-0e37170891d3 spec: toppings: - name: mozzarella quantity: 1 - name: tomato quantity: 1 status:{}
This looks awesome. But the margherita pizza was easy. Let’s try defaulting in action by creating an empty pizza that does not list any toppings:
apiVersion: restaurant.programming-kubernetes.info/v1alpha1
kind: Pizza
metadata:
  name: salami
spec:
Our defaulting should turn this into a salami pizza with a salami topping. Let’s try:
$kubectl create -f empty-pizza.yaml pizza.restaurant.programming-kubernetes.info/salami created$kubectl get pizza -o yaml salami apiVersion: restaurant.programming-kubernetes.info/v1beta1 kind: Pizza metadata: creationTimestamp:"2019-05-05T13:42:42Z"name: salami namespace: default resourceVersion:"8"pizzas/salami uid: a7cb7af2-6f3b-11e9-8270-0e37170891d3 spec: toppings: - name: salami quantity: 1 - name: mozzarella quantity: 1 - name: tomato quantity: 1 status:{}
This looks like a delicious salami pizza.
Now let’s check whether our custom admission plug-in is working. We first delete all pizzas and toppings, and then try to re-create the pizzas:
$kubectl delete pizzas --all pizza.restaurant.programming-kubernetes.info"margherita"deleted pizza.restaurant.programming-kubernetes.info"salami"deleted$kubectl delete toppings --all topping.restaurant.programming-kubernetes.info"mozzarella"deleted topping.restaurant.programming-kubernetes.info"salami"deleted topping.restaurant.programming-kubernetes.info"tomato"deleted$kubectl create -f pizza-margherita.yaml Error from server(Forbidden): error when creating"pizza-margherita.yaml": pizzas.restaurant.programming-kubernetes.info"margherita"is forbidden: unknown topping: mozzarella
No margherita without mozzarella, like in any good Italian restaurant.
Looks like we are done implementing what we described in “Example: A Pizza Restaurant”. But not quite. Security. Again. We have not taken care of the proper certificates. A malicious pizza seller could try to get between our users and the custom API server because the Kubernetes API server just accepts any serving certificates without checking them. Let’s fix this.
Certificates and Trust
The APIService object contains the caBundle field. This configures how the aggregator (inside the Kubernetes API server) trusts the custom API server. This CA bundle contains the certificate (and intermediate certificates) used to verify that the aggregated API server has the identity it claims to have. For any serious deployment, put the corresponding CA bundle into this field.
Warning
While insecureSkipTLSVerify is allowed in an APIService in order to disable certification verification, it is a bad idea to use this in a production setup. The Kubernetes API server sends requests to a trusted aggregated API server. Setting insecureSkipTLSVerify to true means that any other actor can claim to be the aggregated API server. This is obviously insecure and should not be used in production environments.
The reverse trust from the custom API server to the Kubernetes API server, and its preauthentication of requests, is described in “Delegated Authentication and Trust”. We don’t have to do anything extra.
Back to the pizza example: to make it secure, we need a serving certificate and a key for the custom API server in the deployment. We put both into a serving-cert secret and mount it into the pod at /var/run/apiserver/serving-cert/tls.{crt,key}. Then we use the tls.crt file as CA in the APIService. This can all be found in the example code on GitHub.
The certificate-generation logic is scripted in a Makefile.
Note that in a real-world scenario we’d probably have some kind of cluster or company CA we can plug into the APIService.
To see it in action, either start with a new cluster or just reuse the previous one and apply the new, secure manifests:
$cd../deployment-secure$make openssl req -new -x509 -subj"/CN=api.pizza-apiserver.svc"-nodes -newkey rsa:4096 -keyout tls.key -out tls.crt -days 365 Generating a4096bit RSA private key ......................++ ................................................................++ writing new private key to'tls.key'...$ls *.yaml|xargs -n1kubectl apply -f clusterrolebinding.rbac.authorization.k8s.io/pizza-apiserver:system:auth-delegator unchanged rolebinding.rbac.authorization.k8s.io/pizza-apiserver-auth-reader unchanged deployment.apps/pizza-apiserver configured namespace/pizza-apiserver unchanged clusterrolebinding.rbac.authorization.k8s.io/pizza-apiserver-clusterrolebinding unchanged clusterrole.rbac.authorization.k8s.io/aggregated-apiserver-clusterrole unchanged serviceaccount/apiserver unchanged service/api unchanged secret/serving-cert created apiservice.apiregistration.k8s.io/v1alpha1.restaurant.programming-kubernetes.info configured apiservice.apiregistration.k8s.io/v1beta1.restaurant.programming-kubernetes.info configured
Note here the correct common name CN=api.pizza-apiserver.svc in the certificate. The Kubernetes API server proxies the request to the api/pizza-apiserver service and hence its DNS name must be put into the certificate.
We double-check that we really have disabled the insecureSkipTLSVerify flag in the APIService:
$kubectl get apiservices v1alpha1.restaurant.programming-kubernetes.info -o yaml apiVersion: apiregistration.k8s.io/v1 kind: APIService metadata: name: v1alpha1.restaurant.programming-kubernetes.info ... spec: caBundle: LS0tLS1C... group: restaurant.programming-kubernetes.info groupPriorityMinimum: 1000 service: name: api namespace: pizza-apiserver version: v1alpha1 versionPriority: 15 status: conditions: - lastTransitionTime:"2019-05-05T14:07:07Z"message: all checks passed reason: Passed status:"True"type: Available artifacts/deploymen
This looks as expected: insecureSkipTLSVerify is gone and the caBundle field is filled with a base64 value of our certificate And: the service is still available.
Now let’s see whether kubectl can still query the API:
$kubectl get pizzas No resources found.$cd../examples$ls topping*|xargs -n1kubectl create -f topping.restaurant.programming-kubernetes.info/mozzarella created topping.restaurant.programming-kubernetes.info/salami created topping.restaurant.programming-kubernetes.info/tomato created$kubectl create -f pizza-margherita.yaml pizza.restaurant.programming-kubernetes.info/margherita created
The margherita pizza is back. This time it is perfectly secured. No chance for a malicious pizza seller to start a man-in-the-middle attack. Buon appetito!
Sharing etcd
Aggregated API servers using the RecommendOptions (see “Options and Config Pattern and Startup Plumbing”) use etcd for storage. This means that any deployment of a custom API server requires an etcd cluster to be available.
This cluster can be in-cluster—for example, deployed using the etcd operator. This operator allows us to launch and administrate an etcd cluster in a declarative way. The operator will do updates, up and down scaling, and backup. This reduces the operational overhead a lot.
Alternatively, the etcd of the cluster control plane (i.e., that of kube-apiserver) can be used. Depending on the environment—self-deployed, on-premise, or hosted services like Google Container Engine (GKE)—this might be viable, or it might be impossible because the user has no access to the cluster at all (as is the case with GKE). In the viable cases, the custom API server has to use a key path that is distinct from the one used by the Kubernetes API server or other etcd consumers. In our example custom API server, it looks like this:
constdefaultEtcdPathPrefix="/registry/pizza-apiserver.programming-kubernetes.github.com"funcNewCustomServerOptions()*CustomServerOptions{o:=&CustomServerOptions{RecommendedOptions:genericoptions.NewRecommendedOptions(defaultEtcdPathPrefix,...),}returno}
This etcd path prefix is different from Kubernetes API server paths, which use different group API names.
Last but not least, etcd can be proxied. The project etcdproxy-controller implements this mechanism using the operator pattern; that is, etcd proxies can be deployed automatically to the cluster and configured using EtcdProxy objects.
The etcd proxies will automatically do key mapping, so it is guaranteed that etcd key prefixes will not conflict. This allows us to share etcd clusters for multiple aggregated API servers without worrying that one aggregated API server reads or changes the data of another one. This will improve security in an environment where shared etcd clusters are required, for example, due to resource constraints or to avoid operational overhead.
Depending on the context, one of these options must be chosen. Finally, aggregated API servers can of course also use other storage backends, at least in theory, as it requires a lot of custom code to implement the k8s.io/apiserver storage interfaces.
Summary
This was a pretty large chapter, and you made it to the end. You’ve gotten a lot of background about APIs in Kubernetes and how they are implemented.
We saw how aggregation of custom API servers fits into the architecture of a Kubernetes cluster. We saw how a custom API server receives requests that are proxies from the Kubernetes API server. We have seen how the Kubernetes API server preauthenticates these requests, and how API groups are implemented, with external versions and internal versions. We learned how objects are decoded into the Golang structs, how they are defaulted, how they are converted to internal types, and how they go through admission and validation and finally reach the registry. We saw how a strategy is plugged into a generic registry to implement “normal” Kubernetes-like REST resources, how we can add custom admissions, and how to configure a custom admission plug-in with a custom initializer. We now know how to do all the plumbing to start up a custom API server with a multiversion API group, and how to deploy the API group in a cluster with APIServices. We saw how to configure RBAC rules to allow the custom API server to do its job. We discussed how kubectl queries API groups. Finally, we learned how to secure the connection to our custom API server with certificates.
This was a lot. Now you have a much better understanding of what APIs are in Kubernetes and how they are implemented, and hopefully you are motivated to do one or more of the following:
-
Implement your own custom API server
-
Learn about the inner workings of Kubernetes
-
Contribute to Kubernetes in the future
We hope that you have found this a good starting point.
1 Graceful deletion means that the client can pass a graceful deletion period as part of the deletion call. The actual deletion is done by a controller asynchronously (the kubelet does that for pods) by doing a forced deletion. This way pods have time to cleanly shut down.
2 Kubernetes uses cohabitation to migrate resources (e.g., deployments from the extensions/v1beta1 API group) to subject-specific API groups (e.g., apps/v1). CRDs have no concept of shared storage.
3 We’ll see in Chapter 9 that CRD conversion and admission webhooks available in the latest Kubernetes versions also allow us to add these features to CRDs.
4 PaaS stands for Platform as a Service.