
Chapter 4. Using Multiple Source Files: Break it down, build it up

If you create a big program, you don’t want a big source file.
Can you imagine how difficult and time-consuming a single source
file for an enterprise-level program would be to maintain? In this
chapter, you’ll learn how C allows you to break your source code into
small, manageable chunks and then
rebuild them into one huge program.
Along the way, you’ll learn a bit more about data
type subtleties and get to meet your new best friend: make.


Don’t put something big into something small
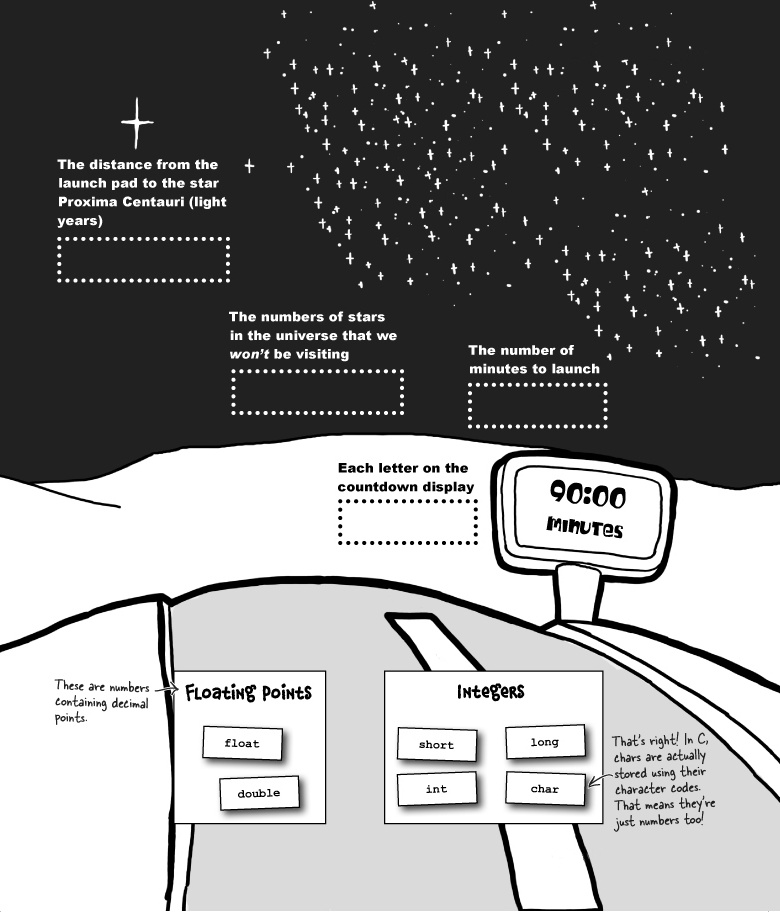
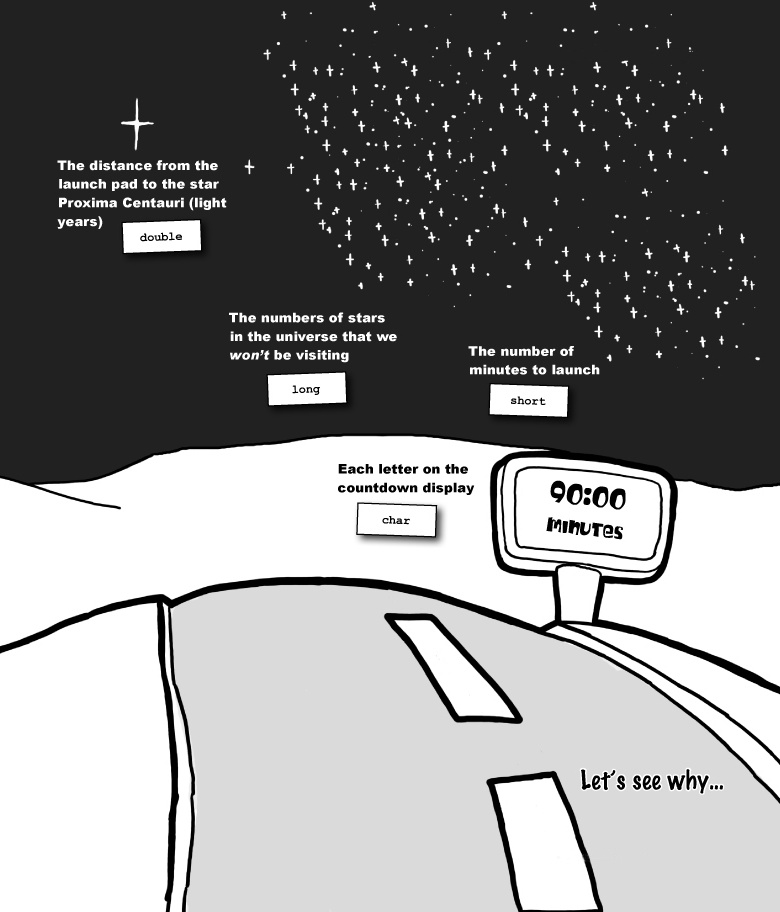
When you’re passing around values, you need to be careful that the type of the value matches the type of the variable you are going to store it in.
Different data types use different amounts of memory. So you need
to be careful that you don’t try to store a value that’s too large for
the amount of space allocated to a variable. short variables take up less memory than
ints, and ints take up less memory than longs.
Now there’s no problem storing a short value inside an int or a long variable. There is plenty of space in
memory, and your code will work correctly:

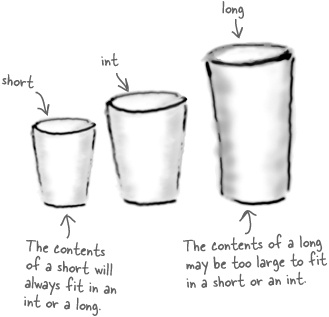
The problems start to happen if you go the other way around—if,
say, you try to store an int value
into a short.
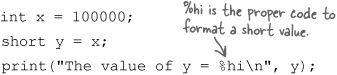
Sometimes, the compiler will be able to spot that you’re trying to
store a really big value into a small variable, and then give you a
warning. But a lot of the time the compiler won’t be smart enough for
that, and it will compile the code without complaining. In that case,
when you try to run the code, the computer won’t be able to store a
number 100,000 into a short variable.
The computer will fit in as many 1s and 0s as it can, but the number
that ends up stored inside the y
variable will be very different from the one you
sent it:
The value of y = -31072
Geek Bits
So why did putting a large number into a short go negative? Numbers are stored in
binary. This is what 100,000 looks like in binary:
x <- 0001 1000 0110 1010 0000But when the computer tried to store that value into a short, it only allowed the value a couple of
bytes of storage. The program stored just the righthand
side of the number:
y <- 1000 0110 1010 0000Signed values in binary beginning with a 1 in highest bit are treated as negative numbers. And this shortened value is equal to this in decimal:
-31072Use casting to put floats into whole numbers
What do you think this piece of code will display?
int x = 7;
int y = 2;
float z = x / y;
printf("z = %f
", z);
The answer? 3.0000. Why is
that? Well, x and y are both integers, and if you divide
integers you always get a rounded-off whole number—in this case,
3.
What do you do if you want to perform calculations on whole
numbers and you want to get floating-point results? You could store the
whole numbers into float variables
first, but that’s a little wordy. Instead, you can use a cast to convert the numbers on the fly:
int x = 7;
int y = 2;
float z =
(float)x /
(float)y;
printf("z = %f
", z);
The (float) will
cast an integer value into a float value. The calculation will then work
just as if you were using floating-point values the entire time. In
fact, if the compiler sees you are adding, subtracting, multiplying, or
dividing a floating-point value with a whole number, it will
automatically cast the numbers for you. That means you can cut down the
number of explicit casts in your code:
Note
You can put some other keywords before data types to change the way that the numbers are interpreted:
unsigned
The number will always be positive. Because it doesn’t need to
worry about recording negative numbers, unsigned numbers can store larger numbers
since there’s now one more bit to work with. So an unsigned int stores numbers from 0 to a
maximum value that is about twice as large as the maximum number that
can be stored inside an int.
There’s also a signed keyword, but you almost never see it, because
all data types are signed by default.

long
That’s right, you can prefix a data type with the word long and make it longer. So a long int is a longer version of an int, which means it can store a larger range
of numbers. And a long long is
longer than a long. You can also
use long with floating-point
numbers.

There’s a new program helping the waiters bus tables at the Head First Diner. The code automatically totals a bill and adds sales tax to each item. See if you can figure out what needs to go in each of the blanks.
Note: there are several data types that could be used for this program, but which would you use for the kind of figures you’d expect?

There’s a new program helping the waiters bus tables at the Head First Diner. The code automatically totals a bill and adds sales tax to each item. You were to figure out what needs to go in each of the blanks.
Note: there are several data types that could be used for this program, but which would you use for the kind of figures you’d expect?

Data types are different sizes on different platforms.
But how do you find out how big an int is, or how many bytes a double takes up? Fortunately, the C Standard
Library has a couple of headers with the details. This program will
tell you about the sizes of ints
and floats:

When you compile and run this code, you will see something like this:

The values you see on your particular machine will probably be different.
What if you want to know the details for chars or doubles? Or longs? No problem. Just replace INT and FLT with CHAR ( chars), DBL ( doubles), SHRT ( shorts), or LNG ( longs).
Oh no...it’s the out-of-work actors...
Some people were never really cut out to be programmers. It seems that some aspiring actors are filling in their time between roles and making a little extra cash by cutting code, and they’ve decided to spend some time freshening up the code in the bill-totalling program.
By the time they rejiggered the code, the actors were much happier about the way everything looked...but there’s just a tiny problem.
The code doesn’t compile anymore.

Let’s see what’s happened to the code
This is what the actors did to the code. You can see they really just did a couple of things.
The code has had some comments added, and they also changed the order of the functions. They made no other changes.
So there really shouldn’t be a problem. The code should be good to go, right? Well, everything was great, right up until the point that they compiled the code...
If you open up the console and try to compile the program, this happens:

Bummer.
That’s not good. What does error:
conflicting types for 'add_with_tax' mean? What is a
previous implicit declaration? And why does it
think the line that prints out the current total is now an int? Didn’t we design that to be floating
point?
The compiler will ignore the changes made to the comments, so that shouldn’t make any difference. That means the problem must be caused by changing the order of the functions. But if the order is the problem, why doesn’t the compiler just return a message saying something like:

Seriously, why doesn’t the compiler give us a little help here?
To understand exactly what’s happening here, you need to get inside the head of the compiler for a while and look at things from its point of view. You’ll see that what’s happening is that the compiler is actually trying to be a little too helpful.
Compilers don’t like surprises
So what happens when the compiler sees this line of code?
printf("Total so far: %.2f
", add_with_tax(val));
The compiler sees a call to a function it doesn’t recognize.
Rather than complain about it, the compiler figures that it will find out more about the function later in the source file. The compiler simply remembers to look out for the function later on in the file. Unfortunately, this is where the problem lies...
The compiler needs to know what data type the function will return.
Of course, the compiler can’t know what the function will return just yet, so it makes an assumption. The compiler assumes it will return an
int.When it reaches the code for the actual function, it returns a “conflicting types for ‘add_with_tax’” error.
This is because the compiler thinks it has two functions with the same name. One function is the real one in the file. The other is the one that the compiler assumed would return an
int.


Brain Power
The computer makes an assumption that the function returns an
int, when in reality it returns a
float. If you were designing the C
language, how would you fix the problem?

You could just put the functions back in the correct order and define the function before you call it in main().
Changing the order of the functions means that you can avoid the compiler ever making any dangerous assumptions about the return types of unknown functions. But if you force yourself to always define functions in a specific order, there are a couple of consequences.
Fixing function order is a pain
Say you’ve added a cool new function to your code that everyone thinks is fantastic:
int do_whatever(){...}
float do_something_fantastic(int awesome_level) {...}
int do_stuff() {
  do_something_fantastic(11);
}
What happens if you then decide your
program will be even better if you add a call to
the do_something_fantastic()
function in the existing do_whatever() code? You will have to
move the function earlier in the
file. Most coders want to spend their time improving what their code
can do. It would be better if you didn’t have to shuffle the order of
the code just to keep the compiler happy.
In some situations, there is no correct order
OK, so this situation is kind of rare, but occasionally you might write some code that is mutually recursive:
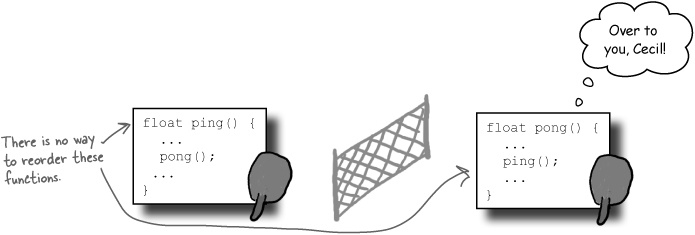
If you have two functions that call each other, then one of them will always be called in the file before it’s defined.
For both of those reasons, it’s really useful to be able to define functions in whatever order is easiest at the time. But how?
Split the declaration from the definition
Remember how the compiler made a note to itself about the function it was expecting to find later in the file? You can avoid the compiler making assumptions by explicitly telling it what functions it should expect. When you tell the compiler about a function, it’s called a function declaration:

The declaration is just a function signature: a record of what the function will be called, what kind of parameters it will accept, and what type of data it will return.
Once you’ve declared a function, the compiler won’t need to make any assumptions, so it won’t matter if you define the function after you call it.
So if you have a whole bunch of functions in your code and you don’t want to worry about their order in the file, you can put a list of function declarations at the start of your C program code:
float do_something_fantastic();
double awesomeness_2_dot_0();
int stinky_pete();
char make_maguerita(int count);
But even better than that, C allows you to take that whole set of declarations out of your code and put them in a header file. You’ve already used header files to include code from the C Standard Library:

Let’s go see how you can create your own header files.

Creating your first header file
To create a header, you just need to do two things:
Create a new file with a .h extension.
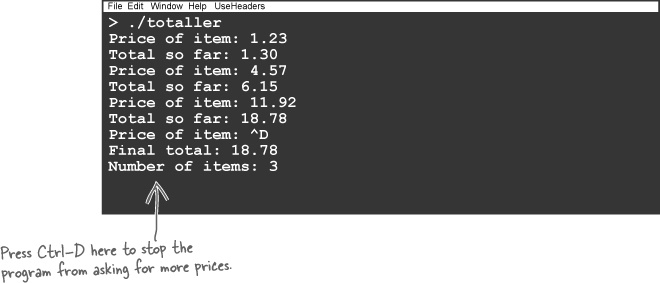
If you are writing a program called
totaller, then create a file called totaller.h and write your declarations inside it:You won’t need to include the
main()function in the header file, because nothing else will need to call it.Include your header file in your main program.
At the top of your program, you should add an extra
includeline:


When you write the name of the header file, make sure you surround
it with double quotes rather than angle brackets. Why the difference?
When the compiler sees an include
line with angle brackets, it assumes it will find the header file
somewhere off in the directories where the library code lives. But
your header file is in the same
directory as your .c file. By
wrapping the header filename in quotes, you are telling the compiler to
look for a local file.
Note
Local header files can also include directory names, but you will normally put them in the same directory as the C file.
When the compiler reads the #include in the code, it will read the
contents of the header file, just as if it had been typed into the
code.
Separating the declarations into a separate header file keeps your main code a little shorter, and it has another big advantage that you’ll find out about in a few pages.
For now, let’s see if the header file fixed the mess.
#include is a preprocessor instruction.
Now when you compile the code, this happens:

The compiler reads the function declarations from the header file, which means it doesn’t have to make any guesses about the return type of the function. The order of the functions doesn’t matter.
Just to check that everything is OK, you can run the generated program to see if it works the same as before.
Look at the program below. Part of the program is missing. Your job is to play like you’re the compiler and say what you would do if each of the candidate code fragments on the right were slotted into the missing space.


float mercury_day_in_earth_days();

int main()
{
  float length_of_day = mercury_day_in_earth_days();
  int hours = hours_in_an_earth_day();
float day = length_of_day * hours; |
int main()
{
  float length_of_day = mercury_day_in_earth_days();
  int hours = hours_in_an_earth_day();
float day = length_of_day * hours; |
Look at the program below. Part of the program is missing. Your job was to play like you’re the compiler and say what you would do if each of the candidate code fragments on the right were slotted into the missing space.


This Table’s Reserved...
C is a very small language. Here is the entire set of reserved words (in no useful order).
Every C program you ever see will break into just these words and a few symbols. If you use these for names, the compiler will be very, very upset.
| | |
| | |
| | |
| | |
| | |
| | |
| | |
| | |
| | |
| | |
| | |
If you have common features...
Chances are, when you begin to write several programs in C, you will find that there are some functions and features that you will want to reuse from other programs. For example, look at the specs of the two programs on the right.
XOR encryption is a very simple way of disguising a piece of text by XOR-ing each character with some value. It’s not very secure, but it’s very easy to do. And the same code that can encrypt text can also be used to decrypt it. Here’s the code to encrypt some text:


...it’s good to share code
Clearly, both of those programs are going to need to use the
same encrypt() function. So you
could just copy the code from one program to the other, right? That’s
not so bad if there’s just a small amount of code to copy, but what if
there’s a really large amount of code? Or what if the way the encrypt() function works needs to change in
the future? If there are two copies of the encrypt() function, you will have to change
it in more than one place.
For your code to scale properly, you really need to find some way to reuse common pieces of code—some way of taking a set of functions and making them available in a bunch of different programs.
How would you do that?
You can split the code into separate files
If you have a set of code that you want to share among several files, it makes a lot of sense to put that shared code into a separate .c file. If the compiler can somehow include the shared code when it’s compiling the program, you can use the same code in multiple applications at once. So if you ever need to change the shared code, you only have to do it in one place.

If you want to use a separate .c file for the
shared code, that gives us a problem. So far, you
have only created programs from single .c source
files. So if you had a C program called blitz_hack, you would have created it from a
single source code file called blitz_hack.c.
But now you want some way to give the compiler a set of source code files and say, “Go make a
program from those.” How do you do that? What syntax do you use with the
gcc compiler? And more importantly,
what does it mean for a compiler to create a single
executable program from several files? How would it work? How would it
stitch them together?
To understand how the C compiler can create a single program from multiple files, let’s take a look at how compilation works...
Compilation behind the scenes
To understand how a compiler can compile several source files into a single program, you’ll need to pull back the curtain and see how compilation really works.
Preprocessing: fix the source.
Compilation: translate into assembly.
The C programming language probably seems pretty low level, but the truth is it’s not low level enough for the computer to understand. The computer only really understands very low-level machine code instructions, and the first step to generate machine code is to convert the C source code into assembly language symbols like this:
movq  -24(%rbp), %rax
movzbl(%rax), %eax
movl  %eax, %edx
Looks pretty obscure? Assembly language describes the individual instructions the central processor will have to follow when running the program. The C compiler has a whole set of recipes for each of the different parts of the C language. These recipes will tell the compiler how to convert an
ifstatement or a function call into a sequence of assembly language instructions. But even assembly isn’t low level enough for the computer. That’s why it needs...Assembly: generate the object code.
The compiler will need to assemble the symbol codes into machine or object code. This is the actual binary code that will be executed by the circuits inside the CPU.
So are you all done? After all, you’ve taken the original C source code and converted it into the 1s and 0s that the computer’s circuits need. But no, there’s still one more step. If you give the computer several files to compile for a program, the compiler will generate a piece of object code for each source file. But in order for these separate object files to form a single executable program, one more thing has to occur...
Linking: put it all together.
Once you have all of the separate pieces of object code, you need to fit them together like jigsaw pieces to form the executable program. The compiler will connect the code in one piece of object code that calls a function in another piece of object code. Linking will also make sure that the program is able to call library code properly. Finally, the program will be written out into the executable program file using a format that is supported by the operating system. The file format is important, because it will allow the operating system to load the program into memory and make it run.


So how do you actually tell gcc that we want to make one executable program from several separate source files?
The shared code needs its own header file
If you are going to share the encrypt.c code between programs, you need some way to tell those programs about the encrypt code. You do that with a header file.
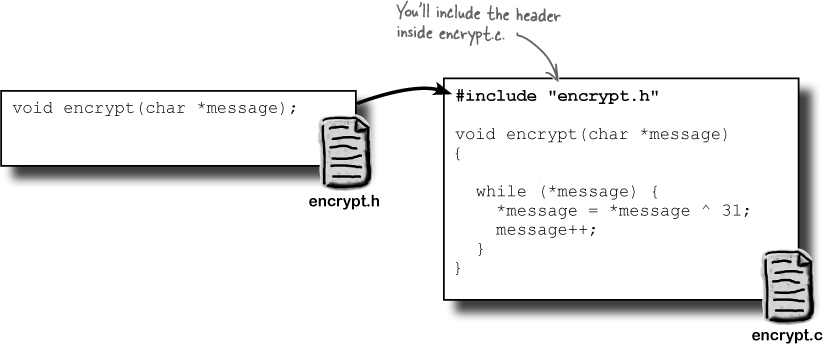
Include encrypt.h in your program
You’re not using a header file here to be able to reorder the
functions. You’re using it to tell other
programs about the encrypt()
function:

Having encrypt.h inside the main program
will mean the compiler will know enough about the encrypt() function to compile the code. At
the linking stage, the compiler will be able to connect the call to
encrypt(msg) in
message_hider.c to the actual encrypt() function in
encrypt.c.
Finally, to compile everything together you just need to pass
the source files to gcc:
gcc message_hider.c encrypt.c -o message_hiderSharing variables
You’ve seen how to share functions between different files.
But what if you want to share variables? Source code files normally
contain their own separate variables to prevent a variable in one
file affecting a variable in another file with the same name. But if
you genuinely want to share variables, you should declare them in
your header file and prefix them with the keyword extern:
extern int passcode;Let’s see what happens when you compile the message_hider program:
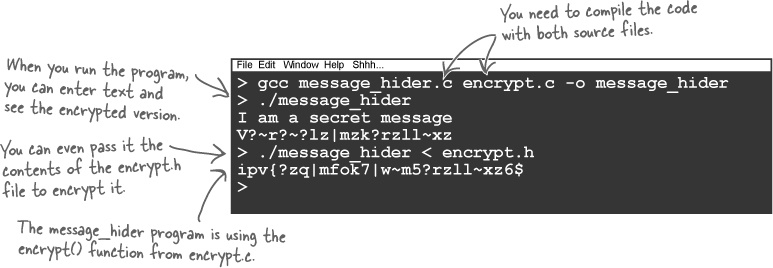
The program works. Now that you have the encrypt() function in a separate file, you
can use it in any program you like. If you ever change the encrypt() function to be something a
little more secure, you will need to amend only the
encrypt.c file.


It’s not rocket science...or is it?
Breaking your program out into separate source files not only means that you can share code between different programs, but it also means you can start to create really large programs. Why? Well, because you can start to break your program down into smaller self-contained pieces of code. Rather than being forced to have one huge source file, you can have lots of simpler files that are easier to understand, maintain, and test.
So on the plus side, you can start to create really large programs. The downside? The downside is...you can start to create really large programs. C compilers are really efficient pieces of software. They take your software through some very complex transformations. They can modify your source, link hundreds of files together without blowing your memory, and even optimize the code you wrote, along the way. And even though they do all that, they still manage to run quickly.
But if you create programs that use more than a few files, the time it takes to compile the code starts to become important. Let’s say it takes a minute to compile a large project. That might not sound like a lot of time, but it’s more than long enough to break your train of thought. If you try out a change in a single line of code, you want to see the result of that change as quickly as possible. If you have to wait a full minute to see the result of every change, that will really start to slow you down.
Don’t recompile every file
If you’ve just made a change to one or two of your source code files, it’s a waste to recompile every source file for your program. Think what happens when you issue a command like this:

What will the compiler do? It will run the preprocessor, compiler, and assembler for each source code file. Even the ones that haven’t changed. And if the source code hasn’t changed, the object code that’s generated for that file won’t change either. So if the compiler is generating the object code for every file, every time, what do you need to do?
Save copies of the compiled code
If you tell the compiler to save the object code it generates into a file, it shouldn’t need to recreate it unless the source code changes. If a file does change, you can recreate the object code for that one file and then pass the whole set of object files to the compiler so they can be linked.

If you change a single file, you will have to recreate the object code file from it, but you won’t need to create the object code for any other file. Then you can pass all the object code files to the linker and create a new version of the program.
So how do you tell gcc to save the object code in a file? And how do you then get the compiler to link the object files together?
First, compile the source into object files
You want object code for each of the source files, and you can do that by typing this command:

gcc -c will compile the code but won’t link it.
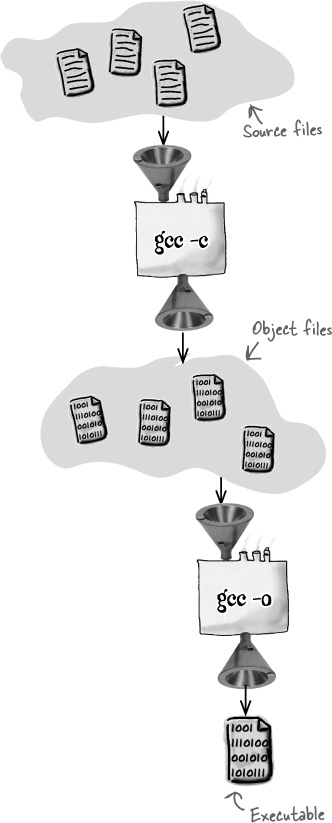
The *.c will match every C file
in the current directory, and the -c
will tell the compiler that you want to create an object file for each
source file, but you don’t want to link them together into a full
executable program.
Then, link them together
Now that you have a set of object files, you can link them together with a simple compile command. But instead of giving the compiler the names of the C source files, you tell it the names of the object files:

The compiler is smart enough to recognize the files as object
files, rather than source files, so it will skip most of the
compilation steps and just link them together into an executable
program called launch.
OK, so now you have a compiled program, just like before. But you also have a set of object files that are ready to be linked together if you need them again. So if you change just one of the files, you’ll only need to recompile that single file and then relink the program:

Even though you have to type two commands, you’re saving a lot of time:

Here is some of the code that’s used to control the engine
management system on the craft. There’s a timestamp on each file.
Which files do you think need to be recreated to make the ems executable up to date? Circle the
files you think need to be updated.

And in the galley, they need to check that their code’s up to date as well. Look at the times against the files. Which of these files need to be updated?

Here is some of the code that’s used to control the engine
management system on the craft. There’s a timestamp on each file.
You were to circle the files you think need to be recreated to make
the ems executable up to
date.

And in the galley, they need to check that their code’s up to date as well. Look at the times against the files. Which of these files need to be updated?

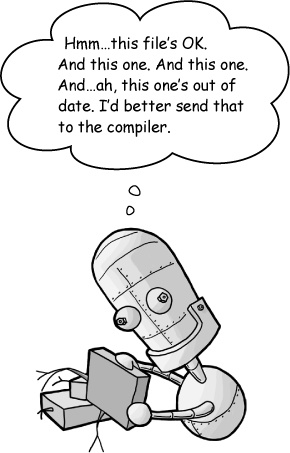
It’s hard to keep track of the files

It’s true: partial compiles are faster, but you have to think more carefully to make sure you recompile everything you need.
If you are working on just one source file, things will be pretty simple. But if you’ve changed a few files, it’s pretty easy to forget to recompile some of them. That means the newly compiled program won’t pick up all the changes you made. Now, of course, when you come to ship the final program, you can always make sure you can do a full recompile of every file, but you don’t want to do that while you’re still developing the code.
Even though it’s a fairly mechanical process to look for files that need to be compiled, if you do it manually, it will be pretty easy to miss some changes.
Is there something we can use to automate the process?

Automate your builds with the make tool
You can compile your applications really quickly in
gcc, as long as you keep track of
which files have changed. That’s a tricky thing to do, but it’s also
pretty straightforward to automate. Imagine you have a file that is
generated from some other file. Let’s say it’s an object file that is
compiled from a source file:


How do you tell if the thruster.o file needs to be recompiled? You just look at the timestamps of the two files. If the thruster.o file is older than the thruster.c file, then the thruster.o file needs to be recreated. Otherwise, it’s up to date.
That’s a pretty simple rule. And if you have a simple rule for something, then don’t think about it— automate it...
make is a tool that can run the
compile command for you. The make
tool will check the timestamps of the source files and the generated
files, and then it will only recompile the files if things have gotten
out of date.
But before you can do all these things, you need to tell make about your source code. It needs to know
the details of which files depend on which files. And it also needs to
be told exactly how you want to build the code.
What does make need to know?
Every file that make compiles
is called a target. Strictly
speaking, make isn’t limited to
compiling files. A target is any file that is
generated from some other files. So a target
might be a zip archive that is generated from the set of files that
need to be compressed.
For every target, make needs
to be told two things:
The dependencies.
Which files the target is going to be generated from.
The recipe.
The set of instructions it needs to run to generate the file.
Together, the dependencies and the recipe form a rule. A rule tells make all it needs to know to create the
target file.
How make works
Let’s say you want to compile thruster.c into some object code in thruster.o. What are the dependencies and what’s the recipe?
The thruster.o file is called the target, because it’s the file you want to generate. thruster.c is a dependency, because it’s a file the compiler will need in order to create thruster.o. And what will the recipe be? That’s the compile command to convert thruster.c into thruster.o.
Make sense? If you tell the make tool about the dependencies and the
recipe, you can leave it to make to
decide when it needs to recompile
thruster.o.
But you can go further than that. Once you build the
thruster.o file, you’re going to use it to create
the launch program. That means the
launch file can also be set up as a
target, because it’s a file you want to generate. The dependency files
for launch are all of the
.o object files. The recipe is this command:
gcc *.o -o launchOnce make has been given the
details of all of the dependencies and rules, all you have to do is tell
it to create the launch file.
make will work out the
details.


But how do you tell make about the dependencies and recipes? Let’s find out.
Tell make about your code with a makefile
All of the details about the targets, dependencies, and
recipes need to be stored in a file called either
makefile or Makefile. To see
how it works, imagine you have a pair of source files that together
create the launch program:
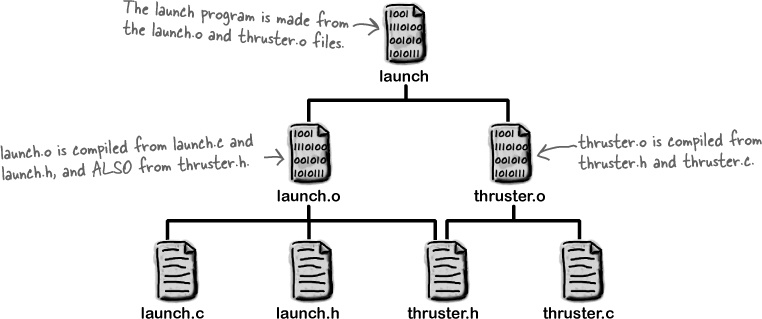
The launch program is made by
linking the launch.o and
thruster.o files. Those files are compiled from
their matching C and header files, but the launch.o
file also depends on the
thruster.h file because it contains code that will
need to call a function in the thruster code.
This is how you’d describe that build in a makefile:

Watch it!
All of the recipe lines MUST begin with a tab character.
If you just try to indent the recipe lines with spaces, the build won’t work.
Save your make rules into a
text file called Makefile in the same directory;
then, open up a console and type the following:

You can see that make was
able to work out the sequence of commands required to create the
launch program. But what happens if
you make a change to the thruster.c file and then
run make again?

make is able to skip creating
a new version of launch.o. Instead, it just
compiles thruster.o and then relinks the
program.
Tales from the Crypt
Why indent with tabs?
It’s easy to indent recipes with spaces instead of
tabs. So why does make
insist on using tabs? This is a quote from
make ’s creator, Stuart
Feldman:
“Why the tab in column 1? ... It worked, it stayed. And then a few weeks later I had a user population of about a dozen, most of them friends, and I didn’t want to screw up my embedded base. The rest, sadly, is history.”
Geek Bits
make takes away a lot of the
pain of compiling files. But if you find that even it is not automatic
enough, take a look at a tool called autoconf:
http://www.gnu.org/software/autoconf/
autoconf is used to generate
makefiles. C programmers often create tools to automate the creation
of software. An increasing number of them are available on the GNU
website.
Hey, baby, if you don’t groove to the latest tunes, then
you’ll love the program the guys in the Head
First Lounge just wrote! oggswing
is a program that reads an Ogg Vorbis music file and creates a swing
version. Sweet! See if you can complete the makefile that compiles
oggswing and then uses it to
convert a .ogg file:


Hey, baby, if you don’t groove to the latest tunes, then you’ll
love the program the guys in the Head First
Lounge just wrote! oggswing is a
program that reads an Ogg Vorbis music file and creates a swing
version. Sweet! You were to complete the makefile that compiles
oggswing and then uses it to
convert a .ogg file:

Geek Bits
The make tool can do far, far
more than we have space to discuss here. To find out more about
make and what it can do for you,
visit the GNU Make Manual at:
If you have a very slow
build, make will
really speed things up. Most developers are so used to building their
code with make that
they even use it for small programs. make
is like having a really careful developer
sitting alongside you. If you have a large amount of code,
make will
always take care to build just the code you need at just the time you
need it.
And sometimes getting things done in time is important...

Your C Toolbox
You’ve got Chapter 4 under your belt, and now you’ve added data types and header files to your toolbox. For a complete list of tooltips in the book, see Appendix B.

C Lab 1: Arduino
This lab gives you a spec that describes a program for you to build, using the knowledge you’ve gained over the last few chapters.
This project is bigger than the ones you’ve seen so far. So read the whole thing before you get started, and give yourself a little time. And don’t worry if you get stuck. There are no new C concepts in here, so you can move on in the book and come back to the lab later.
We’ve filled in a few design details for you, and we’ve made sure you’ve got all the pieces you need to write the code. You can even build the physical device.
It’s up to you to finish the job, but we won’t give you the code for the answer.
The spec: make your houseplant talk
Ever wished your plants could tell you when they need watering? Well, with an Arduino they can! In this lab, you’ll create an Arduino-powered plant monitor, all coded in C.
Here’s what you’re going to build.

The physical device
The plant monitor has a moisture sensor that measures how wet your plant’s soil is. If the plant needs watering, an LED lights up until the plant’s been watered, and the string “Feed me!” is repeatedly sent to your computer.
When the plant has been watered, the LED switches off and the string “Thank you, Seymour!” is sent once to your computer.

The Arduino
The brains of the plant monitor is an Arduino. An Arduino is a small micro-controller-based open source platform for electronic prototyping. You can connect it to sensors that pick up information about the world around it, and actuators that respond. All of this is controlled by code you write in C.
The Arduino board has 14 digital IO pins, which can be inputs or outputs. These tend to be used for reading on or off values, or switching actuators on or off.
The board also has six analog input pins, which take voltage readings from a sensor.
The board can take power from your computer’s USB port.

The Arduino IDE
You write your C code in an Arduino IDE. The IDE allows you to verify and compile your code, and then upload it to the Arduino itself via your USB port. The IDE also has a built-in serial monitor so that you can see what data the Arduino is sending back (if any).
The Arduino IDE is free, and you can get hold of a copy from www.arduino.cc/en/Main/Software.

Build the physical device
You start by building the physical device. While this bit’s optional, we really recommend that you give it a go. Your plants will thank you for it.

Build the moisture sensor
Take a long piece of jumper wire and attach it to the head of one of the galvanized nails. You can either wrap the wire around the nail or solder it in place.
Once you’ve done that, attach another long piece of jumper wire to the second galvanized nail.
The moisture sensor works by checking the conductivity between the two nails. If the conductivity is high, the moisture content must be high. If it’s low, the moisture content must be low.

Connect the LED
Look at the LED. You will see that it has one longer (positive) lead and one shorter (negative) lead.
Now take a close look at the Arduino. You will see that along one edge there are slots for 14 digital pins labeled 0–13, and another one next to it labeled GND. Put the long positive lead of the LED into the slot labeled 13, and the shorter negative lead into the slot labeled GND.
This means that the LED can be controlled through digital pin 13.

Connect the moisture sensor
Connect the moisture sensor as shown below:
Connect a short jumper wire from the GND pin on the Arduino to slot D15 on the breadboard.
Connect the 10K Ohm resistor from slot C15 on the breadboard to slot C10.
Connect a short jumper wire from the 0 analog input pin to slot D10 on the breadboard.
Take one of the galvanized nails, and connect the wire attached to it to slot B10.
Connect a short jumper wire from the 5V pin on the Arduino to slot C5 on the breadboard.
Take the other galvanized nail, and connect the wire attached to it to slot B5.

That’s the physical Arduino built. Now for the C code...
Here’s what your code should do
Your Arduino C code should do the following.
Read from the moisture sensor
The moisture sensor is connected to an analog input pin. You will need to read analog values from this pin.
Here at the lab, we’ve found that our plants generally need watering when the value goes below 800, but your plant’s requirements may be different—say, if it’s a cactus.

Write to the LED
The LED is connected to a digital pin.
When the plant doesn’t need any more water, write to the digital pin the LED is connected to, and get it to switch off the LED.
When the plant needs watering, write to the digital pin and get it to switch on the LED. For extra credit, get it to flash. Even better, get it to flash when the conditions are borderline.

Write to the serial port
When the plant needs watering, repeatedly write the string “Feed me!” to the computer serial port.
When the plant has enough water, write the string “Thank you, Seymour!” to the serial port once.
Assume that the Arduino is plugged in to the computer USB socket.

Here’s what your C code should look like
An Arduino C program has a specific structure. Your program must implement the following:

The easiest way of writing the Arduino C code is with the Arduino IDE. The IDE allows you to verify and compile your code, and then upload your completed program to the Arduino board, where you’ll be able to see it running.
The Arduino IDE comes with a library of Arduino functions and includes lots of handy code examples. Turn the page to see a list of the functions you’ll find most useful when creating Arduino.
Here are some useful Arduino functions
You’ll need some of these to write the program.
-
void
            pinMode(int pin, int mode)
Tells the Arduino whether the digital
pinis an input or output.modecan be eitherINPUTorOUTPUT.-
int
            digitalRead(int pin)
Reads the value from the digital pin. The return value can be either
HIGHorLOW.-
void digitalWrite(int pin, intvalue) Writes a value to a digital pin.
valuecan be eitherHIGHorLOW.-
intanalogRead(int pin) Reads the value from an analog pin. The return value is between 0 and 1023.
-
void analogWrite(int pin, intvalue) Writes an analog value to a pin.
valueis between 0 and 255.-
void Serial.begin(longspeed) Tells the Arduino to start sending and receiving serial data at
speedbits per second. You usually setspeedto 9600.-
void Serial.println(val) Prints data to the serial port.
valcan be any data type.-
void delay(longinterval) Pauses the program for
intervalmilliseconds.
The finished product
You’ll know your Arduino project is complete when you put the moisture sensor in your plant’s soil, connect the Arduino to your computer, and start getting status updates about your plant.

If you have a Mac and want to make your plant really talk, you can download a script from the Head First Labs website that will read out the stream of serial data: