
![]()
Using Entity Framework in ASP.NET MVC
ASP.NET is a free Web framework that supports three different technologies to create websites and Web applications; that is, Web Pages, Web Forms, and MVC. Although MVC is a very popular and well-established concept designed to be used as a pattern in software development, MVC in ASP.NET framework is fairly new technology. The latest version of ASP.NET MVC 4 was released in 2012. Since the release of the initial version in 2008, it has become a popular means for ASP.NET Web Forms development. Therefore, this chapter shows you recipes made only with ASP.NET MVC 4 and Entity Framework. Two other forms of ASP.NET technology—ASP.NET Web Forms and ASP.NET Web Pages—are not covered in this chapter.
The recipes in this chapter cover everything from building an insert, update, delete, and list page to implementing search functionality.
Each of the recipes in this chapter is shown using an ASP.NET MVC 4 Web application project in Visual Studio 2012. We’ve tried to keep things simple by not including all of the extra code that comes with the default project template.
4.1. Building CRUD Operations in an ASP.NET MVC Page
The create, read, update, and delete (CRUD) operations are fundamental to almost every software application. We are going to implement these operations in this section using ASP.NET MVC.
Problem
You want to build an ASP.NET MVC page that allows inserting, updating, deleting, and reading from your model.
Solution
Let’s say you have a Web application that manages the list of software apps for a mobile device. You have a model like the one shown in Figure 4-1.

Figure 4-1. A model with a Category entity that contains an application’s category name and description
The model contains a Category entity. You want to create a few simple ASP.NET MVC pages to show the list of all of the app categories. You also want to allow the user to create a new app category, update an existing app category, and delete an app category. Although there are number of ways to do this, we will do it in a very simple way to build your understanding of the integration of Entity Framework with ASP.NET MVC. To create an MVC application, you will need three parts: a model, a controller, and a view. We have used the file MyStore.mdf as our database for this recipe. We are also using the Razor engine for all of the views. There is only one model but with multiple views, depending on the actions or operations required. In this case, we will have four views: one each for Create, Update, Delete, and List.
First we will create an ASP.NET MVC 4 Web Application using the project template Internet Application, as demonstrated in Figure 4-2 and Figure 4-3.
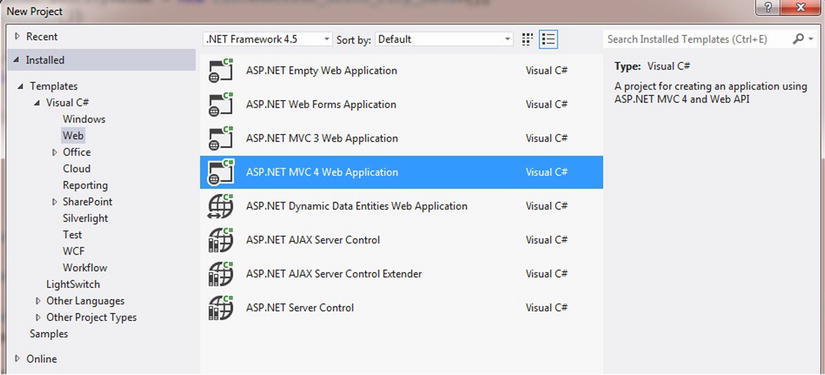
Figure 4-2. Selecting an ASP.NET MVC Web Application project in Visual Studio 2012

Figure 4-3. Selecting a project template for an ASP.NET MVC application
A new project is created in Visual Studio IDE with number of default files and folders.
Now we have to set up the database for this application. We will use a MyStore.mdf file database within our project to make everything simple and clear.
An MDF file-based database can easily be created within the Visual Studio development environment. This MDF file-based database can then be attached to a SQL Server Express instance and used as a normal, full-fledged database. The difference here is that it is attached through a connection string and not as a permanently attached database onto a SQL Server instance.
Right click on the App_Data folder to add a new .mdf file. This file can be added in two ways: either click on New Item in the Add context menu, as shown in Figure 4-4, or click on SQL Server Database entry, as shown in Figure 4-5.
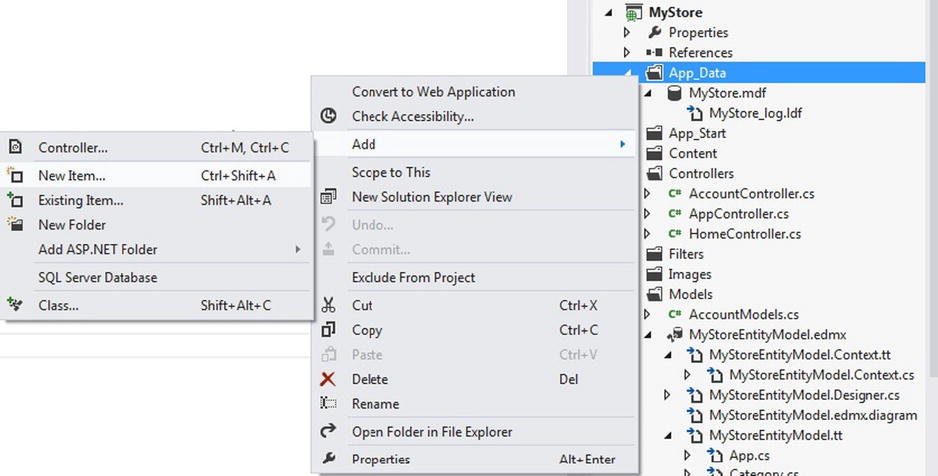
Figure 4-4. Adding a new item in the App_Data folder

Figure 4-5. Selecting a SQL Server Database file as a new item to add
After creating the three tables as .mdf files, as shown in Figure 4-6, we generated a new model using Entity Framework.

Figure 4-6. Three tables with their relationships
The model is generated by adding an ADO.NET Entity Data Model into Models folder of your project, as shown in Figure 4-7.

Figure 4-7. Adding an Entity Data Model
As we have discussed, there are three parts to an ASP.NET MVC application: model, view, and controller. We have now completed the model creation part. Next we need to create a controller and then finally create the views. The number of views is dependent on the amount of actions that are required to be performed through the controller.
Add a new controller, as shown in Figure 4-8, by right-clicking on the Controllers folder and then selecting Add Controller. Name the controller CategoryController.

Figure 4-8. Adding a controller
As you know, we selected the template of empty read/write actions while adding CategoryController. It will create all of the dummy action methods in the controller code. The DbContext code for this recipe is shown in Listing 4-1.
Listing 4-1. Inherited DbContext Class to Perform Operations in the Database Using Entity Framework
namespace MyStore.Models
{
    using System;
    using System.Data.Entity;
    using System.Data.Entity.Infrastructure;

    public partial class MyStoreEntities : DbContext
    {
        public MyStoreEntities()
            : base("name=MyStoreEntities")
        {
        }

        protected override void OnModelCreating(DbModelBuilder modelBuilder)
        {
            throw new UnintentionalCodeFirstException();
        }

        public DbSet<App> Apps { get; set; }
        public DbSet<Category> Categories { get; set; }
        public DbSet<Developer> Developers { get; set; }
    }
}
We have to change the code, as shown in Listing 4-2, in these action methods to perform insert, delete, edit, and view on models using DbContext class.
Listing 4-2. Controller Code for Category Model
using System;
using System.Collections.Generic;
using System.Linq;
using System.Web;
using System.Web.Mvc;
using MyStore.Models;
namespace MyStore.Controllers
{
    public class CategoryController : Controller
    {
        // GET: /Category/

        public ActionResult Index()
        {
            using (var db = new MyStoreEntities())
                {
                    return View(db.Categories.ToList());
                }
        }

        //
        // GET: /Category/Details/5

        public ActionResult Details(int id)
        {
            using (var db = new MyStoreEntities())
                {
                    return View(db.Categories.Find(id));
                }
        }

        //
        // GET: /Category/Create

        public ActionResult Create()
        {
            return View();
        }

        //
        // POST: /Category/Create

        [HttpPost]
        public ActionResult Create(Category categoryValue)
        {
            try
                {
                    using (var db = new MyStoreEntities())
                        {
                            db.Categories.Add(categoryValue);
                            db.SaveChanges();
                        }
                            return RedirectToAction("Index");
                }
            catch
                {
                    return View();
                }
        }

        // GET: /Category/Edit/5
        public ActionResult Edit(int id)
        {
            using (var db = new MyStoreEntities())
                {
                    return View(db.Categories.Find(id));
                }
        }

        // POST: /Category/Edit/5
        [HttpPost]
        public ActionResult Edit(int id, Category categoryValue)
        {
            try
                {
                    using (var db = new MyStoreEntities())
                        {
                            db.Entry(categoryValue).State = System.Data.EntityState.Modified;
                            db.SaveChanges();
                            return RedirectToAction("Index");
                        }
                }
            catch
                {
                    return View();
                }
        }

        //
        // GET: /Category/Delete/5

        public ActionResult Delete(int id)
        {
            using (var db = new MyStoreEntities())
                {
                    return View(db.Categories.Find(id));
                }
        }

        //
        // POST: /Category/Delete/5

        [HttpPost]
        public ActionResult Delete(int id, Category categoryValue)
        {
            try
                {
                    using (var db = new MyStoreEntities())
                        {
                            db.Entry(categoryValue).State = System.Data.EntityState.Deleted;
                            db.SaveChanges();
                            return RedirectToAction("Index");
                        }
                }
            catch
                {
                    return View();
                }
        }
    }
}
Create five views for all of the actions as Create, Delete, Details, Edit, and Index in CategoryController. You can add a view, as shown in Figure 4-9, by right-clicking on any operation in the controller and selecting AddView. A new view will be added into the Views ![]() Category folder, as shown in Figure 4-9.
Category folder, as shown in Figure 4-9.

Figure 4-9. Adding a view using an action method in the controller
In the Add View dialog box shown in Figure 4-10, select View Engine as Razor (CSHTML), and then click the checkbox to create a strongly-typed view, and finally select the Model class as Category (MyStore.Models).

Figure 4-10. Adding a view
The index view in Listing 4-3 displays a page that lists the app categories, along with buttons for inserting new categories as well as editing and deleting current categories. The create view page in Listing 4-4 is used to insert a new application category.
Listing 4-3. The Code of Index View
@model IEnumerable<MyStore.Models.Category>

@{
    Layout = null;
}

<!DOCTYPE html>

<html>
<head>
    <meta name="viewport" content="width=device-width" />
    <title>Entity Framework Recipes - Recipe 1</title>
</head>
<body>
                 <h2>Manage Apps Category</h2>
    <p>
        @Html.ActionLink("Create New", "Create")
    </p>
    <table>
        <tr>
            <th>
                @Html.DisplayNameFor(model => model.Name)
            </th>
            <th>
                @Html.DisplayNameFor(model => model.Description)
            </th>
            <th></th>
        </tr>

    @foreach (var item in Model) {
        <tr>
            <td>
                @Html.DisplayFor(modelItem => item.Name)
            </td>
            <td>
                @Html.DisplayFor(modelItem => item.Description)
            </td>
            <td>
                @Html.ActionLink("Edit", "Edit", new { id=item.CategoryId }) |
                @Html.ActionLink("Details", "Details", new { id=item.CategoryId }) |
                @Html.ActionLink("Delete", "Delete", new { id=item.CategoryId })
            </td>
        </tr>
    }

    </table>
</body>
</html>
Listing 4-4. The Code of Create View
@model MyStore.Models.Category

@{
    Layout = null;
}

<!DOCTYPE html>

<html>
<head>
    <meta name="viewport" content="width=device-width" />
    <title>Entity Framework Recipes - Recipe 1</title>
</head>
<body>
                 <h2>Manage Apps Category</h2>

    @using (Html.BeginForm()) {
        @Html.AntiForgeryToken()
        @Html.ValidationSummary(true)

        <fieldset>
            <legend>Category</legend>

            <div class="editor-label">
                @Html.LabelFor(model => model.Name)
            </div>
            <div class="editor-field">
                @Html.EditorFor(model => model.Name)
                @Html.ValidationMessageFor(model => model.Name)
            </div>

            <div class="editor-label">
                @Html.LabelFor(model => model.Description)
            </div>
            <div class="editor-field">
                @Html.EditorFor(model => model.Description)
                @Html.ValidationMessageFor(model => model.Description)
            </div>

            <p>
                <input type="submit" value="Create" />
            </p>
        </fieldset>
    }

    <div>
        @Html.ActionLink("Back to List", "Index")
    </div>
    <script src="∼/Scripts/jquery-1.8.2.min.js"></script>
    <script src="∼/Scripts/jquery.validate.min.js"></script>
    <script src="∼/Scripts/jquery.validate.unobtrusive.min.js"></script>
</body>
</html>
The code of the index view in Listing 4-3 displays a page that lists the app categories, along with the buttons for inserting new categories as well as those for editing and deleting current categories. This index page is shown in Figure 4-11.

Figure 4-11. The listing of the app categories
The text boxes shown in Figure 4-12 allow the user to enter the category information. Clicking the Create button causes the new record to be added to the database.
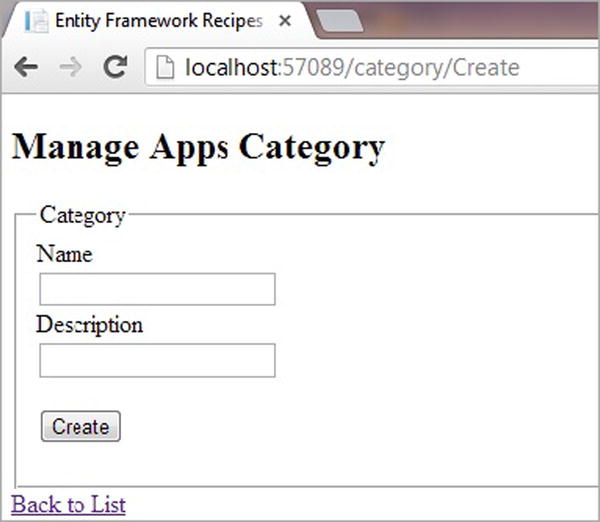
Figure 4-12. Inserting a new app category
Clicking the Edit button on a category shows the view that allows editing of an existing app category as shown in Figure 4-13.
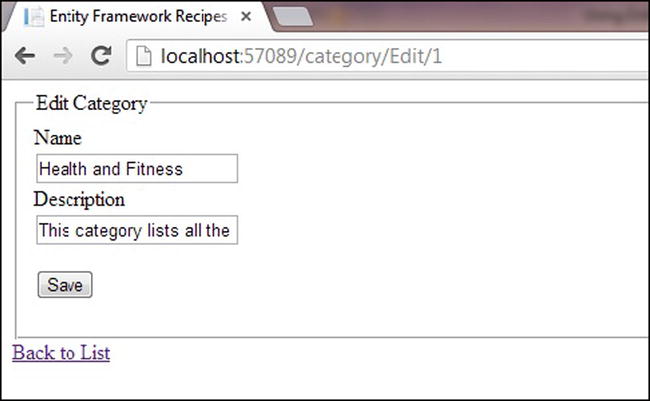
Figure 4-13. Editing an app category
How It Works
The entire code base is divided into three parts:
- Model with DbContext class (Listing 4-1)
- Controller code (Listing 4-2)
- View code (Listing 4-3 and Listing 4-4)
The controller is the largest piece of the code, and it is the heart of the functionality of all the operations. The views are created on the basis of action methods in the Controller. All of the code that is used to fetch, create, update, and delete is addressed in the action methods. Whenever a view is accessed through a URL or another view, the corresponding action method of that operation is called upon in the controller to perform that action. We selected the scaffolding option while creating new views, which automatically generates the HTML code of edit, create, and list using the Razor view engine, depending upon the scaffolding option selected.
Searching data is a very basic functionality that most of the applications have. It is very dynamic in nature, as users can use any criteria, if provided, to search, or none. So we discuss below in detail the basic implementation of search functionality.
Problem
You want to build a search page in ASP.NET MVC 4 using Entity Framework.
Solution
Let’s say you have a model like the one in Figure 4-14. In the solution, we are going to use three basic parts to build our search page:
- A table to structure the query parameters.
- A WebGrid to present the results in Razor view.
- A Controller to incorporate the logic for the view.
In the database, you have a Customer table, which stores the Name, City and State information of all the customers. The data model (schema) of the Customer table is shown in Figure 4-14.
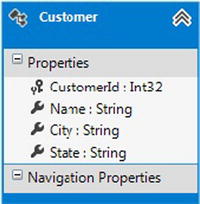
Figure 4-14. A model with a Customer entity
After having the Customer view model created, we need to write the view using Razor. In this view, we are using WebGrid control to show the Customer records as mentioned in Listing 4-5.
Listing 4-5. Using WebGrid in MVC Razor View
@model EntityFrameworkRecipe2.ViewModels.CustomerVM

@{
    Layout = null;
}

@{
    ViewBag.Title = "Customer";
    WebGrid grid = new WebGrid(canPage:false,canSort:false);
                   grid.Bind(Model.Customers,
                   autoSortAndPage: false
    );
}

@using (Html.BeginForm())
{
<table>
    <tr>
        <td>
            Name
        </td>
        <td>
            @Html.TextBoxFor(model => model.Name)
        </td>
    </tr>
    <tr>
        <td>
            City
        </td>
        <td>
            @Html.TextBoxFor(model => model.City)
        </td>
    </tr>
    <tr>
        <td>
            State
        </td>
        <td>
            @Html.TextBoxFor(model => model.State)
        </td>
    </tr>
    <tr>
        <td colspan="2">
            <input type="submit" id="search" title="Search" value="Search" />
        </td>
    </tr>
</table>
<div id="searchResults">
    <!-- placeHolder for search results -->
         @grid.GetHtml(
         fillEmptyRows: true,
         alternatingRowStyle: "alternate-row",
         headerStyle: "grid-header",
         footerStyle: "grid-footer",
         columns: new [] {
         grid.Column("Name"),
         grid.Column("City"),
         grid.Column("State")
         })
</div>
}
Once this view is written, we are going to write the Controller with both Get and Post actions of Search function, in which we are going to provide the implementation to fetch the Customer data from database and populate into the view model. This implementation is shown in Listing 4-6.
Listing 4-6. The Controller Code That Builds the Data to Test Our Search Page
public class CustomerController : Controller
    {
        public ActionResult Search()
            {
                using (var db = new CustomerEntities())
                    {
                        var customer = db.Customers.ToList();
                        var data = new CustomerVM()
                            {
                                Customers = customer
                            };
                        return View(data);
                    }
            }
    [HttpPost]
        public ActionResult Search(CustomerVM customerVmValue)
            {
                using (var db = new CustomerEntities())
                    {
                        var customerSearchResults = from customerRec in db.Customers
                        where ((customerVmValue.Name == null) || (customerRec.Name == customerVmValue.Name.Trim()))
                        && ((customerVmValue.City == null) || (customerRec.City == customerVmValue.City.Trim()))
                        && ((customerVmValue.State == null) || (customerRec.State == customerVmValue.State.Trim()))
                        select new
                            {

                                Id = customerRec.CustomerId,
                                Name = customerRec.Name,
                                City = customerRec.City,
                                State = customerRec.State
                            };
                                List<Customer> lstCustomer = new  List<Customer>();
                                    foreach (var record in customerSearchResults)
                                        {
                                            Customer customerValue = new Customer();
                                            customerValue.Id = record.Id;
                                            customerValue.Name = record.Name;
                                            customerValue.City = record.City;
                                            customerValue.State = record.State;
                                            lstCustomer.Add(customerValue);
                                        }
                                            customerVmValue.Customers = lstCustomer;
                                            return View(customerVmValue);
                    }
            }
    }
In your browser, the page should appear similar to the one shown in Figure 4-15.
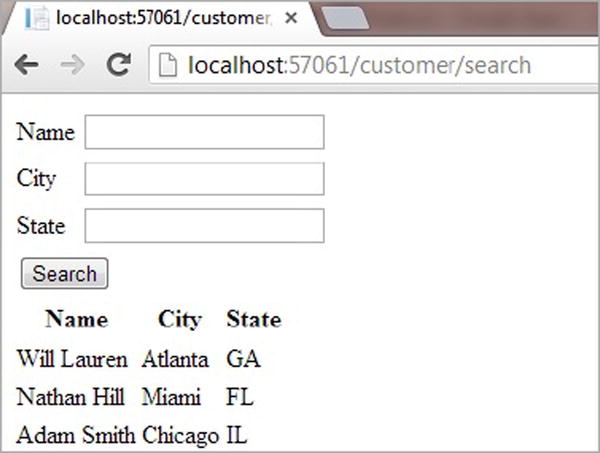
Figure 4-15. The rendered view shown in a browser
How It Works
In the first section of the page (see Listing 4-5), we format the query fields using a table. There’s nothing fancy here—the idea is to provide some structure to capture the three query fields: Name, City, and State. These values, or the lack of them, will be used in the Controller’s Search action method after the Search button is clicked. Thus these parameters will form the filter for the query.
Next we use an HTML helper to show the result set using WebGrid control. The data source will be the view model. Take note here that we have created two models: one to fetch the data from the database and one to be used as a model for the view that will capture the query parameters from the page and also show the customer records. Actually, the first model will be created at the moment we generate the entity data model for Customer table.
We are using Linq-to-entities to query the Customer entity data model. The where clause and parameter variables define the filter of our query. In the view, we map the parameters of the search query to the Name, City, and State HTML helper text boxes. We map the Name property of the model to the Name text box, and so on.
We use a WebGrid to display the results. The WebGrid is bound with the Customer model list, which is a model that is capturing only the search results.
The controller code, shown in Listing 4-6, is used fetch the results from database and fill the view the first time view is rendered and also when the Search button is clicked. We have used an .mdf file local database and filled the records in Customer table.
4-3. Filtering with ASP.NET’s URL Routing
Problem
You want to simplify the URLs on your site using a MapRoute. You also want to leverage these routes to filter the result sets in the Razor view engine.
Solution
Suppose your model looks like the one in Figure 4-16. Here we’ve modeled our products, represented by the Product entity, together with their categories. In a typical eCommerce website, we would show products by category. We want to avoid exposing query strings like /Products/Index?Category=Tents in our URLs. While these cryptic URLs simplify programming a little, they don’t help much when it comes to search engine optimization. We would rather have URLs that look more like /Products/Tents.

Figure 4-16. A model for products and their categories
We can get this more Search Engine Optimization–friendly URL structure by using routing. Routes are typically created in the Application_Start() event handler in Global.asax. The code in Listing 4-7 illustrates adding a route for the Product controller.
Listing 4-7. Adding the Route in Global.asax
protected void Application_Start()
{
    RouteTable.Routes.MapRoute("Product", "{controller}/{name}", new { controller = "Product", action = "Index" });
    RouteConfig.RegisterRoutes(RouteTable.Routes);
}
In the Index view as shown in the Listing 4-8, we use the category name bound to the name parameter in the Index method of Product controller, as illustrated in Listing 4-7. We use the controller code in Listing 4-9 to fetch the value of the category name parameter and produce the results through View. Figure 4-17 and Figure 4-18 show the rendered pages for categories Tents and Cooking Equipment.
Listing 4-8. The Index View Code That Displays the Products Filtered by Category
@model IEnumerable<EntityFrameworkRecipe3.ViewModels.ProductVM>

@{
    Layout = null;
}

<!DOCTYPE html>

<html>
<head>
    <meta name="viewport" content="width=device-width" />
    <title>Index</title>
</head>
<body>
    <table>
        <tr>
            <th>
                @Html.DisplayNameFor(model => model.Name)
            </th>
            <th>
                @Html.DisplayNameFor(model => model.CategoryName)
            </th>
            <th></th>
        </tr>

    @foreach (var item in Model) {
        <tr>
            <td>
                @Html.DisplayFor(modelItem => item.Name)
            </td>
            <td>
                @Html.DisplayFor(modelItem => item.CategoryName)
            </td>
        </tr>
    }

    </table>
</body>
</html>
Listing 4-9. The Controller Code That Populates the Model with the Product Data Filtered by Category Name
public class ProductController : Controller
    {
        //
        // GET: /Product/

        public ActionResult Index(string name)
        {
            using (var db = new ProductEntities())
                {
                    var query = from productRec in db.Products
                    join categoryRec in db.Categories
                    on productRec.CategoryId
                    equals categoryRec.CategoryId
                    where categoryRec.Name == name
                    select new
                        {
                            Name = productRec.Name,
                            CategoryName = categoryRec.Name
                        };
                            List<ProductVM> lstProduct = new List<ProductVM>();
                            foreach(var record in query)
                                {
                                    ProductVM productValue = new ProductVM();
                                    productValue.Name = record.Name;
                                    productValue.CategoryName = record.CategoryName;
                                    lstProduct.Add(productValue);
                                }
                            return View(lstProduct);
                }
        }

    }
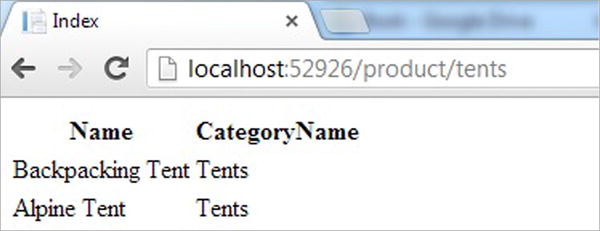
Figure 4-17. Using the route /Product/Tents, the result set is filtered to the Tents category

Figure 4-18. Using the route /Product/Cooking Equipment, the result set is filtered to the Cooking Equipment category
How It Works
In the Application_Start() event handler in Global.asax, we mapped the route /Product/{name} to the /Product/Index?name=category. The route key, category, is bound to the actual category string in the URL. In the Product controller, we used the name route key in a MapRoute to filter the result set to filter those products in the given category.