Xcode is a comprehensive toolset for the development, management, and maintenance of software products that run on the Apple OS X and iOS platforms. It includes an IDE, compiler, debugger, and numerous other tools. Xcode also bundles the OS X and iOS Software Development Kits (SDKs) that comprise the Cocoa and Cocoa Touch frameworks. You have been using Xcode to develop and run the example applications presented throughout this book, so by now, you’re already familiar with several of its basic features. In this appendix, you are going to “look under the hood” to explore some of Xcode’s key features in depth. Specifically, you will examine the key concepts that form the foundation of Xcode and, by doing this, become more familiar with some of its key tools.
Basic Concepts
From a user perspective, Xcode is organized around several basic concepts: projects, workspaces, targets, schemes, and actions. In the next few paragraphs, you will learn more about these concepts and how they are used within Xcode.
Targets
A target is a fundamental concept in Xcode. It consists of a collection of instructions for building a software product. A target is comprised of rules and settings for how to build a product, and defines a set of build phases, the sequence of steps used to perform the actual software build.
Each target takes a collection of inputs (source files, resources, build instructions, etc.) and produces a product as its output. The product can be an application, software library, and so forth. An Xcode project can have multiple targets, each of which can have its own set of instructions for building a software product.
A target can have dependencies on other targets (e.g., dependent targets). Xcode automatically builds dependent targets when the selected target is built. Xcode provides capabilities for managing targets (create, update, delete, managing dependencies between them) and managing the files of a target (add, delete, setting role of header files).
Build Phases
Build phases define the stages by which your product is built. Three of these phases—Compile Sources, Link Binary With Libraries, and Copy Bundle Resources—are required, and others can be added as necessary. As build phases define how the target will be built, changing the build phases changes the build process.
Build Settings
Build settings define what to do at various stages of the build process, and hence provide a means of customizing this process. There are actually multiple lists of build setting values, each of which is called a build configuration. A build configuration is a named collection of build settings that are used to build a target’s product in a particular way. They provide a mechanism for building different versions of the same target. You can also create build configuration files. These enable you to easily share a set of build setting definitions across targets, projects, and among developers.
Build Configurations
A project build configuration is used to build a software product. It contains build-setting definitions. These can be embedded in an Xcode project file or stored in a separate configuration settings file. When you create a project, Xcode provides two default embedded build configurations: Debug and Release, which differ primarily in the inclusion of debug information and in the degree to which the build is optimized. The Debug configuration is typically used throughout the development process, whereas the Release configuration is used for late-stage testing, when you want to check performance on a device. Several of the build settings for the Debug configuration are shown in Listing B-1.
Listing B-1. Debug Build Configuration Settings
ONLY_ACTIVE_ARCH=YES
CONFIGURATION_BUILD_DIR=build/Debug
COPY_PHASE_STRIP=NO
GCC_OPTIMIZATION_LEVEL=0
GCC_PREPROCESSOR_DEFINITIONS=DEBUG=1
A configuration settings file is a plain text file that specifies a list of build-setting definitions, one per line. If you are creating a new build configuration from an existing one, it must be based only on a configuration file that is in your project, not an external file.
Build Rules
Build rules provide instructions for processing files on a per-target basis. Xcode provides a set of default build rules, and you can add your own custom build rules to perform custom processing for specific file types.
Build rules specify how particular types of files are processed and which tool is used to process files during build phases. Each build rule consists of a condition and an action. The condition, which usually specifies a file type, determines whether a source file is processed with the associated action.
Xcode provides default build rules that process a variety of file types, including C-based files (such as Objective-C files) and assembly files. You can add custom build rules to process other types of files to each target. These are added in the Build Rules pane of the editor window, as shown in Figure B-1. Build rules are processed in the order they appear in the Rules pane.
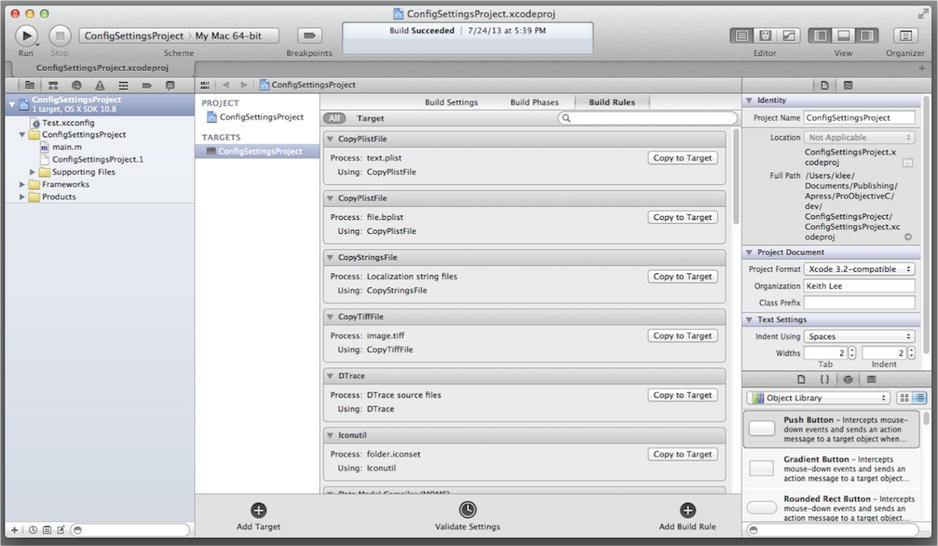
Figure B-1. The Build Rules editing pane
Creating a Configuration Settings File
In this example, you will use Xcode to create a plain-text build configuration settings file for a project.
- In Xcode, create a new project by selecting New
 Project … from the Xcode File menu.
 - In the New Project Assistant pane, create a command-line application.
- In the Project Options window specify ConfigSettingsProject for the Product Name, choose Foundation for the Project Type, and select ARC memory management by selecting the Use Automatic Reference Counting check box.
- Specify the location in your file system where you want the project to be created (if necessary select New Folder and enter the name and location for the folder), uncheck the Source Control check box, and then click the Create button.
- Now you will create the configuration settings file. Select New File … from the Xcode File menu and select the Configuration Settings File template from the Other option under OS X (as shown in Figure B-2).
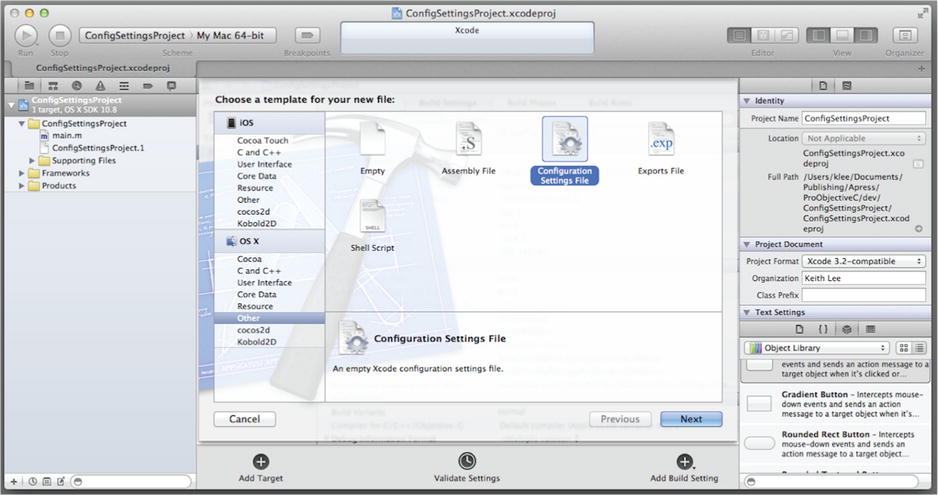
Figure B-2. Selecting a configuration settings file
- Name the file Test, select the ConfigSettingsProject folder for the files location and the ConfigSettingsProject project as the target, and then click the Create button.
- This creates an empty configuration settings file named Test.xconfig. Now update this file to support code coverage during testing. This is accomplished by setting the configuration flags to Enable test coverage and Instrument program flow.
GCC_GENERATE_TEST_COVERAGE_FILES=YES
GCC_INSTRUMENT_PROGRAM_FLOW_ARCS=YES - In Xcode, select and update the Test.xconfig file, as shown in Figure B-3.
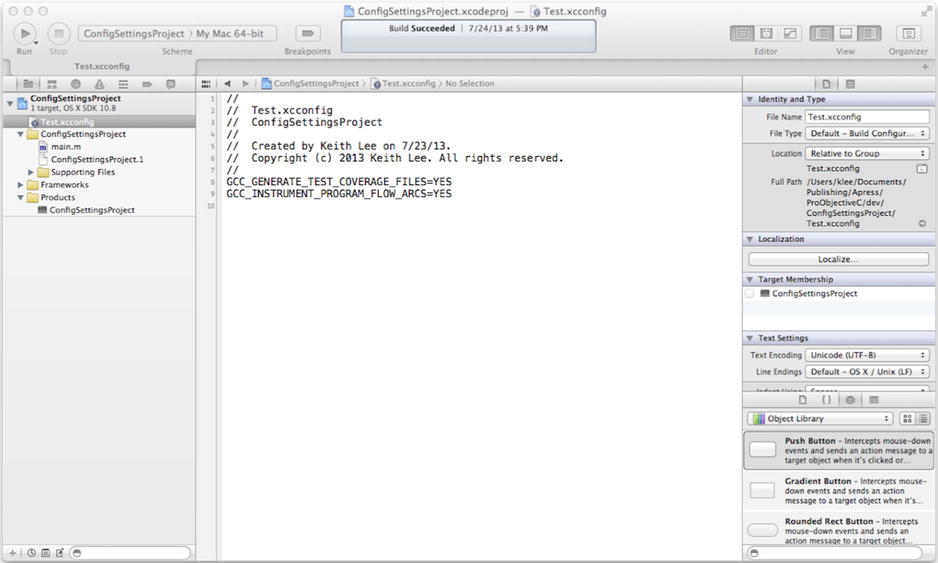
Figure B-3. Edit the configuration settings file to support code coverage
Now you need to add the settings from the file to the current build configuration for the project.
- In the Xcode project navigator, select the ConfigSettingsProject, and then the ConfigSettingsProject in the Project Editor, and finally the Info tab in the Editor window. Note that the Debug configuration (under Configurations in the Editor window) has no configurations set.
- Click the arrow next to Debug to display the ConfigSettingsProject, and then under the configuration file drop-down list select Test (as shown in Figure B-4) to update the Debug configuration settings with the values in the Test.xconfig file.
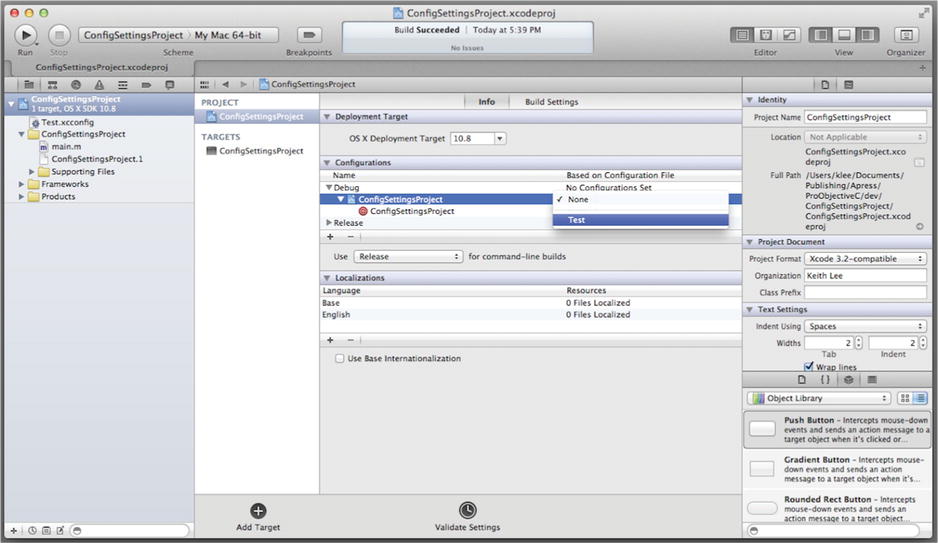
Figure B-4. Assigning configuration file settings to build configuration
The settings for the debug configuration have now been updated. You can check this by viewing the updated build settings for test coverage (see Figure B-5).

Figure B-5. Updated test coverage build settings
The Xcode Build Setting Reference provides a comprehensive reference for the various build settings available for Xcode.
Projects
An Xcode project is comprised of the artifacts for one or more software products, along with the mechanisms used to build these products and perform actions on them. As such, it contains not only all of the elements used to build a software product(s), but also maintains the relationships between these elements. Each Xcode project consists of the following items:
- Project content. The project content includes source files, resources, property list settings files, a precompiled header file, localization files, etc.).
- Test content. The test content consists of automated test source files and any required test resources.
- Xcode project file. The Xcode project file is actually a subdirectory. It contains various files and directories related to the project that it is a part of. The project file artifacts provide the infrastructure required to build a product and perform the selected actions on it. An Xcode project file is named according to the convention ProjectName.xcodeproj, where ProjectName is the name of the Xcode project. The files (and directories) within an Xcode project file contain the following information:
- References to project and test content (source code, libraries and frameworks (both internal and external), resource files, storyboard and nib files).
- Group folders used to organize source files.
- Targets, where each target includes a reference to one product build by the project, references to the source file(s) needed to build that product, and the build configurations that can be used to build that product).
- Project-level build configurations.
- Executable environments.
As an example, an Xcode project named GreetingProject would be comprised of the following files and directories:
- A subdirectory named GreetingProject, in which all of the project content files are stored.
- A subdirectory named GreetingProjectTests, in which all of the test content files are stored.
- An Xcode project file named GreetingProject.xcodeproj, which contains the Xcode project file information listed earlier.
An Xcode project can be standalone or included in a workspace. You will learn about workspaces later in this appendix.
Executable Environment
An executable environment defines the configuration used to run a software product from Xcode. The configuration specifies the executable to launch when running/debugging the product, command-line arguments to be passed to the executable (if any), along with any environment variables to be set when running the program. The executable environment settings are edited via a project scheme. You will learn about schemes a little later in this appendix.
Workspaces
Workspaces are the Xcode mechanism for supporting and organizing multiple projects. A workspace groups projects and other related documents, thereby facilitating multi-product development. You can share code between projects without having to manually copy and paste project dependencies (e.g., libraries, along with their corresponding public header files), yet still manage each project individually. An Xcode workspace can discover implicit dependencies between projects, and thus resolve these dependencies automatically during build. In addition, workspaces also enable you to more easily create and use external (i.e., third-party) software libraries.
Each workspace is, in fact, an Xcode document composed of metadata that can contain any number of Xcode projects, plus any other files you want to include. In addition to organizing all the files in each Xcode project, a workspace provides implicit and explicit relationships among the included projects and their targets. The workspace document contains pointers to the included projects and other files, but no other data. A project can belong to more than one workspace.
You can include a project in a workspace by simply dragging the project file into the workspace (or by using an Xcode command to add files to a workspace) and it becomes available for use by all other projects in the workspace. However, projects in a workspace are still managed separately, and builds of software products within a workspace will automatically resolve dependencies between projects (and recompile these projects as necessary if their contents have been updated).
By default, all the Xcode projects in a workspace are built in the same directory, referred to as the workspace build directory. Each workspace has its own build directory. Because all of the files in all of the projects in a workspace are in the same build directory, all of these files are visible to each project. Therefore, if two or more projects use the same libraries, you don’t need to copy them into each project folder separately.
Xcode examines the files in the build directory to discover implicit dependencies. For example, if one project included in a workspace builds a library that is linked against another project in the same workspace, Xcode automatically builds the library before building the other project, even if the build configuration does not make this dependency explicit. You can override such implicit dependencies with explicit build settings, if necessary. For explicit dependencies, you must create project references.
Each project in a workspace continues to have its own independent identity. To work on a project without affecting—or being affected by—the other projects in the workspace, you can open the project without opening the workspace, or you can add the project to another workspace. Because a project can belong to more than one workspace, you can work on your projects in any number of combinations without having to reconfigure any of the projects or workspaces.
You can use the workspace’s default build directory or you can specify one. If a project specifies a build directory, the build directory of whatever workspace the project is in at the time you build the project overrides that directory.
Adding an Existing Project to a Workspace
In Xcode, perform the following steps to add an existing project to a workspace:
- In the project navigator, Control-click in the empty space below the projects in the list. In the pop-up menu that follows, select Add Files to “<WorkspaceName>”…, where WorkspaceName is the name of the workspace.
- Navigate to the folder containing the corresponding Xcode project file (it ends with .xcodeproj).
- Select the project file and click Add.
The project is now part of the workspace, and thus its contents can be shared with other projects in the workspace.
Using Static Libraries in a Workspace
Now you will learn how to incorporate static libraries into a workspace. Briefly, the steps you will perform are as follows:
- Create workspace.
- Create static library.
- Create app.
Note The following example program was developed using Xcode version 4.6.3. Xcode version 4.5 or greater is required for the configuration steps documented in this example (particularly those used to share static libraries) to work properly.
Creating a Workspace
First. you will create a workspace that you will use for the library and app.
- In Xcode, create a new workspace by selecting New Workspace … from the Xcode File menu.
- Save the workspace as HelloSpace in a new folder named Hello. As shown in Figure B-6, a new workspace named HelloSpace.xcworkspace is displayed in the Xcode window.
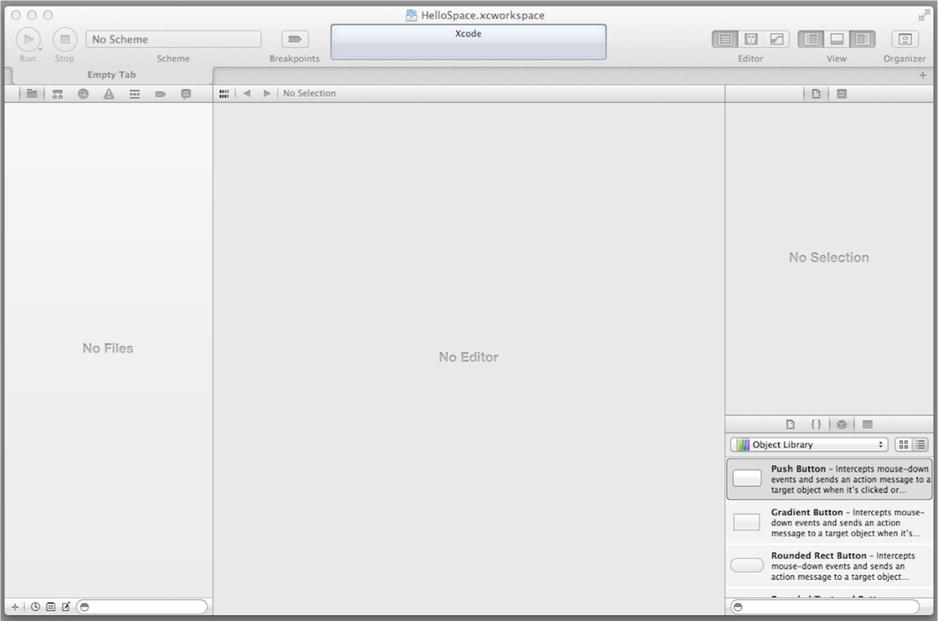
Figure B-6. HelloSpace workspace
As you learned earlier, a workspace builds its projects in a Derived Data directory. The location for this directory must be identical at the project level and as specified in the Xcode preferences pane.
- In Xcode, open the preferences pane by selecting Preferences … from the Xcode menu. In the preferences pane, select the Location tab, and then select Default from the Derived Data: drop-down list (as shown in Figure B-7).
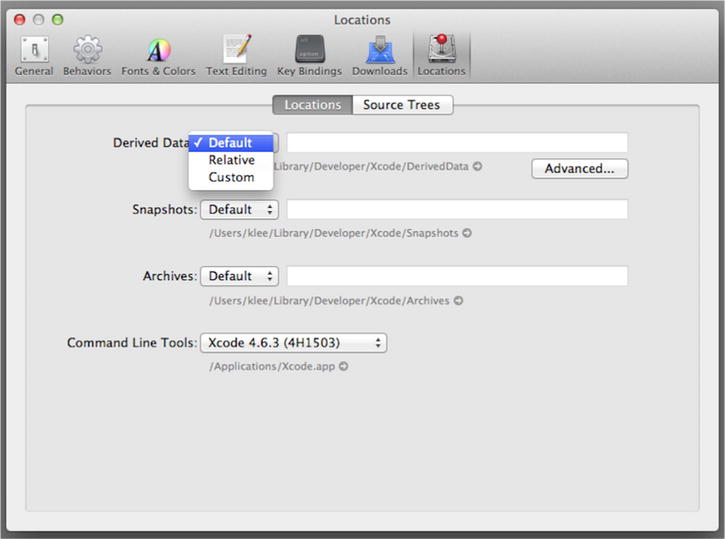
Figure B-7. Xcode Preferences Derived Data Location
OK, now that the workspace is properly configured, you will create projects.
Creating a Static Library
Now you will create a static library.
- In Xcode, create a new project by selecting New Project … from the Xcode File menu.
- In the New Project Assistant pane, create a Cocoa library by first selecting Framework & Library (under the Mac OS X section), and then selecting the Cocoa Library icon in the upper-right pane (as shown in Figure B-8).
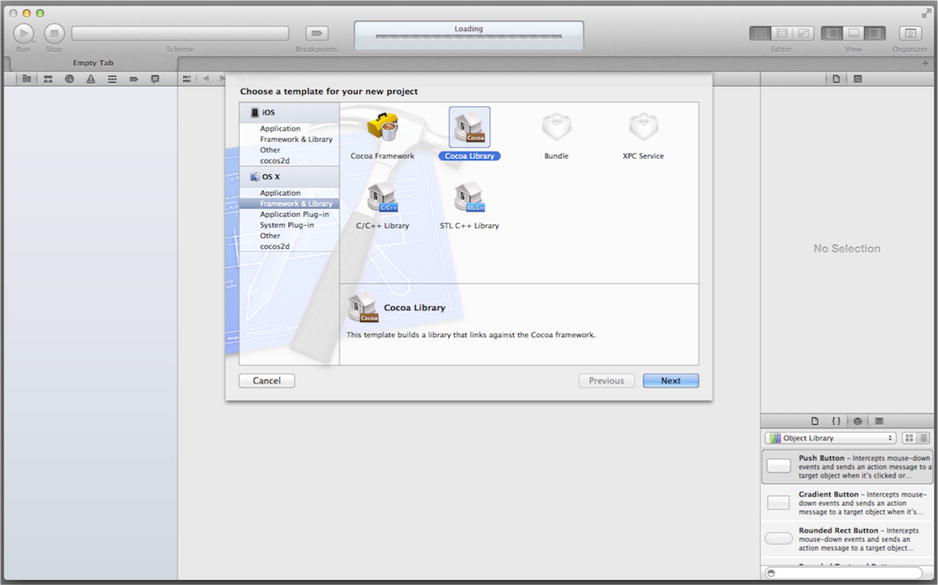
Figure B-8. Creating a Cocoa Library
- The Project Options window is then displayed. Specify the Product Name as HelloLib, the Type drop-down list as Static (to create a static library), and select the check box to specify that the project will use Automatic Reference Counting for memory management. Do not select the check box for Include Unit Tests, and accept the defaults for the rest of the options.
- Now click Next to bring up the Project Options window. In this window, specify Hello for location of the project, select HelloSpace in the Add to: drop-down list (to add this library to the HelloSpace workspace), and then click the Create button.
- In the Xcode project navigator, observe that an empty HelloLib class is created. Select HelloLib.h and update the class interface as shown in Listing B-2.
Listing B-2. HelloLib Class Interface
#import <Foundation/Foundation.h>

@interface HelloLib : NSObject

- (NSString *) greeting:(NSString *)salutation;

@end - The interface declares a single method named greeting: that takes an NSString object as its argument. Now select HelloLib.m and update the class implementation as shown in Listing B-3.
Listing B-3. HelloLib Class Implementation
#import "HelloLib.h"

@implementation HelloLib

- (NSString *) greeting:(NSString *)salutation
{
  return [NSString stringWithFormat:@"%@, World!", salutation];
}

@end
The method returns a greeting that includes the input parameter. This completes the implementation of the static library. Now you need to make the header publicly available to users of the library.
- In the project editor pane of the workspace window (under Targets), select the HelloLib target, and then the Build Phases tab.
- Delete the Copy Headers phase (if provided), and then add the Copy Files build phase using the Add Build Phase icon (as shown in Figure B-9).

Figure B-9. Adding the Copy Files build phase
- Now disclose for the Copy Files phase by clicking the neighboring triangle. You will see a location for adding files at the bottom of the window (it’s labeled Add files here). From the project navigator, drag a copy of the HelloLib.h header into this area and release it. This will make this header file available to clients.
- In the Copy Files area, set the Subpath to include/${PRODUCT_NAME}, and select Products Directory in the Destination drop-down list. The workspace window should now look as shown in Figure B-10.
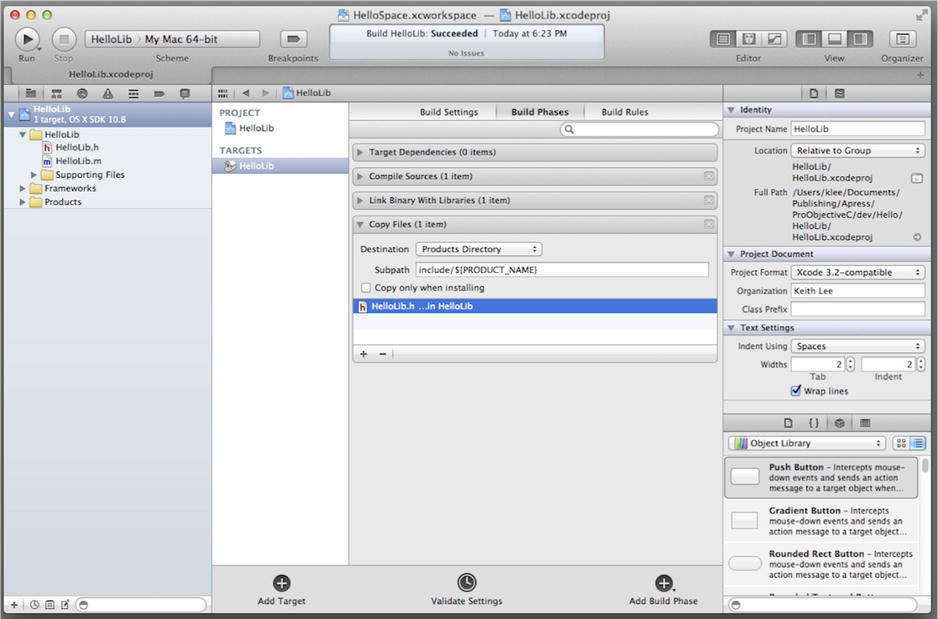
Figure B-10. Updating the Copy Files build phase
Note The subpath setting will copy files into a folder named after the library (i.e., HelloLib), inside a folder named include, inside the workspace built products directory. This setting enables you to organize header files for different libraries by library name. The include folder inside a build products directory is in the default header search path for applications.
- Finally, you should share the library, thereby making it available to any project using the workspace. In Xcode, select Scheme Manage Schemes … from the Xcode Product menu. The Manage Schemes dialog will be displayed. Then locate the HelloLib scheme in this dialog and click the Shared check box.
- Now select the Build Settings tab. Use the Search tool to find the Skip Install setting and set that to Yes; this prevents Xcode from creating a multiapplication bundle when projects that use this library are archived. This setting must be made for both the HelloLib project and HelloLib target.
With those steps completed, your static library is properly configured. Now let’s create the app.
Creating the App
Now you will create the application that uses the static library.
- In Xcode, create a new project by selecting New Project … from the Xcode File menu.
- In the New Project Assistant pane, create a command-line application by selecting the Command Line Tool icon (from the Application selection under OS X template groups).
- In the Project Options window, specify HelloApp for the Product Name, choose Foundation for the Project Type, and select ARC memory management by checking the Use Automatic Reference Counting check box. Specify the location in your file system where you want the project to be created (if necessary, select New Folder and enter the name and location for the folder) and uncheck the Source Control check box.
- Finally, select HelloSpace in the Add to: and Group: drop-down lists (to add this library to the HelloSpace workspace), and then click the Create button.
The first thing you’ll do is link the app against the static library.
- Select the HelloApp project in the project navigator, and then select the HelloApp target in the project editor.
- Select the Build Phases tab, disclose the Link Binaries With Libraries phase, and click the plus (+) button.
- In the window, choose libHelloLib.a and click Add to add the library.
Next you’ll update build configuration settings to link the library:
- Select the Build Settings tab.
- Find the Other Linker Flags build setting (using the search tool) and add the flag
-ObjC to this setting’s value, if not present (as shown in Figure B-11).
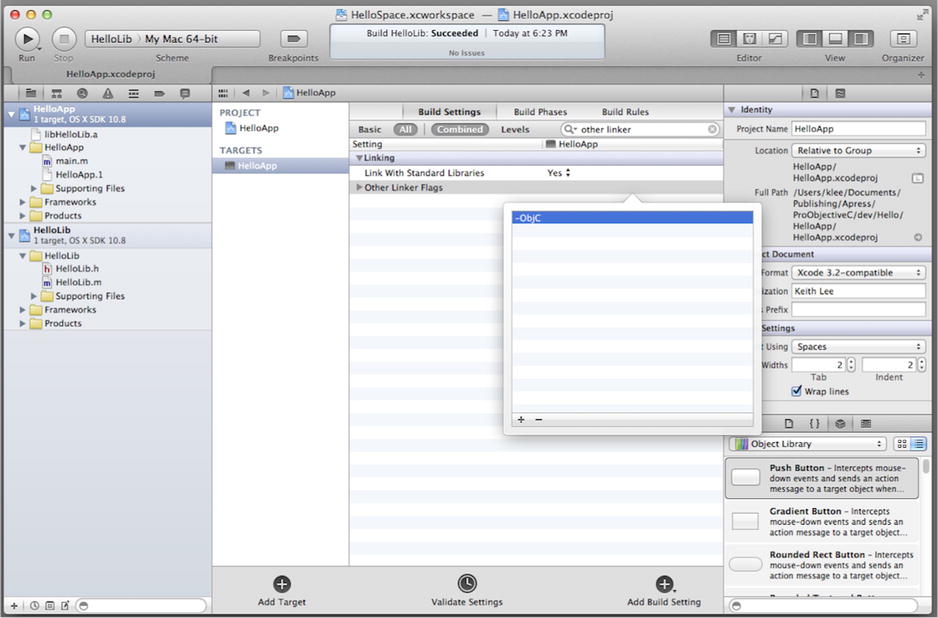
Figure B-11. Updating the Copy Files build phase
The -ObjC flag will tell the linker to link all Objective-C classes and categories from static libraries into your application, even if the linker can’t tell that they are used (e.g., categories and/or classes added dynamically).
Now you need to import the header file for the static library.
The build products for all the projects in a workspace are located in the workspace build directory. Earlier, you copied the HelloLib.h header file into the Products Directory include directory. This directory is automatically included in the search path for all projects in the workspace. Because you specified a subdirectory named after the PRODUCT_NAME build setting (e.g., include/${PRODUCT_NAME}) in the subpath, the import statement should include that directory, for example:
#import "HelloLib/HelloLib.h"
OK, now you will add the code to the app to demonstrate use of the static library. In the project navigator, select the main.m file for the HelloApp and make the updates shown in Listing B-4.
Listing B-4. HelloApp main() Function
#import <Foundation/Foundation.h>
#import "HelloLib/HelloLib.h"

int main(int argc, const char * argv[])
{
  @autoreleasepool
  {
    HelloLib *hello = [HelloLib new];
    NSLog(@"%@", [hello greeting:@"Hello"]);
  }
  return 0;
}
The header file for the HelloLib static library is imported with the statement.
#import "HelloLib/HelloLib.h"
The main() function creates a HelloLib instance and invokes its greeting: method. When you compile and run the program, you should observe the messages in the output pane shown in Figure B-12.
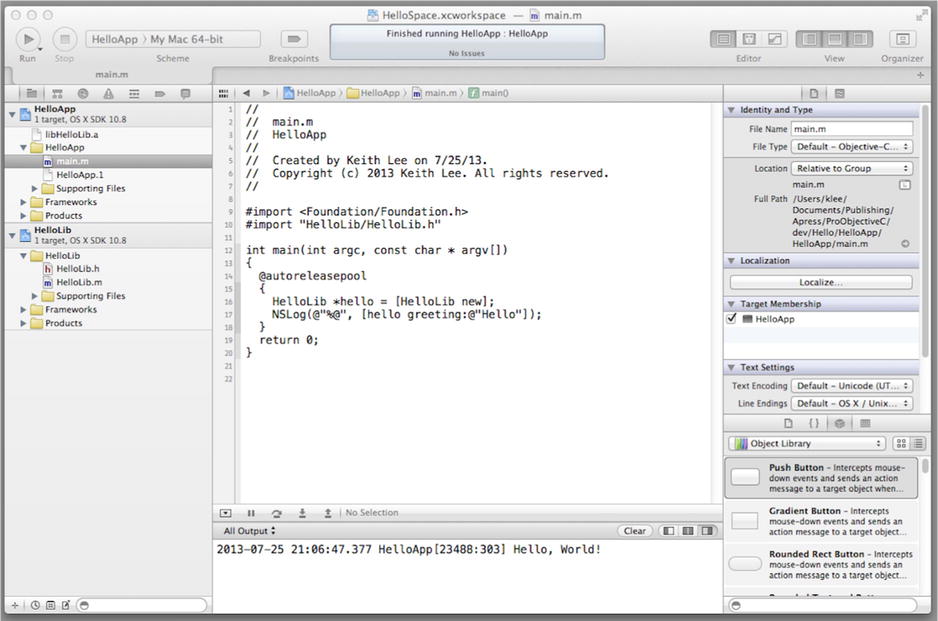
Figure B-12. HelloApp program output
Cool. This demonstrates how to incorporate static libraries into your projects using Xcode workspaces. The same techniques apply for other reusable software libraries (dynamic libraries, frameworks, bundles, etc.).
Schemes
An Xcode scheme groups one or more targets with a build configuration and an environment execution configuration, with respect to the purpose (i.e., action) for which you are building the product.
You can have as many schemes as you want, but only one can be active at a time. You can specify whether a scheme should be stored in a project—in which case it’s available in every workspace that includes that project, or in the workspace—in which case it’s available only in that workspace. When you select an active scheme, you also select a run destination (that is, the architecture of the hardware for which the products are built).
To edit a scheme, select Edit Scheme…from the Scheme toolbar menu in the Xcode workspace window, as shown in Figure B-13.
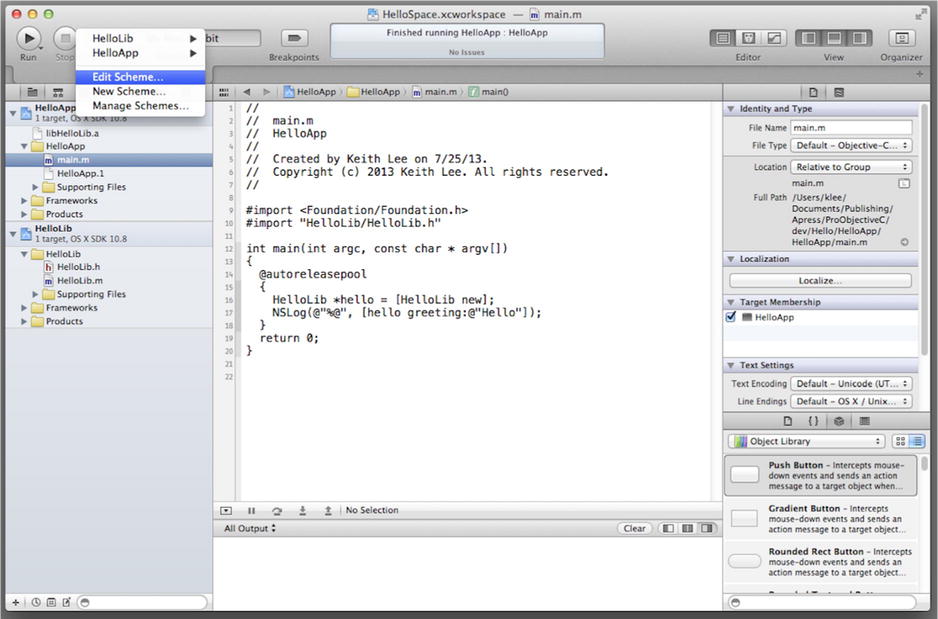
Figure B-13. Selecting Edit Scheme using the scheme toolbar menu
The Scheme pop-up dialog allows you to specify many settings that affect product build and the actions performed on a product. As shown in Figure B-14, the left column lists actions that correspond to commands in the Product menu: Run, Test, Profile, Analyze, and Archive. The Build option allows you to select the targets to build for each of these actions.
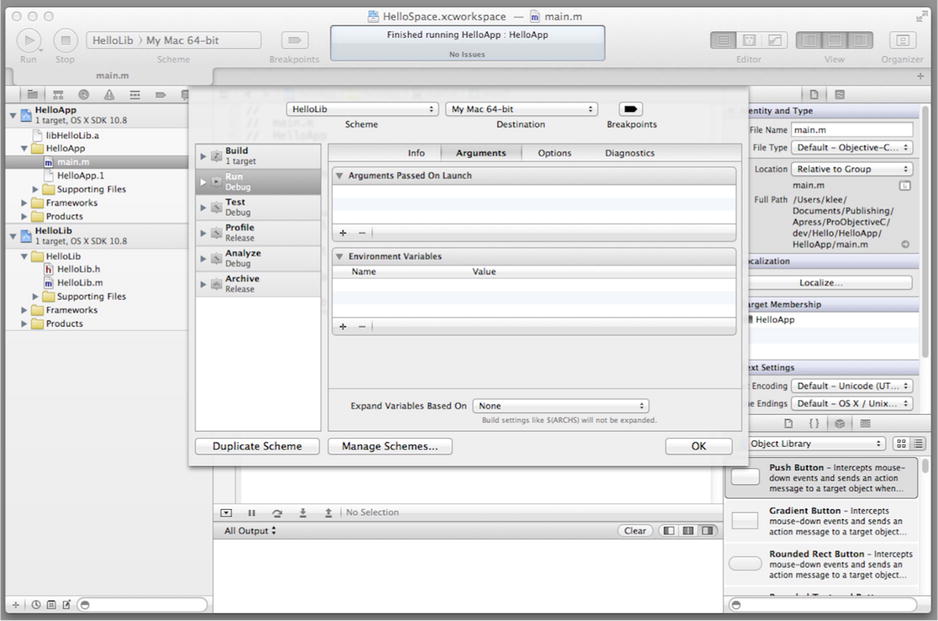
Figure B-14. Scheme pop-up dialog
As shown in Figure B-14, the tabs at the top of the scheme dialog vary according to the action performed on the product. They enable you to configure the build and the execution environment appropriately.
In Xcode, an action builds a target (thereby creating a product) and processes the product accordingly. Xcode defines the Build, Run, Test, Profile, Analyze, and Archive actions.
- The Build actionbuilds one or more targets, creating the associated products. This step is performed automatically by all the other actions.
- The Run action builds and then runs the product in the debugger. This is the default action.
- The Test action builds and runs the unit test features of a project. If the project doesn’t include a unit-testing target, this action does nothing.
- The Profile actionbuilds the product, launches the selected Instruments profiling and testing application, and then loads the product into it. Instruments can be used to perform a variety of profiling and testing activities on the product, including performance analysis, stress testing, memory usage, leak detection, and general troubleshooting.
- The Analyze action builds the product and then runs the static code analyzer on it.
- Finally, the Archive action builds and packages the product so that it is ready for distribution, adding it to the archive list in the Xcode Organizer.
In this appendix, you learned about some of key features of Xcode and how they can be used to make you a more efficient and productive programmer. You now have a good understanding of Xcode projects, workspaces, targets, schemes, and actions, and how they can be used. Apple provides a complete set of reference documents that will be of great assistance for more complex software development scenarios and project configurations. The following lists several of these documents.
- Xcode User Guide
- Xcode Release Notes
- Xcode Build Setting Reference
- Instruments User Guide
- Instruments User Reference
- App Distribution Guide