
In computer science, concurrent processing refers to logical control flows (implemented in software) whose execution overlaps in time. Concurrent processing can occur at many different levels of a computer system, from the hardware level up to and including the application layer. From a programmer perspective, application-level concurrency enables you to develop applications that perform numerous operations in parallel, including responding to asynchronous events, accessing I/O devices, servicing network requests, parallel computing, and so forth.
The Objective-C platform provides a variety of language extensions, APIs, and operating system services that are designed to enable you to safely and efficiently implement concurrent programming. In this chapter, you will explore this technology in depth and apply what you learn with several example programs.
Concurrent Programming Fundamentals
Concurrent programming is a broad field with many concepts and ideas that have various interpretations. Therefore, it’s important to understand some basic terminology, along with identifying some of the benefits and design concepts for concurrent programming.
Let’s begin by differentiating concurrent from sequential processing. Basically, sequential processing refers to logical control flows that execute sequentially (i.e., one after the other), as shown in Figure 17-1.
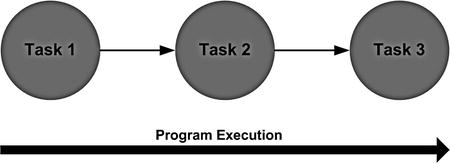
Figure 17-1. Sequential processing of control flows
This contrasts with the concurrent processing, which refers to logical control flows that may execute in parallel, as depicted in Figure 17-2.
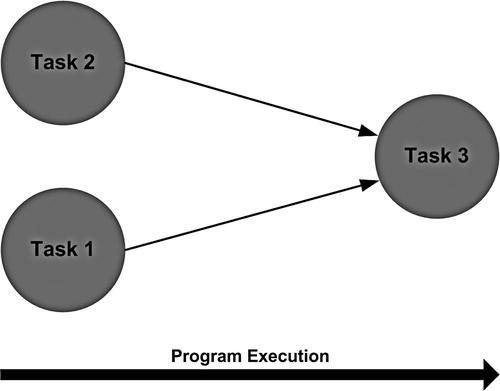
Figure 17-2. Concurrent processing of control flows
So, concurrent computing implies the simultaneous execution of multiple tasks. But in fact, whether a program designed to take advantage of concurrency actually executes multiple tasks in parallel is a function of the computer system on which it runs. This brings up another distinction that should be pointed out, and that’s the difference between concurrent and parallel computing. Broadly speaking, concurrent computing is a function of design, whereas parallel computing is a function of hardware.
Parallel computing refers to software that executes multiple operations or tasks simultaneously. The ability to perform parallel computing (i.e., parallel processing) is directly a function of the computer system hardware. For example, most modern computers have multiple cores (CPUs) and/or multiple processors. This enables them to simultaneously execute multiple instructions. On the other hand, concurrent computing refers to software that is designed and implemented to be able to perform multiple operations or tasks simultaneously. If your software is designed and implemented using concurrent programming principles and mechanisms, then some/all of its component parts may execute concurrently depending upon the capabilities of the underlying computer system. Therefore, in order to realize the benefits of concurrency, you have to design and implement your software appropriately, and execute it on hardware that supports parallel processing.
Finally, before you go any further, it’s important for you to understand the difference between concurrent and asynchronous programming. As I defined earlier, concurrent processing refers to multiple logical control flows that may execute in parallel. Asynchronous processing, on the other hand, is effectively a mechanism for the asynchronous (i.e., nonblocking) invocation of methods/functions. In other words, the caller invokes the method and can continue processing while the method is being executed. This approach can improve application responsiveness, system throughput, and so forth, while abstracting the underlying implementation mechanisms. Asynchronous processing can be implemented using a variety of devices, including concurrent programming APIs and services.
Application-level concurrent processing enables you to develop programs that can perform multiple operations in parallel. However, these features do not come for free; concurrency must be factored into both software design and implementation, given the capabilities of the underlying computing system. Now this may sound like a burden when it comes to developing programs, however, the motivations for concurrent processing are numerous, some of which include the following:
- Increased application throughput. As concurrent processing enables the parallel execution of tasks, overall application throughput, defined as the number of tasks that an application can execute over time, is increased compared to sequential processing.
- Improved system utilization. The execution of multiple tasks in parallel enables system resources to be more consistently and efficiently utilized.
- Improved overall application responsiveness. Concurrent execution of tasks enables other tasks to continue running if one is waiting (for input, etc.) Thus overall application idle time decreases and application responsiveness is increased.
- Better mapping to the problem domain. Certain problems, particularly in the scientific, mathematical, and artificial intelligence fields, can be modeled as a collection of simultaneously executing tasks. This makes solution implementation (in code) with concurrent programming the more natural, preferred approach.
Implementing Concurrency
OK, so now that you are (hopefully) convinced of the benefits of concurrent processing, the next question is: How do you do it? Well, there are numerous ways to implement concurrency in computer systems, from specialized programming languages up to and including parallelized computer systems. Some of the more common approaches include the following:
- Distributed computing: In this form of concurrent processing, a number of tasks are distributed to and executed on multiple, networked computers that communicate by message passing.
- Parallel programming: In this form of concurrent processing, a number of calculations are performed simultaneously, typically on multicore CPUs and programmable GPUs. This approach utilizes parallel computing to improve performance and deliver features made possible by compute-intensive algorithms.
- Multiple processes: In this form of concurrent processing a number of tasks is distributed to multiple software processes on a single computer for concurrent execution. Each process has separate resources and a separate address space, managed by the operating system.
- Multiple threads: Also known as multithreading, in this approach tasks are mapped to multiple threads, which are configured to execute concurrently. The threads execute within the context of a single program (i.e., process) and thus share its resources (address space, memory, etc.).
Note The term thread refers to a sequence of instructions that can be executed independently. A thread is sometimes referred to as a lightweight process, and multiple threads may share an address space. A process is a running computer program with its own address space and allocation of system resources. A process may have multiple threads that execute sequentially, concurrently, or a combination of the two. A task refers to a logical unit of work. A task may be executed by a thread or a process.
Each of these approaches has its specific applications and usage scenarios. Whereas OS X and iOS both support (to different extents) each of the concurrent computing approaches presented earlier, the concurrent programming mechanisms that you will examine in this chapter are all based on the multithreading approach, so that’s what you’ll be exploring here.
Challenges with Concurrency
For all of its benefits, concurrent programming is difficult to implement correctly. This is primarily due to the challenges of synchronizing operations and sharing information between concurrently executing threads of control (i.e., logical control flows). Synchronization is required to control the relative order in which operations occur in different threads, while information sharing enables communication between threads. In addition, the overall program execution order is nondeterministic due to the simultaneous execution of multiple threads of control. Thus, different executions of the same program may produce different results. As a result, bugs in concurrent programs may be difficult to detect and reproduce. Furthermore, the complexity introduced by multiple threads and their potential interactions makes these programs much more difficult to analyze and reason.
There are a variety of mechanisms used to address these challenges; two of the more common are shared memory and message passing. The shared-memory programming model implies shared state—that is, some of the program data is accessible to multiple threads. As the threads of a program utilize a common address space, shared memory is a natural mechanism for information sharing. It’s also fast and efficient.
The shared-memory model requires a mechanism to coordinate shared data access between the threads. This is commonly implemented using a synchronization mechanism; for example, a lock or a condition. A lock is a mechanism used to control access to data or a resource shared by multiple threads. A thread acquires a lock to a shared resource, performs operations on the resource, and then releases the lock, thereby enabling other threads to access the resource. A condition variable is a synchronization mechanism that causes a thread to wait until a specified condition occurs. Condition variables are commonly implemented using locks.
Locks are one of the most common mechanisms used for controlling access to shared data. They enforce a mutual exclusion policy, thereby preventing concurrent access to the protected data/resource. Unfortunately, using locks to coordinate access to shared data introduces the possibility of deadlock, live-lock, or resource starvation—any of which can halt program execution. A deadlock is a situation in which two or more threads are each blocked, waiting to acquire a resource locked by another, thus preventing the blocked threads from finishing. An example of a deadlock condition is a circular wait. Figure 17-3 illustrates a deadlock condition that can occur between concurrent threads accessing shared data.
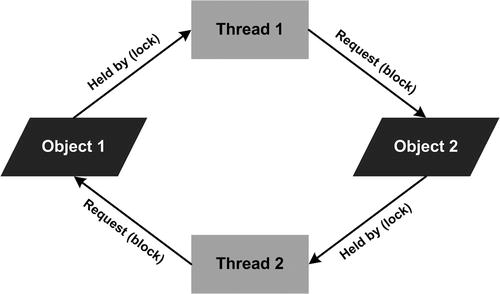
Figure 17-3. A deadlock condition between two threads accessing shared data
A live-lock is a situation where a thread is unable to progress because it is responding to the action of another thread(s). A live-locked thread is not blocked. It is spending all of its computing time responding to other threads to resume normal execution.
Resource starvation is a condition where a thread is not able to gain regular access to a shared resource, typically because it is being used by other threads and thus cannot execute as intended. This can happen if one or more other threads hold onto shared resources for an inordinate amount of time. In effect, you can look at live-lock as a form of resource starvation.
As you develop larger and more complex concurrent programs that use shared data, the potential for your code to cause a deadlock condition increases. The following are some of the most common recommendations for preventing these conditions:
- Implement a total ordering on lock acquisition. Make sure that locks are acquired and released in a fixed order. This approach requires detailed knowledge of the threaded code, and may not even be feasible for third-party software.
- Prevent hold and wait conditions. Acquire all locks at once, atomically. This requires that any time any thread grabs a lock, it first acquires the global prevention lock. This approach eliminates the possibility of hold-and-wait scenarios, but potentially decreases concurrency and also requires detailed knowledge of the threaded code.
- Provide preemption. Use locks that provide a trylock or similar mechanism to grab a lock, if available, or return an appropriate result if not. This approach has the potential of causing livelock, and still requires detailed knowledge of how the code is using locks.
- Provide timeouts on waits. Use locks that provide a timeout feature, thereby preventing indefinite waits on a lock.
In the message passing, model state is not shared; instead, the threads communicate by exchanging messages. This approach enables threads to both synchronize and communicate information through message exchanges. Message passing avoids the issues surrounding mutual exclusion and it maps naturally to multiple core, multiple processor systems. Message passing can be used to perform both synchronous and asynchronous communication. With synchronous message passing, the sender and receiver are directly linked; the sender and receiver block while the message exchange is performed. Asynchronous message passing utilizes queues for message transfer, as shown in Figure 17-4.

Figure 17-4. Message passing using queues
Messages are not sent directly between threads, but rather are exchanged through message queues. Hence, the sender and receiver are decoupled and the sender does not block when it posts a message to the queue. Asynchronous message passing can be used to implement concurrent programming. In fact, the next section will cover several frameworks that do just that.
Concurrent Programming with Objective-C
Now that you understand some of the key issues regarding concurrent programming, you can begin to explore the mechanisms available to implement concurrent programming in Objective-C. This ranges from language features to APIs and system services, and includes the following:
- Language features: The Objective-C language includes several language features to support concurrent programming. The @synchronized directive is used to create locks in Objective-C code. Thread-safe access to Objective-C properties can be specified declaratively using the atomic property qualifier.
- Message passing: The Foundation Framework NSObject class includes several methods that deliver messages to other threads. These methods queue the messages on the run loop of the target thread and can be performed synchronously or asynchronously.
- Threads: The Foundation Framework provides a complete set of APIs for directly creating and managing threads. It also includes a set of Foundation Framework APIs for performing synchronized access to data shared by multiple threads.
- Operation queues: These are Objective-C based message-passing mechanisms that utilize an asynchronous design approach to perform concurrent programming.
- Dispatch queues: These are a C-based set of language features and runtime services used to perform tasks asynchronously and concurrently.
Language Features
The @synchronized directive provides a simple mechanism for creating locks in Objective-C code, thereby enabling concurrent threads to synchronize access to shared state. The syntax for using this directive in your code is shown in Listing 17-1.
Listing 17-1. Syntax for the @synchronized Directive
@synchronized(uniqueObj)
{
  // Critical section - code protected by the directive
}
Listing 17-1 shows that the @synchronized directive is followed by a unique identifier in parentheses and a protected block of code surrounded by braces. The unique identifier is an object used to distinguish the protected block. If multiple threads attempt to access this critical section with the same unique identifier, one of the threads would acquire the lock first and the other(s) would block until the first thread finished executing the critical section.
Note that the @synchronized block implicitly adds an exception handler to the protected code. This handler automatically releases the lock in the event that an exception is thrown. Hence, you must enable Objective-C exception handling in your code in order to use this directive.
The Objective-C language also includes a feature that is intended to provide atomic access to properties. The atomic property qualifier is an Objective-C language feature that is designed to provide atomic access to a property, even when its accessor methods are called concurrently from different threads. Atomic means that a property’s accessor methods always set/get a complete (consistent) value, regardless of whether the property is being accessed concurrently. The following statement declares an atomic, read-write property named greeting.
@property (atomic, readwrite) NSString *greeting;
By default, an Objective-C property is atomic, hence the use of the atomic keyword in the preceding property declaration is not necessary.
Note that the atomic property qualifier provides atomic access for a property, but not thread safety. Listing 17-2 depicts a class named Person whose interface declares atomic properties named firstName and lastName.
Listing 17-2. Person Class Atomic Properties
@interface Person : NSObject
@property (readwrite) NSString *firstName;
@property (readwrite) NSString *lastName;
@end
Although the properties firstName and lastName are atomic, as specified earlier, a Person object is not thread-safe. Hence, if two different threads accessed the same Person object, access to each of the individual properties within the object would be atomic, but the names could be inconsistent relative to each other, depending upon the order of access and the (get/set) operations performed. For example, the following statement declares a Person property.
@property (readwrite) Person *person;
The property is itself composed of two properties (firstName and lastName) that can be accessed atomically, but the person property itself is not thread-safe. This is due to the fact that there is no mechanism provided to collectively synchronize concurrent access to its components (i.e., firstName and lastName could be modified independently). This can be accomplished using the @synchronized directive or a synchronization primitive, which you will learn about shortly.
Message Passing
The Foundation Framework NSObject class includes a collection of methods that use the message-passing paradigm to invoke a method on an object with a thread. The thread can be an existing secondary thread or the main application thread. The method selectors are
- performSelector:onThread:withObject:waitUntilDone:
- performSelector:onThread:withObject:waitUntilDone:modes:
- performSelectorOnMainThread:withObject:waitUntilDone:
- performSelectorOnMainThread:withObject:waitUntilDone:modes:
Each method specifies a selector for a method on the receiver object that will be invoked with a thread. This method is also known as a thread entry-point routine. The selector message is queued on the run loop of the thread, and the method is executed on the thread as part of the run loop’s standard processing. These message-passing methods enable you to specify whether the thread is invoked asynchronously or synchronously. Synchronous invocation results in the current thread blocking until the method finishes execution. Because these methods are defined for the NSObject class, they are provided for all classes that descend from NSObject (i.e., the majority of the Foundation Framework APIs and most of the custom classes that you will implement). Listing 17-3 depicts use of the performSelector:onThread: method to asynchronously invoke the downloadTask method on a thread named secondaryThread, where this method is defined for a custom class named ConcurrentProcessor.
Listing 17-3. NSObject performSelector:onThread:withObject:waitUntilDone: Method Invocation
ConcurrentProcessor *processor = [ConcurrentProcessor new];
[processor performSelector:@selector(downloadTask)
                  onThread:secondaryThread
                withObject:nil
             waitUntilDone:NO];
As shown in Listing 17-3, the waitUntilDone: parameter specifies asynchronous/synchronous operation. In this example, the input value is set to NO, thus the current thread returns immediately.
When you create a thread, you can configure portions of its runtime environment (e.g., stack size, thread-local storage, thread priority, etc.). It is also important to configure the thread context appropriately by implementing the thread entry-point routine with the following functionality (as necessary):
- An autorelease pool: An autorelease pool should be created at the beginning of the entry-point routine, and destroyed at the end of the routine.
- An exception handler: If the application catches and handles exceptions, the entry-point routine should be configured to catch any exceptions that can occur. Chapter 14 discusses the Objective-C mechanisms for exception handling.
- A run loop: In order to have a thread process requests dynamically as they arrive, you can setup a run loop in the entry-point routine. Chapter 11 covers the use of the Foundation Framework NSRunLoop class.
Listing 17-4, the ConcurrentProcessor downloadTask method, demonstrates implementation of an entry-point routine per the guidelines documented earlier.
Listing 17-4. ConcurrentProcessor downloadTask Method
@implementation ConcurrentProcessor
...
- (void)downloadTask
{
  @autoreleasepool
  {
    NSURL *url = [NSURL URLWithString:@"http://www.apress.com"];
    NSString *str = [NSString stringWithContentsOfURL:url
                                             encoding:NSUTF8StringEncoding
                                                error:nil];
    NSLog(@"URL Contents:
%@", str);
    self.isLoaded = YES;
  }
}
@end
The NSObject performSelectorOnMainThread: methods are typically used to return values (status, results, etc.) from secondary thread objects to main (application) thread objects. This enables the implementation of communication between secondary threads and the main thread. This API is especially important for objects (such as those of the UIKit) that should only be used from the application’s main thread.
Threads
As mentioned earlier in this chapter, a thread is a logical control flow that executes within the context of a single process. The Apple OS X and iOS operating systems provide direct support for the creation, management, and execution of threads. At the application layer, the Foundation Framework provides APIs for creating and managing threads, and also a collection of APIs to synchronize shared data access between concurrent threads.
The NSObject method performSelectorInBackground:withObject: enables you to implicitly create and start a new thread that is used to execute a method on an object. The thread begins immediately as a secondary background thread, and the current thread returns immediately.
Listing 17-5 depicts use of the performSelectorInBackground:withObject: method to asynchronously invoke the downloadTask method, on an instance of the ConcurrentProcessor class.
Listing 17-5. NSObject performSelectorInBackground:withObject: Method Invocation
ConcurrentProcessor *processor = [ConcurrentProcessor new];
[processor performSelectorInBackground:@selector(downloadTask)
                            withObject:nil];
while (!processor.isLoaded)
  ;
This method provides a simple mechanism for executing a method on an object with a new background thread. As noted earlier, the thread instance is created implicitly, hence you do not use the thread APIs directly. The thread’s context should be configured in the method (the thread’s entry-point routine), with an autorelease pool, an exception handler, and a run loop, as necessary.
The NSThread class provides APIs that can be used to explicitly create and manage threads. The class includes methods to create and initialize an NSThread object (attached to an object instance method), start and stop a thread, configure a thread, and query a thread and its execution environment.
The NSThread APIs to create and initialize a thread are
- detachNewThreadSelector:toTarget:withObject:
- initWithTarget:selector:object:
The detachNewThreadSelector:toTarget:withObject: class method creates and starts a new thread. Its input parameters are the selector to use as the thread entry-point and the target of the selector on the new thread. Listing 17-6 modifies the code in Listing 17-5 to invoke the downloadTask method on a thread using the detachNewThreadSelector:toTarget:withObject: method.
Listing 17-6. Using the NSThread detachNewThreadSelector:toTarget:withObject: Method
ConcurrentProcessor *processor = [ConcurrentProcessor new];
[NSThread detachNewThreadSelector:@selector(downloadTask)
                         toTarget:processor
                       withObject:nil];
This method both creates the new thread and invokes the receiver’s entry-point routine (i.e., the method mapped to its selector). The detachNewThreadSelector:toTarget:withObject: method is functionally equivalent to the NSObject performSelectorInBackground:withObject: method. The NSThread initWithTarget:selector:object: method, by contrast, creates a new thread object but does not start it. The NSThread start instance method is invoked on an initialized thread to begin executing the receiver’s entry-point routine, as shown in Listing 17-7.
Listing 17-7. Using the NSThread initWithTarget:selector:object: Method
ConcurrentProcessor *processor = [ConcurrentProcessor new];
NSThread *computeThread = [[NSThread alloc] initWithTarget:processor
                                                  selector:@selector(computeTask:)
                                                    object:nil];
[computeThread setThreadPriority:0.5];
[computeThread start];
Listing 17-7 shows that the initialization method creates and initializes a new NSThread instance. It sets the selector, the target receiver instance, and an object that can be passed as a parameter to the entry-point routine. The initWithTarget:selector:object: method returns the initialized NSThread instance, hence it can be used to configure the thread prior to invoking the start method. Also shown in Listing 17-7, prior to starting the thread its priority is set using the instance method setThreadPriority:.
As noted previously, the NSThread API includes a number of methods for configuring a thread, determining its execution state, and querying its environment. These enable you to set the thread priority, stack size, and thread dictionary; retrieve the current thread and call stack information; pause the thread, and a variety of other operations. As an example, the following statement pauses the current thread for 5 seconds.
[NSThread sleepForTimeInterval:5.0];
If you decide to use threads for concurrent programming, the Objective-C platform provides several mechanisms to manage shared state and perform synchronization between threads. Specifically, the Foundation Framework includes a set of lock and condition variable APIs that provide object-oriented implementations of these mechanisms, as you will see next.
The Foundation Framework includes several classes (NSLock, NSRecursiveLock, NSConditionLock, NSDistributedLock) that implement various types of locks for synchronizing access to shared state. A lock is used to protect a critical section, that is, a section of code that accesses shared data or a resource, which must not be concurrently executed by multiple threads.
NSLock implements a basic mutual exclusion (mutex) lock for concurrent programming. It conforms to the NSLocking protocol and thus implements the lock and unlock methods to acquire and release a lock accordingly. Earlier in this chapter, you learned about the @synchronized primitive, an Objective-C language feature that implements a mutex lock comparable to NSLock. Key differences between the two is that 1) the @synchronized directive implicitly creates the lock, whereas the NSLock API directly creates the lock, and 2) the @synchronized directive implicitly provides an exception handler for the critical section, whereas the NSLock class does not provide this functionality. Listing 17-8 illustrates use of the NSLock APIs to protect a critical section.
Listing 17-8. Using an NSLock Instance to Protect a Critical Section
NSLock *computeLock = [NSLock new];
...
[computeLock lock];
// Critical section code
...
[computeLock unlock];
The NSDistributedLock class defines a lock that can be used by multiple applications on multiple hosts to control access to a shared resource. Unlike the NSLock class, an NSDistributedLock instance doesn’t enforce mutual exclusion, but rather it reports when the lock is busy and it is up to the code using the lock to proceed appropriately based on the lock status. Listing 17-9 creates a distributed lock using the path of a file (named /hello.lck) that you would like to use as the locking system object.
Listing 17-9. Using an NSDistributedLock Instance to Control Access to a Resource
NSDistributedLock *fileLock = [NSDistributedLock lockWithPath:@"/hello.lck"];
// Access resource
...
...
// Unlock resource
[fileLock unlock];
The NSDistributedLock does not conform to the NSLocking protocol. Also, because this lock is implemented using the file system, the lock must be released explicitly. If an application terminates while holding a distributed lock, other clients must use the NSDistributedLock breakLock method to break a lock in this scenario.
The NSConditionLock class defines a mutex lock that can be acquired and released only under certain conditions, where the condition is an integer value that you define. Condition locks are normally used to ensure that tasks are performed in a specific order; for example, in a producer-consumer flow between threads. Listing 17-10 creates a conditional lock that is used to acquire a lock when a specified condition occurs.
Listing 17-10. Using an NSConditionLock Instance to Control Access to a Resource
NSConditionLock *datalock = [[NSConditionLock alloc] initWithCondition:NO];
...
// Acquire lock - no data in buffer
[dataLock lock];
// Add data to buffer
...
// Unlock with condition - data in buffer
[dataLock unlockWithCondition:YES];
The NSRecursiveLock class defines a lock that can be acquired multiple times by the same thread without causing deadlock. It keeps track of how many times it was acquired and must be balanced by corresponding calls to unlock the object before the lock is released.
Condition variables are a type of lock that can be used to synchronize the order in which operations proceed. In contrast to a lock, a thread trying to acquire a condition remains blocked until that condition is explicitly signaled by another thread. In addition, a thread waiting on a condition remains blocked until that condition is explicitly signaled by another thread. In effect, condition variables allow threads to synchronize based upon the actual value of data.
The Foundation Framework NSCondition class implements a condition variable. The logic for using a condition object is as follows:
- Lock the condition object and check its corresponding BOOL conditional expression.
- If the conditional expression evaluates to YES, perform associated task and then go to step 4.
- If the conditional expression evaluates to NO, block the thread using the condition object’s wait or waitUntilDate: methods, then retest (step 2).
- Optionally, signal the condition object again using its signal or broadcast methods, or change the value of the conditional expression.
- Unlock the condition object.
Listing 17-11 provides the template for an entry-point routine that uses an NSCondition object named condition to consume and process data.
Listing 17-11. Using an NSCondition Instance to Synchronize Consumer Operations on Shared Data
- (void)consumerTask
{
  @autoreleasepool
  {
    // Acquire lock for condition and test boolean condition
    [condition lock];
    while (!self.dataAvailable)
    {
      [condition wait];
    }

    // Data available, now process it (code not provided here)
    ...

    // Finished processing, update predicate value and signal condition
    self.dataAvailable = NO;
    [condition signal];

    // Unlock condition
    [condition unlock];
  }
}
The corresponding entry-point routine that produces data for processing by the consumerTask method is shown in Listing 17-12.
Listing 17-12. Using an NSCondition Instance to Synchronize Producer Operations on Shared Data
- (void)producerTask
{
  @autoreleasepool
  {
    // Acquire lock for condition and test boolean condition
    [condition lock];
    while (self.dataAvailable)
    {
      [condition wait];
    }

    // Retrieve data for processing (code not provided here)
    ....

    // Finished retrieving data, update predicate value and signal condition
    self.dataAvailable = YES;
    [condition signal];

    // Unlock condition
    [condition unlock];
  }
}
As shown in Listings 17-11 and 17-12, condition variables provide an effective mechanism to both control access to shared data and to synchronize operations on that data.
Now that you have learned about threads and synchronization, you will implement an example program that performs concurrent processing using threads and these synchronization mechanisms. In Xcode, create a new project by selecting New ![]() Project . . . from the Xcode File menu. In the New Project Assistant pane, create a command-line application. In the Project Options window, specify ConcurrentThreads for the Product Name, choose Foundation for the Project Type, and select ARC memory management by checking the Use Automatic Reference Counting check box. Specify the location in your file system where you want the project to be created (if necessary, select New Folder and enter the name and location for the folder), uncheck the Source Control check box, and then click the Create button.
Project . . . from the Xcode File menu. In the New Project Assistant pane, create a command-line application. In the Project Options window, specify ConcurrentThreads for the Product Name, choose Foundation for the Project Type, and select ARC memory management by checking the Use Automatic Reference Counting check box. Specify the location in your file system where you want the project to be created (if necessary, select New Folder and enter the name and location for the folder), uncheck the Source Control check box, and then click the Create button.
Next, you will create the class with a method that will be executed in a separate thread. Select New ![]() File . . . from the Xcode File menu, select the Objective-C class template, and name the class ConcurrentProcessor. Select the ConcurrentThreads folder for the files location and the ConcurrentThreads project as the target, and then click the Create button. In the Xcode project navigator pane, select the ConcurrentProcessor.h file and update the class interface, as shown in Listing 17-13.
File . . . from the Xcode File menu, select the Objective-C class template, and name the class ConcurrentProcessor. Select the ConcurrentThreads folder for the files location and the ConcurrentThreads project as the target, and then click the Create button. In the Xcode project navigator pane, select the ConcurrentProcessor.h file and update the class interface, as shown in Listing 17-13.
Listing 17-13. ConcurrentProcessor Interface
#import <Foundation/Foundation.h>

@interface ConcurrentProcessor : NSObject

@property (readwrite) BOOL isFinished;
@property (readonly) NSInteger computeResult;

- (void)computeTask:(id)data;

@end
The interface declares two properties and a single method. The method computeTask: is the method that will be executed in a separate thread. This method performs computations, where its input parameter is the number of computations to perform. The property isFinished is used to signal completion of the computations in the thread(s) that execute the method. The property computeResult contains the results of the computation. OK, now using the Xcode project navigator, select the ConcurrentProcessor.m file and update it as shown in Listing 17-14.
Listing 17-14. ConcurrentProcessor Implementation
#import "ConcurrentProcessor.h"

@interface ConcurrentProcessor()
@property (readwrite) NSInteger computeResult;
@end

@implementation ConcurrentProcessor
{
  NSString *computeID;        // Unique object for @synchronize lock
  NSUInteger computeTasks;    // Count of number of concurrent compute tasks
  NSLock *computeLock;        // lock object
}

- (id)init
{
  if ((self = [super init]))
  {
    _isFinished = NO;
    _computeResult = 0;
    computeLock = [NSLock new];
    computeID = @"1";
    computeTasks = 0;
  }
  return self;
}

- (void)computeTask:(id)data
{
  NSAssert(([data isKindOfClass:[NSNumber class]]), @"Not an NSNumber instance");
  NSUInteger computations = [data unsignedIntegerValue];
  @autoreleasepool
  {
    @try
    {
      // Obtain lock and increment number of active tasks
      if ([[NSThread currentThread] isCancelled])
      {
        return;
      }
      @synchronized(computeID)
      {
        computeTasks++;
      }

      // Obtain lock and perform computation in critical section
      [computeLock lock];
      if ([[NSThread currentThread] isCancelled])
      {
        [computeLock unlock];
        return;
      }
      NSLog(@"Performing computations");
      for (int ii=0; ii<computations; ii++)
      {
        self.computeResult = self.computeResult + 1;
      }
      [computeLock unlock];
      // Simulate additional processing time (outside of critical section)
      [NSThread sleepForTimeInterval:1.0];

      // Decrement number of active tasks, if none left update flag
      @synchronized(computeID)
      {
        computeTasks--;
        if (!computeTasks)
        {
          self.isFinished = YES;
        }
      }
    }
    @catch (NSException *ex) {}
  }
}

@end
The file begins by declaring a class extension that enables write access for the computeResult property. Next, the implementation begins by declaring several private instance variables used for thread management and synchronization. Of note is the computeTasks variable; it contains a count of the number of threads concurrently executing the computeTask: method. The init method initializes ConcurrentProcessor objects, setting variables to the appropriate initial values.
Now let’s examine the computeTask: method. First, observe that the method is surrounded by an autorelease pool and a try-catch exception block. These are required to ensure that objects are not leaked from the thread in which the method executes and that it handles any thrown exceptions (each thread is responsible for handling its own exceptions). Because this method can be executed concurrently by multiple threads and it also accesses and updates shared data, access to this data must be synchronized. The code uses the @synchronized directive to control access to the computeTasks variable, thereby enabling it to be updated by one thread at a time.
@synchronized(computeID)
{
  computeTasks++;
}
The method is also implemented to support thread cancellation, and thus periodically checks the state of the thread and exits if it is cancelled.
if ([[NSThread currentThread] isCancelled])
{
  return;
}
Next, the method contains code to perform its computations. This simple computation merely increments the value of the computeResult property the number of times specified by the method’s input parameter. This code must be performed within a critical section to enforce synchronized access to its shared data. The code acquires a lock to the NSLock instance. Once the lock is obtained, it tests to see if the thread has been cancelled, and if so, it releases the lock and exits the thread without performing its computations.
[computeLock lock];
if ([[NSThread currentThread] isCancelled])
{
  [computeLock unlock];
  return;
}
The code then performs its computations and releases the lock. Next, the thread pauses for one second to simulate additional processing performed outside of the critical section (hence concurrently).
[computeLock unlock];
[NSThread sleepForTimeInterval:1.0];
The method concludes by decrementing the number of threads executing it, and setting the isFinished property if none remain. This logic is all implemented within a synchronized block to ensure access by only one thread at a time.
@synchronized(computeID)
{
  computeTasks--;
  if (!computeTasks)
  {
    self.isFinished = YES;
  }
}
Now that you have finished implementing the ConcurrentProcessor class, let’s move on to the main() function. In the Xcode project navigator, select the main.m file and update the main() function, as shown in Listing 17-15.
Listing 17-15. ConcurrentThreads main( ) Function
#import <Foundation/Foundation.h>
#import "ConcurrentProcessor.h"

int main(int argc, const char * argv[])
{
  @autoreleasepool
  {
    ConcurrentProcessor *processor = [ConcurrentProcessor new];
    [processor performSelectorInBackground:@selector(computeTask:)
                                withObject:[NSNumber numberWithUnsignedInt:5]];
    [processor performSelectorInBackground:@selector(computeTask:)
                                withObject:[NSNumber numberWithUnsignedInt:10]];
    [processor performSelectorInBackground:@selector(computeTask:)
                                withObject:[NSNumber numberWithUnsignedInt:20]];
    while (!processor.isFinished)
      ;
    NSLog(@"Computation result = %ld", processor.computeResult);
  }
  return 0;
}
The main() function begins by creating a ConcurrentProcessor object. It then executes its computeTask: method with a new background thread using its performSelectorInBackground: method. This method is executed with three separate threads, each time providing a different input value for the number of computations performed. The function then uses a conditional expression to test if all of the threads have finished executing the computeTask: method. Once this occurs, the result of the computation is logged to the output pane.
When you compile and run the program, you should observe the messages in the output pane shown in Figure 17-5.
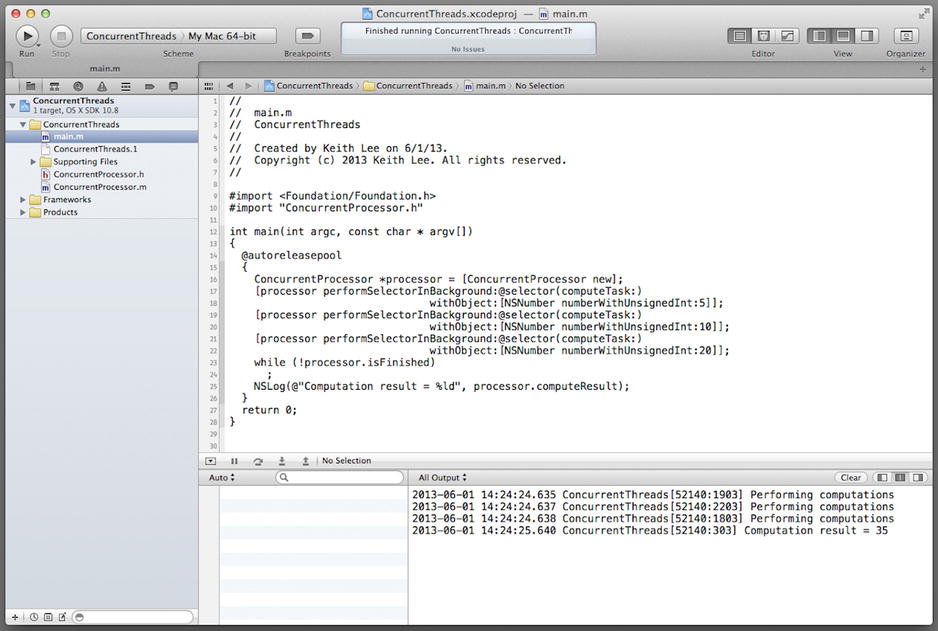
Figure 17-5. ConcurrentThreads program output
This program demonstrates the use of threads to perform concurrent programming. It also illustrates some of the complexities involved with thread management and synchronization. In the next section, you will learn about a different mechanism for concurrent programming, operations and operation queues.
Operations and Operation Queues
In Chapter 11, you learned about operation objects, instances of the NSOperation class (and its subclasses) that encapsulate the code and data for a single task. As an operation object encapsulates a single unit of work, it is an ideal vehicle for implementing concurrent programming. The Foundation Framework includes the following three operation classes:
- NSOperation: The base (abstract) class for defining operation objects. For nonconcurrent tasks, a concrete subclass typically only needs to override the main method. For concurrent tasks, you must override at a minimum the methods start, isConcurrent, isExecuting, and isFinished.
- NSBlockOperation: A concrete subclass of NSOperation that is used to execute one or more block objects concurrently. An NSBlockOperation object is considered finished only when all of its block objects have finished execution.
- NSInvocationOperation: A concrete subclass of NSOperation that is used to create an operation object based on an object and selector that you specify.
The following statement creates an NSBlockOperation instance named greetingOp.
NSBlockOperation* greetingOp = [NSBlockOperation blockOperationWithBlock: ^{
  NSLog(@"Hello, World!");
}];
You can also add additional blocks to an NSBlockOperation instance using the addExecutionBlock: method. The following statement adds a block to the NSBlockOperation instance greetingOp.
[greetingOp addExecutionBlock: ^{
  NSLog(@"Goodbye");
}];
An NSInvocationOperation can be created and initialized using either an NSInvocation object or a selector and receiver object. The following statement creates an NSInvocationOperation with the selector hello and a receiver object named greetingObj.
NSInvocationOperation invokeOp = [[NSInvocationOperation alloc]
  initWithTarget:greetingObj selector:@selector(hello)];
You can also implement custom operation classes. A custom operation class subclasses NSOperation and must implement, at a minimum, the main method to perform the desired task. Optionally, it can also provide the following functionality:
- Custom initialization methods
- Custom helper methods (invoked via the main method)
- Accessor methods for setting data values and accessing the results of the operation
- Methods that conform the class to the NSCoding protocol (to support archiving the object)
Operation objects support a variety of features that facilitate concurrent programming, several of which are
- Establishing dependencies between operation objects, thereby enabling you to control their order of execution.
- Creating a completion block that is executed after an operation’s main task has finished.
- Retrieving an operation’s execution state.
- Prioritizing operations in an operation queue.
- Cancelling operations.
An operation object is executed by invoking its start method. The default implementation of this method executes the operation’s task (implemented by its main method) synchronously. Hence, you may be wondering how operation objects support concurrent programming. Well, operation objects are typically executed by adding them to operation queues, which provide built-in support for executing operations concurrently. Specifically, operation queues provide threads for executing operations.
An operation queue is a mechanism that provides the capability to execute operations concurrently. The Foundation Framework NSOperationQueue class is an Objective-C implementation of an operation queue. An operation can be added to an NSOperationQueue instance as a block object or an instance of a subclass of NSOperation. An operation queue manages the execution of operations. Thus it includes methods to manage operations in the queue, manage the number of running operations, suspend operations, and retrieve specific queues. Listing 17-16 creates and initializes an NSOperationQueue instance and then uses its addOperationWithBlock: method to submit a block object to the queue.
Listing 17-16. Adding a Block Object to an Operation Queue
NSOperationQueue *queue = [NSOperationQueue new];
[queue addOperationWithBlock: ^{
  NSLog(@"Hello, World!");
  }];
[queue waitUntilAllOperationsAreFinished];
Once an operation is added to a queue, it remains in the queue until it is explicitly cancelled or finishes executing its task. You can cancel an (NSOperation) object added to an operation queue by invoking its cancel method or by invoking the cancelAllOperations method on the queue.
The execution order of operations within a queue is a function of the priority level of each operation and the interoperation object dependencies. The current implementation of NSOperationQueue uses Grand Central Dispatch to initiate execution of their operations. As a result, each operation in the queue is executed in a separate thread.
Operation objects and operation queues provide an object-oriented mechanism for performing asynchronous, concurrent programming. They eliminate the need for low-level thread management, and simplify synchronization and coordination of execution for multiple interdependent tasks. Because they utilize system services that can scale dynamically in response to resource availability and utilization, they ensure that tasks are executed as quickly and as efficiently as possible.
Executing Operation Objects Manually
Although operation objects are typically executed using operation queues, it is possible to start an operation object manually (i.e., not add it to a queue). To do this, you must code the operation as a concurrent operation in order to have it execute it asynchronously. This is accomplished by performing the following steps:
- Override the start method. This method should be updated to execute the operation asynchronously, typically by invoking its main method in a new thread.
- Override the main method (optional). In this method, you implement the task associated with the operation. If preferred, you can skip this method and implement the task in the start method, but overriding the main method provides a cleaner design that is consistent with the intent.
- Configure and manage the operation’s execution environment. Concurrent operations must set up their environment and report its status to clients. Specifically, the isExecuting, isFinished, and isConcurrent methods must return appropriate values relative to the operation’s state, and these methods must be thread-safe. These methods must also generate the appropriate key-value (KVO) observer notifications when these values change.
Note Key-value observing is an Objective-C language mechanism that enables objects to be notified of changes to specified properties of other objects. Chapter 18 examines key-value programming in depth.
To highlight the differences between a nonconcurrent operation object (typically executed via an operation queue) versus a concurrent operation object, let’s look at some code. Listing 17-17 illustrates the implementation of a custom, nonconcurrent operation class named GreetingOperation.
Listing 17-17. Minimal Implementation of a Custom, Nonconcurrent Operation Class
@implementation GreetingOperation

- (void)main
{
  @autoreleasepool
  {
    @try
    {
      if (![self isCancelled])
      {
        // Insert code to implement the task below
        NSLog(@"Hello, World!");
        [NSThread sleepForTimeInterval:3.0];
        NSLog(@"Goodbye, World!");
      }
    }
    @catch (NSException *ex) {}
  }
}

@end
As shown in Listing 17-17, the code to perform the task is implemented in the main method. Note that this method includes an autorelease pool and a try-catch block. The autorelease pool prevents memory leaks from the associated thread, while the try-catch block is required to prevent any exceptions from leaving the scope of this thread. The main method also checks if the operation is cancelled in order to quickly terminate its execution if it is no longer needed. To invoke this operation asynchronously, you can add it to an operation queue, as shown in Listing 17-18.
Listing 17-18. Executing a Custom Operation in an Operation Queue
NSOperationQueue *queue = [NSOperationQueue new];
GreetingOperation *greetingOp = [GreetingOperation new];
[greetingOp setThreadPriority:0.5];
[queue addOperation:greetingOp];
[queue waitUntilAllOperationsAreFinished];
This demonstrates the steps required to implement a nonconcurrent operation and submit it to an operation queue for execution. In the next section, you will implement a concurrent operation to understand the differences between the two options.
Implementing Concurrent Operations
Now you will create a program that implements a custom, concurrent operation. It will provide the same functionality as the program shown in Listing 17-14 and enable you to compare the differences between the two implementations. In Xcode, create a new project by selecting New ![]() Project . . . from the Xcode File menu. In the New Project Assistant pane, create a command-line application. In the Project Options window, specify GreetingOperation for the Product Name, choose Foundation for the Project Type, and select ARC memory management by checking the Use Automatic Reference Counting check box. Specify the location in your file system where you want the project to be created (if necessary, select New Folder and enter the name and location for the folder), uncheck the Source Control check box, and then click the Create button.
Project . . . from the Xcode File menu. In the New Project Assistant pane, create a command-line application. In the Project Options window, specify GreetingOperation for the Product Name, choose Foundation for the Project Type, and select ARC memory management by checking the Use Automatic Reference Counting check box. Specify the location in your file system where you want the project to be created (if necessary, select New Folder and enter the name and location for the folder), uncheck the Source Control check box, and then click the Create button.
Next you will create the custom operation class. Select New ![]() File . . . from the Xcode File menu, select the Objective-C class template, and name the class GreetingOperation. Make the class a subclass of NSOperation, select the GreetingOperation folder for the files location and the GreetingOperation project as the target, and then click the Create button. In the Xcode project navigator pane, select the GreetingOperation.m file and update the class implementation, as shown in Listing 17-19.
File . . . from the Xcode File menu, select the Objective-C class template, and name the class GreetingOperation. Make the class a subclass of NSOperation, select the GreetingOperation folder for the files location and the GreetingOperation project as the target, and then click the Create button. In the Xcode project navigator pane, select the GreetingOperation.m file and update the class implementation, as shown in Listing 17-19.
Listing 17-19. GreetingOperation Implementation
#import "GreetingOperation.h"

@implementation GreetingOperation
{
  BOOL finished;
  BOOL executing;
}

- (id)init
{
  if ((self = [super init]))
  {
    executing = NO;
    finished = NO;
  }
  return self;
}

- (void)start
{
  // If cancelled just return
  if ([self isCancelled])
  {
    [self willChangeValueForKey:@"isFinished"];
    finished = YES;
    [self didChangeValueForKey:@"isFinished"];
    return;
  }

  // Now execute in main method a separate thread
  [self willChangeValueForKey:@"isExecuting"];
  [NSThread detachNewThreadSelector:@selector(main) toTarget:self withObject:nil];
  executing = YES;
  [self didChangeValueForKey:@"isExecuting"];
}

- (void)main
{
  @autoreleasepool
  {
    @try
    {
      if (![self isCancelled])
      {
        NSLog(@"Hello, World!");
        // Pause to simulate processing being performed by task
        [NSThread sleepForTimeInterval:3.0];
        NSLog(@"Goodbye, World!");

        [self willChangeValueForKey:@"isFinished"];
        [self willChangeValueForKey:@"isExecuting"];
        executing = NO;
        finished = YES;
        [self didChangeValueForKey:@"isExecuting"];
        [self didChangeValueForKey:@"isFinished"];
      }
    }
    @catch (NSException *ex) {}
  }
}

- (BOOL)isConcurrent
{
  return YES;
}

- (BOOL)isExecuting
{
  return executing;
}

- (BOOL)isFinished
{
  return finished;
}

@end
Compared to the nonconcurrent GreetingOperation implementation in Listing 17-17, there are a number of changes. First, observe the declaration of two private variables.
{
  BOOL finished;
  BOOL executing;
}
These variables are used to set and return the appropriate values for the isFinished and isExecuting methods. Recall that these methods (along with the isConcurrent method) must be overridden for concurrent operations. Now let’s look at the implementation of the start method. This was not implemented for the nonconcurrent version of the GreetingOperation class. First, it checks to see whether or not the operation has been cancelled; if it has, it simply sets the finished variable appropriately for KVO notifications and returns.
if ([self isCancelled])
{
  [self willChangeValueForKey:@"isFinished"];
  finished = YES;
  [self didChangeValueForKey:@"isFinished"];
  return;
}
If not cancelled, the code sets up a new thread and uses it to invoke the main method that implements the associated task, while also performing the appropriate KVO notifications.
[self willChangeValueForKey:@"isExecuting"];
[NSThread detachNewThreadSelector:@selector(main) toTarget:self withObject:nil];
executing = YES;
[self didChangeValueForKey:@"isExecuting"];
Now let’s examine the class’s main method. This method has identical functionality to that of the main method in Listing 17-14, with the addition of KVO notifications to indicate the current operation state. Also note the statement that pauses the thread for three seconds to simulate task processing.
[NSThread sleepForTimeInterval:3.0];
Finally, the remaining methods implement the required isExecuting, isFinished, and isConcurrent methods, returning the appropriate value in each case.
OK, now that you have finished implementing the custom operation class, let’s move on to the main() function. In the Xcode project navigator, select the main.m file and update the main() function, as shown in Listing 17-20.
Listing 17-20. GreetingOperation main( ) Function
#import <Foundation/Foundation.h>
#import "GreetingOperation.h"

int main(int argc, const char * argv[])
{
  @autoreleasepool
  {
    GreetingOperation *greetingOp = [GreetingOperation new];
    [greetingOp start];
    while (![greetingOp isFinished])
      ;
  }
  return 0;
}
The main() function begins by creating a GreetingOperation object. It then executes the operation by invoking its start method. Finally, a conditional expression using the object’s isFinished method is used to end execution of the program when the concurrent operation is finished.
When you compile and run the program, you should observe the messages in the output pane shown in Figure 17-6.
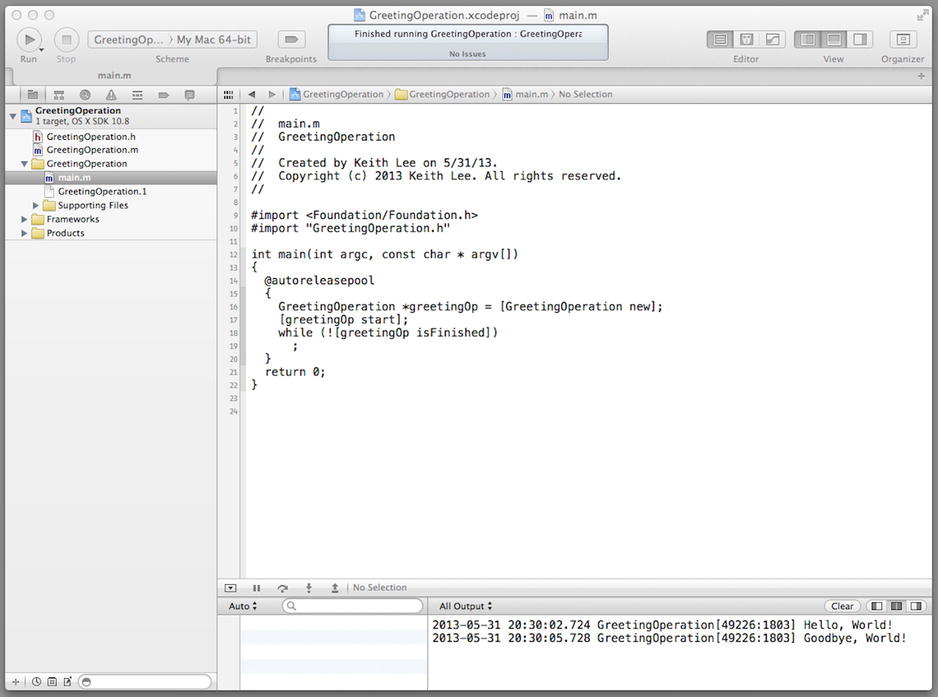
Figure 17-6. GreetingOperation program output
In the output pane, the task displays the initial greeting followed by a delay of approximately 3 seconds, and then the final message. The program exits when the thread finishes execution per the conditional expression. As you learned from this example, a considerable amount of additional functionality must be coded to correctly implement a custom concurrent operation class. Hence, you should only do this if you need to have an operation object execute asynchronously without adding it to a queue.
Using Operation Queues for Concurrency
You have implemented a concurrent program using threads and a concurrent operation, so now you will implement a program that uses operations and an operation queue for concurrency. This program contains the same functionality of the ConcurrentThreads program that you implemented earlier in this chapter. This will enable you to compare the use of the different APIs and mechanisms for concurrent programming.
In Xcode, create a new project by selecting New ![]() Project . . . from the Xcode File menu. In the New Project Assistant pane, create a command-line application. In the Project Options window, specify ConcurrentOperations for the Product Name, choose Foundation for the Project Type, and select ARC memory management by checking the Use Automatic Reference Counting check box. Specify the location in your file system where you want the project to be created (if necessary, select New Folder and enter the name and location for the folder), uncheck the Source Control check box, and then click the Create button.
Project . . . from the Xcode File menu. In the New Project Assistant pane, create a command-line application. In the Project Options window, specify ConcurrentOperations for the Product Name, choose Foundation for the Project Type, and select ARC memory management by checking the Use Automatic Reference Counting check box. Specify the location in your file system where you want the project to be created (if necessary, select New Folder and enter the name and location for the folder), uncheck the Source Control check box, and then click the Create button.
Next you will create the custom operation class. Select New ![]() File . . . from the Xcode File menu, select the Objective-C class template, and name the class ConcurrentProcessor. Make the class a subclass of NSOperation, select the ConcurrentOperations folder for the files location and the ConcurrentOperations project as the target, and then click the Create button. In the Xcode project navigator pane, select the ConcurrentProcessor.m file and update the interface, as shown in Listing 17-21.
File . . . from the Xcode File menu, select the Objective-C class template, and name the class ConcurrentProcessor. Make the class a subclass of NSOperation, select the ConcurrentOperations folder for the files location and the ConcurrentOperations project as the target, and then click the Create button. In the Xcode project navigator pane, select the ConcurrentProcessor.m file and update the interface, as shown in Listing 17-21.
Listing 17-21. ConcurrentProcessor Interface
#import <Foundation/Foundation.h>

@interface ConcurrentProcessor : NSOperation

@property (readonly) NSUInteger computations;

- (id)initWithData:(NSInteger *)result computations:(NSUInteger)computations;

@end
The interface contains one property named computations and a single initialization method. The interface is a subclass of NSOperation, as required for a custom operation class. The computations property specifies the number of computations the operation will perform. In the Xcode project navigator, select the ConcurrentProcessor.m file and update the implementation, as shown in Listing 17-22.
Listing 17-22. ConcurrentProcessor Implementation
#import "ConcurrentProcessor.h"

@implementation ConcurrentProcessor
{
  NSInteger *computeResult;
}

- (id)initWithData:(NSInteger *)result computations:(NSUInteger)computations
{
  if ((self = [super init]))
  {
    _computations = computations;
    computeResult = result;
  }
  return self;
}

- (void)main
{
  @autoreleasepool
  {
    @try
    {
      if (![self isCancelled])
      {
        NSLog(@"Performing %ld computations", self.computations);
        [NSThread sleepForTimeInterval:1.0];
        for (int ii=0; ii<self.computations; ii++)
        {
          *computeResult = *computeResult + 1;
        }
      }
    }
    @catch (NSException *ex) {}
  }
}
@end
The implementation begins by declaring a private instance variable, computeResult, which contains the address of the memory location where the computation result is stored. The init: method sets the computations property and computeResult variable to the input parameters. The main method performs the compute task for the operation. It includes an autorelease pool and a try-catch block, as recommended for thread-based execution of operation objects. The main method also checks if the operation is cancelled in order to quickly terminate its execution if it is no longer needed. The computation logic simply increments the computation result for the number of computations specified. Notice here that, unlike with the concurrent operation shown in Listing 17-19 (the GreetingOperation program), thread execution state (i.e., isFinished and isExecuting) is not updated. This is performed automatically by the operation queue. Also note that, unlike the thread-based ConcurrentProcessor implementation (as shown in Listing 17-14), synchronization mechanisms are not required. This is due to the fact that interoperation dependencies can be declared. These prevent operations from concurrently accessing shared data and also synchronize the order that operations are executed.
Now let’s move on to the main() function. In the Xcode project navigator, select the main.m file and update the main() function, as shown in Listing 17-23.
Listing 17-23. ConcurrentOperations main( ) Function
#import <Foundation/Foundation.h>
#import "ConcurrentProcessor.h"

int main(int argc, const char * argv[])
{
  @autoreleasepool
  {
    NSOperationQueue *queue = [[NSOperationQueue alloc] init];
    NSInteger result = 0;

    // Create operation objects
    ConcurrentProcessor *proc1 = [[ConcurrentProcessor alloc]initWithData:&result
                                                             computations:5];
    ConcurrentProcessor *proc2 = [[ConcurrentProcessor alloc]initWithData:&result
                                                             computations:10];
    ConcurrentProcessor *proc3 = [[ConcurrentProcessor alloc]initWithData:&result
                                                             computations:20];
    NSArray *operations = @[proc1, proc2, proc3];

    // Add inter-operation dependencies
    [proc2 addDependency:proc1];
    [proc3 addDependency:proc2];

    // Add operations to queue to start execution
    [queue addOperations:operations waitUntilFinished:NO];

    // Wait until all operations are finished, then display result
    [queue waitUntilAllOperationsAreFinished];
    NSLog(@"Computation result = %ld", result);
  }
  return 0;
}
The method begins by creating an operation queue and the variable, computeResult, which holds the result of the computation for the operations. Then three operation objects are created, each performing a different number of computations, and these are combined in an NSArray instance. Next, dependencies between the operations are defined. In this case, operation 1 (proc1) must complete before operation 2 (proc2), and operation 2 must complete before operation 3 (proc3). The operations are then added to the queue to begin asynchronous execution. The code waits until all of the operations have finished execution and then logs the computation result to the output pane.
When you compile and run the program, you should observe the messages in the output pane shown in Figure 17-7.
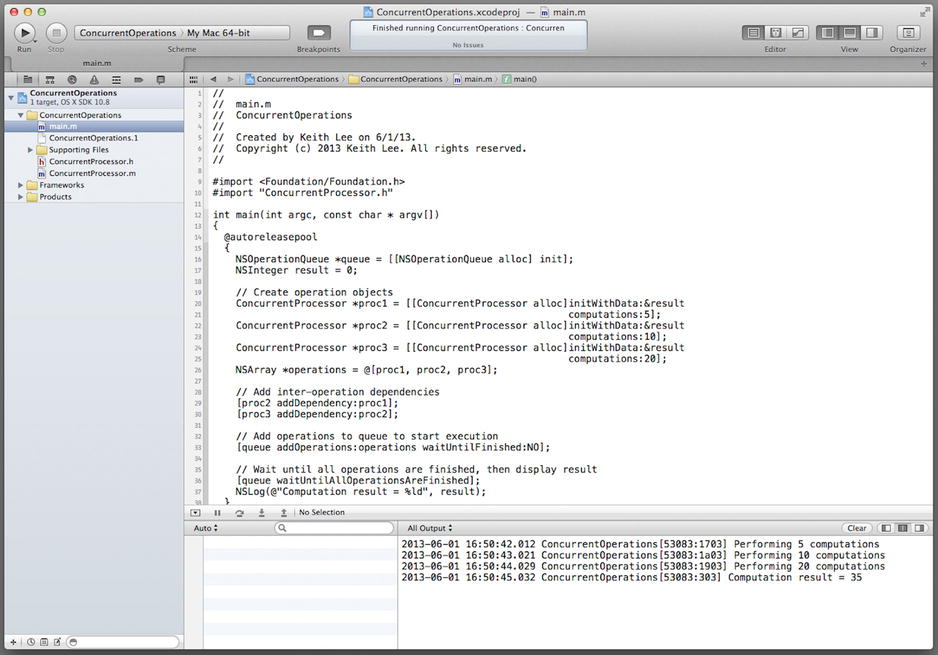
Figure 17-7. ConcurrentOperations program output
The results are identical to that obtained with the thread-based version of this program, with considerably less code complexity. This program demonstrates how operation objects and queues can greatly simplify concurrent programming. In effect, they enable you to execute tasks asynchronously and concurrently without having to perform low-level thread-based programming, and manage the resulting complexity. They enable you to manage dependencies among various operations, cancel or suspend them, and provide a higher-level, object-oriented abstraction for concurrent programming. In the next section, you will explore Grand Central Dispatch, a C-based mechanism for asynchronous/concurrent programming.
Grand Central Dispatch (GCD) is a set of language features, C-based APIs, and system enhancements that support the use of dispatch queues for executing tasks. GCD dispatch queues can be used to execute code synchronously or asynchronously, and to perform tasks serially or concurrently. As with operation queues, dispatch queues are easier to use than threads and more efficient at executing asynchronous or concurrent tasks.
Apple provides a complete set of documentation on the GCD APIs and their use for concurrent programming. In order to provide a simple comparison of concurrent programming using operation queues and dispatch queues, you will now reimplement the ConcurrentOperations program that you developed earlier, this time with dispatch queues.
In Xcode, create a new project by selecting New ![]() Project . . . from the Xcode File menu. In the New Project Assistant pane, create a command-line application. In the Project Options window, specify ConcurrentDispatch for the Product Name, choose Foundation for the Project Type, and select ARC memory management by checking the Use Automatic Reference Counting check box. Specify the location in your file system where you want the project to be created (if necessary, select New Folder and enter the name and location for the folder), uncheck the Source Control check box, and then click the Create button.
Project . . . from the Xcode File menu. In the New Project Assistant pane, create a command-line application. In the Project Options window, specify ConcurrentDispatch for the Product Name, choose Foundation for the Project Type, and select ARC memory management by checking the Use Automatic Reference Counting check box. Specify the location in your file system where you want the project to be created (if necessary, select New Folder and enter the name and location for the folder), uncheck the Source Control check box, and then click the Create button.
In the Xcode project navigator, select the main.m file and update it as shown in Listing 17-24.
Listing 17-24. ConcurrentDispatch main.m File
#import <Foundation/Foundation.h>
typedef void (^ComputeTask)(void);

/* Retrieve a block used to download a URL */
ComputeTask getComputeTask(NSInteger *result, NSUInteger computation)
{
  NSInteger *computeResult = result;
  NSUInteger computations = computation;
  return ^{
    [NSThread sleepForTimeInterval:1.0];
    NSLog(@"Performing %ld computations", computations);
    for (int ii=0; ii<computations; ii++)
    {
      *computeResult = *computeResult + 1;
    }
  };
}

int main(int argc, const char * argv[])
{
  @autoreleasepool
  {
    NSInteger computeResult;

    // Create serial queue and group
    dispatch_queue_t serialQueue = dispatch_queue_create("MySerialQueue",
                                                         DISPATCH_QUEUE_SERIAL);
    dispatch_group_t group = dispatch_group_create();

    // Add tasks to queue
    dispatch_group_async(group, serialQueue, getComputeTask(&computeResult, 5));
    dispatch_group_async(group, serialQueue, getComputeTask(&computeResult, 10));
    dispatch_group_async(group, serialQueue, getComputeTask(&computeResult, 20));

    // Block until all tasks from group are completed, then display results
    dispatch_group_wait(group, DISPATCH_TIME_FOREVER);
    NSLog(@"Computation result = %ld", computeResult);

  }
  return 0;
}
The listing includes, in addition to the main() function, a function named computeTask that is identical in functionality to that provided by the task in the ConcurrentOperations program, as shown in the main method in Listing 17-22.
The main() function uses GCD APIs to create and asynchronously dispatch three tasks for serial execution, thereby coordinating execution properly and preventing concurrent access to shared data. It creates a serial dispatch queue and a dispatch group.
dispatch_queue_t serialQueue = dispatch_queue_create("MySerialQueue",
                                                     DISPATCH_QUEUE_SERIAL);
dispatch_group_t group = dispatch_group_create();
The code then dispatches the three tasks to the queue.
dispatch_group_async(group, serialQueue, getComputeTask(&computeResult, 5));
dispatch_group_async(group, serialQueue, getComputeTask(&computeResult, 10));
dispatch_group_async(group, serialQueue, getComputeTask(&computeResult, 20));
Notice that the task to be executed is specified by a block literal retrieved by the computeTask() function, each time providing a different argument for the number of computations. Again, this is identical to what was done for the ConcurrentOperations program. The GCD dispatch_group_async() function causes these tasks to be performed asynchronously and, as the queue is a serial queue, in serial order. Next, the GCD dispatch_group_wait() function is used to block the main thread until the tasks complete.
dispatch_group_wait(group, DISPATCH_TIME_FOREVER);
Now save, compile, and run the BlockConcurrentTasks program and observe the messages in the output pane (as shown in Figure 17-8).
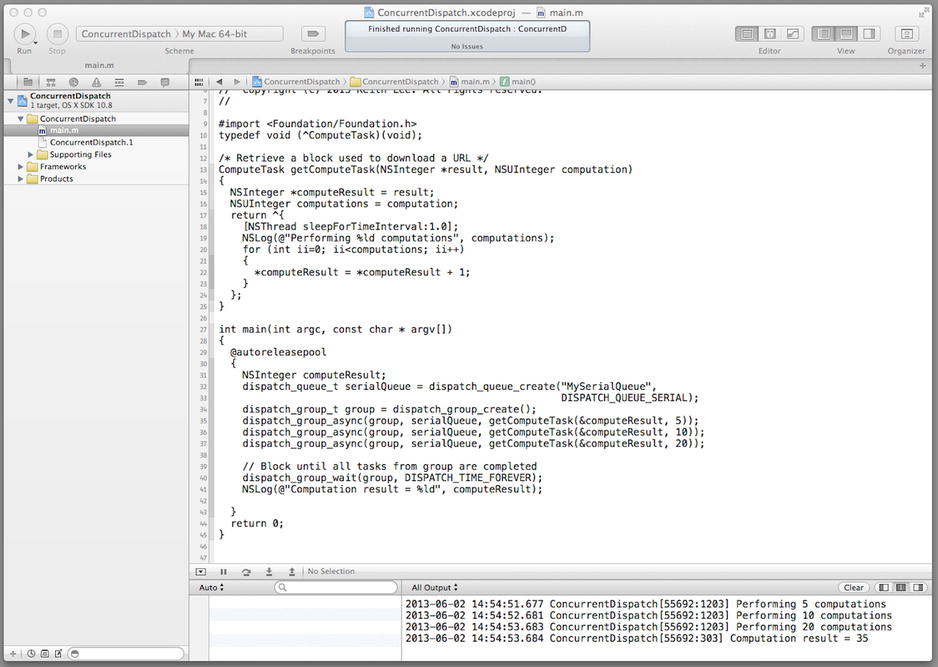
Figure 17-8. Testing the ConcurrentDispatch project
The messages in the output pane show that the concurrent tasks were performed successfully. Compared to the ConcurrentOperations program, the version using GCD dispatch queues. Although it employs C-based APIs, it required much less code.
Choosing the Right API for Concurrent Programming
This chapter has covered a variety of approaches for concurrent programming, so you have several options to choose from. To recap, the following are the available options:
- Asynchronous APIs. The Foundation Framework (along with the Cocoa and Cocoa Touch frameworks) includes a variety of APIs that perform asynchronous processing; examples include the NSURLConnection, NSFileHandle, and NSPort classes.
- Threads. APIs that use threads to implement concurrent programming. This includes the Foundation Framework message passing APIs, the NSThread class, and the synchronization mechanisms.
- Operation queues. NSOperation and NSOperationQueue are Objective-C APIs that can be used to implement concurrent programming using queues.
- Dispatch queues. Grand Central Dispatch is a C-based API and set of services that can be used to implement concurrent programming using dispatch queues.
In general, you should use the asynchronous APIs to implement asynchronous/concurrent processing if possible. These APIs use various technologies (threads, queues, etc.) to provide concurrency that scales with the capabilities of the system and enable your program design to align with the program style and capabilities of the Objective-C platform.
Although the Objective-C platform provides a number of language features and APIs to support thread-based concurrent programming, threads are not the recommendation approach for concurrent programming. Operation queues and dispatch queues are the preferred mechanism for asynchronous, concurrent processing. These should be used to concurrently perform tasks that are not supported by the asynchronous APIs, such as executing a long computation, background data processing, and so forth.
Operation and dispatch queues provide an asynchronous, queue-based approach that eliminate the need for low-level thread management and maximize system utilization and efficiency compared to thread-based programming. Operation queues, being object-based, have more overhead and utilize more resources than GCD dispatch queues. However, the higher-level, object-oriented API is consistent with the Objective-C platform and may be easier to use. In addition, operation queues provide support for complex interoperation dependencies, constraint-based execution, and management of operation objects.
GCD, as it provides a lower-level (C-based) API, is lightweight and provides better performance than operation queues. As shown by the example ConcurrentDispatch program, the GCD block-based approach can result in fewer lines of code that may minimize overall program complexity.
Finally, as operation and dispatch queues do not address real-time constraints, threads are still an appropriate mechanism for concurrent programming of real-time systems.
Roundup
In this chapter, you learned about concurrent programming and the various mechanisms and APIs available to support asynchronous/concurrent processing. As the chapter has shown, there are numerous options to choose from. In addition, concurrent programming is challenging and it is very important to understand the tradeoffs involved with each option under consideration. The following are key takeaways from this chapter:
- Concurrent processing implies the simultaneous execution of multiple tasks. It is a function of design, whereas parallel computing is a function of hardware. The motivations for concurrent processing are numerous, some of which include increased application throughput, increased system utilization, improved application responsiveness, and better mapping to the problem domain.
- Concurrent processing refers to multiple logical control flows that may execute in parallel. Asynchronous processing, on the other hand, is effectively a mechanism for the asynchronous (i.e., nonblocking) invocation of methods/functions. In other words, the caller invokes the method and can continue processing while the method is being executed. Asynchronous processing can be implemented using a variety of devices, including concurrent programming APIs and services.
- The most common mechanisms used to implement concurrent programming in Objective-C are message passing, threads, synchronization mechanisms, operation queues, and dispatch queues.
- The Foundation Framework NSObject class includes a collection of methods that use the message-passing paradigm to invoke a method on an object with a thread.
- The NSThread class provides APIs that can be used to explicitly create and manage threads. The Objective-C language and Foundation Framework also include mechanisms for synchronizing shared data/resource access between concurrent threads.
- Operation objects and operation queues provide an object-oriented mechanism for performing asynchronous/concurrent programming. They eliminate the need for low-level thread management, and simplify synchronization and coordination of execution for multiple interdependent tasks.
- Grand Central Dispatch (GCD) is a set of language features, C-based APIs, and system enhancements that support the use of dispatch queues for executing tasks. GCD dispatch queues can be used to execute code synchronously or asynchronously, and to perform tasks serially or concurrently. Dispatch queues are easier to use than threads and more efficient at executing asynchronous or concurrent tasks.
Congratulations! You have just completed this detailed examination of concurrent programming on the Objective-C platform. This chapter was by far the longest to date and the material is a lot to absorb, so don’t feel as if you have to master this all at once. Take your time to review its contents, and tinker with the examples to let it all sink in. When you’re ready, turn the page to begin the final chapter on key-value programming.