Storyboarding to Multimedia Platforms
This is the last chapter of the book, and I have been looking forward to writing this chapter for a long time. This is the capstone app, if you will, the app that teaches you how to market your restaurant, business, or whatever you like to various multimedia platforms. I chose to promote a band for this app because it involves iTunes, and many of my students struggle with iTunes. In the lecture hall, I first walk through the app with the students as they imagine they’ve discovered a band called The Beatles. They then market that band on the Web, YouTube, and iTunes. In the second half of this project, the students create their own business that they market in a similar but much more creative manner.
Unfortunately, due to copyright issues, it is not permissible to show pictures of The Beatles in a book that’s not authorized by The Beatles. For the purposes of this book, I’ve created some dummy sites on the web, with pictures of myself playing guitar, and iTunes sites where I have songs from many years ago (1997). I will show you where to get Beatles URLs (public domain) and how to make the site — first for The Beatles, as I do in class, and then to promote other bands and types of media. Hopefully, you’ll have your own business — such as a restaurant, bead shop, consulting service, or whatever — that you can make a promotional app for and put on the iTunes Store so that people can download it for free.
How does this work? Back in Chapter 1, I explain the exact process of how you can make money from your app on the Internet. Here I teach you how to market your business and set up your app, possibly for free to begin with. Let’s say you have a babysitting business. After you learn how to manage The Beatles web site, you can make an app for the babysitting business and upload it to the App Store for free downloads. In the old days, we used to hand out cards. Now we hand out apps. You let parents and potential parents, customers of your babysitting service, know that they can download your babysitting business’s app for free and, with a password that only works for a limited time (and only if they are potential parents), view their babies on a live webcam any time of day. They can also see other children being taken care of by your staff. They can get updates on snow days and birthdays and pay their bill, all through your app. By word of mouth, those parents will tell other parents how great your business is based solely on how convenient and cool your app was.
This approach can work for other types of businesses; you just need to be creative. Innovation is your department. But hey, you had to have a huge innovative streak to buy this book — and if you’re still reading this, you’re well into the realm of Geekdom. So, I have full faith that you have everything you need to make a wonderful app for your business, another person’s business, or yourself. All you need is the technical know-how, and I’ll teach you that right here, right now, so let’s go!
myiTunes: A Master-Detail Application (iPad)
myiTunes is based on one of the more daunting methods of creating a Storyboarding app: the Master-Detail Application. I say this because my new students often experience challenges with multiple Master Views and multiple Detail Views. For my more experienced students who’ve worked with earlier versions of Xcode, there are no more Root View Controller or MainWindow.xib files. However, Master-Detail Applications empower the iPad’s Split View and Popover View, together with incredible Storyboarding technology. As if this weren’t enough, I also throw into the mix the ability to access iTunes, Facebook, Google+, pages that have videos, and, of course, the two iPad splash screens with cool icons that all add up to a beautiful, marketable app just waiting to boost you, your business, or someone else’s business into the stratosphere—loudly!
iTunes requires some controversial, quirky, and not-so-user-friendly means of accessing its store. I go through that process step by step, including the ability to look up bands, videos, and podcasts. I don’t cover other multimedia platforms in the example because that would be overload, but I do explain how to convert your media from images to videos and so forth. I also include code to access these other forms of multimedia and offer boilerplate code you can download. So, even though you don’t use all these types of media in this project, they are there for you.
One thing about terminology before we proceed: we will be talking about Split Views and Popover Views in this app. These are the supercool tables and drop-down menus that, depending how you hold your iPad, invoke a table for the user to use. The Split View shows two panels side by side. In Landscape orientation, the Master View is embedded on the side. However, in Portrait orientation the Split View appears as a Popover that looks like it’s lying on top of the existing view — like a drop-down menu sitting on top of what was underneath it (see Figure 10-25). But it can’t be that it works like a dialog box or drop-down menu. One student recently asked me, “Dr. Lewis, can we pimp out the Popover!?” Hmmm … nope! You can’t tweak, pimp out, or change much. But the issue is whether you want to or not, and the answer is probably not. Popovers are sophisticated and elegant and show the user that you, the developer who programmed them, are awesome!
So let’s get on with the preliminaries so you can start on your app.
Preliminaries
This chapter’s download files are a DemoMonkey file and images. You’ll find these files at http://bit.ly/ULpM9P. You can download the sample code that I programmed on the video here: http://bit.ly/ULpO1m. To view the screencast of this chapter’s exercise, go to http://bit.ly/UnfI37. If you need more help, go to the forum at http://bit.ly/oLVwpY.
THE BIG PICTURE
First, I show you the code from 30,000 feet, for a very broad overall view of the landscape. Then, as you drill down, keep the big picture in mind. But first, take a sneak peak at the Storyboard Popover in Figure 10-26 at the end of this chapter, which illustrates how after tapping the app’s icon, the first screen shows the iPad’s Popover as it lies “on top” of the screen “below” it. It’s really cool and certainly something that every Xcode programmer should learn. What you’ll be programming here, from a broad perspective, goes like this:
- Set up the Popover in the Storyboard.
- Code the interaction to the multimedia platforms.
- Tweak the Popover to grab the platforms correctly.
Let’s get started with the app.
- You will use a Master-Detail Application. So, open Xcode and
 , as shown in Figure 10-1. After selecting the Master-Detail Application, Press Enter/Return.

Figure 10-1. Select the Master-Detail Application icon and press Return or click Next
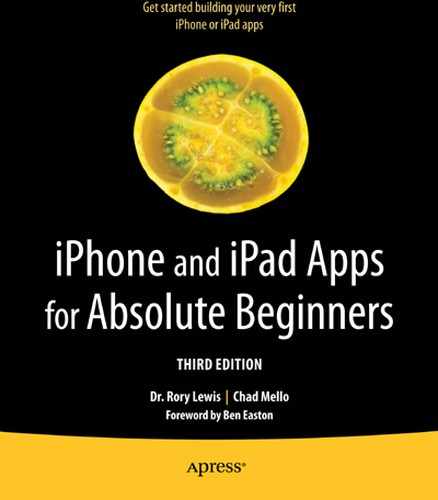
- In order to follow along with me as closely as you can, name it myiTunes, select iPad in the Devices drop-down, and check Use Storyboards and Use Automatic Reference Counting, as shown in Figure 10-2.
Figure 10-2. Name your app myiTunes, making sure Use Storyboards and Use Automatic Reference Counting are checked
Make sure you’ve downloaded the images and boilerplate code onto your desktop from http://bit.ly/ULpM9P.
- Drag in the 72 × 72 px iPad icon and the 144 × 144 iPad icon into the App Icons box. Drag the iPadSplash 769 × 1004 and iPadSplash 1536 × 2008 splash screens into the Launch Images Landscape box. And drag the iPadSplash 1024 × 748 and iPadSplash 2048 × 1496 splash screens into the Launch Images Portrait boxes, as shown in Figure 10-3.
Figure 10-3. Drag in your graphics
- You always want to keep things nice, orderly, and in their proper place, and note that the files holding the images you just dragged into Xcode are in the root directory. Drag them into their proper location: the Supporting Files folder, as shown in Figure 10-4.

Figure 10-4. Drag the images into the Supporting Files folder
Organize the Popover in Storyboard
The first thing you’ll do is set up the Popover in the Storyboard. I’m going to be fairly inventive and artful but won’t overboard with beautiful Popover bells and whistles so that I don’t take away from my two goals: teaching you to set up the Storyboard and teaching you to write the code behind the Storyboard. However, once you complete this project, you’ll have opened the doors to rooms where you can tinker around later. For right now, let’s keep it simple.
- Select MainStoryboard.storyboard, as shown in Figure 10-5.

Figure 10-5. Select the Storyboard
- Before we get too far, let’s first absorb what Xcode has instantiated in the initial Master-Detail Application screen. In the bottom right-hand corner in white is Detail View Controller – Detail. To its left and partially hidden is the Navigation Controller. In the upper right-hand side is the Master View Controller – Master, Navigation Controller, and (partially hidden) the Split View Controller Scene. You’ll probably spend most of your time programming the Popover, which is the Master View Controller – Master, and after that the Detail View Controller – Detail (the meat and potatoes of your app).

Figure 10-6. The initial Master-Detail Application screen
- Figure 10-15 shows all the Table Views and their levels in the left-hand sidebar called the Document Outline, inside the box called Master View Controller – Master Scene. That’s what you’ll be working toward in the next few steps. There are two ways to populate these Table Views with what you want: the long, boring way and the organized and very efficient way. Stick to this simple rule:
Create oneTable View with all its sub-attributes. Then, once you have one done exactly the way you want it, duplicate the entire set.
Go ahead and select Table View in the Master View Controller – Master scene, as shown in Figure 10-7.

Figure 10-7. Select the Master View Controller – Master
THE BIG PICTURE
- Set up the Popover in the Storyboard.
- 1.1 Create a group.
- 1.1.1 Set up the attributes of each Table View Cell – Cell in the group.
- 1.2 Duplicate the group as required.
- 1.3 Label all the cells.
- 1.1 Create a group.
- Code the interaction to the multimedia platforms.
- Tweak the Popover to grab the platforms correctly.
- Set up the Popover in the Storyboard.
- Open the Attributes Inspector in the Utilities pane and ensure Static Cells is selected from the Content drop-down menu, as shown in left-hand image in Figure 10-8. Remember that I advised you to make one cell perfect and duplicate it in order to be efficient? This is where you start that process. Also make sure that the number of cells is only 1, as shown in the right-hand image in Figure 10-8.

Figure 10-8. Select Static Cells and change Sections to 1
- This can get tricky, so pay attention to this very simple step: go back to the Documents Outline and, inside your Master View Controller – Master Scene, select Table View Section, as shown in the left-hand image in Figure 10-9. Name this cell Artist. Later, you’ll change these names when you copy and paste them. For now, simply go over to the Attributes Inspector and first change the number of rows from 3 to 1 and then name it Artist, as shown in the right-hand image in Figure 10-9.

Figure 10-9. Name the Table View Cell – Cell Artist
- You want to create subtitles in each Table View Cell – Cell because they tell you and, most importantly, the user what you’ll see or where you’ll be going if you select this option. So, go back to the Documents Outline. If the Table View Section isn’t expanded, expand it. Once your Table View Section is expanded, select Table View Cell – Cell, as shown in the left-hand image in Figure 10-10. In the Attributes Inspector, change the Style from Basic to Subtitle, as shown in the right-hand image in Figure 10-10.

Figure 10-10. Create subtitle in the Table View Cell – Cell
- In Figure 10-11, you can see Subtitle under Title in your cell. That’s exactly what you want. While you’re here, add disclosure indicators (>) to give the user a sense of the direction that they will be travelling in when they select a particular cell. In the Accessory field, just under the Style section you were in, select Disclosure Indicator, as shown in Figure 10-11.

Figure 10-11. Create disclosure indicators for each Table View Cell – Cell
- Ahh … look at that beautiful disclosure indicator and subtitle you’ve just created in Figure 10-12. Beautiful! The next “Big Picture” section shows that you’re about to embark on setting up the Table View Section (1.1.2.). Go back to the Documents Outline and select the Table View Section, as shown in Figure 10-12.

Figure 10-12. Go back up one level to the Table View Section
THE BIG PICTURE
- Set up the Popover in the Storyboard.
- 1.1 Create a group.
- 1.1.1 Set up the attributes of each Table View Cell – Cell in the group.
- 1.1.1.1 Static cells, grouped style, subtitles, and disclosure indicators.
- 1.1.2 Set up the Table View Section.
- 1.1.2.1 Create a header and create two rows.
- 1.2 Duplicate the group as required.
- 1.2.1 Go to the Master Scene and make four sections.
- 1.3 Label all the cells.
- 1.1.1 Set up the attributes of each Table View Cell – Cell in the group.
- 1.1 Create a group.
- Code the interaction to the multimedia platforms.
- Tweak the Popover to grab the platforms correctly.
- Set up the Popover in the Storyboard.
- You haven’t labeled any Table View Cell – Cells yet. You only do this in step 1.3 in “The Big Picture,” which is the last step for two reasons. First, it takes time and second, you’ll change them. However, in this instance, you need to select the Table View Section and go to the Header in the Attributes Inspector and give it a “dummy” label to give you something (anything) to edit when you duplicate these cells. Label this group with the name of your first group: Artists. Then, create two rows, as shown in Figure 10-13, because you’ll only have two rows of cells in each group. (You may want more. Always err on the side of creating more cells, because you can delete them easily, but if you have to recreate them, you often will have to spend time formatting them.)
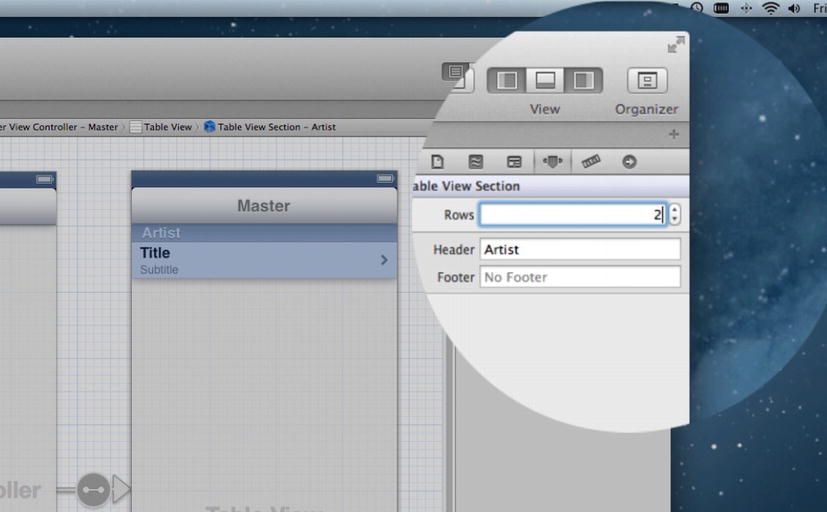
Figure 10-13. Name the first group Artist and create two rows
- You’ve now created one group exactly as you want it. Go back to the original Table View where you began and make four sections, as shown in Figure 10-14.

Figure 10-14. Only now do you create all your sections
- Of course, you’ll do things differently when you create your own, but for now name your four groups: Artists, Albums on iTunes, Songs, and Pictures. These four groups will facilitate the band’s (I give you the Beatles links when I get to the code) presence on the Web and iTunes, under Artists, then Albums. For the Beatles, there will be many albums. For this example, you’re only using two, and likewise for Songs and Pictures. Note some subtitles tell the user that they’ll go to iTunes and some tell the user they’ll go to the Internet. Name all the cells, as shown in Figure 10-15. Remember, you can simply double-click the cell to create a name.

Figure 10-15. Name the cells and headers
I really want to keep this really, really, really simple. You’ll do two broad things when you code: first you create code that hooks up to what you want to happen when each cell is tapped and then you make sure your views connect correctly with the WebViews.
THE BIG PICTURE
- Set up the Popover in the Storyboard.
- 1.1 Set up the header for the Master View Controller.
- 1.2 Set up the header for the Detail View Controller.
- Code the interaction to the multimedia platforms.
- 2.1 Master View Controller.
- 2.1.1 Code for each cell that is selected.
- 2.2 Detail View Controller.
- 2.2.1 Connecting the views to the WebViews
- 2.1 Master View Controller.
- Tweak the Popover to grab the platforms correctly.
- Set up the Popover in the Storyboard.
- Start by looking at the Master View Controller. First make sure your header allows you to do all the things you need to do in your implementation file. Save everything, close the utilities, open the Navigator, and open up MasterViewController.h. You need to delete the existing @interface so you can replace it with your own. Select it as shown in Figure 10-16 and delete it.
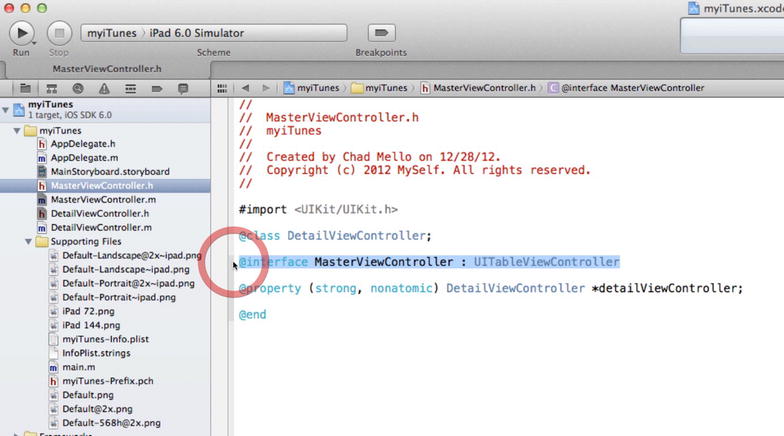
Figure 10-16. Start to create an NSURL to hook up to iTunes
- You’re now going to begin to make sure that you can embed web content into your app using the UIWebView. Simply create a UIWebView object, attach it to a window, and then send it a request to load web content. You can either code this yourself, as I show in a moment, or use DemoMonkey. If you’re using DemoMonkey, open up the DemoMonkey file “MasterViewController.h: interface” and drag it over to where you just deleted the @interface one step ago. This is indicated by arrow 1 in Figure 10-17. What you did here is the MasterViewController declaration to accommodate both your table and WebView components.
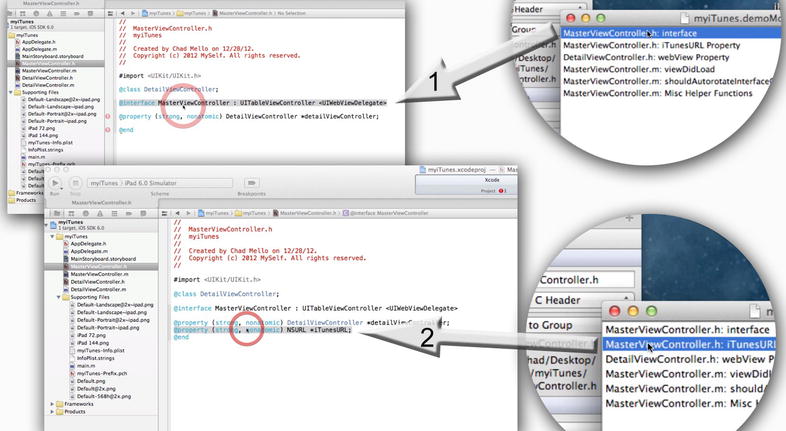
Figure 10-17. Paste the first two DemoMonkey files into the MasterViewController header file
Next, create an @property so you can later use an NSURL object to manipulate a URL to point to the iTunes Store. Either type in the NSURL @property as shown after this step or, if you’re using DemoMonkey, select the second DemoMonkey file “MasterViewController.h: iTunes URL” and drag it immediately beneath the @property for the Detail View, as indicated by arrow 2 in Figure 10-17. The NSURL @property code you’ve just dragged in is what you’ll need every time you want to incorporate URLs that connect to iTunes.
These two steps will soon become as common as getting in your car and turning the ignition key. When you want an @interface for a Split View Controller to accommodate a table for web viewing that includes iTunes URLs, you enter the following code:
#import <UIKit/UIKit.h>

@class DetailViewController;

@interface MasterViewController : UITableViewController <UIWebViewDelegate>
@property (strong, nonatomic) DetailViewController *detailViewController;
@property (strong, nonatomic) NSURL *iTunesURL;
@end - Save your MasterViewController.h and open the DetailViewController.h file. You now want to make sure DetailViewController can also accommodate the UIWebView outlets. Either type in the code as shown after this step or drag the DemoMonkey file “DetailViewController.h: webView Property” over between the @property detailItem and @property detailDescriptionLabel, as shown in Figure 10-18. Note that when you go back to tweak the Storyboard to be able to have the DetailViewController access the Internet, you’ll connect this to your UIWebView.
#import <UIKit/UIKit.h>

@interface DetailViewController : UIViewController <UISplitViewControllerDelegate>

@property (strong, nonatomic) id detailItem;
@property (strong, nonatomic) IBOutlet UIWebView *webView;
@property (weak, nonatomic) IBOutlet UILabel *detailDescriptionLabel;
@end
Figure 10-18. Select and open the DetailViewController header file
In DetailViewController, you need to set up LocateArtistPageInSafari, LocateArtistPageInItunes, LocateMoviePageInItunes (you don’t use this one here, but I thought you may like to have it at your disposal), and StartExternalAppWithURL. The “Big Picture” section shows where you are, in bold.
THE BIG PICTURE
- Set up the Popover in the Storyboard.
- 1.3 Set up the header for the Master View Controller.
- 1.4 Set up the header for the Detail View Controller.
- Code the interaction to the multimedia platforms.
- 2.1 Master View Controller.
- 2.1.1 Code for each cell that is selected.
- 2.2 Detail View Controller.
- 2.2.1 Connect the views to the WebViews.
- 2.1 Master View Controller.
- Tweak the Popover to grab the platforms correctly.
- Set up the Popover in the Storyboard.
- You need to make sure your app still runs regardless of the orientation of the iPad (Split View, in Landscape, and Popover in Portrait) and have a set of cases of events that you’ll trigger if a cell is selected. Drag the DemoMonkey file “MasterViewController.m: shouldAutorotateToInterfaceOrientation” over between the viewDidLoad and DidReceiveMemoryWarning methods, as shown in Figure 10-19. Let’s step back for a minute now and have a look at the Big Picture.

Figure 10-19. Drag in the shouldAutorotateToInterfaceOrientation method
- Set up the Popover in the Storyboard.
- Code the interaction to the multimedia platforms.
- 2.1 Master View Controller.
- 2.1.1 Code for each cell that is selected.
- 2.1.1.1 Header material.
- 2.1.1.2 viewDidLoad.
- 2.1.1.3 Set orientations (just done in Figure 10-19).
- 2.1.1.4 Case statements.
- 2.1.1.5 Private methods.
- 2.1.1 Code for each cell that is selected.
- 2.2 Detail View Controller.
- 2.2.1 Connecting the views to the WebViews.
- 2.1 Master View Controller.
- Tweak the Popover to grab the platforms correctly.
- You need to select everything from the insertNewObject method until the @end statement to add your miscellaneous code that includes your case statements and private methods. Select it, as shown in Figure 10-20, and delete it.

Figure 10-20. Delete from the insertNewObject method to the @end
- You need to first convert your section and row numbers from a linear index to rows when counting from top to bottom and then add your private methods. Drag in the DemoMonkey file "MasterViewController.m: Misc Helper Functions" and place it where you've just deleted all the code in the last step (you can see the case statements have been added in Figure 10-21; I cover them in detail in a moment). I've purposely left some of the code that you deleted and put in Override comments to let you know what it is you're overriding (telling our code to ignore) and what it is you've replaced. The four overrides are as follows:
// Override to support conditional editing of the table view.
// Override to support editing the table view.
// Override to support rearranging the table view.
// Override to support conditional rearranging of the table view.
Figure 10-21. Your case statements
Note that these four overrides make the compiler ignore code that was already not needed for this application. When you uncomment the code, it provides more control over the default behavior of the Table View. This is what’s known as overriding.
Before you start working on the case statements, which will look at what type of link is invoked, depending on the button tapped by the user, you need to do a little housekeeping. As noted earlier, you need to convert your section and row numbers into a linear index of rows when counting from top to bottom. As shown in the override comments, you assume that the first section is two rows and all others are one row. You can, of course, choose your own iTunes links to The Beatles, as mentioned earlier — or to any band, lecture, movie, or podcast you choose. They are obtained from iTunes Link Maker (http://itunes.apple.com/linkmaker/) as recommended in the iTunes Link Maker FAQ (www.apple.com/itunes/linkmaker/faq/).
For those who need to dig a little deeper, the following code is the function that contains the switch block. The first line is the function’s definition, and in the second line it fetches the actual row index that was selected by the user. It’s this line (indexPath.section*2 + indexPath.row) that makes sure that the first section is two rows and all others are one row.
- (void)tableView:(UITableView *)tableView didSelectRowAtIndexPath:(NSIndexPath *)indexPath
{
NSInteger nSelectedRowIdx = indexPath.section *2 + indexPath.row;
    switch (nSelectedRowIdx) {
Now you need to make the case statements that will keep tabs on what selection the user taps in your list that you’ve ordered sequentially. You have four sections: ARTIST, ALBUMS IN ITUNES, SONGS, and PICTURES. Remember that you gave two options for each selection, which means you need to have two cases within each of them. I lay it out in the “Big Picture” section.
THE BIG PICTURE
- Set up the Popover in the Storyboard.
- Code the interaction to the multimedia platforms.
- 2.1 Master View Controller.
- 2.1.1 Code for each cell that is selected.
- 2.1.1.1 Header material.
- 2.1.1.2 viewDidLoad.
- 2.1.1.3 Set orientations.
- 2.1.1.4 Case statements.
- 2.1.1.4.1 ARTISTS.
- 2.1.1.4.1.1 Case 0.
- 2.1.1.4.1.2 Case 1.
- 2.1.1.4.2 ALBUMS.
- 2.1.1.4.2.1 Case 2.
- 2.1.1.4.2.2 Case 3.
- 2.1.1.4.3 SONGS.
- 2.1.1.4.3.1 Case 4.
- 2.1.1.4.3.2 Case 5.
- 2.1.1.4.4 PICTURES.
- 2.1.1.4.4.1 Case 6.
- 2.1.1.4.4.2 Case 7.
- 2.1.1.5 Private methods (helper routines to process redirects prior to handing off to application open).
- 2.2 Detail View Controller.
- 2.2.1 Connecting the views to the WebViews.
- 2.1.1 Code for each cell that is selected.
- 2.1 Master View Controller.
- Tweak the Popover to grab the platforms correctly.
Accordingly, the code is as follows:
                    /////////>>>>>>>>>>>       ARTIST      <<<<<<<<<<<<<<<<<

        case 0: // in Safari (Artist) RLB on WEB
        {
            NSURL *urlInSafari = [NSURL URLWithString:@" http://bit.ly/VAggDR "];
            [self LocatePageInSafari: urlInSafari];
        }
            break;

        case 1: // in Twitter
        {
            NSURL *urlInItunes = [NSURL URLWithString:@" https://twitter.com/RoryLewisBand "];
            [self LocatePageInSafari:urlInItunes];
        }
            break;

            /////////>>>>>>>>>>>   ALBUMS IN ITUNES  <<<<<<<<<<<<<<<<<

        case 2: // in iTunes (Songs) SONGS FOR FRIDAY
            //[self LocateArtistPageInItunes];
        {
            NSURL *urlInItunes = [NSURL URLWithString:@" itms://itunes.apple.com/us/album/songs-for-friday/id408548641?uo=4"];
            [self StartExternalAppWithURL:urlInItunes];
        }
            break;

        case 3: // in iTunes (Songs) HEROINES
            //[self LocateArtistPageInItunes];
        {
            NSURL *urlInItunes = [NSURL URLWithString:@"itms://itunes.apple.com/us/album/heroines/id461113548?uo=4"];
            [self StartExternalAppWithURL:urlInItunes];
        }
            break;
            /////////>>>>>>>>>>>       SONGS      <<<<<<<<<<<<<<<<<


        case 4: // in iTunes (Songs) Elvis Presley
            //[self LocateArtistPageInItunes];
        {
            NSURL *urlInItunes = [NSURL URLWithString:@"itms://itunes.apple.com/us/album/elvis-presley/id461113548?i=461113566&uo=4"];
            [self StartExternalAppWithURL:urlInItunes];
        }
            break;

        case 5: // in iTunes (Songs)
            //[self LocateArtistPageInItunes];
        {
            NSURL *urlInItunes = [NSURL URLWithString:@"itms://itunes.apple.com/us/album/hippie-paradise/id408548641?i=408549591&uo=4"];
            [self StartExternalAppWithURL:urlInItunes];
        }
            break;

            /////////>>>>>>>>>>>     PICTURES    <<<<<<<<<<<<<<<<<


        case 6: // in Safari (Artist) RLB on WEB
        {

            NSURL *urlInSafari = [NSURL URLWithString:@" http://on.fb.me/nFwQj6 "];
            [self LocatePageInSafari:urlInSafari];
        }
            break;

        case 7: // in Safari (Artist) RLB on WEB
        {
            NSURL *urlInSafari = [NSURL URLWithString:@" http://www.youtube.com/watch?v=ANpjUmyaE94 "];
            [self LocatePageInSafari:urlInSafari];
        }
            break;

    }

    //[self DeselectRow];
}
Now you need to create your helper routines to process redirects prior to handing off to iTunes Store. Specifically, you need to process a LinkShare/TradeDoubler/DGM URL into something the iPhone can handle, if you choose to use a universal app on your own that does include the iPhone. For more information, check out http://developer.apple.com/library/ios/#qa/qa1629/_index.html.
- (void)openReferralURL:(NSURL *)referralURL {
    //NSURLConnection *conn =
    (void)[[NSURLConnection alloc] initWithRequest:[NSURLRequest requestWithURL:referralURL] delegate:self startImmediately:YES];
}
Save the most recent URL as a safety measure (just in case multiple redirects occur). Note that iTunesURL is an NSURL property in this class declaration:
- (NSURLRequest *)connection:(NSURLConnection *)connection willSendRequest:(NSURLRequest *)request redirectResponse:(NSURLResponse *)response {
    self.iTunesURL = [response URL];
    NSLog(@"RxURL [%@]",[self.iTunesURL absoluteString]);
    return request;
}
Okay, no more redirects. Use the last URL that you saved:
- (void)connectionDidFinishLoading:(NSURLConnection *)connection {
    [self StartExternalAppWithURL:self.iTunesURL];
}
This is a little technical, but you need to have an iTMS link (a special kind of URL/link protocol used for iTunes’ links and URLs) to get out there into the ether. The little method called StartExternalAppWithURL allows your iTMS links:
-(void)StartExternalAppWithURL:(NSURL *)theURL
{
    NSLog(@"UsingURL [%@]",[theURL absoluteString]);
    [[UIApplication sharedApplication] openURL:theURL];

    [self DeselectRow];
}
Almost done. You just need to deselect your last selected table cell so that when the view reappears, it’s not still selected. You do this after your external app start has been requested because this object is not informed of view leaving or the app restarting from the background when it’s resumed without adding additional plumbing.
-(void)DeselectRow
{
    // Unselect the selected row if any
    NSIndexPath* selection = [self.tableView indexPathForSelectedRow];
    if (selection) {
        [self.tableView deselectRowAtIndexPath:selection animated:YES];
    }
    [self.tableView reloadData];
}
Last bit: three Artist pages in Safari (case 0) and the cases for 6 and 7.
-(void)LocatePageInSafari: (NSURL *)theURL{

    // if we have an iPAD. . .
    if ([[UIDevice currentDevice] userInterfaceIdiom] == UIUserInterfaceIdiomPad) {
        // then open page in detail view (UIWebView)
        NSURLRequest *urlRequest = [NSURLRequest requestWithURL:theURL];
        [self.detailViewController.webView loadRequest:urlRequest];
    } else {
        // else we have an iPhone/iPod Touch so open in external safari
        [self StartExternalAppWithURL:theURL];
    }

@end
}That was something else, wasn’t it!? Just as an aside, when I first began wrapping my head around Storyboarding for my class, the beta version kept changing every week. Not only had I never seen a Storyboard before, but the code was changing constantly, yet I had to teach it in the lecture hall. I had many sleepless nights. But here’s the deal. If you master this app and Storyboarding, you’re well on your way to huge success in programming. You don’t have to know everything I’ve talked about—you can simply learn when to use it. In DetailViewController, you need to set up your UIWebview—but first let’s have a look at The Big Picture. (The good news here is that you don’t actually code the DetailViewController—you do it via Storyboarding.
THE BIG PICTURE
- Set up the Popover in the Storyboard.
- Code the interaction to the multimedia platforms.
- 2.1 Master View Controller.
- 2.2 Detail View Controller.
- 2.2.1 Connecting the views to the WebViews.
- Tweak the Popover to grab the platforms correctly.
- Save everything. Go back into Storyboard, close the Navigator, open up the Utilities, and open up the Library. Your Table View Cell is where your WebViews are shown, so you need a WebView located there. Go back to Storyboard and either delete the label or not at this point. It makes no difference, because as you’ll see in the next step, when you move the WebView up the hierarchy table, the label disappears. Regardless of whether you delete the label or not, select Table View Cell – Cell and drag a Web View onto the Detail View Controller - Detail, as shown in Figure 10-22.

Figure 10-22. Go back to Storyboard, select the Table View Cell – Cell, and drag a WebView onto the Detail View
Finalizing the Storyboard
The only thing you still need to do is connect something that wasn’t there when you began: the webView – UIWebView connection in the code. Now that it’s there, you need to go back into Storyboard and connect them.
- Before you connect the WebView up, here’s a cool little trick: remember when you moved the WebView in you just left it that size? Well, here’s way to guarantee perfect size control no matter what elements you add into your code at different layers. Open Storyboard again, go to the Documents Outline, go to the Detail View Controller – Detail Scene, and select the WebView. Drag it upward above the view and drop it there. The old view disappears, as shown in Figure 10-23, and the WebView is now in control and fills up the entire area. Okay, now let’s make those connections.

Figure 10-23. Move WebView up to fill the iPad screen
- Keeping the Detail View Controller - Detail selected, as shown, go back to the Connection Inspector and drag from the webView to the UIWebView, as shown in Figure 10-24. Save it.

Figure 10-24. Select myDetailViewController
Note Now connect your iPad to your Mac and, rather than selecting iPad Simulator, select iOS Device. You can run it on the Simulator if you like, but iTunes cannot run inside the Simulator, so all the iTunes links won’t work. Once you’ve connected your iPad to your Mac, Click Run.
- Once your app has completed building, which may take a few seconds, you’ll see the icon appear, as shown in Figure 10-25. Once you click the icon, you will immediately see the Popover screen. The first time you select it, it won’t show anything underneath. However, once you select a page and then select the Popover again, it keeps the underlying image below the Popover; mine was the YouTube site, as shown in Figure 10-25.

Figure 10-25. From the icon through to the Popover
- Figure 10-26 shows the flipping while using the web site case.

Figure 10-26. Orientation working with the Web
This has been a wonderful journey, but it’s really only the start. As I’ve gone through this third edition, I can’t help but think of all the fresh minds that will read these exercises and struggle through them—and then break through to create awesome apps and make money! How many more of my students and readers of this book will work at Apple!? Wow! It’s been a great motivation for me to think about this.
I hope to see you all on the forum. I do not answer emailed questions, but I will answer those exact same questions if you post them on the forum (http://bit.ly/oLVwpY) because then everybody can share my answers. I encourage you to help. No matter how much of a beginner you are, get into the forum and help others. Helping others speeds up your journey.
Peace.
Dr. Lewis