
![]()
Today’s systems are so disparate and large enterprises have a widely heterogeneous environment, with Windows and non-Windows platforms for application development. Developers, whether they are enterprise developers, web developers, ISV (Independent Software Vendor) developers or DBAs, have different needs and different ways of accessing the data that resides in SQL Server. For example ISV developers look for stability in the platform and enterprise developers look for rich development tooling experience and interoperability, whereas web developers want the latest rich development experience. Similarly what a PHP developer needs is very different from what a .NET developer needs. To achieve the rich development experience, developers can choose from various data access libraries such as ADO.NET, SQL Server 2012 Native Client (SNAC), JDBC, ODBC and PHP based on the application requirement. Since SQL Server 2000, the platform has supported interoperability with Windows and non-Windows environments. SQL Server 2000 started supporting Java development using JDBC drivers. PHP application development support was added to SQL Server with SQL Server 2005. With SQL Server 2012, support for ODBC driver for Linux has been added. This simplifies the PHP or other application development on Linux to a greater extent.
The model of choice to address distributed computing and heterogeneous environments is today the Service Oriented Architecture (SOA) paradigm, there have been different ways to generate services from query results over the SQL Server versions. Microsoft is now concentrating on a powerful and very flexible framework named Windows Communication Foundation (WCF). We will see how to use WCF Data Services to provide services and trendy RESTful resources from our databases. Bear with us for the explanation of these concepts.
But firstly, the data access libraries support a new SQL Server 2012 powerful feature named LocalDB (Local Database runtime), that is a very interesting way to ship solutions with an embedded database.
SQL Server 2012 Express LocalDB
Developers always look for simple way to install and embed SQL Server with third party applications or use a small database engine to connect to diverse remote data storage types. When you wanted to meet any of these requirements for creating applications in the past, the only option we had until SQL Server 2012 was to use SQL Server Express Edition. However, developers didn’t want to go through tons of screens to install the SQL Server. On top of this they had to worry about the security and management aspect of the SQL Server instance they had just installed as well.
Starting with SQL Server 2012, SQL Server simplifies the experience for developers by introducing LocalDB (Local Database runtime), which was temporarily called Serverless SQL Server during SQL Server 2012 development. The goal of this new feature is to simplify the installation and provide database as a file without any administration overhead while providing the same feature sets as SQL Server Express Edition.
![]() Note By database as a file, we mean that LocalDB allows using SQL Server, a traditional client-server application, in a local context, more or less like local applications like Microsoft Access or sqlite.
Note By database as a file, we mean that LocalDB allows using SQL Server, a traditional client-server application, in a local context, more or less like local applications like Microsoft Access or sqlite.
The installation of LocalDB is simplified to a greater extent, with no pre-requisites, no reboots, and no options to select. There is only one global installation, meaning only one set of binaries are installed per major version of the SQL Server for all the LocalDB instances and no constantly running service or agent in the box. The instance of LocalDB is started with the application connects to it and stopped when the application closes the connection. LocalDB can be downloaded from the same page as the old-fashioned SQL Server 2012 Express Edition, at http://www.microsoft.com/en-us/download/details.aspx?id=29062. There are two builds available, ENUx64SqlLocalDB.MSI for 64-bit systems and ENUx86SqlLocalDB.MSI for 32-bit systems. MSI files are Microsoft Installer packages that you can run by double-clicking and typing them like any executable in a cmd or Powershell session. MSI installations are usually graphical wizard-driven installations. As the LocalDB installation does not require any user choice, you can simply perform a silent install by using the following command:
SQLLocalDB.msi /Quiet
Once the LocalDB is installed you can create and manage the instances by using SQLLocalDB.exe found in %Program Files%Microsoft SQL Server110ToolsBinn. So, from now on, each time we call SQLLocalDB.exe, it will be in this directory context. As it is not in the path, you need to tell your shell where to find the tool.
![]() Note The LocalDB runtime, which is nothing other than a specific sqlserver.exe binary, can be found in %Program Files%Microsoft SQL Server110LocalDBBinn.
Note The LocalDB runtime, which is nothing other than a specific sqlserver.exe binary, can be found in %Program Files%Microsoft SQL Server110LocalDBBinn.
You can use the command as shown below to find out the details on the existing instances:
SQLLocalDB.exe info
To create a LocalDB instance, you can use SQLLocaldb.exe and specify the name of the instance and the version number with the create option. The commands listed below first create an SQL Server 2012 LocalDB instance named SQLSrvWebApp1 and then start the instance. Finally, use the info command to list the existing instances. The results are shown in Figure 16-1.
SQLLocalDB.exe create SQLSrvWebApp1 11.0
SQLLocalDB.exe start SQLSrvWebApp1
SQLLocalDB.exe info

Figure 16-1. Query to Create and Start a LocalDB Instance Named SQLSrvWebApp1
You might have guessed that if you want to drop an instance, you can use the SQLLocalDB.exe delete command.
There are two types of LocalDB instances, Automatic and Named. Automatic instances are created by default. There can be only one automatic instance per major version of SQL Server. For SQL Server 2012, the automatic instance name would be v11.0 (which is the internal version number of the SQL Server 2012 RTM release) and the intent for this instance is that it be public and shared by many applications. Named instances are created explicitly by the user and they are managed by a single application. So, if you have a small web application with the characteristic that it needs to start small and be implemented in the enterprise, the better option is to create a named instance when it is small so that you can isolate and manage the application.
To connect to a LocalDB instance with your SQL server Native Client, OLEDB, or ODBC provider, you simply mention the (localdb) keyword in the connection string. Examples of the connection strings that connect to an automatic instance (first line) and named instance (second line) are shown below:
New SQLConnection("Server  =  (localDB)v11.0;AttachDBFile  =  C:Program FilesMicrosoft SQL ServerData FilesAppDB1.mdf")'
New SQLConnection("Server  =  (localDB)WebApp1;AttachDBFile  =  C:Program FilesMicrosoft SQL ServerData FilesWebApp1DB.mdf")'
This code invokes the LocalDB as a child process and will connect to it. The LocalDB runs as an application when you initiate a connection from the client, and if the database is not used by the client application for more than 5 minutes the LocalDB is shut down to save the system resources. LocalDB is supported in ODBC, SQL Native Client and OLEDB client providers. If these client providers encounter “Server = (localdb) < instancename>” they know to call the LocalDB instance if it already exists or start the instance automatically as a part of the connection attempt.
Likewise, you can connect to a LocalDB instance using SQL Server Management Studio (the Express or full version) or the sqlcmd command line tool, by using the same (localdb) keyword as server name, as shown in the following:
sqlcmd -S (localdb)SQLSrvWebApp1
For it to work, you need to make sure that the LocalDB instance is started. You can test it by using the info command along with the instance name, as shown below. The result of the command is shown in Figure 16-2. The instance’s state is visible on the State: line.
SQLLocalDB.exe info SQLSrvWebApp1

Figure 16-2. Results of the QLLocalDB.exe Info SQLSrvWebApp1 Command When the Instance Is Stopped
We can see in Figure 16-2 that our instance is running. If it had stopped, we could have started it using the start command seen earlier before being able to connect to it.
![]() Note Connecting to the (localdb) keyword is supported in .NET version 4.0.2 onwards. If you are using an older .NET version, you can connect to a LocalDB instance but you need to use the named pipe address that is returned by the SQLLocalDB.exe info command. We see that address In Figure 16-2. So the server’s address in our case is np:\.pipeLOCALDB#EC0F7CB5 sqlquery. That’s what we would need to enter in the Server address box for an SSMS connection, or after the –S parameter when calling sqlcmd.
Note Connecting to the (localdb) keyword is supported in .NET version 4.0.2 onwards. If you are using an older .NET version, you can connect to a LocalDB instance but you need to use the named pipe address that is returned by the SQLLocalDB.exe info command. We see that address In Figure 16-2. So the server’s address in our case is np:\.pipeLOCALDB#EC0F7CB5 sqlquery. That’s what we would need to enter in the Server address box for an SSMS connection, or after the –S parameter when calling sqlcmd.
The authentication and security model of LocalDB is simplified. The current user is sysadmin and is the owner of the databases attached to the instance. No other permission is applied. As the LocalDB processes run under the account of a user, this also implies that the database files you want to use on this instance must be in a directory where the user has read and write permissions. Also, while SQL Server hides the physical details of the database storage, LocalDB follows another approach, which is to give access to a database file. A LocalDB connection string supports the AttachDbFileName property that allows attaching a database file during connection. The C# console application in Listing 16-1 illustrates how to use database as a file with LocalDB.
Listing 16-1. Console Application to Connect to a LocalDB Instance
using System;
using System.Data.SqlClient;
using System.Text;
namespace localdbClient
{
    class Program
    {
        static void Main(string[] args)
        {
            try
            {
                SqlConnectionStringBuilder builder =
                    new SqlConnectionStringBuilder(@"Server  =  (localdb)SQLSrvWebApp1;Integrated Security  =  true");
                builder.AttachDBFilename = @"C:UsersAdministratorDocumentsAdventureWorksLT2012_Data.mdf";
                Console.WriteLine("connection string = " + builder.ConnectionString);
                using (SqlConnection cn = new SqlConnection(builder.ConnectionString))
                {
                    cn.Open();
                    SqlCommand cmd = cn.CreateCommand();
                    cmd.CommandText = "SELECT Name FROM sys.tables;";
                    SqlDataReader rd = cmd.ExecuteReader();
                    while(rd.Read())
                    {
                        Console.WriteLine(rd.GetValue(0));
                    }
                    rd.Close();
                    cn.Close();
                }
                Console.WriteLine("Press any key to finish.");
                Console.ReadLine();
            }
            catch (Exception ex)
            {
                Console.WriteLine(ex.Message);
                Console.WriteLine("Press any key to finish.");
                Console.ReadLine();
            }
        }
    }
}
The interesting element of the code in Listing 16-1 is the connection string builder. We first create a SqlConnectionStringBuilder to connect to the (localdb)SQLSrvWebApp1 LocalDB, then we use the connection builder’s AttachDBFilename property to attach the AdventureWorksLT2012 data file to our LocalDB.
SqlConnectionStringBuilder builder =
    new SqlConnectionStringBuilder(@"Server  =  (localdb)SQLSrvWebApp1;Integrated Security  =  true");
builder.AttachDBFilename = @"C:UsersAdministratorDocumentsAdventureWorksLT2012_Data.mdf";
The AdventureWorksLT2012_Data.mdf file is in our Documents directory, so we have full permissions over it. When connecting, we will be automatically in the database’s context, as we can see by executing the code. A list of the first ten tables inside the AdventureWorksLT database is returned, as shown in Figure 16-3. The generated connection string is also printed in the figure.
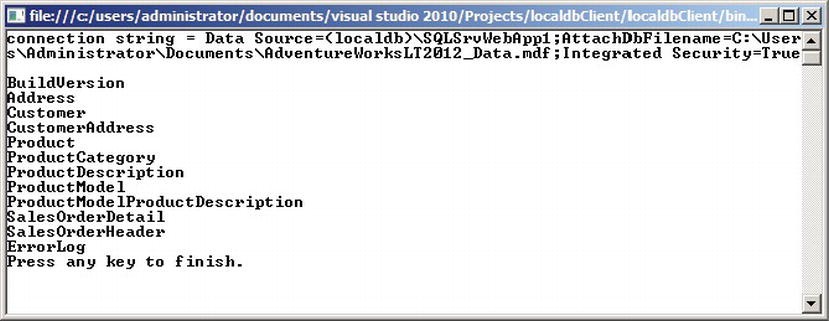
Figure 16-3. Results of the LocalDB Client Program Execution
Databases attached to LocalDB can be thought of as personal databases–thus the database as a file approach. You can of course use all T-SQL DDL commands to create a database and the tables in it. You just need to specify a location that you have permissions on for the database files. If you create a database without specifying a location, your user directory will be chosen by LocalDB. For example, the following command
CREATE DATABASE ApressDb;
will create an .mdf and .ldf file in our personal directory, as shown in Figure 16-4.
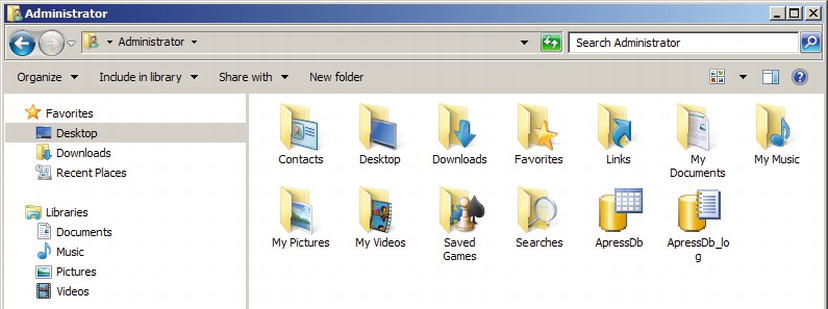
Figure 16-4. The ApressDb Database Files
You should obviously specify a dedicated location when you create a LocalDb database. The databases created or attached to a LocalDB instance will stay attached until you detach or remove them, even if you attached one during a connection with the AttachDBFilename command. So you theoretically don’t need to attach it every time you connect. However, if you used the AttachDBFilename command, the name of the database inside LocalDB will be the full path of the database file. Let’s see what a query on the sys.databases catalog view is returning, in Figure 16-5.
select name FROM sys.databases;

Figure 16-5. Database Names in Our LocalDB Instance
So it is easier to keep the AttachDBFilename option in the connection string that allows attaching the database if it is not already attached, and enter the database context at connection time, thus allowing a smoother experience from the developer’s point of view.
Asynchronous Programming with ADO.NET 4.5
Let’s take a simple scenario of a requirement in the application to upload multiple files or the need to create reports with pagination. In both these scenarios, using a synchronous model in the application can cause the client and server to slow down considerably and cause higher memory utilization due to the I/O operations. In cases like this, instead of writing the calls synchronously, if you write the calls asynchronously you can improve the user experience; however, the current model has some issues with manageability and debugging capabilities with asynchronous code.
Starting with .NET 4.5 the new Async .NET pattern is extended to ADO.NET. Now the connection operations, SqlDataReader and SqlBulkCopy can use the asynchronous capabilities. For example, let’s take a simple case where we open a connection to SQL Server and run a stored procedure. The sample code shown in Listing 16-2 opens a connection and runs a stored procedure named dbo.GetProducts against a LocalDB instance.
Listing 16-2. ADO.NET Code to Run Stored Procedure Synchronously
private void ExecuteSP()
{
    SqlConnectionStringBuilder cnString = new SqlConnectionStringBuilder();
    cnString.DataSource = @"(localdb)v11.0";
    cnString.IntegratedSecurity = true;
    using (SqlConnection cn = new SqlConnection(cnString.ConnectionString))
    {
        cn.Open();
        SqlCommand cmd = new SqlCommand("EXEC dbo.GetProducts", cn);
        cmd.ExecuteReader();
    }
}
The above code opens the connection to the database synchronously and runs the stored procedure waiting till the entire resultset is returned. Instead of waiting for the process to complete, it would be more efficient to perform this operation asynchronously. Listing 16-3 shows the above code modified for asynchronous execution. Changes are shown in bold.
Listing 16-3. ADO.NET Code to Run Stored Procedure Asynchronously
private async Task ExecuteSP()
{
    SqlConnectionStringBuilder cnString = new SqlConnectionStringBuilder();
    cnString.DataSource = @"(localdb)v11.0";
    cnString.IntegratedSecurity = true;
    using (SqlConnection cn = new SqlConnection(cnString.ConnectionString))
    {
        await cn.OpenAsync();
        SqlCommand cmd  =  new SqlCommand("EXEC dbo.GetProducts", cn);
        await cmd.ExecuteReaderAsync();
    }
}
If you compare the code from Listings 16-2 and 16-3, the structure of the code has not changed; however, with the inclusion of the keyword await and the modification of a few keywords in the code we have retained readability and manageability while adding the asynchronous capability. Every possibility of improving performance on the client side is interesting. Keep in mind of course that the best way to ensure optimal performances in database querying is to improve structure and code on the server side.
For many years and over many SQL Server versions, developers who wanted to access SQL Server from non-Windows environments had only one option: using a free library named OpenTDS that was originally created to access Sybase servers.
![]() Note TDS stands for Tabular Data Stream and is the network layer protocol used by Sybase and SQL Server to exchange packets between the database server and the client library. As you might know, SQL Server was in its early days a joint development between Sybase and Microsoft.
Note TDS stands for Tabular Data Stream and is the network layer protocol used by Sybase and SQL Server to exchange packets between the database server and the client library. As you might know, SQL Server was in its early days a joint development between Sybase and Microsoft.
Free TDS is fine and works well, but it does do not cover the newer data types and functionalities SQL Server has to offer, like XML, date, time and datetime2 or FILESTREAM data types, or features like MARS (Multiple Active ResultSets). So, Linux developers wanting for a chance to access SQL Server from PHP or any CGI application had to stick to a limited set of functionalities. If you ever wrote PHP code to access SQL Server in a Linux environment, you might have used the integrated PHP MSSQL functions that call the php5-odbc library. It is nothing else than a layer using FreeTDS behind the scenes.
In an effort to provide a wider range of possibilities for accessing SQL Server, Microsoft decided to change its data access strategy that was previously in favor of OLEDB aligning with ODBC for native access to SQL Server. ODBC (Open DataBase Connectivity) is an API first designed by Microsoft that became a kind of de facto standard for heterogeneous database access. It is a set of APIs that allows access to different data sources from many languages and environments.
Along with this change of strategy, Microsoft developed an ODBC driver for Linux that was released in March 2012. You can download it on this page: http://www.microsoft.com/en-us/download/details.aspx?id=28160.
Linux is available though many distributions, with their own core applications, distribution mechanisms and directory organization. At the time of this writing, Microsoft offers 64-bit packages for the Red Hat Enterprise distribution only. A 32-bit version is planned. Red Hat Enterprise does not necessarily have the most widespread distribution, and many companies use other distributions, like Debian, Ubuntu, CentOS, and so on. The Microsoft ODBC driver can be installed from other distributions, providing you have a way to install the libraries the ODBC driver is using.
![]() Caution In the Linux world, most of the tools used are open source, and can be compiled directly on the system, to link to the available version of the libraries used in the code, but the ODBC driver for SQL Server is not open source, and only the binaries are available to download. That’s why you will need to ensure that you get the proper version of the libraries used by the ODBC driver installed on the Linux box.
Caution In the Linux world, most of the tools used are open source, and can be compiled directly on the system, to link to the available version of the libraries used in the code, but the ODBC driver for SQL Server is not open source, and only the binaries are available to download. That’s why you will need to ensure that you get the proper version of the libraries used by the ODBC driver installed on the Linux box.
We will provide here a short example with Ubuntu Server. Ubuntu is a very popular distribution which is based on Debian, another widespread Linux distribution.
The driver that you can download at the address previously mentioned is compressed in the tar.gz format, the common compression format in Linux. Once downloaded, you can extract it by opening a shell, going to the directory where the compressed file is and executing the following command:
tar xvzf sqlncli-11.0.1790.0.tar.gz
The tar command will extract the archive into a new directory named here sqlncli-11.0.1790.0 on the version of the ODBC driver.
![]() Note The xvzf set of options used with the tar command is commonly used to extract tar.gz archives. x means eXtract, and v means Verbose, and they allow the extraction’s details to be printed on the shell output; z tells tar that it needs to deal with a gzip archive; and f tells tar that the name of the file to extract will follow.
Note The xvzf set of options used with the tar command is commonly used to extract tar.gz archives. x means eXtract, and v means Verbose, and they allow the extraction’s details to be printed on the shell output; z tells tar that it needs to deal with a gzip archive; and f tells tar that the name of the file to extract will follow.
The archive is extracted into a directory. We will enter it using the cd (change directory) command:
cd sqlncli-11.0.1790.0
What we will have to do to install the driver on Ubuntu is valid at the time of this writing, with the current driver release, which is sqlncli-11.0.1790.0 for Red Hat Enterprise 6, and the current Ubuntu version, which is 12.04 Precise Pangolin. The driver we are installing is correct at the time of writing but Linux minor and major version upgrades occur regularly. This can mean that the Microsoft driver might be out of date or you may need a later version when a new one is brought out. However we are demonstrating on Ubuntu 12.04 with the 11.0.1790.0 Microsoft driver, and although in future releases the process may vary, we can hopefully guide you in a general way.
According to its documentation, the unixodbc version needed to run the driver is 2.3.0. Using the apt-cache tool that manages the cache of Debian and Ubuntu packages, we check what the current unixodbc version on our system is:
apt-cache show unixodbc
The show option returns details about a package, and on Debian and Ubuntu, the name of the package is simply unixodbc. The result is shown in Figure 16-6.

Figure 16-6. Apt-cache Command Result
The current version on our Ubuntu is 2.2.14. The libsqlncli downloaded from Microsoft includes a script that downloads and builds the required unixodbc version. So we first uninstall the current unixodbc using the apt-get command, and we install the newer unixodbc using the Microsoft script. Also, we need to prefix our commands with the sudo instruction to execute them with su (super user) privileges, as follows.
sudo apt-get remove unixodbc
sudo bash ./build_dm.sh
There is a catch here. At the time of this writing, the build_dm.sh script (as well as the install.sh script that we will see very soon) has a flaw: if you open it in a text editor, you will see on its first line that it declares itself as a script written for the sh linux shell, using what is called the shebang syntax, as follows.
#!/bin/sh
This allows the file to be executed without mentioning the interpreter on the command line. The shebang line will be read and the proper interpreter will be called. The problem here is that the script is declared as being an sh script, while it is in fact a bash script. sh and bash are two different Linux shells. So, what we do here for the shell to work is to run it explicitly with bash.
A partial result of the build_dm.sh command is shown in Figure 16-7.
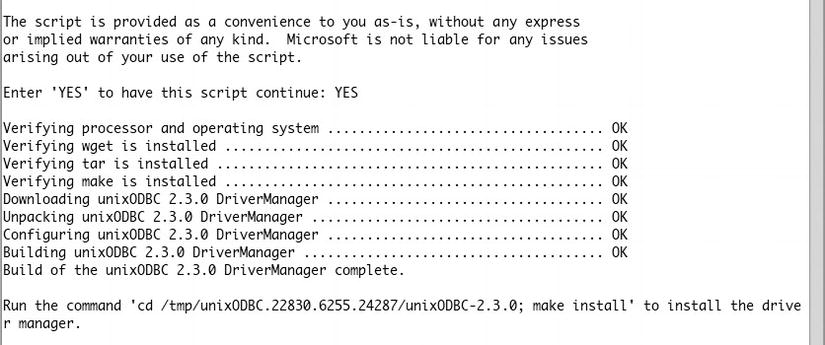
Figure 16-7. build_dm.sh Command Result
The unixodbc driver manager was built and copied to a directory in /tmp. The script tells us what to do next: go there and use the make install command to copy the binaries at the right place. What it does not say is that you need administrative privileges to run both commands (shown in the same line in Figure 16-7, separated by a semicolon). So we need to run the commands as follows.
sudo cd /tmp/unixODBC.22830.6255.24287/unixODBC-2.3.0
sudo make install
Now that the driver manager is installed, we can go to the next step, which is installing the Microsoft driver. The first thing to do is to check the versions of the libraries requested by the driver. We can use the ldd command—ldd returns the shared libraries dependencies of a binary—to check the libraries used by the driver.
ldd lib64/libsqlncli-11.0.so.1790.0
.so (shared object) is the common extension for shared libraries on Linux. On our system, the command returns the results shown in Figure 16-8.
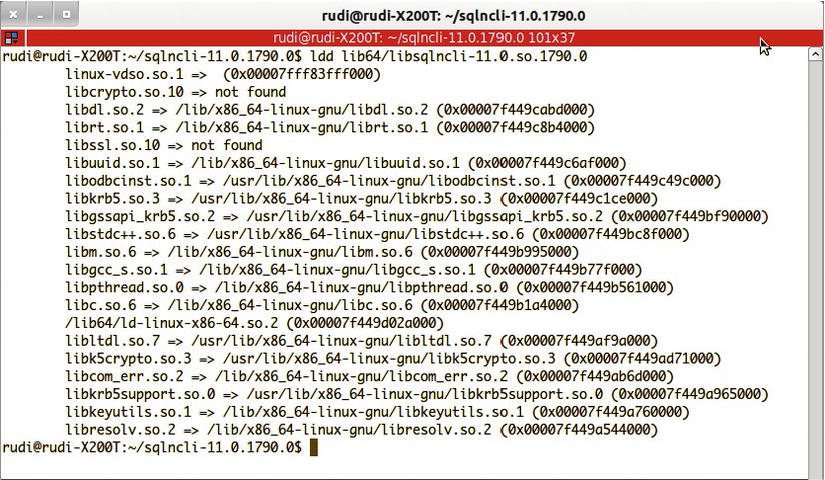
Figure 16-8. Results of the ldd Command
In figure 16-8 we see that most of the libraries are found, except the SSL libraries that are libcrypto.so.10 and libssl.so.10. 10 stands for the dynamic shared objects’ version number. We need to find out if there are any versions of these libraries available on our system. To do that, we use the find command as follows:
find / -name libcrypto.so.* -print
As you might have guessed, the find command searches for files. We ask it to start its search at the root of the file system (/), to search for libcrypto.so.* and to print the result. We found this reference: /lib/x86_64-linux-gnu/libcrypto.so.1.0.0. That looks like what we need, but how do we allow our driver to see it? We will create a symbolic link—we could call it a shortcut—with the name requested by the driver, which will be a pointer to the installed library. The following commands do just that:
sudo ln -s /lib/x86_64-linux-gnu/libcrypto.so.1.0.0 /lib/x86_64-linux-gnu/libcrypto.so.10
sudo ln -s /lib/x86_64-linux-gnu/libssl.so.1.0.0 /lib/x86_64-linux-gnu/libssl.so.10
We use the ln command to create a link, and the –s option specifies that we create a symbolic link.
Now we can install the driver. In the driver’s directory, the install.sh shell script allows us to copy the files to the /opt/microsoft/sqlncli location and create the symbolic links in the path to allow the driver and its tools to be recognized on our system. The /opt directory is chosen as the install path because it’s where applications not installed with the distribution are supposed to go.
sudo bash ./install.sh install --force
Once again we use sudo to run the script under administrative privileges and we use bash explicitly. The —force option is needed on our distribution to avoid dependency checks performed by the script to cancel the installation process.
The installation script runs quickly, and when it is finished, you can test the ODBC driver by using the two tools installed with it: a Linux version of the bcp (Bulk Copy) tool, and a Linux version of the sqlcmd shell. As symbolic links are created by the installation script in the path, you can use sqlcmd wherever you are in the file system. An example of starting sqlcmd follows:
sqlcmd -S SQL2012 -U apress -P @press!
This command connects to the SQL2012 server using the SQL login apress, with password @press!. If you receive an error saying that the library libcrypto.so.10 (or any library used by the ODBC driver) is not found, you might have to investigate and install the library or use the symbolic link technique described above.
Note that here we connect using an SQL Login and not Integrated Security. That’s logical, you might think: we are on Linux, not logged in a Windows domain, so how could integrated security work? Well, it can, not fully, but it can. For that, your Linux box must have Kerberos properly configured, which is out of the scope of this book, so please refer to this documentation entry for a high-level description of the requirements for it to work: http://msdn.microsoft.com/en-us/library/hh568450. Note that you cannot impersonate an account, and you are limited to the Linux machine system account.
JDBC
To use the JDBC component, first download it from this page: http://msdn.microsoft.com/en-us/sqlserver/aa937724.aspx. The driver is a JDBC 4 driver that is available to download as a Windows self-extract executable, or a tar.gz compressed file for non-Windows environments. Once the file is uncompressed, you will have a directory with two jar files and other resources like documentation. Put the sqljdbc4.jar file, which is the JDBC 4 driver, in your Java classpath. The classpath is the path where Java will search for classes to run or to import.
Java development is a broad subject so we will not enter into too many details here, but we will provide a short example of the JDBC driver usage, mainly to illustrate the use of the connection string. JDBC connection can be done using a connection string, also named connection URL that is, in the case of SQL Server, very similar to the ADO.NET or ODBC connection strings. The general form of the string is as follows:
jdbc:sqlserver://[serverName[instanceName][:portNumber]][;property = value[;property = value]]
Other methods, like setting properties of a Connection object, can be used; we will show here the connection string method. Listing 16-4 shows a short but complete example of a Java class allowing connecting to SQL Server and running a query. To make it more interesting, we assumed that we were in an environment using AlwaysOn Availability Groups, and we added the failoverPartner option in the connection string, in order to allow reconnecting to a mirror in case the first server didn’t respond.
![]() Note If your application accesses the SQL Server with AlwaysOn that listens in multiple subnets with JDBC driver, it is important to set the keyword MultiSubnetFailover = True in the connection string. The reason is that JDBC drivers do not iterate through multiple IP addresses and if the network name listens to multiple IP addresses, JDBC driver spawns parallel connections to the IP addresses and listens to the first one that responds.
Note If your application accesses the SQL Server with AlwaysOn that listens in multiple subnets with JDBC driver, it is important to set the keyword MultiSubnetFailover = True in the connection string. The reason is that JDBC drivers do not iterate through multiple IP addresses and if the network name listens to multiple IP addresses, JDBC driver spawns parallel connections to the IP addresses and listens to the first one that responds.
Listing 16-4. Java Example Using the Microsoft JDBC Driver
import java.sql.*;
public class ApressExample {
 public static void main(String[] args) {
 	String connectionUrl  =  "jdbc:sqlserver://SQL2012;integratedSecurity  =  true;databaseName  =  AdventureWorks;failoverPartner  =  SQL2012B";
 	Connection cn = null;
 	String qry = "SELECT TOP 10 FirstName, LastName FROM Person.Contact";
 	try {
  cn = DriverManager.getConnection(connectionUrl);
  runQuery(cn, qry);
 	} catch (SQLException se) {
  try {
  System.out.println("Connection to principal server failed, trying the mirror server.");
  cn = DriverManager.getConnection(connectionUrl);
  runQuery(cn, qry);
  } catch (Exception e) {
  e.printStackTrace();
  }
 	} catch (Exception e) {
  e.printStackTrace();
 	} finally {
  if (cn != null) try { cn.close(); } catch(Exception e) { }
      }
   }
 private static void runQuery(Connection cn, String SQL) {
 	Statement stmt = null;
 	ResultSet rs = null;
 	try {
  stmt = cn.createStatement();
  rs = stmt.executeQuery(SQL);
  while (rs.next()) {
  System.out.println(rs.getString(0));
  }
  rs.close();
  stmt.close();
 	} catch (Exception e) {
  e.printStackTrace();
 	} finally {
  if (rs != null) try { rs.close(); } catch(Exception e) {}
  if (stmt != null) try { stmt.close(); } catch(Exception e) {}
 	}
 }
}
For this example to work, save it in a file named ApressExample.java, and compile it with the java compiler (javac.exe on Windows) after having made sure that the sqljdbc4.jar file is in the Java classpath. You could also indicate the path of the driver in the javac command line, as shown in the following example:
javac.exe -classpath "C:sqljdbc_4.0enusqljdbc4.jar" c:apressApressExample.java
The compilation will result in an ApressExample.class file that you can run with java.exe. Once again the JDBC driver will have to be in the classpath for it to work. The classpath is an environment variable, and an example of setting the classpath for the session and running the java class in a cmd session on Windows is shown below. You must be in the directory where the ApressExample.class file is for it to work.
set classpath  =  c:sqljdbc_4.0enusqljdbc4.jar;.;%classpath%
java ApressExample
The first line adds the path of the sqljdbc4.jar file and the current directory to the classpath environment variable, so it will find the JDBC driver and the ApressExample class. The second line runs our code example.
Now that we were able to run our code example, let’s come back to its content. The first thing we do in the code is to import the java.sql classes in order to have the Connection, Statement, and all other JDBC classes handy. In the main() method of our ApressExample class, we define the connection string and set the server’s address as well as the mirroring server’s address. We choose to be authenticated by Windows, using Integrated Security.
String connectionUrl = "jdbc:sqlserver://SQL2012;integratedSecurity = true;databaseName = AdventureWorks;failoverPartner = SQL2012B";
If you know JDBC, you might be surprised not to find a Class.forName() call, as shown in the following snippet:
Class.forName("com.microsoft.sqlserver.jdbc.SQLServerDriver");
The Class.forName() instruction was used to load the JDBC driver and register it to the JDBC DriverManager. This is not required anymore if you use JDBC 4, because in JDBC 4 the drivers are able to be loaded magically just by being on the classpath.
The rest of the code is a pretty standard Java example; let’s just concentrate on the line that opens the connection:
cn = DriverManager.getConnection(connectionUrl);
It is enclosed inside a try catch block, in order to catch a connection failure. If such a failure happens, the catch block will run the exact same connection command. This is to allow automatic reconnection in case of a failover. At the second connection attempt the JDBC driver will—once again magically—try with the address defined in the failoverpartner option. This second attempt must also be enclosed inside a try catch block in case the other server does not answer either. Because we have to write twice the connection code, we chose here to move the code that uses the connection to run a query in a private method of the class, in order to call it from the main() method.
Service Oriented Architecture and WCF Data Services
If you are a die-hard T-SQL developer who didn’t venture much into Microsoft client-side code and all the frameworks and libraries, you might crack a smile while reading the few next paragraphs. As T-SQL developers, we are used to dealing with a stable and old-fashioned technology, with no fancy names, which could give the impression that it is so old and solid that it will never change. On the client side, however, things are constantly moving. A history of data access methods and what we call today data services, because of the SOA (Service Oriented Architecture) paradigm, could make a book, and that would be a book full of twists and turns. In the early days of SQL Server, the data access libraries were the native dblib dll and the ODBC API. It was superseded by OLEDB, then by the SQL Server Native Client. Today, we are returning to ODBC to align with a de facto standard, as we have seen in the ODBC for Linux section.
On the data services subject, before the concept ever existed, we were talking about distributed applications, in other words applications broken into components spanned across multiple computers, allowing distant interoperability, components that were exchanging information using a broker like DCOM (Distributed Component Object Model) or CORBA (Common Object Request Broker Architecture) and that were using an RPC (Remote Procedure Call) model. With the release of the .NET framework, Microsoft developed a replacement for creating distributed .NET components named .NET Remoting. But the distributed components model had some shortcomings: mainly, the network protocols they used were not tailored for the web and it was sometimes tricky to allow distant computers behind firewalls to be able to work together. Also you had to implement a unique technology, whether it was DCOM, Corba, .NET Remoting, or others. Moreover, in the case of DCOM and .NET Remoting, it meant that you had to develop on Windows and run Microsoft operating systems and technologies on every end.
So, the Service Oriented Architecture (SOA) paradigm gained attention and popularity because it addressed these limitations. The goal of SOA was to leverage standard and widely used protocols like HTTP or SMTP in order to exchange information between the components of a distributed application, except that in SOA that’s not the terminology we use. The components are “services,” a term that emphasizes more their loosely coupled and independent nature, and the distributed application model is named Service Oriented Architecture. Using protocols like HTTP allows us to take advantage of existing and proven technologies and infrastructures available on all platforms and designed for the Internet. To ensure that the information exchanged is understood on every platform, text-based structures like XML or JSON (JavaScript Object Notation) are used to generate messages that are created and consumed by these services, which are called Web Services (WS) because of their use of the HTTP protocol. These messages are exchanged mostly using a protocol named SOAP. SOAP was originally an acronym for Simple Object Access Protocol. It is an envelope in which XML messages are enclosed and that defines a set of properties and functionalities for the message. So far so good, but a new model started to gain popularity the last decade, named REST. REST, or Representational State Transfer, is a set of architectural principles for building services, which are called resources. A REST resource is defined by an address, which is an internet address in the form of a URI (Uniform Resource Identifier), a more generic term for what we call an URL in the HTTP protocol. To call the resource, a REST client uses standard HTTP verbs, like GET or PUT, to send or receive messages. So, with REST, you use a model close to what a Web browser would do to call resources, and that makes it interesting mainly because it allows using proven technologies on both sides, and it offers natively the scalability of the web technologies. As REST is more about offering resources than exchanging messages per se, this model is sometimes called Resource Oriented Architecture (ROA), and a system implementing this model is said to be RESTful.
So, with SOA quickly replacing distributed components, some libraries or frameworks were needed in the Microsoft world to build Web Services. The first generation of these tools was called ASP.NET Web Services (ASMX) and was released for .NET 1.0. It was quickly completed by Web Services Enhancement (WSE), which added some SOAP WS additional specifications. That was another programming model to learn, and it was still limited as it didn’t implement all the SOA possibilities like the REST model. To build the XML messages, we simply used the .NET xml libraries, or, using SQL Server 2000, we generated directly the XML using the FOR XML clause, and we enclosed it in a SOAP message using our client code. In SQL Server, we also could use an ISAPI extension to provide XML responses directly from SQL server through IIS, without using ASMX. When SQL Server 2005 was released, the ISAPI extension was replaced by an integrated HTTP endpoint capability. SQL Server was then able to act natively as an HTTP server, to receive and send back SOAP messages. Today, this feature is removed from SQL Server 2012, because it didn’t offer a complete enough environment to build web services. As a matter of fact, ASMX did not offer all what was needed either. So, Microsoft decided to build a complete and flexible framework to handle all interoperability technologies, which it now calls Connected Systems. That framework is named WCF (Windows Communication Foundation). WCF is integrated into .NET and is the way to go when talking about Web Services, REST, distributed components, or message queuing, in the Microsoft world. WCF offers several layers that provide everything that is needed to create connected systems. They are schematized in Figure 16-9.
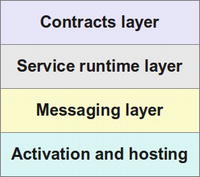
Figure 16-9. The WCF Layers Stack
The contracts layer comprises the contracts (or interfaces) definition classes that allow services to publish and agree on the content of the information they will exchange. You can define data contracts, message contacts, service contracts, and so on; the service runtime layer offers all the behaviors necessary to implement the services, like transaction behavior, parameter filtering, and so on; the messaging layer offers encoders and channels to handle the more physical and concrete exchange of messages and services; and finally, the activation and hosting layer allows running the services, either as an exe, a windows service, or a COM + application, and so on.
WCF can be used to create Services or remoting applications or to implement message queuing. Here, we will of course concentrate on a specific feature of WCF that provides a very simple way to publish data as REST resources, and that is named WCF Data Services.
![]() Note Here again, the name of the technology changed a few times in a few years. In 2007, we heard about project Astoria, which aimed to deliver a framework for creating and consuming data services using Service Oriented Architecture. When it was released in 2008 along with .NET 3.5, its final name was ADO.NET Data Services, which was later renamed WCF Data Services.
Note Here again, the name of the technology changed a few times in a few years. In 2007, we heard about project Astoria, which aimed to deliver a framework for creating and consuming data services using Service Oriented Architecture. When it was released in 2008 along with .NET 3.5, its final name was ADO.NET Data Services, which was later renamed WCF Data Services.
WCF Data Services supports the concept of REST for accessing your data remotely. As we have briefly said before, REST-style services provide simple URI-based querying, a simpler mechanism than the SOAP protocol. WCF Data Services translates regular HTTP requests into create, read, update, delete (CRUD) operations against a data source, and exchanges data by using the OData (Open Data) protocol, an open web protocol for querying and updating data. WCF Data Services uses an HTTP request-to-CRUD operation mapping, as shown in Table 16-1.
Table 16-1. HTTP Requests to WCF Data Services Operations
| HTTP Request | WCF Data Services Operation |
|---|---|
| GET | Query the data source; retrieve data. |
| POST | Create a new entity and insert it into the data source. |
| PUT | Update an entity in the data source. |
| DELETE | Delete an entity from the data source. |
As with a web service, the first step to creating a WCF Data Service is to create a new ASP.NET Web Application project, as shown in Figure 16-10.
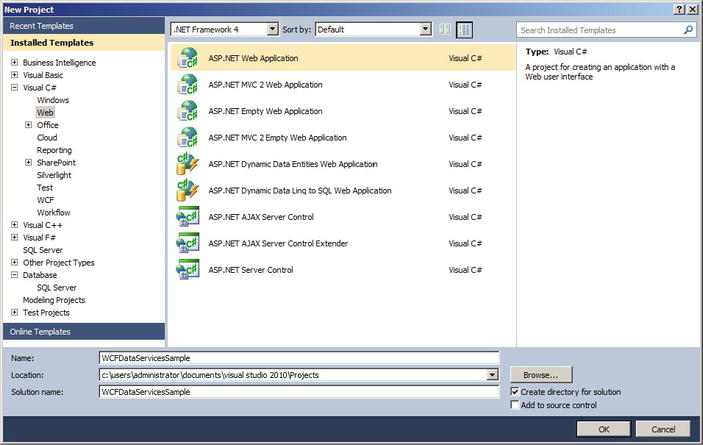
Figure 16-10. Creating an ASP.NET Web Application in Visual Studio 2010
Defining the Data Source
Once you have created a web application project, you need to add a source for your data. The easiest way is to add an ADO.NET entity data model (EDM) by right-clicking on the project in Solution Explorer, and choosing Add ![]() New item . . . in Visual Studio and selecting the ADO.NET Entity Data Model template in the Data page of the New Item window, as shown in Figure 16-11, which launches the ADO.NET Entity Data Model wizard.
New item . . . in Visual Studio and selecting the ADO.NET Entity Data Model template in the Data page of the New Item window, as shown in Figure 16-11, which launches the ADO.NET Entity Data Model wizard.

Figure 16-11. Adding an ADO.NET EDM Item to Your Web Application
We have covered Entity Framework in Chapter 15, so we don’t need to go into details here. We are generating an EDM from tables in the AdventureWorks database. We choose to include the Production.Product, Production.ProductPhoto, and Production.ProductProductPhoto tables of the AdventureWorks database, as shown in Figure 16-12.

Figure 16-12. Adding Tables to the EDM
Once you’ve added tables to your EDM, you can view them in the Entity Data Model designer as we have seen previously.
Creating the Data Service
The next step after you’ve defined your EDM is to add a WCF Data Service item to your project through the New item menu option. The Add New Item window is shown in Figure 16-13 with the WCF Data Service template highlighted.
The WCF Data Service template automatically generates the Data Service landing page, named ProductPhotoDataService.svc in this example. This is the page you need to call to request the service. Its source file, named ProductPhotoDataService.svc.cs in this example, uses the System.Data.Services namespace and contains a class definition for the service that defines access rules for entity sets and service operations. The class defined in this file requires some modification by hand where you see the automatically generated TODO comments. You must define the data source class, namely our EF entities class, and at a minimum you must set the entity access rules. We have done so in Listing 16-5.
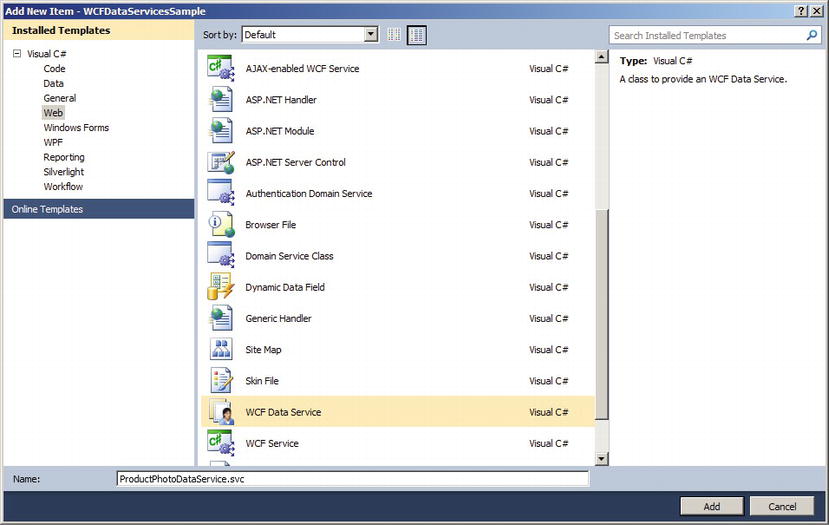
Figure 16-13. Adding a WCF Data Service
Listing 16-5. AdventureWorksDataService Class Definition Using System.Data.Services;
using System;
using System.Collections.Generic;
using System.Data.Services;
using System.Data.Services.Common;
using System.Linq;
using System.ServiceModel.Web;
using System.Web;
namespace WCFDataServicesSample
{
    public class ProductPhotoDataService : DataService  <  AdventureWorksEntities>
    {
        // This method is called only once to initialize service-wide policies.
        public static void InitializeService(DataServiceConfiguration config)
        {
            config.SetEntitySetAccessRule("Products", EntitySetRights.AllRead);
            config.SetEntitySetAccessRule("ProductPhotoes", EntitySetRights.AllRead);
            config.SetEntitySetAccessRule("ProductProductPhotoes", EntitySetRights.AllRead);
            config.DataServiceBehavior.MaxProtocolVersion = DataServiceProtocolVersion.V2;
        }
    }
}
![]() Caution You can use the wildcard character (*) to set rights for all entities and service operations at once, but Microsoft strongly recommends against this. Although it’s useful for testing purposes, in a production environment this can lead to serious security problems.
Caution You can use the wildcard character (*) to set rights for all entities and service operations at once, but Microsoft strongly recommends against this. Although it’s useful for testing purposes, in a production environment this can lead to serious security problems.
In Listing 16-5, we mentioned the Entity Set names that were pluralized by EF, which is why we have the Photoes faulty plural form. Feel free of course to correct it in the entity model source. We’ve set the access rules to AllRead, meaning that the service allows queries by key or queries for all contents of the entity set. The rights allowed are shown in Table 16-2.
Table 16-2 . Service Entity and Operation Access Rights
| Access Rights | Entity/Operation | Description |
|---|---|---|
| All | Both | Allows full read/write access to the entity and full read access to operations. |
| AllRead | Both | Allows full read access to the entity or operation. It is shorthand for ReadSingle and ReadMultiple access rights combined with a logical OR (|) operation. |
| AllWrite | Entity | Allows full write access to the entity. It is shorthand for WriteAppend, WriteUpdate, WriteDelete access rights combined with a logical OR (|) operation. |
| None | Both | Allows no read or write access, and will not appear in the services metadata document. |
| ReadSingle | Both | Allows for queries by key against an entity set. |
| ReadMultiple | Both | Allows for queries for the entire contents of the set. |
| WriteAppend | Entity | Allows new resources to be appended to the set. |
| WriteDelete | Entity | Allows existing resources to be deleted from the set. |
| WriteUpdate | Entity | Allows existing resources to be updated in the set. |
You can test your WCF Data Service by running it in Debug mode from Visual Studio. Visual Studio will open a browser window with the address set to the start page for your project. Change it to the address of the data service, which is in our example http://localhost:59560/ProductPhotoDataService.svc.
![]() Note You can also set your WCF Data Service page (.svc extension) as the project start page. In that case you can delete the Default.aspx page in the project since it’s not needed.
Note You can also set your WCF Data Service page (.svc extension) as the project start page. In that case you can delete the Default.aspx page in the project since it’s not needed.
Your start address and port number will most likely be different. The WCF Data Service will respond to your request with a listing of entities for which you have access, as shown in Figure 16-14.

Figure 16-14. Calling the Page for the WCF Data Service
![]() Tip WCF Data Services supports two payload types. The payload type is the standard format for incoming request data and outgoing results data. WCF Data Services supports both JavaScript Object Notation (JSON) and the Atom Publishing Protocol for payloads. If you call the page for your WCF Data Service and the results look like a nonsensical syndication feed instead of standard XML, you will need to turn off the feed-reading view in your browser. In Internet Explorer 7, you can uncheck the Tools
Tip WCF Data Services supports two payload types. The payload type is the standard format for incoming request data and outgoing results data. WCF Data Services supports both JavaScript Object Notation (JSON) and the Atom Publishing Protocol for payloads. If you call the page for your WCF Data Service and the results look like a nonsensical syndication feed instead of standard XML, you will need to turn off the feed-reading view in your browser. In Internet Explorer 7, you can uncheck the Tools ![]() Internet Options
Internet Options ![]() Content
Content ![]() Settings
Settings ![]() Turn On Feed Reading View option.
Turn On Feed Reading View option.
Once you’ve confirmed that the WCF Data Service is up and running, you can query the service using a combination of path expression-style syntax in the URI to locate entities and query string parameters to further restrict and control output. The following are some examples of WCF Data Service queries:
- http://localhost:59560/ProductPhotoDataService.svc/Products: This query retrieves all Product entities.
- http://localhost:59560/ProductPhotoDataService.svc/Products(749): This query retrieves the Product entities with a primary key value of 749. The primary key of the Product entity is ProductID.
- http://localhost:59560/ProductPhotoDataService.svc/Products?$skip=10&$top=10: This query skips the first ten Product entities and retrieves the following ten (items 11 through 20) in key order.
- http://localhost:59560/ProductPhotoDataService.svc/Products?$top=20&$orderby=Name: This query retrieves the first 20 Product entities ordered (sorted) by the Name attribute.
- http://localhost:59560/ProductPhotoDataService.svc/Products?$filter=ListPrice gt 1000&$expand = ProductProductPhotoes/ProductPhoto: This query retrieves all the Product entities with a ListPrice attribute that is greater than 1,000. The results include related ProductProductPhoto and ProductPhoto entities expanded inline. Note that in the expanded option we need to mention first the entity set, and then the entities linked to the set, which is why we have ProductProductPhotoes and then ProductPhoto.
This is just a small sampling of the types of REST-style queries you can create using WCF Data Services. In fact, WCF Data Services supports several query string options, as shown in Table 16-3.
Table 16-3. Query String Options
| Option | Description |
|---|---|
| $expand | Expands results to include one or more related entities inline in the results. |
| $filter | Restricts the results returned by applying an expression to the last entity set identified in the URI path. The $filter option supports a simple expression language that includes logical, arithmetic, and grouping operators, and an assortment of string, date, and math functions. |
| $orderby | Orders (sorts) results by the attributes specified. You can specify multiple attributes separated by commas, and each attribute can be followed by an optional asc or desc modifier indicating ascending or descending sort order, respectively. |
| $skip | Skips a given number of rows when returning results. |
| $top | Restricts the number of entities returned to the specified number. |
Creating a WCF Data Service Consumer
Once you have a WCF Data Service up and running, creating a consumer application is relatively simple. For this example, we’ve created a simple .NET application that calls the service to display the image and details of products selected from a drop-down list.
The first step in building a consumer application is to create classes based on your EDM. Instead of doing it manually, you can generate the creation of these classes by using the Add Service Reference command in Visual Studio that automatically generates C# or Visual Basic classes for use in client applications. For our example, we created an ASP.NET web application and we right-clicked on the project in the Solution Explorer, and we chose the Add Service Reference command. In the Add Service Reference Window, we added the WCF Data Service address and clicked on Go. Visual Studio queried the service’s metadata. Figure 16-15 shows the result of this request.
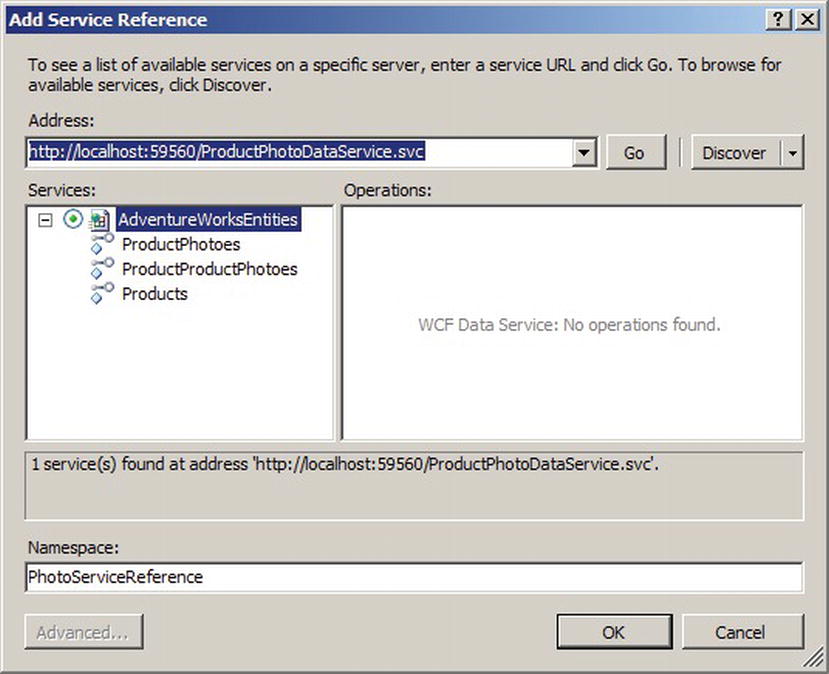
Figure 16-15. Adding a Service Reference in Visual Studio 2010
Step two of the process is to create the Default.aspx page of the client application. This page will perform the necessary calls to the service. You are not tied to a web application, however; you can just as easily call ADO.NET Data Services from Windows applications, Silverlight applications, or any other platform that can initiate HTTP requests (although object deserialization on platforms that don’t support .NET classes could pose a bit of a challenge). For this client application, we simply added a drop-down list, an image control, and a table to the web form. Then we wired up the page load and drop-down list selection change events. The code is shown in Listing 16-6, with results shown in Figure 16-16.
Listing 16-6. ASP.NET Client Application Default.aspx Page
using System;
using System.Collections.Generic;
using System.Linq;
using System.Web;
using System.Web.UI;
using System.Web.UI.WebControls;
using WCFdsClient.PhotoServiceReference;
using System.Data.Services.Client;
namespace WCFdsClient
{
    public partial class _Default : System.Web.UI.Page
    {
        protected void Page_Load(object sender, EventArgs e)
        {
            PopulateDropDown();
        }
        private void PopulateDropDown()
        {
            AdventureWorksEntities ctx = new AdventureWorksEntities(
                new Uri ("http://localhost:59560/ProductPhotoDataService.svc")
                );
            var qry = from p in ctx.Products
                      where p.FinishedGoodsFlag
                      orderby p.Name
                      select p;
            foreach (Product p in qry) {
                ProductDropDown.Items.Add(new ListItem(p.Name, p.ProductID.ToString()));
            }
            string id = ProductDropDown.SelectedValue;
            UpdateImage(id);
        }
        private void UpdateImage(string id) {
            ProductImage.ImageUrl = string.Format("GetImage.aspx?id  =  {0}", id);
        }
        protected void ProductDropDownlist_SelectedIndexChanged(object sender, EventArgs e)
        {
            string id = ProductDropDown.SelectedValue;
            AdventureWorksEntities ctx = new AdventureWorksEntities(
                new Uri("http://localhost:59560/ProductPhotoDataService.svc")
                );
            var qry = from p in ctx.Products
                      where p.ProductID == Convert.ToInt32(id)
                      select p;
            //DataServiceOuery  <  Product  >  qry =  ctx.CreateOuery  <  Product  >  (string.Format("/Product({0})", id));
            foreach (Product p in qry)
            {
                TableProduct.Rows[0].Cells[1].Text  =  p.Class;
                TableProduct.Rows[1].Cells[1].Text  =  p.Color;
                TableProduct.Rows[2].Cells[1].Text  =  p.Size + " " + p.SizeUnitMeasureCode;
                TableProduct.Rows[3].Cells[1].Text  =  p.Weight + " " + p.WeightUnitMeasureCode;
                TableProduct.Rows[4].Cells[1].Text  =  p.ListPrice.ToString();
                TableProduct.Rows[5].Cells[1].Text  =  p.ProductNumber;
            }
            UpdateImage(id);
        }
    }
}

Figure 16-16. Calling the WCF Data Service from a Consumer Application
The first part of the code imports the necessary namespaces. The System.Data.Services.Client namespace is required to create WCF Data Services client queries. You will need to add a reference to the System.Data.Services.Client component library to your project. The WCFdsClient.PhotoServiceReference namespace is a reference to our EDM classes’ namespace.
using WCFdsClient.PhotoServiceReference;
using System.Data.Services.Client;
The PageLoad event of the Default.aspx page simply calls a little function called PopulateDropDown that populates the drop-down list with the names and IDs of all “finished goods” products that AdventureWorks keeps in its database:
PopulateDropDown();
The PopulateDropDown() function begins by creating an instance of the AdventureWorksEntities EDM data context that points to the URI of the WCF Data Service. We have seen data contexts in Chapter 15. Here, in WCF Data Services, the object is a sibling named a DataServiceContext.
AdventureWorksEntities ctx = new AdventureWorksEntities(
    new Uri ("http://localhost:59560/ProductPhotoDataService.svc")
);
Next, this function uses a LINQ query on the AdventureWorksEntities DataServiceContext that returns a DataServiceOuery. The query filters the Product entities whose FinishedGoodsFlag attributes are set to true. Results are sorted by the Name attribute.
var qry = from p in ctx.Products
          where p.FinishedGoodsFlag
          orderby p.Name
          select p;
The query returns an IEnumerable result that can be iterated using foreach. In this example, the Name and ProductID attributes are iterated and added to the drop-down list.
foreach (Product p in qry) {
    ProductDropDown.Items.Add(new ListItem(p.Name, p.ProductID.ToString()));
}
Finally, the product image is updated based on the selected value of the drop-down list:
string id = ProductDropDown.SelectedValue;
UpdateImage(id);
We’ve also wired the SelectedIndexChanged event of the drop-down list so that the image and other data being displayed are updated when the user selects a new product. The first thing this function does is retrieve the currently selected value from the drop-down list.
string id = ProductDropDown.SelectedValue;
Then, as with the PopulateDropDown() function, this function queries the WCF Data Service to retrieve the product selected from the drop-down list.
AdventureWorksEntities ctx = new AdventureWorksEntities(
    new Uri("http://localhost:59560/ProductPhotoDataService.svc")
);
var qry = from p in ctx.Products
          where p.ProductID == Convert.ToInt32(id)
          select p;
Then, the function iterates the results and updates the display, including the summary information table and the product image.
foreach (Product p in qry)
{
    TableProduct.Rows[0].Cells[1].Text = p.Class;
    TableProduct.Rows[1].Cells[1].Text = p.Color;
    TableProduct.Rows[2].Cells[1].Text = p.Size + " " + p.SizeUnitMeasureCode;
    TableProduct.Rows[3].Cells[1].Text = p.Weight + " " + p.WeightUnitMeasureCode;
    TableProduct.Rows[4].Cells[1].Text = p.ListPrice.ToString();
    TableProduct.Rows[5].Cells[1].Text = p.ProductNumber;
}
UpdateImage(id);
The UpdateImage() function, called by two of the event handlers in this example, consists of a single line that changes the URL of the product image:
ProductImage.ImageUrl = string.Format("GetImage.aspx?id = {o}", id);
![]() Note In order to actually show the images on a web page, we had to resort to an old ASP.NET trick. Because the images are stored in the database, we had to create a second page in the project called GetImage.aspx to retrieve the appropriate image. This method calls the WCF Data Service and returns the binary product photo image as a JPEG image. We won’t go into the details here because they’re not essential to understanding WCF Data Services, but the source code is available in the downloadable sample files for the curious.
Note In order to actually show the images on a web page, we had to resort to an old ASP.NET trick. Because the images are stored in the database, we had to create a second page in the project called GetImage.aspx to retrieve the appropriate image. This method calls the WCF Data Service and returns the binary product photo image as a JPEG image. We won’t go into the details here because they’re not essential to understanding WCF Data Services, but the source code is available in the downloadable sample files for the curious.
Now that we created a basic WCF Data Service consumer, let us review some of the SQL Server 2012 features supported in ADO.NET 4.5. ADO.NET 4.5 enables support for null bit compression using sparse columns to optimize the data transfer over the wire. Imagine a table with more than half of its columns that are nullable and have null values for all the rows. When you use null bit compression and sparse column schema you will be able to save on the storage as well as optimize the data transfer over the wire as well.
ADO.NET 4.5 also adds support for LocalDB. Remember that LocalDB needs to be started for your code to be able to access it.
Summary
SQL Server 2012 introduces an addition to SQL Server Express named LocalDB that allows using databases as files in applications and simplifies embedding database capabilities in local and easy to deploy applications. At the same time, SQL Server data access libraries keep improving to allow a heterogeneous environment with Linux systems and Java code.
In SQL Server 2005, Microsoft introduced HTTP SOAP endpoints, which allowed developers to expose SPs and UDFs within the database as web service methods. Because it wasn’t a full featured and solid enough implementation, and also because Microsoft wants to focus on a unified framework for connected systems, HTTP endpoints have been removed from SQL Server 2012.
We closed the chapter out with an introduction to WCF Data Services. With built-in support for entity data models and the powerful ADO.NET EDM designer, REST-style querying, and both the JSON and Atom payload formats, WCF Data Services can provide a lightweight alternative to SOAP-based web services and a good way to provide interoperability across systems.
1. [True/False] A LocalDB instance can be run as a Windows service.
2. [True/False] You cannot access an XML data type column if you access SQL Server from a Linux computer.
3. [True/False] HTTP SOAP endpoints can be created in SQL Server 2012.
4. [Fill in the blank] Visual Studio 2010 and 2012 provide a _________ project template to create new web services.
5. [True/False] Visual Studio 2010 includes a graphical EDM designer.
6. [Choose one] WCF Data Services accepts which type of query requests:
a. SQL queries
b. XSLT queries
c. REST-style queries
d. English language queries