
C H A P T E R 11
![]()
TechieTogs: Site Administration and Finishing Touches
Now that we have completed the public-facing side of the site, it is time to turn our attention to the administrative functionality that is essential for maintaining the site and dealing with customer orders.
The administrative processes that we will deal with in this chapter include:
- Creating a secure area for administrators to manage users, orders and the product catalog
- Adding and removing administrative users
- Viewing customer orders
- Adding and editing categories and products
In addition to these processes, we will add some final finishing touches to the public side of the site to improve the user experience; including:
- Uploading and displaying product images
- Creating dynamic content for the home page
We have a significant amount of content to cover in this chapter. In the majority of cases, the code will be familiar to you by now and will require little explanation. For each page we add, I will describe the function and workflow of the page. I will only provide detailed explanations of the code where I present a new or particularly complex concept.
Creating an Admin Area
We'll need to create an area that can only be accessed by the site administrators. There we will manage the web site. We'll achieve this by creating an ‘Admin’ folder, which will contain all of our administration pages. This folder will be secured by allowing access only to members who have an ‘Admin’ role. Let's start by creating that role.
Creating the Admin Role
Open the Databases workspace in the WebMatrix IDE. In the Navigation pane, open the webpages_Roles table in the TechieTogsData.sdf database. Add a new record, inserting the value ‘Admin’ into the RoleName field (see Figure 11-1). The RoleId field is an identity field that is automatically populated by the database, so do not enter a value in this column.
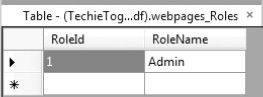
Figure 11-1. Insert an Admin role in to the webpages_Roles table
Next, if you do not currently have a registered user in the database, run the site and create an account using the Account/Register.cshtml page. Once you have a registered user, return to the WebMatrix IDE, open the UserProfile table, and make a note of their UserId.
Open the webpages_UsersInRoles table and create a new record, inserting the relevant UserId and RoleId (see Figure 11-2). In this table, both columns are Foreign Keys so they are not generated by the database (i.e., you should enter a value in both columns).
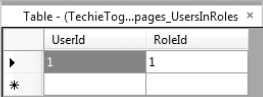
Figure 11-2. Assign a user to the Admin role in the webpages_UsersInRoles table
Since this is one of the first administrative functions that will get a user interface built for it on the site, this is the only time we will have to carry out this action. In the future, site administrators will be able to do this through the UI in the site.
![]() Note For more information on the use of roles as part of the ASP.NET Web Pages membership system, see the ‘Roles’ section in Chapter 7 – Security and Membership.
Note For more information on the use of roles as part of the ASP.NET Web Pages membership system, see the ‘Roles’ section in Chapter 7 – Security and Membership.
Creating and Securing the Admin Folder
All of the administration pages within the site will be stored within an ‘Admin’ folder. We will only allow access to this folder to members of the Admin role we just created.
In the WebMatrix IDE, create a new folder called ‘Admin’ within the site root and to it add a new page called _PageStart.cshtml. Inside the _PageStart.cshtml file add the following code, removing any default markup:
@{

    if (!Roles.IsUserInRole(WebSecurity.CurrentUserName, "Admin"))

    {

        string currentUrl = Request.Url.ToString();

        Response.Redirect("~/Account/Login?sender=" + currentUrl);

    }

}
This code checks to see that the current user is a member of the Admin role, and returns them to the login page if they are not. By convention, the _PageStart.cshtml file will be executed before any other page in the containing folder (in our case, the ‘Admin’ folder), or its sub-folders, thereby securing all of our admin pages.
The Site Administration Home Page
The pages within the admin area will all use the same layout page. Let's create that page before we start to develop any pages that might rely on it.
The Admin Layout Page
Create a new page called _AdminLayout.cshtml within the Shared/Layouts folder. The page will be very similar to the layout page used for the public-facing side of the site, but will present a menu on the left hand side that facilitates navigation to the various administration pages, in place of the categories menu.
The content of the _AdminLayout.cshtml page, in its entirety, is as follows:
<!DOCTYPE html>
<html lang="en">
<head>
<meta charset="utf-8" />
<title>TechieTogs - @Page.Title</title>
<link href="@Href("~/Css/Style.css")" rel="stylesheet" />
<link href="@Href("~/Css/AdminStyle.css")" rel="stylesheet" />
@RenderSection("head", required: false)
</head>
<body>
<div id="page">
<div id="header">
<p class="logo"><a href="@Href("~/")">TechieTogs</a></p>
<div id="headerRight">
<div id="accountSummary">@MembershipHelpers.AccountSummary()</div>
</div>
</div>
<div id="content">
<div id="adminMenu">
@RenderPage("~/Shared/Partials/_AdminMenu.cshtml")
</div>
<div id="main">
@RenderBody()
</div>
</div>
<div id="footer">
©@DateTime.Now.Year TechieTogs. All rights reserved.
</div>
</div>
</body>
</html>
You will notice that the admin layout page requires two files that do not yet exist: _AdminMenu.cshtml and AdminStyle.css. We'll create these files next.
The Admin Menu
The Admin Menu is simply a partial page that provides navigation to the various pages within the administration section of the site. Create the file _AdminMenu.cshtml in the Layouts/Partials folder and enter the following markup:
<p class="title">

    <a href="@Href("~/Admin/")">Site Administration</a>

</p>

<ul>

    <li><a href="@Href("~/Admin/Orders/")">Orders</a></li>

    <li><a href="@Href("~/Admin/Categories/")">Categories</a></li>

    <li><a href="@Href("~/Admin/Products/")">Products</a></li>

    <li><a href="@Href("~/Admin/Products/Featured")">Featured Product</a></li>

    <li><a href="@Href("~/Admin/Users/")">Admin Users</a></li>

</ul>
You can see that the admin pages will be stored within subfolders that relate to their function. We'll create these subfolders and pages as we move through the chapter and implement the various parts of the site administration interface.
The Admin Stylesheet
Any CSS styles that are required solely for use in the administration area of the site will be defined within a separate stylesheet. By doing this, we ensure that non-admin users do not have to download the styles required only for the administration area of the site. This saves us some page load time and bandwidth.
Create a file called AdminStyle.css within the Css folder. For ease, we will add all of the CSS we need for the administration pages here, in one go. We'll make use of these pages throughout the chapter.
Add the following CSS to /Css/AdminStyle.css:
/* General Styles

---------------------------------*/

h2 {

    width: 30%;

    border-bottom: 1px dashed #cdcdcd;

    margin: 25px 0px 20px 0px;

}


textarea {

    font-family: Verdana, Helvetica, Sans-Serif;

}


/* Menu

---------------------------------*/

#adminMenu {

    float:left;

    width:150px;

}


#adminMenu ul {

    border-bottom: 1px solid #cdcdcd;

    margin-bottom: 20px;

}


#adminMenu ul li {

    list-style: none;

    border-top: 1px solid #cdcdcd;

    margin: 0;

    padding: 10px;

}


#adminMenu ul li:hover {

    background-color: #ddd;

}


#adminMenu .title {

    margin-bottom: 20px;

    text-align:center;

    font-size: 12px;

    font-weight: bold;

}


/* Grid

---------------------------------*/

.grid {

    margin-top: 20px;

    border-collapse: collapse;

    width: 100%;

}


.grid td {

    padding: 5px;

}


.gridHeader {

    background-color: #fff;

    font-weight: bold;

    text-align: left;

    border-bottom: 1px solid #cdcdcd;

}


.gridAlt {

    background-color: #f7f7f7;

}


.gridFooter {

    border-top: 1px solid #cdcdcd;

}


.grid tr #mainColumn {

    width: 100%;

}


/* Forms

---------------------------------*/

#shippedForm, #deleteForm {

    margin-top: 15px;

}


#productForm

{

    float: left;

    width: 350px;

}

#productFormImage

{

    float: left;

    width: 330px;

}


#productForm label {

    font-weight: bold;

}


#productForm p {

    padding: 5px 0px 5px 0px;

}
The Site Administration Home Page
The Admin Home Page will be based on the _AdminLayout.cshtml layout page. The page itself will contain little content, although you may wish to add some content later to provide summaries of important site data, such as number of registered users, unshipped orders, overall order values, etc. This is left as an exercise for the reader.
Create a file called Default.cshtml inside the Admin folder and replace the default markup with the following:
@{

    Layout = "~/Shared/Layouts/_AdminLayout.cshtml";

    Page.Title = "Administration";

}


<h1>Site Administration</h1>

<p>Select an administration task from the menu.</p>
Now run the site, log in as the user you assigned to the ‘Admin’ role, and browse to the /Admin/Default.cshtml page. You will see the Site Administration Home Page, based on the admin layout page, including the admin menu, shown in Figure 11-3:
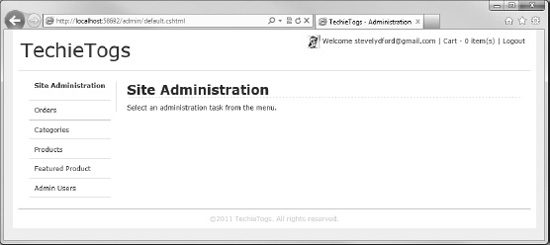
Figure 11-3. The Site Administration Home Page
Amending the Account Summary Helper
Although the site administrators can gain access to the Site Administration Home Page by browsing directly to the URL, it would be much better to provide them with a link after login. We'll do this by adding a new section to the Account Summary Helper, displayed in the top right hand corner of every page.
Open the App_Code/MembershipHelpers.cshtml file and add the code highlighted in bold in the following listing:
@helper AccountSummary()

{

    var cartItemCount = 0;


    if (Session["cart"] != null)

    {

        cartItemCount = ((Cart)Session["cart"]).Items.Count;

    }


    if(WebSecurity.IsAuthenticated) {

        <text>

            @Gravatar.GetHtml(WebSecurity.CurrentUserName,

                                imageSize:24,

                                defaultImage:"mm")


            Welcome <a href="@Href("~/Account/ChangePassword")">

                        @WebSecurity.CurrentUserName

                    </a> |

            <a href="@Href("~/Cart")">Cart - @cartItemCount item(s)</a> |

            <a href="@Href("~/Account/Logout")">Logout</a>

            @if (Roles.IsUserInRole(WebSecurity.CurrentUserName, "Admin"))

            {

                <text>

                    | <a href="@Href("~/Admin/Default")">Admin</a>

                </text>

            }

        </text>

    } else {

        <text>

            <a href="@Href("~/Account/Login")">Login</a> |

            <a href="@Href("~/Cart")">Cart - @cartItemCount item(s)</a> |

            <a href="@Href("~/Account/Register")">Register</a>

        </text>

    }

}
This new section of code displays an additional hyperlink in the account summary, providing a link to the Site Administration Home Page for authenticated users who are members of the Admin role (see Figure 11-4).

Figure 11-4. The Account Summary Helper showing the ‘Admin’ hyperlink
User Administration
Now that we have the infrastructure in place for the secure admin area of our site, we'll need a way to add users to, and remove existing users from, the Admin role.
Create a new subfolder within the admin folder called ‘Users’, and within it a page called Default.cshtml.
This page will list all current Admin role members, with a button to remove them from the role, and provide a form to allow new members to be added. Figure 11-5 shows the completed page:

Figure 11-5. The Admin Users page
Replace any existing markup within the Admin/Users/Default.cshtml page with the following:
@{

    Layout = "~/Shared/Layouts/_AdminLayout.cshtml";

    Page.Title = "Admin Users";


    var userToAdd = "";

    var role = "Admin";


    if(IsPost)

    {

        userToAdd = Request["userToAdd"];


        if(userToAdd != null)

        {

            // Add User to Role

            if (WebSecurity.UserExists(userToAdd) &&

                !Roles.IsUserInRole(userToAdd, role))

            {

                Roles.AddUsersToRoles(

                    new [] { userToAdd }.ToArray(),

                    new [] { role }.ToArray()

                );

            }

            else

            {

                ModelState.AddError("userToAdd", "Unable to add user");

            }

        }

        else if (Request["userToRemove"] != null)

        {

            // Remove User from Role


            var userToRemove = Request["userToRemove"];

            if (Roles.IsUserInRole(userToRemove, role))

            {

                Roles.RemoveUsersFromRoles(

                    new [] { userToRemove }.ToArray(),

                    new [] { role }.ToArray()

                );

            }

        }

    }


    var users = Roles.GetUsersInRole(role);

}


<h1>Admin Users</h1>


<table class="grid">

    <tr>

        <th colspan="3" class="gridHeader">User</th>

    </tr>

    @foreach (var user in users)

    {

        <tr>

            <td id="mainColumn">

                @user

            </td>

            <td>

                @{

                    var buttonState = "";

                    if(user == WebSecurity.CurrentUserName)

                    {

                        buttonState = "disabled=disabled";

                    }

                }

                    <form action="" method="post">

                        @Html.Hidden("userToRemove", user)

                        <input type="submit" value="Remove from Role" @buttonState />

                    </form>


            </td>

        </tr>

    }

</table>


<h2>Add Admin User</h2>

<form action="" method="post">

    <p>

        User Name:

        @Html.TextBox("userToAdd", userToAdd)

        <input type="submit" value="Add" />

        @Html.ValidationMessage("userToAdd")

    </p>

</form>
The POST request handler checks to see if a userToAdd field has been passed back in the posted form values. If it has, we know that the user has submitted the ‘Add Admin User’ form, so we attempt to add the user to the role. Otherwise, if a userToRemove field has been submitted, we know that the user clicked a ‘Remove from Role’ button, so we attempt to remove the relevant user. We have used a mechanism similar to this before, on the Shopping Cart page.
![]() Note For an explanation of the methods used to add and remove role members, see the ‘Roles’ section in Chapter 7 – Security and Membership.
Note For an explanation of the methods used to add and remove role members, see the ‘Roles’ section in Chapter 7 – Security and Membership.
There are two further points of interest on this page. First, we disable the remove button in the row containing the currently authenticated user. Although not foolproof, this will at least help to ensure that at least one user can always gain access to the administrative section of the site.
Second, we require the user to actually type in the user name of the account they wish to add to the Admin role, even though we could easily have provided a dropdown list of registered users. This approach would be fine while the site has a small number of users, but when the site goes live and starts to dominate the worldwide ecommerce marketplace, as we expect it to do, we would soon have page loading issues when we are trying to load thousands of user names in to a dropdown list. A good solution to this, although beyond the scope of this book, would be to implement an auto-complete textbox using AJAX.
Orders Administration
We'll need an area on our site where we can view customers' orders and mark them as shipped. The Orders Administration process will consist of two pages. The first page will list a summary of all orders in a WebGrid. Each row in the WebGrid will display a hyperlink to take the user to the second page, which displays the complete details of the order.
We'll start by creating the Orders Summary page.
The Orders Summary Page
We will use the WebGrid helper to display the summary of orders, as it gives us the ability to easily add paging and sorting functionality to the grid. We will also include a small form above the grid to allow the user the choice to view either shipped or unshipped orders. Figure 11-6 shows the completed Order Summary page:
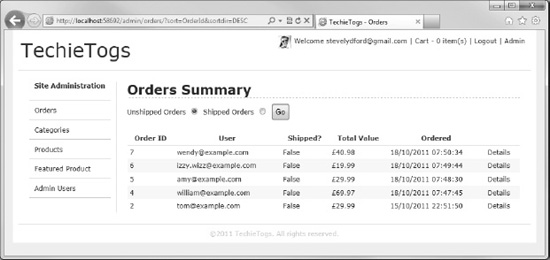
Figure 11-6. The Order Summary Page
To create the page in your site, add a new subfolder called ‘Orders’ within the ‘Admin’ folder and add a page inside it called Default.cshtml. The following listing contains the complete code and markup for Admin/Orders/Default.cshtml:
@{

    Layout = "~/Shared/Layouts/_AdminLayout.cshtml";

    Page.Title = "Orders";


    var showShippedOrders = false;


    if(IsPost)

    {

        showShippedOrders = Request["showShippedOrders"].AsBool();

    }


    var db = Database.Open("TechieTogsData");

    var sqlCommand = "SELECT Orders.OrderId, Orders.OrderShipped, Orders.OrderTotal, " +

                     "Orders.OrderDateTime, UserProfile.Email FROM Orders " +

                     "INNER JOIN UserProfile ON Orders.UserId = UserProfile.UserId " +

                     "WHERE OrderShipped = @0 " +

                     "ORDER BY OrderDateTime DESC";


    var result = db.Query(sqlCommand, showShippedOrders);


    var ordersGrid = new WebGrid(source: result,

                                 rowsPerPage: 20);


}


<h1>Orders Summary</h1>

<form action="Default" method="post">

    <p>

        Unshipped Orders @Html.RadioButton("showShippedOrders", "false", !showShippedOrders)

        Shipped Orders @Html.RadioButton("showShippedOrders", "true", showShippedOrders)

        <input type="submit" value="Go"/>

    </p>

</form>

<div class="grid">

    @ordersGrid.GetHtml(

        tableStyle: "grid",

        headerStyle: "gridHeader",

        alternatingRowStyle: "gridAlt",

        footerStyle: "gridFooter",

        columns: ordersGrid.Columns(

            ordersGrid.Column("OrderId",

                              "Order ID"),

            ordersGrid.Column("Email",

                              "User",

                              format: @<text>

                                          <a href="mailto:@item.Email">

                                              @item.Email

                                          </a>

                                      </text>),

            ordersGrid.Column("OrderShipped",

                              "Shipped?"),

            ordersGrid.Column("OrderTotal",

                              "Total Value",

                              format: @<text>

                                          £@item.OrderTotal

                                      </text>),

            ordersGrid.Column("OrderDateTime",

                              "Ordered"),

            ordersGrid.Column(null,

                              null,

                              format: @<text>

                                          <a href="OrderDetails/@item.OrderId">

                                              Details

                                          </a>

                                      </text>)

        )

    )

</div>
Looking through the code, you can see that the SQL statement to get the data for the WebGrid contains an INNER JOIN between the Orders and UserProfile tables. This allows us to retrieve the user name (Email) of the user, based on the UserId stored against each order.
The WHERE clause of the SQL statement filters the results based on the OrderShipped column. By default this is set to False, but is changed to the value of the radio button group on post back.
The body of the page under the form contains our WebGrid, which is populated from the results of the SQL query mentioned previously. The grid is fairly standard, except that the last column is not bound to a data column but instead displays a hyperlink to the Order Details page, passing the OrderId in the URL.
![]() Note A full explanation of the WebGrid helper and its use can be found in Chapter 6 – Working with Data, in the ‘Displaying Data with WebMatrix Helpers’ section.
Note A full explanation of the WebGrid helper and its use can be found in Chapter 6 – Working with Data, in the ‘Displaying Data with WebMatrix Helpers’ section.
The Order Details Page
The Order Details page displays the comprehensive details of any specific order, including the date and time of order, shipping details, details of all items within the order, and shipping status.
The page includes an ‘Order Shipped?’ checkbox, which the administrator can check to say that the order has been dispatched. This will set the OrderShipped field to true, which will place it onto the ‘Shipped Orders’ list on the Order Summary page.
Create a new page called OrderDetails.cshtml in the Admin/Orders folder and enter the following code, in place of the default markup generated by WebMatrix when the page was created:
@{
Layout = "~/Shared/Layouts/_AdminLayout.cshtml";
Page.Title = "Order Details";
// Get orderID from URL, or set to 0 if not present
var orderID = !UrlData[0].IsEmpty() ? UrlData[0] : "0";
var db = Database.Open("TechieTogsData");
if (IsPost)
{
orderID = Request["orderID"];
var shipped = Request["shipped"].AsBool();
var sqlUpdate = "UPDATE Orders SET OrderShipped = @0 WHERE OrderId = @1";
db.Execute(sqlUpdate, shipped, orderID);
Response.Redirect("~/Admin/Orders/");
}
// Get Order header details
var sqlCommand = "SELECT Orders.*, UserProfile.Email FROM Orders " +
"INNER JOIN UserProfile ON Orders.UserId = UserProfile.UserId " +
"WHERE OrderId = @0 ";
var order = db.QuerySingle(sqlCommand, orderID);
// Get Order items
var itemsSql = "SELECT * FROM OrderItems WHERE OrderID = @0";
var orderItems = db.Query(itemsSql, orderID);
}
@if (order == null)
{
<p>
Unable to fetch order details.
</p>
}
else
{
<text>
<h1>Order Details</h1>
<p><strong>Order ID:</strong> @order.OrderId</p>
<p><strong>User:</strong> <a href="mailto:@order.Email">@order.Email</a></p>
<p><strong>Ordered: </strong>@order.OrderDateTime</p>
<h2>Shipping Details</h2>
<p><strong>Address 1:</strong> @order.Address1</p>
<p><strong>Address 2:</strong> @order.Address2</p>
<p><strong>Town: </strong>@order.Town</p>
<p><strong>Region:</strong> @order.Region</p>
<p><strong>Postal Code:</strong> @order.PostalCode</p>
<p><strong>Country: </strong>@order.Country</p>
<p>
<form action="OrderDetails" method="post" id="shippedForm">
@Html.Hidden("orderId", order.OrderId)
Order Shipped?
@Html.CheckBox("shipped", order.OrderShipped, new { value = "true" })
<input type="submit" value="Update" />
</form>
</p>
<h2>Order Items</h2>
<table id="cartTable">
<tr>
<th class="product">Product</th>
<th class="size">Size</th>
<th class="price">Price</th>
</tr>
@foreach (var item in orderItems)
{
<tr>
<td class="product">@Products.GetProductNameFromId(item.ProductID)</td>
<td class="size">@item.Size</td>
<td class="price">£@item.Price</td>
</tr>
}
<tr class="cartTotal">
<td colspan="2"> </td>
<td>Total: £@order.OrderTotal</td>
</tr>
</table>
</text>
}
When the page initially loads, the OrderId is retrieved from the URL and two database queries are run. The first query populates the top half of the page, including the Shipping Details section. The second query retrieves all of the individual items that form part of the order and is iterated over to produce the Order Items section at the bottom of the page.
If the user checks the ‘Order Shipped?’ checkbox and clicks the ‘Update’ button, the value of the Orders.OrderShipped field in the database is updated to reflect the value of the checkbox and the user is returned to the Orders Summary page. When performing this action, you will note that the order is now listed only under the “Shipped Orders” list on the Orders Summary page.
Figure 11-7 shows the completed Order Details page:
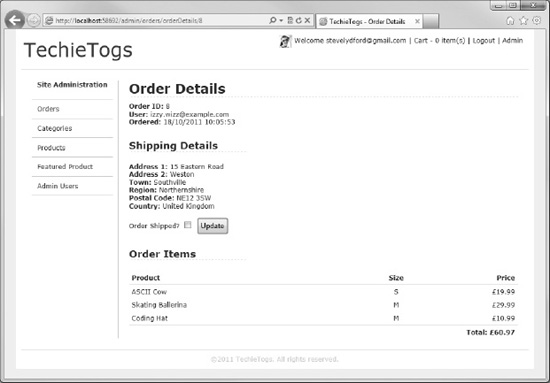
Figure 11-7. The Order Details page
Product Categories
The products within the TechieTogs catalog are organized into categories. All products must be assigned to a category.
The product categories are stored within the Categories table of our database and are used to dynamically build the menu (Shared/Partials/_Categories.cshtml) seen on the left hand side of every page of the public-facing side of the site.
Clearly we need a way to add, edit, and delete items from the Categories table so that we can keep the product catalog well organized. Therefore, add a new subfolder called Categories within the main Admin folder and inside it create a new page called Default.cshtml. This page will be used to list all of the categories in the table and will allow administrators to add a new category record (see Figure 11-8).
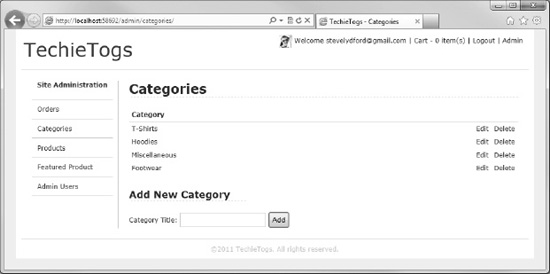
Figure 11-8. The Categories administration default page
The complete listing for the Admin/Categories/Default.cshtml page is as follows:
@{

    Layout = "~/Shared/Layouts/_AdminLayout.cshtml";

    Page.Title = "Categories";


    var categoryTitle = "";


    var db = Database.Open("TechieTogsData");


    if(IsPost && !Request["categoryTitle"].IsEmpty())

    {

        categoryTitle = Request["categoryTitle"];

        if(!Admin.CategoryExists(categoryTitle))

        {

            var sqlInsert = "INSERT INTO Categories (CategoryTitle) VALUES (@0)";

            db.Execute(sqlInsert, categoryTitle);

        }

        else

        {

            ModelState.AddError("categoryTitle", "Category already exists");

        }

    }


    var sqlCommand = "SELECT * FROM Categories";

    var categories = db.Query(sqlCommand);


}


<h1>Categories</h1>


<table class="grid">

    <tr>

        <th colspan="3" class="gridHeader">Category</th>

    </tr>

    @foreach (var category in categories)

    {

        <tr>

            <td id="mainColumn">

                @category.categoryTitle

            </td>

            <td>

                <a href="EditCategory/@category.categoryId">Edit</a>

            </td>

            <td>

                <a href="DeleteCategory/@category.categoryId">Delete</a>

            </td>

        </tr>

    }

</table>


<h2>Add New Category</h2>

<form action="" method="post">

    <p>

        Category Title:

        @Html.TextBox("categoryTitle", categoryTitle)

        <input type="submit" value="Add" />

        @Html.ValidationMessage("categoryTitle")

    </p>

</form>
On its initial load, the page retrieves all of the categories from the database and displays them in a table, with two links next to each category to send the user to the Edit and Delete pages.
Underneath the list of categories, an HTML form is displayed to allow the user to add a new item into the Categories table.
When this form is posted back to the server, the Admin.CategoryExists() method is called to ensure that no duplicate categories are created. If the method returns false, the record is inserted into the Categories table and the page displayed again. If the category already exists, an error is added to the ModelStateDictionary, to be displayed to the user via a call to the Html.ValidationMessage() helper method in the Add New Category form.
The Admin.CategoryExists() method is a custom Razor function that we will create. We are creating it as a function, rather than just adding the code directly into the page, as we will want to call the same code again later from the Edit Categories page. Yet again, we are doing our best to stay DRY!
Add a new file called Admin.cshtml inside the site's App_Code folder. Replace any existing content within the file with the following Razor function:
@* Admin Functions *@

@functions {


    public static bool CategoryExists(string categoryTitle)

    {

        var db = Database.Open("TechieTogsData");

        var sqlQuery = "SELECT categoryID FROM Categories WHERE categoryTitle = @0";

        return db.Query(sqlQuery, categoryTitle).Count() > 0;

    }


}
You can see here that the CategoryExists() method simply accepts a string parameter, categoryTitle, and returns a Boolean. The value of the categoryTitle parameter is searched for in the database; if no rows are returned, the method returns false.
Editing Categories
The Edit Category page simply displays a textbox to allow an administrator to change the title of a category. The code within the post request handler is very similar to that of the default Categories page. When the form is posted back, we call the Admin.CategoryExists() Razor function to ensure that no duplicate categories will be created, before submitting the update query to the database. Note that the call to the Admin.CategoryExists() function is not case sensitive.
Add a new file at Admin/Categories/EditCategory.cshtml and replace the auto-generated content with the following code and markup:
@{

    Layout = "~/Shared/Layouts/_AdminLayout.cshtml";

    Page.Title = "Edit Category";


    // Get categoryId from URL, or set to 0 if not present

    var categoryId = !UrlData[0].IsEmpty() ? UrlData[0] : "0";

    var categoryTitle = "";


    var db = Database.Open("TechieTogsData");


    if(IsPost)

    {

        categoryId = Request["categoryId"];

        categoryTitle = Request["categoryTitle"];


        // Validation

        if (categoryTitle.IsEmpty())

        {

            ModelState.AddError("categoryTitle", "Category Title cannot be blank");

        }


        if(Admin.CategoryExists(categoryTitle))

        {

            ModelState.AddError("categoryTitle", "Category already exists");

        }


        if(ModelState.IsValid)

        {

            var sqlUpdate = "UPDATE Categories SET CategoryTitle = @0 WHERE CategoryId = @1";

            db.Execute(sqlUpdate, categoryTitle, categoryId);


            Response.Redirect("~/Admin/Categories/");

        }

    }

    else

    {

            var sqlCommand = "SELECT * FROM Categories WHERE CategoryID = @0";

            categoryTitle = db.QuerySingle(sqlCommand, categoryId).CategoryTitle;

    }


}


<h1>Edit Category</h1>


<form action="" method="post">

    <p>

        Category Title:

        @Html.Hidden("categoryId", categoryId)

        @Html.TextBox("categoryTitle", categoryTitle)

        <input type="submit" value="Update" />

        @Html.ValidationMessage("categoryTitle")

    </p>

</form>
Deleting Categories
When deleting categories, we need to be careful that we do not delete any category that has products currently associated with it. The code for this page is fairly simple and calls a helper function to ensure that the category is empty before we carry out the delete. The delete is executed on the database using the CategoryId passed in the URL from the Categories page.
When users first land on the Delete Category page, and if the category is empty, they are presented with a confirmation message and two buttons. One of these buttons submits the form (i.e., to proceed with the deletion), which is then processed by the post request handler in the code block at the top of the page. The second button is a ‘Cancel’ button, which uses JavaScript in the onclick attribute to send the user directly back to the Categories page without submitting the form. The Delete Category page is shown in Figure 11-9:
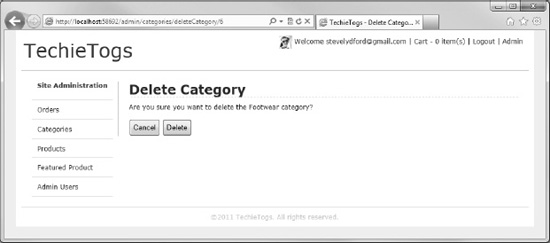
Figure 11-9. The Delete Category page
If the user lands on the page and the category is not empty, a message is displayed to the user to say that the category cannot be deleted as it has associated products.
Add a new file called DeleteCategory.cshtml to the Admin/Categories folder and replace any existing markup with the following code:
@{

    Layout = "~/Shared/Layouts/_AdminLayout.cshtml";

    Page.Title = "Delete Category";


    var categoryId  = UrlData[0];

    if (categoryId.IsEmpty()) {

         Response.Redirect("~/Admin/Categories/");

    }


    var db = Database.Open("TechieTogsData");


    if (IsPost)

    {

        var sqlDelete = "DELETE FROM Categories WHERE CategoryId = @0";

        db.Execute(sqlDelete, categoryId);

        Response.Redirect("~/Admin/Categories/");

    }


    var sqlSelect = "SELECT * FROM Categories WHERE categoryId = @0";

    var category = db.QuerySingle(sqlSelect, categoryId);

}


<h1>Delete Category</h1>


@if (!Admin.CategoryIsEmpty(categoryId))

{

    <p>

        Unable to delete the @category.CategoryTitle category as it has associated products.

    </p>

}

else

{

    <p>

        Are you sure you want to delete the @category.CategoryTitle category?

    </p>

    <p style="margin:">

        <form action="" method="post" id="deleteForm">

            <input type="button"

                onclick="window.location = '@Href("~/Admin/Categories/")';"

                value="Cancel" />

            <input type="submit" value="Delete" />

        </form>

    </p>

}
As mentioned previously, the page calls a custom Razor function that checks that the category is empty before deletion. This function must now be added within the App_Code/Admin.cshtml page, which we created earlier to contain our CategoryExists() method. Open the App_Code/Admin.cshtml file and insert the function highlighted in bold in the following code sample:
@* Admin Functions *@

@functions {


    public static bool CategoryExists(string categoryTitle)

    {

        var db = Database.Open("TechieTogsData");

        var sqlQuery = "SELECT categoryID FROM Categories WHERE categoryTitle = @0";

        return db.Query(sqlQuery, categoryTitle).Count() > 0;

    }


    public static bool CategoryIsEmpty(string categoryId)

    {

        var db = Database.Open("TechieTogsData");

        var sqlQuery = "SELECT ProductID FROM Products WHERE category = @0";

        return db.Query(sqlQuery, categoryId).Count() == 0;

    }


}
This method simply queries the database for products within the specified category and returns true if no matching records are found.
Product Administration
As the product catalog is generated entirely dynamically from the TechieTogsData database, we will need to provide facilities to administer it.
The Product Administration part of our site will consist of two pages. The first page will list a summary of all products within the catalog, showing the product ID, title, and category. Alongside each product will be a link to the second page, which will display the product details in full, enabling the user to update them. The Products Summary page will also display a link to allow the user to add a new product to the catalog.
The Products Summary Page
The Products Summary page presents a list of all of the products held within the database. For this task we will use the WebGrid helper, which gives us built-in sorting and paging functionality.
Figure 11-10 shows the Products Summary page running in the browser:
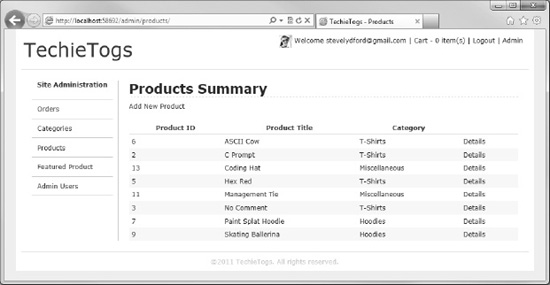
Figure 11-10. The Products Summary page
The page is straightforward and requires little explanation, so go ahead and create a new Products subfolder within the main Admin folder and add to it a new file called Default.cshtml. The following listing shows the complete code for the Admin/Products/Default.cshtml page:
@{

    Layout = "~/Shared/Layouts/_AdminLayout.cshtml";

    Page.Title = "Products";


    var db = Database.Open("TechieTogsData");

    var sqlCommand = "SELECT Products.ProductId, Products.Title, Categories.CategoryTitle " +

                     "FROM Products " +

                     "INNER JOIN Categories ON Products.Category = Categories.CategoryId " +

                     "ORDER BY title";


    var result = db.Query(sqlCommand);


    var productsGrid = new WebGrid(source: result,

                                    rowsPerPage: 20);


}


<h1>Products Summary</h1>

<a href="productDetails">Add New Product</a>

<div class="grid">

    @productsGrid.GetHtml(

        tableStyle: "grid",

        headerStyle: "gridHeader",

        alternatingRowStyle: "gridAlt",

        footerStyle: "gridFooter",

        columns: productsGrid.Columns(

            productsGrid.Column("ProductId",

                              "Product ID"),

            productsGrid.Column("Title",

                              "Product Title"),

            productsGrid.Column("CategoryTitle",

                              "Category"),

            productsGrid.Column(null,

                              null,

                              format: @<text>

                                          <a href="ProductDetails/@item.ProductId">

                                              Details

                                          </a>

                                      </text>)

        )

    )

</div>
You will no doubt have noticed that the ‘Add New Product’ link points to the same page as the individual product details links. This is done intentionally so that we can use the same page for both tasks, as the UI is identical. We'll deal with the Product Details page next.
The Product Details Page
The Product Details page will be used to create new products and edit existing products. If a Product ID is passed in the UrlData, the product details are retrieved from the database and the form is populated. If no Product ID is present in the URL, an empty form is displayed to allow the creation of a new product.
If we are to create a new product, we store the value "new” in the productID hidden field. This enables us to identify it as a new product in the post request handler and to perform a SQL INSERT command, rather than an UPDATE.
Create a new file called ProductDetails.cshtml in the Admin/Products folder and replace any existing content with the following code:
@{

    Layout = "~/Shared/Layouts/_AdminLayout.cshtml";

    Page.Title = "Edit Category";


    var productId = "new";

    var title = "";

    var price = "";

    var description = "";

    var keywords = "";

    var category = "";


    var db = Database.Open("TechieTogsData");


    // Retrieve product details associated to the Product ID passed in the URL

    if (!UrlData[0].IsEmpty())

    {

        productId = UrlData[0];


        var sqlCommand = "SELECT * FROM Products WHERE productID = @0";

        var product = db.QuerySingle(sqlCommand, productId);


        title = product.title;

        price = product.price.ToString();

        description = product.description;

        keywords = product.keywords;

        category = product.category.ToString();

    }


    if(IsPost)

    {

        productId = Request["productId"];

        title = Request["title"];

        price = Request["price"];

        description = Request["description"];

        keywords = Request["keywords"];

        category = Request["category"];


        // Validation

        if (title.IsEmpty())

        {

            ModelState.AddError("title", "Product Title cannot be blank");

        }


        if (price.IsEmpty())

        {

            ModelState.AddError("price", "Price is required");

        }


        if (description.IsEmpty())

        {

            ModelState.AddError("description", "Description cannot be blank");

        }


        if(ModelState.IsValid)

        {

            var sql = "";

            if (productId == "new")

            {

                // Insert new product record

                sql = "INSERT INTO Products (title, price, description, " +

                      "keywords, category) VALUES (@0, @1, @2, @3, @4)";

            }

            else

            {

                // Update existing product record

                sql = "UPDATE Products SET title = @0, price = @1, " +

                      "description = @2, keywords = @3, category = @4 " +

                      "WHERE productId = @5";

            }


            db.Execute(sql, title, price, description,

                        keywords, category, productId);


            Response.Redirect("~/Admin/Products/");

        }

    }


}


<h1>Product Details</h1>


<div id="productForm">

    <form action="" method="post">

        <p>

            @Html.Hidden("productId", productId)

            @Html.Label("Title:", title)<br />

            @Html.TextBox("title", title)

            @Html.ValidationMessage("title")

        </p>

        <p>

            @Html.Label("Price:", price)<br />

            @Html.TextBox("price", price, new { @class="short" })

            @Html.ValidationMessage("price")

        </p>

        <p>

            @Html.Label("Description:", description)<br />

            @Html.TextArea("description", description, 10, 40, null)

            @Html.ValidationMessage("description")

        </p>

        <p>

            @Html.Label("Keywords:", keywords)<br />

            @Html.TextBox("keywords", keywords)

        </p>

        <p>

            @Html.Label("Category:", category)<br />

            @Products.CategoriesDropDownList("category", category)

        </p>

        <p>

            <input type="submit" value="Update" />

        </p>

    </form>

</div>
This page uses a helper, Products.CategoriesDropDownList(), to display a dropdown list of categories. Add the following helper code to the App_Code/Products.cshtml file we created earlier:
@helper CategoriesDropDownList(string name, string selectedValue)

{

    var optionList = new List<SelectListItem>();

    var db = Database.Open("TechieTogsData");


    var sqlCommand = "SELECT categoryId, categoryTitle FROM Categories " +

                     "ORDER BY categoryTitle";

    var result = db.Query(sqlCommand);


    foreach(var item in result)

    {

        optionList.Add(new SelectListItem { Value = item.categoryId.ToString(),

                                            Text = item.categoryTitle });

    }


    @Html.DropDownList(name, null , optionList, selectedValue, null)

}
This helper retrieves a list of categories from the database and uses it to output an HTML <select> control. The name of the <select> control and the item selected within it are set by the parameter values.
The completed Product Details page is shown here in Figure 11-11:
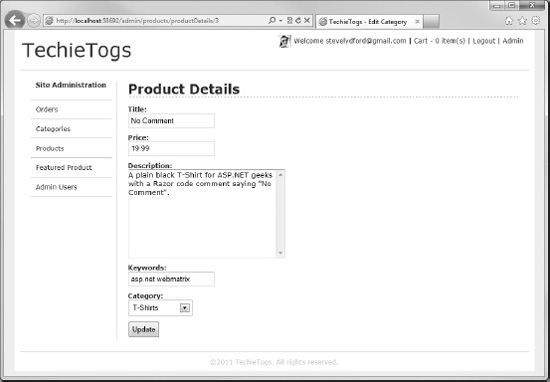
Figure 11-11. The Product Details page
Adding Product Images
Our product catalog is complete and works well, but it we are much more likely to sell products if customers can see an image of the product before they buy. In this section, we'll amend the Product Details administration page to allow site administrators to upload a picture of the product. We'll then display thumbnails of the product image in the catalog, with a full-size image on the Product Details page.
Let's make the changes to the Product Details administration page first, to give the site administrator the option of uploading a product image.
Open the Admin/Products/ProductDetails.cshtml page we created earlier and make the changes to the body of the page, shown in bold in the following listing:
<h1>Product Details</h1>

<div id="productForm">

    <form action="" method="post" enctype="multipart/form-data">

        <p>

            @Html.Hidden("productId", productId)

            @Html.Label("Title:", title)<br />

            @Html.TextBox("title", title)

            @Html.ValidationMessage("title")

        </p>

        <p>

            @Html.Label("Price:", price)<br />

            @Html.TextBox("price", price, new { @class="short" })

            @Html.ValidationMessage("price")

        </p>

        <p>

            @Html.Label("Description:", description)<br />

            @Html.TextArea("description", description, 10, 40, null)

            @Html.ValidationMessage("description")

        </p>

        <p>

            @Html.Label("Keywords:", keywords)<br />

            @Html.TextBox("keywords", keywords)

        </p>

        <p>

            @Html.Label("Category:", category)<br />

            @Products.CategoriesDropDownList("category", category)

        </p>

       <p>

            @Html.Label("Product Image:", "productImage")<br />

            <input type="file" name="productImage" />

        </p>

        <p>

            <input type="submit" value="Update" />

        </p>

    </form>

</div>
The first change is to insert the enctype="multipart/form-data" attribute into the <form> tag. The addition of this attribute is necessary to be able to gather the file information submitted in the file control.
The other change to the page is the addition of a file input control. This will present the user with the UI necessary to select a file from their local file system for upload.
We will store the uploaded files in a folder in the site root called ProductImages, which you should create now. Next we'll add some code to the post request handling code to grab the file from the user's machine and upload it into this folder. Make the following changes seen in bold type:
![]() Note When deploying this site to a public-facing server, you may have to alter the default permissions of the
Note When deploying this site to a public-facing server, you may have to alter the default permissions of the ProductImages folder to allow write access. Your system administrator or web hosting provider will be able to help you with this.
if(IsPost)

{

    productId = Request["productId"];

    title = Request["title"];

    price = Request["price"];

    description = Request["description"];

    keywords = Request["keywords"];

    category = Request["category"];


    // Validation

    if (title.IsEmpty())

    {

        ModelState.AddError("title", "Product Title cannot be blank");

    }


    if (price.IsEmpty())

    {

        ModelState.AddError("price", "Price is required");

    }


    if (description.IsEmpty())

    {

        ModelState.AddError("description", "Description cannot be blank");

    }


    if(ModelState.IsValid)

    {

        var sql = "";

        if (productId == "new")

        {

            // Insert new product record

            sql = "INSERT INTO Products (title, price, description, " +

                "keywords, category) VALUES (@0, @1, @2, @3, @4)";


            db.Execute(sql, title, price, description,

                    keywords, category, productId);


            productId = db.GetLastInsertId().ToString();

        }

        else

        {

            // Update existing product record

            sql = "UPDATE Products SET title = @0, price = @1, " +

                "description = @2, keywords = @3, category = @4 " +

                "WHERE productId = @5";


            db.Execute(sql, title, price, description,

                    keywords, category, productId);

        }


        // Product image

        var productImage = WebImage.GetImageFromRequest();

        if(productImage != null)

        {

            // Save main product image

            var savePath = @"~ProductImages" + productId;

            productImage.Save(filePath: savePath + ".png",

                                imageFormat: "png",

                                forceCorrectExtension: true );


            // Resize and save thumbnail

            productImage.Resize(height: 120, width: 120,

                                preserveAspectRatio: true);

            productImage.Save(filePath: savePath + "_thumb.png",

                                imageFormat: "png",

                                forceCorrectExtension: true );

        }

        Response.Redirect("~/Admin/Products/");

    }

}
In this code, we make use of the WebImage helper to process and upload the image file.
![]() Note A full explanation of the WebImage helper and its use can be found in Chapter 12 – Additional Techniques and Features.
Note A full explanation of the WebImage helper and its use can be found in Chapter 12 – Additional Techniques and Features.
First, if this is a new product, we need to get the ID of the product inserted using the Database.GetLastInsertId() method. This is necessary because we will be using the Product ID to create the file name that we are going to use to store the images in the productImages folder.
We then use the WebImage.GetImageFromRequest() method to retrieve the image, whose path is passed in via the file control, from the user's local file system. We then construct the path and file name we wish to use to store the file on our web server. In our case, we are going to store all of the images in the ProductImages folder, using the Product ID as the filename, which will ensure that each file name is unique. The call to the Save() method stores the file at the specified path, with the imageFormat parameter telling the WebImage helper to save the image file in the Portable Network Graphics (PNG) format, regardless of the format of the original image.
We want to display thumbnail images in the product catalog. Rather than asking the user to provide an additional thumbnail image, we use the WebImage.Resize() method to produce a thumbnail from the uploaded product image. When the Resize() method is called, we specify maximum width and height and set the preserveAspectRatio parameter to true, to ensure that the aspect ratio of the original image is maintained. Finally, we save the thumbnail, appending "_thumb" to the Product ID to produce the file name.
Displaying Product Images
When it comes to displaying the image on the page, we could simply point an HTML <img> tag at the uploaded image in the ProductImages folder. However, if for any reason a product image has not been uploaded, the browser will display an ugly “missing image” graphic, such as the one seen in Figure 11-12 displayed by Internet Explorer:
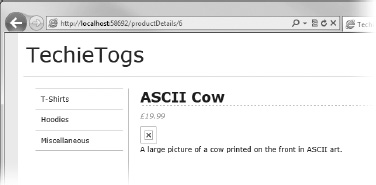
Figure 11-12. A missing image, as seen in Internet Explorer 9
Obviously, this behavior is not desirable, so we'll write some code to display a default image wherever a specific product image is not available. In the interest of code reuse, we'll implement this code inside a helper method so that we can make use of it wherever we want to display a product image in the application.
Open the file at App_Code/Products.cshtml and insert the following helper method, called ShowProductImage() at the bottom of the file:
@helper ShowProductImage(string productId)

{

    var imagePath = @"~/ProductImages/" + productId + ".png";

    if (!File.Exists(Server.MapPath(imagePath)))

    {

        imagePath = "~/ProductImages/noImage.png";

    }

    <img src="@Href(imagePath)" alt="Product Image"/>

}
This product uses the .NET File.Exists() method to determine the existence of a product image matching the Product ID. The Server.MapPath() method is used to map the specified URL to the corresponding physical directory on the server.
![]() Note More information on the File.Exists() and Server.MapPath() methods can be found on the following two pages of the MSDN web site:
Note More information on the File.Exists() and Server.MapPath() methods can be found on the following two pages of the MSDN web site:
If the requested image file can be found, it is displayed using an HTML <img> tag. If the relevant image file does not exist, a default image, noImage.png, which we you should create and store in the ProductImages folder, will be displayed.
The first page we will change to display our product image is /Admin/Products/ProductDetails.cshtml. Add the following <div> and method call to the bottom of the page:
<div id="productFormImage">

    @Products.ShowProductImage(productId)

</div>
Now, when we visit the Product Details administration page for a product that does not yet have an associated image, we will see the following (see Figure 11-13):
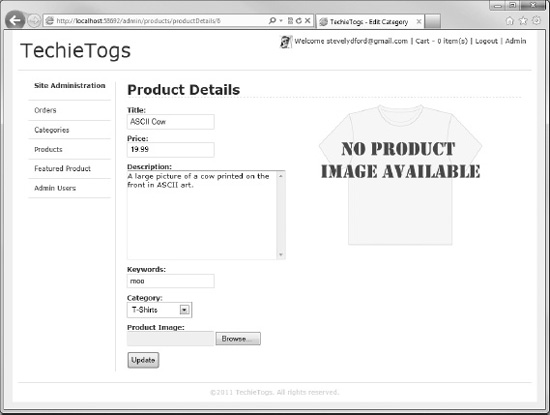
Figure 11-13. The Product Details administration page showing a product that has no associated image
Now we'll upload an image and move on to make amendments to the Product Details page within the catalog to display the image to the user.
Open the ProductDetails.cshtml page in the root of the site and add the following highlighted paragraph and method call within the productDetails <div>:
<div id="productDetails">

    <p class="price">

        £@product.price

    </p>

    <p>@Products.ShowProductImage(productID)</p>

    <p>@product.description</p>

</div>
Now, when we run the page and browse to the Product Details page of a product with an uploaded image, we will see the image rendered in the browser (see Figure 11-14):
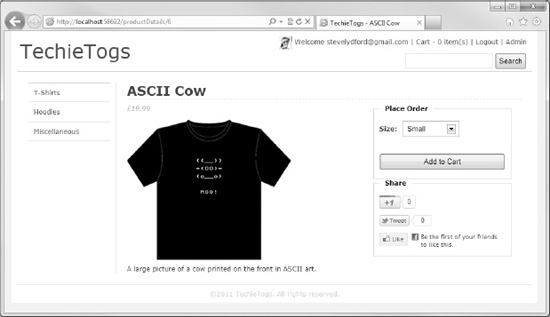
Figure 11-14. The Product Details page of the catalog showing a product image
Finally, we want to display the thumbnail images that we have created on the products summary page of the catalog. For this, we will need to add the following ShowProductThumbnail() helper method to the bottom of the App_Code/Products.cshtml file:
@helper ShowProductThumbnail(string productId)

{

    var imagePath = @"~/ProductImages/" + productId + "_thumb.png";

    if (!File.Exists(Server.MapPath(imagePath)))

    {

        imagePath = "~/ProductImages/noThumb.png";

    }

    <img src="@Href(imagePath)" alt="Product Image"/>

}
This method works in exactly the same way as the ShowProductImage() helper that we created earlier, except that it displays the product thumbnail.
Amend the unordered list, populated with a foreach loop, in the Products.cshtml file in the site root folder to include the method call to ShowProductThumbnail(), as highlighted in the following listing:
<ul id="productsList">

    @foreach (var item in products) {

        <li>

            <h3>

                <a href="/ProductDetails/@item.productID">@item.title</a>

            </h3>

            <p>

                @Products.ShowProductThumbnail(item.productID.ToString())

            </p>

            <p class="price">

                £@item.price

            </p>

            <p>

                <a href="/ProductDetails/@item.productID" class="detailsButton">

                    More Details

                </a>

            </p>

        </li>

    }

</ul>
Now, when we run the site and browse to a category, the product thumbnails will be displayed in the catalog (see Figure 11-15):
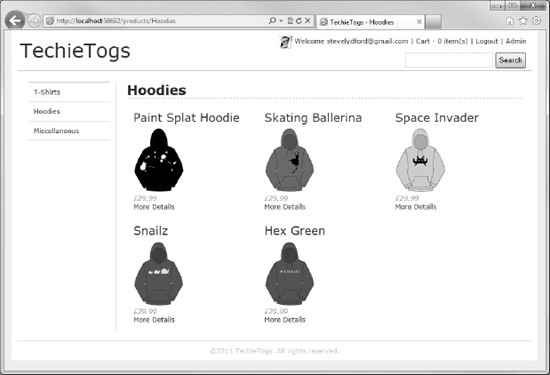
Figure 11-15. The product thumbnail images displayed in the catalog
Displaying Dynamic Content on the Home Page
The last job to perform on the TechieTogs web site is to produce some dynamic content for the Home Page. We will create this content in this section.
Displaying a ‘Featured Product’
You will have noticed that we have included a menu item in the administration menu for ‘Featured Product’. We will create a page where the site administrator can choose one item to ‘feature’ on the Home Page.
First, we will need to create a database table to store the Product ID of the featured item. Create a new table in the TechieTogsData database called Settings. For now, the Settings table will have only one column, featuredProduct, although you may wish to add more ‘settings’ at a later date, as you develop the site further. Figure 11-16 shows the details of the Settings table that you will need to add to your site's database:

Figure 11-16. The details of the Settings table
Now that the necessary database table is in place, add a new page to the Admin folder at Admin/Products/Featured.cshtml. Replace any existing page content with the following code and markup:
@{

    Layout = "~/Shared/Layouts/_AdminLayout.cshtml";

    Page.Title = "Featured Product";


    var featuredProduct = "";


    var db = Database.Open("TechieTogsData");


    if(IsPost)

    {

        featuredProduct = Request["featuredProduct"];

        var sqlUpdate = "UPDATE Settings SET featuredProduct = @0";

        db.Execute(sqlUpdate, featuredProduct);


        Response.Redirect("~/Admin");

    }


    var sqlCommand = "SELECT featuredProduct FROM Settings";

    featuredProduct = db.QuerySingle(sqlCommand).featuredProduct.ToString();

}


<h1>Featured Product</h1>


<form action="Featured" method="post">

    <p>

        Featured product:

        @Products.ProductsDropDownList("featuredProduct", featuredProduct)

        <input type="submit" value="Save" />

    </p>

</form>
This code requires very little explanation. It simply displays a dropdown list of all of the products in the database using the Products.ProductsDropDownList() helper that we created earlier and it stores the value of that dropdown list to the featuredProduct column of the Settings table on post back.
Now we'll make some changes in the Home Page to display the featured product. Open Default.cshtml in the site root folder and replace the entire current content with the following:
@{

    Layout = "~/Shared/Layouts/_Layout.cshtml";

    Page.Title = "Home Page";


    var db = Database.Open("TechieTogsData");

    var sqlSelect = "SELECT * FROM Products " +

                    "INNER JOIN Settings ON Products.ProductID = Settings.featuredProduct";


    var product = db.QuerySingle(sqlSelect);

}


@if (product != null)

{

    <h1 class="homePageHeading">Featured Product</h1>

    <div id="featuredProductImage">

        <p>@Products.ShowProductImage(product.productID.ToString())</p>

    </div>

    <div id="featuredProductDetails">

        <a href="/ProductDetails/@product.productID">

            <h2>@product.title</h2>

        </a>

        <p>

            @product.description

        </p>

        <p class="price">

            £@product.price

        </p>

        <p>

            <a href="/ProductDetails/@product.productID" class="detailsButton">

                More Details

            </a>

        </p>

    </div>

}
This page uses a SQL INNER JOIN to get the details of the featured product from the Products table, and uses the result to display the product details on the page. The information displayed includes a link to the Product Details page, from where the customer can place an order.
Add the following CSS to Css/Style.css, to format the Featured Product on the Home Page:
/* Home Page

---------------------------------*/

#featuredProductImage {

    float: left;

    width: 380px;

}


#featuredProductDetails

{

    float:left;

    width: 250px;

}


#featuredProductDetails h3

{

    margin-bottom: 20px;

}


#featuredProductDetails .price {

    font-size: 1em;

    font-style: italic;

    color: #999;

    margin: 10px 0px 10px 0px;

}
Popular Products
In addition to the Featured Product, we'll also display the four most popular products on the Home Page of the site. We can get this information from the OrderItems table by finding the four productIDs that occur most often in the table. Add the following code to the bottom of the Default.cshtml page in the site root folder:
@{

    sqlSelect = "SELECT TOP 4 COUNT(productID) AS productCount, productId " +

                "FROM OrderItems GROUP BY productID ORDER BY productCount DESC";

    var mostPopular = db.Query(sqlSelect);

}

@if (mostPopular.Count() > 0)

{

    <div id="popularProducts">

        <h1 class="homePageHeading">Most Popular Products</h1>

        <ul id="popularProductsList">

            @foreach (var item in mostPopular) {

                <li>

                    <a href="/ProductDetails/@item.productID" class="detailsButton">

                        @Products.ShowProductThumbnail(item.productID.ToString())

                    </a>

                </li>

            }

        </ul>

    </div>

}
This code uses the SQL COUNT function to count the number of occurrences of each productID in the OrderItems table. In the same query, we also use the SQL TOP function to return just the first four records. It is then simply a matter of using a foreach loop to iterate over the results of the query and output the thumbnail image of each of the four most popular products to the page.
Add the following CSS to Css/Style.css to style the Most Popular Products section:
#popularProducts {

    clear:both;

    padding-top:25px;

}


#popularProductsList {

    list-style: none;

    margin: 0px;

    padding: 0px;

}


#popularProductsList li {

    float: left;

    margin: 12px 32px 12px 32px;

    text-align: center;

}


#popularProductsList li a img {

    border: none;

}
This is now our Home Page—and our site—complete. Now, when the user lands on the TechieTogs Home Page, they will be presented with something similar to that shown in Figure 11-17:

Figure 11-17. The completed TechieTogs Home Page, displaying dynamic content
![]() Tip The dynamic content we have generated here for the Home Page is a prime candidate for performance enhancement using caching. See Chapter 12 – Additional Techniques and Features, for more information on caching using WebMatrix.
Tip The dynamic content we have generated here for the Home Page is a prime candidate for performance enhancement using caching. See Chapter 12 – Additional Techniques and Features, for more information on caching using WebMatrix.
Summary
Over the last three chapters, we have seen how WebMatrix can be used to produce a fully functional e-commerce application. The creation of the TechieTogs site has demonstrated the real-world use of many of the features and techniques that we have covered in earlier chapters of the book, and it has introduced some new ones.