
C H A P T E R 12
![]()
Working with Images and Video
As Internet connection speeds have improved over the last few years, images and video have become an increasingly important part of the modern web site. In this chapter, we'll take a look at how WebMatrix helpers can be used to greatly improve the ease with which we can work with images and video.
Let's start this chapter with a discussion about uploading and manipulating images in ASP.NET Web Pages.
Working with Images
WebMatrix ships with a WebImage helper that is designed to assist with the manipulation of images on your website. We already saw it in action in the last chapter, when we used it to upload product images to the TechieTogs example website. In this section, we will look at the helper in more detail and see how it can be used to:
- Let users upload images
- Resize and crop images
- Flip and rotate images
- Add a textual watermark to an image
- Overlay another image as a watermark
Create a new WebMatrix site in order to work through the examples in this section. Within the root of the site, you should create a new folder called ‘images’. It is important that you create this folder in the correct place, with the correct name, because you may receive error messages if you try to manipulate an image that is not in the correct path, or try to save an image to a folder that doesn't exist, when working through the examples later in the chapter.
Uploading Images
To allow users to upload images, we will need to provide them with a form containing an HTML file <input> control and a submit button. When they submit the form, we will use the WebImage.GetImageFromRequest() method to retrieve the file from their local file system. Next, we'll construct a unique file name using a Globally Unique Identifier (GUID) and save the image to the images folder using the WebImage.Save() method.
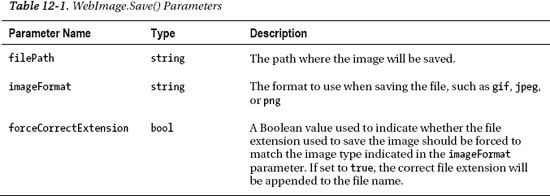
The WebImage.Save() method has three parameters, detailed in Table 12-1:
In the following example, we output the uploaded image to the page underneath the form to verify that it has worked. Enter the following code into a new page called UploadingImages.cshtml:
@{

    WebImage image = null;

    var imageFileName = "";


    if(IsPost)

    {

        image = WebImage.GetImageFromRequest();

        if(image != null)

        {

            imageFileName = Guid.NewGuid().ToString() + "_" +

                Path.GetFileName(image.FileName);


            image.Save(@"~images" + imageFileName);

        }

    }

}


<!DOCTYPE html>


<html lang="en">

<head>

    <meta charset="utf-8" />

    <title>Uploading Images</title>

</head>

    <body>

        <form action="" method="post" enctype="multipart/form-data">

            @Html.Label("Image to upload:", "imageUpload")
            <input type="file" name="imageUpload" /><br/>

            <input type="submit" value="Upload Image" />

        </form>


        <h1>Uploaded Image</h1>

        @if(imageFileName != "")

        {

            <div>

                <img src="images/@imageFileName" alt="Uploaded Image" />

            </div>

        }

    </body>

</html>
You will see that the enctype="multipart/form-data" parameter has been included in the <form> tag. This additional attribute is necessary in order to be able to retrieve the value of the file <input> control. The attribute allows uploading of file content that would not otherwise be submitted with the form data.
We use a GUID to create a unique file name for storing the image in our images folder. By constructing a unique file name, we ensure that an image will never be overwritten in the images folder. Without this, if two images were to be saved in the same folder with identical file names, one would overwrite the other.
GUIDs
Figure 12-1 shows the image-upload example in action:
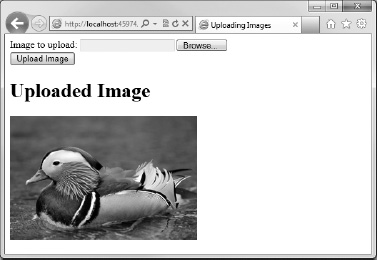
Figure 12-1. Uploading an image using the WebImage helper
![]() Note As noted when you were developing the image-upload functionality of the TechieTogs example web site in Chapter 11, when deploying this site to a public-facing server, you may have to alter the default permissions of the images folder to allow read–write access. Your system administrator or web hosting provider will be able to help you with this.
Note As noted when you were developing the image-upload functionality of the TechieTogs example web site in Chapter 11, when deploying this site to a public-facing server, you may have to alter the default permissions of the images folder to allow read–write access. Your system administrator or web hosting provider will be able to help you with this.
Resizing Images
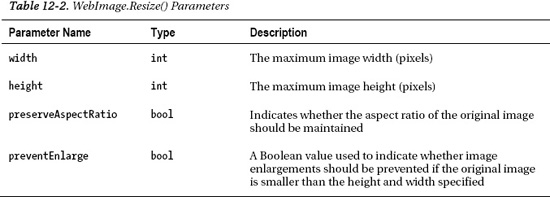
The WebImage helper also exposes a Resize() method, which allows us to alter the size of an image. The Resize() method has four parameters, listed in Table 12-2:
The following code sample allows the user to upload an image, which is then saved and displayed back to the user both in its original size and as a thumbnail image. The thumbnail image is stored with ‘thumb_’ prefixed to the file name, a preserved aspect ratio, and a maximum width and height of 120 pixels.
Add the following code to a new page called ResizingImages.cshtml:
@{

    WebImage originalImage = null;

    WebImage thumbnailImage = null;

    var imageFileName = "";


    if(IsPost)

    {

        originalImage = WebImage.GetImageFromRequest();

        if(originalImage != null)

        {

            imageFileName = Guid.NewGuid().ToString() + "_" +

                Path.GetFileName(originalImage.FileName);


            originalImage.Save(@"~images" + imageFileName);


            thumbnailImage = originalImage.Resize(width: 120,

                                                 height:120,

                                                 preserveAspectRatio: true);


            thumbnailImage.Save(@"~images	humb_" + imageFileName);

        }

    }

}


<!DOCTYPE html>


<html lang="en">

<head>

    <meta charset="utf-8" />

    <title>Resizing Images</title>

</head>

    <body>

        <form action="" method="post" enctype="multipart/form-data">

            @Html.Label("Image to upload:", "imageUpload")

            <input type="file" name="imageUpload" /><br/>

            <input type="submit" value="Upload Image" />

        </form>


        <h1>Uploaded Images</h1>

        @if(imageFileName != "")

        {

            <div>

                Original Image: <br />

                <img src="images/@imageFileName" alt="Original Image" />

            </div>
            <div>

                Thumbnail Image: <br />

                <img src="images/thumb_@(imageFileName)" alt="Thumbnail Image" />

            </div>

        }

    </body>

</html>
Figure 12-2 shows an example of the output produced by the ResizingImages.cshtml page:
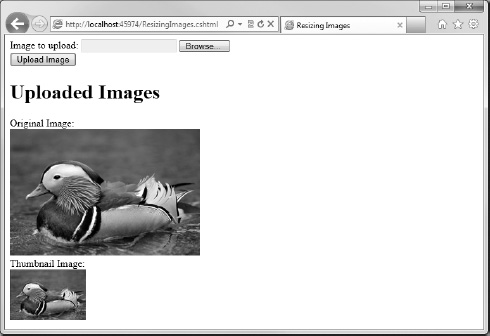
Figure 12-2. Resizing an image using the WebImage.Resize() method
Cropping Images
The WebImage.Crop() method allows us to remove a specified number of pixels from each side of an image. The method itself is very simple to use and is best demonstrated with example code.
Add a new file called CroppingImages.cshtml and insert the following code, which removes 50 pixels from each side of an image:
@{

    WebImage originalImage = null;

    WebImage croppedImage = null;

    var imageFileName = "";


    if(IsPost)

    {

        originalImage = WebImage.GetImageFromRequest();

        if(originalImage != null)
        {

            imageFileName = Guid.NewGuid().ToString() + "_" +

                Path.GetFileName(originalImage.FileName);


            originalImage.Save(@"~images" + imageFileName);


            croppedImage = originalImage.Crop(top: 50, left: 50,

                                              bottom: 50, right: 50);


            croppedImage.Save(@"~imagescropped_" + imageFileName);

        }

    }

}


<!DOCTYPE html>


<html lang="en">

<head>

    <meta charset="utf-8" />

    <title>Cropping Images</title>

</head>

    <body>

        <form action="" method="post" enctype="multipart/form-data">

            @Html.Label("Image to upload:", "imageUpload")

            <input type="file" name="imageUpload" /><br/>

            <input type="submit" value="Upload Image" />

        </form>


        <h1>Uploaded Images</h1>

        @if(imageFileName != "")

        {

            <div style="float:left; margin-right: 10px;">

                Original Image: <br />

                <img src="images/@imageFileName" alt="Original Image" />

            </div>

            <div>

                Cropped Image: <br />

                <img src="images/cropped_@(imageFileName)" alt="Cropped Image" />

            </div>

        }

    </body>

</html>
Figure 12-3 shows this code in action:
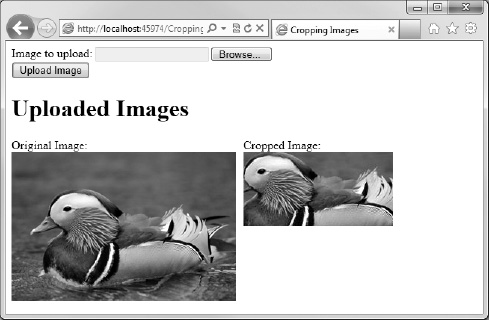
Figure 12-3. Using the WebImage.Crop() method
Flipping and Rotating Images
Four methods are exposed by the WebImage helper for flipping and rotating images, listed in Table 12-3:

The following example is similar to the Resizing Images example except that this time the image is rotated 90 degrees to the right and flipped horizontally.
Create a new page called FlipAndRotate.cshtml and replace any existing markup with the following:
@{

    WebImage originalImage = null;

    WebImage flippedAndRotatedImage = null;
    var imageFileName = "";


    if(IsPost)

    {

        originalImage = WebImage.GetImageFromRequest();

        if(originalImage != null)

        {

            imageFileName = Guid.NewGuid().ToString() + "_" +

                Path.GetFileName(originalImage.FileName);


            originalImage.Save(@"~images" + imageFileName);


            flippedAndRotatedImage = originalImage.RotateRight().FlipHorizontal();


            flippedAndRotatedImage.Save(@"~imagesflippedAndRotated_" + imageFileName);

        }

    }

}


<!DOCTYPE html>


<html lang="en">

<head>

    <meta charset="utf-8" />

    <title>Resizing Images</title>

</head>

    <body>

        <form action="" method="post" enctype="multipart/form-data">

            @Html.Label("Image to upload:", "imageUpload")

            <input type="file" name="imageUpload" /><br/>

            <input type="submit" value="Upload Image" />

        </form>


        <h1>Uploaded Images</h1>

        @if(imageFileName != "")

        {

            <div style="float:left; margin-right: 10px;">

                Original Image: <br />

                <img src="images/@imageFileName" alt="Original Image" />

            </div>

            <div>

                Flipped and Rotated Image: <br />

                <img src="images/flippedAndRotated_@(imageFileName)" alt="Manipulated Image"

/>

            </div>

        }

    </body>

</html>
Figure 12-4 shows the output of this example in the browser:
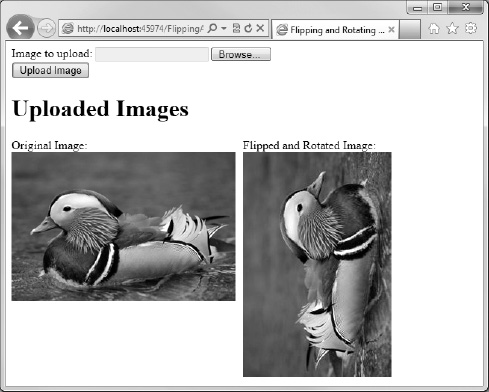
Figure 12-4. Rotating and flipping images using the WebImage helper
Adding Watermarks to Images
The WebImage helper offers two ways to add watermarks to images. The first method overlays text onto the image as a watermark, whereas the second overlays another image on top of the original as a watermark. We'll look at each one in turn.
Adding Text as a Watermark
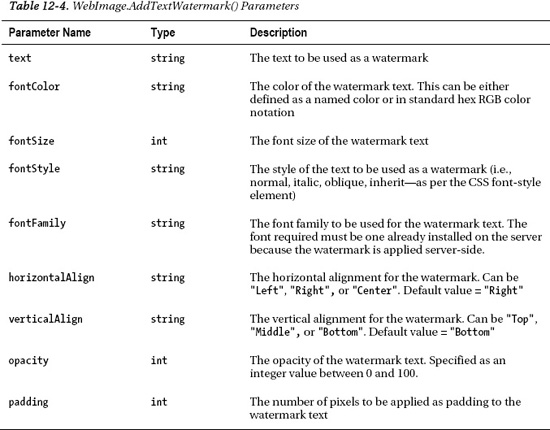
Text can be added as a watermark to an image through the use of the WebImage.AddTextWatermark() method. The method has several parameters used to style the watermark. Table 12-4 lists these parameters in detail:
Add a new file to your example site, and name it TextWatermark.cshtml. Our example page will allow the user to upload an image, to which we will apply a textual watermark and render it back to the browser. Add the following code to the page, replacing any existing content:
@{

    WebImage originalImage = null;

    WebImage watermarkedImage = null;

    var imageFileName = "";


    if(IsPost)
    {

        originalImage = WebImage.GetImageFromRequest();

        if(originalImage != null)

        {

            imageFileName = Guid.NewGuid().ToString() + "_" +

                Path.GetFileName(originalImage.FileName);


            originalImage.Save(@"~images" + imageFileName);


            watermarkedImage = originalImage.AddTextWatermark("Sample Watermark",

                                                              fontColor:"#00FFFF",

                                                              fontSize: 20,

                                                              fontFamily: "Tahoma",

                                                              horizontalAlign: "Center",

                                                              verticalAlign: "Top",

                                                              padding: 15);

            watermarkedImage.Save(@"~imageswatermarked_" + imageFileName);

        }

    }

}


<!DOCTYPE html>


<html lang="en">

<head>

    <meta charset="utf-8" />

    <title>Text Watermark</title>

</head>

    <body>

        <form action="" method="post" enctype="multipart/form-data">

            @Html.Label("Image to upload:", "imageUpload")

            <input type="file" name="imageUpload" /><br/>

            <input type="submit" value="Upload Image" />

        </form>


        <h1>Uploaded Images</h1>

        @if(imageFileName != "")

        {

            <div style="float:left; margin-right: 10px;">

                Original Image: <br />

                <img src="images/@imageFileName" alt="Original Image" />

            </div>

            <div>

                Watermarked Image: <br />

                <img src="images/watermarked_@(imageFileName)" alt="Watermarked Image" />

            </div>

        }

    </body>

</html>
Figure 12-5 shows the watermark applied by this code:
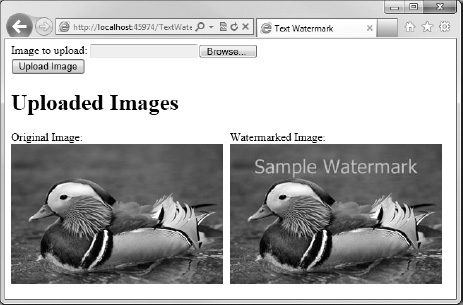
Figure 12-5. A watermark applied using the AddTextWatermark() method
Using Another Image as a Watermark
The other way to add a watermark to an image is by overlaying another image on top of the original. To do this, wecall the AddImageWatermark() method.
The AddImageWatermark() method can overlay either an image stored on file or a specified WebImage object onto another image. In our example here, we will create a page that accepts two images for upload, stores both, and displays one as a watermark on top of the other.
Create a new page called ImageWatermark.cshtml, and replace the default markup with the following code sample:
@{

    WebImage originalImage = null;

    WebImage watermarkImage = null;

    WebImage watermarkedImage = null;

    var originalFileName = "";

    var watermarkFileName = "";


    if(IsPost)

    {

        originalImage = WebImage.GetImageFromRequest("originalImage");

        watermarkImage = WebImage.GetImageFromRequest("watermarkImage");

        if((originalImage != null) && (watermarkImage != null))

        {

            originalFileName = Guid.NewGuid().ToString() + "_" +

                Path.GetFileName(originalImage.FileName);
            originalImage.Save(@"~images" + originalFileName);


            watermarkFileName = Guid.NewGuid().ToString() + "_" +

                Path.GetFileName(watermarkImage.FileName);

            watermarkImage.Save(@"~images" + watermarkFileName);


            watermarkedImage = originalImage.AddImageWatermark(watermarkImage,

                                                               width: 150, height: 50,

                                                               horizontalAlign:"Right",

                                                               verticalAlign:"Top",

                                                               opacity:100,  padding:10);


            watermarkedImage.Save(@"~imageswatermarked_" + originalFileName);

        }

    }

}


<!DOCTYPE html>


<html lang="en">

<head>

    <meta charset="utf-8" />

    <title>Image Watermark</title>

</head>

    <body>

        <form action="" method="post" enctype="multipart/form-data">

            @Html.Label("Original image:", "originalImage")

            <input type="file" name="originalImage" /><br/>

            @Html.Label("Watermark image:", "watermarkImage")

            <input type="file" name="watermarkImage" /><br/>

            <input type="submit" value="Upload Images" />

        </form>


        <h1>Uploaded Images</h1>

        @if(originalFileName != "")

        {

            <div style="float:left; margin-right: 10px;">

                Original Image: <br />

                <img src="images/@originalFileName" alt="Original Image" />

            </div>

            <div>

                Watermark Image: <br />

                <img src="images/@watermarkFileName" alt="Watermark Image" />

            </div>

            <div style="clear:both;">

                Watermarked Image:<br />

                <img src="images/watermarked_@(originalFileName)" alt="Watermarked Image" />

            </div>

        }

    </body>

</html>
When you run the page, you will be asked for an original image and a watermark image. When you click the Upload Images button, the watermark image will be applied to the original image and will be displayed in the browser, as shown here in Figure 12-6:
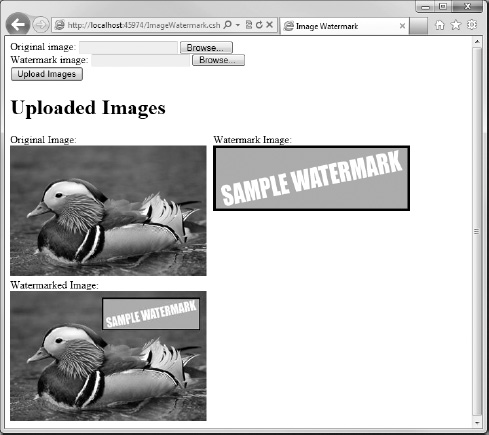
Figure 12-6. Using an image as a watermark
The AddImageWatermark() method has a number of parameters for customizing the output. They are listed in Table 12-5:

Working with Video
The ASP.NET Web Helpers Library package includes a Video helper that lets you embed Adobe Flash (.swf), Windows MediaPlayer (.wmv), and Microsoft Silverlight (.xap) videos into your web pages. The helper simplifies the process of embedding video in a web page by automatically generating the <object> and <embed> HTML tags and associated attributes that are normally used to embed video.
To use the helper, you will first need to install the ASP.NET Web Helpers Library package using the WebMatrix Package Manager.
Navigate to the Site workspace and open the ASP.NET Web Sites Administration site using the link in the Content Pane. Enter a password and remove the leading underscore in the filename of the /App_Data/Admin/_Password.config file when prompted. Next, search for the ASP.NET Web Helpers Library 1.15 package within the Package Manager, and click the Install button to add it to your site.
![]() Note For full instructions about installing the ASP.NET Web Helpers Library package using the WebMatrix Package Manager, see “Chapter 8 – Using Web Helper Packages.”
Note For full instructions about installing the ASP.NET Web Helpers Library package using the WebMatrix Package Manager, see “Chapter 8 – Using Web Helper Packages.”
Once the ASP.NET Web Helpers Library has been successfully installed in your project, you can embed video into the page by using one of the three methods exposed by the Video object: Video.Flash(), Video.MediaPlayer, and Video.Silverlight().
The next three sections look at each of these in turn.
Embedding Flash Video
Adobe Flash video can be embedded into a page using the Video.Flash() helper method. The method has several parameters, listed here in Table 12-6:
Create a new folder in the root of your web site called Media, and place a Flash video (.swf) file inside it.
The following code sample embeds a Flash video located at Media/wildlife.swf into a web page:
<!DOCTYPE html>


<html lang="en">

    <head>

        <meta charset="utf-8" />

        <title>Flash Video</title>

    </head>

    <body>

        <h1>Flash Video</h1>

        @Video.Flash(path: "Media/wildlife.swf",

                 width: "640",

                 height: "360",

                 play: true,

                 loop: true,

                 menu:  true,

                 quality: "best",

                 scale: "exactfit",

                 windowMode: "transparent")

    </body>

</html>
Figure 12-7 shows the resulting page in the browser:
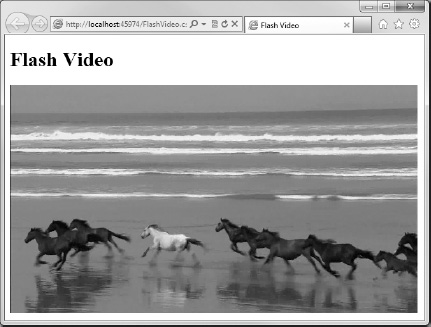
Figure 12-7. Embedding Flash video with the Video helper
![]() Note More information about Flash video attributes can be found on the Adobe web site at
Note More information about Flash video attributes can be found on the Adobe web site at http://kb2.adobe.com/cps/127/tn_12701.html
Embedding Windows MediaPlayer Video
Windows MediaPlayer videos can be embedded into a page using the Video.MediaPlayer() helper method. Videos embedded using the Video helper will play once they are completely downloaded; there is no facility within the helper for streaming video. The method parameters are detailed in Table 12-7:


The following code sample embeds a MediaPlayer video, Media/wildlife.wmf, in a web page.
![]() Note All three of the video types that the Video helper is capable of playing require the relevant plug-in to be installed in the user's browser. Users who do not have the relevant plug-in installed will receive a message in the browser to this effect. The actual message displayed depends on the combination of the user's browser and the required plug-in.
Note All three of the video types that the Video helper is capable of playing require the relevant plug-in to be installed in the user's browser. Users who do not have the relevant plug-in installed will receive a message in the browser to this effect. The actual message displayed depends on the combination of the user's browser and the required plug-in.
<!DOCTYPE html>


<html lang="en">

    <head>

        <meta charset="utf-8" />

        <title>MediaPlayer Video</title>

    </head>

    <body>

        <h1>MediaPlayer Video</h1>

        @Video.MediaPlayer(

            path: "Media/wildlife.wmv",

            width: "640",

            height: "480",

            autoStart: true,

            playCount: 1,

            uiMode:  "full",

            stretchToFit: false,

            enableContextMenu: true,

            mute: false,

            volume: 75)

    </body>

</html>
Figure 12-8 shows the MediaPlayer plug-in displaying the video in the browser.

Figure 12-8. Embedding a .wmv movie in a web page with the MediaPlayer() helper method
![]() Note More information about MediaPlayer's parameters can be found on the Windows Media web site at
Note More information about MediaPlayer's parameters can be found on the Windows Media web site at http://msdn.microsoft.com/en-us/library/aa392321(VS.85).aspx
Embedding Microsoft Silverlight Video
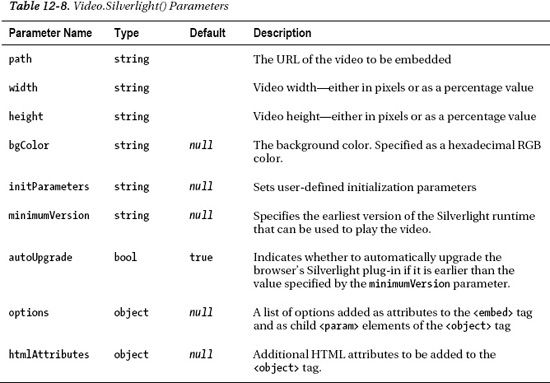
The final method of the Video helper class allows you to embed Microsoft Silverlight (.xap) videos into a web page. The Video.Silverlight() method's parameters are listed here in Table 12-8:
The following code sample embeds a Silverlight video into a web page. Figure 12-9 shows the page rendered to the browser:
<!DOCTYPE html>


<html lang="en">

    <head>

        <meta charset="utf-8" />

        <title>Silverlight Video</title>

    </head>

    <body>

        <h1>Silverlight Video</h1>

        @Video.Silverlight(

            path: "media/wildlife.xap",

            width: "640",

            height: "360")

    </body>

</html>
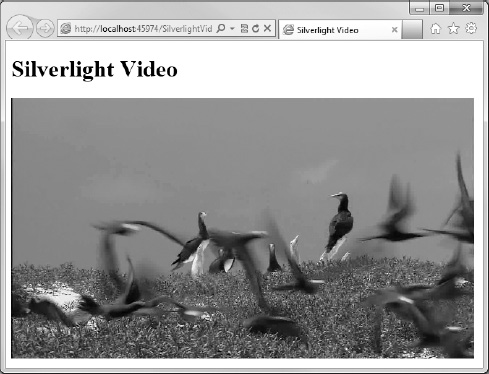
Figure 12-9. A Silverlight movie embedded using the Video.Silverlight() helper
![]() Note More information about the Silverlight plug-in parameters can be found on the MSDN web site at:
Note More information about the Silverlight plug-in parameters can be found on the MSDN web site at: http://msdn.microsoft.com/en-us/library/cc838259(v=VS.95).aspx
Summary
This chapter has been entirely concerned with the embedding of images and videos into web pages by making use of the helper classes provided by Microsoft WebMatrix: WebImage and Video.
In addition to simply embedding images, we have also seen how the WebImage helper can be used to upload images and manipulate them on the web server.
In the final chapter, we will discuss how WebMatrix can be used to debug your web pages and deploy the finished site to a public-facing web server. We'll also see how caching can be used to improve the performance of the site, and we'll look at the tools provided as part of the WebMatrix IDE for improving your site's placement in search engines.