
Chapter 5
Tune Your App Using Algorithms and Data Structures
In this chapter, you will learn about:
- How bad algorithms and data structure can affect your app's performance.
- Theoretical issues of measuring your algorithms.
- Practical measurement of your app's performance.
- Main data structures and algorithms:
- iPhone data structures: NSSet, NSArray, and NSDictionary.
- Other important data structures and their implementations.
- Other algorithms and problem-solving approaches:
- Recursion
- SAX vs. DOM in XML parsing
You may hear that in mobile phone development you don't need to worry about algorithms and data structure due to the computing power of the server side. However, as mentioned with regards to caching issues in the previous chapter, especially when your phone is offline, you should store your data locally and compute it within the phone environment. Here is the issue: your phone environment is not as powerful as your server environment. In other words, you don't have the power of cloud computing or a data center.
First Example
This first example will show you how a bad algorithm can affect your program when it runs in the strict mobile phone environment.
My sample code is simple:
- In the first benchmark, the example contains two arrays, each of which contains 1,000 elements. The first and second arrays are the same in terms of the number of elements. I loop through two arrays to check how many common elements are contained between the two arrays.
- In the second benchmark, the example contains two sets, each of which contains 1,000 elements. I use a special method inside the NSSet API to get the set of common elements between the two original sets.
Then, I benchmark each of them based on a simulator, a new device (iPhone 4 with iOS4), and an old device (iPhone 3G with iOS3). The results are shown in Table 5-1.

Table 5–1 shows that the second benchmark is 100 times faster than the first benchmark. Considering that 1,000 items is not practical when you deal with real applications, 5.44 seconds may not be much for new devices. However, remember that there are many old devices with less power out there, and their owners may not update these devices any time soon. In that light, 5.44 seconds is actually a significant delay when running in those old devices.
What follows is a look at the initial source code and few explanations before I move on to explain some concepts in-depth.
The purpose of Listings 5–1 and 5–2 is to count how many objects inside the first array/set also belong to the second array/set. Listing 5–1 solves the problem by using an array and loop while Listing 5–2 solves the problem by using a set.
Listing 5–1. First Benchmark Using an Array and Loop
   // [self defaultData] returns an array with 1000 thousands different NSObjects

   NSArray *myFirstArray = [NSArray arrayWithArray:[self defaultData]];

   NSArray *mySecondArray = [NSArray arrayWithArray:[self defaulData]];
   NSDate *date1 = [NSDate date];

   int i = 0;

   for (NSObject *obj in myFirstArray) {

       for (NSObject *secondObj in mySecondArray) {

           if ([secondObj isEqual:obj]) {

               i++;

               break;

           }

       }

   }


   NSDate *date2 = [NSDate date];

   NSLog(@"time: %f", [date2 timeIntervalSinceDate:date1]);

   NSLog(@"i: %d", i);
Listing 5–2. Second Benchmark Using a Set
- (void)secondBenchmark {

   NSArray *defaultArray = [self defaultData];

   NSMutableSet *myFirstSet = [NSMutableSet setWithArray:defaultArray];

   NSMutableSet *mySecondSet = [NSMutableSet setWithArray:defaultArray];


   NSDate *date1 = [NSDate date];


   [myFirstSet intersectSet:mySecondSet];


   NSDate *date2 = [NSDate date];

   NSLog(@"time: %f", [date2 timeIntervalSinceDate:date1]);

   NSLog(@"count: %d", [myFirstSet count]);

}
For the first benchmark, I put 1,000 elements into each array and then looped through the two arrays to find if any two items are the same. To avoid a duplicate count, after the program finds the item in the second array, the program stops looping over the second array.
The second approach is much simpler; with the use of NSSet, you only need to store all elements inside the NSSet and call the correct method to do the job for you. The intersect method will find same items inside two sets and put them into the variable myFirstSet.
As you can see, a wrong approach can be 100 times slower than a correct approach. Moreover, the correct approach may save you a few hours of coding when trying to reuse all the necessary data structures and algorithms. Therefore, it's a good idea to choose the correct approach the first time.
Theoretical Issues of Measuring Algorithmic Performance
I've shown you one way to measure the algorithm's performance using NSLog and NSDate in Listings 5–1 and 5–2. However, in computer science, people don't use NSLog or the instruments tool to talk about how fast an algorithm is compared to other algorithms. Computer science requires exact data and standards to make sure that some algorithms are actually better than others.
People usually use Big-O notation to describe how an algorithm scales (performs) in the worst case scenario. (There are other terms and definitions used in computer science that I will not cover here.) For example, if you have an algorithm with the performance O(N), then that algorithm when working on an array of 25 elements will take 25 steps, compared to 5 steps for an array with 5 elements. So, it takes 5 times longer for the 25–element array to finish the task.
How to Measure Big-O
To determine the Big-O of an algorithm, you need to look at how the size of the input affects the time it takes the algorithm to execute. Another way to accomplish this is to logically think through the algorithm execution. Listing 5–3 should help you understand this concept.
Listing 5–3. How to Measure Big-O
   int myFirstCount = 0;

   int mySecondCount = 0;

   // Outer Loop

   for (int i = 0; i < [myFirstArray count]; i++) {

        // Inner Loop

       for (int i = 0; i < [mySecondArray count]; i++) {

           myFirstCount++;

           mySecondCount++;

       }

       NSLog(@"my first Count: %d", myFirstCount++);

       NSLog(@"my second Count: %d", mySecondCount++);

   }
For the purposes of illustration, Listing 5–3 contains duplicate code of two variables, myFirstCount and mySecondCount, which do exactly the same thing. I will explain them further later.
So, looking through each line of code, you can see that the two main computation logics is myFirstCount++; and mySecondCount++;. There are other computing logics like NSLog(@"my first Count: %d", myFirstCount); and NSLog(@ " my second Count: %d", mySecondCount);.
In this part, m and n are the number of elements in myFirstArray and mySecondArray respectively . Programmatically, after the outer loop, myFirstCount and mySecondCount each has the value of (m * n + m). The sum of them will have the value of 2 * m * n + 2 * m.
The following explanation will give you the details of why the total result is 2 * m * n + 2 * m. This helps you do performance analysis yourself without using the actual counting code.
The outer loop (the loop that runs over myFirstArray) runs m times. Because the outer loop runs m times, every computation logic inside the outer loop runs m times as well. So the number of computation of the outer loop is m * (the number of computation inside the outer loop).
To calculate the number of computation inside the outer loop, I consider the inner loop and the two NSLog lines. For each cycle of the loop, the inner loop and two NSLog lines run once. So, the number of computation of the outer loop is m * (the number of computation of the inner loop + 2). ( * )
Then, I let n to be the number of elements in mySecondArray. Similarly to the previous situation, t he inner loop runs n times, and every computation logic inside the inner loop runs n times. There are only two computation logics inside the inner loop, myFirstCount++ and mySecondCount++. Therefore, the number of computation logic inside the inner loop is 2*n. Place this result into the ( * ) equation and you have m * ( 2 * n + 2) = 2 * m * n + 2 * m.
Therefore, the total calculation is 2 * m * n + 2 * m.
To make the calculation simple, I will let m = n. It can be rewritten as 2 * n * n + 2 * n by replacing m with n. It can be further simplified as 2n2 + 2n. The next step is to keep the most significant term (or the fastest growing term) in the formula, so you have only 2n2 left. The last step is to remove all constants in the formula, so you have n2 left, which you can write in the theoretical format as O(n2).
NOTE: You can see why I put duplicate code into Listing 5–3; it demonstrates that the final result doesn't depend much on any constants. Using either n2 or 2n2 doesn't make any difference.
Each of the operations has its own growth rate. Here's an example of the growth rate of operations: log(n), n, n2.
For n = 1, you have log(1) = 0, n = 1, and n2 =1.
For n = 10, you have log(10)=1, n=10, and n2=100. You can see that by increasing n by 9 units, the log(n) only increases 1 unit, n increases 9 units, and n2 increases 99 units.
For n = 100, you have log(100)=2, n=100 and n2=10,000. You can see that by increasing n by 9 units, the log(n) only increases 1 unit, n increases 9 units, and n2 increases 99 units.
Thus by increasing the same number of units, different operations grow differently. Figure 5–1 shows how fast each operation (log(n), n, n2 and n3) grows when you increase n.
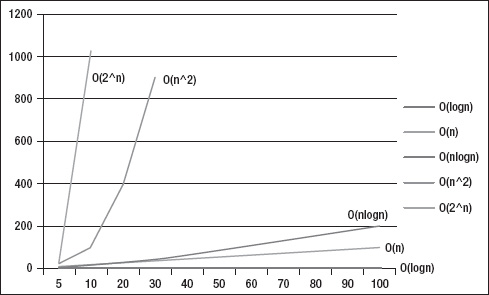
Figure 5–1. Results of each Big-O notation when the input (variable n) increases
Implementation Details
The Big-O notation doesn't mention anything about implementation details; it neither tells you how much memory you need to embody an algorithm nor how difficult it will be to implement such an algorithm into your system. It also doesn't tell you which algorithms may be better in a small scale input but repeated many times. For example, in a small scale, an insertion sort will be faster than a quick sort; when repeated 100 times, the total performance of insertion sort will beat the quick sort. Therefore, Big-O notation gives you a general understanding about algorithms, which you can use to quickly compare different algorithms and approaches.
NOTE: There are other notations in the family of notations to describe average and best cases performance. These notations indicate how good each algorithm is when you take individual circumstances into consideration.
Big-O of Famous Algorithms
To give you a better understanding of Big-O, Table 5–2 lists famous algorithms and their corresponding Big-O notation so that you can see how these algorithms will behave theoretically.
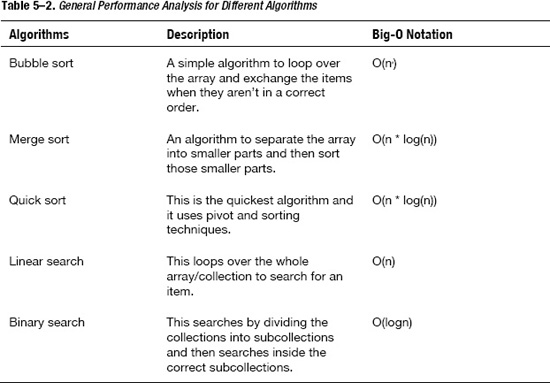
You may get confused about the order in which you should understand the Big-O notation. The order is like this: O(log(n)) < O(n) < O(n * log(n)) < O(n2).
If you take a look at Table 5–2, this means that:
- Bubble sort is slower than merge sort and quick sort.
- Linear search is slower than binary search.
Thus, because merge sort and quick sort run faster than bubble sort, you should choose these sorting algorithms over bubble sort in most cases.
Practical Measurement
In practical use, you will need to combine some theory about Big-Owith the instruments and analysis tools covered in Chapter 2. Here's a quick review of the important tools for measuring the performance of your algorithms and data structure: CPU Sampler and Time Profiler.

Figure 5–2. Results of running CPU Sampler over the program
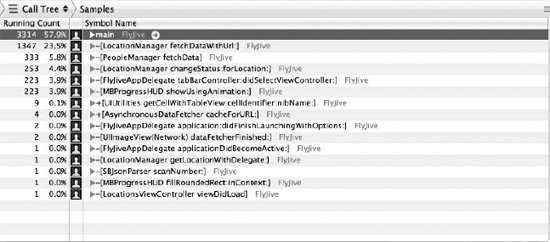
Figure 5–3. Detailed results of each method and function inside the program
Figure 5–2 shows the usage of CPU Sampler showing system load, user load, and total load when the program is running. Figure 5–3 provides more details about each method inside the program, such as how often each method is called and how long it takes for a method to finish.

Figure 5–4. The Time Profiler instrument
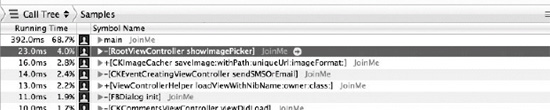
Figure 5–5. Detailed results of the Time Profiler
The Time Profiler (Figure 5–4) focuses more on the running time of your program. Figure 5–5 shows the detailed results of the time perspective.
You should use the instruments to figure out which method you actually need to optimize. All methods may run slowly or need optimizing but you should only focus on methods that run frequently through your program's life cycle. You have limited time and resources to optimize the algorithms and data structure for that method.
Data Structure and Algorithms
Cocoa Touch framework of iOS environment gives you three main data structures for most usages: NSSet, NSArray, and NSDictionary. Each of them has benefits and best usage scenarios. I will discuss each of these main data structures for iPhone, then I will walk you through some other important data structures via code and samples so you can build your own in case you need a better performance data structure: linked list, binary tree, stack, queue, and graph.
When discussing data structures, you can't separate the algorithms used inside the data structure out to a separate part. For example, there is no use in talking about NSDictionary and hash table without knowing what a hash function does. Similarly, it's hard to understand about a balanced binary tree without understanding binary search. Therefore, I will discuss them in parallel; I will talk about data structures and what algorithms they use to speed up their performance. In the last sections, I talk separately about common algorithms shared between data structures.
Cocoa Touch Data Structures
Actually, you will have NSMutableArray and NSArray, NSMutableSet and NSSet, NSMutableDictionary and NSDictionary. The difference between the NSMutable kind of classes and NS kind of classes is that you can change the content of NSMutable classes but you can't change the content of NS classes. The advantage of the latter is to protect the data and make sure that any code that can touch the data can't change its content. Because you can't modify NSArray, I will use cases of NSMutableArray in my examples.
When discussing data structures, I will talk about their performance in terms of these main issues: insert, delete, search, access, and sort. I use the Big-O notation to give you the idea of how fast each data structure performs under each insertion, deletion, search, or sort.
NSMutableArray
An array is the simplest form of data structure. So, understanding how an array works when you retrieve, insert, update, or delete data from it will help you improve your app's performance.
Figure 5–6. Array illustration
An array is a collection of individual items put into a block, like in Figure 5–6, where each block is numbered from 0 to the length of the array. NSArray stores data in an order and so won't let you insert data just anywhere. NSArray also allows you to store duplicate data in the array.
Insert/Delete:
- If you insert/delete into the end of the array, it's quite fast: O(1).
- If you insert into the middle or the beginning of the array, all data has to be shifted to the right, as in Figure 5–7: O(n).

Figure 5–7. Inserting an item into the second position of the array
Search:
- Every time you search for an element, you need to loop over the whole array: O(n). The process is shown in Figure 5–8. A similar problem with searching inside an array is determining if that array contains a particular element.
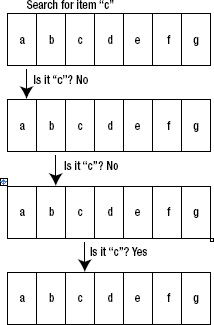
Figure 5–8. Searching for a specific item inside the array
- You can access to any index inside the array really quickly: O(1).
Sort:
- Generally, sorting in an array is implemented by merge sort or quick sort. The sort performance for NSMutableArraysort should be O(n * log(n)).
Table 5–3 covers common methods and APIs for NSMutableArray.

Hashing
Hashing is an important technique in computer science and software engineering. It's used to improve the performance of storage collections. In iPhone apps, hashing is implemented inside NSSet and NSDictionary. To fully understand why NSSet and NSDictionary run so fast when searching for items, you need to understand hashing first.
The general task of a hashing function is to make sure that it creates a unique hash value for each distinct item. And the same item should always return the same hash value.
For example, @“khang” and @”vo” (my names) are two different strings; therefore, the hash functions should try to create a different value for each string. A real hashing algorithm is complicated and requires lots of optimization, so I will use an easy hash calculation as an example. With a string, I can use the integer value of each character in the alphabet table and the position of the character to compute the hash value of the string (Figure 5–9).

Figure 5–9. Positions of all characters inside the string
=> @”khang” = 11 * 10 ^ 4 + 8 * 10 ^ 3 + 0 * 10 ^ 2 + 14 * 10 ^ 1 + 7 = 110,000 + 8,000 +

0 + 140 + 7 = 118147
Do a similar job for “vo” and you will get the hash value of 22 * 10^1 + 15 = 235.
Using this hash function, you can see that you created two unique hash values of two distinct items. The purpose of the hash function is to generate a unique value for a specific piece of data. Later, I will examine the benefits of having this unique representation of data.
isEqual and Hash Methods in Objective-C
In objective-C, as in other object-oriented programming languages, every object has two important methods: isEqual: and hash. Hash was just discussed so you should have a clear picture of what the hash function does. I will discuss how you should implement/override the hash method in objective-C after discussing the isEqual method.
isEqual
In most object-oriented programming languages, when people talk about the equality of two objects, they mean one of two things: the exact object in memory, and semantic equality (equality of meaning). By default for a single object, these two things are the same. The first equality is talking about if variables hold the same object in the memory, checked by obj1 == obj2. However, for the latter, the equality of two objects is checked by the method [object1 isEqual:object2]; so if the method returns YES, then the two objects are equal, which is different than checking the memory reference.
To make it clear, here is a class MyItem that overrides the isEqual: method, as follows:
MyItem.h

@interface MyItem : NSObject {

 @private

   NSString *identifier;

}


@property (nonatomic,  copy) NSString *identifier;


- (id)initWithIdentifier:(NSString *)anIdentifier;


@end


MyItem.m

@implementation MyItem

@synthesize identifier;


- (id)initWithIdentifier:(NSString *)anIdentifier {

   if (self = [super init]) {

       self.identifier = anIdentifier;

   }

   return self;

}


- (BOOL)isEqual:(id)object {


   // By default, if two variables point to the same object in memory, it should always be

   //  equal

   if (object == self) {

      return YES;

   }


   if (![object isKindOfClass:[MyItem class]]) {

       return NO;

   }


   MyItem *myItem = (MyItem *)object;

   return [myItem.identifier isEqual:self.identifier];

}


- (NSUInteger)hash {

   return [self.identifier hash];

}


@end
For this class, you can easily create a mock object that is equal to a specific object by giving them the same identifier. For example, if the first object is created by MyItem *item1 = [[MyItemalloc] initWithIdentifier:@"1"]; and another object is created by MyItem *item2= [[MyItemalloc] initWithIdentifier:@"1"]; then
[item1 isEqual:item2] returns YES while item1 == item2 returns NO;
Hash Method
As mentioned, two objects that are equal must have the same hash value. Therefore, people usually use the overridden method of the isEqual method to write the hash method. If your isEqual method is determined by a variable identifier, your hash should be something like that in Listing 5–4.
Listing 5–4. Hash Method
- (NSUInteger)hash {

   int hash =0;

   hash = 37 * [self.identifier hash];

   return hash:[self.identifier1 hash];

}
The number 37 was picked randomly in this case, but whatever number you choose must be a prime integer. Therefore, if you don't have a big performance issue, you can pick the same number or any prime integer without any issue.
NOTE: In Listing 5–4, I wanted to demonstrate how to write a hash algorithm yourself so I calculated a new hash value based on the string hash value. In a simple case like this, you can just return [self.identifier hash]; directly.
NSMutableSet
NSSet is an Apple implementation for an abstract concept, set. A set is an unordered collection that contains no duplicate elements. In other words, NSSet contains no pair of elements e1 and e2 such that [e1 isEqual:e2]; return YES.
Based on the unique characteristics of a set, people usually implement a set based on a hashing algorithm. The hashing algorithm will make it really easy for a set to find any elements inside.
Now, imagine that you have a set like that in Figure 5–10. Your set has the capacity to contain seven elements.
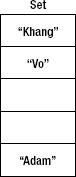
Figure 5–10. Finding an item inside a set using the hash method
A new item, called “vo” arrives and you want to add it into the set. Because your set can't contain duplicate elements, the first task is to see if your set contains the item “vo” already. As shown in Figure 5–8, if you want to do this with an array, you have to loop over that array to check for equality. However, with a set, it's simpler.
First step: Hashing
@”vo” ![]() 118147 mod 13 = 1 (I get mod 13 because the capacity of a set should be a prime integer, and I choose 13 as an example for a capacity of a set here.)
118147 mod 13 = 1 (I get mod 13 because the capacity of a set should be a prime integer, and I choose 13 as an example for a capacity of a set here.)
Second step: You check the item into the index 1 spot, as in Figure 5–11.

Figure 5–11. Finding an item inside a set using the hash method
So you've found it. If the set already contains the element @”vo”, it shouldn't add a duplicate. If it doesn't contain anything in that index, then @”vo” should be added into that index position. (For simplicity, I won't discuss what happens if two distinct elements have the same hash, which can happen in reality.)
Insert/Delete:
- As shown in the previous example, insert/delete will perform instantly with the hash functions and add it into the correct index position. The performance is: O(1). However, you can't determine the position of insertion.
Search:
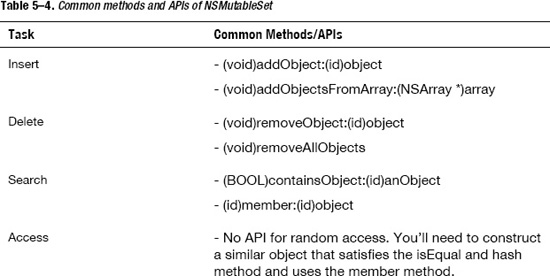
- If you want to search for an object, you probably have three purposes. The first purpose is to check if that object is contained inside the set. The second purpose is to find an object in the set that is equal to the object you have in hand. The last purpose is to see if the object inside the set has a specific property that satisfies a condition.
- For the first purpose, you can just use the method
[set containsObject:obj1];and it will return your item really fast: O(1). - For the second purpose, you need to create a mock object that is equal to the object you are finding. As an example, in the isEqual: part, you can create the new object such that
[newObjisEqual:oldObject]returns YES. The good thing is that the cost of creating the new object is either cheap or you don't need to know much information. After that, you can callMyItem *oldObject = [set member:newObject];and you have your old object with full information. The performance for this case is:O(1). - The last purpose is to find a property, such as a name that starts with character “k.” You will need to loop over all the elements as in the array. The performance for this case is: O(n).
- For the first purpose, you can just use the method
Access:
- You can't access any item directly by its index, like in array. One way to access the element discussed in the search section is by creating a mock object that isEqual: to the object you want to access. The performance is O(1).
Sort:
- Cocoa Touch framework doesn't provide a good way to sort an NSMutableSet. It only provides you with a method to return a sorted array. Based on the sorting performance of an array, I can estimate that the performance for a sorting in set is: O(nlogn).
Table 5–4 shows the common methods and APIs for NSMutableSet.
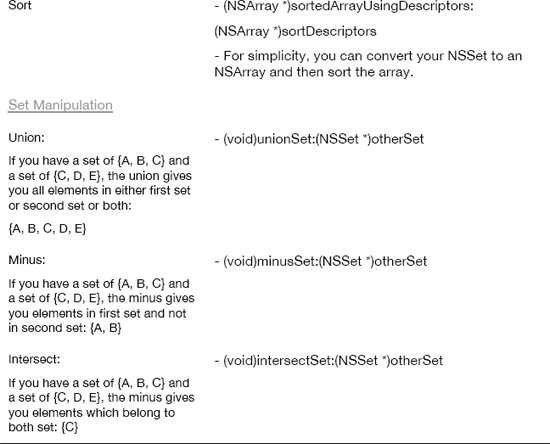
NOTE: One important factor for in using NSMutableSet and NSSet is their rich API for set manipulation. Like a set concept in mathematics, you may need to use a special calculation like union, intersect, and minus. If you need to manipulate collections with unique data a lot and are concerned with union, intersect, or minus, set is the best choice.
For example, you are given two lists: one of people who play tennis and the other of people who play football. Now, you need to find three lists:
- People who play both tennis and football.
- People who only play tennis.
- People who only play football.
I will leave this as an exercise for you to practice. You should try it with both approaches: an array approach and a set approach.
NSMutableDictionary
NSDictionary and NSMutableDictionaryare specific implementations of the hash table concept in computer science. The specification for a hash table is you have a list of unique keys and that each key corresponds to a value, which does not need to be unique. The hash table utilizes the hash concept to make sure that it has a list of unique keys.
As Figure 5–12 shows, your NSMutableDictionary contains a list of key/value pairs. The key is associated with an object, and that object can be accessed through the key.
When you have a new pair of (key values) that you want to add into the NSMutableDictionary, you need to calculate the hash and add them in, like the way you did with NSMutableSet above. The key collection is like a set and can only contain unique items. After the hashing function, you can determine the index of the key in the key collection, and then you insert both the key and value into the correct position.

Figure 5–12. Illustration for the Dictionary concept
In the simplest case where the key is an integer, you can understand that the NSMutableDictionary works similarly to an array, with the index in the left and the value on the right. In the case of a dictionary, the main difference is that the key will be hashed to create an index.
Now, let's analyze the performance of NSMutableDictionary in each operation (insert/delete, search, access and sort).
Insert/Delete:
- As in the set case, the insert/delete for dictionary will happen instantly by determining the correct key position. The performance is O(1).
Search:
- The same as the set case, you need to create an object for which the call of
[newObjisEqual:oldObj]returns YES, and use that object to look up the value. The performance is O(1).
- In dictionary, you only care about accessing the value of a pair. If you already know the key, then the performance for accessing the value isO(1).
Sort:
- You can't sort a dictionary, so you can choose to either sort the key collection or the value collection. Either way will make you create a new array from the dictionary and then sort it. The performance is the same as if you sort an array: O(nlogn).
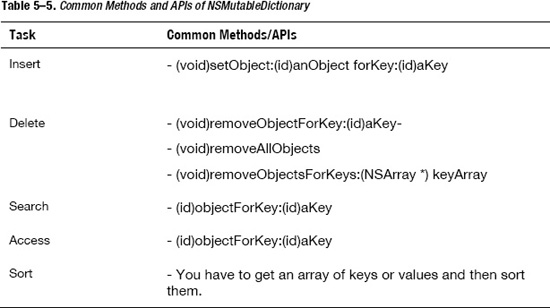
Table 5–5 shows the common methods and APIs for NSMutableDictionary.
NOTE: For an object to be put as a key into a NSMutableDictionary, the corresponding class has to conform to nscopying protocol, and implement the method copyWithZone:. For example, NSString conforms to NSCopying protocol but UIView does not. Therefore, you can't use a UIView as a key inside NSDictionary.
I have finished the three main important data structures and their APIs that Cocoa Touch framework provides free as built-in data structures. These classes and their methods will handle most of your problems in a reasonable amount of time. Next, I will introduce other important and useful data structures for specific cases. Remember to benchmark and test your app's performance before spending your time building a new data structure. Using these built-in and well-tested data structures should always be your first choice.
Other Data Structures
If you need to think beyond basic built-in classes, here are some other basic data structures:
- Linked list: Good when you need to do a lot of insert/delete and want to keep an ordered collection like array.
- Binary tree: Good when you need a collection that always sorted. This is different than whenever you insert a new item into an array and you need to sort the array again. Searching in NSArray, even a sorted array, will always require a linear search because there is no way to know that the array is already sorted. Binary tree is better when you need to do a binary search for the item. Binary search compared to linear search is O(logn) compare to O(n).
- Stack and queue: These are good when you need to build an API that only allows you to add at the end and get out from the end (stack), or add at the end and get out from the beginning (queue). You can easily implement them by a linked list or a normal array.
- Graph: This is an important concept in mathematics and computer science to demonstrate difficult problems. Although many problems will be solved in server side, knowing about the graph will help you with many problems on the iPhone side.
Linked List
The specification and supported public methods (API) of a linked list and an array are usually the same in many cases. You can add an object in anywhere into a linked list, retrieve object from any index inside the linked list, check for the existing object inside the linked list, and sort the linked list. However, the main difference between a linked list and an array is shown in Figure 5–13.
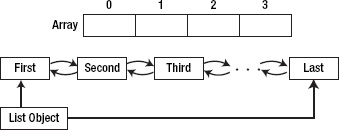
Figure 5–13. Comparison between an array and a linked list
As you can see, in an array, you store items in an indexed position and you can access any item inside the array using the index. However, in linked list, the main List object that holds the List will only hold the first and the last item. (For simplicity, I won't discuss the doubly linked list inside which you can go forward and backward). To access any object inside the linked list, you have to go from one of two sides: the first item or the last item. If you go by the first item, you move forward one by one item until you reach the index that you want. If you go by the last item, you move backwards one by one item until you reach the index that you want. Figures 5–14 and 5–15 illustrate the process.
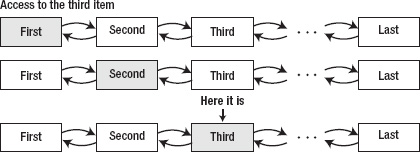
Figure 5–14. Accessing the item at index 2 (third item) in the linked list
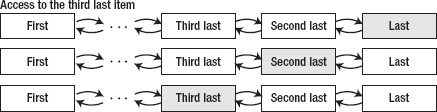
Figure 5–15. Accessing the third last item in the linked list
I will give you a sample implementation for linked list; it's not a perfect implementation but you can use it in most cases. You should download the source code project LinkedList for a full version of the sample. I shall briefly explain the most important parts to make sure you fully understand the linked list concepts.
There are two main objects in the implementation, Node and List. The List object holds the first and the last node, as shown in Figure 5–12. Every Node object contains three items: the item inside the Node, the next item, and the previous item. For the first item, the previous item will point to a nil object; similarly, for the last item, the next item will point to a nil object; see Listings 5–5 and 5–6.
Listing 5–5. ListNode
ListNode.h

// Structure representing a

// doubly-linked list node

@interface ListNode : NSObject {

 @private

   NSObject *value;

   ListNode *next;

   ListNode *pre;

}

@property (nonatomic, strong) NSObject *value;

@property (nonatomic, strong) ListNode *next;

@property (nonatomic, strong) ListNode *pre;
- (id)initWithObject:(NSObject *)object;


@end


ListNode.m

@implementation ListNode


@synthesize value;

@synthesize next;

@synthesize pre;


- (id)initWithObject:(NSObject *)object {

   if (self = [super init]) {

       self.value = object;

   }

   return self;

}


@end
Listing 5–6. Linked List
LinkedList.h

@interface LinkedList : NSObject {

 @private

   ListNode *head;

   ListNode *tail;

   ListNode *current;

}


@property (nonatomic, strong) ListNode *head;

@property (nonatomic, strong) ListNode *current;

@property (nonatomic, strong) ListNode *tail;


- (id)initWithHead:(NSObject *)value;

- (void)addToFront:(NSObject *)value;

- (void)addToBack:(NSObject *)value;

- (void)insertObjectAtIndex:(NSInteger)index;

- (NSObject *)first;

- (NSObject *)currentValue;

- (NSObject *)next;

- (NSObject *)previous;


- (NSUInteger)count;

- (NSObject *)objectAtIndex:(NSInteger)index;


- (BOOL)removeCurrent;

- (BOOL)removeObjectAtIndex:(NSInteger)index;


@end


LinkedList.m
@implementation LinkedList

@synthesize current;

@synthesize head;

@synthesize tail;


- (id)initWithHead:(NSObject *)value {

  // to be implemented and explained later

  return nil;

}


- (void)addToFront:(NSObject *)value {

  // to be implemented and explained later

}


- (void)addToBack:(NSObject *)value {

  // to be implemented and explained later

}


- (void)insertObject:(NSObject *)object atIndex:(NSInteger)index {

  // to be implemented and explained later

}


- (NSObject *)first {

  // to be implemented and explained later

  return nil;

}


- (NSObject *)currentValue {

  // to be implemented and explained later

  return nil;

}


- (NSObject *)next {

  // to be implemented and explained later

  return nil;

}


- (NSObject *)previous {

// to be implemented and explained later

  return nil;

}


- (NSObject *)objectAtIndex:(NSInteger)index {

// to be implemented and explained later

  return nil;

}


- (NSUInteger)count {

  // to be implemented and explained later

  return -1;

}
- (BOOL)removeCurrent {

  // to be implemented and explained later

  return NO;

}


- (BOOL)removeObjectAtIndex:(NSInteger)index {

  // to be implemented and explained later

  return NO;

}


@end
As you can see from Listing 5–6, the LinkedList object has the capability to get objects from the list in the forward or backward order, as well as to add to the first or the end of the linked list. I will show you only the main implementation methods because others are similar or easy to implement yourself.
There are six main methods that you will need to think about when implementing a linked list: init, add object, get object, count, remove object, and release the whole list.
Init
- (id)initWithHead:(NSObject *)value {

   if ((self = [super init]) != nil) {

       head = [[ListNode alloc] initWithObject:value];

   }

   return self;
}
You need to allocate the head of the list first; this head will hold the next item.
Add Object
- (void)addToFront:(NSObject *)value {

   ListNode *node = [[ListNode alloc] initWithObject:value];

   // new element becomes the head node

   node.next = head;

   head.pre = node;

   self.head = node;

}
Adding into the first spot of the linked list is easy and fast; you just need to relink the LinkedList object with the new node. Adding to the end is similar and I leave it as an exercise for you.
To add a new node the beginning, you need to remove the link of objects around the position you desire and relink them with the new element, as shown in Figure 5–16.
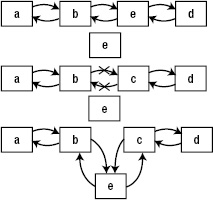
Figure 5–16. Inserting new object to the middle of the array
To insert an element into a current position in the list, you can use the following code snippet:
- (void)insertObject:(NSObject *)object atIndex:(NSInteger)index {

   ListNode *currentNode = self.head;

   ListNode *previousNode = nil;

   ListNode *nextNode = nil;


   // find two items around the place that you need to add an object in

   for (int i = 1; i <= index; i++) {

       currentNode = currentNode.next;

       if (i == index - 1) {

           previousNode = currentNode;

       } else if (i == index) {

           nextNode = currentNode;

       }

   }


   // add your object in

   ListNode *newNode = [[ListNode alloc] initWithObject:object];

   if (!previousNode) {

       self.head = newNode;

   } else {

       previousNode.next = newNode;

       newNode.pre = previousNode;


       nextNode.pre = newNode;

       newNode.next = nextNode;

   }

}
To insert an object at random position or in the middle of the linked list, you need to figure out where to put your node. Therefore, the first part of the code is to loop through the current linked list and find the previous node as well as the next node to insert an object in between. After that, you link nodes around the place with the new node.
Get Object
- (NSObject *)first {

   return self.head.value;

}

- (NSObject *)currentValue {

   return self.current.value;

}

- (NSObject *)next {

   self.current = self.current.next;

   return self.current.value;

}

- (NSObject *)previous {

   self.current = self.current.pre;

   return self.current.value;

}

- (NSObject *)objectAtIndex:(NSInteger)index {

   ListNode *currentNode = self.head;

   for (int i = 1; i < index; i++) {

       currentNode = currentNode.next;

   }

   return currentNode.value;

}
To get the current or next object of the linked list is easy; you use the current property. Methods like current, next, and previous are mainly used for iteration (looping through the whole linked list). I will leave the iteration for you as an exercise.
Another way to get random access to an object is to use objectAtIndex. It will loop until it reaches the correct index and return.
Count
- (NSUInteger)count {

   if (!self.head) {

       return 0;

   }


   ListNode *currentNode = self.head;

   int i = 1;

   while (currentNode.next) {

       currentNode = currentNode.next;

       i++;

   }

   return i;

}
To count the number of items inside the linked list, you just need to loop over the list until you find a nil object. Then you return the count.
Remove Object
This action is similar to the add object action, so I leave it as an exercise to practice. If you have any problems, you can look at the complete source code in my LinkedList sample project.
Performance Analysis
Insert/Delete:
- It depends on where you insert/delete and if you have the current node that you want to add after or before that node. If you need to traverse the whole list to find the place to add object in, the performance is the same as array: O(n). However, if you already have the current node, then the performance is really fast: O(1).
Search:
- For searching, you need to traverse the list, so the performance is O(n).
Access:
- For random access based on the index, you need to traverse the list until you read the node you want, so the performance is O(n).
Sort:
- You can sort the linked list the same way you sort an array. However, for a linked list, because it is not a built-in data structure, you have to write the sort method yourself. The best performance you can get is O(n * log(n)).
Stack and Queue
Stack and queue are special data structures to limit the permissible operations over the data that these data structures hold. These data structures can be implemented either by an array or by a linked list, as shown in the previous sections. These restrictions will help you manage your data better or make sure that the data is processed in the correct order.
Stack
Stack allows access to only one data item: the last item. If you insert, retrieve, or remove item from the stack, you have to do it from the last item. Figures 5–17 and 5–18 show you how a stack works.
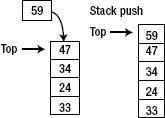
Figure 5–17. Pushing a new item into the stack

Figure 5–18. Popping the latest item out of the stack
There is an analogy that will help you to understand the concept of stack:
- Washing dishes: You wash the dish from the top to the bottom; you don't ever take out an arbitrary dish in middle or the whole dish stack will collapse.
Placing an item on the top of the stack is called pushing it. Removing it from the top of the stack is called popping it. The computer science term for this mechanism is Last-In First-Out (LIFO) because the last item inserted is the first one to be removed.
I will leave you with a small exercise to implement a stack yourself using both an array and a linked list. Your stack should support these necessary methods:
- init // to create the stack
- push
- pop
- peek // to retrieve an item from the stack without removing it out of the stack
- isEmpty
- isFull // if your stack can automatically grow its size, similar to the way NSMutableArray grows, this method always returns false.
Another practice exercise is to reverse a string by using a stack.
Queue
Queue is similar to stack in the way it restricts random access to the data. However, its mechanism is that the first one inserted to the queue is the first one get out of the queue; in other words, First-In First-Out (FIFO). A queue works like a line of people waiting to buy a ticket, as shown in Figure 5–19.

Figure 5–19. Access to third last item in the linked list
The way you manipulate data inside a queue is the opposite of the way you deal with a stack. Figures 5–20 and 5–21 illustrate the processes.
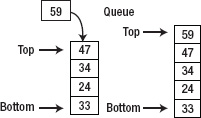
Figure 5–20. Inserting the last item into a queue
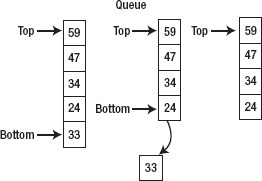
Figure 5–21. Removing the first item out of a queue
Again, I will leave you with a small exercise to implement a queue yourself using both array and linked list. Your queue should support these necessary methods:
- init
- insert
- remove
- peek // to retrieve an item from the queue without removing it out of the queue
- isEmpty
- isFull // if your queue can automatically grow its size, similar to the way NSMutableArray grows, this method always returns false
There may be no specific performance gain in using a stack or queue rather than an array or linked list. However, this can save you a ton of time thinking about restricting access to your data or an understanding concept that helps you to solve specific problems.
Binary Tree
Next, I will talk about binary trees. However, I will first take a short aside to discuss the main problems with sorting and searching algorithms; this will help you understand why you might want to use a binary tree.
Sorting Algorithms
In iPhone development, you shouldn't write the sorting algorithms yourself. You should understand how the sorting algorithms work and why they work that way. However, because of the abstraction and encapsulation of the frameworks and libraries, most of the time, you don't need to know which algorithms the Cocoa Touch framework is using. So, in this section I will just cover some famous algorithms and how to convert data structures into a sorted array of data.
Most of the time, you need to provide the framework a method to determine how to compare two objects inside your array. Here is a simple code snippet to take advantage of the sort algorithms inside NSArray:
MyItem

- (NSComparisonResult)compareWithItem:(MyItem *)item {

   return [self.name compare:item.name];

}

- (void)viewDidLoad {

   myArray = [myArray sortedArrayUsingSelector:@selector(compareWithItem:)];


}
Most of the time you will convert your current data structure into an array, sort this array, and use the results. This is one approach. The other approach to having a sorted array all the time is to use a binary tree, which I will discuss in later sections.
Search
Let's talk about the search strategy in data structures, such as array, linked list, set, and dictionary. As mentioned, set and dictionary are built based on a hash table, so searching for these data structures requires having an object that has a key and a hash value equal to the ones you are searching. Searching for these data structures is done in the time of O(1) (which means really fast).
For array and linked list, the problem is harder. If you want to search, you can use one of two strategies:
- Traverse through the array/linked list until you find the item you want. The performance is O(n).
- Sort the array or linked list and then use an optimal search strategy (binary search, which I will discuss later). The performance is O(n * log(n)) + O(logn), which means O(n * log(n)), because you only care about the fastest growing term.
So, as you can see, if you have an array that is always sorted, it takes you O(logn) to find the item you want. I will show you how to create a data structure that is always sorted in the “Binary Tree” section.
Binary Search
Remember the childhood game where a friend asks you to guess a number he's thinking of between 1 and 20? When you guess a number, he tells you three things: your guess is larger, equal, or smaller than the actual number in his head.
What's the best way to start? Do you start from 1 and continue to 20? Or should you start to 5 and then know which way to go next?
If you go with 10 and your friend says that your guess is smaller than the actual number, then you know that the actual number is between 10 and 20. Amazing! You just divided the set by half and now you only need to guess 10 more numbers. In three or four more steps you will figure out the number.
If you go sequentially from 1 to 20, in the worst case, you need to guess 20 times. In most cases, you will need to guess more than five times. There are only five times that you can guess correctly with less than five guesses. This is illustrated by Figure 5–22.
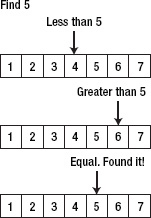
Figure 5–22. Binary Search in a sorted array
That is binary search; it's really quite simple. Here is a code snippet for you to implement it on an array:
- (void)methodToCall {

   NSMutableArray *myArray = [NSMutableArray array];

   for (int i = 0; i < 20; i++) {

       [myArray addObject:[NSNumber numberWithInt:i]];

   }

   // find number 15.

   NSInteger index = [self indexForNumber:[NSNumber numberWithInt:15] inArray:myArray];

   NSLog(@"index: %d", index);

}


// Note that this method only works if the array is already sorted

- (NSInteger)indexForNumber:(NSNumber *)number inArray:(NSArray *)array {

   int firstIndex = 0;

   int uptoIndex = [array count];


   while (firstIndex < uptoIndex) {

       int mid = (firstIndex + uptoIndex) / 2;  // Compute mid point.

       if ([number intValue] < [[array objectAtIndex:mid] intValue]) {

           uptoIndex = mid;     // repeat search in bottom half.

       } else if ([number intValue] > [[array objectAtIndex:mid] intValue]) {

           firstIndex = mid + 1;  // repeat search in top half.

       } else {

           return mid;     // Found it. return position

       }

   }

   return -1;    // Failed to find key

}
The main job of the algorithm is to look into the middle of the array. If the value of the middle element is less than the value of the data you are finding, the algorithm divides the array by half; it then takes the first half and continues with that first half until only one item is left. If the value of the middle element is greater than the value of the data you are finding, it will take the second half.
NOTE: Binary search only works with sorted array or list. It assumes that the data in the right is always greater than the data in the left, so it can divide the data array by half.
Binary Tree
Binary tree combines two other structures inside: an ordered array, a linked list, and the binary search algorithm.
There are many uses for a binary tree:
- It is always sorted in a fast way. The performance to add in a new object is O (logn).
- It can always be used with binary search without any necessary calculations (because it is always sorted).
If you want an array/linked list that is always arranged in order (in other words, an ordered array/linked list), you may need to choose one of these approaches:
- For an already sorted array: When you need to insert new item in middle of the array, you need to look for the position and then shift all items to the right. This will take O(n) to run. The performance problem is when you need to shift all the items to the right to insert (or left to delete).
- For an already sorted linked list: With the insert/delete object inside, the linked list is really fast. However, although the linked list is already sorted, you have to traverse the list to find a place to insert the new object. The performance of this traverse is O(n).
- Adding to the end until you need to search or retrieve data, and then sort the array/linked list. The sort operation will take O(n * log(n))to complete.
So, binary tree is a best way to implement a sorted collection so you can find the item easily within O(log(n)) performance.
I've discussed why you should use a binary tree, but you may still have some questions. What is a tree? What is a binary tree? Before I answer those questions, I want to introduce to you the concept of node and edge.
Node and Edge
Nodes are shown by the circles in Figure 5–23, while the lines show the edges. Nodes can be labeled with a name or number to make them unique in the tree. Each edge is bounded by the two nodes at its ends.

Figure 5–23. Vertex and edge illustration
Tree
A tree is a collection of points (usually called nodes) and connections (usually called edges) between these points. The tree has a node as the root, and nodes inside a tree are connected with each other by directed edges. Every node inside a tree must have at most one parent and no cycles are allowed. A simple illustration is shown in Figure 5–24.
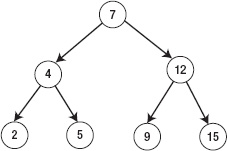
Figure 5–24. Tree example
A binary tree is a tree in which each node has 0, 1, or 2 children. Figure 5–24 also represents a binary tree. Figure 5–25 shows a non-tree because it creates a cycle inside it and node 5has two parent nodes: 2 and 4.

The two children of each node in a binary tree are called the left child and the right child, as shown in Figure 5–26.
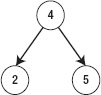
Figure 5–26. Left and right child
A binary search tree is a binary tree in which the right node is greater than the direct parent and the parent is greater than the left node for any three nodes that you pick from the binary tree. This is the technical name of the binary tree that I always talk about. For simplicity, I will use binary tree to talk about the binary search tree. Figure 5–27 illustrates an example.

Figure 5–27. Binary Search Tree
How Does a Binary Tree Work?
The mechanisms for insert/delete and search in a binary tree are similar. All methods require you to traverse the binary tree until you find a place to insert/delete or search for the item that you want. Figure 5–28 shows an example that inserts the item into the correct place in the binary tree.
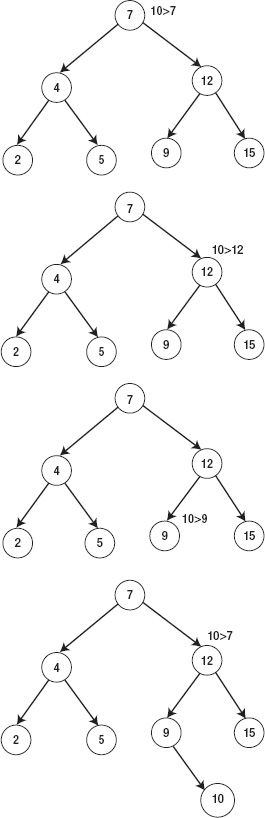
Figure 5–28. Inserting an item into a binary tree
The binary tree is implemented based on the idea of a linked list. Because I have already discussed how to implement a linked list, in this section I will only write the skeleton and APIs for the binary tree. Listing 5–7 only contains the interface file; you need to fill in the implementation file to make it work.
Listing 5–7. Binary Search Tree
TreeNode.h

@interface TreeNode : NSObject {

 @private

   NSObject *object;

   SEL compareSelector;

   TreeNode *leftChild;

   TreeNode *rightChild;

}


@property (nonatomic,strong) NSObject *object;

@property (nonatomic, strong) TreeNode *leftChild;

@property (nonatomic, strong) TreeNode *rightChild;

@property (nonatomic, weak) SEL compareSelector;


@end


Tree.h

#import "TreeNode.h"

@interface Tree : NSObject {

 @private

   TreeNode *root;

}

- (id)initWithObject:(NSObject *)obj compareSelector:(SEL)selector;

- (BOOL)find:(NSObject *)obj;

- (void)insertObject:(NSObject *)newObj;

- (void)deleteObject:(NSObject *)obj;


@end
To implement this code, you should understand a binary tree as a special linked list where you have a tree object that holds a root object, and then the root object hold its children itself. This is the same way a linked list works: you have a LinkedList object that contains the head node, and that head node contains the next node itself.
You should practice with binary tree by implementing the APIs that I gave you. You should also review binary search to make sure that you understand the concept well and know how to apply in this case. If you get stuck in any point, you can look at my sample project, BinarySearchTree.
Graph
Graph is a data structure that looks like tree but in a more general format. Currently, with the growing demand for data mining and data visualization, graph visualization problems are becoming more common to developers. In this section, I will show you the basic concept of a graph data structure and two algorithms to solve one of the most important problems with graph: searching. I will not go too deeply into the source code because you may not use this data structure and specific code that much. However, you really do need to understand the concepts of the graph because it can be used to solve many important problems.
Some common and popular terms:
- Vertex and edge: The vertex concept is the same as the node concept in the tree, and the edge concept for the graph is exactly the same as the edge concept in the tree. You can look back Figure 5–23 for the illustration of vertices and edges. The term “vertex” is mostly used in the graph concept while the term “node” is more frequently used in the tree concept.
- Path: A path is a sequence of edges that can go through a sequence of nodes. For example, in Figure 5–29, you can see two paths from the same pair of nodes: ACD and ABD.
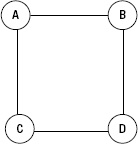
Figure 5–29. Path
- Connected graph: There is a path between any pair of vertices that you pick out from the graph. For example, Figure 5–30 shows a connected graph where if you pick every two vertices, you can go from one to the other by some path. However, in Figure 5–31, you can't go from A to C by any path, so it's not a connected graph.
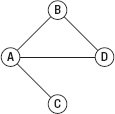
Figure 5–30. Connected graph
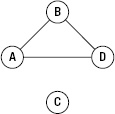
Figure 5–31. Not a connected graph
- Directed graph: If every edge inside the graph has a direction, as shown by an arrow from one vertex to another vertex as in Figure 5–32, the graph is a directed graph. If the edges don't have any direction, you can go either way on them. However, if the edges have directions, you can only follow the path shown by the arrow.
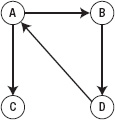
Figure 5–32. Directed graph
- Weighted graph: If every edge inside the graph is given a weight, as shown by an edge with label as in Figure 5–33, the edge can show any cost or value of travel from one vertex to another vertex. The graph then is called weighted graph. Weighted graphs can be used to represent the airline flights between cities in the country with edge showing the cost.

Figure 5–33. Weighted graph
Searching within the graph is important. There are many famous search problems in graph theory in computer science. Imagine a simple case: you want to travel from New York to California. You can travel directly by plane but it may cost a lot, or you can travel by train to many cities and finally reach your goal but the total cost was much cheaper than flying directly.
Here's another search problem. You want to travel to all the cities starting from your current city by moving along edges inside the graph. Common benefits are to get information on every city and to see every city. There are two ways to do this: depth-first search and breadth-first search.
Depth-First Search
As in Figure 5–34, you travel along the graph as shown by the arrow and when you reach the last node, you travel back by the dashed-line arrow.
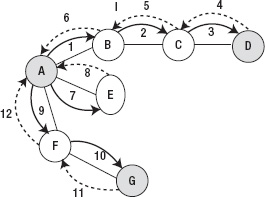
Figure 5–34. Depth-first search traverse orders
One of the common implementation of this depth-first search algorithm is using a stack and following these four steps:
- Pick one vertex in the graph and push it into the stack as the initial vertex; also mark it as visited. You can track visited vertices by setting a property was Visited as YES, as shown in Listing 5–7.
- If possible, from the last vertex of the stack, visit any adjacent unvisited vertex, mark it as visited, and push it on the stack.
- If you can't follow step 2, then if possible, pop a vertex off the stack, and then repeat step 2.
- If you can't follow step 1 and step 2, you're done.
To make it easier to understand, follow Table 5–6 to see how the four rules are applied to Figure 5–34.
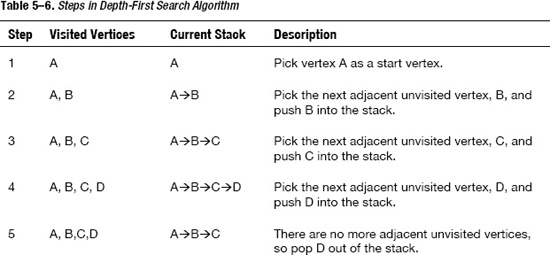
Listing 5–8 contains the code explanation.
Listing 5–8. Depth-First Search
@interface Vertex : NSObject {

 @private

   NSString *label;

   BOOL wasVisited;

   NSMutableSet *adjacentVertices;

}

@property (nonatomic,  copy) NSString *label;

@property (nonatomic, weak) BOOL wasVisited;

@property (nonatomic, strong) NSMutableSet *adjacentVertices;
The vertex object will have a label, a mark for visited or not, and a list of vertices around it.
@interface Graph : NSObject {

 @private

   NSMutableArray *vertices;

}

@property (nonatomic, strong) NSMutableArray *vertices;

- (void)addVertex:(Vertex *)vertex;

- (void)addEdgeForVertex:(Vertex *)vertex1 andVertex:(Vertex *)vertex2;

- (void)depthFirstSearch;

@end
The graph has a list of vertices. Because every vertex keeps a list of adjacent vertices, graph doesn't need to take care of the edges.
- (void)depthFirstSearch {

   if ([self.vertices count] == 0) {

       NSLog(@"There is no vertex in graph");

       return;

   }


   Vertex *firstVertex = [self.vertices objectAtIndex:0];

   firstVertex.wasVisited = YES;

   [self display:firstVertex];


   Stack *stack = [[Stack alloc] init];

   [stack push:firstVertex];

   while (![stack isEmpty]) {

       Vertex *lastVertex = [stack peek];


       BOOL isAddNewVertex = NO;


       for (Vertex *adjacentVertex in lastVertex.adjacentVertices) {

           if (!adjacentVertex.wasVisited) {

               [stack push:adjacentVertex];

               adjacentVertex.wasVisited = YES;

               isAddNewVertex = YES;

               [self display:adjacentVertex];


               break;

           }

       }


       if (!isAddNewVertex) {

           [stack pop];

       }

   }

}
The main code for the depth-first search algorithm is in Listing 5–8. First, I checked to make sure that there are some vertices inside the graph, and then I pushed the first vertex into the stack. The loop code will continue the rules explained previously until it gets out the last vertex and checks all the adjacent nodes. If there is a node that is not visited, it pushes the nodes into the stack, marks that node, and prints that node out. If it can't find any adjacent vertex, then it is popped out of the stack.
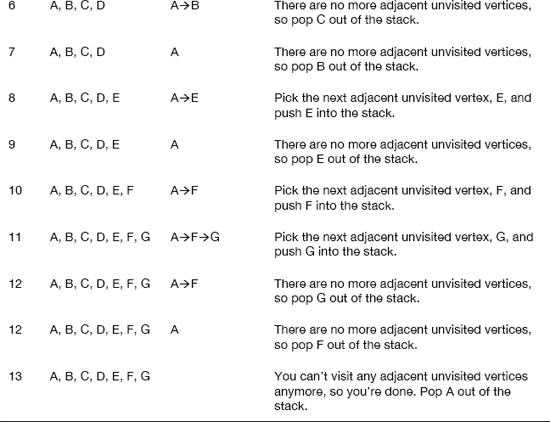
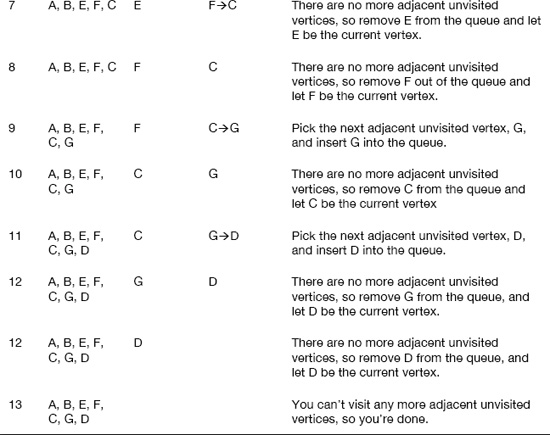
Breadth-First Search
As in Figure 5–35, you travel along the graph as shown by the arrow. You travel by reaching the first layer and then the second layer and finally the last layer. It is different than the order you traveled with the depth-first search.

Figure 5–35. Breadth-first search traverse orders
- One of common implementation for this breadth-first search algorithm is using queue and following these four steps, which are also explained in Table 5–7:
- Pick one vertex in the graph as the current vertex; mark it as visited.
- If possible, from the current vertex, visit any adjacent unvisited vertex, mark it as visited, and insert it into the queue.
- If you can't follow step 2, then if possible, remove a vertex from the queue, make it the current vertex, and then repeat step 2.
- If you can't follow step1 and step 2, you're done.

For code, you should implement the breadth-first search algorithm yourself as an exercise.
Other Algorithms and Problem-Solving Approaches
I have introduced the most important data structures and their related algorithms; these will help speed up your code significantly. However, for an iPhone developer, there are a few more algorithms and problem-solving approaches you should know. You may already know about how to solve a problem with recursion. The second one is SAX/DOM parser for XML parsing. XML is heavily used in iPhone development when you need to download and get data from the network.
Recursion
Recursion is a programming technique in which a method (function) calls itself. This is one of the most interesting techniques in programming. I will show you scenarios that you can solve immediately using a recursion technique.
However, there is one drawback with recursion: the performance may be slower than using a direct loop. This performance loss may be insignificant if you only call recursion a few times, not thousands of times. It can cost you more memory when you need to store data and stack trace if you are calling the methods over and over again.
The recursion technique can be used to implement many high performance algorithms like merge sort or binary search. To illustrate the technique in objective-C, I will show you two sample problems: a factorial calculation and a binary search. Then you can compare this version of binary search with the version using the loop that I showed previously.
What is a factorial? A factorial of n is found by multiplying n by the factorial of n-1. In other words, factorial (n) = n * factorial (n-1). This is perfect for a recursion because the definition already suggests to use recursion.
- (NSInteger)factorial:(NSInteger) n {

   if ( n <= 1 ) {

       return 1;

   } else {

       return n * [self factorial:(n - 1)];

   }

}
It is very simple and straightforward, right? Now, I will discuss a more difficult problem with binary search. Here is the original approach with a simple loop for a binary search:
- (NSInteger)indexForNumber:(NSNumber *)number inArray:(NSArray *)array {

   int firstIndex = 0;

   int uptoIndex = [array count];


   while (firstIndex < uptoIndex) {

       int mid = (firstIndex + uptoIndex) / 2;  // Compute mid point.

       if ([number intValue] < [[array objectAtIndex:mid] intValue]) {

           uptoIndex = mid;     // repeat search in bottom half.

       } else if ([number intValue] > [[array objectAtIndex:mid] intValue]) {

           firstIndex = mid + 1;  // repeat search in top half.

       } else {

           return mid;     // Found it. return position

       }

   }

   return -1;    // Failed to find key

}
Here is an implementation for recursion:
- (NSInteger)indexForNumber:(NSNumber *)number inArray:(NSArray *)array lowerBound:(NSInteger)lowerBound upperBound:(NSInteger)upperBound {

   int mid = (lowerBound + upperBound) / 2;
   if([[array objectAtIndex:mid] intValue] == [number intValue]) {

       return mid; // found it

   } else if (lowerBound > upperBound) {

       return -1;  // can't find it

   } else { // divide range

       if ([[array objectAtIndex:mid] intValue] < [number intValue]) {

           // it is in upper half

           return [self indexForNumber:number inArray:array lowerBound:(mid + 1) upperBound:upperBound];

       } else {

           // it is in lower half

           return [self indexForNumber:number inArray:array lowerBound:lowerBound upperBound:(mid - 1)];

       }

   }

}
SAX/DOM Parser for XML Parsing
XML parsing is important for iPhone developers when they need to retrieve data from network; much of it will return in the XML format. There is one important consideration when dealing with XML: SAX vs. DOM. I will discuss the two main differences between SAX and DOM and when you should choose one over the other.
SAX is a way to read the file or the XML string line by line to find or parse the data you need. Parsing through the whole XML file with SAX can be done very quickly. The problem is that the logic can be really complicated if you need to find a simple piece of data inside the XML file. It does not consume much memory as well.
DOM is opposite to SAX: you store the whole XML structure in memory, making it very easy to retrieve the data that you need. However, it takes more time and memory to store the data structure in memory than the SAX approach.
Now let's compare the two methods in code. To use SAX Method, I choose to use NSXML Parser; I also need to implement two methods so that I can receive the XML events: the start element event and end element event.
@interface XMLParser : NSObject <NSXMLParserDelegate> {

 @private

   NSMutableArray* strings;

}


@property (nonatomic, strong) NSMutableArray *strings;

- (NSString *)parseDemonstration;


@end


#import "XMLParser.h"


@implementation XMLParser

@synthesize strings;


- (void)parser:(NSXMLParser *)parser didStartElement:(NSString *)elementName

 namespaceURI:(NSString *)namespaceURI qualifiedName:(NSString *)qName

   attributes:(NSDictionary *)attributeDict {

  // you need to implement this method to get the element out

}


- (void)parser:(NSXMLParser *)parser didEndElement:(NSString *)elementName

 namespaceURI:(NSString *)namespaceURI qualifiedName:(NSString *)qName {

  // you need to implement this method to get the element out

}
- (void)parser:(NSXMLParser*)parser foundCharacters:(NSString*)string {

  // you need to implement this method to get the element's content out

}


- (NSString *)parseDemonstration {

   self.strings = [[NSMutableArray alloc] init];

   NSString *filePath = [[NSBundle mainBundle] pathForResource:@"books" ofType:@"xml"];

   NSString *text = [[NSString alloc] initWithContentsOfFile:filePath encoding:NSASCIIStringEncoding error:nil];

   NSData*       data      = [text dataUsingEncoding:NSASCIIStringEncoding];

   NSXMLParser*  parser    = [[NSXMLParser alloc] initWithData:data];

   parser.delegate = self;

   [parser parse];


   NSString* result = [self.strings componentsJoinedByString:@""];


   return result;

}


@end
For the DOM method, all you need to know is the element names:
[myXMLDoc nodesForXPath:[NSString stringWithFormat:@"//%@:links", @"myNameSpace"]

                              namespaceMappings:namespaceDic error:nil];
Summary
In this chapter, I covered the main data structures and algorithms, both theoretically and practically. The theoretical way is used as a benchmark when talking about the concept of algorithms or data structures. I used it to compare the different algorithms and data structures. However, in practice, don't forget to use the instruments to get a real benchmark.
You also know how to use three main important data structures, which are built in to the Cocoa Touch framework. Knowing how to use them properly will help you boost the performance of your app without reinventing the whole wheel. However, when you really need better performance, you should consider good alternatives like linked list, binary search tree, and other abstract concepts like stack and queue. Recursion and XML parsing are more important skills that you will need.
EXERCISE