One of the most useful things your robots will be doing is waiting. Yep, you heard me right—waiting. Don't believe me? Okay, think about it this way:
SPOT is moving toward a red line, waiting for the Color sensor to detect the line.
SPOT is preparing to throw a ball at a target, waiting for the Touch sensor to be pressed and released.
SPOT is rolling towards the wall, waiting for the Ultrasonic sensor to detect the wall.
SPOT is sitting on the start line, waiting for me to push the Left button to let it race forward.
Are you beginning to see that waiting is an important part of a robot's program? Your robots will probably always be waiting for something to happen. It may be as simple as waiting for you to press the Enter button on the Brick or something similar to the preceding examples. All this waiting is accomplished using the WAIT block, so keep reading to figure out how to program your bots to "wait for it!"
When discussing the WAIT block, you need to understand one important concept: The WAIT block will stop waiting when a specific condition is met. Until the condition is met, the WAIT block will essentially pause the program and keep it from executing any more blocks.
It doesn't matter if you are using the Color sensor, Sound sensor, Touch sensor, Ultrasonic sensor, Light sensor, or a simple time limit. When you use a WAIT block, you must tell the WAIT block what condition must be met before the waiting ends.
So, to show you how this works, let me give SPOT some more pseudo-code:
Me: SPOT, keep moving forward until something happens.
Vague, isn't it? What does "something happens" mean? Well, it can be anything:
Until five seconds have passed
Until the Sound sensor detects a loud noise
Until the Ultrasonic sensor detects something eight inches in front of it
Until the Color sensor detects a blue card on the ground
Do you get the idea? I want SPOT to keep moving forward until a special condition is met. And with NXT-G, that condition can occur using data from a sensor, an NXT button, or a time limit. I'm going to go over each of these individually, so you'll see how the conditions are configured. To demonstrate different conditions, I'm going to have you first create an extremely simple program for SPOT (or your own bot).
Open the NXT-G software, and start a new program. Drop a MOVE block on the workspace, and configure it to spin motors B and C forward with an Unlimited Duration and a Power setting of 50 (see Figure 10-1).

Now it's time to play around with different conditions that will end SPOT's forward movement. The WAIT block is our answer.
Note
When I discuss the WAIT block, I'm going to put another word in front of it or behind it to tell you how I will configure it. For example, a WAIT TIME block will use time as the condition. If I want to use the Sound sensor to end the wait, I'll use a SOUND SENSOR WAIT block. OK?
The WAIT blocks are found on the Common Palette. When you move your mouse pointer over the WAIT block, a fly-out menu appears with six options (see Figure 10-2).

Note
If you are using the NXT-G 1.0 version of the software, you will not see the COLOR SENSOR WAIT block, the right-most icon in Figure 10-2.
Let me start with the easiest to configure—the TIME WAIT block. Figure 10-3 shows the TIME WAIT block added and its configuration panel.

There are two items that can be configured on the TIME WAIT block. The first is a drop-down menu in the Control section. If you click this, you'll see that the WAIT block can be set to Sensor or Time. Don't change it yet, but be aware that by selecting Sensor you can change the TIME WAIT block to a SENSOR WAIT block.
The other option in the TIME WAIT block that can be configured is the Until section. You'll notice that it expects you to enter a number in the text box for the number of seconds you wish for the WAIT block to ... wait.
Figure 10-3 shows that I've configured the TIME WAIT block for ten seconds. Go ahead and save the program, upload it to your bot, and then run it. What happens?
Did the motors run for ten seconds and then stop? If not, check to make sure you configured the TIME WAIT block for ten seconds; that's the most likely problem.
Well, that's it for the TIME WAIT sensor. Now let's take a look at some of the SENSOR WAIT blocks.
For the basic SENSOR WAIT blocks, I'm going to cover the configuration panels and the options available. I highly encourage you to practice these with the program you've just created: replace the TIME WAIT block with each of the SENSOR WAIT blocks discussed in the following sections. Configure each SENSOR WAIT block and play around with it; upload each to your bot, and see how it works.
Note
The RECEIVE MESSAGE WAIT block will be covered later in the book when I discuss using Bluetooth to send and receive messages between bricks.
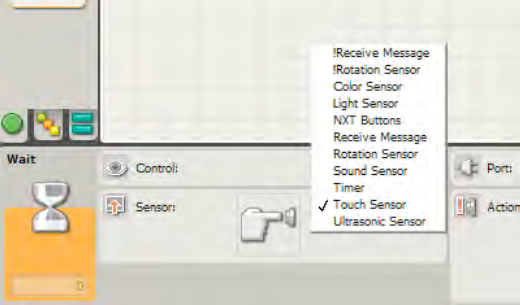
To get started, let me give you a shortcut for changing the type of the WAIT block. Go back to your original program with the MOVE block and the TIME WAIT block (shown in Figure 10-3). Click the TIME WAIT block to access the configuration panel. Click the Control section's drop-down menu, and choose Sensor instead of Time. When you change to Sensor, you now have a new configuration panel section (called Sensor) with another drop-down menu. Click the drop-down menu, and take a look at your options (shown in Figure 10-4).
Note
You may not see all the options displayed in Figure 10-4 listed in the drop-down menu on your screen. Owners of the 1.0 version of the software will have a slightly different list, and if you have not installed the Legacy Blocks (see Chapter 9), these will also not be listed.
I'd like to show you most of these options and their corresponding configuration panels. Refer to Chapter 9 for details on the configuration panels for the sensors, NXT buttons, and timers.
Figure 10-5 shows the LIGHT SENSOR WAIT block and its configuration panel.

In this example, the WAIT block has been configured to wait until the Light sensor detects a light level less than 20. When this occurs, the motors will stop spinning, and SPOT will stop moving forward.
Figure 10-6 shows the NXT BUTTONS WAIT block and its configuration panel.

In this example, the WAIT block has been configured to wait until the Left button has been released. When this occurs, the motors will stop spinning, and SPOT will stop moving forward.
Figure 10-7 shows the ROTATION SENSOR WAIT block and its configuration panel.

In this example, the WAIT block has been configured to wait until motor A has spun in the Reverse direction for 180 degrees or more. When this occurs, motors B and C will stop spinning, and SPOT will stop moving forward.
Figure 10-8 shows the SOUND SENSOR WAIT block and its configuration panel.

In this example, the WAIT block has been configured to wait until the Sound sensor detects a sound level below 30. When this occurs, motors B and C will stop spinning, and SPOT will stop moving forward.
Figure 10-9 shows the TIMER WAIT block and its configuration panel.

In this example, the WAIT block has been configured to wait until Timer 2 exceeds 20 seconds. All timers start counting immediately when you run a program. So once you press the orange Enter button on the NXT Brick to run a program, this WAIT block will wait until the value read from Timer 2 equals 20 before the program continues. When this occurs, the motors will stop spinning, and SPOT will stop moving forward.
Later, you'll learn how to reset the timers, but for now, you just need to know that there are three timers—Timer 1, Timer 2, and Timer 3—and all start counting when a program starts.
Figure 10-10 shows the TOUCH SENSOR WAIT block and its configuration panel.

In this example, the WAIT block has been configured to wait until the Touch sensor button has been Bumped (pressed and released quickly). When this occurs, motors B and C will stop spinning, and SPOT will stop moving forward.
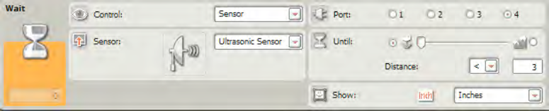
Figure 10-11 shows the ULTRASONIC SENSOR WAIT block and its configuration panel.

In this example, the WAIT block has been configured to wait until the Ultrasonic sensor detects an object (or obstacle) less than 64 centimeters in front of it. When this occurs, motors B and C will stop spinning, and SPOT will stop moving forward.
Figure 10-12 shows the COLOR SENSOR WAIT block and its configuration panel.

In this example, the COLOR SENSOR WAIT block has been configured to wait until the Color sensor detects an object (tape, piece of paper, ball, etc.) that is the color yellow. When this occurs, motors B and C will stop spinning, and SPOT will stop moving forward.
And that's it! Now you can configure your robots to wait for a variety of different conditions. You know how to use the sensors, the built-in timers, and the NXT buttons to trigger a WAIT block to stop waiting.
And now it's time for an exercise. I want to give you a scenario for SPOT where you'll need to use a variety of sensors to allow the robot to complete a very specific movement. I've provided one possible solution to the exercise at the end of the chapter.
SPOT needs to navigate a cluttered floor. Figure 10-13 shows a bird's-eye view of a small area where SPOT will do some rolling.

Place SPOT behind the START line and pointing in the direction of some red tape that's been placed on the floor. When the program starts (by selecting the program and pressing the Enter button), have SPOT wait until the Touch sensor button is pressed and released (bumped) before beginning to roll forward. Have SPOT continue to roll forward until the Color sensor detects the red tape. When the red tape is detected, have SPOT stop, turn left (90 degrees), and then roll forward towards the wall. SPOT should continue to roll forward until the Ultrasonic sensor detects the wall is three inches in front of the robot. SPOT will then stop, turn left (90 degrees), and roll forward until it crosses the FINISH line and you press the Touch sensor button.
Now, let me ask you a question. You know how to make your robot wait and wait and wait—but do you know how to make your robot do something else over and over again? To do this, you'll use something called a LOOP block. I'll show you how it works in Chapter 11.
Figures 10-14 through 10-21 show the complete program and configuration panels for Exercise 10-1. Keep in mind that you'll want to attach the Ultrasonic sensor so it faces forward (and can detect the wall) and the Color sensor so it faces down and can detect the tape on the floor. The Touch sensor can be placed anywhere that doesn't impede the robot's movements or other sensors. You will also need to experiment with the value for Degrees in the second and fourth MOVE blocks to get your robot to make a good 90-degree turn.