
This will be another short chapter. How much can one really say about a block that simply stops your program from running?
The most important thing you need to know about the STOP block is this: if your robot encounters a STOP block at any point in the program, the robot will simply stop at that point with no further action (there is one exception and that is when you are using data wires—more on that later).
Why would you need a STOP block? Your robot will always stop when it reaches the end of your program unless you have a LOOP block somewhere in the program that keeps the program running (or a LOOP block surrounding all other programming blocks, which means the program will run forever until you press the Cancel button or a STOP block is encountered somewhere in the inner workings of your program).
So why a STOP block? It's because once you begin looping, you need a way to stop looping.
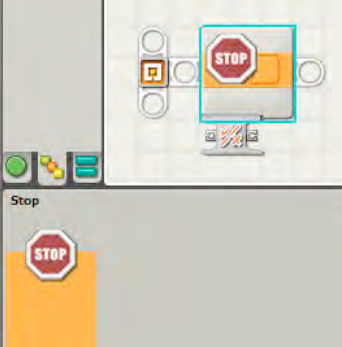
The STOP block is shown in Figure 13-1. Notice in its data hub that it only has one input data plug and one output data plug, which can use a Logic data type.
As I mentioned earlier, the STOP block will immediately stop the program when the STOP block is reached unless a data wire is providing a False input (signal) to the STOP block's input data plug. Let's look at the example in Figure 13-2.

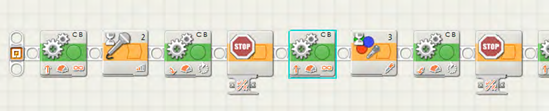
In Figure 13-2, I've got a small program for SPOT. It's a LOOP block that contains a TOUCH SENSOR block, a STOP block, and a SOUND block. When the program is run, every time the LOOP block loops, SPOT will beep (using the SOUND block). This will continue until the Touch sensor is pressed. When the Touch sensor is pressed, a True response is sent (using the data wire) to the STOP block's input data plug. And the program will stop. As long as the Touch sensor is not pressed, the STOP block will continue to receive a False response from the Touch sensor and will not stop the program. Simple!
Now, what do you think would happen if I didn't connect a data wire between the Touch sensor and the STOP block, as shown in Figure 13-3?

You can load the program and try it, but if you walk through the simple program visually I think you'll figure it out.
When the program runs, the LOOP block starts. The Touch sensor block runs, followed by the STOP block. Will the program execute the SOUND block? The answer is, "No." Remember my initial rule: the program will stop running when it executes a STOP block and will perform no further actions. This program will stop immediately and never execute the SOUND block (run the program to prove it to yourself).
You might be wondering when you would ever want to put a STOP block in the middle of a program. Well, one answer involves the SWITCH block. Recall that using the SWITCH block allows your robots to choose different action paths to take. One path might send your robot into some more complex programming behavior while the other path might be a simple STOP block. Take a look at Figure 13-4, which shows an example of this process.

In this example, I've placed SPOT on a tall table. SPOT's Touch sensor is mounted facing downward on the table, so the button is pressed. If SPOT reaches the edge of the table, the Touch sensor button will no longer be pressed, right? (There's no table surface to continue to press against the button.)
Figure 13-4 shows a simple LOOP block that contains a SWITCH block. I've configured the SWITCH block to test whether the Touch sensor button is Released. If it is, the True path will be selected. If the button is still pressed, the False path will be selected. I want SPOT to stop immediately when the Touch sensor button is released, so I place a STOP block in the True path and a MOVE block in the False path. As long as the button is pressed, SPOT will keep moving forward. But for SPOT's safety, once the button is released (and he's reached the edge of the table), I want the program to immediately end. The trick to this program is placing the Touch sensor far out in front of SPOT, so he's still safely back from the edge when the button is released. Try it!
The STOP block is extremely easy to use. As a testing tool, you can always place a STOP block in your program if you're testing a robot but don't want it to continue past a certain point in the program. For example, let's say you have a robot that performs three separate tasks, one after the other. Placing a STOP block after the programming blocks for the first task will allow you to run your program and test to make certain the program works for that task. This is seen in Figure 13-5. If all is well, remove the STOP block and place another STOP block after the programming blocks for the second task. Now when you run the program, your robot will perform the steps for the first and second tasks, but not for the third.
In the program in Figure 13-5, SPOT will begin rolling forward for an Unlimited duration. Only when the SOUND SENSOR WAIT block is triggered will SPOT rotate a specific number of degrees. I want to test different values for the number of degrees to rotate, so I've placed a STOP block in the program so that SPOT doesn't begin to roll forward again (controlled by the third MOVE block in the program). Once I've got the proper number of degrees configured in the second MOVE block, I'll remove the first STOP block, upload the new program to SPOT, and proceed with the next portion of the program (which performs the same action but will be triggered by the COLOR SENSOR WAIT block).
The STOP block is there when you need it—for testing or for building in a method for automatically stopping your robots when a specific condition is reached (or not reached). It's one of the simplest NXT-G blocks around, but it's also one of the most helpful.