
In this chapter we explain the basic techniques for programming SharePoint. This includes
Programming the SharePoint Server API—finding the entry points
Where to find helper classes and utility methods
Working with internal objects—object disposal and security
The security model, the user and group objects, and how to use them
Writing isolated applications that access the server API
Accessing the API is not like implementing an interface or calling a method. SharePoint is both a platform that provides a programming environment and a framework that supplies features to aid in building high-level applications.
Developers new to SharePoint often struggle to find the entry points to the API. Even advanced developers occasionally get lost in the hundreds of classes. For historical reasons, the framework is not as clear and well designed as the .NET Framework. However, it contains almost everything you need to perform infrastructure work with a few lines of code—if you can find the right class. In this chapter we introduce the indispensable helper and utility classes.
A framework with the complexity of SharePoint has several guidelines and conditions. In particular, the internal objects based on COM (Component Object Model) layers require careful disposal. Most applications have security implications. User management, roles, and groups are part of any distributed application. Learning how to manipulate such data as objects is essential for SharePoint developers. Using the API is not limited to web pages and Web Parts. You can actually program against SharePoint using any kind of application, including console applications, Windows Forms, Windows Presentation Foundation (WPF), and anything else .NET supports. We call this the isolated programming style to indicate that it's a program running outside the context of SharePoint. You will discover the special ways to access and properly use the API from such isolated applications.
Depending on the type of custom solution you are creating, you use different entry points into the object model to obtain the appropriate objects. If you are building a Web Part, a custom web service, or a web application to work with site collections, individual sites, or lists, you can use members of the Microsoft.SharePoint.SPContext class to obtain the current site collection, web site, or list. When you create a web application in the /_layouts virtual directory, its functionality becomes available to all sites on the web server. Outside of an HTTP context, such as in a console application or a Windows application, use a constructor of the SPSite class to obtain a specific site collection and to reach objects within the collection.
To work with SharePoint data, your code must first obtain a reference to the objects with which it will be working, including web sites, site collections, and web applications. The methods depend on the sort of application you create. As we focus in this book on extending SharePoint using web applications, we run most of our samples in the context of SharePoint as physical application pages. For information on how to run code outside this context, refer to the section "The Isolated Programming Style" later in this chapter.
To work with SharePoint from a browser-hosted application, your code must first establish the site context or site collection context for requests sent to the server.
In your code you need to obtain the HTTP context of the request. Microsoft recommends that you do this via the Microsoft.SharePoint.SPContext class and its members. To return the current site collection, you can use the SPContext.Current.Site property. The Microsoft.SharePoint namespace must be imported to use the required classes.
SPSite site = SPContext.Current.Site;
To return the web site of the current request, you can use SPContext.Current.Web:
SPWeb web = SPContext.Current.Web;
Alternatively, when your code is contained in an ASPX file, you can use methods of the SPControl object with the System.Web.UI.Page.Context property as the parameter. For example, use the GetContextWeb method to get a reference to the current web site.
SPWeb web = SPControl.GetContextWeb(Context);
Finally, if your ASPX page inherits from UnsecuredLayoutsPageBase or LayoutsPageBase, instead of Page, you can use the Site or Web properties of the former classes to obtain references to the current site collection or web site, respectively. Or you can use the System.Web.UI.Page.Context property as the parameter to the GetContextWeb and GetContextSite methods. LayoutsPageBase gives you some extra SharePoint-oriented functionality beyond what is available with Page—mainly in connection with managing user rights to the page. (We'll look into this in more detail in Chapter 8—in particular in the section "Application Pages.")
For example, the following code, when used in an ASPX page that inherits from LayoutsPageBase (or in the code-behind page), gets a reference to the current web site:
SPWeb web = this.Web;
The Microsoft.SharePoint.WebControls namespace is required to run this code.
Warning
You may know that the SPWeb object, among several others, needs to be disposed of explicitly. That's true for the context-driven access methods. However, you should not dispose of any SPSite or SPWeb object obtained by any of the methods provided by LayoutsPageBase or UnsecuredLayoutsPageBase. Calling the Dispose or Close method of these objects will result in unpredictable behavior. The SharePoint runtime will dispose of them after page completion. (See the "Object Disposal Issues" section of this chapter for more details.)
Programming the API is not limited to accessing the object model or manipulating data. SharePoint is a vast infrastructure framework and comes with a number of classes that provide basic utilities—helper classes to achieve common tasks or to support coders with predefined constant values. Several types inherit from or make use of corresponding classes from the ASP.NET namespaces. The intention is to deliver similar behavior within the context of the SharePoint environment. Developers new to SharePoint tend to overlook these classes and reinvent functionality they think is missing. The SharePoint framework actually provides such functions—the trick is to find them. In this section we give an overview and some pointers to the official documentation.
If you search within the Microsoft.SharePoint namespace for a letter sequence such as Util, you'll find these among all the others:
Microsoft.SharePoint.JsonUtilities: Helper classes for encoding and decoding JSON. This assists when writing client-side code using the client object model.Microsoft.SharePoint.Utilities: Several classes that support many parts of SharePoint. The most common methods are explained following.
Next, we'll give some examples that demonstrate the use of various helper functions. (There are more, but they can often be found in code snippets and throughout other chapters of this book.) The examples assume that the code runs within an application page that derives from LayoutsPageBase and exposes the current SPWeb object through the Web property.
This method allows you to format a given date to any of the SPDateFormat types:
DateTime curDate = DateTime.UtcNow;
DateTime regionDate = Web.RegionalSettings.TimeZone.UTCToLocalTime(curDate);
string result = SPUtility.FormatDate(web, regionDate, SPDateFormat.ISO8601);
This code returns the same date value in the regionDate and result variables, even if the type is different. Both are converted from UTC to local time according to the regional settings for the specified web. FormatDate always expects to convert from UTC. The code snippet assumes this. If you instead provided curDate as the input, it would return the wrong value. ISO8601 formats the output to look like 2010-01-19T16:55:04Z. You might consider putting this method into an extension method to convert date fields in lists:
public static class MySPExtensions
{
  public static DateTime GetDateAsIso(this SPListItem listItem,
                                       string fieldName,
                                       DateTime defaultVal)
  {
     SPWeb web = listItem.Web;
     try
{
if (String.IsNullOrEmpty(fieldName))
{
return defaultVal;
}
if (listItem[fieldName] == null)
{
return defaultVal;
}
DateTime curDate = Convert.ToDateTime(listItem[fieldName]);
DateTime regionDate = web.RegionalSettings.TimeZone.UTCToLocalTime(
web.ParentWeb.RegionalSettings.TimeZone.LocalTimeToUTC(curDate));
return Convert.ToDateTime(SPUtility.FormatDate(web, regionDate,
SPDateFormat.ISO8601));
}
catch (Exception exception)
{
Debug.Write(exception.Message);
}
return defaultVal;
}
}This code assumes that the list resides in a web, rather than a site collection (because of the call to ParentWeb). That is, however, easy to change. The intention is just to give you an idea of how to extend common classes with fragments pulled from utility classes.
The following code returns the file system path for the 14 hive (SharePoint root), or any of the folders beneath it. This is typically—though not always—located at
C:Program FilesCommon FilesMicrosoft Sharedweb server extensions14
The argument is any relative path beneath the root—for example:
string featurePath = SPUtility.GetGenericSetupPath("template\features");An empty string returns the root path itself:
string featurePath = SPUtility.GetGenericSetupPath("");Some objects expose relative paths. To convert a relative path to the full URL, you add the current server, site paths, and so forth. Rather than performing path manipulation, use the GetFullUrl method instead:
SPList list = Web.Lists["Authors"];
string listUrl = SPUtility.GetFullUrl(site, list.DefaultDisplayFormUrl);
The variable listUrl now contains something like this:
http://myserver/site/Lists/Authors/DispFormASPX
Sending an HTTP redirect to the client's browser is a common task, and Response.Redirect is the standard method for doing so in ASP.NET applications. However, within the SharePoint environment, extra internal processing is required. Instead, use SPUtility.Redirect:
string url = "http://myportal/Test/Pages/results.aspx";
string queryString = "author=Joerg";
SPUtility.Redirect(url, SPRedirectFlags.Default, Context, queryString);
There is an overload that omits the queryString parameter. The SPRedirectFlags enumeration has these possible values:
CheckUrlDefaultDoNotEncodeUrlDoNotEndResponseRelativeToLayoutsPageRelativeToLocalizedLayoutsPageStaticTrustedUseSource
As the name implies, the enumeration is flagged and the values can be combined. However, not all possible combinations make sense. The next few working examples indicate how this works.
Handling the Source URL with UseSource
If UseSource is part of the flags parameter of the Redirect method, the URL to which the user is redirected will be read from the query string of the original request (from the context parameter). The new URL will be the value of one of these query string parameters:
SourceNextUsingNextPage
If one of these parameters has a value, the new URL will be validated. Validation is performed by the IsUrlSafeForRedirect method of the Request property of the current SPWeb object. The URL in the query string of the original request needs to be relative. If this URL is not valid, or the UseSource parameter resulted in an empty string, the Url parameter that was originally passed will be used.
If Static is part of the flags parameter, the URL is considered relative. Depending on the presence of RelativeToLayoutsPage in the flags parameter, the URL is relative to the _layouts directory. This is where your application pages reside. If so, SharePoint checks the flags parameter for the presence of RelativeToLocalizedLayoutsPage. If this is also present, a new absolute URL to the localized _layouts folder is assembled. If not, the URL is assembled for the root of the _layouts folder. The localized _layouts folder is merely the folder followed by the current web's language. If required, the value of SPGlobal.ServerCulture.LCID is added to the URL. This is 1033 for English, for instance.
If Static is not part of the flags parameter, the user will be redirected to the value of the Url parameter, after it is validated. If Trusted is part of the flags parameter, then the URL is always valid, and the validation is skipped. If Trusted is not specified, the outcome of the IsUrlSafeForRedirect method of the Request property of the current SPWeb determines whether or not the URL is recognized as valid.
URLs may need encoding. If DoNotEncodeUrl is not present, the URL is first encoded using SPHttpUtility.UrlPathEncode. (For more information about SPHttpUtility, see the section "The SPHttpUtility Class.")
Redirection Examples
Redirecting from one page to another is a common task. The redirect is a special HTTP header (302 redirect) that is sent to the browser. This forces the browser to issue another request retrieving a new page—the one defined within the header. In SharePoint you have to handle internal disposal and cleanup routines. A "hard" redirect might produce unpredictable behavior. Therefore, the SPUtility.Redirect method is available to invoke a safe redirect.
Following are several examples. Each is a one-line call to SPUtility.Redirect.
SPUtility.Redirect("http://mysite", SPRedirectFlags.Default, HttpContext.Current);If this line is called from a page with the address http://mynet/site/Pages/default.aspx, there is no redirect, because the second parameter indicates that the server address should be the same. Even a query string parameter, such as &Source=data, does not influence the outcome.
SPUtility.Redirect("/news", SPRedirectFlags.Default, HttpContext.Current);If this line is called from a page with the address http://mynet/site/Pages/default.aspx, redirection to http://mynet/news will occur. The query string parameter has no influence at all.
SPUtility.Redirect("http://newsite", SPRedirectFlags.Static, HttpContext.Current);Without a query string parameter, this code redirects. If the query string parameter contains a URL, such as http://newsite, it does not redirect because it expects a relative URL.
SPUtility.Redirect("http://newsite", SPRedirectFlags.UseSource,
                    HttpContext.Current);
This code redirects only if a query string parameter such as Source is present and it's relative. That means http://news/news does not redirect, while /news does. If the current site is http://mysite, it redirects to http://mysite/news and ignores the http://newsite instruction. This is obviously confusing and should be used in advanced scenarios only. If you want to redirect anyway, use this combination of flags:
SPUtility.Redirect("http://newsite",
                   SPRedirectFlags.UseSource | SPRedirectFlags.Trusted,
                   HttpContext.Current);
A URL such as this redirects to the site http://newsite:
http://mysite/site/Pages/default.aspx?Source=http://newsite
The same code redirects to http://intranet/news, if the current URL is
http://mysite/site/Pages/default.aspx?Source=/news http://intranet/news
Using the Trusted flag alone redirects to whatever is supplied in the first argument:
SPUtility.Redirect("http://newsite", SPRedirectFlags.Trusted, HttpContext.Current);Working with application pages is common to many SharePoint applications. This code redirects to http://mysite/site/_layouts/demo.aspx:
SPUtility.Redirect("demo.aspx",
                   SPRedirectFlags.Static | SPRedirectFlags.RelativeToLayoutsPage,
HttpContext.Current);These methods allow you to transfer the browser to the built-in error and success pages.
Exception ex = new Exception("Some error message");
SPUtility.TransferToErrorPage(ex.Message);
The TransferToErrorPage method has a second overload, in which you can specify the URL and text for a link that leads to a troubleshooting page (illustrated in Figure 3-1).

You can also transfer to a success page (see Figure 3-2), and specify the URL to move to after OK is clicked by the user:
SPUtility.TransferToSuccessPage("Operation was completed", @"default.aspx", "", "");The last two parameters seem to not have any effect.
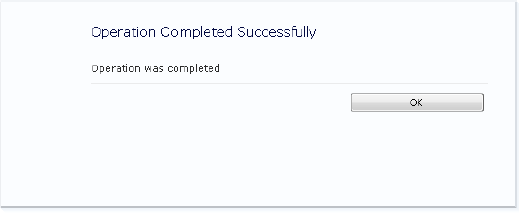
The success page is not very impressive, but can save you some construction time.
The SPUtility class comes with a few methods for formatting data. See Table 3-1 for selected examples.
Table 3.1. Formatting Scalar Data Samples
Method | Input | Output | Description |
|---|---|---|---|
|
|
| Formats disk size information (1KB equals 1024 bytes) |
|
|
| Concatenates URLs with slashes |
|
|
| Replaces the |
|
|
| Extracts the provider from a string |
|
|
| Extracts the name from a string containing "provider" |
|
|
| Converts a hexadecimal value into decimal value within the "long" range |
|
| Returns the appropriate | |
|
|
| Recognizes the optional |
|
| Compares two |
We use the SPUtility class in many circumstances in this book. You will encounter more methods in their appropriate contexts in later chapters.
Within the Microsoft.SharePoint.Utility namespace you can find many classes. Only a few of them seem to be useful for development projects. Some are dedicated to support specific site types, such as wiki pages.
This class contains methods that extend what's already available in the DateTime class. Many of the methods are particularly useful in conjunction with the calendar. Instead of the more complex DateTime class, the DateOptions class works with the SimpleDate structure. This structure does not support time values. For internationalization, you might consider using the IntlDate class.
SharePoint is a web application, and most objects have a URL. Handling URLs is a very common task. The SPUrlUtility class has some methods and a property to make this easier. IsUrlFull and IsUrlRelative are particularly useful.
This class provides methods to encode and decode a string for usage in an URL, escape a string for JavaScript (ECMAScript), and add URL-safe quotation marks.
When using the API, you will frequently retrieve objects that implement the IDisposable interface. Such objects need manual cleanup after usage. The objects often consume large chunks of memory. The garbage collector might clean up the memory, but if underlying unmanaged objects keep holding references or if the server is under permanent pressure, the memory-tidying routine is going to leave affected objects in memory. This causes the server's memory consumption to ratchet upward and not completely return to normal. The problem is a lack of understanding regarding why and when SharePoint objects require explicit disposal.
The general principles described previously do not answer all questions that arise regarding object disposal. One typical question is whether it's safe to dispose of an object or not. When in doubt, let SharePoint decide. Not disposing costs memory, but it will not destabilize your system. Dereferencing an object that's still in use could cause unpredictable behavior.
What's more confusing is the internal disposal within the object hierarchy. If you dispose of an SPSite object, all SPWeb objects taken from there will be disposed of as well. Attempting to access any orphaned object will throw an exception. To avoid such issues, it's good practice to keep object creation and disposal as close together as possible. Creating an object that derives from SPPersistedObject extracts its definition from the database and instantiates it. Usually, this is straightforward and takes a short time. Hence, creating an object and disposing of it several times is better than risking orphaned objects. The easiest way is via the common using statement. Enclosing code in a using block ensures that the Dispose method is called implicitly at the end of the block.
First, here's an example that's typical, but not recommended practice:
SPList GetList(string webUrl, string listName)
{
   SPSite site = new SPSite(webUrl);
   SPWeb web = site.OpenWeb();
   return web.Lists[listName];
}
void AddItemToList(string webUrl, string listName, object item)
{
   SPList list = GetList(webUrl, listName);
   // Code for adding stripped for sake of clarity
   list.ParentWeb.Site.Dispose();
}
The disposable objects are SPWeb and SPSite. The creator of the GetList method can't ensure that the object is disposed of correctly because the call to Dispose is in a separate method from the list creation. If the AddItemToList method fails for some reason and the application is able to continue, the object is never disposed of. With a using statement, the code would look like this:
void GetList(string webUrl, string listName)
{
   using(SPSite site = new SPSite(webUrl)
   {
     using(SPWeb web = site.OpenWeb())
     {
        try
        {
           GetListHelper(web, listName);
        }
        catch { }
     }
   }
}
void GetListHelper(SPWeb web, string listName)
{
   SPList list = web.Lists[listName];
   // Do something with list
}
Both using statements ensure the disposal of the respective objects at the right time. It's easy to read, because the object flow is made visible through the braces. The helper method that's used do something useful has no influence, and the implementer can ignore the disposable objects.
Retrieving objects and disposing of them is only appropriate if you are the developer responsible for their creation.
To clarify when this rule applies, here are some different examples of common sources of SPSite and SPWeb objects that may be your responsibility to call Dispose on.
Objects are owned by the developer if the SPSite constructor is called directly:
using(SPSite site = new SPSite(url))
{
   // Do stuff here
}
The same situation applies if a new site is created in code:
using(SPSite site = new SPSite(url))
{
   using(SPSite siteSelfServ = site.SelfServiceCreateSite(...))
   {
     // Process new Site
   }
}
As with sites, webs also need to be disposed of:
using(SPWeb web = site.OpenWeb())
{
   // Do stuff
}
The SPLimitedWebPartManager object returned by the GetLimitedWebPartManager method holds a reference to an internal SPWeb that it will not dispose of. The developer needs to call Dispose explicitly, as follows:
SPFile page = web.GetFile("default.aspx");
using (SPLimitedWebPartManager webPartManager =
       page.GetLimitedWebPartManager(PersonalizationScope.Shared))
{
   try
   {
      // Do stuff
   }
   finally
   {
      webPartManager.Web.Dispose();
   }
}The Publishing feature is available in SharePoint Server only. It supports the SharePoint content management system (CMS). As the publishing objects are based on regular objects and SharePoint Foundation, similar rules apply.
Microsoft.SharePoint.Publishing.PublishingWebCollection objects retrieved by indexing into or enumerating over this collection will hold a reference to an internal SPWeb that will not be disposed of by Close. Instead, the developer needs to call Dispose on the publishing web's web.
using(SPWeb web = site.OpenWeb())
{
   PublishingWeb parentWeb = PublishingWeb.GetPublishingWeb(web);
   PublishingWebCollection pubWebs = parentWeb.GetPublishingWebs());
   foreach(PublishingWeb pubWeb in pubWebs)
   {
      try
      {
         // Do stuff
      }
      finally
      {
         pubWeb.Web.Dispose();
      }
   }
}
For the Microsoft.SharePoint.Publishing.PublishingWebCollection.Add method, the developer needs to call Close on the returned PublishingWeb object, as follows:
using(SPWeb web = site.OpenWeb())
{
   PublishingWeb newPubWeb = null;
   try
   {
      PublishingWeb pubWeb = PublishingWeb.GetPublishingWeb(web);
      PublishingWebCollection pubWebs = pubWeb.GetPublishingWebs();
      newPubWeb = pubWebs.Add("NewPubWeb");
   }
   finally
   {
      if(null != newPubWeb)
      {
         newPubWeb.Close();
      }
   }
}
The Microsoft.SharePoint.Publishing.PublishingWeb.GetVariation method returns a PublishingWeb object that needs a call to Close too:
using(SPWeb web = site.OpenWeb())
{
   PublishingWeb varPubWeb = null;
   try
   {
      PublishingWeb pubWeb = PublishingWeb.GetPublishingWeb(web);
      VariationLabel label = Variations.Current[0];
      varPublWeb = pubWeb.GetVariation(label);
      // Do stuff
   }
finally
{
if(varPublWeb != null)
{
varPublWeb.Close();
}
}
}All the publishing examples need disposal, because internally they call the OpenWeb method on an SPWeb object.
The Microsoft.Office.Server.UserProfiles.UserProfile.PersonalSite property creates an SPSite object that needs to be disposed of:
using (SPSite site = new SPSite("http://sharepointdevelope"))
{
    SPServiceContext context = SPServiceContext.GetContext(site);
    UserProfile profile = ProfileLoader.GetProfileLoader(context).GetUserProfile();
    using (SPSite personalSite = profile.PersonalSite)
    {
        // Do stuff
    }
}SharePoint is all about collections. Sites contain collections of webs, webs contain collections of lists, and this goes on down to the field and item level. When iterating through SPSite or SPWeb collections, you need to handle the disposal carefully.
Assume you have a simple loop to iterate over SPWeb objects:
foreach (SPWeb subweb in rootweb.Webs)
{
   // Do stuff
}
There is obviously no Dispose call, and therefore the SPWeb objects remain in memory. Looking into the internal code reveals that the OpenWeb method is called implicitly for each item when looping through the collection. Consider using the following code instead, to obtain and dispose of each object correctly:
for (int i = 0; i <= rootweb.Webs.Count; i++)
{
   using (SPWeb subweb = rootweb.Webs[i])
   {
      // Do stuff
   }
}
When using LINQ, things are not as straightforward. You can replace foreach with for statements, but the internal way LINQ processes collections can't be changed. However, we still encourage you to use this sophisticated technology to query SharePoint. To fool the object creation and disposal procedure, the following extension method is safe to use:
public static IEnumerable<SPWeb> SafeEnumerable(this SPWebCollection webs)
{
foreach (SPWeb web in webs)
{
try
{
yield return web;
}
finally
{
web.Dispose();
}
}
}This method extends the SPWebCollection class. The yield statement returns an item for each loop. The try...finally block ensures that the object is disposed of under all circumstances after usage. To use it, call the extension method, as shown next:
var lists = from w in site.AllWebs.SafeEnumerable()
            from SPList l in w.Lists
            where !l.Hidden && !w.IsRootWeb
            select new
            {
                WebTitle = w.Title,
                ListTitle = l.Title
            };
The extension method can be defined in a central place and should be part of any project. SPWebCollection and SPSiteCollection objects are used at many places in SharePoint, such as
Microsoft.SharePoint.Administration.SPContentDatabase.SitesMicrosoft.SharePoint.Administration.SPVirtualServer.SitesMicrosoft.SharePoint.Administration.SPWebApplication.SitesMicrosoft.SharePoint.SPSite.AllWebsMicrosoft.SharePoint.SPWeb.WebsMicrosoft.SharePoint.SPWeb.GetSubwebsForCurrentUser()Microsoft.SharePoint.Meetings.SPMeeting.GetWorkspacesToLinkTo()
Objects retrieved by adding to, indexing into, or enumerating over these collections always need to be disposed of. Here is one way to do this:
using(SPSite site = webApp.Sites[0])
{
   using(SPWeb newWeb = site.AllWebs.Add("MyNewWeb"))
   {
      // Do stuff
   }
   foreach(SPWeb web in site.RootWeb.GetSubwebsForCurrentUser())
   {
      try
      {
         // Do stuff
      }
finally
{
web.Dispose();
}
}
}Some objects are owned by SharePoint and must not be disposed of in custom code. The SPWeb object returned by SPSite.RootWeb is such an example.
This property returns a shared SPWeb instance and is used internally in several methods and properties. It should never be disposed of explicitly. The following sample code does not dispose of anything:
SPSite site = SPContext.Current.Site;
SPWeb rootWeb = site.RootWeb;
SPWeb web = SPContext.Web;
SPWeb web = SPContext.Current.Web;
SPSite site = SPContext.Site;
SPSite site = SPContext.Current.Site;
Objects Used in a Feature Receiver
The object returned by the SPFeatureReceiverProperties.Feature.Parent property for a site- or web-scoped feature receiver should not be disposed of:
public override void FeatureActivated(SPFeatureReceiverProperties properties)
{
    SPWeb web = properties.Feature.Parent as SPWeb;
    // Do stuff
}
The following event receiver objects do not require disposal either:
SPWebEventProperties.Web
SPListEventProperties.Web
SPListEventProperties.List.Web
SPItemEventProperties.ListItem.Web
SPItemEventProperties implements IDisposable to clean up the SPSite object it creates; the others do not. It is not yet clear if the framework actually handles these correctly, so it may be safer to avoid these properties in favor of creating a new developer-owned SPSite object.
public override void ItemAdded(SPItemEventProperties properties)
{
   using (SPSite site = new SPSite(properties.WebUrl))
   {
      using(SPWeb web = site.OpenWeb())
      {
         SPList list = web.Lists[properties.ListId];
         SPListItem item = list.GetItemById(properties.ListItemId);
         // Do stuff
      }
   }
base.ItemAdded(properties); }
Objects Used with Personal Pages
The Microsoft.SharePoint.Portal.WebControls.IPersonalPage interface has two properties that return SPSite and SPWeb objects, respectively: IPersonalPage.PersonalSite and IPersonalPage.PersonalWeb. My Site pages, which implement IPersonalPage, implement these properties as shared instances that should not be disposed of by controls that use them.
IPersonalPage currentMySitePage = this.Page as IPersonalPage;
if (currentMySitePage != null && !currentMySitePage.IsProfileError)
{
   SPSite personalSite = currentMySitePage.PersonalSite;
   // Do stuff
}
Some other functions used internally return the same objects:
UnsecuredLayoutsPage.WebLayoutsPageBase.WebSPControl.GetContextWeb()SPControl.GetContextSite()SPWebProvisioningProperties.Web
There is one special property that might be owned by the developer or SharePoint: SPWeb.ParentWeb. This property will allocate an SPWeb object the first time it is called. The caveat is that once it is disposed of, any reference to the property will return the disposed-of object. If an SPWeb object is not owned by the developer, its ParentWeb object should be considered not owned as well. For example, there could be a problem if two components both depend on SPContext.Current.Web.ParentWeb, and one calls Dispose before the other is finished. Official Microsoft guidance is to never explicitly call Dispose on ParentWeb.
In their eager fight against undisposed-of objects, developers sometimes overreact. The following code shows such an example. The intention is presumably an implicit disposal after usage.
public static SPWeb GetSPWeb(string url)
{
  using (var site = new SPSite(url))
  {
    using (SPWeb web = site.OpenWeb())
    {
      return web;
    }
  }
}
The using statements force the compiler to include the Dispose calls within the block. That means the web is disposed of before it is returned.
To monitor memory consumption, Windows provides several techniques and tools. Because monitoring is not a solution, administrators often set a threshold based on a memory limit. Each time the limit is reached, the application pool gets recycled, and you can simply monitor the event log to check for memory leaks. It is good practice to set the threshold at the right level and let the pool be recycled. However, finding the right limit value takes some time. For instance, with at least 2GB of RAM you can set the value between 800 and 1500MB. If the value is well set, the application pool recycling should appear occasionally—less than once per day, for instance. If the pool is recycled frequently under a higher load—say, more than once per hour—you probably have incorrectly disposed-of objects.
You can determine whether the cause is a memory leak due to incorrectly disposed-of objects by checking the SharePoint log files. Look for the files in this path:
C:Program FilesCommon Filesmicrosoft sharedWeb Server Extensions14LOGS
Each instance of SPSite and SPWeb contains a reference to an SPRequest object, which in turn contains a reference to an unmanaged COM object that handles communications with the database server. SharePoint monitors the number of SPRequest objects that exist in all threads, and adds entries to the logs under some circumstances. For such objects, a threshold is configured—eight by default. If the threshold is exceeded, a warning is added to the log. The threshold settings are stored in a registry key:
HKLMSOFTWAREMicrosoftShared ToolsWeb Server ExtensionsHeapSettings
There are two values that aid in finding the problem:
This section provides a basic introduction to the security model that SharePoint provides and some parts of the API you can use to access users, roles, and related objects.
SharePoint's security model is closely related to Windows, IIS, and ASP.NET. There are a few additions required to handle internal objects, such as Web Parts.
In order for someone to use a SharePoint application, the application must validate the user's identity. This process is known as authentication. SharePoint is not a directory service, and the actual authentication process is handled by IIS. However, SharePoint is responsible for authorization to its sites and content after a user successfully authenticates. The user points his or her browser at a SharePoint site, and IIS performs the user validation using the authentication method that is configured. If this procedure is successful, SharePoint renders the pages based on the access level of the user. If authentication fails, the user is denied access to the site.
Authentication methods determine which type of identity directory is to be used and how users are authenticated by IIS. SharePoint supports these methods of authentication:
Windows Authentication
Windows Authentication is the most common authentication type used in intranet deployments. It uses Active Directory to validate users. When Windows Authentication is selected, IIS uses the Windows Authentication protocol that is configured in IIS. The options are NTLM, Kerberos, certificates, Basic, and Digest protocols. The security policies that are applied to the user accounts are configured within Active Directory. For example, account expiration policies, password complexity policies, and password history policies are all defined in Active Directory, not in SharePoint. When a user attempts to authenticate to a SharePoint web using Windows Authentication, IIS validates the user against NTFS and Active Directory; once the validation occurs, the user is authenticated and the access levels of that user are applied by SharePoint (see Figure 3-3). The SPUser object that represents the user internally reflects the method and actual credentials.

Anonymous access is considered to be a Windows Authentication method because it associates unknown users with an anonymous user account (IUSR_machinename). It is commonly used in Internet sites. However, this configuration is disabled by default. The default configuration assumes that the SharePoint server runs in an intranet. In order to configure anonymous access to a SharePoint application, anonymous access must be enabled in IIS and the SharePoint application, and the anonymous user account must be provisioned. Users using anonymous access still face several limitations compared to authenticated users. By default, anonymous users are only allowed to read, and they are unable to edit, update, or delete content. Additionally, anonymous users are not able to utilize personalization features such as Microsoft Office integration, check-in/checkout, alerts, and page personalization.
Forms-Based Authentication
The ASP.NET Forms Authentication method is commonly used in situations where a custom authentication provider is required. Imagine using a custom LDAP directory, SQL Server, or another type of identity repository to store user account information. This is common in extranet environments, such as partner collaboration sites, where either it is not practical to create Active Directory user accounts for users, or a different type of directory is required.
Claims-Based Security
Claims-based identity is a security model for authentication and authorization based on the Windows Identity Foundation (WIF, formerly called Geneva), and was first introduced with SharePoint 2010. Claims-based identity provides a common way for applications to acquire identity information from users inside their organizations, in other organizations, and on the Internet. Identity information is contained in a security token, often simply called a token. A token contains one or more claims about the user. Think of it as metadata about the user that stays with them throughout their session.
Primarily, the WIF-enabled security model decouples SharePoint from an authentication provider. It supports multiple authentication providers per URL. Identity tokens can be passed without Kerberos to enable federation between organizations. When talking about claims-based security, the term claim plays an important role. First, it means an attribute of an identity. While the identity is a user's account, his or her claim may consist of things like a login name, an Active Directory group, and so on. Second, the term is related to an issuer. An issuer is a trusted party that issues claims. Third, a security token is a set of claims serialized and digitally signed (e.g., in Security Assertion Markup Language [SAML]). The security token is another crucial component of the security model. Security tokens are built, signed, and issued by a security token service (STS). A relying party may make decisions about the authorization of an identity based on a security token. This relying party is often called an authority. Technically, you can regard this as a web service.
SharePoint 2010 supports two scenarios: incoming claims and outgoing claims. Incoming claims require an external STS that creates identity tokens. The incoming identity is mapped to the SPUser object used internally. This means that it is transparent for API access because it's the very same object as any other authentication method creates. SharePoint is decoupled from the identity provider. The connection between the external STS and SharePoint is handled by STS. Because the identity can be any kind of token used for security reasons, the object might contain not just a user, but even a role, group, or something similar. Consequently, an SPUser object might be more than just a user—every claim is seen as an SPUser object. Outgoing claims are related to service applications. Whenever a SharePoint application calls services, external line-of-business (LOB) systems, or external SharePoint farms, it transfers the token via a WCF (Windows Communication Foundation) service to the client applications. WIF is able to convert the token to a Windows identity object or whatever the client requires, evaluating what claims the caller requests and what authorization it permits.
Web Single Sign-On
The Web Single Sign-On authentication method is used in environments configured for federated identity systems. An independent identity management system integrates user identities across heterogeneous directories and provides the user validation for IIS. This includes Microsoft Identity Information Server with Active Directory Federation Services, Oracle Identity Management with Single Sign-On and Web Access Control, and Sun Microsystems Java System Identity Manager. Large enterprises often implement federated identity models to ease the administration of user provisioning for systems that span across subsidiaries and companies. Single sign-on systems are used to consolidate user accounts across heterogeneous systems, allowing the end user to authenticate to systems with one set of credentials, rather than having to use a different set of credentials for each unique system.
Combined Access
In SharePoint it is possible to configure a combination of authentication methods. For instance, employees and external partners can use different methods, such as Active Directory for internal people and a SharePoint list via Forms Authentication for others. This is achieved by defining two zones and associating authentication methods with the zones. The intranet zone would be configured with Windows Authentication and an extranet zone would be configured with ASP.NET Forms authentication.
A SharePoint application includes sites, content pages, and web parts. SharePoint has several management controls in place for provisioning access to and within a web application. Users, groups, permissions, and permission levels are used to configure access within a SharePoint application.
SharePoint provides management and configuration functionality for such objects. Users are added from a directory service such as Active Directory. Once users are provisioned to a site collection, they are added to groups and assigned permissions on sites, lists, and items. SharePoint groups are used to maintain memberships internally. Additionally, Active Directory security groups may also be used directly. Active Directory group memberships are managed in Active Directory.
Note
In this book we cover the SharePoint features only. Depending on your project's requirements, you might need access to the Active Directory Services API and .NET security namespaces as well. If you're not familiar with these, we strongly recommend reading about basic security techniques.
Permissions
Users and groups gain access or are restricted access to sites and Web Parts based upon permission levels. Permissions are individual rights that may be performed by a user in a site, list, or list item. These types of permissions are referred to as site permissions, list permissions, and item permissions, respectively. SharePoint comes with a number of predefined permissions. You can even create your own permissions.
Permissions are applied to users and groups using permission levels. Permission levels allow roles to be defined, consisting of unique combinations of individual permissions, or a set of permissions. SharePoint provides some default permission levels, such as Contribute and Full Control. In addition, you can extend the default permission levels to add custom permission levels in cases where a more appropriate name is desired or a unique combination of permissions is more appropriate.
The relationship between sites, lists, and items is hierarchical in nature. The same applies to permissions—they are inherited by child objects from the parent objects. In cases where business requirements require an object to have different permissions from the parent, the permission inheritance chain may be broken manually (see Figure 3-4). This is done by using the access control list of the child object.

The access control lists for sites, lists, and items are very similar. In addition, document libraries can contain folders, and it is possible to set permissions on these folders.
Only those Web Parts that contain items such as lists and document libraries have access control lists to manage permissions. However, all Web Parts support audiences. Audiences are used to target content to users. SharePoint groups, Active Directory groups, Active Directory users, and global audiences may be used to define the audience of a particular Web Part. Audiences are used to restrict and filter certain content that exists on a content page to users who would otherwise have some level of access to the page. For example, an organization may have a portal that serves employees and external partners. If there is an employee announcement on the home page exposed by some Web Part, it might not be appropriate for external people to read. It is possible to target the Announcements Web Part to a specific audience, such as a security group assigned to employees only.
In SharePoint, users are able to search for content across many different content sources, such as portals, web sites, file shares, data stored in LOB systems, and people profiles stored within Active Directory. The security model is fully integrated with the search feature, and therefore all of the content access concepts that apply to sites, Web Parts, and items also apply to search results. There are several management controls available that allow for custom tailoring of how content is crawled, what content can be searched, and how the search results appear to users.
In this section we give an overview of the security model. This includes ways to access the currently authenticated user using the SPUser object and its related classes. This section complements the programming tasks introduced in Chapter 8, where you can find more about how to work with groups, roles, and users. Here we focus more on how to get the current user object and identify the various properties and conditions to make security decisions.
There are several ways to retrieve user collections. Users of a SharePoint site can be divided into sections at the site level:
All users of a site
All users of a site collection
All authenticated users
Some objects, such as alerts, can expose user collections, too. If you work with the specific rights concerning users along with the SPGroup object, collections of assigned users can be retrieved from there as well. (See the "Working with Groups" section, which follows, for more details about security considerations.)
To retrieve all users, you should start from the current SPWeb object using the AllUsers or SiteUsers method. SPUserCollection is the type returned. While SiteUsers returns the users that belong to the site, the AllUsers property returns these and others that browse the site as members of a domain group. This assumes that the SharePoint farm runs within an Active Directory environment. The example in Listing 3-1 retrieves all users and shows them unfiltered using a GridView control placed on an application page.
Example 3.1. Retrieving All Users and Binding to a GridView Control
using System;
using Microsoft.SharePoint;
using Microsoft.SharePoint.WebControls;

namespace Apress.SP2010.UserManagement.Layouts.UserManagement
{
    public partial class RetrieveUsers : LayoutsPageBase
    {
        protected void Page_Load(object sender, EventArgs e)
        {
            if (!IsPostBack)
            {
                gvUsers.DataSource = Web.AllUsers;
                gvUsers.DataBind();

            }
        }
    }
}
The SPWeb object is retrieved from the Web property exposed by the LayoutsPageBase base class. If this code runs in a different context, you can use SPContext.Current.Web instead. The collection contains SPUser objects, which provide several useful properties, as shown in Table 3-2. The type derives from SPPrincipal, which in turn inherits SPMember.
Table 3.2. Useful Properties of the SPUser Type
Description | |
|---|---|
You can set some basic properties such as | |
| The e-mail address |
| The collection of groups ( |
| The internal ID and the security ID (SID) of the network account |
| The login name |
| The display name |
| Access to the |
| Some additional notes for this user |
| The XML used internally to store all the information |
| Property that returns an |
| A Boolean value that indicates whether the user is a site administrator |
| A Boolean value that indicates whether the user is a site author |
| A Boolean value that indicates whether the user is a member of a domain group |
Note
The SPRole type is now obsolete and exists for backward compatibility only. Instead, you can use the SPRoleAssigment class to deal with groups and users that belong to them.
To get the current user, the SPWeb object is again the best choice. Call the CurrentUser property:
SPUser user = SPContext.Current.Web.CurrentUser;
If you change the current user when creating an SPSite object, this property returns the creating user:
SPUser userAlex = Web.Users[@"sharepointdevelopealex"];
SPSite site = new SPSite("http://sharepointdevelope", userAlex.UserToken);
using (SPWeb web = site.OpenWeb())
{
   lblCurrent.Text = web.CurrentUser.LoginName;
}
In this example, the Label control lblCurrent is defined in the markup. After this code is executed, the label shows sharepointdevelopealex. This is the preferred way to elevate permissions, because the administrator can define and control the account used to access the site.
Warning
If the user executing the page has fewer rights, the code will still execute (same with RunWithElevatedPrivileges) and the user will gain higher rights. It is remarkable that a password is not required using this procedure. This is a security risk, and you should use this method with caution.
To get a particular user of type SPUser from the root web site in the root site collection of the current web application, you can retrieve it like this:
SPUser user = SPContext.Current.Site.WebApplication.Sites["/"].RootWeb.Users[name];
The EnsureUser method will return the SPUser object for the specified user login. The user will be added to the site if the user does not already exist. This will ensure an SPUser object is always returned.
SPContext.Current.Web.EnsureUser(@"domainuser");
Assigning permissions directly to users is not a scalable and maintainable solution. Simplifying the management effort is one argument, scalability is another in large enterprises. If the database grows, the permission checks can impact performance. Using groups make such security checks faster.
SharePoint creates three predefined groups to which you can assign your users. Each group has a typical set of permissions. The groups are
Owners: Members of this group get full control.
Members: Members of this group can contribute content.
Visitors: This group provides its members read-only access to the site.
You can define any number of groups at the site collection level and assign specific permission sets, such as Full Control, to your groups.
The next example assumes you have several ASP.NET controls on an application page:
<asp:TextBox runat="server" ID="txtGroup" />
<asp:Button runat="server" ID="btnAddGroup" Text="Add Group" OnClick="btnAddGroups_Click" />
<br />
Existing Groups:
<asp:DropDownList runat="server" ID="ddlGroups" />
The code-behind is used to create a new group with the name given in the TextBox control. The DropDownList shows the current list of groups for the site collection in which the page runs. The code in Listing 3-2 assumes that the executing user has the appropriate permissions.
Example 3.2. Code to Retrieve Groups, Add a New Group, and Assign Users
using System;
using Microsoft.SharePoint;
using Microsoft.SharePoint.WebControls;

namespace Apress.SP2010.UserManagement.Layouts.UserManagement
{
    public partial class AddGroup : LayoutsPageBase
    {
        protected void Page_Load(object sender, EventArgs e)
        {
            if (!IsPostBack)
            {
                GetGroups();
            }
        }

        private void GetGroups()
        {
            ddlGroups.DataSource = Web.Groups;
            ddlGroups.DataTextField = "Name";
            ddlGroups.DataValueField = "ID";
            ddlGroups.DataBind();
        }

        protected void btnAddGroups_Click(object sender, EventArgs e)
        {
            // Retrieve root collection
            SPSite site = new SPSite("http://joerg-netbook");
            using (SPWeb web = site.OpenWeb())
            {
                string newGroup = txtGroup.Text;
                // Create
                web.SiteGroups.Add(newGroup, web.CurrentUser, web.CurrentUser,
                                   "A group created by code");
                // Assign to site
                SPGroup group = web.SiteGroups[newGroup];
                SPRoleAssignment roles = new SPRoleAssignment(group);
                SPRoleDefinition perms = web.RoleDefinitions["Full Control"];
                roles.RoleDefinitionBindings.Add(perms);
                web.RoleAssignments.Add(roles);
                // Add users to this group
                SPUser user1 = web.AllUsers[@"joerg-netbookernd"];
                SPUser user2 = web.AllUsers[@"joerg-netbookmartin"];
                group.AddUser(user1);
                group.AddUser(user2);
            }
            GetGroups();
}
}
}The code that creates the group is in Button's click event. The current user becomes the default member and the group's owner. Adding the required permissions is not that straightforward. You first have to create an SPRoleAssignment object for the new group. Then you retrieve a permission as an SPRoleDefinition object from the current site collection. In this example, the Full Control permission is used. As you can see, the properties expose indexers. You can easily search in the collection or run a foreach loop to check or show the existing values. Once you have the right permission, you add it to the RoleDefinitionBindings collection. Finally, the object is assigned to RoleAssignments.
The reason for this procedure is the structure of collections. A site collection can have any number of groups, which can have any number of users and any number or roles, which in turn represent a collection of specific permissions.
When the group is ready, you can start adding users. In the example, this is hard-coded, and the users must exist. Remember to add error-checking code in a real-life solution. The settings for users, roles, groups, and so on do not require any call of an Update method. Calling the appropriate Add method creates the object immediately.
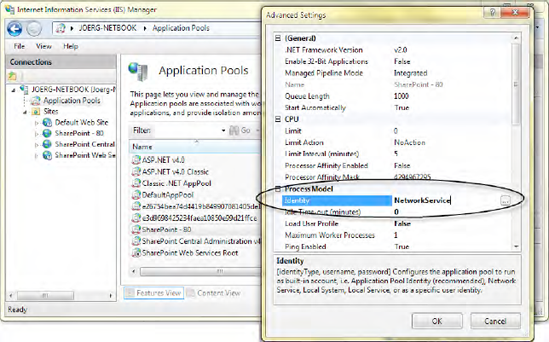
The application pool identity plays a significant role in SharePoint applications. This account is used to run the application itself. This means that internally, all connections to the content and configuration databases rely on the same account. In a single-server environment, this can be a local network service account. In a domain environment with several servers running in your farm, consider using a domain account. By using domain accounts, you can distinguish between the account used for Central Administration and those used for all other applications. In this section we show how to raise the current execution privileges to the application pool account. Running the whole farm with one account means that users can accidentally get access to features only available to the administrator. We strongly recommend decoupling the application pool account of Central Administration before deploying any code that raises the user's privileges.
Internally, SharePoint maps domain accounts or external accounts to internal ones. The same happens with the application pool account, which is mapped to the SHAREPOINTsystem account. If you retrieve all users, as shown in the previous examples, the system account appears in the list too. However, you cannot do much with it, and it will cause most operations that apply to SPUser to fail. It doesn't matter whether the actual account is NetworkService or a domain account. It will always map to the same internal account, which is named statically. When you run code by using the SHAREPOINTsystem identity, you're using the mapped Windows account—the one used by the application pool. Changing the settings is shown in Figure 3-5.
The SPSecurity class exposes a method called RunWithElevatedPrivileges, which gives you an option to elevate the privilege to the application pool identity under which your code is executing. In SharePoint it's common practice to run code with elevated privileges in order to avoid using additional accounts. The basic code example uses a delegate to encapsulate the code:
SPSecurity.RunWithElevatedPrivileges(
delegate()
{
// Privileged code is running here
}
);If you like lambda expressions or just want to feel better, you might prefer this syntax:
SPSecurity.RunWithElevatedPrivileges(() =>
{
/* Some privileged expressions */
}
);For example, retrieving the current Windows account user would look like this:
string name;
SPSecurity. RunWithElevatedPrivileges(
() => name = WindowsIdentity.GetCurrent().Name);However, impersonation is not that simple. In order to get this method call to properly impersonate your application pool identity, you need to do further work. SPSite and SPWeb objects created outside the delegate or lambda expression do not have full control, even when referenced inside the delegate (anonymous method), so you need to find out their GUIDs before impersonation is performed, and re-create the context again. Finally, never forget to dispose of your objects. (See the "Object Disposal Issues" section earlier in the chapter for more details.)
You essentially need to create a parent SPWeb object again via creation of a new SPSite object, SPWeb object, and so on within the RunWithElevatedPrivileges block:
SPWeb webInUserContext = SPContext.Current.Web;
SPSite SiteInUserContext = SPContext.Current.Site;
Guid webGuid = webInUserContext.ID;
Guid siteGuid = SiteInUserContext.ID;
SPSecurity.RunWithElevatedPrivileges(delegate()
{
// Get the site in the impersonated context
using (SPSite site = new SPSite(siteGuid))
{
// Get the web in the impersonated context
using (SPWeb web = site.OpenWeb(webGuid))
{
web.AllowUnsafeUpdates = true;
// Do your work here
}
    }
});While the RunWithElevatedPrivileges method seems to be easy to use and solves several problems, using this approach isn't recommend for general purposes. Elevated privilege can be used to bypass or work with security, and can be performed either through SPSecurity or impersonation techniques involving the SPUserToken and SPSite classes. It's one of the most misunderstood aspects of the SharePoint API, but in general you should always prefer impersonation using the SPSite class and SPUserToken objects.
To impersonate the system, use the SystemAccount.UserToken property of the current SPSite context—for example:
var site = new SPSite(SPContext.Current.Site.ID,
                       SPContext.Current.Site.SystemAccount.UserToken);
If you need a specific user, use a similar approach (replace the <username> placeholder with a SharePoint user's name):
try
{
    SPWeb web = SPContext.Current.Web;
    SPUserToken token = web.AllUsers["<username>"].UserToken;
    SPSite site = new SPSite(SiteId/SiteUrl, token);
    // Do stuff
}
catch
{
}
The SPSite object returned is now running with explicit rights, and you have more control over when and how you dispose of it.
It can, however, be useful to run code under the context of the application pool for code that accesses network or file resources, or for SharePoint code that does not support impersonation through the SPSite object. Without further introduction, here's a list of best practices for elevated-privilege code in SharePoint that will help you create more reliable applications for the enterprise:
Avoid using
SPSecurity.RunWithElevatedPrivilegesto access the SharePoint object model. Instead, useSPUserTokento impersonateSPSitewith a specific account, as shown previously.If you do use
SPSecurity.RunWithElevatedPrivileges, dispose of all objects in thedelegate. Do not pass SharePoint objects out of theRunWithElevatedPrivilegesmethod.Only use
SPSecurity.RunWithElevatedPrivilegesto make network calls under the application pool identity. Don't use it for elevation of privilege of SharePoint objects.
Avoid passing SharePoint objects between different security contexts (SPSite instances), with the exception of SPUserToken used in the SPSite constructor. An SPUser object created from one SPSite object cannot be passed reliably to another SPSite object. This can be the source of obscure bugs in production that are difficult to reproduce in development.
Tip
Never use elevated privilege to bypass security—always use it to work with the security model your site needs.
To add to the previous explanation regarding the usage of the SPUser object and related types, the next section describes working with users.
Common Challenges with RunWithElevatedPrivileges
If you run code with elevated privileges and you create new objects, such as list items within a list, the user automatically assigned as author or editor is SHAREPOINTsystem. If you use another user's token, it's of course the user you currently use. However, this might not be your intention. A user might expect to be the owner of an item with his or her current credentials. To handle this, you must first retrieve the real credentials, and then elevate the privileges. The example in Listing 3-3 shows how to deal with this issue of two identities.
Example 3.3. Save Method That Handles Elevated Privileges
private void Save(SPList fictitiousList, bool ifAnonymous)
{
   SPUser user = ((LayoutsPageBase)Page).Web.CurrentUser;
   Guid siteID = fictitiousList.ParentWeb.Site.ID;
   Guid webID = fictitiousList.ParentWeb.ID;
   Guid listID = fictitiousList.ID;
   SPSecurity.RunWithElevatedPrivileges(() =>
   {
      using (SPSite site = new SPSite(siteID))
      {
         using (SPWeb web = site.OpenWeb(webID))
{
web.AllowUnsafeUpdates = true;
SPList elevatedList = web.Lists[listID];
SPListItem item = elevatedList.Items.Add();
SPUser systemUser = web.AllUsers[@"SHAREPOINTsystem"];
SPFieldUserValue currentUser = new SPFieldUserValue(
item.ParentList.ParentWeb, user.ID, user.Name);
if (!question.Anonymous)
{
item["Author"] = currentUser;
item["Editor"] = currentUser;
} else {
item["Author"] = systemUser;
item["Editor"] = systemUser;
}
item.Update();
}
}
}
);
}
}The code can access a fictitious list (FictitiousList) that the current user cannot normally access (even the usual read permission has been removed). This prevents users from accessing the list by entering the URL directly. From the current list, the IDs are retrieved to reinstantiate the SPList, SPWeb, and SPSite objects with elevated privileges. Within the delegate, a new list item is created. The Anonymous parameter determines whether the standard Author and Editor fields take the system account or the current user. However, the SPUser object exposed by SPWeb.CurrentUser is SHAREPOINTsystem within the privileged block. That's why the user object is retrieved first from the current SPWeb object. The code assumes you run a Web Part or user control that resides on an application page that derives from LayoutsPageBase, as recommended in Chapter 2. The Web property contains the user credentials of the user currently logged on.
This code has several advantages:
The user can access the list data through your code, but any other access is blocked, including directly entering the
AllItemsURL.You can decide in your code to set the user's data or leave the item in an anonymous state.
You can manipulate the Author and Editor field values to suit.
Identifying users serves two operations: authentication and authorization. While the common login procedure authenticates a user and creates the assigned token for further identification, the authorization process gains access to particular objects using the current credentials. In SharePoint, this association is resolved via securable objects. An object is securable if it inherits the abstract Microsoft.SharePoint.SPSecurableObject class. It is shown in Listing 3-4.
Example 3.4. SPSecurableObject Class
public abstract class SPSecurableObject : ISecurableObject
{
   protected SPSecurableObject();
   public virtual SPRoleDefinitionBindingCollection AllRolesForCurrentUser { get; }
   public abstract SPBasePermissions EffectiveBasePermissions { get; }
   [Obsolete("Use FirstUniqueAncestorSecurableObject instead")]
   public ISecurableObject FirstUniqueAncestor { get; }
   public abstract SPSecurableObject FirstUniqueAncestorSecurableObject { get; }
   public virtual bool HasUniqueRoleAssignments { get; }
   public abstract SPReusableAcl ReusableAcl { get; }
   public virtual SPRoleAssignmentCollection RoleAssignments { get; }

   public virtual void BreakRoleInheritance(bool copyRoleAssignments);
   public virtual void BreakRoleInheritance(bool copyRoleAssignments,
                                            bool clearSubscopes);
   public virtual void CheckPermissions(SPBasePermissions permissionMask);
   public virtual bool DoesUserHavePermissions(SPBasePermissions permissionMask);
   public abstract SPPermissionInfo GetUserEffectivePermissionInfo(string userName);
   public abstract SPBasePermissions GetUserEffectivePermissions(string userName);
   public virtual void ResetRoleInheritance();
}
The SPWeb, SPList, and SPListItem classes implement this base class. That's why you can assign access permissions down to the item level. The base class provides methods to check permissions (DoesUserHavePermissions) interactively or force an exception (CheckPermissions) immediately.
Specific permissions are defined in the SPBasePermission enumeration. This is a flagged enum with the values described in Table 3-3.
Table 3.3. SPBasePermission enum (Source: MSDN Documentation)
Name | Value | Description |
|---|---|---|
| 0 | No permissions on the web site. This option is not available through the user interface. |
| 1 | View items in lists, documents in document libraries, and web discussions. |
| 2 | Add items to lists, documents to document libraries, and web discussion comments. |
| 4 | Edit items in lists, edit documents in document libraries, edit web discussion comments in documents, and customize Web Part pages in document libraries. |
| 8 | Delete items from lists, documents from document libraries, and web discussion comments from documents. |
| 16 | Approve a minor version of a list item or document. |
| 32 | View the source of documents with server-side file handlers. |
| 64 | View past versions of a list item or document. |
| 128 | Delete past versions of a list item or document. |
| 256 | Discard or check-in a document that is checked out to another user. |
| 512 | Create, change, and delete personal views of lists. |
| 2048 | Create and delete lists, add or remove columns in lists, and add or remove public views of lists. |
| 4096 | View forms, views, and application pages, and enumerate lists. |
| 65536 | Open a web site, list, or folder to access items inside that container. |
| 131072 | View pages in a web site. |
| 262144 | Add, change, or delete HTML pages or Web Part pages, and edit the web site using a Windows SharePoint Services–compatible editor. |
| 524288 | Apply a theme or borders to the entire web site. |
| 1048576 | Apply a stylesheet (CSS file) to the web site. |
| 221 | View reports on web site usage. |
| 222 | Create a web site using self-service site creation. |
| 223 | Create subsites such as team sites, Meeting Workspace sites, and Document Workspace sites. |
| 224 | Create a group of users that can be used anywhere within the site collection. |
| 225 | Create and change permission levels on the web site and assign permissions to users and groups. |
| 226 | Enumerate files and folders in a web site using the Microsoft Office SharePoint Designer 2007 and WebDAV interfaces. |
| 227 | View information about users of the web site. |
| 228 | Add or remove personal Web Parts on a Web Part page. |
| 229 | Update Web Parts to display personalized information. |
| 230 | Grant the ability to perform all administration tasks for the web site. |
| 231 | Use features that launch client applications; otherwise, users must work on documents locally and upload changes. |
232 | Use SOAP, WebDAV, or Microsoft Office SharePoint Designer interfaces to access the web site. | |
| 233 | Manage others' e-mail alerts. |
| 234 | Create e-mail alerts. |
| 235 | Allow a user to change his or her user information, such as adding a picture. |
| 236 | Enumerate permissions on the web site, list, folder, document, or list item. |
There is an additional value called FullMask (hex: 7FFFFFFFFFFFFFFF) that includes all the permission flags shown in the table.
The permissions are grouped into several roles to simplify their usage. The SPRoleDefinition object holds those roles. Table 3-4 shows the predefined sets.
Table 3.4. Default Role Sets
Role | Permissions (from SPBasePermissions; See Table 3-3) |
|---|---|
Full Control |
|
Design |
|
Contribute |
|
Read |
|
Limited Access |
|
Now you can use the enumeration values to retrieve the current permissions in custom code. Using the EffectiveBasePermissions property of SPWeb class, this can look like the following:
if ((Web.EffectiveBasePermissions & SPBasePermissions.ViewListItems)
                                 == SPBasePermissions.ViewListItems)
{
}
The binary operator is used to mask the bit flags of the enum type. However, it's more efficient to use the methods defined in SPSecurableObject to check the permissions before a security exception is thrown.
Working with the security model actively delegates the responsibility of handling authorization tasks to your code. This includes two actions. First, you must check the required permissions for the user using his or her credentials. Second, you have to let your code execute properly.
There are many ways to show an authorization failure. Some internal features simplify this, as shown in Listing 3-5, which demonstrates an application page that requires administrative permissions.
Example 3.5. Manually Securing an Application Page
using System;
using Microsoft.SharePoint;
using Microsoft.SharePoint.WebControls;
using Microsoft.SharePoint.Utilities;

namespace Apress.SP2010.SecurityModel.Layouts.SecurityModel
{
    public partial class SecurePage : LayoutsPageBase
    {
        protected void Page_Load(object sender, EventArgs e)
        {
            // This page requires Admin permissions
           if (Web.CurrentUser.IsSiteAdmin)
            {
                lblName.Text = Web.CurrentUser.Name;
            }
            else
            {
                SPUtility.Redirect(SPUtility.AccessDeniedPage,
                                    SPRedirectFlags.RelativeToLayoutsPage,
                                    Context);
            }
        }
    }
}
This code simply checks the IsSiteAdmin property exposed by the SPUser object. If the current user is not an administrator, the page is redirected to the built-in Access Denied page (see Figure 3-6). With just one line of code, you get the default error message.

You can achieve the same effect with the following code:
SecurityException ex = new SecurityException();
SPUtility.HandleAccessDenied(ex);
This method takes an object of type System.Security.SecurityException, which you can use further for logging purpose. The HandleAccessDenied method redirects to the same page as used in Listing 3-5.
This is good if your users are comfortable with the default SharePoint environment. External users, for instance, might be better served with standard HTTP messages. The HTTP return code for a security failure is 401 (Access Denied). Sending this as shown in Listing 3-6 lets the browser decide how to present the issue.
Example 3.6. Creating a 401 HTTP Message
using System;
using Microsoft.SharePoint;
using Microsoft.SharePoint.WebControls;
using Microsoft.SharePoint.Utilities;
using System.Security;

namespace Apress.SP2010.SecurityModel.Layouts.SecurityModel
{
    public partial class Http401Page : LayoutsPageBase
    {
        protected void Page_Load(object sender, EventArgs e)
        {
            // This page requires Admin permissions
            if (Web.CurrentUser.IsSiteAdmin)
            {
                lblName.Text = Web.CurrentUser.Name;
            }
            else
            {
               SecurityException ex = new SecurityException();
               SPUtility.SendAccessDeniedHeader(ex);
            }
}
}
}The browser is now forced to present the common logon dialog to request the appropriate credentials. If the user fails to enter the expected logon data, the message "401 UNAUTHORIZED" is shown. Different browsers might show this message in distinct ways in response to the Access Denied header.
In addition to SPUser, which is mostly used in the context of lists, you can use SPPrincipal to work with user information. The example in Listing 3-7 shows how to search principals and display available information.
Example 3.7. Searching Principals and Binding to a GridView
using System;
using Microsoft.SharePoint;
using Microsoft.SharePoint.WebControls;
using Microsoft.SharePoint.Utilities;
using System.Collections.Generic;
namespace Apress.SP2010.UtilityExperiment.Layouts.UtilityExperiment
{
public partial class SecurityUtils : LayoutsPageBase
{
protected void Page_Load(object sender, EventArgs e)
{
bool maxCount;
IList<SPPrincipalInfo> users = SPUtility.SearchPrincipals(Web,
txtInput.Text,
SPPrincipalType.All,
SPPrincipalSource.All,
null,
100,
out maxCount);
grdPrincipals.DataSource = users;
grdPrincipals.DataBind();
}
    }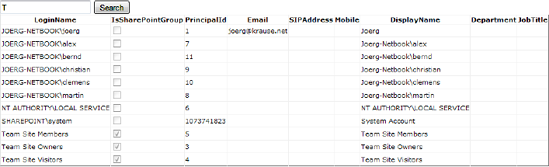
}This code searches principals for a word taken from a TextBox control's Text property. The results grid shows the properties that the SPPrincipalInfo class exposes (see Figure 3-7).
To retrieve a single item instead of a list, see the following example:
SPPrincipalInfo userInfo = SPUtility.ResolvePrincipal(web,
                                                       "Test User",
                                                       SPPrincipalType.All,
                                                       SPPrincipalSource.All,
                                                       null,
                                                       false);
The ResolvePrincipal method returns null if the user can't be found.
The methods shown thus far in this chapter have used the API and have been tightly integrated with the SharePoint environment. This dictates a particular coding style that has both advantages and limitations. The advantages are that the deep interdependence between the API, the base files in the SharePoint root, and the settings in Visual Studio make for a great development experience. The disadvantage is that you're limited to only what this environment allows. In particular, it requires you to program either Web Parts or application pages that run within the context of SharePoint and IIS.
Breaking this barrier allows you to program against the API from any sort of application, including console, Windows Forms, and WPF applications.
Note
Running an isolated application that makes use of the complete API requires executing the application on the server. To run an application from a remote location, where the DLLs are not available, you must use the client object model. The client object model uses web services to work with webs, lists, and list items. It has limited capabilities and cannot be used to create administration applications, such as code that operates at the farm or server level. The client object model is described in depth in Chapter 12.
Programming SharePoint is not limited to the boundaries of SharePoint itself. Imagine you want to write a new command-line tool to automate common tasks in your environment. In that situation, you have to work with the SharePoint object model, but with your code running in an isolated fashion. The SharePoint object model supports this, and lets you instantiate the access to any part, whether administrative or data-driven, in a similar way. Console-based applications are excellent for automation tasks. Administrators can easily integrate them into batch files and scheduled tasks, or run them on demand with no interaction.
Note
One rule for console applications is that they should not require any user action. It's possible to make them work interactively; however, this would force somebody to sit in front of a computer, which is what console-based applications are trying to avoid.
Creating a console application (see Figure 3-8) with Visual Studio 2010 requires only a few steps. After creating the project, you must add the required references to Microsoft.SharePoint.dll. Remember that applications running the SharePoint object model must be compiled for "x64" types (or "AnyCPU") and use the .NET Framework 3.5.

Tip
Follow the instructions in Chapter 1 for details on how to set up a project for SharePoint 2010.
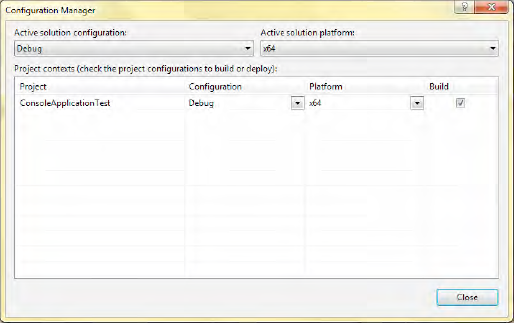
Set the x64 option in the Configuration Manager as shown in Figure 3-9 by selecting x64 from the "Active solution platform" drop-down.
This setting is required because SharePoint runs in 64-bit mode only. To program against the SharePoint API, you must add a reference to the SharePoint assembly (at a minimum), as shown in Figure 3-10.

For specific namespaces, you might need to add more SharePoint assemblies. Most can be found in the ISAPI folder under the SharePoint root (also known as the 14 hive).
Using command-line parameters, you can control the behavior of console applications. This is well known, and you might consider copying the schema from one of the other SDK tools. It makes it easier for administrators to work with your new tool. The following code snippet shows how to extract multiple parameters from the command-line arguments.
Administrators love to organize their commands in files. It helps to hold things together. Consider that in a large enterprise, an administrator has to handle hundreds if not thousands of scripts. Your console application should be able to retrieve the parameters or switches from an external file. To do so, an XDocument object is used to read the data, extract it, and hand it over to the parameter parser (shown next).
This example (see Listing 3-8) does not contain any SharePoint-specific code. It's merely a skeleton used to create console applications with a powerful parameter parser. However, for the sake of clarity, the error checks and exception-handling parts are limited to some very basic checks. Before releasing this to a production environment, consider adding error checks and unit tests.
Example 3.8. Empty Console Application with Parameter Parser
using System;
using System.Collections.Generic;
using System.Linq;
using System.Text;
using System.Xml.Linq;
using System.IO;

namespace Apress.SP2010.ConsoleApplicationTest
{
    class Program
    {
        static void Main(string[] args)
        {
            Properties p;
            if (args.Length > 0 && !args[0].StartsWith("xml"))
            {
                p = Properties.ReadArguments<Properties>(args);
}
else
{
string[] param = args[0].Split(new char[] {':'}, 2);
if (param.Length == 2 && param[0].Equals("xml"))
{
if (File.Exists(param[1]))
{
XDocument doc = XDocument.Load(param[1]);
p = Properties.Deserialize<Properties>(doc);
}
else
{
throw new FileNotFoundException();
}
}
else
{
throw new ArgumentException("parameter 'xml' expected");
}
}
}
}
}This simple parameter parser accepts either a list of values in any order that matches the structure of the serializable parameter class Properties, or an XML file that also contains a serialized object. The call to the console could look like this:
C:>ConsoleApp.exe ShowAll:false WebUrl:"http://myserver" Filter:*
For the XML file, it would look like this:
C:>ConsoleApp.exe xml:pathtofileparams.xml
An abstract base class (see Listing 3-9) that contains the serializers and deserializers delivers the appropriate functionality.
Example 3.9. Serialize, Deserialize, and Read Any Parameter
public abstract class PropertyReader
{

    public static XDocument Serialize<T>(T source) where T : PropertyReader
    {
        XDocument target = new XDocument();
        XmlSerializer s = new XmlSerializer(typeof(T));
        XmlWriter writer = target.CreateWriter();
        s.Serialize(writer, source);
        writer.Close();
        return target;
    }

    public static T Deserialize<T>(XDocument doc) where T : PropertyReader
{
XmlSerializer s = new XmlSerializer(typeof(T));
XmlReader r = doc.CreateReader();
T props = s.Deserialize(r) as T;
return props;
}
public static T ReadArguments<T>(string[] args) where T : PropertyReader, new()
{
T props = new T();
foreach (string arg in args)
{
// Assume the parameter looks like param:value
string[] param = arg.Split(new char[] {':'}, 2);
if (param.Length != 2) throw new ArgumentOutOfRangeException("args");
PropertyInfo pi = props.GetType().GetProperty(param[0]);
if (pi == null) throw new ArgumentOutOfRangeException("args");
object anyTypeValue = Convert.ChangeType(param[1], pi.PropertyType);
pi.SetValue(props, anyTypeValue, null);
}
return props;
}
}This code assumes that the parameters are formatted as param:value. The Serialize and Deserialize methods are ready to use. The ReadArguments method uses Reflection to access the generic type properties and set the appropriate values. The foreach loop looks for corresponding properties and does not depend on any order. The class that is used to store the properties could look like this:
[XmlRoot(ElementName="Properties")]
public class Properties : PropertyReader
{

   [XmlElement(ElementName = "ShowAll")]
   public bool ShowAll { get; set; }

   [XmlElement(ElementName = "Filter")]
   public string Filter { get; set; }

   [XmlElement(ElementName = "WebUrl")]
   public string WebUrl { get; set; }

}
This class would produce the following XML:
<?xml version="1.0" encoding="utf-8"?>
<Properties xmlns:xsi="http://www.w3.org/2001/XMLSchema-instance"
            xmlns:xsd="http://www.w3.org/2001/XMLSchema">
  <ShowAll>true</ShowAll>
  <Filter>Tasks*</Filter>
  <WebUrl>http://joerg-netbook/</WebUrl>
</Properties>
You can use any serializable type here to store values in the XML file. To define a different schema, you simply change the Properties class. The serializer follows the XmlRoot and XmlElement attributes to create and read the file.
When your console application is running, it may need to output information. For example, the task may be going wrong, or a simple success message should be sent. Consider the following ways to return status information:
Write to the console's output.
Write to the Windows event log.
Write to a file.
Return a status code.
The most important thing is that the application must run even if the output is not handled by a human. So never use pop-up windows or wait at the console for input. You may consider writing it in a dual-function fashion: interactively and noninteractively. For testing purposes, it's often better to have a direct way to change parameters, instead of having to edit a file. However, command-line tools are not for daily use—they are primarily designed to support automation tasks.
The following example shows a tool that examines the farm's structure by reading information about the registered servers. If an error occurs, it writes a message to the event log.
When working with console applications, there is no context equivalent to the SPContext class. Instead, you must use the SPSite constructor to instantiate an object that represents the site collection:
SPSite site = new SPSite("http://localhost");
  ...
site.Dispose();
Note
Your code should dispose of any SPSite or SPWeb object obtained by using a constructor. The SharePoint runtime cannot take care of the object disposal, and to avoid a memory leak, explicit disposal after use is necessary. (See the earlier section "Object Disposal Issues" for more details.)
For a simpler programming style, take advantage of a using block to ensure that the object is disposed of:
using (SPSite site = new SPSite("http://localhost"))
{
 ...
}
The localhost name used in the example is an alias for the computer on which the code is executed. For console applications, you should always use localhost, because a console application can only operate on the local computer anyway. If you hard-code a server name, then your console application cannot be ported to another computer, and will break if the server's name is ever changed.
After you have a reference to a collection, you can use the AllWebs collection to obtain a reference to a particular web site in the collection:
using (SPWeb web = mySiteCollection.AllWebs["mySite"])
{
  ...
}
Alternatively, you can use the OpenWeb method, as shown in the following line:
using (SPWeb web = mySiteCollection.OpenWeb("mySite"))
{
  ...
}The next example loops through all objects of a farm and writes the GUIDs out to the console. It may not make much practical sense, but it looks like a grid and demonstrates how to access the object's tree.
The ReadFarm method (see Listing 3-10) is called from the entry point of the console application shown in the previous example.
Example 3.10. The SharePoint Grid Code
private static void ReadFarm(Properties p)
{
    Console.ForegroundColor = ConsoleColor.Green;
    Console.BufferHeight = 1024;
    SPFarm farm = SPFarm.Local;
    Console.WriteLine(farm.Id.ToString("N"));
    var srvs = from s in farm.Services where s is SPWebService select s;
    Action<object> a = v =>
        {
            PropertyInfo pi = v.GetType().GetProperty("ID");
            if (pi == null || !pi.PropertyType.Equals(typeof(Guid))) return;
            Guid id = (Guid)pi.GetValue(v, null);
            Console.WriteLine(id.ToString("N").ToUpper());
        };
    foreach (SPWebService srv in srvs)
    {
        a(srv);
        foreach (SPWebApplication webapp in srv.WebApplications)
        {
            a(webapp);
            foreach (SPSite site in webapp.Sites)
            {
                a(site);
                foreach (SPWeb web in site.AllWebs)
                {
                    a(web);
                    foreach (SPList list in web.Lists)
                    {
a(list);
foreach (SPField field in list.Fields)
{
a(field);
}
}
web.Dispose();
}
site.Dispose();
}
}
}
Console.ReadLine();
}The Action clause, defined first, reads any object and tries to get its ID property. If it is present, it writes the value out as a Guid without the hyphens. That's just a demonstration that makes the following foreach loops more compact and readable. Don't forget to dispose of objects as necessary to save memory. The output is shown in Figure 3-11.

The general approach of getting objects out of a tree and doing something useful with them—except writing the ID to the console in green—is a basic pattern for most automation examples. Refer to Chapter 17 for more information about how to manipulate farm-level objects.
Windows Forms and WPF applications follow rules similar to console applications. However, because these applications have a powerful UI, the use of parameters is needless. Instead, users will probably manipulate the program's features by setting parameters interactively. Windows Forms and WPF are beyond the scope of this book. If you plan to write such applications to manage SharePoint, remember the following advice:
Operations can take time. You should program asynchronously using background threads to keep the UI responsive.
Add tracing to get information about the user actions to aid in investigating errors.
Constrain the user's input as much as possible, and don't trust any textual input.
Employ progress bars or hourglasses to inform the user that a lengthy operation is in progress.
Check for appropriate user rights before starting the application.
Keep these in mind when adopting code samples from application programming.
In this chapter you got an overview about the basic SharePoint programming characteristics. We covered the entry points—the ways to access the object model from custom code to reach internal and custom data and properties. Whatever type of code you write, several utilities and helper classes support you by providing common tasks out of the box. The Microsoft.SharePoint.Utilities namespace, in particular, is a cornucopia of classes that save a lot of time.
SharePoint is mostly written in managed code. However, some critical parts responsible for performance and availability are based on COM components. This means that you have to carefully manage object disposal and keep your memory clean. Several best practices and examples show how and when to explicitly dispose of objects.
Each application developer needs to be concerned about security. SharePoint has a comprehensive built-in security model with integrated management of roles, groups, and users. The basic steps to access the collections of roles, groups, and users, and work with the retrieved objects, were explained in this chapter. Furthermore, you learned how to elevate privileges and work with a system account dynamically.
Programming SharePoint is not limited to Web Parts and web pages. Especially for tools and administrative tasks, it's possible to create Windows Forms, WPF, and console applications. Using the isolated programming style that decouples your development environment further from the SharePoint server, you can create standalone applications. We explained how to get access to the object model even in those circumstances.